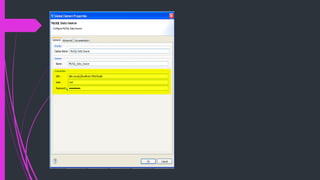
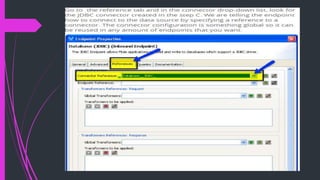
Database in Mule Studio
MULE Routing Messages
A little reference for JDBC:
JDBC, which stands for Java Database Connectivity, is basically an API that
enables users to execute operations over a Data Source using the Java
programming language. This API allows you to connect to almost any Data
Source system, from relational databases to spreadsheets and flat files and,
using the proper SQL syntax, you can perform queries, updates, deletes, or even
execute store procedures.
What Mule ESB and Mule Studio do with JDBC
Now let’s see how this is architected in Mule ESB. What Mule ESB does is to
make this Java code layer transparent to you. Simply importing a jar file with the
driver for a specific data source (MySQL, Oracle, etc) and writing some easy
XML code will make you able to connect to a Data Source and manipulate the
data in it. Studio comes with a friendly User Interface, which makes Mule XML
code very easy to create and edit. The image below gives you a better idea of
how all this works:
Database in Mule studio
a. Import the Driver
Once you have the jar file, the next steps are very simple:
In the Package Explorer, right-click over the Project folder ( in
this case “jdbcprj”).
Look in the menu for Build Path > Add External Archives…
Look for the jar file in your hard drive and click Open.
Now you should see in the package explorer that the jar file is
present in “Referenced Libraries.” This will allow you to create
an instance of the Object driver you will need.
Creating a Datasource
Mule and Studio come with some predefined configuration elements for
the most common datasources: Derby, MySQL, Oracle and
PostgreSQL. If you want to use another datasource, you can do it by
creating a bean object with the configuration and using the bean as the
Datasource. No let’s create a MySQL datasource for our connector:
Go to the Global Elements tab and click on the Create button, which will
display a new window.
Look for Data Sources > MySQL Data Source and click the OK button.
In the Data Source configuration window only 3 things are need to
make this work: the database name in the URL, the User and the
Password. Enter those attributes according to your database
configuration and click OK.
c. Create the Connector
Now that we have the datasource with its driver we need a Connector.
From the Global Elements tab, click on Create and look for Connector > Database (JDBC). Then click
OK.
The only thing that we need to do here is tell the connector which datasource to use. To do this click on
the ‘Database Specific’ drop-down list and look for our datasource created in the previous step. Then click
OK. Optionally, you can go to the Queries tab now and create the queries or SQL statements that you
want. If you don’t do this now you will have to do it when configuring an endpoint.
d. Creating a flow
Now, we have the half of the work done. To use our Datasource in a flow, we need an inbound endpoint
or an outbound endpoint, depending on what we want to do, you can use a jdbc inbound endpoint if you
want use de information from a database to feed your flow and do some process or use an outbound if
you want to write the information you process in your flow in a database. In any of these cases you need
to do this:
In the Studio Message Flow view, add a JDBC endpoint (either inbound or outbound) in the flow, and
open the configuration window by double-clicking on the endpoint.* Note: To add the endpoint you just
need to look for it in the palette and drag and drop it into the canvas, if you drop it in the canvas out of any
flow then a flow scope will be created and you endpoint will be an inbound endpoint, if you drop it in a flow
after any element, then you will have an outbound endpoint. Studio automatically perform this
conversions as flows should always start with inbound endpoints:
Go to the General tab and select the Query Key you want to use in this endpoint. The JDBC
endpoint can execute one SQL statement. If you have not created the query in the connector
then you can do it now by going to the Queries tab.* Queries Tab and a New Query
Query selected in the Query key drop down list:
Following these steps you are ready to feed your flow by doing queries to your database or
create new database registers with the information processed in your flow, or execute any
statement you need over your data source. Here you have an example flow. To use this just
copy the configuration and paste it in the XML Configuration tab and save the project. You
should see a flow like this in the message flow view:

Mule data bases

  • 1.
  • 2.
    MULE Routing Messages Alittle reference for JDBC: JDBC, which stands for Java Database Connectivity, is basically an API that enables users to execute operations over a Data Source using the Java programming language. This API allows you to connect to almost any Data Source system, from relational databases to spreadsheets and flat files and, using the proper SQL syntax, you can perform queries, updates, deletes, or even execute store procedures. What Mule ESB and Mule Studio do with JDBC Now let’s see how this is architected in Mule ESB. What Mule ESB does is to make this Java code layer transparent to you. Simply importing a jar file with the driver for a specific data source (MySQL, Oracle, etc) and writing some easy XML code will make you able to connect to a Data Source and manipulate the data in it. Studio comes with a friendly User Interface, which makes Mule XML code very easy to create and edit. The image below gives you a better idea of how all this works:
  • 3.
  • 4.
    a. Import theDriver Once you have the jar file, the next steps are very simple: In the Package Explorer, right-click over the Project folder ( in this case “jdbcprj”). Look in the menu for Build Path > Add External Archives… Look for the jar file in your hard drive and click Open. Now you should see in the package explorer that the jar file is present in “Referenced Libraries.” This will allow you to create an instance of the Object driver you will need.
  • 5.
    Creating a Datasource Muleand Studio come with some predefined configuration elements for the most common datasources: Derby, MySQL, Oracle and PostgreSQL. If you want to use another datasource, you can do it by creating a bean object with the configuration and using the bean as the Datasource. No let’s create a MySQL datasource for our connector: Go to the Global Elements tab and click on the Create button, which will display a new window. Look for Data Sources > MySQL Data Source and click the OK button. In the Data Source configuration window only 3 things are need to make this work: the database name in the URL, the User and the Password. Enter those attributes according to your database configuration and click OK.
  • 7.
    c. Create theConnector Now that we have the datasource with its driver we need a Connector. From the Global Elements tab, click on Create and look for Connector > Database (JDBC). Then click OK. The only thing that we need to do here is tell the connector which datasource to use. To do this click on the ‘Database Specific’ drop-down list and look for our datasource created in the previous step. Then click OK. Optionally, you can go to the Queries tab now and create the queries or SQL statements that you want. If you don’t do this now you will have to do it when configuring an endpoint. d. Creating a flow Now, we have the half of the work done. To use our Datasource in a flow, we need an inbound endpoint or an outbound endpoint, depending on what we want to do, you can use a jdbc inbound endpoint if you want use de information from a database to feed your flow and do some process or use an outbound if you want to write the information you process in your flow in a database. In any of these cases you need to do this: In the Studio Message Flow view, add a JDBC endpoint (either inbound or outbound) in the flow, and open the configuration window by double-clicking on the endpoint.* Note: To add the endpoint you just need to look for it in the palette and drag and drop it into the canvas, if you drop it in the canvas out of any flow then a flow scope will be created and you endpoint will be an inbound endpoint, if you drop it in a flow after any element, then you will have an outbound endpoint. Studio automatically perform this conversions as flows should always start with inbound endpoints:
  • 9.
    Go to theGeneral tab and select the Query Key you want to use in this endpoint. The JDBC endpoint can execute one SQL statement. If you have not created the query in the connector then you can do it now by going to the Queries tab.* Queries Tab and a New Query Query selected in the Query key drop down list: Following these steps you are ready to feed your flow by doing queries to your database or create new database registers with the information processed in your flow, or execute any statement you need over your data source. Here you have an example flow. To use this just copy the configuration and paste it in the XML Configuration tab and save the project. You should see a flow like this in the message flow view: