How-to book and art gallery featuring scale models placed in dynamic images using Photoshop.
"Learn how to make your scale models fly, shoot and sail with Photoshop."
The document discusses how various media technologies were used and how they both helped and hindered the production of a horror trailer. Technologies like Blogger, iMovie, Photoshop, and YouTube tutorials were used for organization, editing, poster design, and learning skills. However, lack of experience with Photoshop and difficulties implementing certain design elements held back aspects of the production. Overall, technologies enabled improvements but inexperience also caused delays and limitations.
Photoshop Express is a free online photo editing and sharing tool. It allows users to customize their photos through features like color adjustment, touchups, effects and more. Users can then showcase their photos through sharing on Facebook/MySpace, creating online "studios" to display photos however they want, and more. The target audience is social media savvy 18-24 year olds who are active online sharing photos and experiences with friends.
Throughout the process of creating a thriller film, the document discusses how various technologies were used and what was learned from using them. Research was conducted online to understand thriller conventions and find inspiration. Microsoft Word and survey tools online were used in the planning process. Filming utilized an HD camera, though it had limitations. Editing was done on Final Cut Pro which allowed for shaping the film based on audience feedback. The school blog and YouTube helped distribute the film for feedback, though the blog had issues. Overall, technology helped at every stage but also had limitations to overcome.
What have you learnt about technologies from the process of constructing this...Talloulah Matthews
The document discusses the technologies used by the author at various stages of creating a thriller film project. It describes how the internet was used for research on thriller conventions and certificates. A questionnaire was conducted using Survey Monkey to get audience feedback on ideas. Final Cut Pro was used to edit footage, add transitions, and refine the film based on audience comments on a school blog. The author learned about the capabilities and limitations of the camera, editing software, and technologies used to distribute and receive feedback on the project.
Throughout the process of planning, filming, and editing his thriller film, the author found technology to be very helpful. He used the internet to research thriller conventions and find inspiration. He created mind maps in Microsoft Word and distributed questionnaires using Survey Monkey to get audience feedback. While filming with an HD camera provided high quality footage, it had limitations in low light. Final Cut Pro allowed for efficient editing, including changing shot order and adding transitions based on further audience feedback via the school media blog. Overall, digital technologies streamlined the filmmaking process and enabled collaboration with audiences.
The student used various new media technologies throughout the construction, research, planning and evaluation stages of their project. Blogger was used to present work online and track progress. Prezi allowed incorporation of multimedia into presentations. Social media gained feedback and helped spread work. Photoshop was used for image editing and print layouts. Video equipment like cameras and Final Cut Pro were used to film and edit a trailer. Various software, hardware and online tools were leveraged at each stage to complete the project to a professional standard.
The document outlines experiments conducted by the student to develop skills for creating a website. It includes experimentation with logo designs, hyperlink colors, background colors, images, banners, footers, advertisements, buttons, maps, and tickets. Screenshots provide evidence of experiments testing different designs, effects, and layouts with the goal of innovating and improving the website.
Media technologies played a key role throughout the creation of the promotional package. Premier Pro and Photoshop were used to edit footage and create graphics. YouTube and Google provided inspiration from existing horror films and magazines. Skills with these programs improved over time, allowing for more professional and sophisticated end products. Media technologies were essential for researching, planning, producing, and promoting the various elements of the package.
How did you use media technologies in the construction and research, planning...Brilli Pazmino
Bridget Cardenas Pazmiño used various media technologies throughout the research, planning, construction, and evaluation stages of her supernatural psychological horror film project. During research and planning, she used the BBFC website, Wikipedia, YouTube, personal interviews, and blogs to research conventions, budgets, ratings, and audience expectations. She planned her film to be rated 15+ based on its scary content. In construction, she used Final Cut Pro to edit her trailer, Blender to create animated titles, Photoshop to design posters and magazine covers, and cameras to film. For evaluation, she presented her work using Prezi, Slides, PowToon, and PowerPoint and shared it through blogs and YouTube.
How did you use media technologies in thecsullivans05
The document discusses the use of various media technologies throughout the research, planning, construction, and evaluation stages of a media project. Technologies used included the internet for research, blogs for planning, cameras and microphones for filming, movie maker for editing, photoshop for poster and magazine design, and different presentation methods like PowerPoint and podcasts for evaluation. Challenges arose like battery and memory issues, but the technologies overall helped effectively complete the different stages of the project.
The document discusses the creative critical reflection of a student's horror/thriller movie opening project. It describes how the student followed horror movie conventions like using low light and scary sound effects. It discusses how the student was inspired by movies like "A Nightmare on Elm Street" and took shots and camera angles from other horror videos and movies. The student describes learning new techniques through the project like the rule of thirds, headroom, shot types, and using software like Premiere Pro to edit. Hardware like a tripod and camera were used, and online platforms like Vimeo were used to share the work.
The document provides an evaluation of the student's photography project. It summarizes the key aspects of the project including the technical and aesthetic qualities of the images, the skills learned, and the production process. The student aimed to show how technology influences art through glitching, repetition, and pixelation effects in their images of everyday urban scenes. They struggled with some technical aspects like blurry photos but learned new editing skills in Photoshop. The evaluation reflects on what they achieved and possibilities for future improvement.
The document discusses the various media technologies used at different stages of creating a slasher horror trailer, film poster, and magazine cover. During research, the student used Google, YouTube, Netflix, and presentation software to gather and analyze information. Surveys were created using SurveyMonkey to gather audience opinions. Video footage was captured using a Canon camera and edited in Serif Movie Plus. Photoshop was used to design the poster and magazine cover. Social media was used to promote the projects and gather feedback.
The document discusses the use of new media technologies in the research, planning, construction, and evaluation stages of a project. In research, the person used Google, YouTube, Wikipedia, and survey tools to learn about film techniques and audience preferences. Planning involved using Word, PowerPoint, and Photoshop to draft storyboards, presentations, and poster concepts. Construction saw the use of iMovie to edit footage, Photoshop for graphics, and royalty-free music sites. Evaluation was done through PowerPoint presentations, surveys, and uploading the finished trailer to YouTube.
In the research and planning stages, the document author used various online technologies and programs. Google was frequently used for researching horror films, posters, and theories. Microsoft Word and PowerPoint were used to write documents and create presentations. SurveyMonkey was used to create surveys. A Nikon camera was used to take test footage.
During construction, iMovie was used to edit footage and add effects/audio to create a trailer. Photoshop was used to design a poster and magazine cover. Fonts were downloaded from Dafont. Brushes were downloaded from Brusheezy to add effects in Photoshop. Feedback on the poster was gathered through Facebook. Royalty-free music was used for the trailer.
In the research and planning stages, the document author used various online technologies and programs. Google was frequently used for researching horror films, posters, and theories. Microsoft Word and PowerPoint were used to write documents and create presentations. SurveyMonkey was used to create surveys for the target audience. A blog on WordPress kept an updated diary of research. A Nikon camera was used for test shots.
In the construction stage, iMovie was used to edit footage and add effects to create the trailer. Photoshop was used to design the poster and magazine cover. Fonts were downloaded from Dafont. Brushes were downloaded from Brusheezy to add effects in Photoshop. Feedback on the poster design
In the research and planning stages, the document author used various online technologies and programs. Google was frequently used for research into horror films, posters, and theories. Microsoft Word and PowerPoint were used to write documents and create presentations. SurveyMonkey was used to create surveys for the target audience. A blog on WordPress kept an updated diary of research. A Nikon camera was used to take test footage.
In the construction stage, iMovie was used to edit footage and add effects/audio to create the trailer. Photoshop was used to design the poster and magazine cover. Fonts were obtained from Dafont.com. Brushes were downloaded from Brusheezy to add effects in Photoshop
- The document summarizes a photography student's process of researching techniques, creating a portfolio, and developing a final exhibition focused on abstract and macro photography.
- Key strengths of the exhibition included compelling editing that encouraged closer examination of photos and high resolution capturing detail. Weaknesses included lack of a unified theme and inability to take truly macro photos without a macro lens.
- While the exhibition did not fully match the original plan due to unavailable equipment and changes during the process, the student was still pleased with highlights like a photo combining a peacock feather and face.
The document summarizes the process for creating a fanzine focused on fictional apocalyptic scenarios. It describes drawing images for hazards like a volcano erupting and a zombie. Photographs were also included and treated to look like polaroid photos or surveillance camera stills. Text was added using a brush tool to give it a scrapbook feel. A newspaper page was designed to set the scene, including reprinted articles and added images and notes. Further pages included laying out survival gear on a textured backdrop and illustrating a Mad Max-inspired vehicle.
The document describes the production process for an experimental photography assignment, including plans to create multiple exposure, solarization, photomontage, Hockney joiner, and black and white photos around campus using a digital camera and tripod, with techniques like adjusting aperture, shutter speed, and white balance, and requiring post-production edits in Photoshop. Contact sheets are provided from a first shoot attempting multiple exposure portraits combining faces with landscape elements.
1. Take two photos of the same scene from slightly different angles, about 2 inches apart.
2. Open the photos as layers in Photoshop, with one layer above the other.
3. Disable blending of the red channel in the top layer.
4. Use the move tool to align the focal point between the two layers, creating a 3D effect.
5. Crop the extra areas not included in both photos.
Hollie Ferguson presented on her Design Practice 2 module, which focused on developing design skills through virtual environments, moving image, and interactive media projects. She struggled with the 3D software for her virtual environments Halloween-themed ride but learned from online tutorials. For her film project, she served as assistant director and organized the group via a blog. Creating her interactive media portfolio website helped her develop skills in layout, branding, and linking to her online networks. Overall, the module helped improve her technical skills across multimedia disciplines through hands-on projects.
The document describes the media products created by Jake Hobday for an assignment. It discusses the use of conventions in the trailer, magazine, and poster he created for a horror film project. It also covers the feedback received from audiences on his trailer, and how he used various media technologies in constructing, researching, planning and evaluating his media products.
The document discusses the use of new media technologies during the research, planning, production, and evaluation stages of a student's horror film trailer project. During research, the student used online resources like Google, IMDB, YouTube, and other film databases to find information on existing horror films and trailers. SurveyMonkey was used to conduct audience research. Prezi and slideshare were used to display research and work in a visual way. Final Cut Pro was used to edit footage and add effects to create tension and atmosphere. Photoshop, Pixlr and Pages were used to design promotional materials. Evaluation questions were created using iMovie, Prezi and Emaze to convey information in an interactive, visual format.
This document is a presentation about designing effective PowerPoint slides. It provides tips over several slides on how to design slides with a killer title and opening slide, use of color schemes and images, getting the text right, using the principles of contrast, repetition, alignment and proximity (CRAP), incorporating video, sharing the presentation online, and recapping the key tips. The presentation emphasizes the importance of visual design over text-heavy slides and using techniques like strong images and video to engage the audience in a way words alone cannot. It provides examples throughout to illustrate its tips.
The document discusses the student's experience creating a two minute horror movie opening for a class project. It describes how the student used conventions of the horror genre, such as low key lighting, creepy music, and a ghostly figure. Inspiration came from movies and TV shows about mysteries at sea. The student learned many new film production skills throughout the project, such as using a DSLR camera, tripod, editing software, and online platforms to host the video. Completing the project was a challenging but rewarding learning experience.
Wordpress allowed the student to analyze existing trailers, publish work-in-progress, and receive feedback to improve their trailer. Photoshop was used to create text, titles, and release date slides for the trailer. Premier Elements combined all the elements like text, footage, and sounds into the finished trailer. YouTube provided existing trailers for research and was used to distribute and get feedback on the student's trailer.
The document discusses what the author learned about technologies from constructing a film product. They used their own camera which helped the filming go smoothly. They also learned about using tripods, natural lighting, and editing software like Adobe Premiere Pro. Surveys, social media, and the internet helped with research, locations, and feedback. Mobile phones aided communication and contact during the process. The author believes technology will both help and hinder small filmmakers in getting noticed in the future.
This document summarizes the author's experience learning to use Adobe Photoshop software to create magazine covers and movie posters. It describes the challenges of learning an unfamiliar program and receiving guidance from a teacher. The author shows progression from early posters to later works that demonstrate mastery of tools like rulers, 3D text effects, and advanced lighting and color techniques to resemble professional designs. Overall it reflects on the learning process of a new design program through completed sample projects.
This document evaluates different techniques for creating a graphic novel: digital photography, illustration, comic book effects, rotoscoping. The author finds that comic book effects and rotoscoping on photographs produce high quality results similar to graphic novels. Illustration is better suited to children's books. They have practiced rotoscoping the most and feel confident using comic book effects and rotoscoping to create their graphic novel interpretation of Little Red Riding Hood.
For her final media project, the student used various new media technologies at different stages of construction and evaluation. She used Final Cut Pro to edit footage for a teaser trailer, Photoshop to edit images for a magazine cover and poster, and a digital camera to film the teaser trailer. For research, she used Google to find professional examples and YouTube to analyze trailers. Excel was used to create graphs from questionnaire data and SlideShare for a storyboard. Photoshop was used to edit photos to fit different purposes for the poster and magazine cover. The student is pleased with applying the skills learned over her course to create high quality final products.
The document discusses various techniques and potential problems the author may encounter while creating an animation project. Some key points:
- The author will record narration using a Rode mic and Tascam recorder, and may face issues with sensitivity levels and background noise. Test recordings will be done to find the best settings.
- Photoshop and After Effects will be used for animation, but different screen sizes could cause problems. Test renders will ensure consistency.
- Previous Premiere projects had audio and video corruption issues. Backups of source files and regular Premiere saves will prevent lost work.
- Test animations were created to experiment with different styles. A style using simple shapes and layers for
Oliver Keppie outlines potential problems and solutions for the audio, animation, and software aspects of his video project. For audio recording, he may encounter issues with microphone sensitivity but plans to test different settings. He will book a quiet recording studio to minimize background noise. For animation, working across Photoshop and After Effects could cause inconsistencies, so he will match screen sizes and contain movements to each program's strengths. Potential software crashes will be addressed by saving regularly to multiple locations. Overall he believes the problems can be easily overcome through preparation and testing.
In this experiment, the document discusses testing different lighting conditions for photography shoots. Half the photos were taken in a studio with white lighting, which produced clean, neutral images suitable for editing. The other half used natural lighting, which resulted in yellow-tinted photos requiring extra editing. The document also discusses using a classmate as a model for practice shoots and experiments with posing. It reflects on learning that side lighting works better than front lighting for shadows.
STEAL THIS PRESENTATION! from Powered by C3 / SelectNY.Parissuhailmirza
This document provides tips for creating engaging presentations that do not bore audiences. It recommends beginning with an attention-grabbing opening slide and using stunning visuals rather than walls of text. Photos and videos should be used to illustrate key points. Design elements like fonts, colors, and images should have repetition and consistency for cohesion. Credits should be provided for any copyrighted materials. Presentations should be uploaded online to maximize sharing and exposure. The overall message is that presentation design is an art that can inspire audiences rather than cause "death by PowerPoint" if these best practices are followed.
- The student used various media technologies like iMovie, Final Cut Pro, After Effects, LiveType, and Photoshop to construct their horror film trailer, magazine cover, and poster.
- iMovie and Final Cut Pro were used to edit footage and add effects for the trailer. After Effects was used to create a smoke screen background and LiveType to add text over it.
- Photoshop allowed the creation of realistic magazine cover and poster through tools like color correction, clone stamp, and pen tool to modify images. This enabled effects like changing makeup for injuries.
- Different software provided accessible and effective means for editing, text, and image creation that contributed to a professional looking final product across media.
The document discusses various problems the author may encounter while creating an animated video project, including audio recording issues, software compatibility problems, file corruption, and properly utilizing animation software and tools. The author provides methods for overcoming these problems, such as testing microphone sensitivity, backing up files, practicing animation techniques, and separating character elements across different layers and programs. The techniques, strengths, and experimentation discussed aim to help the author produce high quality animation and audio for the project.
The document discusses how the author used photography and editing skills at various stages of creating a trailer, poster, and magazine for a school project. Photography was used to plan and construct animated sequences for the trailer by capturing stereotypical school scenes and objects. Photos of a classmate in costume were used as the basis for the poster and magazine cover designs. Photoshop skills improved for editing layers and manipulating images, while Illustrator was used to create cartoon drawings from photos and animate sequences for the trailer.
What have you learnt about technologies in the process of constructing this p...laurb96
The document discusses the technologies used to produce a media product, including both familiar and new technologies. Photoshop was one of the new technologies learned, which allowed editing of photos through techniques like adjusting lighting and levels, reshaping objects, and removing shadows. While Photoshop provided useful editing tools, it was challenging to learn as a new technology, sometimes resulting in issues like unwanted lines that then had to be fixed. Overall, both familiar and new technologies were used, but learning to properly use the new technologies like Photoshop took time and practice.
The document discusses the various websites, software programs, and equipment used throughout the planning, research, and construction of a film trailer coursework project. Google, YouTube, Wikipedia, IMDb, and Blogger were used for researching genres, films, codes/conventions, and gathering audience feedback. Final Cut Express was used to edit footage on a school Mac, while Photoshop CS6 was used on a personal MacBook to edit ancillary products. LiveType, Soundtrack Pro, and InDesign CS6 were also used to create idents, background music, and marketing materials. Photography skills from another course helped with composition and editing.
What have you learnt about technologies from the process of completing and co...Jack Hudson
Jack learned about several technologies through completing his school product. He used a DSLR camera to take photos for his magazine, and learned about how the camera works through taking photos with different shutter speeds and exposures. He used Photoshop to edit the photos, such as applying a monochrome filter and moving the subject. Finally, he used QuarkXPress to lay out his magazine pages, adding images, text with different fonts, sizes, colors and drop shadows. He changed images and layouts up until the final version.
The document summarizes Grace Crawford's process of editing a photograph in Photoshop and designing a magazine cover in InDesign for her media studies project. She began by removing imperfections from the raw photo in Photoshop. She then experimented with hue, saturation and tones to create a darker, eerie effect. In InDesign, she imported the edited photo and added text, logos, and other design elements to layout the magazine cover. While pleased overall, she notes areas for improvement like the color scheme, text readability, and positioning of elements.
The document discusses the student's process of creating a magazine using various software programs and tools. It describes how the student used conventions like a masthead, cover images, and contents pages to develop their magazine. The student learned how to use tools in Photoshop and InDesign, such as the magnetic lasso tool, text tool, and paint bucket tool to design professional-looking elements for their magazine like images, text, and backgrounds. They also used a digital camera, Moodle, and researched conventions from other magazines to inform the design of their media product.
Q6. What have you learnt about technologies from the process of constructing ...JenniferEse
The document describes the process of creating a magazine product. It began with contacting models and finding suitable images for the front page, contents, and spreads. The most time-consuming but vital part was the editing process to create the final product. It also discusses learning photography skills like shutter speed and lighting using a DSLR camera for the project. Websites like DIY Magazine and NME were referenced to understand the tone of music magazines. Photoshop and other desktop publishing software were used for post-production editing. Presentation tools like Prezi and Slideshare were used to creatively show research, planning, and final products.
The document discusses various digital file formats for graphics, including raster graphics, vector graphics, JPEG, TIFF, PSD, AI, and 3DS.
It provides information on each file format such as what it stands for, typical uses, advantages, and disadvantages. JPEG is noted as the most common format for images used on websites due to its small file size, though it can cause loss of quality upon recompression. TIFF is described as useful for graphic design work due to its lossless compression preventing quality loss. PSD is only compatible with Photoshop but allows for layers. AI uses vector graphics making it suitable for scaling without quality loss. 3DS is an industry standard for 3D modeling.
Q6. What have you learnt about technologies from the process of constructing ...JenniferEse
The document describes the process of creating a magazine product. It began with contacting models and finding suitable photography. Once the photos were selected, extensive editing was required, which was the most time-consuming but vital step. The document also discusses learning photography skills using a DSLR camera, including testing different shutter speeds and continuous shooting modes. Overall, the process provided experience in magazine construction, photography equipment, lighting techniques, and using Photoshop creative tools. Websites like DIY Magazine and NME were referenced to understand tone. Photoshop and other programs like Gimp and PhotoScape were used for image editing. Presentation tools like Prezi and SlideShare were utilized to showcase research, planning, and final products
The student felt they had improved their photography, Photoshop, and layout design skills over the course of their media studies. For their initial ancillary project, they rushed their photo shoot and the images were not professional standard. However, for their final music magazine, the student planned the shoot better by booking a studio, models, and planning poses and lighting. This resulted in higher quality images. The student also learned to properly use a camera, upload photos, and got better at editing images in Photoshop. Their initial cover design was plain with an out of place barcode, but their final magazine cover had well-designed cover lines in different sizes and colors. Overall, the student felt they gained valuable skills in photography, Phot
Similar to "Modeling History with Photoshop" Book Concept (20)
This document provides information about key events, battles, leaders, and developments during World War 2. It covers multiple theaters of the war, including Europe, North Africa, the Pacific, and China. Multiple choice questions are asked about specific details relating to countries involved, battles, ships, generals, and operations. Correct answers are provided along with short explanations of context.
The document provides an overview of the Canadian Air Force's Air Power History Tour for 2022, honoring those who served in 1942, and emphasizes that as members they should focus on honoring veterans, educating the public about aviation history, and inspiring future generations through their work with historical aircraft and interactions with the public. It stresses professionalism, safety, and supporting the mission to honor the sacrifices of the past and preserve aviation heritage.
A portfolio of my creative work, contributions, and projects as an employee of Dallas College, member of professional associations, volunteer with non-profit organizations, and for personal enjoyment.
Squadron D-Day Quiz - with no transition effectsKonley Kelley
- Adolf Hitler declared war on the United States on December 11, 1941, which was considered one of his key mistakes as the US would have likely joined the war against Germany eventually but he gave them cause to focus more initially on the war in Europe.
- The Normandy coast of France was selected as the site for the Allied invasion on D-Day, known as Operation Overlord. The city of Caen, which was supposed to be captured by British and Canadian troops on D-Day, actually took months to capture due to strong German resistance.
- The temporary harbors constructed after the beachheads were secured on D-Day were called Mulberry Harbors. Omaha Beach had the highest casualties of the beaches
The document is a quiz about key details related to Operation Overlord and the D-Day landings during World War 2. It contains over 30 multiple choice or short answer questions testing knowledge of planning, execution details, key figures, locations, units involved, objectives, challenges, and outcomes of the largest seaborne invasion in history on June 6, 1944 when Allied forces landed in Normandy, France to liberate German-occupied Western Europe. The questions cover topics like which beaches were targeted, weather conditions, casualties, equipment used, strategic decisions made, and more.
Crossing the California High Sierras with Marmot BobKonley Kelley
This document is a photo memoir by Robert H. Kelley spanning 60 years of experiences hiking and backpacking in the High Sierras region of California. It features photographs from Kelley and others of trails, wildlife, fishing, lakes, and camping scenes. The memoir includes brief descriptions of places like Marcella Lake, known for its haunting sounds and good fly fishing, and Rose Marie Meadows, surrounded by large granite shelves and lush meadows flowing into lakes. The memoir expresses gratitude to family and friends who joined Kelley on journeys through the High Sierras over the past 60 years.
A portfolio of my creative work, contributions, and projects as an employee of Dallas College, member of professional associations, volunteer with non-profit organizations, and for personal enjoyment.
A portfolio of creative work and projects with my direct involvement as an employee of Dallas College, member of professional associations, volunteer with non-profit organizations, and for personal enjoyment.
Crossing the California High Sierras with "Marmot Bob"Konley Kelley
This document is a photo memoir by Robert H. Kelley spanning 60 years of experiences hiking and backpacking in the High Sierras region of California. It features photographs from Kelley and others depicting trails, wildlife, fishing, flowers, trees, meadows, lakes, and camping in areas such as the John Muir Wilderness, Bear Creek, and Rose Marie Meadows. The memoir provides scenic descriptions of places like Marcella Lake and recounts Kelley's appreciation for time spent in nature with family and friends.
Richland College - Emeritus presentation 2019Konley Kelley
Konley Kelley's presentation about his experiences with the Commemorative Air Force B-29 B-24 Squadron and why he is grateful to be a member. Konley also connects his passion for WWII history, scale modeling and 3D modeling to his CAF adventures and the honor and privilege to meet many WWII veterans and learn their stories.
Robert "Marmot Bob" Kelley took his last backpacking trip with his son Konley Kelley, grandson Kurtis Kelley, and friends Evan Serpa and Jake Martin to Apollo Lake from July 26-31, 2014. The group hiked along Bear Creek, passed double waterfalls, reached a granite shelf after climbing 300 steps, and set up camp at Kip Camp with luxuries. They continued on the John Muir Trail, crossed creeks in crocks, and made an emergency camp as daylight ran out before reaching their destination of Apollo Lake at 10,600 feet, with its year-round glacier, where they enjoyed the views before Marmot Bob said his farewells.
This document provides an overview of a presentation about 3D modeling. It includes examples of 3D models the presenter has created across various scales and genres, from military aircraft and vehicles to buildings and characters. The presenter discusses their modeling process and shares tips for getting started in 3D modeling, including recommended software and training resources.
This document provides information about the Consolidated B-24 Liberator heavy bomber that was widely used in World War II. It discusses the design requirements and production of the B-24, describes some of its missions like the Ploesti oil refinery raid, and profiles the various crew positions. It also provides details about a specific B-24 (serial number N24927) known as "Diamond Lil", including its early career, restoration, and current operation giving ride flights to educate the public.
Part Two of a presentation about "FIFI", the World's Only Flying B-29 Superfortress. Part Two - "FIFI's History" Presenters: Keville Miller and Konley Kelley (Oct 2011)
Part One of a presentation about "FIFI", the World's Only Flying B-29 Superfortress. Part One - "B-29 History" Presenters: Keville Miller and Konley Kelley (Oct 2011)
This document provides an overview of Konley Kelley's career as a 3D modeler and enthusiast, showcasing many of the 3D models he has created over the years at varying scales from aircraft to ships to vehicles. It describes his educational background and early work at the American Film Institute, and highlights some of his most detailed 3D projects including models of the USS Lexington aircraft carrier, B-24 Liberator bombers, P-51 Mustangs, and the German battleship Bismarck. The document promotes Konley's skills and experience in 3D modeling while honoring American veterans.
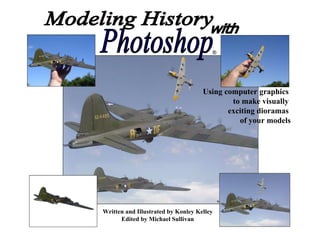
1. Modeling History with Photoshop Written and Illustrated by Konley Kelley Edited by Michael Sullivan Using computer graphics to make visually exciting dioramas of your models ®
2. Introduction This book represents the blending of two personal hobbies, scale modeling and computer graphics. I will not claim to be an expert or guru at either hobby. I simply enjoy using scale and 3D models to create images that highlight the machines and honor the men tied to these moments in history. I also hope this book will encourage others to explore using digital cameras and Photoshop as a means of showcasing their models. There are an abundance of modeling websites, magazines and books, many of which included photographs of static models or models in diorama. Photoshop is another tool offering exciting ways to exhibit your work. It can also add action to the scene i.e., your planes can fly, tanks can shoot, and ships can battle on the high seas. The drama is totally up to the imagination of the artist. Photoshop can solve some logistic problems, too. A diorama using Photoshop can include models of different scales. An artist can clone one model airplane to make a squadron of airplanes. Models can be repainted and "re-decaled" in Photoshop. Damage in combat can be virtually created without ever scarring the model itself. If a modeler makes a mistake building the model, mistakes can be "erased" in the digital image using Photoshop tools. I have a basic digital camera and no special photography equipment. A Photoshop user can manipulate the lighting, colors, and elements of an image. Frankly, seeing every detail of the model is less important than composing a scene and working to make your models look like they belong in the scene. This requires blurring propellor blades, blurring sections of fast-moving models or distant backgrounds, and adding special effects. Above all, the model should look right against the background. Having created many Photoshop dioramas, background selection and lighting the model are the greatest challenge and something I continue to work at improving in my art. 3D modeling is another aspect of my work. I learned to make 3D models using software called Strata. By using Strata or a 3D landscape software, I have created 3D models and, as it pertains to this book, added a tool for creating backgrounds and adding models that compliment the scale model featured in the image. I firmly believe a scale modeler has the skillsets to ramp up knowledge quickly on a 3D modeling software. What we see in computer games and on film today is truly remarkable and it is a certainty we'll someday see full blown wartime epics created completely in 3D by 3D modelers and artists. Which brings me back to another reason to write this book. It hope a topic like scale modeling and Photoshop will interest a younger generation more in tune with computer graphics than sprues of plastic. Modeling and diorama construction is a time-consuming endeavor yet a genuine way to represent important machines and moments in history. Photoshop is another art form to add to this mix and could bring more kids back to the hobby I enjoyed so much in my youth. My thanks to my friend Mike Sullivan for helping me edit this book and to the Squadron for providing an opportunity for this first time author.Happy modeling and you can "fix it" in Photoshop :) Konley Kelley
3.
4. Photography and Photoshop Where to begin… Quite simply, everything starts with a photograph. This book will focus on photographing your models but I encourage you to take your digital camera and take a lot of photographs. You experiment with these pictures in Photoshop. I used a simple Sony 7.2 megapixel camera for my pictures. I download them to my Macintosh and open them in iPhoto. My family has amassed more than 10,000 photos in the years we’ve had the Mac. I was able to go back several years in my photo library to find pictures to use for this book. This isn’t to say you need Photoshop to create great pictures. The best possible thing you can provide Photoshop is a great picture. My camera next to my Mac G4. My son Kurt in the “Patton” pose. A pier in Rockport, Texas Flowers and gate on the outskirts of London.
5. What is Photoshop? So what is Photoshop? Photoshop is an imaging editing software. It was created by two brother, John and Thomas Knoll in 1987. The software allows you to edit pixels in a digital photograph. Pixels are the most basic elements of a photograph when it has been digitized. At its most basic level, Photoshop can prepare your pictures for optimal output to print or the web. The tools and options you have in Photoshop appear endless. Professional graphic artist and photographers use the basic to higher-end functions of the software. Like you might react looking at other software for the first time, the interface for Photoshop may look intimidating. Unless you plan to use the software professionally, I would bet you have nothing to worry about. I will include resources for you at the end of this book but the purpose of this book isn’t to turn you into a Photoshop guru. I recommend taking a class. I did that very thing about 15 years ago with a marvelous Photoshop artist, Linda Shepard. Since then I have continually played and experimented with the software until I can use it for most anything I need it to do. My recommendation to you is to buy a lower-end version of the software like Photoshop Elements. And, there is no less expensive way to learn Photoshop than a class at your local community college. While my attention has been focused on using Photoshop with my scale models, this hasn’t limited me to using with with many other subjects. My wife and I both have used the software to make many wonderful images. I find it particularly useful for correcting something that often happens in photography, that one thing that can prevent a photograph from being a keeper. Case in point - we took some lovely pictures of my daughter in a field of Texas Bluebonnets. The picture was great except for one blade of grass that covered her face. With some help from Photoshop, the blade of grass was removed and we have a picture we now treasure. CD cover designed by my wife, Whitney. Dragonfly art using Photoshop filters and paint tools. Katie before. Katie after.
7. What can I learn about Photoshop from this book? I want to show you the tools I use to manipulate photographs I take of my models. I’ve shown you the interface for Photoshop, now I’ll show you tools from the interface I use to create my Photoshop dioramas. I’ll try to make the details of how it is done simple. The #1 thing I want for your take-away is thinking how you can use Photoshop to create images like this of your models. I started tinkering with this in 1995 and I am still learning tips and tricks to make my work better. There is one other reason to learn and experiment with Photoshop. It can be a lot of fun. My wife and I have used Photoshop to create many interesting images. Many of my images tend to be silly but if they make me laugh, maybe they’ll make you laugh. The possibilities are endless when you learn this software and you may begin to wonder if what you are seeing in print or on the web hasn’t been doctored in one way or another using Photoshop. Photoshop is fun! Katie before. “ Katie Liberty” Miniature Katie. My house with Giant Sequoia. My truck with a squirrel hitcher.
8. Getting started Digital composite, 1995 Digital composite, 2005 Creating photoshop images using your models is part imagination, part inspiration and a lot of practice. I took my first Photoshop class in the early 1990’s. About the same time, I had begun scale modeling again. I saw the potential of Photoshop to create dynamic scenes using my models.
9.
10. Inspiration The works of great aviation artists History’s Heroes Ken Walsh First Corsair Ace, WW2 Model kit box tops Roy Grinnell Real Warbirds B-17G Flying Fortress “Liberty Bell” Cavanaugh Flight Museum, Addison, Texas Popular omputer-generated art and games So…what is your digital diorama going to look like? What story is it going to tell? Inspiration can be found in many places. Don Greer
11. Planning the scene The August 1, 1943 bombing raid on the Ploesti oil refineries resulted in more Medal-of-Honor recipients than any mission of WW2. Unfortunately many of the medals were given post-humously. Over a third of the 9th Air Force bomber groups were lost in action. After building the 1:72 Academy B-24D Liberator and adding aftermarket decals, I began planning my scene. This image was inspired by a painting by Tom Freeman. His painting featured Major John “ Killer” Kane’s B-24 “ Hail Columbia” making its bombing raid so close to the ground it had to dodge the refinery smokestacks. After photographing the model, I painted fire and smoke using Photoshop. The smokestacks were rendered in 3D. After placing the model in the scene I used Photoshop paint and smudge tools to paint spinning propellor blades. One photographed bomb became many using Photoshop’s clone tool. Bombs away! Photograph your model Pick a shot and delete the background Photograph a bomb Clone the bomb Digitally paint a background 3D smokestacks Smokestacks and background combined Place model above background layer and paint blurred propellor blades
12. Photography and lighting Indoor Photographing indoors can be done anytime and with some control. A simple set-up can provide enough content to build your scene. Outdoor Shooting in bright sunlight can be challenging. The white paper helps differentiate the model from the backdrop when cutting out the model in Photoshop. Carefully using the segmented lasso tool, you can delete the background until you have a pure backdrop. Using select inverse, you can grab your model and paste it into a scene. This was shot in my kitchen using a white blanket as a backdrop and medicine bottle lids for support. The finished scene “ Hunt for the Bismarck.” There is nothing easier than a rear shot of a plane against a blue sky. Here the Akagi gets the “front steps” photo shoot treatment. The finished scene is a mixture of models and smoke, water and virtual damage created with Photoshop. “ Sole Survivor”
13. Backgrounds The background is an essential element of the digital diorama. Your digital camera, the internet, digital imaging and 3D software can capture or create the background you want. Keep a library file of backgrounds. Internet shots *copyrighted vs. public domain issues apply. Just be careful! From my camera 3D landscape software
14. Compositing Compositing is the placement of your models after you have cut the undesired background away using Photoshop’s segmented lasso tool. One of the advantages of a diorama made in Photoshop is the ability to mix model scales. Here a 1:32 Academy BF-109E is prepared for the diorama. Here the 1:48 Monogram Spitfire (with kit decals for ace Douglas Bader) is shown partly in the kitchen and partly in the sky. The kitchen is deleted from the scene using the polygon lasso tool. Think about where to place your aircraft in the dogfight. Put them there, add a backdrop plus effects and the Battle of Britain takes flight again.
15. Layers Think of Photoshop layers like a 7-layer cake. One layer sits on top of another layer. As you plan your scene, think about what will appear in the background and what will appear in the foreground. In this “Battle of Midway” scene, the water is the background layer. From this point I built the scene from the “ground-up” as you might say. One cool feature is the opacity tool. It allows you to see one layer behind another layer. Using the lasso tool, you can cut something out from one layer so the other layer can show through. This was done in the case of the Akagi’s bridge. I wanted the fire and smoke to be behind the bridge. Other elements can be added in a layer without being permanently “painted” on another layer. The “rising sun” is its own layer and “artist’s choice” i.e., this decal did not come with the model kit.
16. Layers (broken down) Make your models: IJN Akagi, Dauntless Select, treat and place your background. Place the Akagi Paint the Akagi’s wake. Paint smoke and and crop out bridge. Paint fire and crop out bridge. Place the hero aircraft, SBD Dauntless. Paint a blurred prop. Clone and scale distant Dauntless. Paint AA fire / flak. Add “rising sun” to deck of Akagi. Add text.
17. Special Effects Creating blurred propellors Painting smoke and fire. Adding muzzle blasts and shell casings Painting a ship’s wake. Creating virtual destruction
18. Other cool tips and tricks Virtual airbrushing By adding another layer, you can repaint your model over the original image. In the case of the Tiger tank, winter camouflage was a perfect foundation to paint a multi-color camouflage. By setting the opacity of the layer at a lower percentage, you can see details of the model under the new paint job. Improve your decals Some kits come with very crude decals. With some web research, you can locate better noseart (in this example), save it and prep the nose art with Photoshop to be printed on decal paper. Most decal paper can be found at a local hobby store and printed on an inkjet printer. Experiment with 3D software Many of the principles for building a scale model are the same for building a model in 3D. Give it a try. Software is becoming less expensive and more user-friendly. Learning 3D will expand your modeling toolset and can offer more options for your digital dioramas. Decals can be used for 3D modeling Some decals sheets are arguably works of art. One of my favorite kits is the “snake” Stuka. Before applying decals to the scale model, I scanned and saved them on my Mac. Photoshop can prep the decals to be used as texture maps for your 3D model. Real or 3D?
19. Case Study: “Bismarck” The story of the Bismarck has always fascinated me. This fearsome warship dealt a heartwrenching blow to the British people when it sunk the HMS Hood in battle. But, the fate of this mighty ship was sealed after pilots flying obsolete biplanes attacked the Bismarck with torpedoes. One torpedo struck the ship in the rudder disabling her so the British Navy could catch up and sink her. I was able to combine the best parts of my hobbies and immerse myself in the Bismarck story. My “Bismarck project” began with a Tamiya 1:350 Bismarck kit. With web research and the model as visual reference, I constructed a 3D Bismarck. The next step was to acquire the Tamiya 1:48 Swordfish kit. I was dying to create a Photoshop diorama using my 3D Bismarck and Swordfish model. The image is a combination of a 3D ocean scene made with Bryce, the 3D Bismarck and the Swordfish model. I took several pictures of the Swordfish at different angles so I could scale the aircraft to place several in the scene. I added the ship’s wake, flak and splashes from shell hits using Photoshop paint tools. I’ve created other images using 3D models, such as a PBY, and recently an Airfix 1:600 scale model of the HMS Ark Royal to continue telling the Bismarck story. Eventually I’d like to build more British ships such as the HMS Hood, Prince of Wales, or King George V. Sink the Bismarck!
20. Gallery Following are some of my favorite Photoshop dioramas. On my website, I have them broken down into two groups “Aces in 1:48 Scale” and “Famous Bombers in 1:72 Scale.”In these images, the foreground “hero” aircraft is always 1:48 scale (fighters) and 1:72 (bombers). I used a variety of Photoshop tools and techniques to create the images. For each image, I will describe something specific I did to create the scene. I will also give you some background on the model kit and actual aircraft. If the image is that of a famous aircraft or aircraft flown by a famous pilot, Plus, I will include background on what prompted me to create the scene and what the scene represents. I hope you enjoy the gallery images. These images were created over the last several years. In some cases, the diorama was made before a companion model was made i.e., I created the hero aircraft and designed the scene – I revised the scene sometime later when I built other aircraft (or ships) for the background. That is the magic of Photoshop. These dioramas can be revisited and updated. As a Photoshop user, you are also continually learning more about the software. When you learn a new technique, you can revisit your images and make changes.
21. This image was first made with 3D triplane as the victim of the Spad’s guns. After finishing a model of a Fokker DVII, I replaced the triplane. The pilot figure came with his head turned to the right which worked for the diorama. I added smoke and fire effects with Photoshop paint tools. “ America’s First Ace” features a Hawk 1:48 Spad and a Revell 1:48 Fokker DVII. “ America’s First Ace” 1:48 Hawk Spad XIII, 1:48 Monogram Fokker DVII
22. This is a good example of cloning. Photoshop has a cloning tool. I use it on every image. Most frequently I use it to cover parts of a model with other parts. For example, I clone sections of a model’s surface to cover an area obscured by the propeller blades. After that is done, I paint the blurred props of the plane. The Heinkel was “cloned” using another process. Using the segmented lasso, I cut out the surroundings in a picture of the Heinkel. When the Heinkel background was deleted, I selected the Heinkel and placed it in the scene. I used the copy/selection tool to copy the Heinkel several times until I had a squadron. One Heinkel, the aircraft being shot down, is a unique picture in order to present the aircraft in a dynamic pose. The other Heinkels are maintaining formation so the same aircraft can be duplicated. “ Battle of Britain” showcases an Academy 1:48 scale Hurricane flown by British ace Stanford Tuck. Stanford Tuck……. “ The Battle of Britain” 1:48 Hawker Hurricane, 1:72 Matchbox HeIII
23. Heinz Bar… “ Red 13” 1:48 Monogram Me-262, 3D Scratchbuilt B-17G Flying Fortress
24. Johnny Baldwin “ Typhoon Attack” 1:48 Monogram Hawker Typhoon, HO Scale German Military Train
25. “ Battle over Guadalcanal” 1:48 Monogram P-39 Airacobra, 1:48 Tamiya A6M2 Zero This is a good example of “re-decaling” your model using Photoshop. The zero is the model kit with markings for Japanese ace, Tetzuzo Iwamoto. His aircraft is featured in another digital image. With Photoshop clone and paint tool, you can change the markings for an aircraft. So, one zero can become any aircraft and, in the case of this image, an aircraft being shot down by the hero aircraft. The beach scene was created using Vista Pro. The software generated palm trees for the island landscape. “ Dogfight over Guadalcanal” features a Monogram 1:48 P-39 Airacobra flown by American ace, Bill Fiedler. Fiedler, a pilot in the “Cactus Air Force,” has shot down a Tamiya 1:48 A6M Zero.
26. “ Shangri-La” 1:48 Tamiya P-51B, 1:32 Monogram FW-190A Focke-Wulf This is a good example of lighting your scene. I found a cloudscape on the internet with pinks and orange hues brought on by a setting sun coloring the clouds. After placing my P-51B and my Focke-Wulf, I added smoke and fire to the FW-190 spinning out of control after falling under the guns of the Mustang. I blurred the prop on both aircraft – a much more simple operation when you are viewing the aircraft from the a rear-facing angle. Using Photoshop’s color palette, I selected a pinkish hue much like that seen on the clouds. I lowered the opacity of my very large feathered brush to 20 percent and painted over the aircraft. Now they looked more at home in the scene in a wash of the same colors painting the clouds. “ Shangri-La” features a Tamiya 1:48 P-51B flown by famous American ace, Don Gentile. Gentile named his aircraft Shangri-La and painted an…..
27. “ The Navy’s Top Ace” 1:48 Hasegawa F6F-5 Hellcat, 1:700 Tamiya USS Essex CV-9 and 1:700 Tamiya USS Cushing DD376 This is a good example of an “unfinished” Photoshop diorama. I positioned the 1:700 scale carrier in the scene with the 1:48 scale Hellcat flying above. A few months later, I completed a 1:700 destroyer. I painted it in the same “dazzle” camouflage scheme (Measure 21) as the carrier. The destroyer gave me the opportunity to “add to the fleet.” I photographed the carrier and destroyer from the same angle. Because I saved the assets from the first digital image, I placed the Hellcat with the blurred prop and complete the scene. “ Top Navy Ace’ features a Hasegawa 1:48 F65 Hellcat flown by the leading Navy ace of WW2, David McCampbell. David McCambell…
28. “ Mig Alley” 1:48 Academy F-86F Sabre, 1:48 Monogram Mig-15 This is a good example of making a background work for your image. After seeing an image painted by aviation artist Roy Grinnell, I went to work on my digital image of “Mig Alley” using scale models. The background was created using Vista Pro, a software that creates 3D landscapes using topographical maps. I created the background for this image using a map of Aspen, CO. The software give you the option of terrain, I chose not to include trees or grassy areas. I chose to show dusty brown mountains as they might look from aircraft in a life and death dogfight high over the North Korean landscape. I used Photoshop paint tools to create vapor trails, engine glow, shell casings, muzzle blasts and damage to the Mig-15. “ Mig Alley” features an Academy 1:48 F-86F Sabre flown by top Korean ace, Joseph McConnell.
29. “ Wulf over Russia” 1:48 Tamiya Focke-Wulf Fw-190A, 1:488 Accurate Miniatures IL-2 Stormovik This image was inspired by a painting by Iain Wylie. It features a FW-190 flying to camera after shooting down a Stormvick. After I made the FW-190, I considered making the image with smoke trailing from an aircraft outside of the frame. But, after acquiring the Trumpeter 1:48 Stormovick, I built the kit and added it to the final image. The background was created in Bryce and the snow and smoke effects were painted with Photoshop tools. I posted the image on www.aircraftresourcecenter.com and credited Iain Wylie with the inspiration. A few days later Mr. Wylie wrote me complimenting me on my work.
30. “ Warrior of the Rising Sun” 1:48 Tamiya A6M2 Zero, 1:32 Monogram F4U Corsair