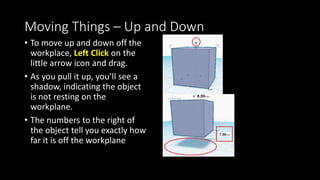
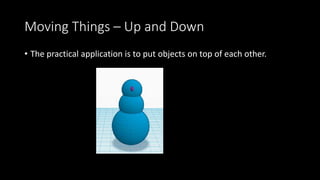
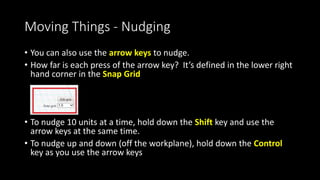
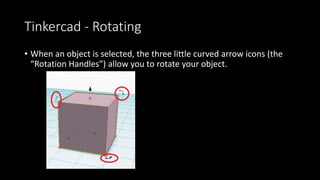
Modeling for 3D Printing
with Tinkercad
Vicky Somma
vicky@tgaw.com
http://www.tgaw.com
This slideshow is on SlideShare at http://www.slideshare.net/VickyTGAW/modeling-for-3d-printing-with-tinkercad
3D Printing
• “Layer by Layer”…Like Legos!
Source: https://youtu.be/2ujP-_cWWBU
3D Printing
• “Layer by Layer”…Like Legos!
Source: https://youtu.be/He_gYshkOmI
3D Models
• The Printer Needs a Model to Print
• We Can Download Existing Models (More Later)
-OR-
• Make Our Own!
Making Models – MANY Options
• Blender
http://www.blender.org
• Maya
http://www.autodesk.com/products/maya
/overview
• OpenSCAD
http://www.openscad.org
• AutoDesk 123D
http://www.123dapp.com/
Want more options? Check out https://www.shapeways.com/creator/tools
• Sketchup
http://www.sketchup.com/
• ZBrush
http://pixologic.com/
• LightWave 3D
https://www.lightwave3d.com/
• SculptGL (Web-Based)
http://stephaneginier.com/sculptgl/#
• Even iPad/iPhone Apps!
Making Models - Tinkercad
• Free
• Online, Nothing to Install
• “The Easiest Fiercest 3D Design
Tool Around”
http://www.tinkercad.com
Design Revisions Happen
Fails Happen
Photo Credits: http://www.pinterestfail.com
3D Printing Fails Happen
Tinkercad – Signing In
http://www.tinkercad.com
Signing in is straight forward
Tinkercad - Workplane
• Like a piece of graph paper.
• By Default– Millimeter measurements (Can be changed)
Tinkercad – Camera Controls
• Navigation Buttons (officially called “The Camera”) on the upper left
hand corner
• Right Click allows you to move the “camera”
• Shift Right Click allows you to pan
• Mouse Scroll Wheel lets you zoom in and out
Tinkercad – Shapes, Letters, Numbers, Etc.
• Our building blocks.
• To start click on the “Basic Shapes” in the dropdown
Tinkercad - Shapes
You can build a lot out of standard shapes
Tinkercad - Shapes
You can build a lot out of these standard shapes- “Bipedal Mech” by Mathew Ridge
in Tinkercad!
http://shpws.me/GQX5
Tinkercad – #3DBlockZoo
(Photos courtesy of Tessa Nesci)
Tinkercad - Adding Shapes
• Drag and Drop to Your Workplane
Tinkercad - Adding Shapes
• Shape Properties give you another way to size your objects
• You can use the slidebar to change dimensions
• If you double click on the number, you can type in an exact number
Tinkercad - Selecting Shapes
• Left Click on a Shape to Select It
• Holding the Shift Key Allows you to Select
Multiple Objects
• You can also draw a box to select multiple
objects at once.
Tinkercad - Clicking
You can think of it as
alphabetic order:
Left Clicks  Shapes
Right Clicks  Workplane
Mouse Image by Wasin Waeosri
Tinkercad - “Inspector”
• Additional Properties for the Object Such as Colors and Holes (More
Later)
Tinkercad - Moving Things on the Workplane
Photo Credit: Project Ignite
Moving Things – Along the Workplane
• Along the Workplane (X and Y), just Left Click
and Drag and Drop
Tip: Be careful to click on the object and not
one of the icons.
• The numbers and arrows show you how far
you have moved it.
Moving Things – Up and Down
• To move up and down off the
workplace, Left Click on the
little arrow icon and drag.
• As you pull it up, you’ll see a
shadow, indicating the object
is not resting on the
workplane.
• The numbers to the right of
the object tell you exactly how
far it is off the workplane
Moving Things – Up and Down
• The practical application is to put objects on top of each other.
Moving Things - Nudging
• You can also use the arrow keys to nudge.
• How far is each press of the arrow key? It’s defined in the lower right
hand corner in the Snap Grid
• To nudge 10 units at a time, hold down the Shift key and use the
arrow keys at the same time.
• To nudge up and down (off the workplane), hold down the Control
key as you use the arrow keys
Tinkercad - Rotating
• When an object is selected, the three little curved arrow icons (the
“Rotation Handles”) allow you to rotate your object.
Tinkercad - Rotating
• A circle appears to help you rotate (The
“Protractor”)
• The Inner Circle rotates at 22.5 degrees steps
• The Outer Circle rotates at 1 degree steps
• Holding down Shift rotates at 45 degrees steps
Tinkercad - Resizing (Scaling)
• When you select and object, there are black and white dots (the
“Scaling Handles”)
Tinkercad - Resizing
• White Dots scale two sizes (dimensions) at once
• Black Dots scale one size
• Hint: You can tell what sides you are resizing by the numbers
Tinkercad - Resizing
• The White Dot (“handle”) at the top allows you to control the height
of your object
Tinkercad - Resizing – Proportional
• If you want to resize everything uniformly (you love your object, you
just want it bigger all around), hold down the Shift key.
• If you want to grow out from the center while resizing, hold down the
Alt Key
Tinkercad – Copying Items
• You can use Copy and Paste Icons
• You can also do Ctrl-C and Ctrl-V
• Holding down the Alt key while you
Left Click and Drag will also make a
copy of the object.
• You can select multiple objects at
once and copy and paste those too.
Tinkercad - Fixing Mistakes
• Undo/Redo
Like Word, Excel or most programs,
you have the ability to Undo and
Redo steps.
• Delete
Just click on the object and click the
Delete button
Tinkercad - Holes
• Any Shape, Letter, Number, etc Can Be Turned Into a Hole
• Holes allow you to subtract an object from another
• Click on the Inspector and select Hole
Tinkercad - Holes
• Practical Applications:
• Actual Holes
• To Change Shapes
• Or to Engrave!
Tinkercad - Grouping
• Grouping makes multiple objects into one and applies any holes
• Select your objects and hit Group Icon (or Ctrl-G). You can always
Ungroup.
Tinkercad – Download for 3D Printing
• Click on Export button
• In most cases, you’ll pick .STL as the format
Design Time!
3D Printing – “Slicing”
• We used Tinkercad to make .STL files.
• Next we used a Slicer Software to “slice” our model into layer by layer
instructions for the printer (called Gcode)
3D Printing Concepts and Vocabulary Words
Filament – Our “thread” for
our final product
Filament Drive – Moves the
Filament to the Hot End
Hot End – Melts that Filament
so we can “draw” with it.
3D Printing – Start Up and the Skirt
• Makes sure the filament is
flowing
• Like squirting mustard before
putting it on your sandwich
Photo by Josh Reichlin
3D Printing – The All Important First Layer
• You want your print to stick
• People have employed a variety of
tools to make that happen:
• Heated Bed
• Painters Tape
• Glue Stick
• Hairspray
• Even Superglue
• Rafts
3D Printing – The All Important First Layer
• Why?
• Your print may fall off or move
• Precise Measurements – A curled
edge may throw things off
• Your Nozzle could even knock the
print
3D Printing – Infill
• Prints Aren’t Usually Solid
• Saves Time and Material
Design Considerations – Thin Walls
• Your object needs to be sturdy enough to support itself… and be
moved.
Design Considerations – Thin Walls
• The 3D Printing service companies
publish guidelines on Wall Thickness
• Varies for My Home Printing:
• Walls Supporting Lot of Weight– 2mm
• Normal Walls 1.0 – 1.5mm
• Detailing (such as Embossed Letters) –
0.5mm
Design Considerations - Bridging
• With the right speeds and temperatures,
we can print over gaps!
• Just small distances - I tend to stick to
20mm-30mm gaps
Find/Test Your Printer’s Capabilities With “Ultimate Extruder
Calibration Test”
http://www.thingiverse.com/thing:9804
Design Considerations - Bridging
• Bridging Can Be Exploited for Moving Parts
Design Considerations - Overhangs
• Overhangs – Supported underneath by one side
• Works when there is good overlap with
previous layer
• Most printers can handle angles of 45 degrees
or higher Photo Courtesy of Joel Telling, The 3D Printing Nerd
Design Considerations - Supports
• Overhangs too flat, bridges too far, object starts in mid-air?
• Supports are temporary structures that help the print
Design Considerations–Orientation
You aren’t necessarily going to print your object right side up.
Design Considerations–Orientation
Printing Heart Upside Down Doesn’t Require Supports
Design Considerations– Splitting Up Into Parts
You don’t necessarily have to print it all at once
Design Considerations – Using Other Parts
• No need to recreate the wheel.
Getting Models - Thingiverse
http://www.thingiverse.com
Getting Models - Smithsonian
http://3d.si.edu/
Getting Models – So MANY Resources
Including PinShape, YouMagine, Yeggi
Need A Listing? Check out http://3dprintingforbeginners.com/3d-model-repositories/
Advanced Tinkercad – Importing Models
• You found and downloaded a model you like.
• In Tinkercad, click on Import, browse to the file and hit Import again.
Advanced Tinkercad – Importing Models
• It’ll bring the new object into Tinkercad and you can manipulate, add
additional objects or engrave just as a normal object to make it your
own
Advanced Tinkercad – Ruler
• Adds keyboard control to be more exact with the measurements
• Drag the Ruler icon to your Workplane.
• It’ll display the dimensions of your object. Click on a measurement and
you can enter in exact numbers.
Advanced Tinkercad – Workplane Tool
• Drag the Workplane icon allows you to move the Workplane
(our graph paper)
• Helps save some layout and rotation time
Advanced Tinkercad - Align
• A quick way to line your objects.
• Click on Adjust (in the top tool bar) and choose Align…
• Click where you want to align everything (Top, Middle, Bottom, Right,
Left)
Tinkercad – Resources to Learn More
• In Tinkercad, click Learn to access all their tutorials
Tinkercad - Resources to Learn More
• AutoDesk’s Project Ignite Site - FULL of Tinkercad classes and tutorials
• The same login as Tinkercad
• https://projectignite.autodesk.com
Printing Models – MANY Options
THANK YOU!!!
http://www.facebook.com/tgaw3d
https://twitter.com/tgaw
http://www.tgaw.com
http://www.etsy.com/shop/vickytgaw
http://www.shapeways.com/shops/tgaw
http://www.instructables.com/member/VickyTGAW
http://www.youtube.com/TGAW3D
Vicky Somma
vicky@tgaw.com

Modeling for 3D Printing with Tinkercad

  • 1.
    Modeling for 3DPrinting with Tinkercad Vicky Somma vicky@tgaw.com http://www.tgaw.com This slideshow is on SlideShare at http://www.slideshare.net/VickyTGAW/modeling-for-3d-printing-with-tinkercad
  • 2.
    3D Printing • “Layerby Layer”…Like Legos! Source: https://youtu.be/2ujP-_cWWBU
  • 3.
    3D Printing • “Layerby Layer”…Like Legos! Source: https://youtu.be/He_gYshkOmI
  • 4.
    3D Models • ThePrinter Needs a Model to Print • We Can Download Existing Models (More Later) -OR- • Make Our Own!
  • 5.
    Making Models –MANY Options • Blender http://www.blender.org • Maya http://www.autodesk.com/products/maya /overview • OpenSCAD http://www.openscad.org • AutoDesk 123D http://www.123dapp.com/ Want more options? Check out https://www.shapeways.com/creator/tools • Sketchup http://www.sketchup.com/ • ZBrush http://pixologic.com/ • LightWave 3D https://www.lightwave3d.com/ • SculptGL (Web-Based) http://stephaneginier.com/sculptgl/# • Even iPad/iPhone Apps!
  • 6.
    Making Models -Tinkercad • Free • Online, Nothing to Install • “The Easiest Fiercest 3D Design Tool Around” http://www.tinkercad.com
  • 7.
  • 8.
    Fails Happen Photo Credits:http://www.pinterestfail.com
  • 9.
  • 10.
    Tinkercad – SigningIn http://www.tinkercad.com Signing in is straight forward
  • 11.
    Tinkercad - Workplane •Like a piece of graph paper. • By Default– Millimeter measurements (Can be changed)
  • 12.
    Tinkercad – CameraControls • Navigation Buttons (officially called “The Camera”) on the upper left hand corner • Right Click allows you to move the “camera” • Shift Right Click allows you to pan • Mouse Scroll Wheel lets you zoom in and out
  • 13.
    Tinkercad – Shapes,Letters, Numbers, Etc. • Our building blocks. • To start click on the “Basic Shapes” in the dropdown
  • 14.
    Tinkercad - Shapes Youcan build a lot out of standard shapes
  • 15.
    Tinkercad - Shapes Youcan build a lot out of these standard shapes- “Bipedal Mech” by Mathew Ridge in Tinkercad! http://shpws.me/GQX5
  • 16.
    Tinkercad – #3DBlockZoo (Photoscourtesy of Tessa Nesci)
  • 17.
    Tinkercad - AddingShapes • Drag and Drop to Your Workplane
  • 18.
    Tinkercad - AddingShapes • Shape Properties give you another way to size your objects • You can use the slidebar to change dimensions • If you double click on the number, you can type in an exact number
  • 19.
    Tinkercad - SelectingShapes • Left Click on a Shape to Select It • Holding the Shift Key Allows you to Select Multiple Objects • You can also draw a box to select multiple objects at once.
  • 20.
    Tinkercad - Clicking Youcan think of it as alphabetic order: Left Clicks  Shapes Right Clicks  Workplane Mouse Image by Wasin Waeosri
  • 21.
    Tinkercad - “Inspector” •Additional Properties for the Object Such as Colors and Holes (More Later)
  • 22.
    Tinkercad - MovingThings on the Workplane Photo Credit: Project Ignite
  • 23.
    Moving Things –Along the Workplane • Along the Workplane (X and Y), just Left Click and Drag and Drop Tip: Be careful to click on the object and not one of the icons. • The numbers and arrows show you how far you have moved it.
  • 24.
    Moving Things –Up and Down • To move up and down off the workplace, Left Click on the little arrow icon and drag. • As you pull it up, you’ll see a shadow, indicating the object is not resting on the workplane. • The numbers to the right of the object tell you exactly how far it is off the workplane
  • 25.
    Moving Things –Up and Down • The practical application is to put objects on top of each other.
  • 26.
    Moving Things -Nudging • You can also use the arrow keys to nudge. • How far is each press of the arrow key? It’s defined in the lower right hand corner in the Snap Grid • To nudge 10 units at a time, hold down the Shift key and use the arrow keys at the same time. • To nudge up and down (off the workplane), hold down the Control key as you use the arrow keys
  • 27.
    Tinkercad - Rotating •When an object is selected, the three little curved arrow icons (the “Rotation Handles”) allow you to rotate your object.
  • 28.
    Tinkercad - Rotating •A circle appears to help you rotate (The “Protractor”) • The Inner Circle rotates at 22.5 degrees steps • The Outer Circle rotates at 1 degree steps • Holding down Shift rotates at 45 degrees steps
  • 29.
    Tinkercad - Resizing(Scaling) • When you select and object, there are black and white dots (the “Scaling Handles”)
  • 30.
    Tinkercad - Resizing •White Dots scale two sizes (dimensions) at once • Black Dots scale one size • Hint: You can tell what sides you are resizing by the numbers
  • 31.
    Tinkercad - Resizing •The White Dot (“handle”) at the top allows you to control the height of your object
  • 32.
    Tinkercad - Resizing– Proportional • If you want to resize everything uniformly (you love your object, you just want it bigger all around), hold down the Shift key. • If you want to grow out from the center while resizing, hold down the Alt Key
  • 33.
    Tinkercad – CopyingItems • You can use Copy and Paste Icons • You can also do Ctrl-C and Ctrl-V • Holding down the Alt key while you Left Click and Drag will also make a copy of the object. • You can select multiple objects at once and copy and paste those too.
  • 34.
    Tinkercad - FixingMistakes • Undo/Redo Like Word, Excel or most programs, you have the ability to Undo and Redo steps. • Delete Just click on the object and click the Delete button
  • 35.
    Tinkercad - Holes •Any Shape, Letter, Number, etc Can Be Turned Into a Hole • Holes allow you to subtract an object from another • Click on the Inspector and select Hole
  • 36.
    Tinkercad - Holes •Practical Applications: • Actual Holes • To Change Shapes • Or to Engrave!
  • 37.
    Tinkercad - Grouping •Grouping makes multiple objects into one and applies any holes • Select your objects and hit Group Icon (or Ctrl-G). You can always Ungroup.
  • 38.
    Tinkercad – Downloadfor 3D Printing • Click on Export button • In most cases, you’ll pick .STL as the format
  • 39.
  • 40.
    3D Printing –“Slicing” • We used Tinkercad to make .STL files. • Next we used a Slicer Software to “slice” our model into layer by layer instructions for the printer (called Gcode)
  • 41.
    3D Printing Conceptsand Vocabulary Words Filament – Our “thread” for our final product Filament Drive – Moves the Filament to the Hot End Hot End – Melts that Filament so we can “draw” with it.
  • 42.
    3D Printing –Start Up and the Skirt • Makes sure the filament is flowing • Like squirting mustard before putting it on your sandwich Photo by Josh Reichlin
  • 43.
    3D Printing –The All Important First Layer • You want your print to stick • People have employed a variety of tools to make that happen: • Heated Bed • Painters Tape • Glue Stick • Hairspray • Even Superglue • Rafts
  • 44.
    3D Printing –The All Important First Layer • Why? • Your print may fall off or move • Precise Measurements – A curled edge may throw things off • Your Nozzle could even knock the print
  • 45.
    3D Printing –Infill • Prints Aren’t Usually Solid • Saves Time and Material
  • 46.
    Design Considerations –Thin Walls • Your object needs to be sturdy enough to support itself… and be moved.
  • 47.
    Design Considerations –Thin Walls • The 3D Printing service companies publish guidelines on Wall Thickness • Varies for My Home Printing: • Walls Supporting Lot of Weight– 2mm • Normal Walls 1.0 – 1.5mm • Detailing (such as Embossed Letters) – 0.5mm
  • 48.
    Design Considerations -Bridging • With the right speeds and temperatures, we can print over gaps! • Just small distances - I tend to stick to 20mm-30mm gaps Find/Test Your Printer’s Capabilities With “Ultimate Extruder Calibration Test” http://www.thingiverse.com/thing:9804
  • 49.
    Design Considerations -Bridging • Bridging Can Be Exploited for Moving Parts
  • 50.
    Design Considerations -Overhangs • Overhangs – Supported underneath by one side • Works when there is good overlap with previous layer • Most printers can handle angles of 45 degrees or higher Photo Courtesy of Joel Telling, The 3D Printing Nerd
  • 51.
    Design Considerations -Supports • Overhangs too flat, bridges too far, object starts in mid-air? • Supports are temporary structures that help the print
  • 52.
    Design Considerations–Orientation You aren’tnecessarily going to print your object right side up.
  • 53.
    Design Considerations–Orientation Printing HeartUpside Down Doesn’t Require Supports
  • 54.
    Design Considerations– SplittingUp Into Parts You don’t necessarily have to print it all at once
  • 55.
    Design Considerations –Using Other Parts • No need to recreate the wheel.
  • 56.
    Getting Models -Thingiverse http://www.thingiverse.com
  • 57.
    Getting Models -Smithsonian http://3d.si.edu/
  • 58.
    Getting Models –So MANY Resources Including PinShape, YouMagine, Yeggi Need A Listing? Check out http://3dprintingforbeginners.com/3d-model-repositories/
  • 59.
    Advanced Tinkercad –Importing Models • You found and downloaded a model you like. • In Tinkercad, click on Import, browse to the file and hit Import again.
  • 60.
    Advanced Tinkercad –Importing Models • It’ll bring the new object into Tinkercad and you can manipulate, add additional objects or engrave just as a normal object to make it your own
  • 61.
    Advanced Tinkercad –Ruler • Adds keyboard control to be more exact with the measurements • Drag the Ruler icon to your Workplane. • It’ll display the dimensions of your object. Click on a measurement and you can enter in exact numbers.
  • 62.
    Advanced Tinkercad –Workplane Tool • Drag the Workplane icon allows you to move the Workplane (our graph paper) • Helps save some layout and rotation time
  • 63.
    Advanced Tinkercad -Align • A quick way to line your objects. • Click on Adjust (in the top tool bar) and choose Align… • Click where you want to align everything (Top, Middle, Bottom, Right, Left)
  • 64.
    Tinkercad – Resourcesto Learn More • In Tinkercad, click Learn to access all their tutorials
  • 65.
    Tinkercad - Resourcesto Learn More • AutoDesk’s Project Ignite Site - FULL of Tinkercad classes and tutorials • The same login as Tinkercad • https://projectignite.autodesk.com
  • 66.
    Printing Models –MANY Options
  • 67.