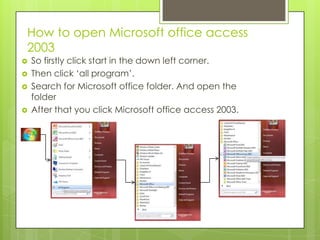
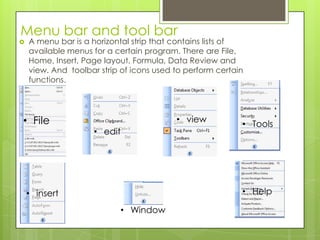
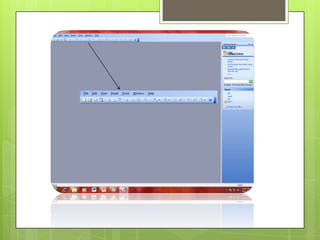
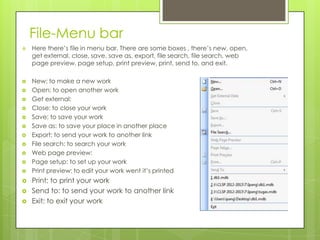
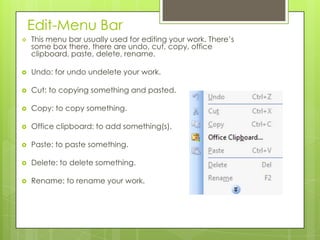
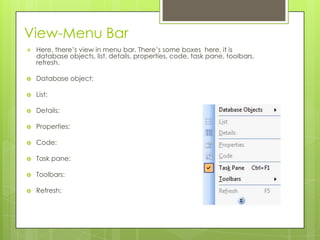
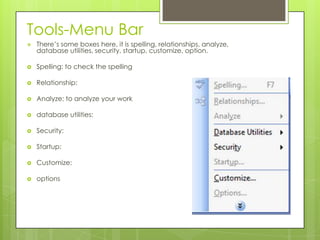
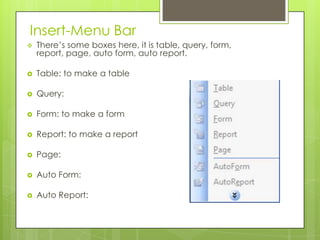
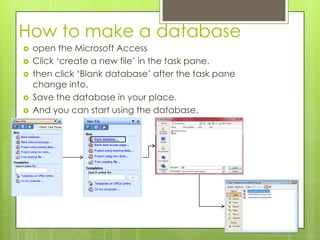
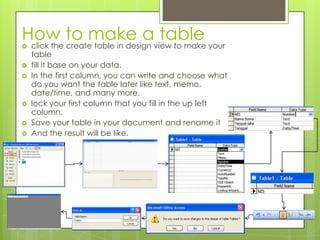
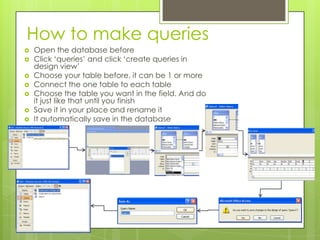
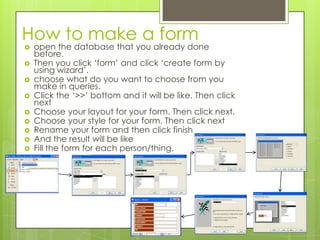
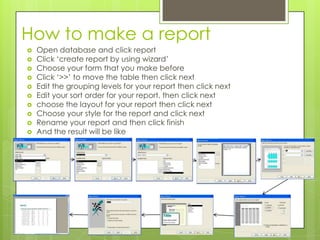
Microsoft
office access
2003
By: ipang
How to open Microsoft office access
2003
 So firstly click start in the down left corner.
 Then click ‘all program’.
 Search for Microsoft office folder. And open the
folder
 After that you click Microsoft office access 2003.
Menu bar and tool bar
 A menu bar is a horizontal strip that contains lists of
available menus for a certain program. There are File,
Home, Insert, Page layout, Formula, Data Review and
view. And toolbar strip of icons used to perform certain
functions.
• File
• edit
• view
• Tools
• insert
• Window
• Help
File-Menu bar
 Here there’s file in menu bar. There are some boxes , there’s new, open,
get external, close, save, save as, export, file search, file search, web
page preview, page setup, print preview, print, send to, and exit.
 New: to make a new work
 Open: to open another work
 Get external:
 Close: to close your work
 Save: to save your work
 Save as: to save your place in another place
 Export: to send your work to another link
 File search: to search your work
 Web page preview:
 Page setup: to set up your work
 Print preview: to edit your work went it’s printed
 Print: to print your work
 Send to: to send your work to another link
 Exit: to exit your work
Edit-Menu Bar
 This menu bar usually used for editing your work. There’s
some box there, there are undo, cut, copy, office
clipboard, paste, delete, rename.
 Undo: for undo undelete your work.
 Cut: to copying something and pasted.
 Copy: to copy something.
 Office clipboard: to add something(s).
 Paste: to paste something.
 Delete: to delete something.
 Rename: to rename your work.
View-Menu Bar
 Here, there’s view in menu bar. There’s some boxes here, it is
database objects, list, details, properties, code, task pane, toolbars,
refresh.
 Database object:
 List:
 Details:
 Properties:
 Code:
 Task pane:
 Toolbars:
 Refresh:
Tools-Menu Bar
 There’s some boxes here, it is spelling, relationships, analyze,
database utilities, security, startup, customize, option.
 Spelling: to check the spelling
 Relationship:
 Analyze: to analyze your work
 database utilities:
 Security:
 Startup:
 Customize:
 options
Insert-Menu Bar
 There’s some boxes here, it is table, query, form,
report, page, auto form, auto report.
 Table: to make a table
 Query:
 Form: to make a form
 Report: to make a report
 Page:
 Auto Form:
 Auto Report:
Window-Menu Bar
 This menu bar usually used hide or unhide
something, like picture, sentences and else. There
are two boxes here it is hide and unhide.
 Hide: for hide something.
 Unhide: for unhide something that already hided.
Help-Menu Bar
 Here there’s menu bar that called help.
This menu bar are usually used for helping
you, if you need some help for your work
you can open this menu bar. You know
this menu bar are really helped.
How to make a database
 open the Microsoft Access
 Click ‘create a new file’ in the task pane.
 then click ‘Blank database’ after the task pane
change into.
 Save the database in your place.
 And you can start using the database.
How to make a table click the create table in design view to make your
table
 fill it base on your data.
 In the first column, you can write and choose what
do you want the table later like text, memo,
date/time, and many more.
 lock your first column that you fill in the up left
column.
 Save your table in your document and rename it
 And the result will be like.
How to make queries
 Open the database before
 Click ‘queries’ and click ‘create queries in
design view’
 Choose your table before, it can be 1 or more
 Connect the one table to each table
 Choose the table you want in the field. And do
it just like that until you finish
 Save it in your place and rename it
 It automatically save in the database
How to make a form
 open the database that you already done
before.
 Then you click ‘form’ and click ‘create form by
using wizard’.
 choose what do you want to choose from you
make in queries.
 Click the ‘>>’ bottom and it will be like. Then click
next
 Choose your layout for your form. Then click next.
 Choose your style for your form. Then click next
 Rename your form and then click finish
 And the result will be like
 Fill the form for each person/thing.
How to make a report
 Open database and click report
 Click ‘create report by using wizard’
 Choose your form that you make before
 Click ‘>>’ to move the table then click next
 Edit the grouping levels for your report then click next
 Edit your sort order for your report. then click next
 choose the layout for your report then click next
 Choose your style for the report and click next
 Rename your report and then click finish
 And the result will be like
Thanks

Microsoft office access 2003

  • 1.
  • 2.
    How to openMicrosoft office access 2003  So firstly click start in the down left corner.  Then click ‘all program’.  Search for Microsoft office folder. And open the folder  After that you click Microsoft office access 2003.
  • 3.
    Menu bar andtool bar  A menu bar is a horizontal strip that contains lists of available menus for a certain program. There are File, Home, Insert, Page layout, Formula, Data Review and view. And toolbar strip of icons used to perform certain functions. • File • edit • view • Tools • insert • Window • Help
  • 5.
    File-Menu bar  Herethere’s file in menu bar. There are some boxes , there’s new, open, get external, close, save, save as, export, file search, file search, web page preview, page setup, print preview, print, send to, and exit.  New: to make a new work  Open: to open another work  Get external:  Close: to close your work  Save: to save your work  Save as: to save your place in another place  Export: to send your work to another link  File search: to search your work  Web page preview:  Page setup: to set up your work  Print preview: to edit your work went it’s printed  Print: to print your work  Send to: to send your work to another link  Exit: to exit your work
  • 6.
    Edit-Menu Bar  Thismenu bar usually used for editing your work. There’s some box there, there are undo, cut, copy, office clipboard, paste, delete, rename.  Undo: for undo undelete your work.  Cut: to copying something and pasted.  Copy: to copy something.  Office clipboard: to add something(s).  Paste: to paste something.  Delete: to delete something.  Rename: to rename your work.
  • 7.
    View-Menu Bar  Here,there’s view in menu bar. There’s some boxes here, it is database objects, list, details, properties, code, task pane, toolbars, refresh.  Database object:  List:  Details:  Properties:  Code:  Task pane:  Toolbars:  Refresh:
  • 8.
    Tools-Menu Bar  There’ssome boxes here, it is spelling, relationships, analyze, database utilities, security, startup, customize, option.  Spelling: to check the spelling  Relationship:  Analyze: to analyze your work  database utilities:  Security:  Startup:  Customize:  options
  • 9.
    Insert-Menu Bar  There’ssome boxes here, it is table, query, form, report, page, auto form, auto report.  Table: to make a table  Query:  Form: to make a form  Report: to make a report  Page:  Auto Form:  Auto Report:
  • 10.
    Window-Menu Bar  Thismenu bar usually used hide or unhide something, like picture, sentences and else. There are two boxes here it is hide and unhide.  Hide: for hide something.  Unhide: for unhide something that already hided.
  • 11.
    Help-Menu Bar  Herethere’s menu bar that called help. This menu bar are usually used for helping you, if you need some help for your work you can open this menu bar. You know this menu bar are really helped.
  • 12.
    How to makea database  open the Microsoft Access  Click ‘create a new file’ in the task pane.  then click ‘Blank database’ after the task pane change into.  Save the database in your place.  And you can start using the database.
  • 13.
    How to makea table click the create table in design view to make your table  fill it base on your data.  In the first column, you can write and choose what do you want the table later like text, memo, date/time, and many more.  lock your first column that you fill in the up left column.  Save your table in your document and rename it  And the result will be like.
  • 14.
    How to makequeries  Open the database before  Click ‘queries’ and click ‘create queries in design view’  Choose your table before, it can be 1 or more  Connect the one table to each table  Choose the table you want in the field. And do it just like that until you finish  Save it in your place and rename it  It automatically save in the database
  • 15.
    How to makea form  open the database that you already done before.  Then you click ‘form’ and click ‘create form by using wizard’.  choose what do you want to choose from you make in queries.  Click the ‘>>’ bottom and it will be like. Then click next  Choose your layout for your form. Then click next.  Choose your style for your form. Then click next  Rename your form and then click finish  And the result will be like  Fill the form for each person/thing.
  • 16.
    How to makea report  Open database and click report  Click ‘create report by using wizard’  Choose your form that you make before  Click ‘>>’ to move the table then click next  Edit the grouping levels for your report then click next  Edit your sort order for your report. then click next  choose the layout for your report then click next  Choose your style for the report and click next  Rename your report and then click finish  And the result will be like
  • 17.