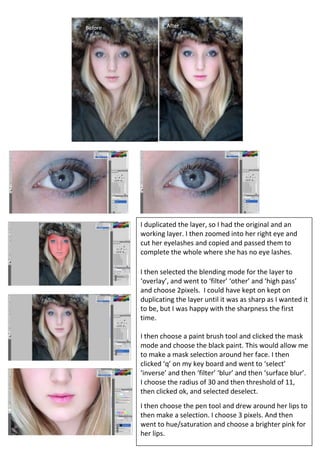
BeforeAfter77787548260BeforeAfter88709548260283845034925BeforeAfter<br />-7283455427345-7283453674745-72834519602452395855283845-699770283845<br />I duplicated the layer, so I had the original and an working layer. I then zoomed into her right eye and cut her eyelashes and copied and passed them to complete the whole where she has no eye lashes.I then selected the blending mode for the layer to ‘overlay’, and went to ‘filter’ ‘other’ and ‘high pass’ and choose 2pixels.  I could have kept on kept on duplicating the layer until it was as sharp as I wanted it to be, but I was happy with the sharpness the first time.I then choose a paint brush tool and clicked the mask mode and choose the black paint. This would allow me to make a mask selection around her face. I then clicked ‘q’ on my key board and went to ‘select’ ‘inverse’ and then ‘filter’ ‘blur’ and then ‘surface blur’. I choose the radius of 30 and then threshold of 11, then clicked ok, and selected deselect.I then choose the pen tool and drew around her lips to then make a selection. I choose 3 pixels. And then went to hue/saturation and choose a brighter pink for her lips.<br />BeforeAfter2705100-141605704850-141605Photo2:<br />First I used the ‘lasso’ cut tool and drew around the lower eye lash to then copy and paste. I then dragged the paste (new layer) closer to the eye, and used the smudge and blur tool on the harsh line to blend it out more. I then also used the ‘erase’ tool to erase skin and eye lashes that I did not want to include in the photo.I then used the ‘spot healing brush’ to select and take away any blemishes or birth marks. I then also made a mask, as the previous photo (the exact same steps)I then also make a selection around her lips by using the ‘pen tool’ and right clicked on my selection, then choose make 3pixels, and choose a new lip pink colour on ‘hue/saturation’.I then used the ‘quick selection’ tool and made a selection around her tooth with help by holding in ‘shift’ while make and clicking on the tooth. I then went to ‘hue/saturation’ to change the colour of the teeth to a whiter looking.I then selected the blending mode for the layer to ‘overlay’, and went to ‘filter’ ‘other’ and ‘high pass’ and choose 2pixels.  I could have kept on kept on duplicating the layer until it was as sharp as I wanted it to be, but I was happy with the sharpness the first time.-8191505203825-771525327977557150192722521431251927225<br />This first photo I just changed the colour tone to a redder hint tone filter.The other two photos I just changed the sharpness of, so I went through the same process as the other two photos.2694011417242-567804417242Photos 3, 4 &5 <br />
Manipulating the Photos

Manipulating the Photos

  • 1.
    BeforeAfter77787548260BeforeAfter88709548260283845034925BeforeAfter<br />-7283455427345-7283453674745-72834519602452395855283845-699770283845<br />Iduplicated the layer, so I had the original and an working layer. I then zoomed into her right eye and cut her eyelashes and copied and passed them to complete the whole where she has no eye lashes.I then selected the blending mode for the layer to ‘overlay’, and went to ‘filter’ ‘other’ and ‘high pass’ and choose 2pixels. I could have kept on kept on duplicating the layer until it was as sharp as I wanted it to be, but I was happy with the sharpness the first time.I then choose a paint brush tool and clicked the mask mode and choose the black paint. This would allow me to make a mask selection around her face. I then clicked ‘q’ on my key board and went to ‘select’ ‘inverse’ and then ‘filter’ ‘blur’ and then ‘surface blur’. I choose the radius of 30 and then threshold of 11, then clicked ok, and selected deselect.I then choose the pen tool and drew around her lips to then make a selection. I choose 3 pixels. And then went to hue/saturation and choose a brighter pink for her lips.<br />BeforeAfter2705100-141605704850-141605Photo2:<br />First I used the ‘lasso’ cut tool and drew around the lower eye lash to then copy and paste. I then dragged the paste (new layer) closer to the eye, and used the smudge and blur tool on the harsh line to blend it out more. I then also used the ‘erase’ tool to erase skin and eye lashes that I did not want to include in the photo.I then used the ‘spot healing brush’ to select and take away any blemishes or birth marks. I then also made a mask, as the previous photo (the exact same steps)I then also make a selection around her lips by using the ‘pen tool’ and right clicked on my selection, then choose make 3pixels, and choose a new lip pink colour on ‘hue/saturation’.I then used the ‘quick selection’ tool and made a selection around her tooth with help by holding in ‘shift’ while make and clicking on the tooth. I then went to ‘hue/saturation’ to change the colour of the teeth to a whiter looking.I then selected the blending mode for the layer to ‘overlay’, and went to ‘filter’ ‘other’ and ‘high pass’ and choose 2pixels. I could have kept on kept on duplicating the layer until it was as sharp as I wanted it to be, but I was happy with the sharpness the first time.-8191505203825-771525327977557150192722521431251927225<br />This first photo I just changed the colour tone to a redder hint tone filter.The other two photos I just changed the sharpness of, so I went through the same process as the other two photos.2694011417242-567804417242Photos 3, 4 &5 <br />