

Recommended
More Related Content
Similar to manual cell count.pdf
Similar to manual cell count.pdf (20)
More from Mohamed Alashram
More from Mohamed Alashram (20)
Recently uploaded
Recently uploaded (20)
manual cell count.pdf
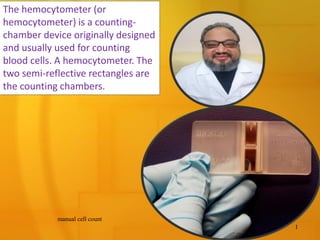
- 1. The hemocytometer (or hemocytometer) is a counting- chamber device originally designed and usually used for counting blood cells. A hemocytometer. The two semi-reflective rectangles are the counting chambers. manual cell count 1
- 2. A manual cell count of a blood specimen, also known as a peripheral blood smear (PBS), is a microscopic examination of blood stained on a glass slide. It is used to: 1. Count the different types of white blood cells (WBCs). This is called a differential white blood cell count. 2. Examine the size and shape of red blood cells (RBCs). 3. Look for abnormal cells, such as immature blood cells or cancer cells. manual cell count 2
- 3. A PBS is a more time-consuming and labor-intensive test than automated blood cell counts, but it can provide more information about the types and morphology of blood cells. It is often used in conjunction with automated blood cell counts to investigate abnormal results or to diagnose certain conditions. manual cell count 3
- 4. Here are the steps involved in performing a manual cell count of a blood specimen: 1.Prepare a blood smear. A small drop of blood is placed on a glass slide and spread into a thin film. The slide is then stained with special dyes to make the cells easier to see under a microscope. 2.Examine the slide under a microscope. A trained technician will examine the slide under a microscope to count the different types of white blood cells and examine the size and shape of the red blood cells. 3.Report the results. The technician will report the results of the cell count to the doctor. manual cell count 4
- 5. While still used in some cases, manual cell counts are becoming less common as automated blood cell counters become more sophisticated. However, they are still an important tool for diagnosing certain conditions. manual cell count 5
- 6. a hemocytometer is the primary tool used for manual cell counts in blood specimens. It's essentially a specialized microscope slide with a precise, shallow chamber etched with a grid. This grid allows for accurate counting of cells suspended in a known volume of liquid. Here's a closer look at hemocytometers: Hemocytometer microscope slide manual cell count 6
- 7. manual cell count 7
- 8. manual cell count 8 Components: •Counting chamber: This is the rectangular indentation where the cell suspension is loaded. It has a specific depth and volume (usually 10 microliters). •Cover slip: This thin glass plate is placed over the counting chamber to create a sealed chamber and ensure even distribution of the cell suspension. •Etched grid: The grid is typically divided into several smaller squares, with specific areas designated for counting different types of cells. For example, the Neubauer improved hemocytometer, a common type, has a large central area with 16 squares further divided into 16 smaller squares each. How it works: 1.Prepare the hemocytometer: Clean the chamber and coverslip and ensure proper adhesion. 2.Load the cell suspension: Carefully pipette a known volume of the diluted cell suspension into the counting chamber. Capillary action will draw the liquid in. 3.Count the cells: Using a microscope with the appropriate objective (usually 10x or 40x), systematically count the cells within the designated grid areas according to the type of cell being counted. 4.Calculate the cell concentration: Use the counted number of cells, the grid area, and the loaded volume to calculate the cell concentration per unit volume (e.g., cells/mL).
- 9. Components: •Counting chamber: This is the rectangular indentation where the cell suspension is loaded. It has a specific depth and volume (usually 10 microliters). •Cover slip: This thin glass plate is placed over the counting chamber to create a sealed chamber and ensure even distribution of the cell suspension. •Etched grid: The grid is typically divided into several smaller squares, with specific areas designated for counting different types of cells. For example, the Neubauer improved hemocytometer, a common type, has a large central area with 16 squares further divided into 16 smaller squares each. How it works: 1.Prepare the hemocytometer: Clean the chamber and coverslip and ensure proper adhesion. 2.Load the cell suspension: Carefully pipette a known volume of the diluted cell suspension into the counting chamber. Capillary action will draw the liquid in. 3.Count the cells: Using a microscope with the appropriate objective (usually 10x or 40x), systematically count the cells within the designated grid areas according to the type of cell being counted. 4.Calculate the cell concentration: Use the counted number of cells, the grid area, and the loaded volume to calculate the cell concentration per unit volume (e.g., cells/mL). manual cell count 9
- 10. Advantages of using a hemocytometer: •Relatively inexpensive and readily available. •Provides detailed information on cell morphology and types. •Useful for low cell count samples. Disadvantages of using a hemocytometer: •Time-consuming and labor- intensive. •Requires skill and experience for accurate counting. •More prone to errors compared to automated methods. manual cell count 10
- 11. Overall, hemocytometers remain valuable tools for manual cell counting in various applications, including blood analysis, cell culture experiments, and environmental monitoring. manual cell count 11
- 12. Using a Hemocytometer in Four Simple Steps 1. Dilute Your Sample with Trypan blue Trypan blue is a stain that allows you to distinguish dead cells from living cells. When mixed with your cell sample, any dead cells will be stained blue by the dye, meaning that you can count only those cells that are living and viable. You can dilute your sample with trypan blue at any ratio, but a 1:1 ratio is the most common. Whatever dilution you use, make sure to note it down as you’ll need this for your final calculation. manual cell count 12
- 13. 2. Loading the Hemocytometer Before you get started, ensure that both the hemocytometer and its coverslip are clean by removing any dust particles with lens paper. Coverslips used for mounting on hemocytometers are specially made to be thicker than conventional microscopy coverslips because they must be able to overcome the surface tension of a drop of liquid. Make sure you place the coverslip over the counting surface before loading the cell suspension. Then place the pipette tip with your sample into one of the V-shaped wells, and gently expel the sample. The area under the coverslip fills by capillary action. Enough liquid should be introduced so that the mirrored surface is just covered, usually around 10 µl, but don’t overfill the surface. You can load two samples on one hemocytometer, one into each of the two grids. manual cell count 13
- 14. The loaded hemocytometer is then placed on the microscope stage and the counting grid is brought into focus at low power. Allow the sample to settle for a couple of minutes and avoid moving the coverslip as it might introduce air bubbles and make counting difficult. manual cell count 14
- 15. . Counting Cells in a Hemocytometer The full grid on a hemocytometer contains nine squares, each of which is 1 mm2 The central counting area of the hemocytometer contains 25 large squares and each large square has 16 smaller squares. When counting cells that overlap an exterior line or ruling, count only those cells on the top or right-hand line of the large square to avoid counting cells twice. Suspensions should be dilute enough so that the cells or other particles do not overlap each other on the grid, and should be uniformly distributed. manual cell count 15
- 16. To perform the count, determine the magnification needed to recognize the desired cell type and systematically count the cells in selected squares so that the total count is approximately 100 cells, a minimum number of cells needed for a statistically significant count. manual cell count 16
- 17. For large cells, you can simply count the cells inside the four large corner squares and the middle square For a dense suspension of small cells, you may wish to count the cells in the four outer and middle squares of the central square or make a more dilute suspension. Remember if a cell overlaps a line, count it as “in” if it overlaps the top or right- hand line and “out” if it overlaps the bottom or left-hand line manual cell count 17
- 18. The area of the middle and each corner square is 1 mm x 1 mm = 1 mm2. The depth of each square is 0.1 mm. Hence, the final volume of each square at that depth is 100 nl. manual cell count 18
- 19. Calculating Cell Concentration You can calculate your cell concentration using the following formula: Total cells/ml = (Total cells counted x Dilution factor x 10,000 cells/ml)/ Number of squares counted So, for example, if you diluted your sample 1:1 with Trypan blue (dilution factor is 2 in this case), and you counted 325 cells in the four corner squares plus the central big square (number of squares counted is 5), then: Total cells/ml = (325 cells x 2 x 10,000 cells/ml)/ 5 = 130 x 104 cells/ml manual cell count 19
- 20. If you want to know how many cells you have in your original sample, just multiply the cell concentration by the total sample volume. For example, if your original sample volume is 5 ml, then: Total cells in sample = 130 x 104 cells/ml x 5 ml = 650 x 104 cells manual cell count 20