MAIL MERGE
•One ofthe important reason in using
computers per se is its ability to do
recurring tasks automatically. But its
ability has to be honed by learning the
characteristics and features of the
software you use with your computer.
Form document
•It isgenerally the document that
contains the main body of the message
we want to convey or send. The main
body of the message is the part of the
form document that remains the same
no matter whom you send it to from
among your list.
6.
List or DATAFILE
•The second component of our mail
merged document is the list or data file.
This is where the individual information
or data that needs to be plugged in
(merge) to the form of document is
placed and maintained.
7.
Label and generation
•Included in the mail merge feature on
microsoft word is the label genereator.
It just makes sense that after you print
out your form letters, you will need to
send it to individual recipients ina an
envelope with the matching address
printed directly on the envelope or on a
mailing label to stick on.
8.
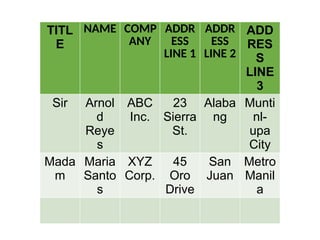
TITL
E
NAME COMP
ANY
ADDR
ESS
LINE 1
ADDR
ESS
LINE2
ADD
RES
S
LINE
3
Sir Arnol
d
Reye
s
ABC
Inc.
23
Sierra
St.
Alaba
ng
Munti
nl-
upa
City
Mada
m
Maria
Santo
s
XYZ
Corp.
45
Oro
Drive
San
Juan
Metro
Manil
a
9.
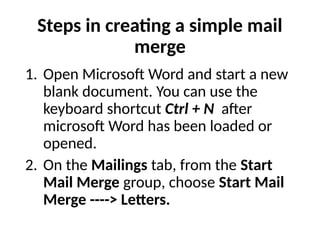
Steps in creatinga simple mail
merge
1. Open Microsoft Word and start a new
blank document. You can use the
keyboard shortcut Ctrl + N after
microsoft Word has been loaded or
opened.
2. On the Mailings tab, from the Start
Mail Merge group, choose Start Mail
Merge ----> Letters.
10.
Type the letterbelow. You will be typing
in only the common parts of the letter.
The next text that does not change for
each copy you print
11.
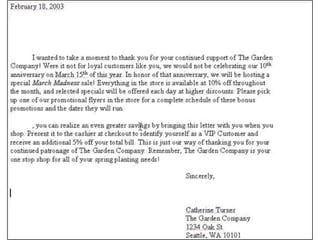
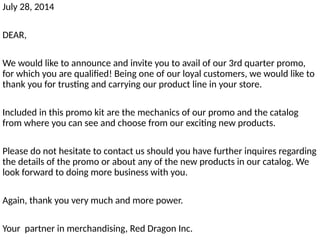
July 28, 2014
DEAR,
Wewould like to announce and invite you to avail of our 3rd quarter promo,
for which you are qualified! Being one of our loyal customers, we would like to
thank you for trusting and carrying our product line in your store.
Included in this promo kit are the mechanics of our promo and the catalog
from where you can see and choose from our exciting new products.
Please do not hesitate to contact us should you have further inquires regarding
the details of the promo or about any of the new products in our catalog. We
look forward to doing more business with you.
Again, thank you very much and more power.
Your partner in merchandising, Red Dragon Inc.
12.
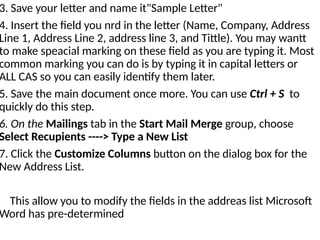
3. Save yourletter and name it"Sample Letter"
4. Insert the field you nrd in the letter (Name, Company, Address
Line 1, Address Line 2, address line 3, and Tittle). You may wantt
to make speacial marking on these field as you are typing it. Most
common marking you can do is by typing it in capital letters or
ALL CAS so you can easily identify them later.
5. Save the main document once more. You can use Ctrl + S to
quickly do this step.
6. On the Mailings tab in the Start Mail Merge group, choose
Select Recupients ----> Type a New List
7. Click the Customize Columns button on the dialog box for the
New Address List.
This allow you to modify the fields in the addreas list Microsoft
Word has pre-determined
13.
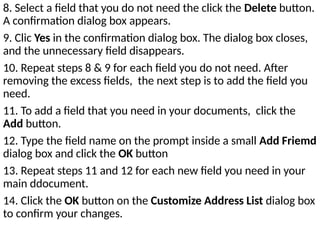
8. Select afield that you do not need the click the Delete button.
A confirmation dialog box appears.
9. Clic Yes in the confirmation dialog box. The dialog box closes,
and the unnecessary field disappears.
10. Repeat steps 8 & 9 for each field you do not need. After
removing the excess fields, the next step is to add the field you
need.
11. To add a field that you need in your documents, click the
Add button.
12. Type the field name on the prompt inside a small Add Friemd
dialog box and click the OK button
13. Repeat steps 11 and 12 for each new field you need in your
main ddocument.
14. Click the OK button on the Customize Address List dialog box
to confirm your changes.
14.
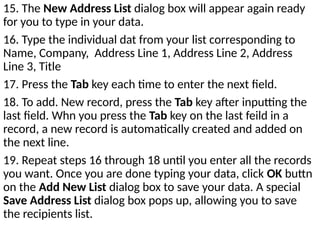
15. The NewAddress List dialog box will appear again ready
for you to type in your data.
16. Type the individual dat from your list corresponding to
Name, Company, Address Line 1, Address Line 2, Address
Line 3, Title
17. Press the Tab key each time to enter the next field.
18. To add. New record, press the Tab key after inputting the
last field. Whn you press the Tab key on the last feild in a
record, a new record is automatically created and added on
the next line.
19. Repeat steps 16 through 18 until you enter all the records
you want. Once you are done typing your data, click OK buttn
on the Add New List dialog box to save your data. A special
Save Address List dialog box pops up, allowing you to save
the recipients list.
15.
20. Type aname for the address list. Name it "client List"
21. Click the Save button. You should be back on your main
document soon after.
22. Select a field placeholder (ALL CAPS) in the main
document.
23. Click the Insert Merge Field command button
24. Choose the proper field to insert into your text. For
example, if you are replacing the text nae in yur document
with a name field, choose the Name Field from th Insert
Merge Field menu. The field is inserted into your document
and replace the ALL CAPS text.
25. Continue adding fields until the document is complete.
Repeat step 22 through 24 as necessary to stick all fields into
your documents.
16.
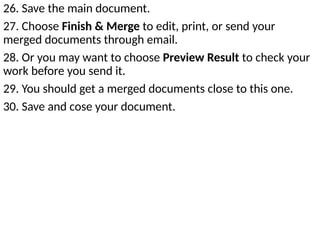
26. Save themain document.
27. Choose Finish & Merge to edit, print, or send your
merged documents through email.
28. Or you may want to choose Preview Result to check your
work before you send it.
29. You should get a merged documents close to this one.
30. Save and cose your document.
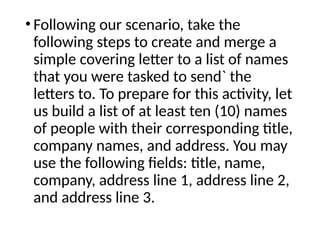
• Following ourscenario, take the
following steps to create and merge a
simple covering letter to a list of names
that you were tasked to send` the
letters to. To prepare for this activity, let
us build a list of at least ten (10) names
of people with their corresponding title,
company names, and address. You may
use the following fields: title, name,
company, address line 1, address line 2,
and address line 3.


![[EMPOWERMENT TECHNOLOGIES] - ADVANCED WORD PROCESSING SKILLS](https://cdn.slidesharecdn.com/ss_thumbnails/lesson3-advancedwordprocessingskills2-211128024207-thumbnail.jpg?width=640&height=640&fit=bounds)


