![HelloWorld! +
1. Create the new class HelloWorld. Project | New | Class
import lejos.nxt.LCD; Add
public class HelloWorld {
public static void main(String[] args) {
LCD.drawString("Hello World!", 1, 2);
LCD.refresh();
while(true) {}
} Speak using LCD
}
2. Upload this class to you NXT, using your LeJOS Download tool.
17](https://image.slidesharecdn.com/legoslidesfinal-ppt-090630064106-phpapp02/85/200810-Lego-Mindstorms-NTX-with-Java-17-320.jpg)

![Example: Motors and Buttons +
import lejos.nxt.*;
public class WalkingTalking {
public static void main (String[] aArg) throws Exception{
LCD.drawString("Hi!", 0, 1);
LCD.refresh();
Button.ESCAPE.waitForPressAndRelease();
Motor.A.forward();
Motor.B.forward();
LCD.clear();
LCD.drawString("Walking", 2, 0);
LCD.refresh();
Button.ESCAPE.waitForPressAndRelease();
Motor.A.stop();
Motor.B.stop();
LCD.clear();
LCD.drawString("End!", 3, 4);
LCD.refresh();
}
}
21](https://image.slidesharecdn.com/legoslidesfinal-ppt-090630064106-phpapp02/85/200810-Lego-Mindstorms-NTX-with-Java-21-320.jpg)
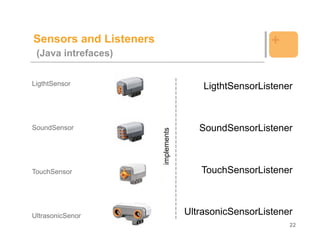
![Example: Sensor and Listeners +
import lejos.nxt.*;
public class Hearing implements SensorPortListener
{
SoundSensor sound = new SoundSensor(SensorPort.S2);
int count = 0;
public static void main (String[] aArg) throws Exception {
Hearing listen = new Hearing();
listen.run();
LCD.clear();
LCD.drawString("Im hearing", 2, 0);
LCD.refresh();
Button.ESCAPE.waitForPressAndRelease();
LCD.clear();
LCD.drawString("End!", 3, 4);
LCD.refresh();
}
…
23](https://image.slidesharecdn.com/legoslidesfinal-ppt-090630064106-phpapp02/85/200810-Lego-Mindstorms-NTX-with-Java-23-320.jpg)

![Example: Speaker +
import lejos.nxt.*;
class PlaySound {
public static void main(String[] args) throws InterruptedException {
Sound.playTone(4000,100);
Thread.sleep(1500);
Sound.systemSound(false,4);
Thread.sleep(2000);
}
}
25](https://image.slidesharecdn.com/legoslidesfinal-ppt-090630064106-phpapp02/85/200810-Lego-Mindstorms-NTX-with-Java-25-320.jpg)
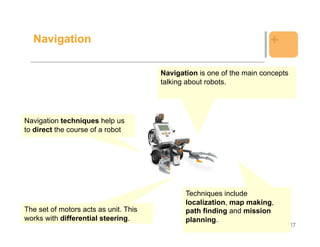
![Example: Navigation +
import lejos.navigation.*;
import lejos.nxt.*;
public class WTPilot {
static final float DIAM_WHEEL = 5.6F;
static final float TRAC_WHEEL = 13F;
Pilot robot = new Pilot(DIAM_WHEEL, TRAC_WHEEL, Motor.A, Motor.B);
public static void main (String[] aArg) throws Exception{
LCD.drawString("Hi!", 0, 1);
LCD.refresh();
Button.ESCAPE.waitForPressAndRelease();
WTPilot s = new WTPilot();
s.run();
LCD.clear();
LCD.drawString("Walking", 2, 0);
LCD.refresh(); public void run(){
Button.ESCAPE.waitForPressAndRelease(); robot.forward();
LCD.clear();
LCD.drawString("End!", 3, 4); }
LCD.refresh();
s.stop(); public void stop(){
} robot.stop();
}
}
29](https://image.slidesharecdn.com/legoslidesfinal-ppt-090630064106-phpapp02/85/200810-Lego-Mindstorms-NTX-with-Java-29-320.jpg)

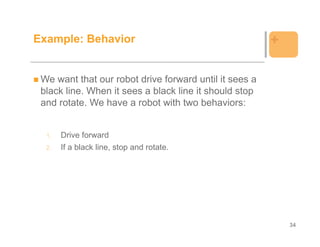
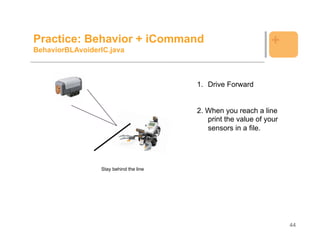
![Example: Behavior +
public class BlackLineAvoider {
static final float DIAM_WHEEL = 5.6F;
static final float TRAC_WHEEL = 13F;
public static void main(String [] args){
LightSensor ls = new LightSensor (SensorPort.S1, true);
Pilot robot = new Pilot(DIAM_WHEEL, TRAC_WHEEL, Motor.A, Motor.B);
robot.setSpeed(500);
LCD.drawString("Hi!", 0, 1);
LCD.refresh();
Button.ESCAPE.waitForPressAndRelease();
Behavior b1 = new BehaviorDriveFwd(robot);
Behavior b2 = new BehaviorBlackLine(ls,robot);
Behavior [] bArray = {b1, b2};
Arbitrator arby = new Arbitrator(bArray);
arby.start();
}
}
36](https://image.slidesharecdn.com/legoslidesfinal-ppt-090630064106-phpapp02/85/200810-Lego-Mindstorms-NTX-with-Java-36-320.jpg)
![Example: Sending data +
import icommand.nxt.Sound;
import icommand.nxt.comm.*;
public class Beep {
private static final short[] note = { 2349, 115, 0, 5, 1760, 165, 0, 35, 1760, 28, 0, 13, 1976, 23, 0, 18,
1760, 18, 0, 23, 1568, 15, 0, 25, 1480, 103, 0, 18, 1175, 180, 0,
20, 1760, 18, 0, 23, 1976, 20, 0, 20, 1760, 15, 0, 25, 1568, 15, 0,
25, 2217, 98, 0, 23, 1760, 88, 0, 33, 1760, 75, 0, 5, 1760, 20, 0,
20, 1760, 20, 0, 20, 1976, 18, 0, 23, 1760, 18, 0, 23, 2217, 225,
0, 15, 2217, 218 };
public static void main(String[] args) {
NXTCommand.open();
for (int i = 0; i < note.length; i += 2) {
final short w = note[i + 1];
final int n = note[i];
if (n != 0)
Sound.playTone(n, w * 10);
try { Thread.sleep(w * 10);
} catch (InterruptedException e) {
}
}
NXTCommand.close();
}
}
42](https://image.slidesharecdn.com/legoslidesfinal-ppt-090630064106-phpapp02/85/200810-Lego-Mindstorms-NTX-with-Java-42-320.jpg)
![Example: Getting data +
import icommand.nxt.comm.NXTCommand;
import icommand.nxt.*;
import java.io.*;
public class GetInfo {
public static void main (String [] args)throws FileNotFoundException{
NXTCommand.open();
String toFile;
PrintWriter outFile = new PrintWriter ("outfile.txt");
LightSensor ls = new LightSensor(SensorPort.S1);
toFile = "Light sensor: " + ls.getLightValue() + "n";
TouchSensor ts = new TouchSensor (SensorPort.S3); for (int i=0; i<20;i++)
String tsStatus; if (i%2==0)
Motor.C.rotate(20);
if (ts.isPressed()) tsStatus ="Pressed"; else
else tsStatus="Not pressed"; Motor.C.rotate(-20);
toFile = toFile + "Touch sensor: " + tsStatus; System.out.println (toFile);
outFile.println(toFile);
outFile.close();
NXTCommand.close();
}
}
43](https://image.slidesharecdn.com/legoslidesfinal-ppt-090630064106-phpapp02/85/200810-Lego-Mindstorms-NTX-with-Java-43-320.jpg)

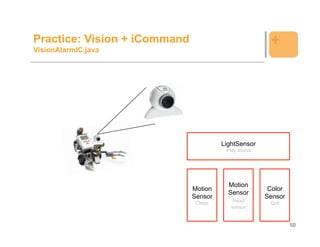
![Example: Vision +
import icommand.vision.*; public void motionDetected(int region) {
if ((System.currentTimeMillis() - lastPlay) > 1000)
public class VisionAlarm implements {
MotionListener, ColorListener, LightListener { lastPlay = System.currentTimeMillis();
if (region == 1) System.out.println("Región 1");
long lastPlay = 0; else System.out.println("Región 2");
private final int WHITE = 0xFFFFFF; Vision.playSound("blip.wav");
} }
public static void main(String [] args) { public void colorDetected(int region, int color) {
(new VisionAlarm()).run(); if ((System.currentTimeMillis() - lastPlay) >
} 1000) {
lastPlay = System.currentTimeMillis();
private void run() { if (region == 3) System.out.println("Región 3");
Vision.setImageSize(320, 240); Vision.playSound("quack.wav");
Vision.flipHorizontal(false); Vision.stopViewer();
Vision.addRectRegion(1, 30, 50, 50, 100); System.exit(0);
Vision.addMotionListener(1, this); } }
Vision.addRectRegion(2, 130, 50, 50, 100); public void lightDetected (int region) {
Vision.addMotionListener(2, this); if ((System.currentTimeMillis() - lastPlay) >
Vision.addRectRegion(3, 230, 50, 50, 100); 1000) {
Vision.addColorListener(3, this, WHITE); lastPlay = System.currentTimeMillis();
Vision.addRectRegion(4, 30, 180, 250, 50); if (region == 4) System.out.println("Región 4");
Vision.addLightListener(4, this); Vision.playSound("quack.wav");
Vision.startViewer("Alarm"); } } }
}
49](https://image.slidesharecdn.com/legoslidesfinal-ppt-090630064106-phpapp02/85/200810-Lego-Mindstorms-NTX-with-Java-49-320.jpg)

![Example: Speech +
import com.sun.speech.freetts.Voice;
import com.sun.speech.freetts.VoiceManager;
public class HelloWorldSpeech {
public static void main(String[] args) {
String voiceName = "kevin16";
System.out.println("Using voice: " + voiceName);
VoiceManager voiceManager = VoiceManager.getInstance();
Voice helloVoice = voiceManager.getVoice(voiceName);
if (helloVoice == null) {
System.err.println(
"Cannot find a voice named "
+ voiceName + ". Please specify a different voice.");
System.exit(1); helloVoice.speak("Hi Educator Symposium
} Attendees");
helloVoice.allocate(); helloVoice.deallocate();
System.exit(0);
}
}
54](https://image.slidesharecdn.com/legoslidesfinal-ppt-090630064106-phpapp02/85/200810-Lego-Mindstorms-NTX-with-Java-54-320.jpg)
![Practice: Speech + Vision +
SpeechVision.java
/**
* Copyright 2003 Sun Microsystems, Inc.
*/
import com.sun.speech.freetts.Voice;
import com.sun.speech.freetts.VoiceManager;
import icommand.vision.*;
public class SpeechVision implements MotionListener, ColorListener, LightListener {
long lastPlay = 0;
private final int WHITE = 0xFFFFFF;
public static void main(String [] args) {
(new SpeechVision()).run();
}
55](https://image.slidesharecdn.com/legoslidesfinal-ppt-090630064106-phpapp02/85/200810-Lego-Mindstorms-NTX-with-Java-55-320.jpg)


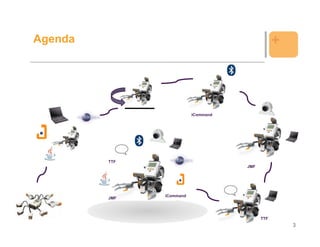
The document outlines an agenda for a tutorial on programming LEGO Mindstorms robots with Java, covering topics like installation, basic programming, navigation, behaviors, communication via Bluetooth, and speech and vision capabilities. It provides examples of code to control motors and sensors, implement behaviors, and send and receive data via Bluetooth. The goal is to teach techniques for controlling LEGO Mindstorms robots using Java programming.