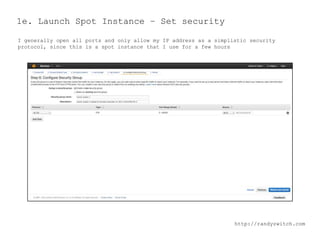
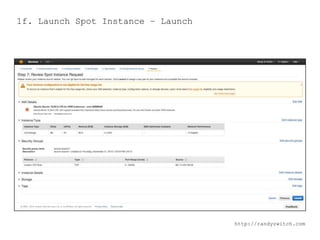
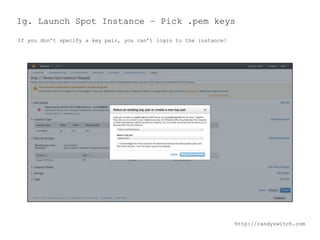
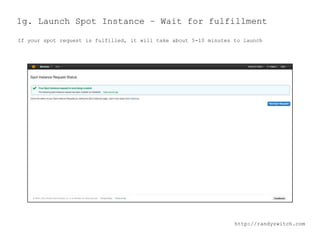
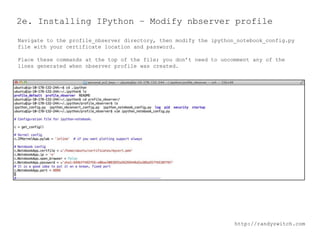
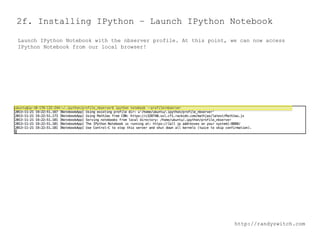
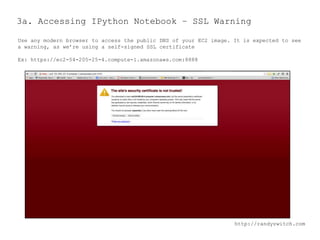
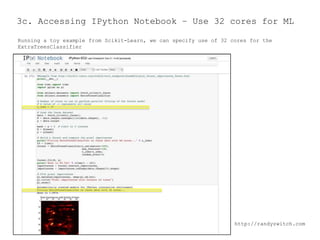
Cluster Computing Using
IPython Notebook with
Amazon EC2

http://randyzwitch.com
1. Launching EC2 Cluster Instance
1. Launch Spot Instance from Spot Instance Menu

http://randyzwitch.com
1b. Launch Spot Instance – Ubuntu Server 12.04LTS for
HVM Instances

http://randyzwitch.com
1c. Launch Spot Instance – Choose cc2.8xl instance

http://randyzwitch.com
1d. Launch Spot Instance – Set bid price
For max bid, set price that you’re comfortable paying to keep instance running. Cost has
been pretty stable at $0.27/hr for a while

http://randyzwitch.com
1e. Launch Spot Instance – Set security
I generally open all ports and only allow my IP address as a simplistic security
protocol, since this is a spot instance that I use for a few hours

http://randyzwitch.com
1f. Launch Spot Instance – Launch

http://randyzwitch.com
1g. Launch Spot Instance – Pick .pem keys
If you don’t specify a key pair, you can’t login to the instance!

http://randyzwitch.com
1g. Launch Spot Instance – Wait for fulfillment
If your spot request is fulfilled, it will take about 5-10 minutes to launch

http://randyzwitch.com
2. Installing & Configuring Python/IPython Using
Anaconda
FULL INSTRUCTIONS:
HTTP://IPYTHON.ORG/IPYTHON-DOC/DEV/INTERACTIVE/PUBLIC_SERVER.HTML#NOTEBOOK-PUBLIC-SERVER
2a. Installing IPython – SSH into EC2 Instance
SSH into EC2 instance, create /temp directory, then download Anaconda (64-bit, Linux).
http://continuum.io/downloads
Run script after downloading to install Anaconda: bash Anaconda-1.8.0-Linux-x86_64.sh

http://randyzwitch.com
2b. Installing IPython – Generate Password
In IPython REPL, use the IPython.lib passwd() feature to create a password. Copy
password to a text editor for later use.
(No, this is not a real password to use on my EC2 instance!)

http://randyzwitch.com
2c. Installing IPython – Create nbserver profile
Create an IPython profile called ‘nbserver’, which we will use as our profile to create
the public Notebook server

http://randyzwitch.com
2d. Installing IPython – Generate SSL certificate
Create a self-signed SSL certificate so that we can use HTTPS on the IPython Notebook

http://randyzwitch.com
2e. Installing IPython – Modify nbserver profile
Navigate to the profile_nbserver directory, then modify the ipython_notebook_config.py
file with your certificate location and password.
Place these commands at the top of the file; you don’t need to uncomment any of the
lines generated when nbserver profile was created.

http://randyzwitch.com
2f. Installing IPython – Launch IPython Notebook
Launch IPython Notebook with the nbserver profile. At this point, we can now access
IPython Notebook from our local browser!

http://randyzwitch.com
3. Using IPython Notebook from Local Browser
3a. Accessing IPython Notebook – SSL Warning
Use any modern browser to access the public DNS of your EC2 image. It is expected to see
a warning, as we’re using a self-signed SSL certificate
Ex: https://ec2-54-205-25-4.compute-1.amazonaws.com:8888

http://randyzwitch.com
3b. Accessing IPython Notebook – Enter Password
Sign in using password that you set during the prior step (the actual password, not the
SHA1 version)

http://randyzwitch.com
3c. Accessing IPython Notebook – Success!
At this point, you’ve got a fully functional Python clusterenvironment running on EC2,
which you are accessing from your local browser

http://randyzwitch.com
3c. Accessing IPython Notebook – Use 32 cores for ML
Running a toy example from Scikit-Learn, we can specify use of 32 cores for the
ExtraTreesClassifier

http://randyzwitch.com

Cluster Computing for $0.27/hr using Amazon EC2 and IPython Notebook

  • 1.
    Cluster Computing Using IPythonNotebook with Amazon EC2 http://randyzwitch.com
  • 2.
    1. Launching EC2Cluster Instance
  • 3.
    1. Launch SpotInstance from Spot Instance Menu http://randyzwitch.com
  • 4.
    1b. Launch SpotInstance – Ubuntu Server 12.04LTS for HVM Instances http://randyzwitch.com
  • 5.
    1c. Launch SpotInstance – Choose cc2.8xl instance http://randyzwitch.com
  • 6.
    1d. Launch SpotInstance – Set bid price For max bid, set price that you’re comfortable paying to keep instance running. Cost has been pretty stable at $0.27/hr for a while http://randyzwitch.com
  • 7.
    1e. Launch SpotInstance – Set security I generally open all ports and only allow my IP address as a simplistic security protocol, since this is a spot instance that I use for a few hours http://randyzwitch.com
  • 8.
    1f. Launch SpotInstance – Launch http://randyzwitch.com
  • 9.
    1g. Launch SpotInstance – Pick .pem keys If you don’t specify a key pair, you can’t login to the instance! http://randyzwitch.com
  • 10.
    1g. Launch SpotInstance – Wait for fulfillment If your spot request is fulfilled, it will take about 5-10 minutes to launch http://randyzwitch.com
  • 11.
    2. Installing &Configuring Python/IPython Using Anaconda FULL INSTRUCTIONS: HTTP://IPYTHON.ORG/IPYTHON-DOC/DEV/INTERACTIVE/PUBLIC_SERVER.HTML#NOTEBOOK-PUBLIC-SERVER
  • 12.
    2a. Installing IPython– SSH into EC2 Instance SSH into EC2 instance, create /temp directory, then download Anaconda (64-bit, Linux). http://continuum.io/downloads Run script after downloading to install Anaconda: bash Anaconda-1.8.0-Linux-x86_64.sh http://randyzwitch.com
  • 13.
    2b. Installing IPython– Generate Password In IPython REPL, use the IPython.lib passwd() feature to create a password. Copy password to a text editor for later use. (No, this is not a real password to use on my EC2 instance!) http://randyzwitch.com
  • 14.
    2c. Installing IPython– Create nbserver profile Create an IPython profile called ‘nbserver’, which we will use as our profile to create the public Notebook server http://randyzwitch.com
  • 15.
    2d. Installing IPython– Generate SSL certificate Create a self-signed SSL certificate so that we can use HTTPS on the IPython Notebook http://randyzwitch.com
  • 16.
    2e. Installing IPython– Modify nbserver profile Navigate to the profile_nbserver directory, then modify the ipython_notebook_config.py file with your certificate location and password. Place these commands at the top of the file; you don’t need to uncomment any of the lines generated when nbserver profile was created. http://randyzwitch.com
  • 17.
    2f. Installing IPython– Launch IPython Notebook Launch IPython Notebook with the nbserver profile. At this point, we can now access IPython Notebook from our local browser! http://randyzwitch.com
  • 18.
    3. Using IPythonNotebook from Local Browser
  • 19.
    3a. Accessing IPythonNotebook – SSL Warning Use any modern browser to access the public DNS of your EC2 image. It is expected to see a warning, as we’re using a self-signed SSL certificate Ex: https://ec2-54-205-25-4.compute-1.amazonaws.com:8888 http://randyzwitch.com
  • 20.
    3b. Accessing IPythonNotebook – Enter Password Sign in using password that you set during the prior step (the actual password, not the SHA1 version) http://randyzwitch.com
  • 21.
    3c. Accessing IPythonNotebook – Success! At this point, you’ve got a fully functional Python clusterenvironment running on EC2, which you are accessing from your local browser http://randyzwitch.com
  • 22.
    3c. Accessing IPythonNotebook – Use 32 cores for ML Running a toy example from Scikit-Learn, we can specify use of 32 cores for the ExtraTreesClassifier http://randyzwitch.com