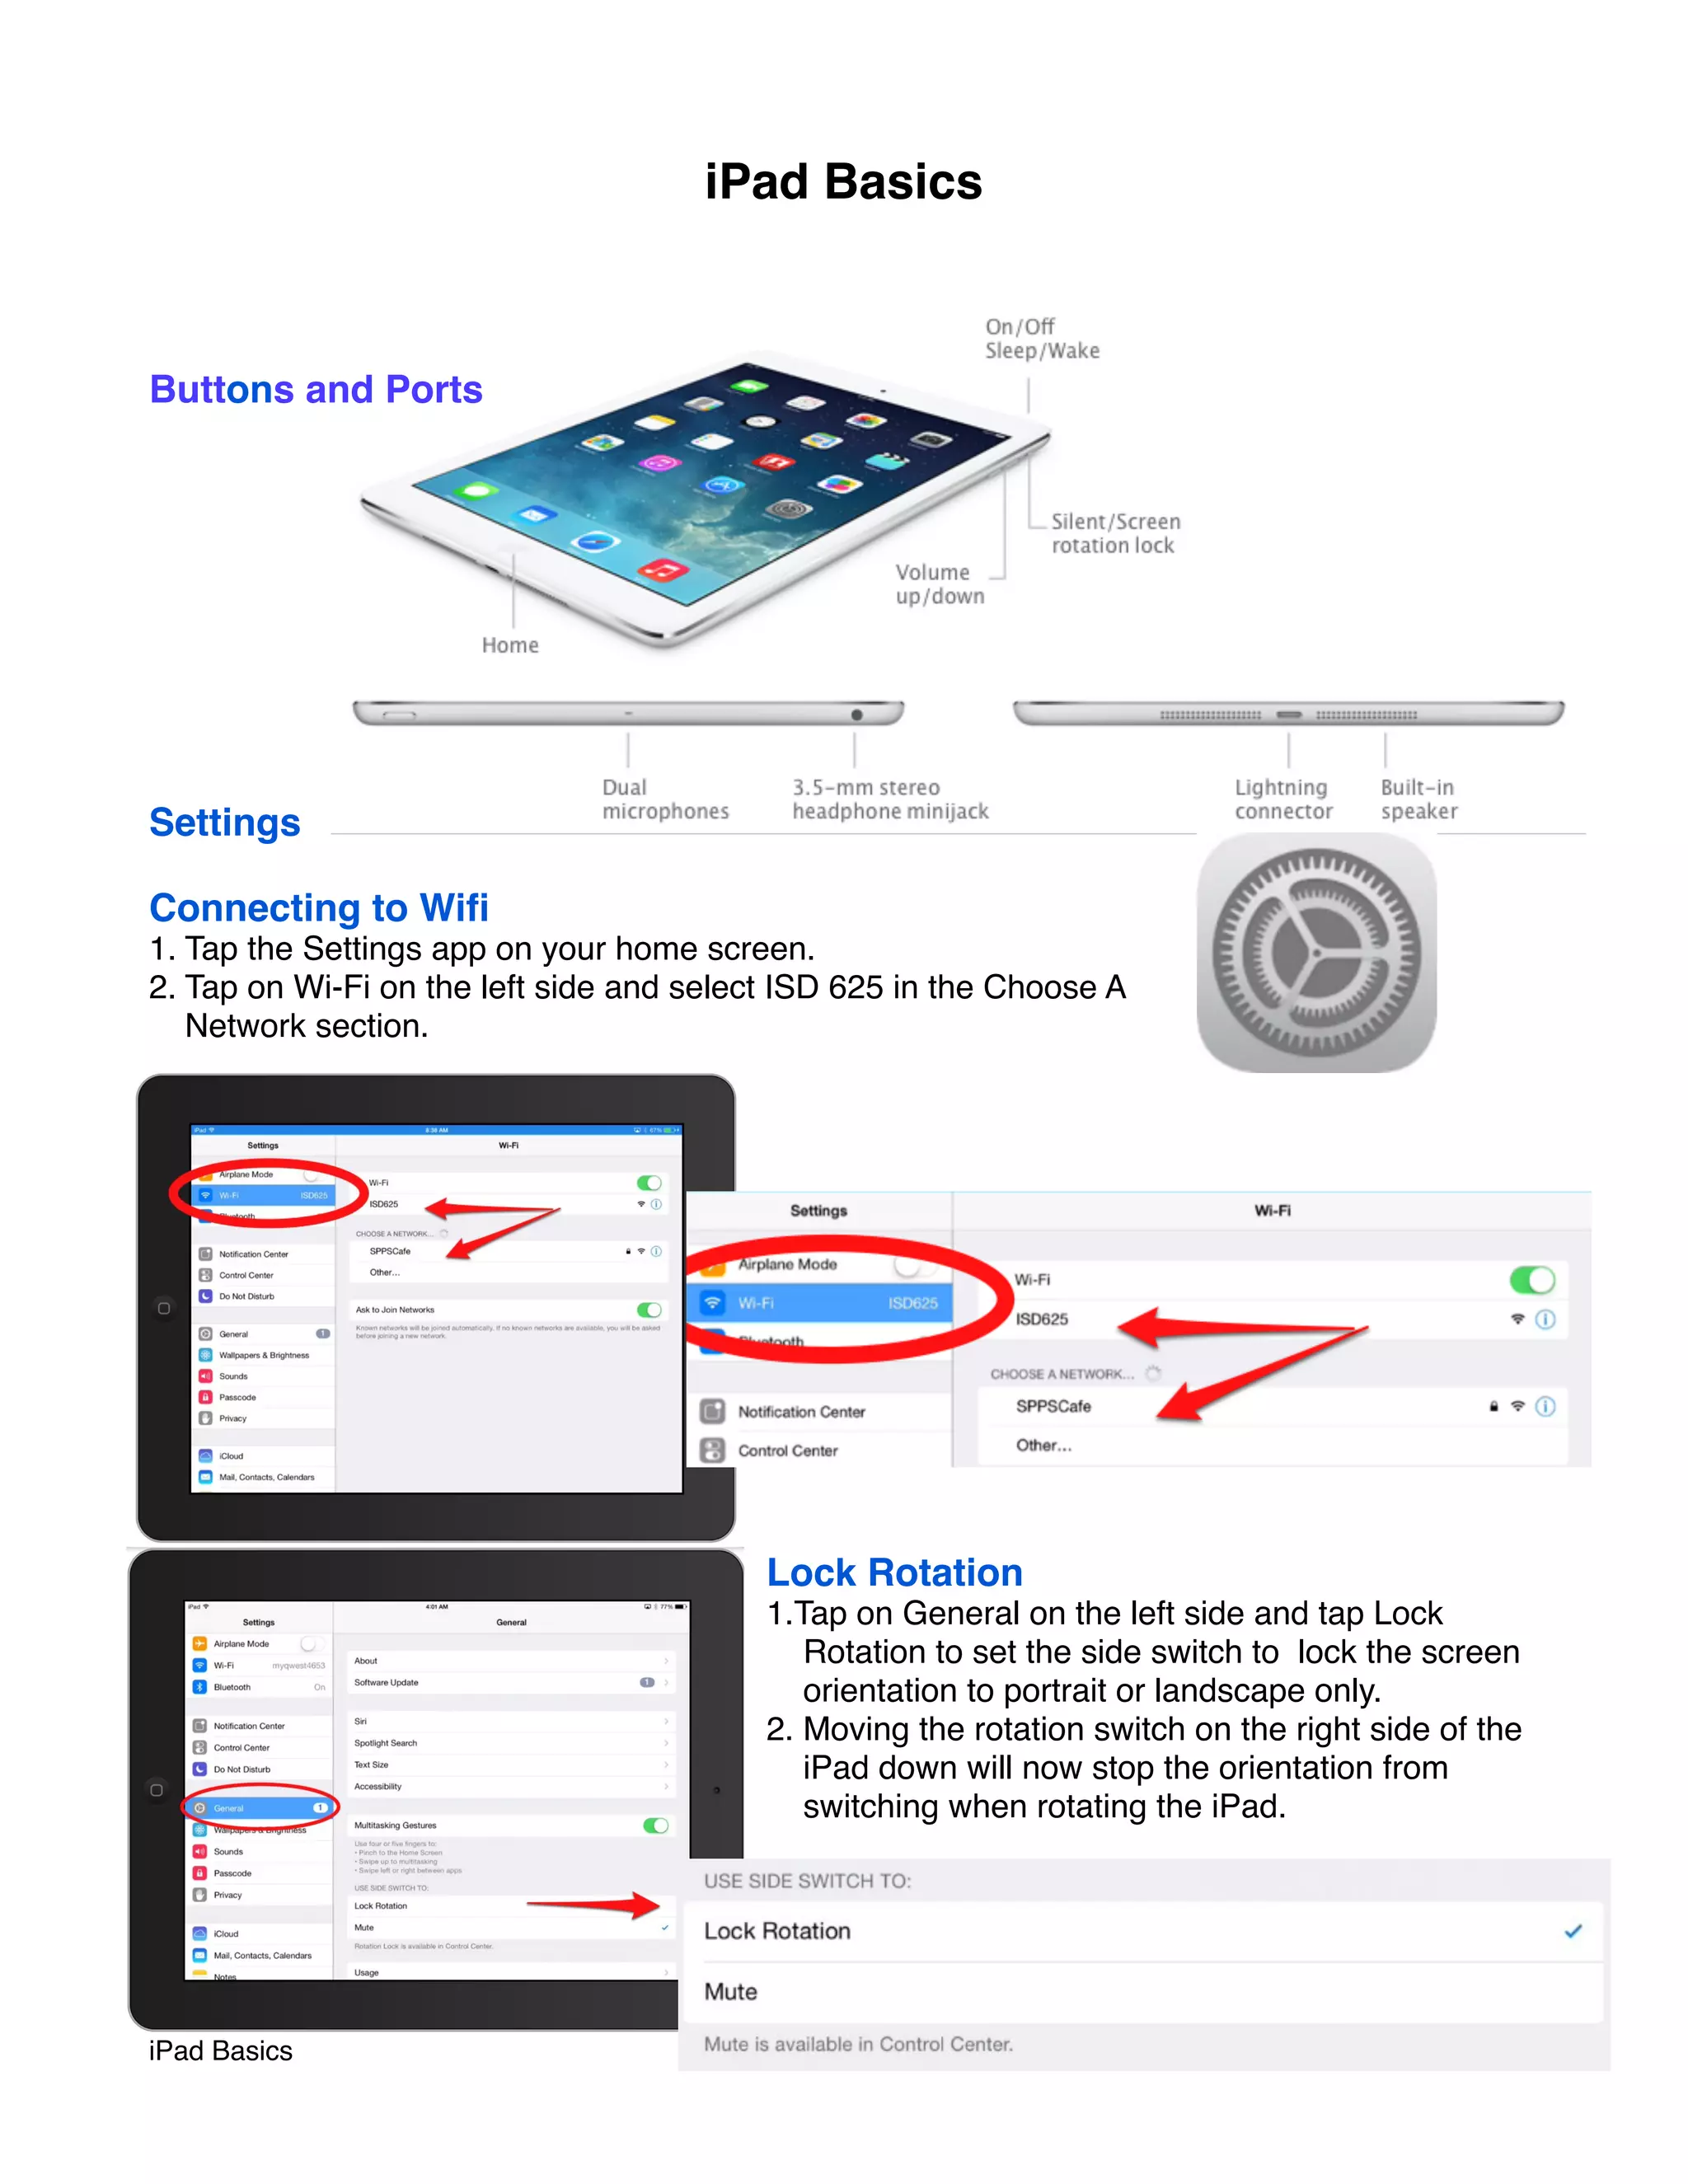
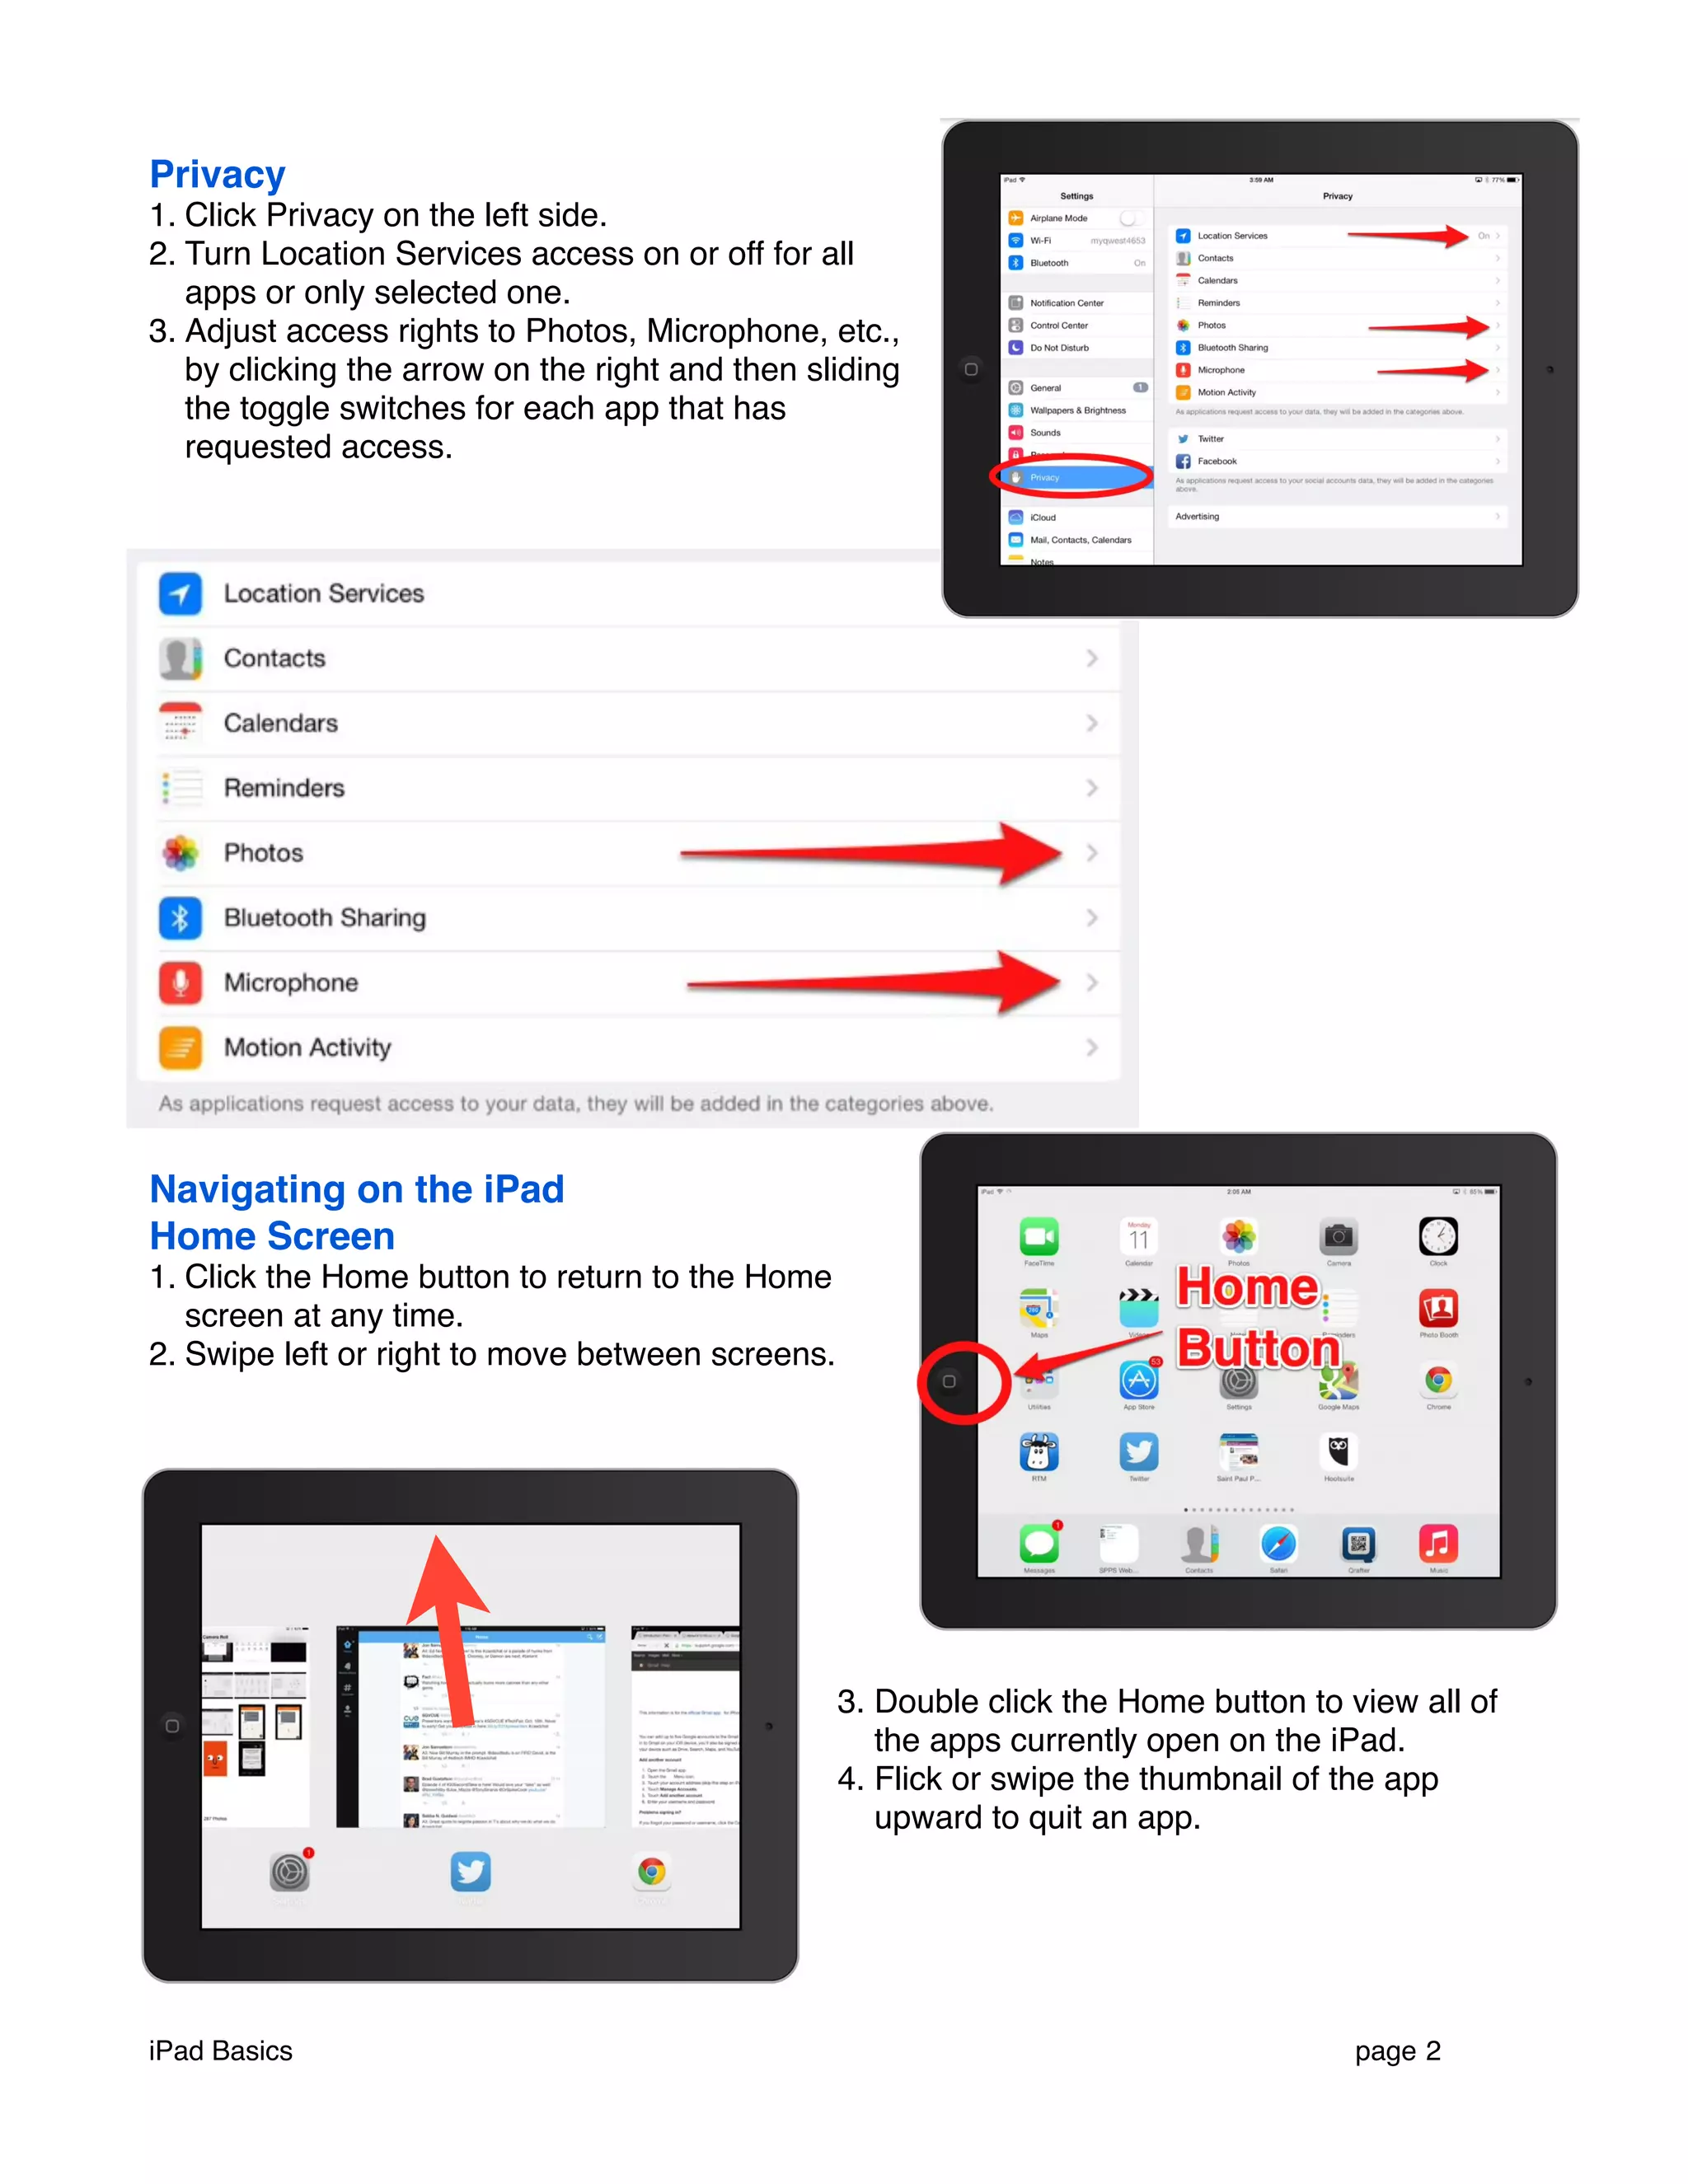
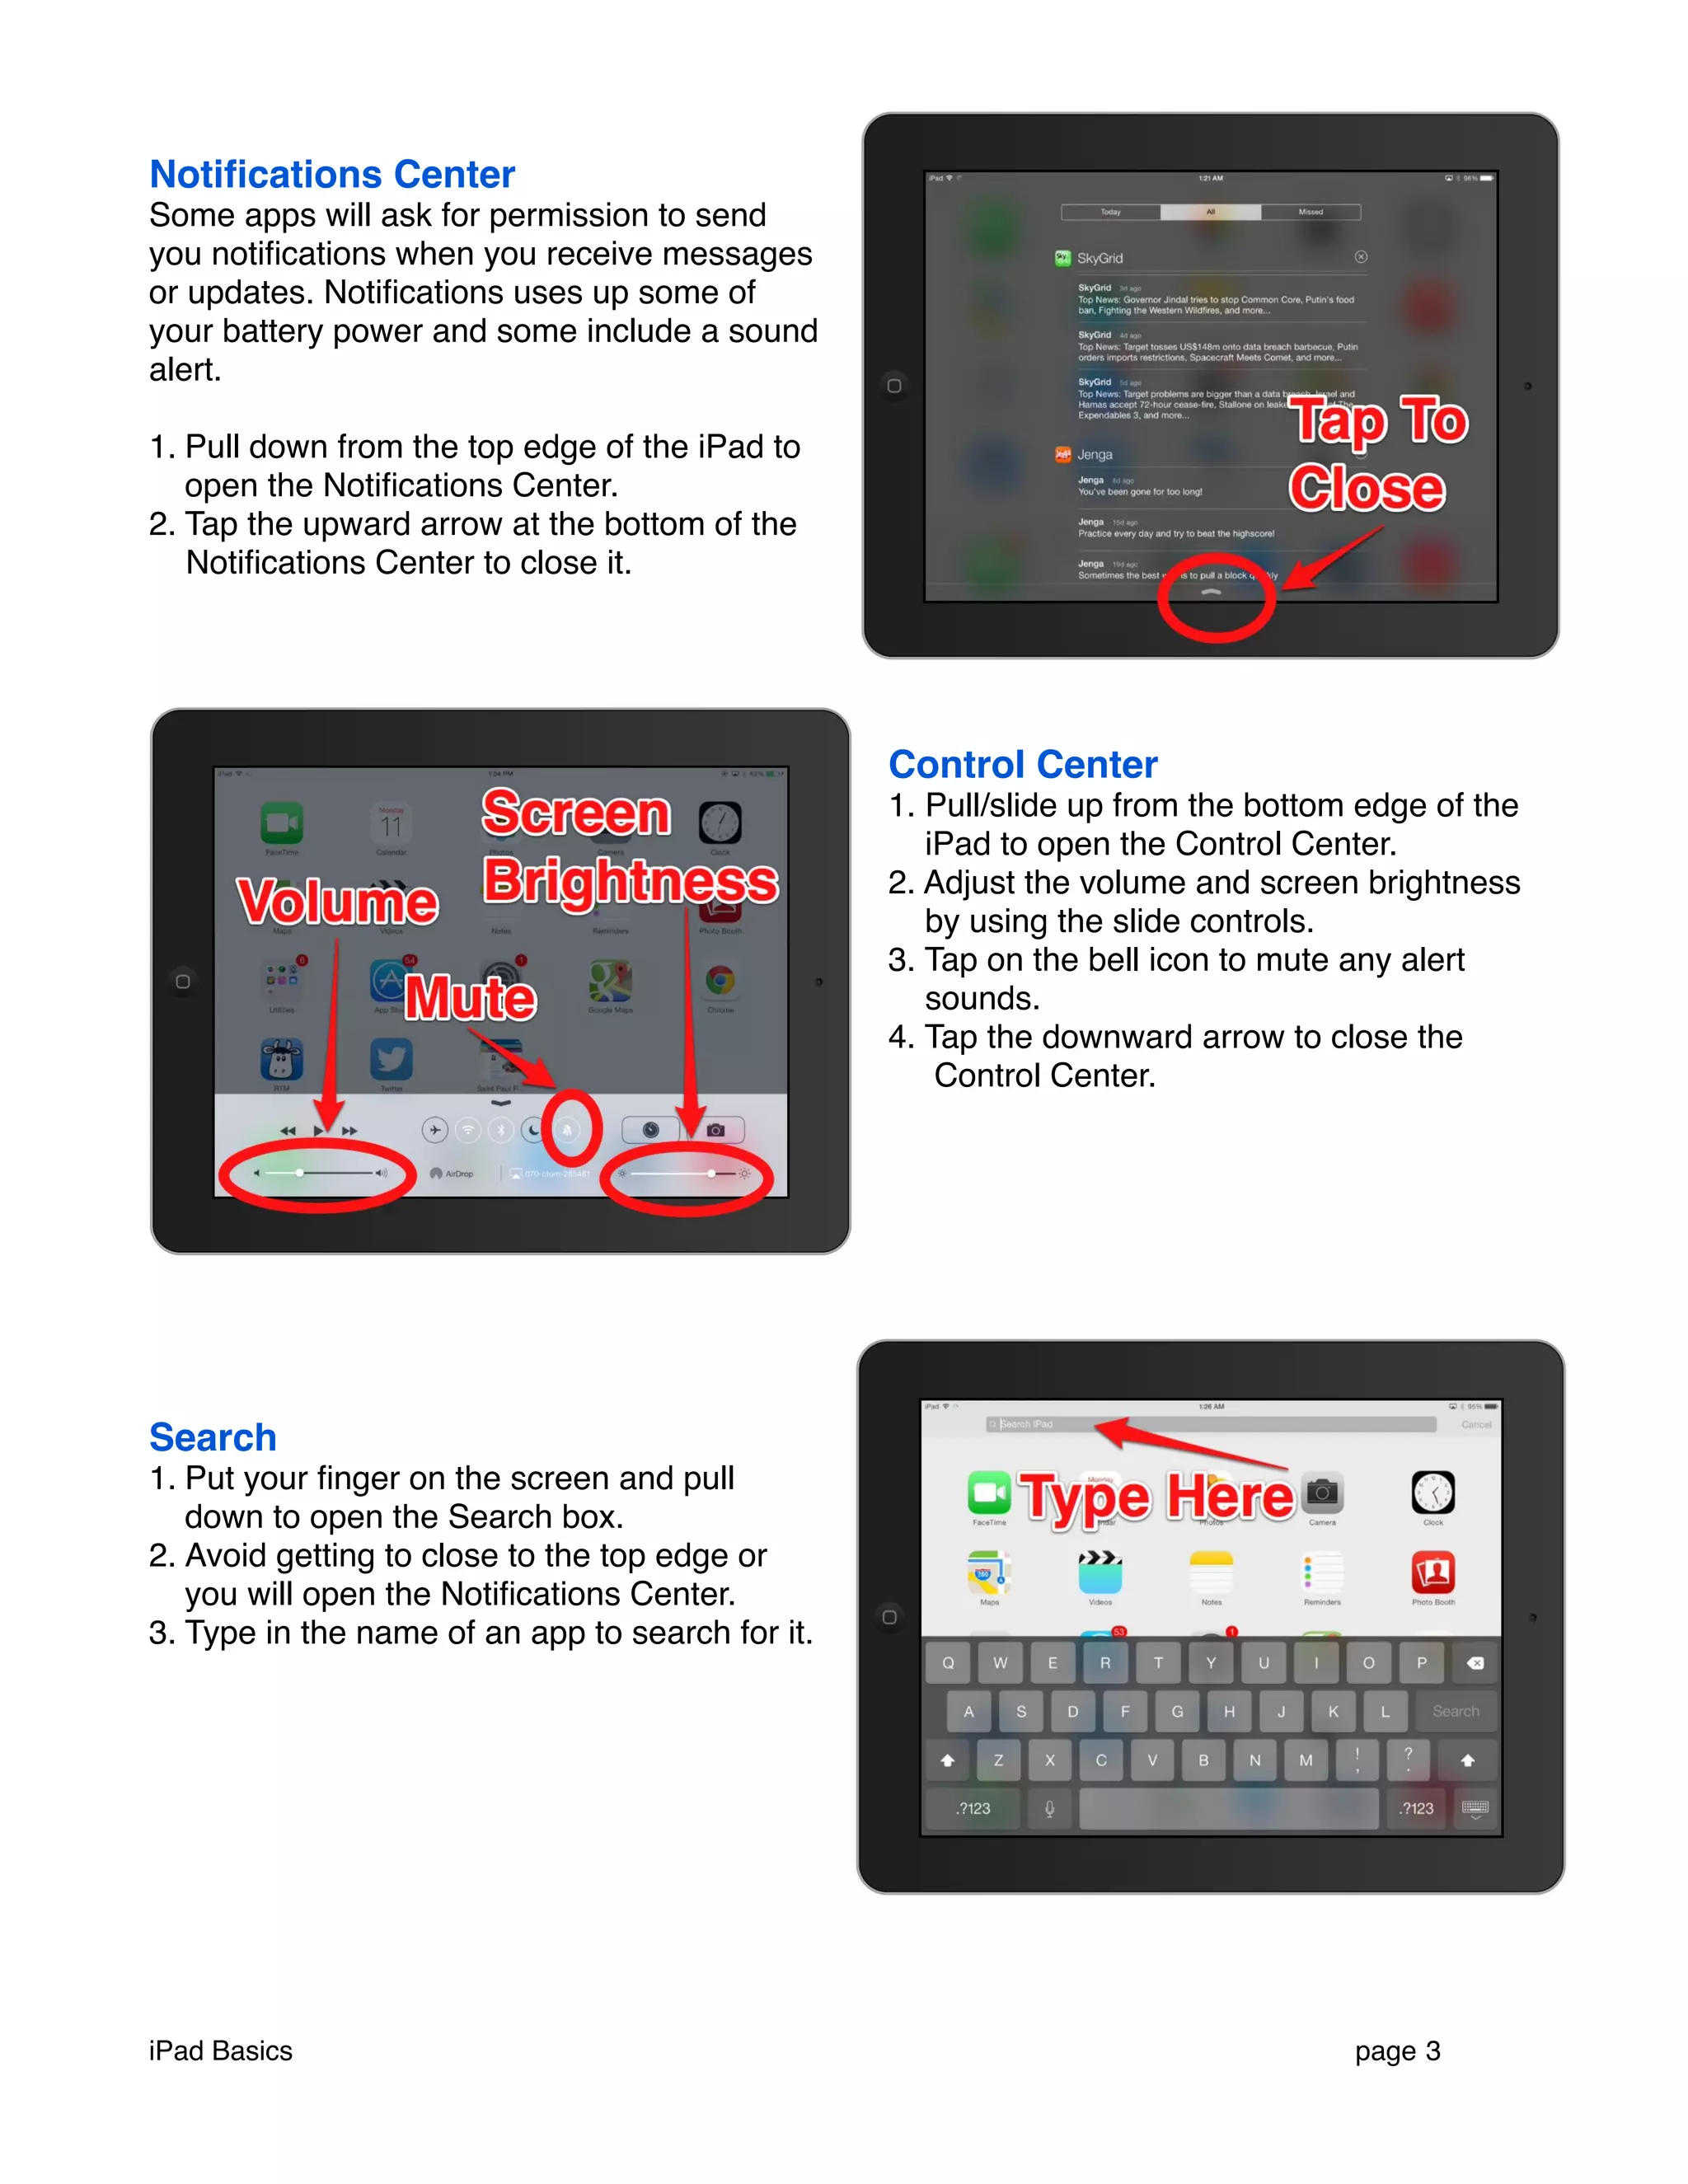
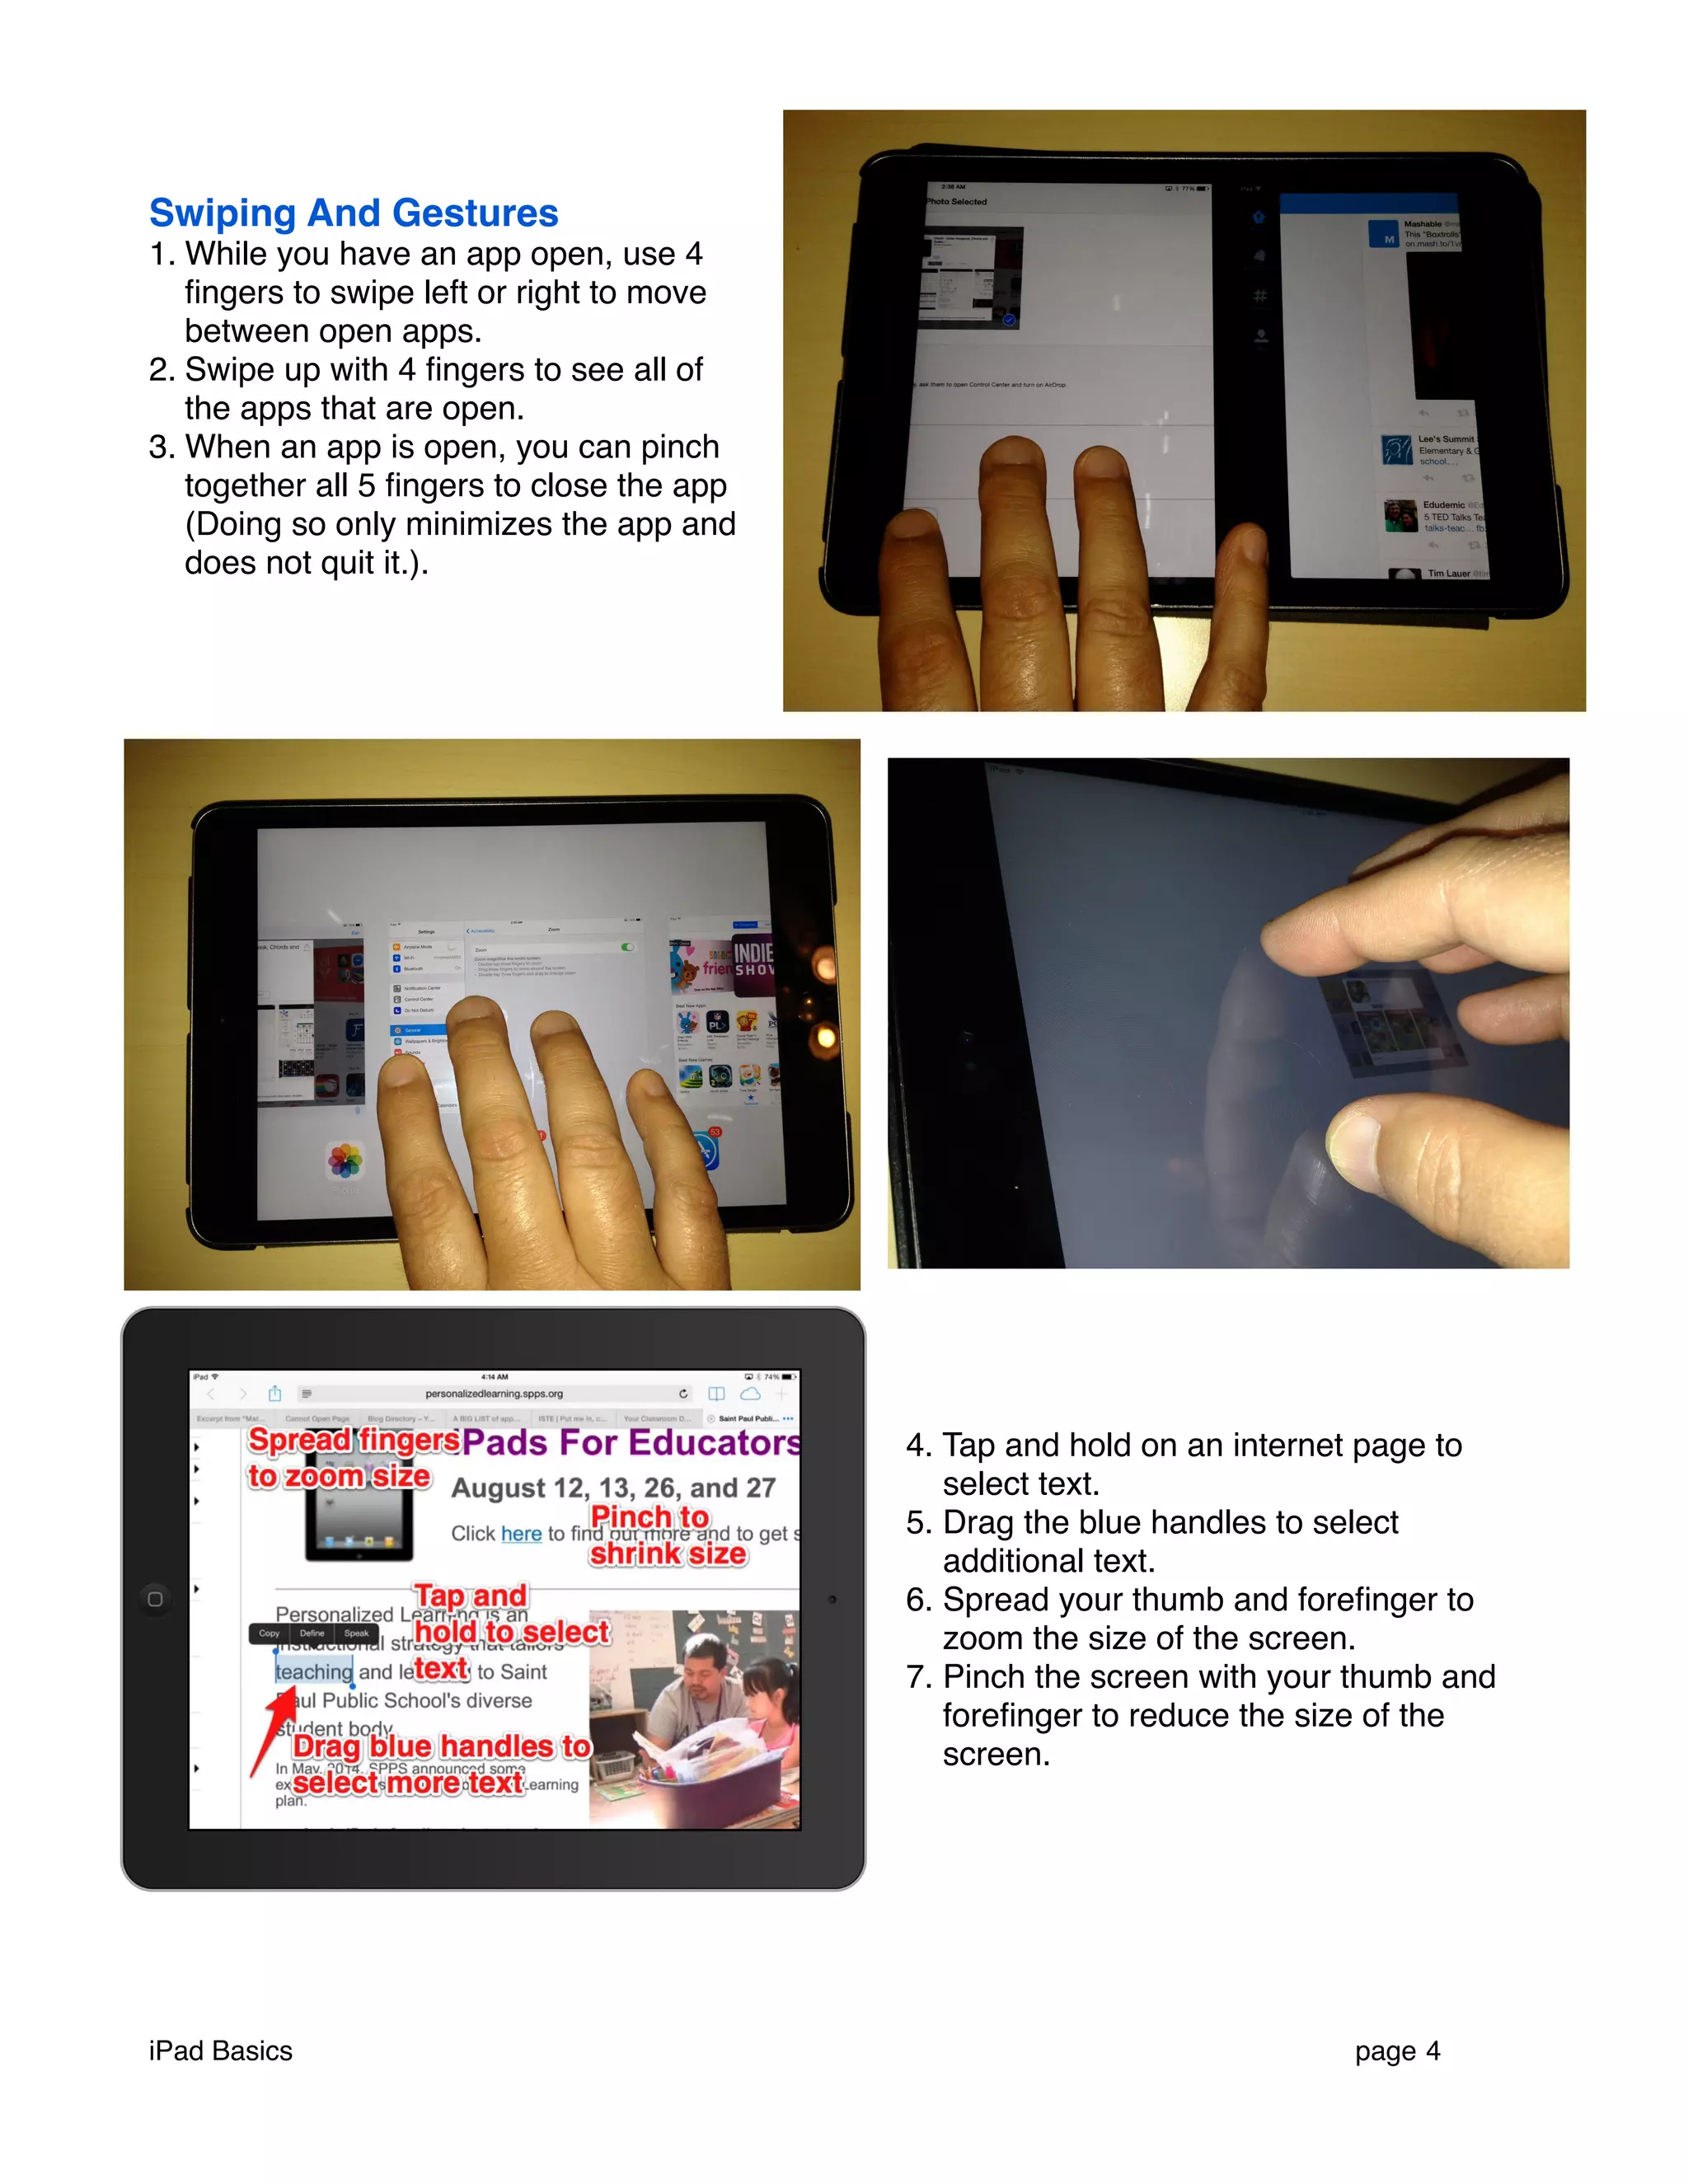
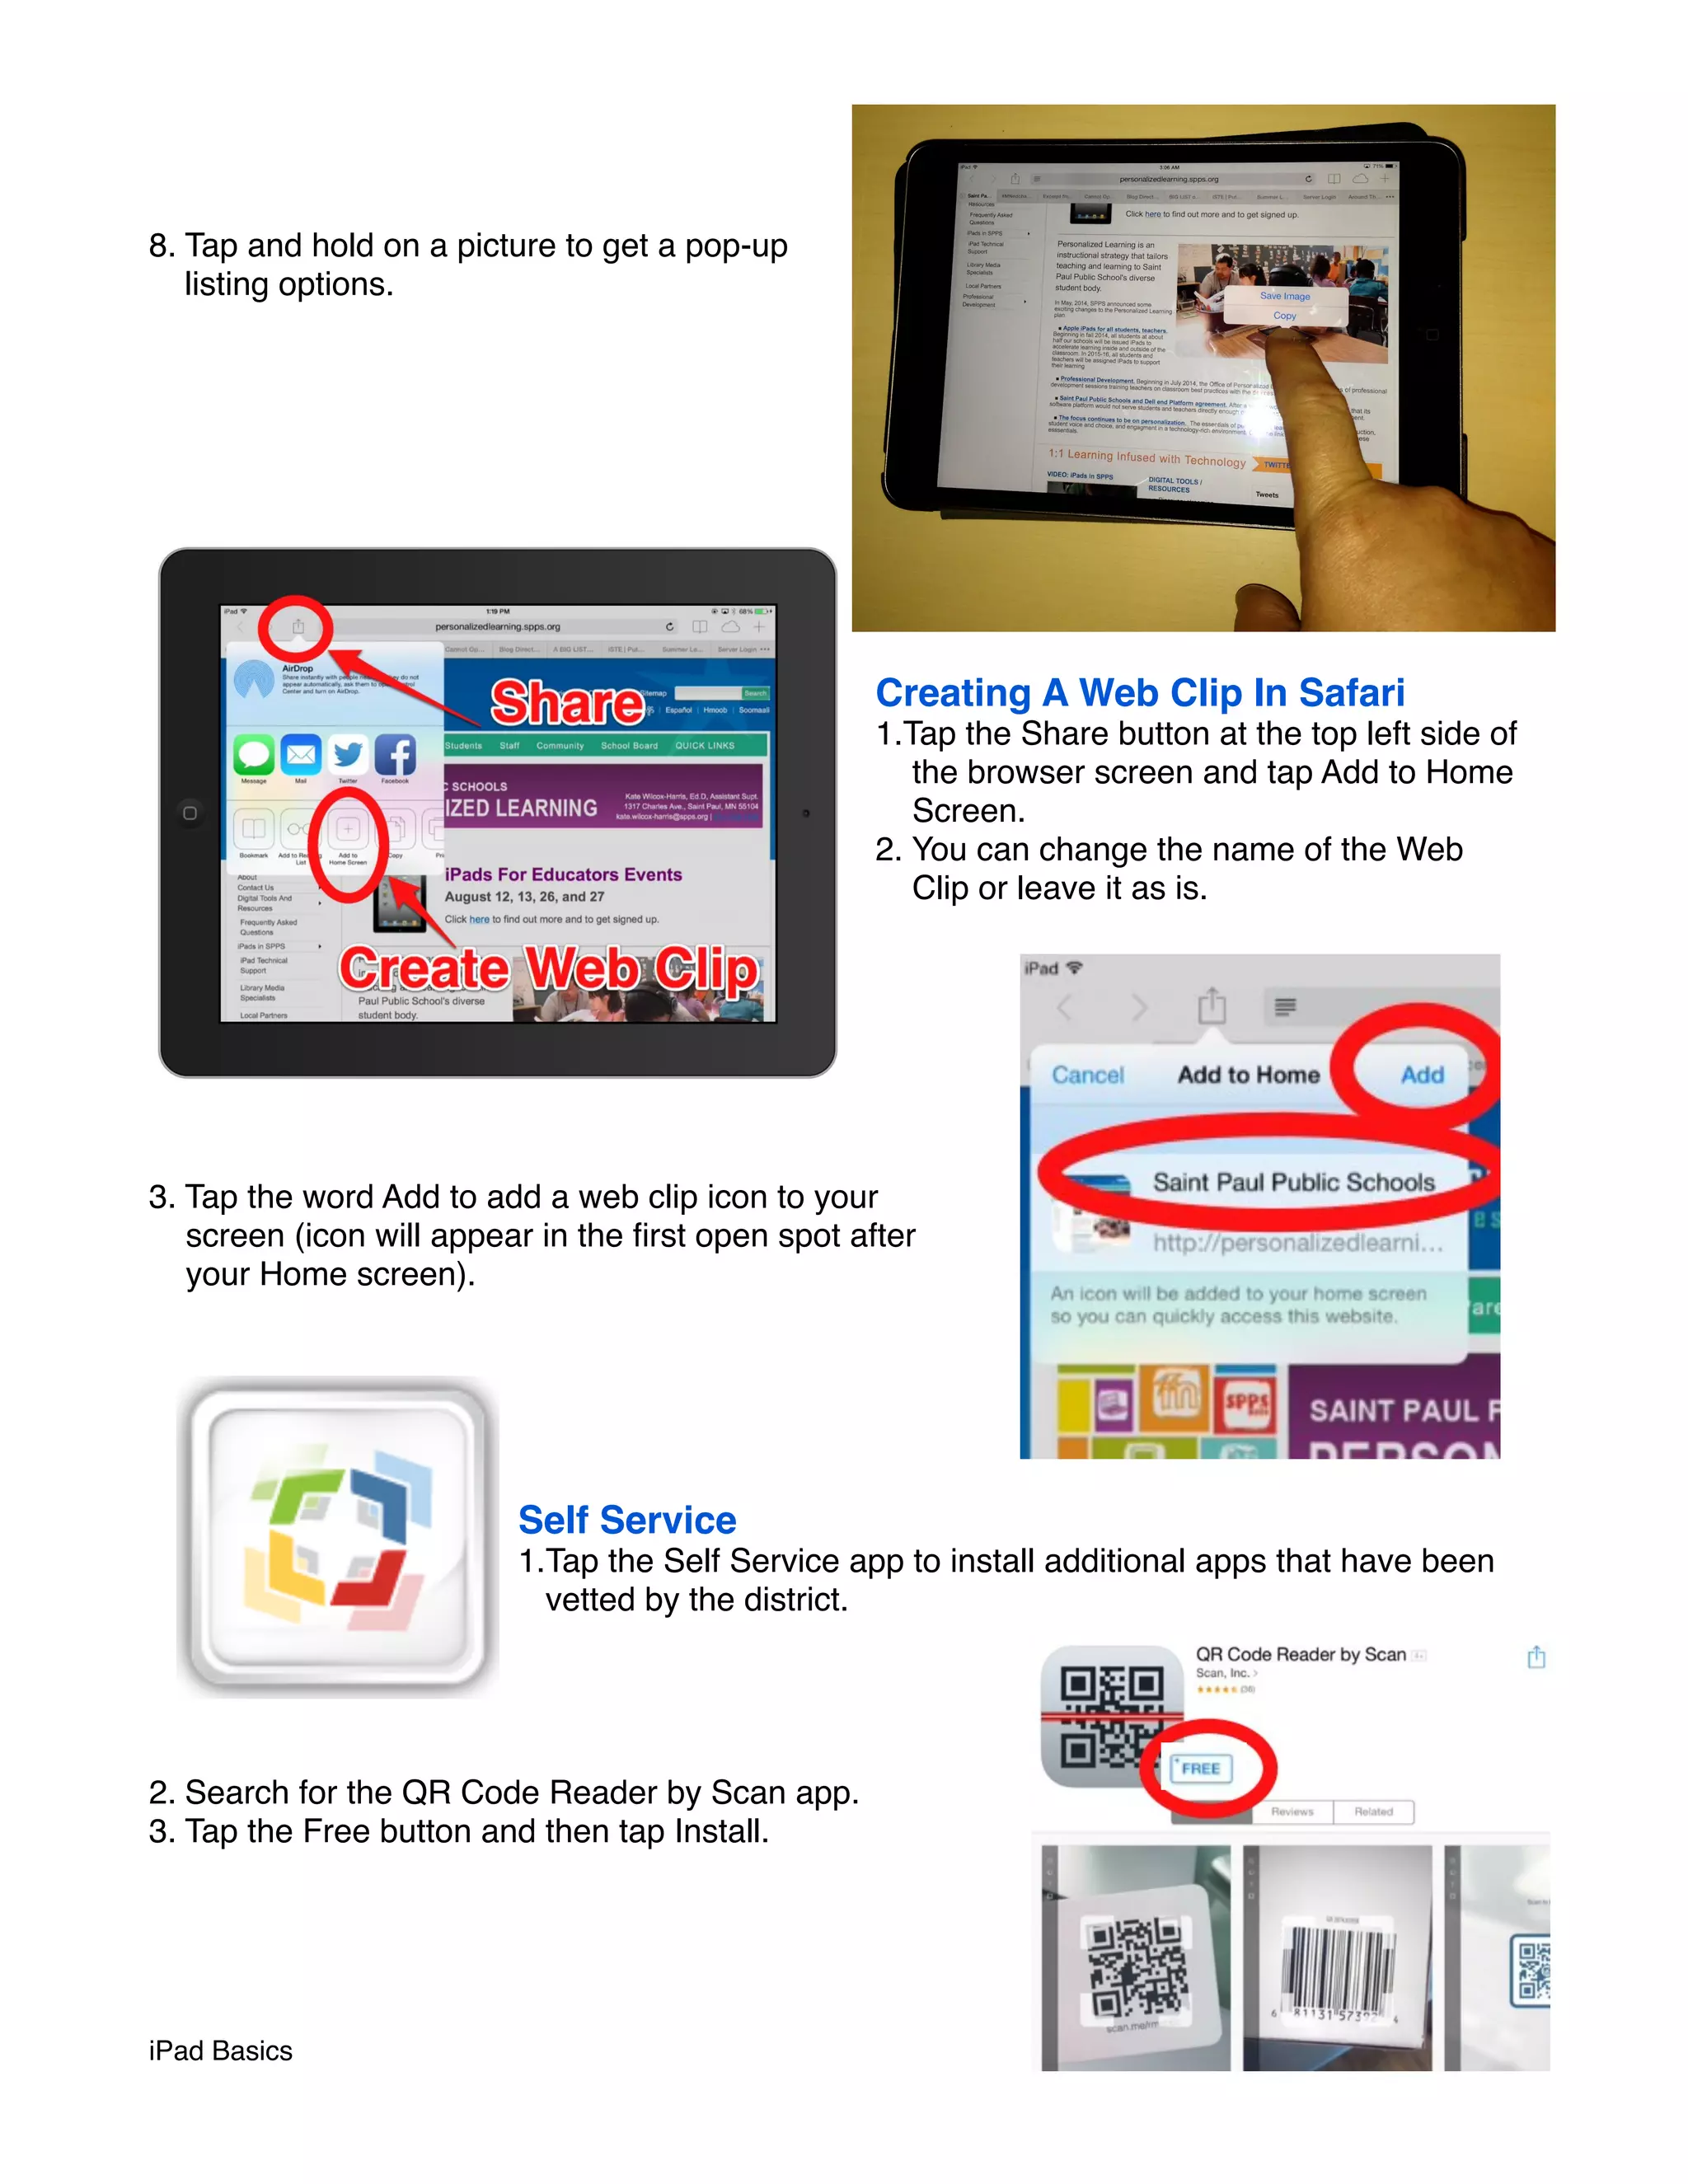
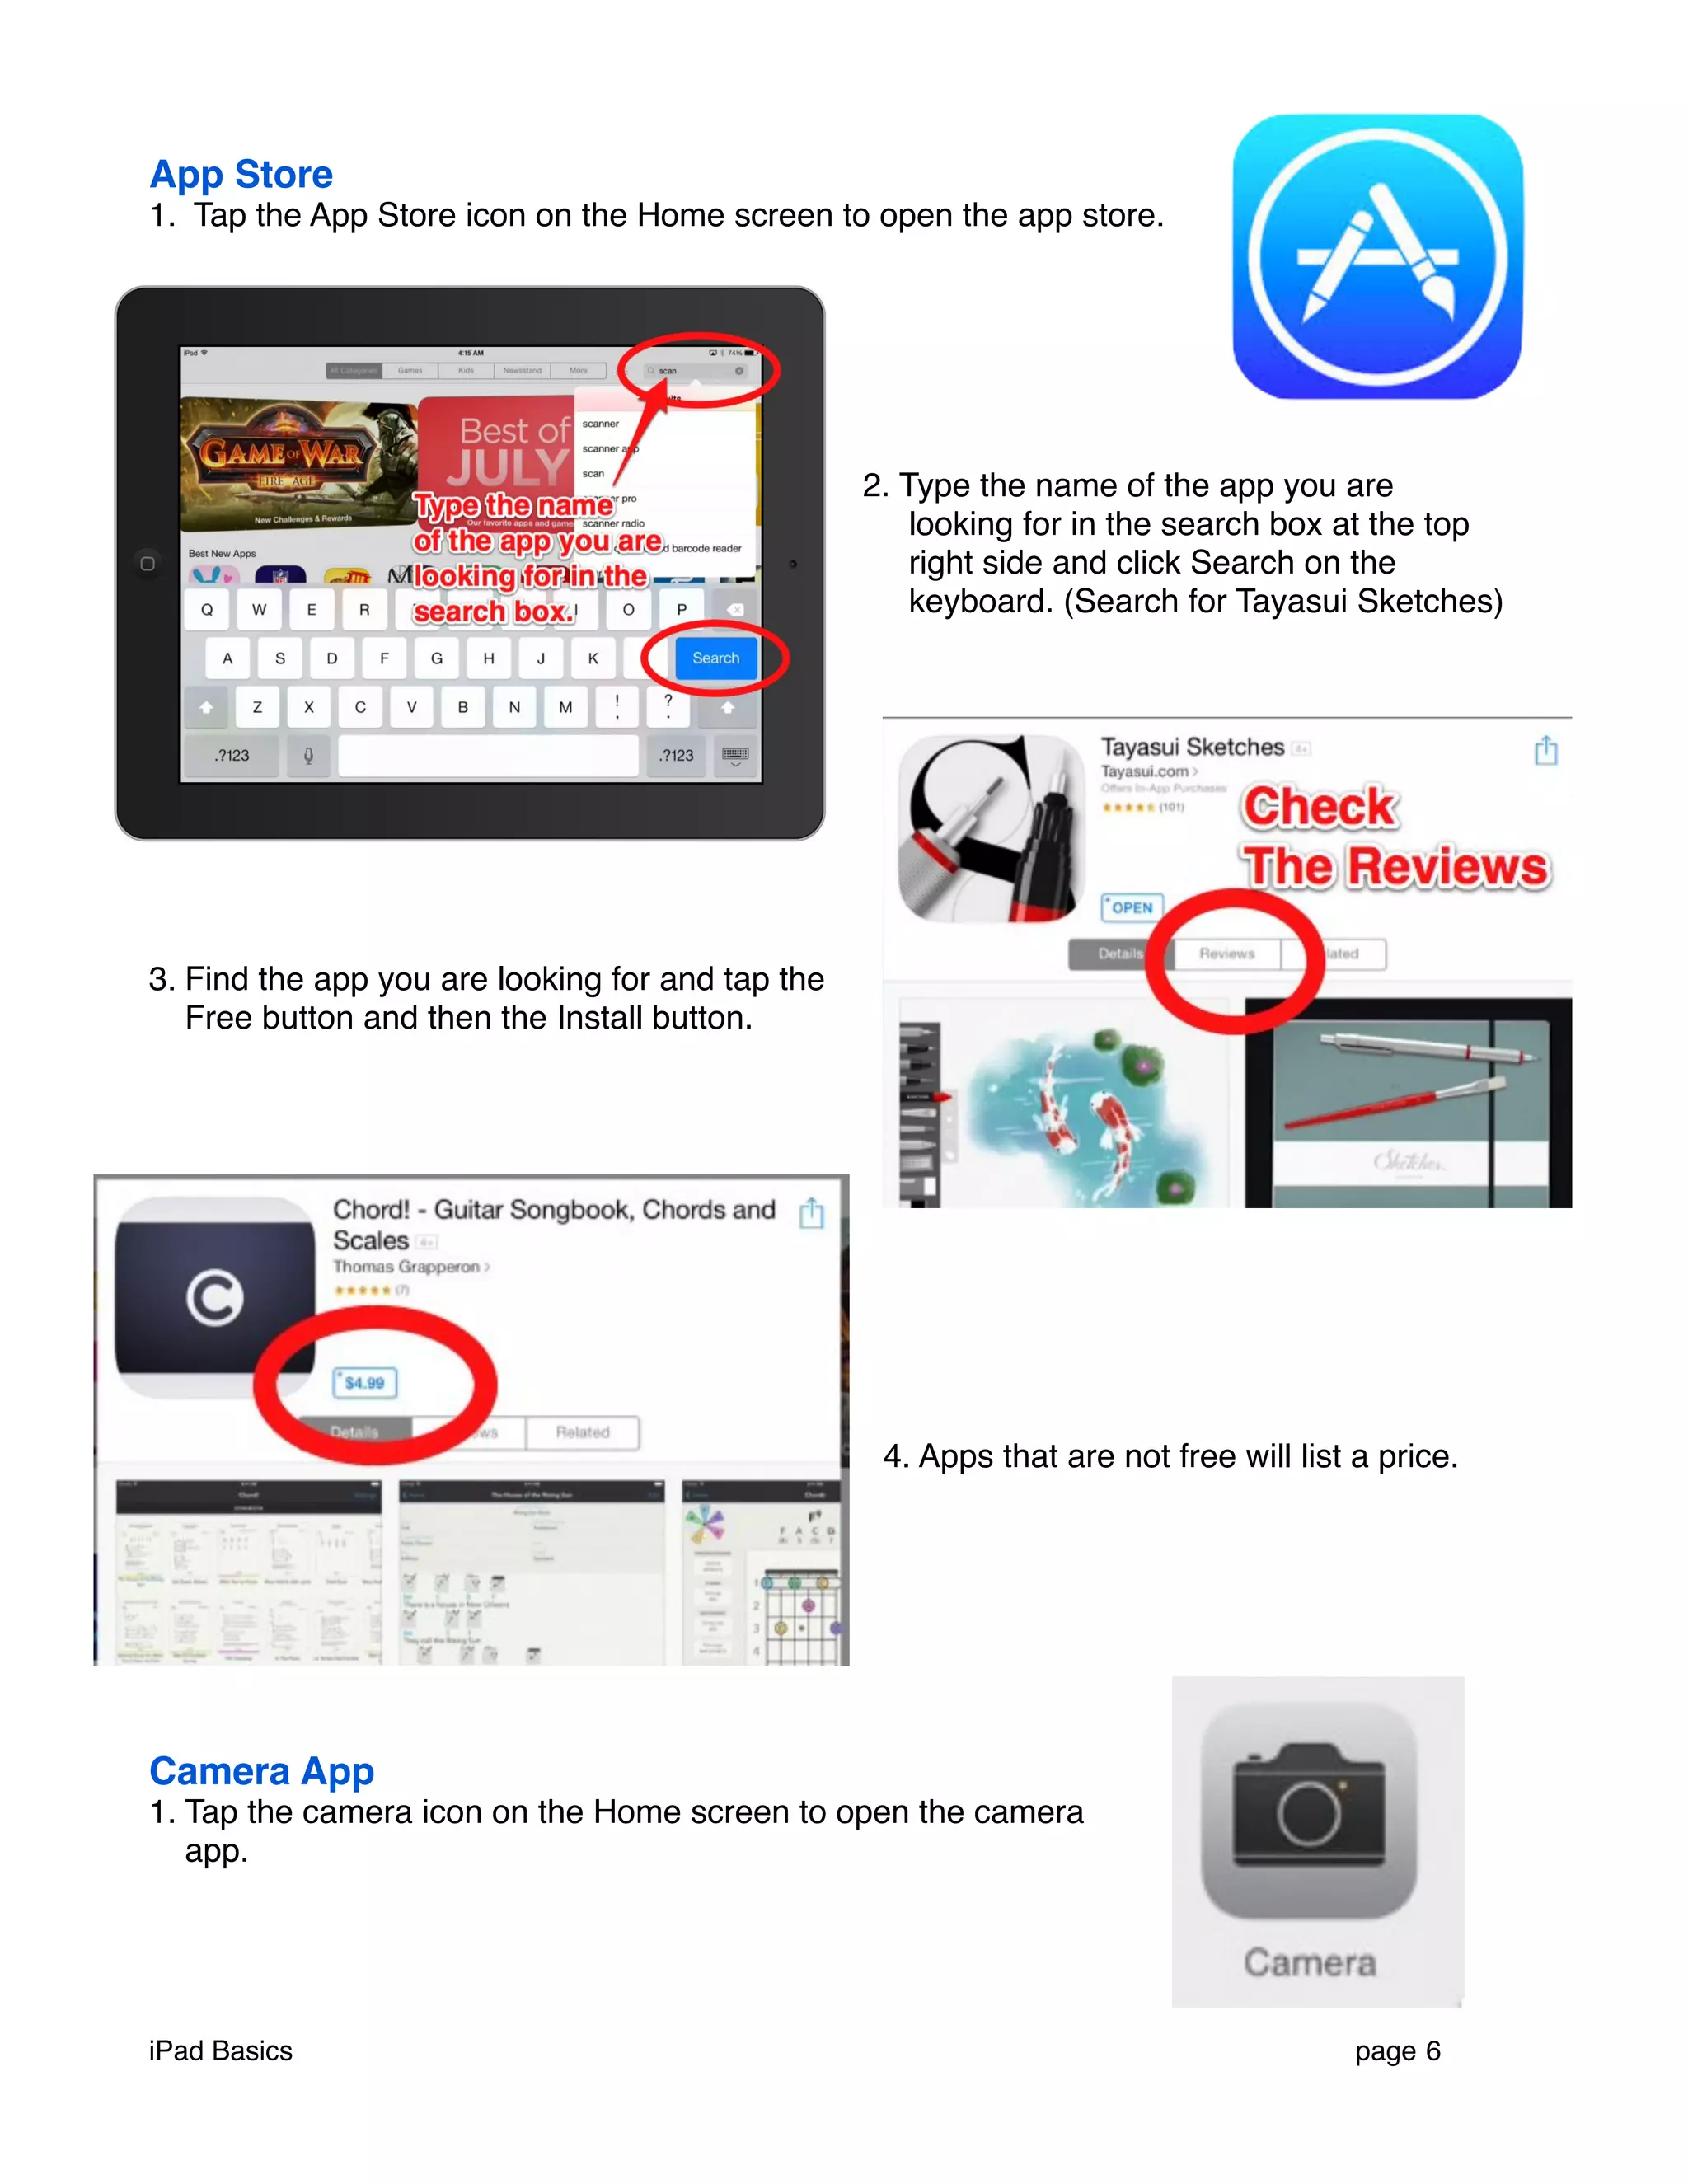
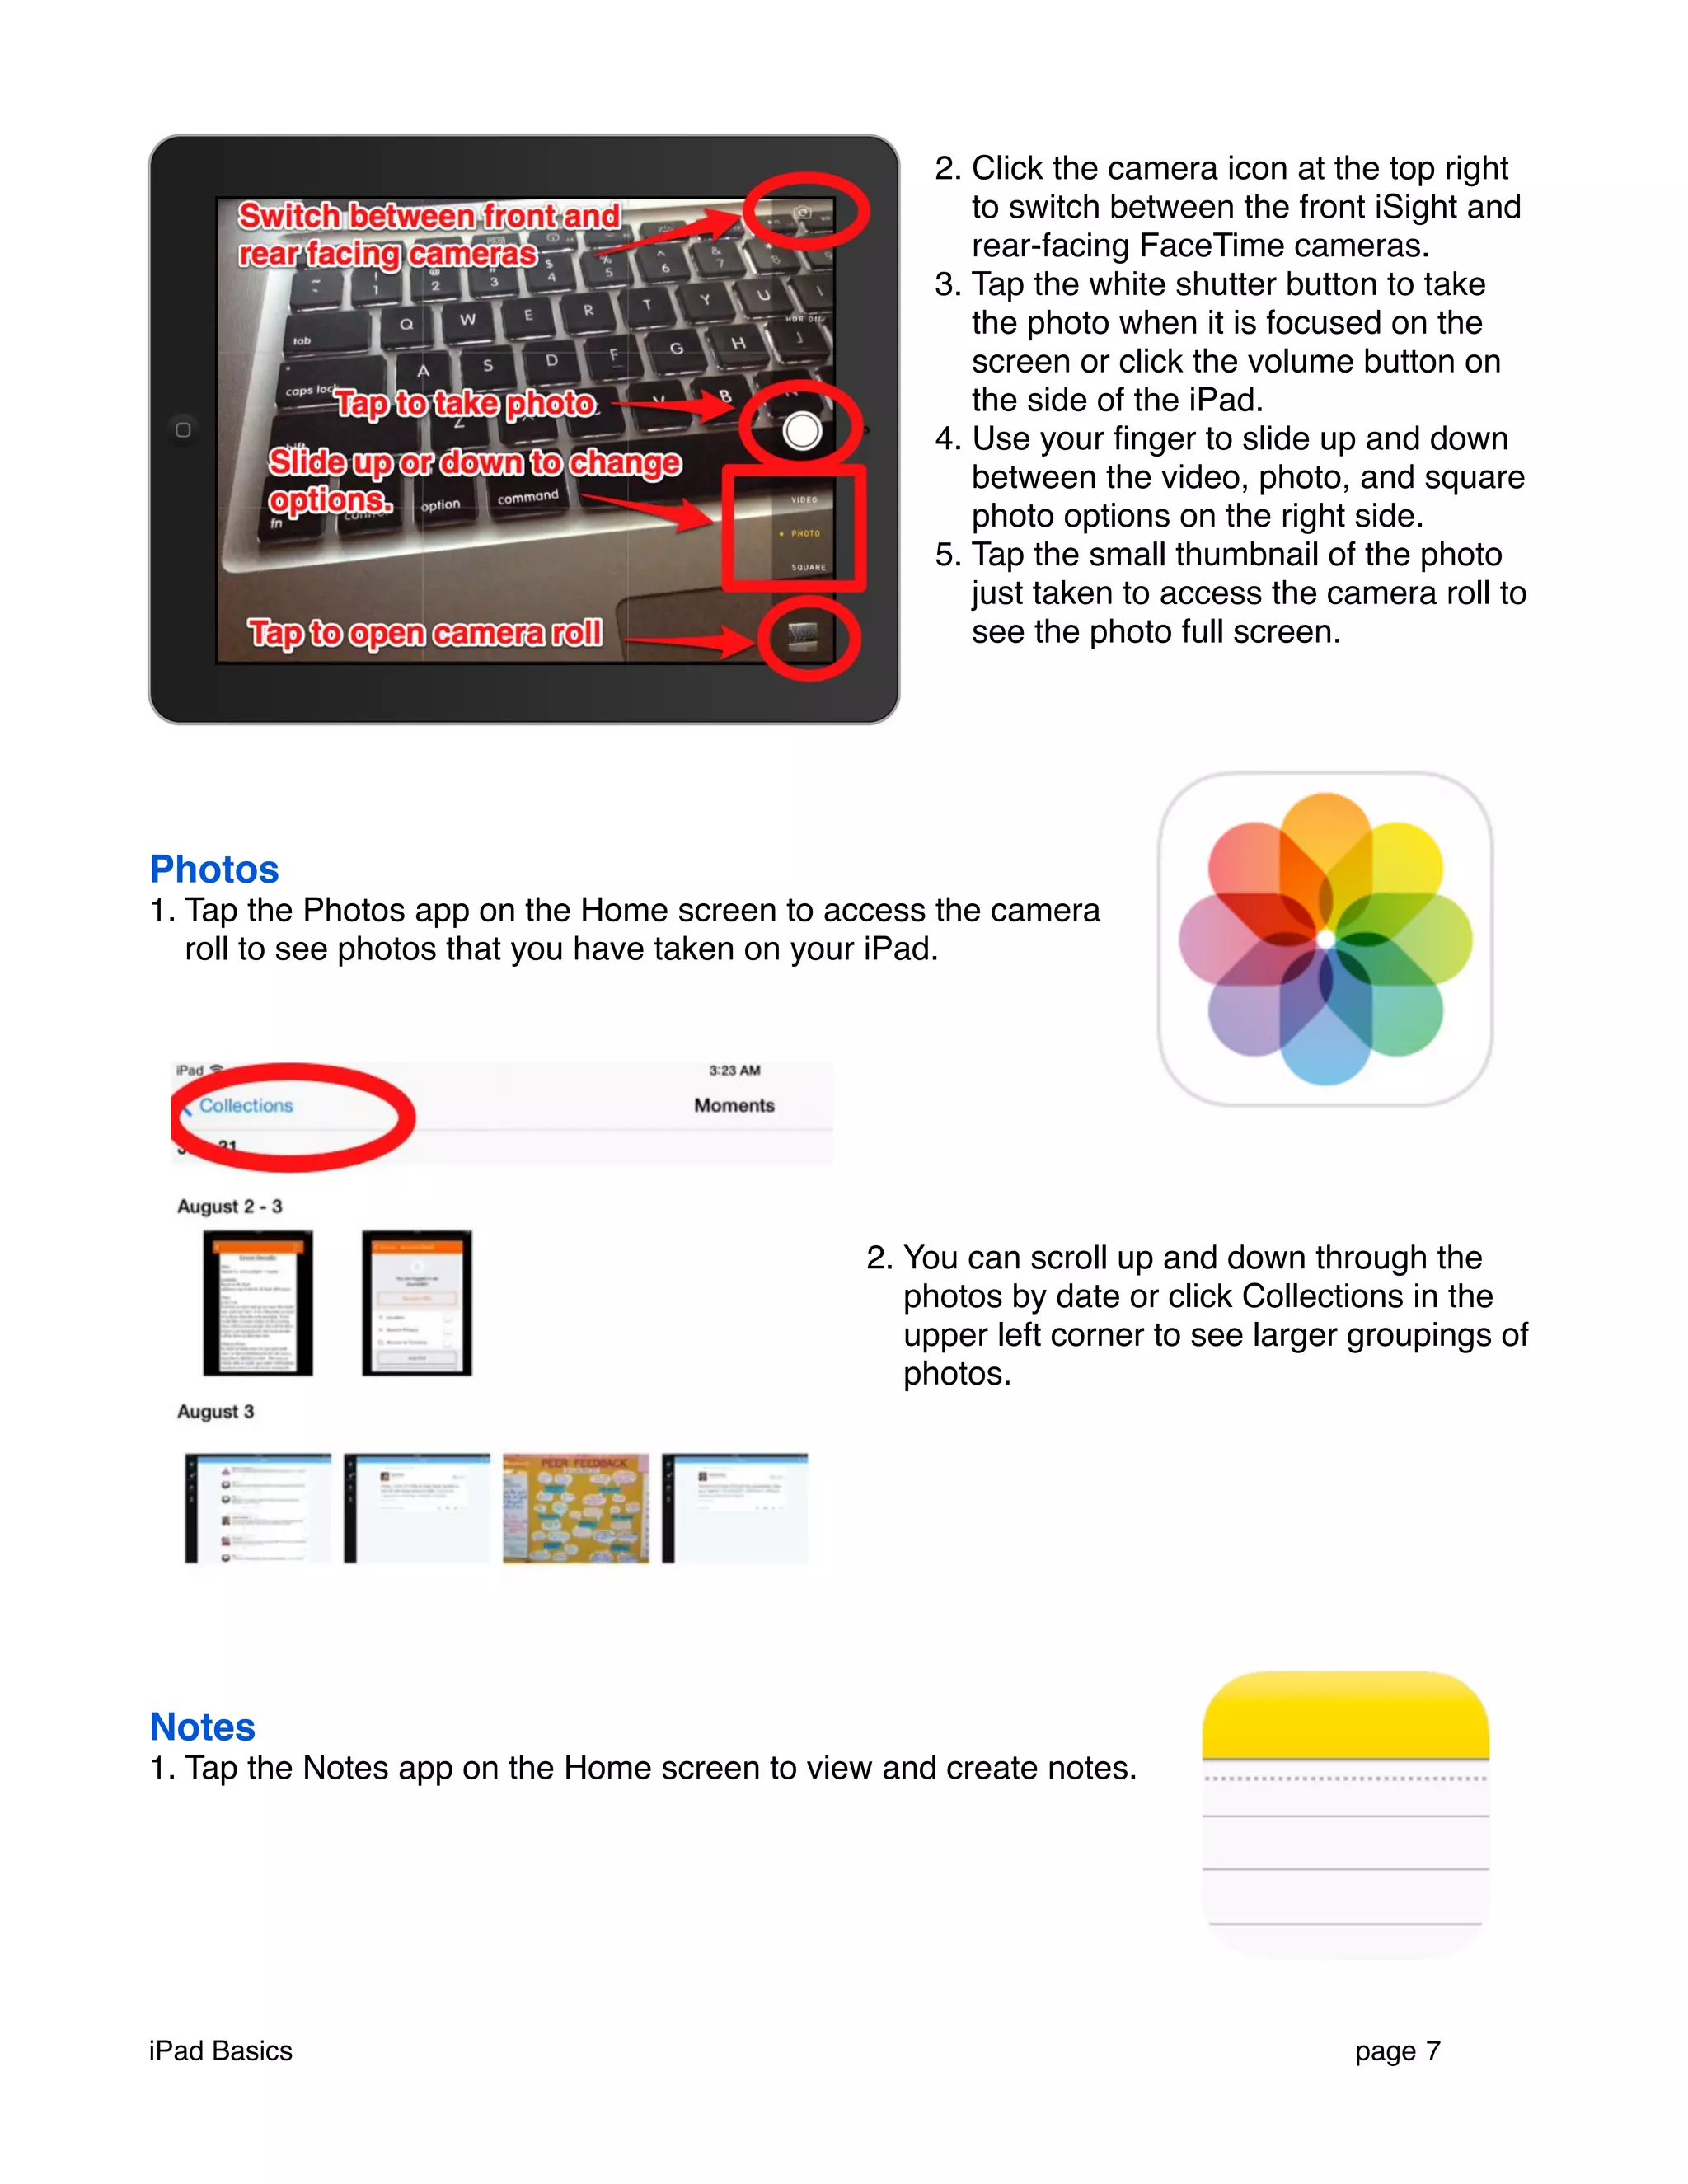
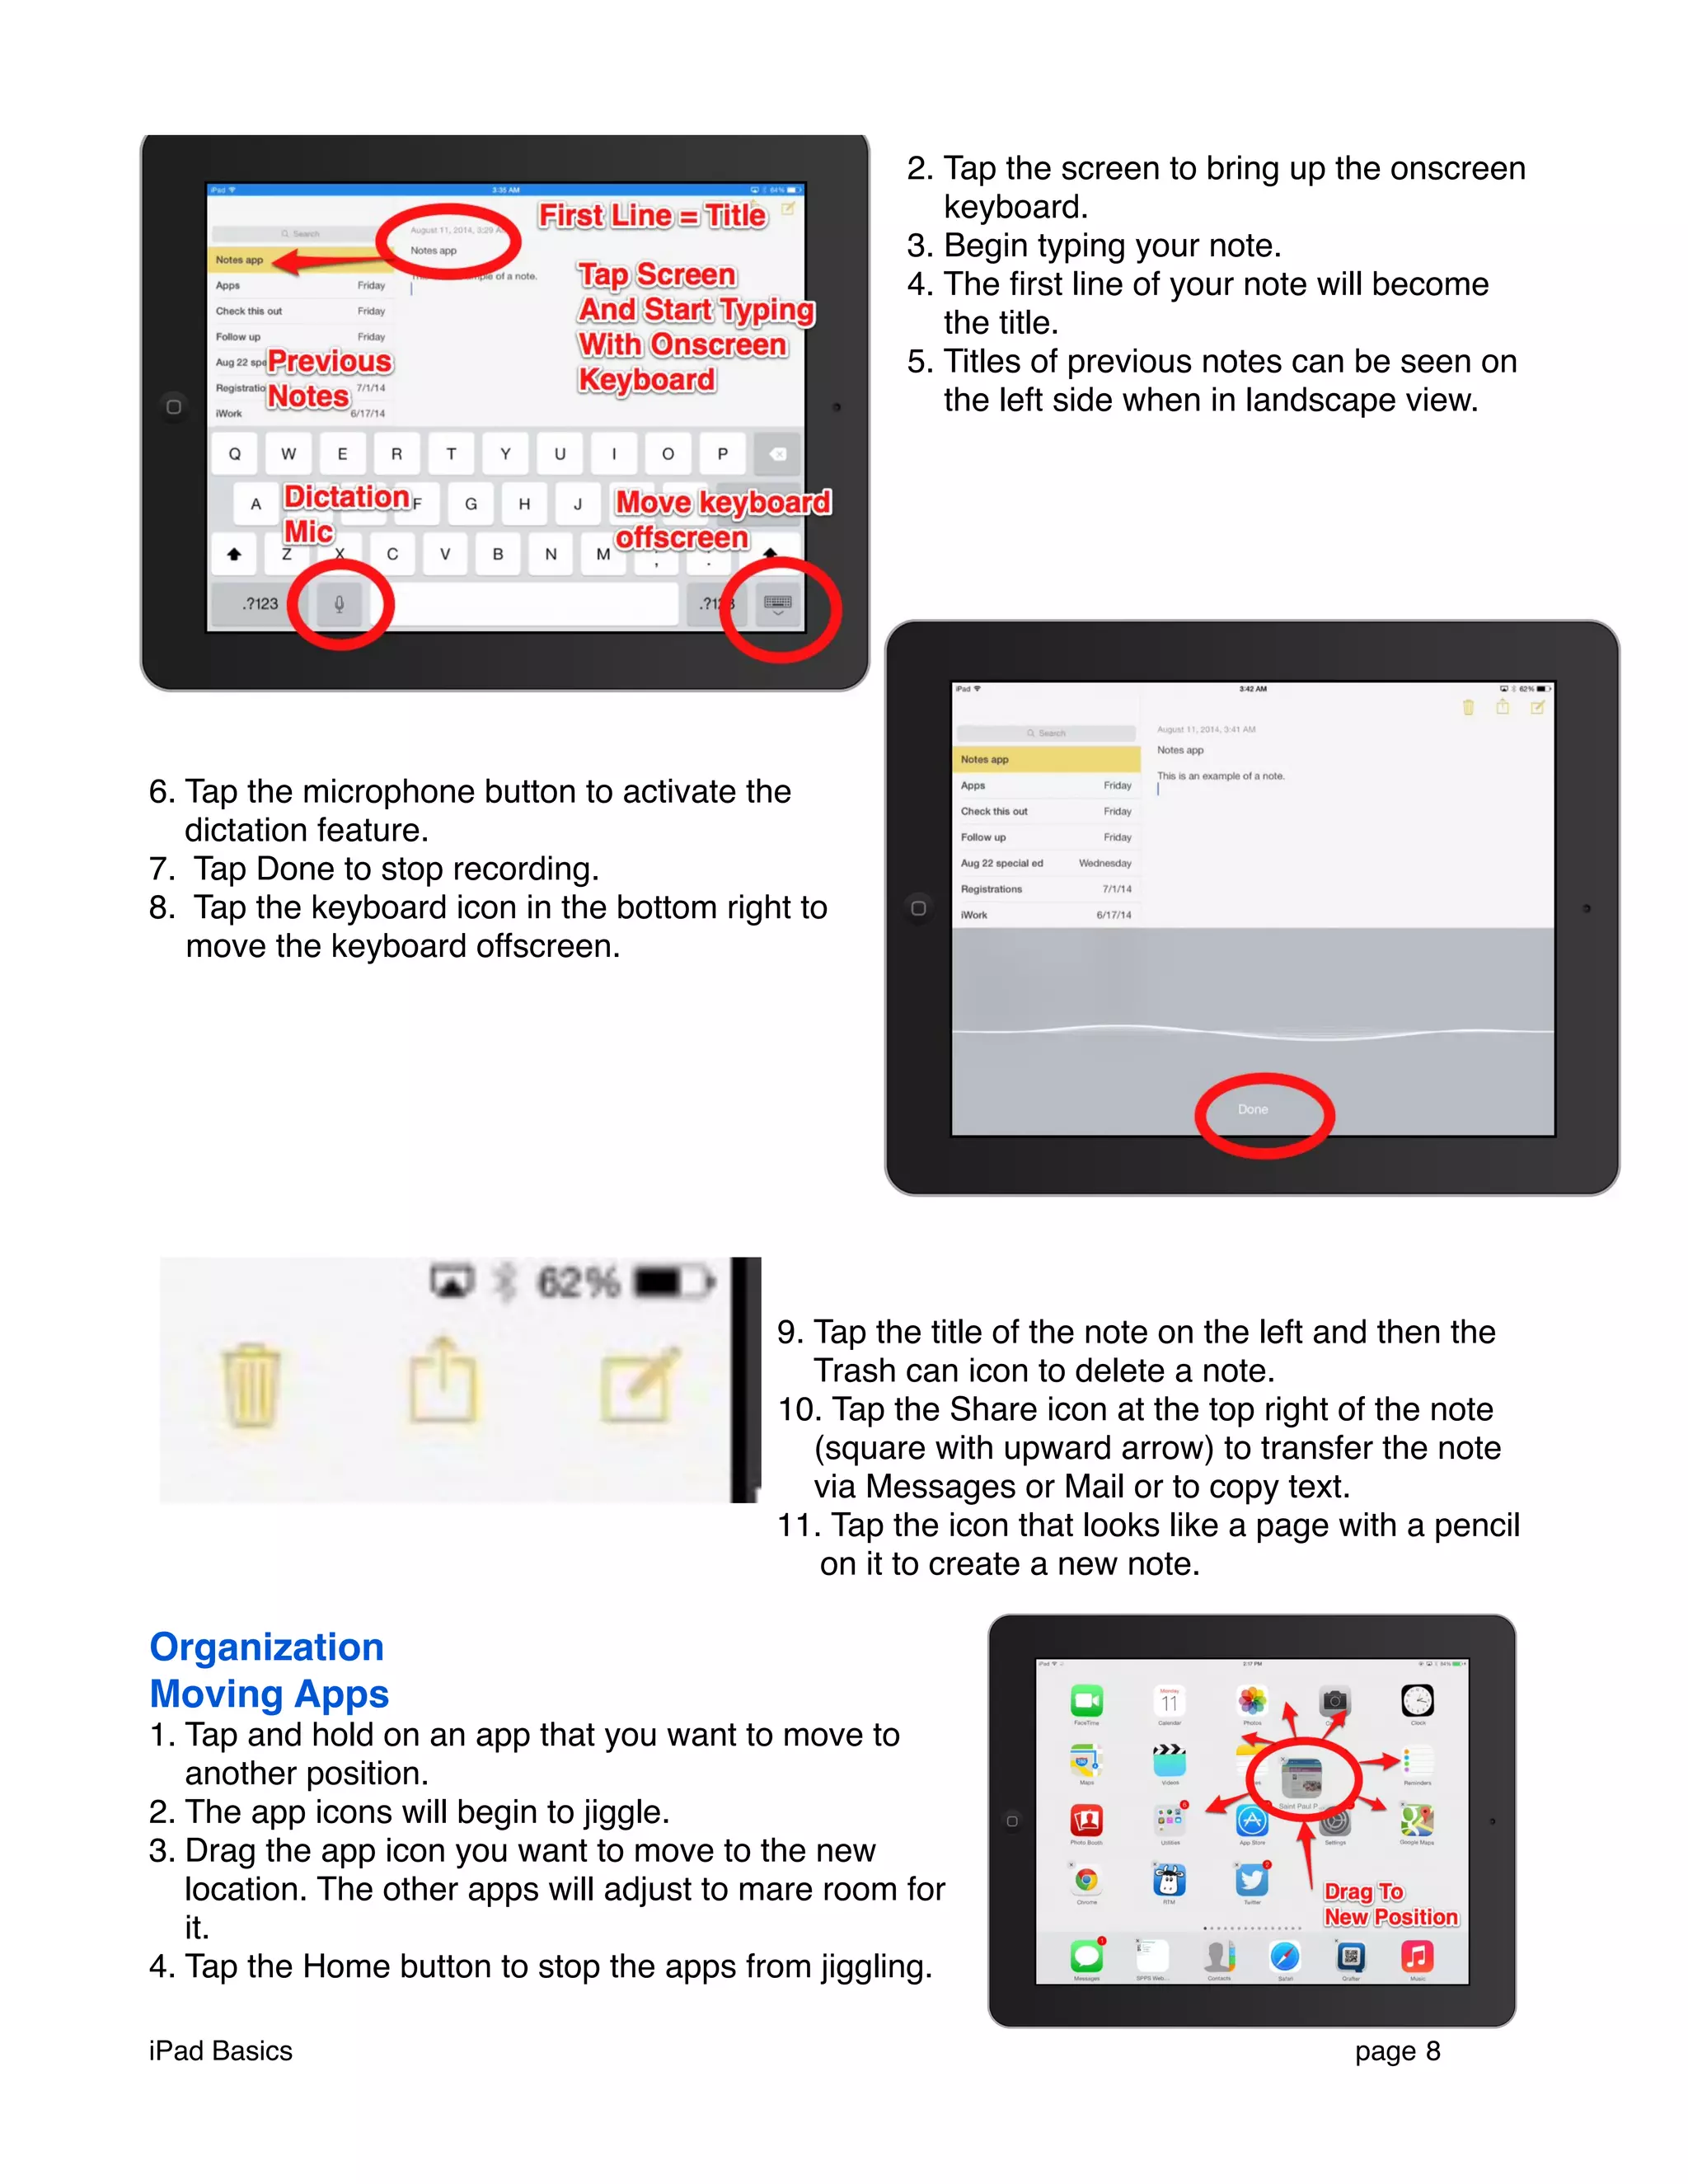
iPad Basics 
Buttons and Ports 
Settings 
Connecting to Wifi 
1. Tap the Settings app on your home screen. 
2. Tap on Wi-Fi on the left side and select ISD 625 in the Choose A 
Network section. 
Lock Rotation 
1.Tap on General on the left side and tap Lock 
Rotation to set the side switch to lock the screen 
orientation to portrait or landscape only. 
2. Moving the rotation switch on the right side of the 
iPad down will now stop the orientation from 
switching when rotating the iPad. 
iPad Basics ! page 1
Privacy 
1. Click Privacy on the left side. 
2. Turn Location Services access on or off for all 
apps or only selected one. 
3. Adjust access rights to Photos, Microphone, etc., 
by clicking the arrow on the right and then sliding 
the toggle switches for each app that has 
requested access. 
Navigating on the iPad 
Home Screen 
1. Click the Home button to return to the Home 
screen at any time. 
2. Swipe left or right to move between screens. 
3. Double click the Home button to view all of 
the apps currently open on the iPad. 
4. Flick or swipe the thumbnail of the app 
upward to quit an app. 
iPad Basics ! page 2
Notifications Center 
Some apps will ask for permission to send 
you notifications when you receive messages 
or updates. Notifications uses up some of 
your battery power and some include a sound 
alert. 
1. Pull down from the top edge of the iPad to 
open the Notifications Center. 
2. Tap the upward arrow at the bottom of the 
Notifications Center to close it. 
Control Center 
1. Pull/slide up from the bottom edge of the 
iPad to open the Control Center. 
2. Adjust the volume and screen brightness 
by using the slide controls. 
3. Tap on the bell icon to mute any alert 
sounds. 
4. Tap the downward arrow to close the 
Control Center. 
Search 
1. Put your finger on the screen and pull 
down to open the Search box. 
2. Avoid getting to close to the top edge or 
you will open the Notifications Center. 
3. Type in the name of an app to search for it. 
iPad Basics ! page 3
Swiping And Gestures 
1. While you have an app open, use 4 
fingers to swipe left or right to move 
between open apps. 
2. Swipe up with 4 fingers to see all of 
the apps that are open. 
3. When an app is open, you can pinch 
together all 5 fingers to close the app 
(Doing so only minimizes the app and 
does not quit it.). 
4. Tap and hold on an internet page to 
select text. 
5. Drag the blue handles to select 
additional text. 
6. Spread your thumb and forefinger to 
zoom the size of the screen. 
7. Pinch the screen with your thumb and 
forefinger to reduce the size of the 
screen. 
iPad Basics ! page 4
8. Tap and hold on a picture to get a pop-up 
listing options. 
Creating A Web Clip In Safari 
1.Tap the Share button at the top left side of 
the browser screen and tap Add to Home 
Screen. 
2. You can change the name of the Web 
Clip or leave it as is. 
3. Tap the word Add to add a web clip icon to your 
screen (icon will appear in the first open spot after 
your Home screen). 
Self Service 
1.Tap the Self Service app to install additional apps that have been 
vetted by the district. 
2. Search for the QR Code Reader by Scan app. 
3. Tap the Free button and then tap Install. 
iPad Basics ! page 5
App Store 
1. Tap the App Store icon on the Home screen to open the app store. 
2. Type the name of the app you are 
looking for in the search box at the top 
right side and click Search on the 
keyboard. (Search for Tayasui Sketches) 
3. Find the app you are looking for and tap the 
Free button and then the Install button. 
4. Apps that are not free will list a price. 
Camera App 
1. Tap the camera icon on the Home screen to open the camera 
app. 
iPad Basics ! page 6
2. Click the camera icon at the top right 
to switch between the front iSight and 
rear-facing FaceTime cameras. 
3. Tap the white shutter button to take 
the photo when it is focused on the 
screen or click the volume button on 
the side of the iPad. 
4. Use your finger to slide up and down 
between the video, photo, and square 
photo options on the right side. 
5. Tap the small thumbnail of the photo 
just taken to access the camera roll to 
see the photo full screen. 
Photos 
1. Tap the Photos app on the Home screen to access the camera 
roll to see photos that you have taken on your iPad. 
2. You can scroll up and down through the 
photos by date or click Collections in the 
upper left corner to see larger groupings of 
photos. 
Notes 
1. Tap the Notes app on the Home screen to view and create notes. 
iPad Basics ! page 7
2. Tap the screen to bring up the onscreen 
keyboard. 
3. Begin typing your note. 
4. The first line of your note will become 
the title. 
5. Titles of previous notes can be seen on 
the left side when in landscape view. 
6. Tap the microphone button to activate the 
dictation feature. 
7. Tap Done to stop recording. 
8. Tap the keyboard icon in the bottom right to 
move the keyboard offscreen. 
9. Tap the title of the note on the left and then the 
Trash can icon to delete a note. 
10. Tap the Share icon at the top right of the note 
(square with upward arrow) to transfer the note 
via Messages or Mail or to copy text. 
11. Tap the icon that looks like a page with a pencil 
on it to create a new note. 
Organization 
Moving Apps 
1. Tap and hold on an app that you want to move to 
another position. 
2. The app icons will begin to jiggle. 
3. Drag the app icon you want to move to the new 
location. The other apps will adjust to mare room for 
it. 
4. Tap the Home button to stop the apps from jiggling. 
iPad Basics ! page 8
Creating Folders 
1. Drag an app on top of another app if you want 
to create folders of similar apps. 
2. A folder name will be generated by the 
iPad based on what the apps have in 
common. 
3. Tap on the folder name and type a new 
name if you want. 
4. Drag apps out of the folder if you no 
longer want them to be organized in a 
folder. 
Deleting Apps 
1. Tap and hold on the app icon until it starts to 
jiggle. 
2. Tap the X on the corner to delete the app. 
3. Tap Delete on the pop-up message. 
4. Tape the Home button to stop the apps from 
jiggling. 
iPad Basics ! page 9

iPad Basics Turnbull

  • 1.
    iPad Basics Buttonsand Ports Settings Connecting to Wifi 1. Tap the Settings app on your home screen. 2. Tap on Wi-Fi on the left side and select ISD 625 in the Choose A Network section. Lock Rotation 1.Tap on General on the left side and tap Lock Rotation to set the side switch to lock the screen orientation to portrait or landscape only. 2. Moving the rotation switch on the right side of the iPad down will now stop the orientation from switching when rotating the iPad. iPad Basics ! page 1
  • 2.
    Privacy 1. ClickPrivacy on the left side. 2. Turn Location Services access on or off for all apps or only selected one. 3. Adjust access rights to Photos, Microphone, etc., by clicking the arrow on the right and then sliding the toggle switches for each app that has requested access. Navigating on the iPad Home Screen 1. Click the Home button to return to the Home screen at any time. 2. Swipe left or right to move between screens. 3. Double click the Home button to view all of the apps currently open on the iPad. 4. Flick or swipe the thumbnail of the app upward to quit an app. iPad Basics ! page 2
  • 3.
    Notifications Center Someapps will ask for permission to send you notifications when you receive messages or updates. Notifications uses up some of your battery power and some include a sound alert. 1. Pull down from the top edge of the iPad to open the Notifications Center. 2. Tap the upward arrow at the bottom of the Notifications Center to close it. Control Center 1. Pull/slide up from the bottom edge of the iPad to open the Control Center. 2. Adjust the volume and screen brightness by using the slide controls. 3. Tap on the bell icon to mute any alert sounds. 4. Tap the downward arrow to close the Control Center. Search 1. Put your finger on the screen and pull down to open the Search box. 2. Avoid getting to close to the top edge or you will open the Notifications Center. 3. Type in the name of an app to search for it. iPad Basics ! page 3
  • 4.
    Swiping And Gestures 1. While you have an app open, use 4 fingers to swipe left or right to move between open apps. 2. Swipe up with 4 fingers to see all of the apps that are open. 3. When an app is open, you can pinch together all 5 fingers to close the app (Doing so only minimizes the app and does not quit it.). 4. Tap and hold on an internet page to select text. 5. Drag the blue handles to select additional text. 6. Spread your thumb and forefinger to zoom the size of the screen. 7. Pinch the screen with your thumb and forefinger to reduce the size of the screen. iPad Basics ! page 4
  • 5.
    8. Tap andhold on a picture to get a pop-up listing options. Creating A Web Clip In Safari 1.Tap the Share button at the top left side of the browser screen and tap Add to Home Screen. 2. You can change the name of the Web Clip or leave it as is. 3. Tap the word Add to add a web clip icon to your screen (icon will appear in the first open spot after your Home screen). Self Service 1.Tap the Self Service app to install additional apps that have been vetted by the district. 2. Search for the QR Code Reader by Scan app. 3. Tap the Free button and then tap Install. iPad Basics ! page 5
  • 6.
    App Store 1.Tap the App Store icon on the Home screen to open the app store. 2. Type the name of the app you are looking for in the search box at the top right side and click Search on the keyboard. (Search for Tayasui Sketches) 3. Find the app you are looking for and tap the Free button and then the Install button. 4. Apps that are not free will list a price. Camera App 1. Tap the camera icon on the Home screen to open the camera app. iPad Basics ! page 6
  • 7.
    2. Click thecamera icon at the top right to switch between the front iSight and rear-facing FaceTime cameras. 3. Tap the white shutter button to take the photo when it is focused on the screen or click the volume button on the side of the iPad. 4. Use your finger to slide up and down between the video, photo, and square photo options on the right side. 5. Tap the small thumbnail of the photo just taken to access the camera roll to see the photo full screen. Photos 1. Tap the Photos app on the Home screen to access the camera roll to see photos that you have taken on your iPad. 2. You can scroll up and down through the photos by date or click Collections in the upper left corner to see larger groupings of photos. Notes 1. Tap the Notes app on the Home screen to view and create notes. iPad Basics ! page 7
  • 8.
    2. Tap thescreen to bring up the onscreen keyboard. 3. Begin typing your note. 4. The first line of your note will become the title. 5. Titles of previous notes can be seen on the left side when in landscape view. 6. Tap the microphone button to activate the dictation feature. 7. Tap Done to stop recording. 8. Tap the keyboard icon in the bottom right to move the keyboard offscreen. 9. Tap the title of the note on the left and then the Trash can icon to delete a note. 10. Tap the Share icon at the top right of the note (square with upward arrow) to transfer the note via Messages or Mail or to copy text. 11. Tap the icon that looks like a page with a pencil on it to create a new note. Organization Moving Apps 1. Tap and hold on an app that you want to move to another position. 2. The app icons will begin to jiggle. 3. Drag the app icon you want to move to the new location. The other apps will adjust to mare room for it. 4. Tap the Home button to stop the apps from jiggling. iPad Basics ! page 8
  • 9.
    Creating Folders 1.Drag an app on top of another app if you want to create folders of similar apps. 2. A folder name will be generated by the iPad based on what the apps have in common. 3. Tap on the folder name and type a new name if you want. 4. Drag apps out of the folder if you no longer want them to be organized in a folder. Deleting Apps 1. Tap and hold on the app icon until it starts to jiggle. 2. Tap the X on the corner to delete the app. 3. Tap Delete on the pop-up message. 4. Tape the Home button to stop the apps from jiggling. iPad Basics ! page 9