Downloaded 11 times


![Page13
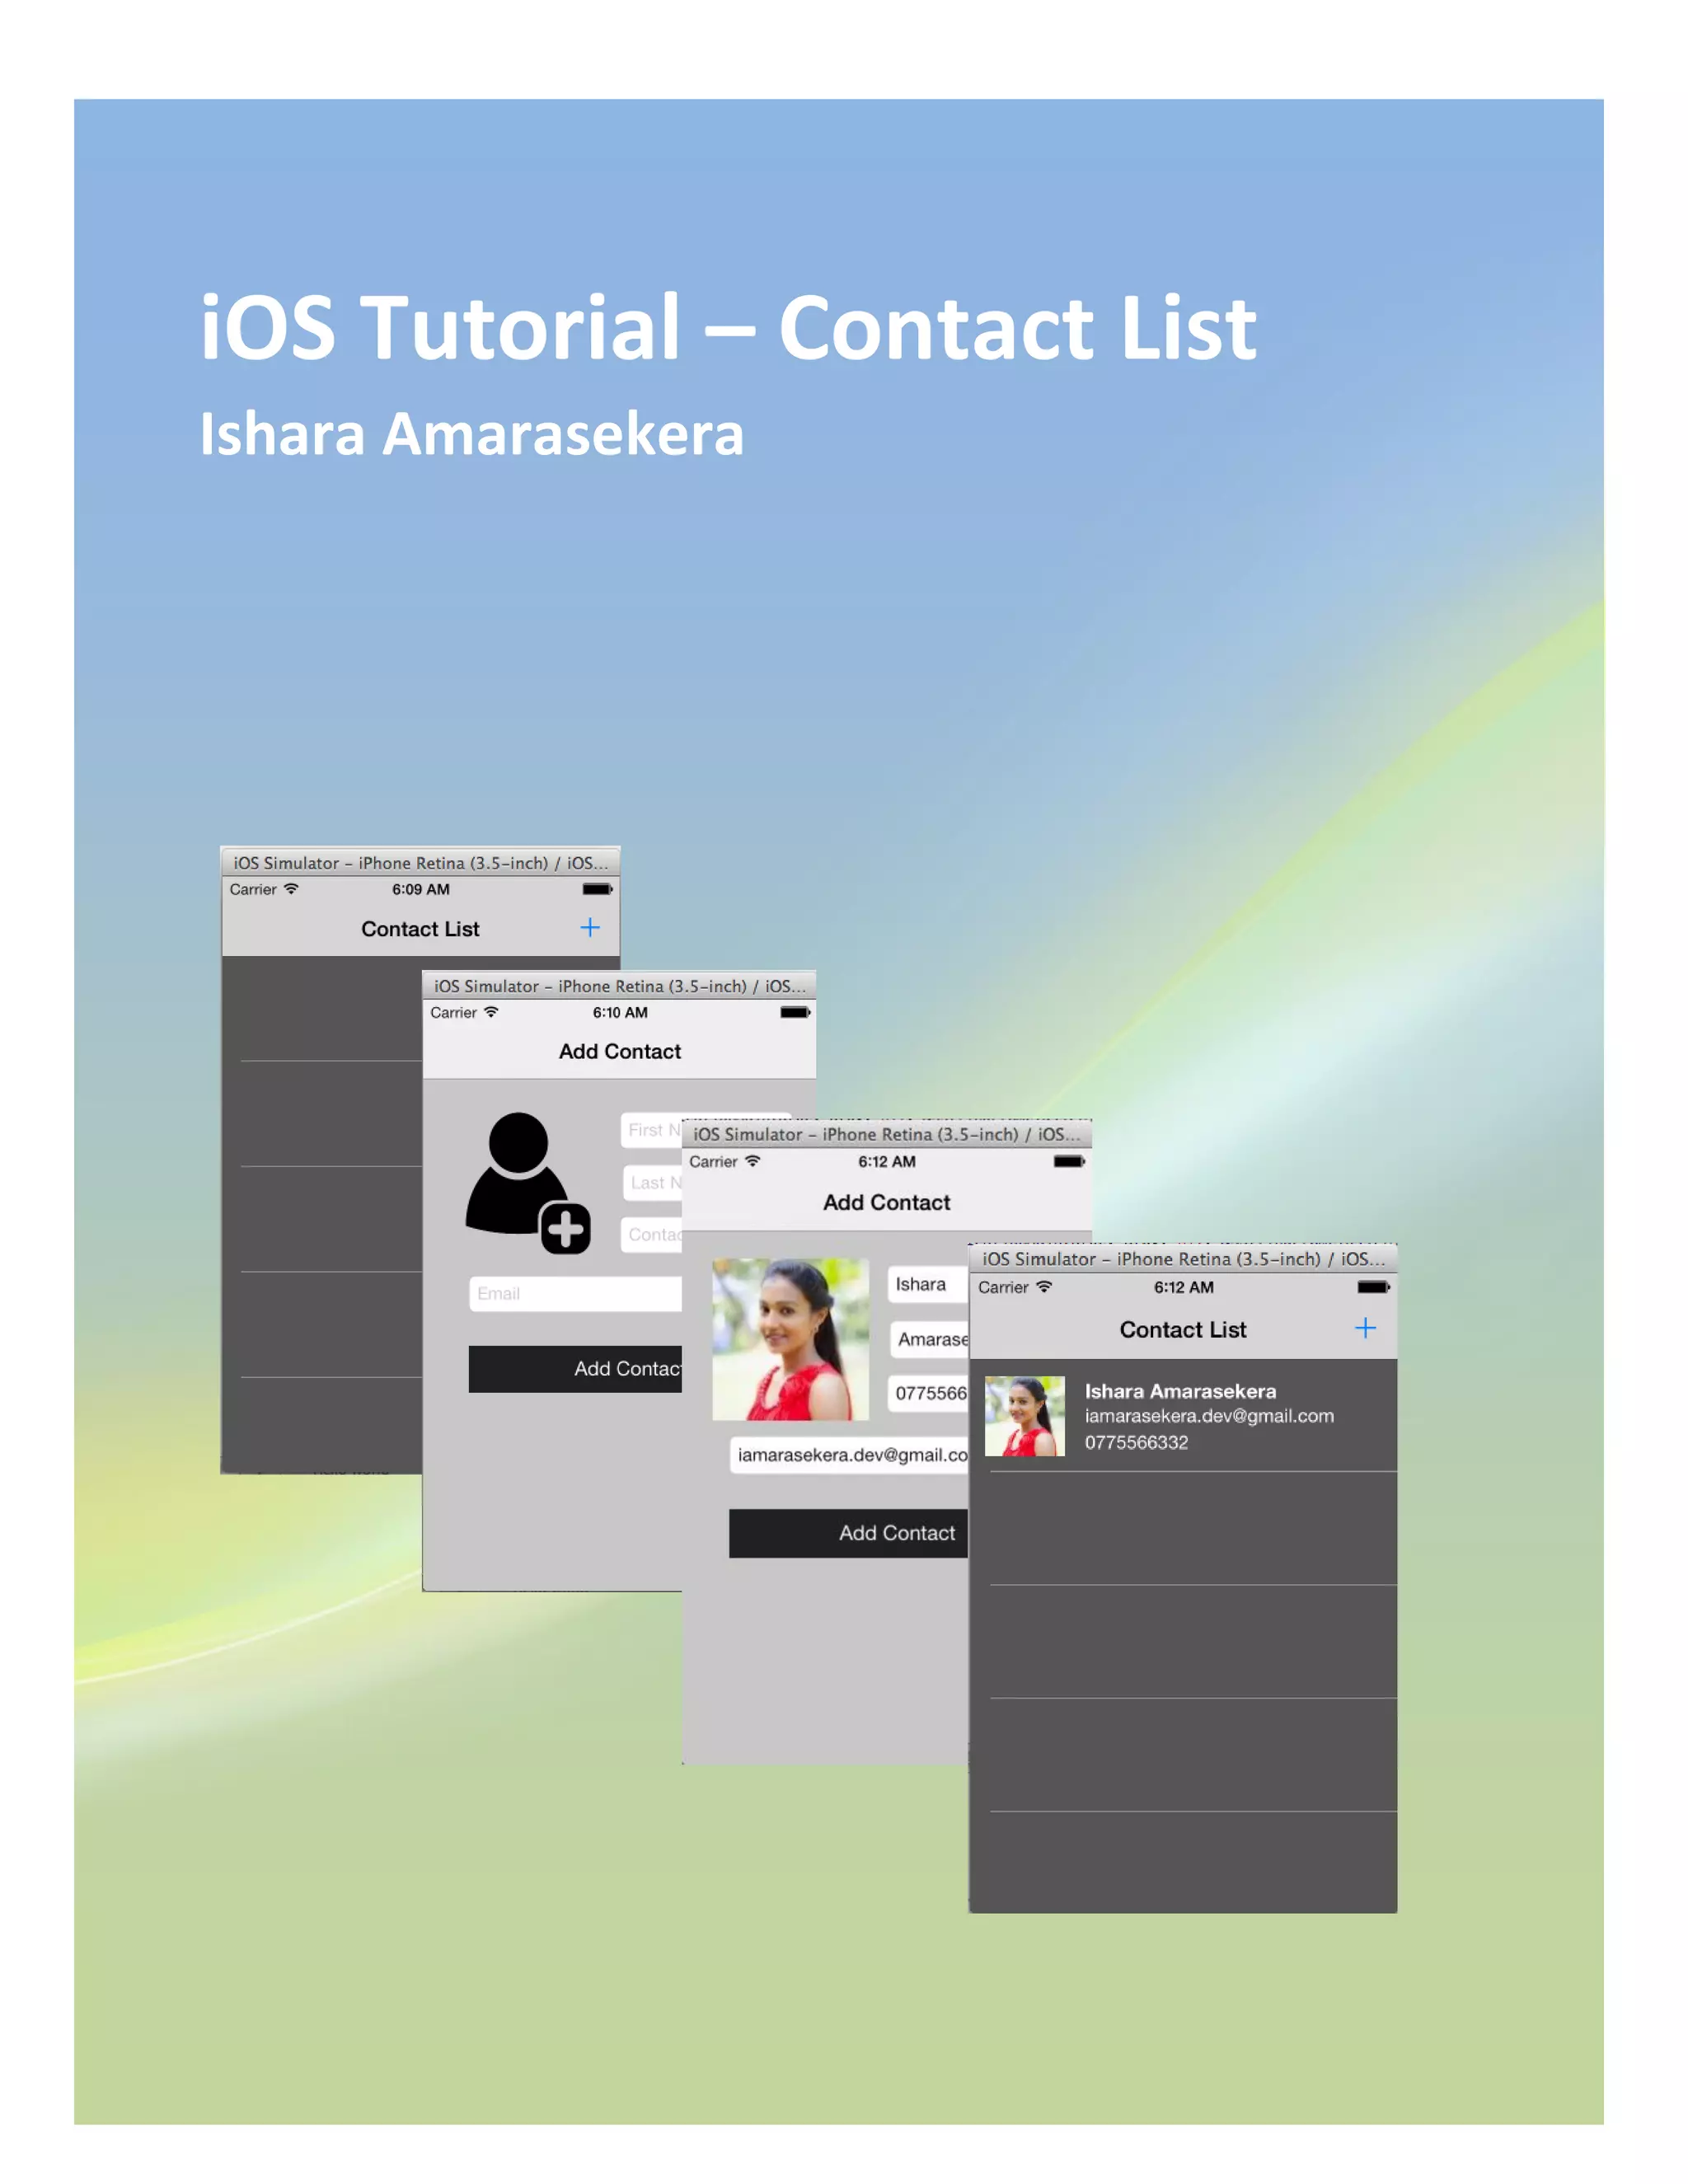
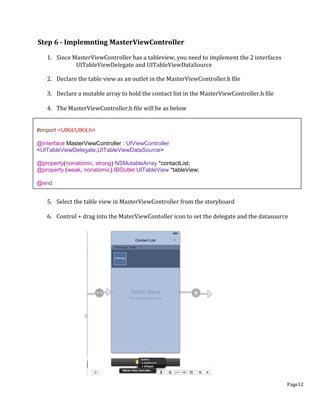
7. In ViewdidLoad method of the MasterViewController.m , you need to instantiate the
contactList array
8. When we go to the DeatilView,Controller we loose the current context of the
MasterViewController, hence we need to create an instance of the App Delegate and create
a reference to the current instance of the MasterViewController .
In MasterViewController you need to set the current Instance and later retrieve it form the
DetailViewController
*This is one approach. You do not need to do it all the time. There are other approaches to
avoid this.
9. In order to do the above step, we need to declare a current instance of the
MasteViewController in the APP delegate as given below
10. Coming back to the MasterViewController ,in viewdidAppear method you need to reload
data in the Tableview
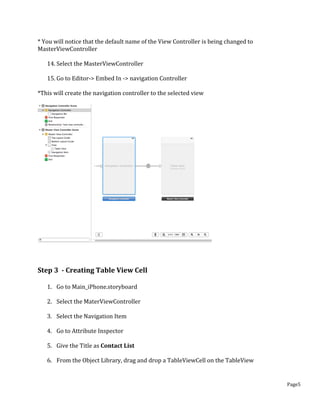
- (void)viewDidLoad
{
[super viewDidLoad];
// Do any additional setup after loading the view, typically from a nib.
self.contactList = [[NSMutableArray alloc]init];
AppDelegate *appD = (AppDelegate *)[[UIApplication sharedApplication] delegate];
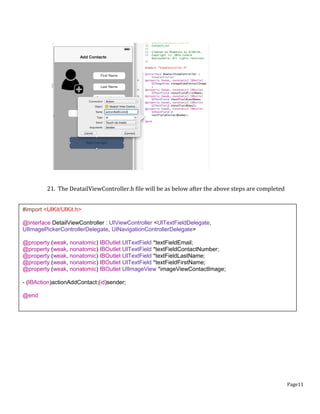
[appD setCurrentMasterInstance:self];
}
- (void)viewDidAppear:(BOOL)animated {
[super viewDidAppear:animated];
[self.tableView reloadData];
}
@property (strong, nonatomic) MasterViewController *currentMasterInstance;](https://image.slidesharecdn.com/ioscontactlisttutorial-isharaamarasekera-160524081740/85/iOS-Contact-List-Application-Tutorial-13-320.jpg)
![Page14
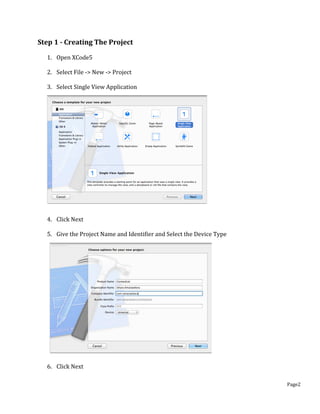
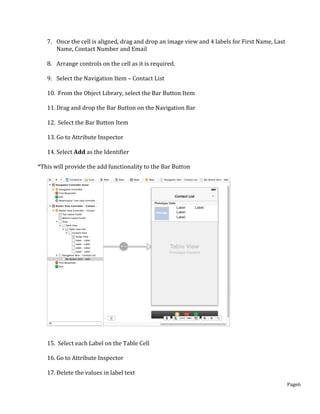
11. Implement the following methods in the MasterViewController.m file
*There are 3 essential methods in that you need to implement for a Tableview
1. numberOfSectionsInTableView (In this case, it is one, hence return one)
2. numberOfRowsInSection (Here, you have to return your count of the contact list)
3. cellForRowAtIndexPath (returns cell per section)
- (NSInteger)numberOfSectionsInTableView:(UITableView *)tableView
{
// Return the number of sections.
return 1;
}
- (NSInteger)tableView:(UITableView *)tableView
numberOfRowsInSection:(NSInteger)section
{
// Return the number of rows in the section.
return [self.contactList count];
}](https://image.slidesharecdn.com/ioscontactlisttutorial-isharaamarasekera-160524081740/85/iOS-Contact-List-Application-Tutorial-14-320.jpg)
![Page15
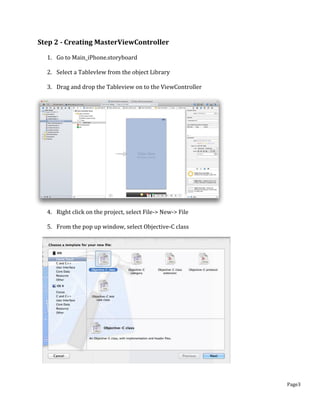
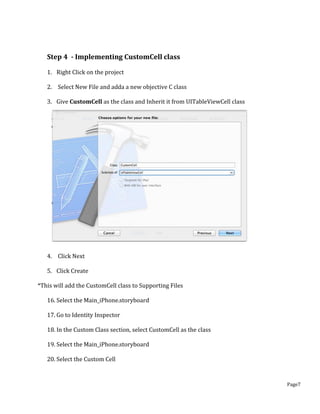
- (UITableViewCell *)tableView:(UITableView *)tableView cellForRowAtIndexPath:(NSIndexPath
*)indexPath
{
CustomCell *cell = [tableView dequeueReusableCellWithIdentifier:@"cell"];
if (cell == nil) {
cell = [[CustomCell alloc] initWithStyle:UITableViewCellStyleSubtitle reuseIdentifier:@"cell"];
}
NSDictionary *userData = [self.contactList objectAtIndex:[indexPath row]];
if (([userData objectForKey:@"firstName"] && [NSString stringWithFormat:@"%@", [userData
objectForKey:@"firstName"]].length>0)
||
([userData objectForKey:@"lastName"] && [NSString stringWithFormat:@"%@", [userData
objectForKey:@"lastName"]].length>0)){
cell.labelName.text = [NSString stringWithFormat:@"%@ %@", [userData
objectForKey:@"firstName"], [userData objectForKey:@"lastName"]];
}
if ([userData objectForKey:@"email"] && [NSString stringWithFormat:@"%@", [userData
objectForKey:@"email"]].length >0) {
cell.labelEmail.text = [userData objectForKey:@"email"];
}
if ([userData objectForKey:@"contactNumber"] && [NSString stringWithFormat:@"%@", [userData
objectForKey:@"contactNumber"]].length >0) {
cell.labelContactNumber.text = [userData objectForKey:@"contactNumber"];
}
if ([userData objectForKey:@"contactImage"]!= NULL ) {
cell.imageViewContactImage.image = [userData objectForKey:@"contactImage"];
}
return cell;
}](https://image.slidesharecdn.com/ioscontactlisttutorial-isharaamarasekera-160524081740/85/iOS-Contact-List-Application-Tutorial-15-320.jpg)
![Page16
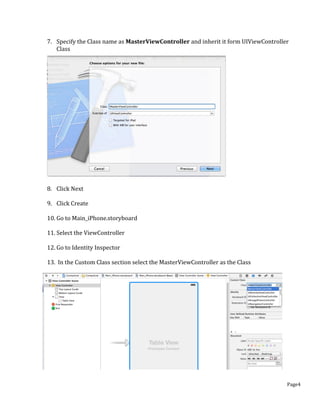
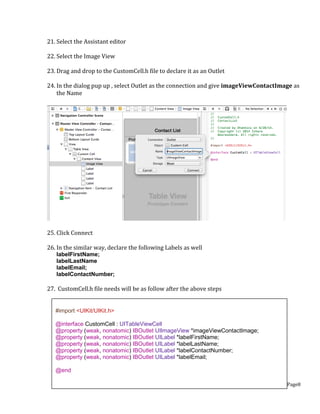
Step 7- Implemnting DetailViewController
1. The DetailViewController needs to implent the following interfaces
UITextFieldDelegate, UIImagePickerControllerDelegate, UINavigationControllerDelegate]
2. Declare the UIImagePicker
3. In the ViewdidLoad method the followings need to be done
Setting Delegates text controls
Create image view selector for the touch event (for gesture events)
Instantiation of image picker controller
- (void)viewDidLoad
{
[super viewDidLoad];
// Do any additional setup after loading the view.
//Setting Delegates text controls
self.textFieldFirstName.delegate = self;
self.textFieldLastName.delegate = self;
self.textFieldEmail.delegate = self;
self.textFieldContactNumber.delegate = self;
[self.textFieldFirstName resignFirstResponder];
[self.textFieldLastName resignFirstResponder];
[self.textFieldEmail resignFirstResponder];
[self.textFieldContactNumber resignFirstResponder];
//image view selector for the touch event
UITapGestureRecognizer *singleTap = [[UITapGestureRecognizer alloc]
initWithTarget:self action:@selector(addContactImage)];
singleTap.numberOfTapsRequired = 1;
self.imageViewContactImage.userInteractionEnabled = YES;
[self.imageViewContactImage addGestureRecognizer:singleTap];
//instantiation of image picker controller
imgPicker = [[UIImagePickerController alloc] init];
imgPicker.sourceType = UIImagePickerControllerSourceTypeSavedPhotosAlbum;
}
UIImagePickerController *imgPicker;](https://image.slidesharecdn.com/ioscontactlisttutorial-isharaamarasekera-160524081740/85/iOS-Contact-List-Application-Tutorial-16-320.jpg)
![Page17
4. Implement the utility and other delegate methods
#pragma mark - TextField Delegates
- (BOOL)textFieldShouldReturn:(UITextField *)textField
{
[textField resignFirstResponder];
return YES;
}
#pragma mark - Image Picker Delegates
- (void)imagePickerController:(UIImagePickerController *)picker didFinishPickingImage:(UIImage
*)image editingInfo:(NSDictionary *)editingInfo {
[picker dismissViewControllerAnimated:YES completion:^{
self.imageViewContactImage.image = image;
}];
}
#pragma mark - Utility Methods
-(void) addContactImage{
imgPicker.delegate = self;
imgPicker.sourceType = UIImagePickerControllerSourceTypeSavedPhotosAlbum;
[self presentViewController:imgPicker animated:YES completion:nil];
}](https://image.slidesharecdn.com/ioscontactlisttutorial-isharaamarasekera-160524081740/85/iOS-Contact-List-Application-Tutorial-17-320.jpg)
![Page18
5. Implement the method for the button, Add Contact click event
- (IBAction)actionAddContact:(id)sender {
if(self.textFieldFirstName.text.length > 0 && self.textFieldLastName.text.length >0 &&
self.textFieldEmail.text.length >0 && self.textFieldContactNumber.text.length > 0) {
MasterViewController *masterViewController;
//Get the viewcontrollers instance from the app delegate
AppDelegate *appD = (AppDelegate *)[[UIApplication sharedApplication] delegate];
masterViewController = [appD currentMasterInstance];
/** Note: Instead of alloc init, we could use new **/
NSMutableDictionary *userData = [NSMutableDictionary new];
[userData setValue:self.textFieldFirstName.text forKey:@"firstName"];
[userData setValue:self.textFieldLastName.text forKey:@"lastName"];
[userData setValue:self.textFieldContactNumber.text forKey:@"contactNumber"];
[userData setValue:self.textFieldEmail.text forKey:@"email"];
//Setting the user image to default image if not contact image browsed
//Image comparison
UIImage *addUserIconImage = [UIImage imageNamed:@"icon_plus.png"];
NSData *imgData1 = UIImagePNGRepresentation(addUserIconImage);
NSData *imgData2 = UIImagePNGRepresentation(self.imageViewContactImage.image);
BOOL isCompare = [imgData1 isEqual:imgData2];
if (isCompare) {
//Change the image into the default image, if user has not selected any
[userData setValue:[UIImage imageNamed:@"default_user_image.png"]
forKey:@"contactImage"];
}else{
[userData setValue:self.imageViewContactImage.image forKey:@"contactImage"];
}
//Adding the current user to the contact list
[masterViewController.contactList addObject:userData];
//Dissmiss current stack to move previous
[self dismissViewControllerAnimated:YES completion:nil];
} else {
UIAlertView *alert = [[UIAlertView alloc] initWithTitle:@"Add Contact"
message:@"Empty fields remaining"
delegate:self
cancelButtonTitle:@"OK"
otherButtonTitles:nil];
[alert show];
}
}](https://image.slidesharecdn.com/ioscontactlisttutorial-isharaamarasekera-160524081740/85/iOS-Contact-List-Application-Tutorial-18-320.jpg)


This document provides steps to create a contact list iOS application. It involves creating multiple view controllers and classes to manage the contact list, table view, and contact details view. Key steps include: 1. Creating a MasterViewController to manage the contact list table view. 2. Creating a CustomCell class to display contact cells. 3. Creating a DetailViewController to add/edit contact details with text fields and image picker. 4. Implementing delegate methods and outlets to populate the table view from the contact list and pass data between view controllers. 5. Adding gestures and image picker integration for the contact photo.