SlideShare a Scribd company logo
introSeparate Hydrogen and Oxygen from Water Through Electrolysis
Electrolysis a method of separating elements by pushing an electric current through a compound. It is used
in various industrial applications such as removing copper from its ore. It is also used to separate hydrogen
and oxygen from water. Electrolysis isn't the most efficient way to obtain hydrogen, but it is one of the
easiest and cheapest ways to "homebrew" hydrogen.

Hydrogen is the most abundant element in the universe. With the "green-energy" craze and talk of powering
our future oil-free economy on hydrogen, it has gotten much attention in the last few years. Learning about
this potential fuel of the future is important and interesting. Besides, hydrogen is a powerful fuel, and blowing
stuff up in the name of science is fun .


step 1Electrolysis of Water - An Explanation
This section is an explanation of the electrolysis of water, feel free to skip it if you don't find it interesting.
2H2O(l) = 2H2(g) + O2(g) As everyone knows a wate…


step 2Materials
****DISCLAIMER**** You are putting electricity into water. It has the potential to be dangerous. Do so at
your own risk. Be smart about it. If you wouldn't touch it with yo…
step 3Water and Salt
Water alone is not a very good conductor. You need to add some sort of electrolyte. Regular old table salt
works fine. Add as much as will dissolve into the water, and don'…


step 4The Tricky Part
Ok, this is the tricky part. You need to flip the gas collecting container(s) upside down in the med. container,
so that no air is trapped in the gas container(s). I do it …


step 5The Electrodes
Now take the two electrodes leading from your power source. The hydrogen will form on the positive
electrode, and the oxygen on the negative. If you don't know which is whi…


step 6Thats it!
Thats it! Turn it on, and watch it bubble. The amount of time it takes depends on how powerful your power
source is. Stronger it is, faster it bubbles. Mine takes about 5 …


step 7Further Ideas
When your gas collecting container is full, try lighting it. The hydrogen will give a very satisfying *POP*, and
the oxygen won't do anything. Here's a Video (sorry for…


tep 1Electrolysis of Water - An Explanation
This section is an explanation of the electrolysis of water, feel free to skip it if you don't find it interesting.

2H2O(l) = 2H2(g) + O2(g)

As everyone knows a water molecule is formed by two elements: two positive Hydrogen ions and one
negative Oxygen ion. The water molecule is held together by the electromagnetic attraction between these
ions. When electricity is introduced to water through two electrodes, a cathode (negative) and an anode
(positive), these ions are attracted to the opposite charged electrode. Therefore the positively charged
hydrogen ions will collect on the cathode and the negatively charged oxygen will collect on the anode.

When these ions come into contact with their respective electrodes they either gain or lose electrons
depending on there ionic charge. (In this case the hydrogen gains electrons and the oxygen loses them) In
doing so these ions balance their charges, and become real, electrically balanced, bona fide atoms (or in the
case of the hydrogen, a molecule).

The reason this system isn't very efficient is because some of the electrical energy is converted into heat
during the process. There have been reports of 50%-70% efficiency, but I doubt that is possible in a home
environment. Anyway, enough with the boring stuff, lets go make some gas!
i


step 2Materials
****DISCLAIMER**** You are putting electricity into water. It has the potential to be dangerous. Do so at
your own risk. Be smart about it. If you wouldn't touch it with your hands don't stick it in the water. If you're
worried about it wearing rubber gloves will give some extra insulation. ****DISCLAIMER****

****DISCLAIMER**** Hydrogen is highly flammable and explosive (think Hindenburg). The amount we're
making isn't extremely dangerous, but be careful. Flying shards of glass are never fun.****DISCLAIMER****

Separating Hydrogen and oxygen from water is really simple. It can be as easy as sticking two wires leading
from a battery into water and watching the bubbles form. We however want to collect all the little bubbles, so
its just slightly more complicated.

Things you will need:

@ (1) Med.Container - To hold water. Preferably clear so you can see whats going on.
@ (1 or 2) Gas Collecting Containers - A test tube, or an old soda bottle like me. Also clear. 2 if you want to
collect both the hydrogen and the oxygen
@ (1) Power Source - I use a 12v 1000mA adapter, 9v batteries (in a series) and other sources work too.
Bigger the power source, faster the bubbles form.
@ (2) Graphite Electrodes - Optional. You can stick a bare wire into the water, but it corrodes pretty quick.
You can pull them out of a 6v Lantern Battery
@ Salt
@ Water


step 3Water and Salt
Water alone is not a very good conductor. You need to add some sort of electrolyte. Regular old table salt
works fine. Add as much as will dissolve into the water, and don't worry about it if there is some sitting on
the bottom, it really doesn't matter. Pour this salt/water solution into your med. container, and also fill your 1
or 2 gas collecting containers
step 4The Tricky Part
Ok, this is the tricky part. You need to flip the gas collecting container(s) upside down in the med. container,
so that no air is trapped in the gas container(s). I do it by holding my thumb over the hole, and flip it really
quickly. Its not a huge deal if air is trapped, your hydrogen just won't be pure.
i
step 5The Electrodes
Now take the two electrodes leading from your power source. The hydrogen will form on the positive
electrode, and the oxygen on the negative. If you don't know which is which, turn on the power source and
stick the electrodes in the water. The one with more bubbles is the hydrogen. Now stick the electrode
underneath the gas collecting container. (turn off the power first) If you're having trouble making the gas
collecting container stay up, and the electrode stay in the right place, tape it. Thats what I do anyway.


step 6Thats it!
Thats it! Turn it on, and watch it bubble. The amount of time it takes depends on how powerful your power
source is. Stronger it is, faster it bubbles. Mine takes about 5 min for a test tube.

The electrodes do corrode if you don't have graphite, its pretty gross, but i don't think its dangerous. (don't
quote me)

Here is a video of it bubbling:
i

…


introCollecting Hydrogen and Oxygen
In this instructable I'll give you a simple way to collect Hydrogen gas and if you want also, to collect Oxygen.
Depending on the voltage and current that you use for the project this could be hazardous. I used a 14.4 volt
power drill battery pack for the process but don't recommend it, I only used it to achieve a noticeable effect
in a short time period (about 20 minutes).
i


step 1Materials
The required materials are:
-Sufficient length of wire
-DC power source
-Deep water basin or bowl (preferably plastic, there is a chance you could ruin a metal one)
-Water, logically
-Weak acid (ex.vinegar as acetic acid)
-At least two plastic bottles with caps (I like the Gatorade ones because they are thicker and for some
reason the Hydrogen at least will compress itself after a few days)
-A sacrificial pencil (or if you have lead [graphite] from an architect's pencil use that instead)
-Small pencil lead case or even just the cap (the refill material case for mechanical pencils)
-Tape
-Putty
-Marker to label the gases
-Long piece of tubing if you cannot find a bowl deep enough
-One sided blade or knife if you use a pencil

-You may also want other materials to plate or turn into Oxide salts
step 2The Non-Electric Setup
Fill your bowl most of the way with water, the purity of which doesn't make much difference so long as you
don't use mud or something. Now add your salt or weak acid to the water, it doesn't take a large amount of
either to get a good result so be moderate with it you can always add more later but can't take it out. Fill the
two bottles as full as you can with tap water and carefully put it into the water so that the lip of the bottle is
turned down, do this with the second bottle. Make about two or three fingers worth of room between the
bottom of the bowl and the lip of the bottle and tape it to the side so that the tape is not underwater. If you
were unable to get all the air out this is the point where you want to get out that tubing and put it in the bottle
while still underwater and suck the air out but try not to get a mouthful of acid or saltwater in your mouth.
tep 3Electric Setup
Take the pencil and shave off the wood so that all you have left is graphite, if it breaks wait to throw it way if
it is long enough you may be fine. Then take two lengths of wire and strip the ends off for each wire wrap
one end for both around a length of the graphite. Then take your pencil lead (graphite) case and push putty
into it so that it is a solid mass and has no cracks. Take one of the wires and push the end with the graphite
into it so that none of the metal of the wire is showing but the graphite is. Then secure the ends of the wires
that do not have graphite to your DC source
IMPORTANT-place the wire with the case on the positive (generally red) end of your source otherwise the
unshielded wire will dissolve into an oxide salt
step 4Combined Setup
Now you're ready to place your electrodes into the electrolyte (saltwater / dilute acid). Arrange the
electrodes so that the bubbles are floating into the bottles. If you have no bubbles then you did something
wrong if you only have bubbles coming out of the negative side then you may be usingactual lead (unless
you are intentionally oxidizing some other metal this is normal).
step 5Filling and Conatainment
Now all you have to do is wait for the bottles to become filled with the gas coming from the electrodes. When
doing this the unshielded wire's bottle should be filling faster, about twice as fast because water is two parts
Hydrogen and one part Oxygen (and because they are both part of the diatomic BrINClHOF [If you have not
taken Chemistry disregard this statement it's not important]). If the unshielded wire is making less than the
shielded one, turning blue or falls off then you may have switched the charges.

If / when they do fill take the bottle cap of that bottle and make a ring around the inside of the cap and place
it underwater and screw it on without letting air out or in. Once you do this use your marker to label it the
bottle with the unshielded wire is Hydrogen and the shielded one is Oxygen if you did this correctly.
step 6Extra Possibilities
Along with making Hydrogen and Oxygen there are other things you can do with this concept. One is Making
Oxide salts (i.e. metal+Oxygen such as Fe2O3) although this will not allow you to collect gaseous Oxygen,
you can make pigments out of this such as turquoise blue with Copper or Orange with Iron. You can also
make Aluminum powder for thermite, with the positive being Aluminum and the negative being Carbon
(Graphite/pencil lead) the Aluminum either does not bond or it decomposes. If I'm wrong it will stay bonded
but can still be used as a pyrotechnic. You may also plate a metal using this with the plating metal on the
positive and the object to be plated on the negative although this will also crate it's oxide. All you have to
remember is that the positive will dissolve into an oxide salt and the negative will be plated. Have fun
experimenting
i


introHow to build a water assisted engine system
Friends,
I have an Idea budding in my head to run engines on water as fuel.
Today, I will share my thoughts with you and provide you a good clue of what could be the solution of GAS
alternative.
Friends, before starting with the instructable I want to make it clear that I haven't build anything with this idea
as of now. So, I am not completely sure how far it is safe and possible.
With this in mind lets start the 'project ENVIRONMENT'.....

I TAKE NO RESPONSIBILITY OF HARM CAUSED DUE TO THIS INSTRUCTABLE.

P.S.: Those who are looking for the prototype, this instructable will not help you.

I will like to thank all those whose instructables I have used here.


step 1Basic Concept
The concept is to generate hydrogen from water through electrolysis and use it to power the usual petrol
engine. Electrolysis of water: Go to my instructable on 'HHO …


step 2Supply hydrogen gas to engine
Supply hydrogen generated from electrolysis to engine through the petrol intake valve. Petrol engine uses a
mixture of petrol and air to fire. Instead of petrol we will …


step 3Vary voltage of DC supply to control Electrolysis process
THIS IS THE STEP WHERE I HAVE NO CLUE OF WHAT CAN BE USED TO VARY VOLTAGE.
HOWEVER, I can help you of what can be done. Use a tachometer sensor (tachometer is used to r…
step 4The DC supply
DC supply powers the electrolysis process.... To charge the supply, use a battery or dynamo/alternator.
Read the following instructable: http://www.instructables.c…


introHHO generator
Hi frnds!

Here I am at my attempt to give you more information about powering engine using water.
This instructable is a part of my previous one. Do visit that one to get a clear idea.

I am posting a video on how to build a HHO generator which will produce HHO gas to power your car's
engine.
The video has part 2 for details. It leads you to a site and wants you to buy the guide.

I am posting my version and giving you a detailed information on how to do it.

Let's start!


   i


tep 1Things we need
Things we need.

Parts:
1. Glass jar with plastic lid
2. Pet/squeeze bottle
3. 1000mm long braided wire
4. 500mm long water pipe
5. 1000mm long electric wire
6. CD case or thick plastic sheet
7. 2 screws with nut
8. Hollow screw with nut
9. Cheap pen without refill
10. Fuse

Tools:
1. Drill machine with bits
2. Screw driver set
3. Saw
4. Ruler
5. Plase


step 2Setting the plastic lid
Remove the lid from the jar and with the help of ruler mark the centre of the lid.
Mark four holes for HHO gas, 2screws and fuse.
Drill holes through the marked points and insert screws and fuse respectively.
Now, take the cheap pen and cut near the rear end and insert the piece in the HHO gas hole (watch the
video).

Now, insert the water pipe at one of the pen. Connect the wires to the screws.

The lid is now ready.
step 3Making the wire mesh for electrolysis
For making wire mesh, take a plastic sheet and divide it from centre. Then cut into 2 pieces using a saw as
shown below.
Mark the center of each of 2 pieces and draw a line from the centre to one end. Cut using saw as shown
below.

Now, carefully drill holes and cut small grooves at the end of the piece and join them as shown below.

Use the braided wire and cut it into 2 and insert in each of the 2 holes of the plastic sheet. Cover the sheet
with the wire as shown below and then connect the 2 ends of the wire to each screw respectively.
It should look similar to figure shown below.
http://www.instructables.com/id/S8QMPLOFJ8OHYNN/


tep 4setting up the pet/squeeze bottle
Make a hole and insert the pipe in the bottle. Make sure the pipe reaches to the bottom of the bottle.

Now, drill a second hole and insert the hollow screw there.
This hole is for using the HHO gas. Fill the bottle with water and leave some space for air.

The Center one will pass the HHO gas through water and you will see bubbles coming out. The gas will than
escape through the hollow screw which can then be used for combustion.


tep 5Summary
The assembly is complete.

Fill some distilled water and 3-4 tea spoons of baking soda. Connect the electric wires to 6V to 12V battery
to start the process. HHo gas is released from water. It travels through the pipe into the bottle releasing
bubbles and escape from the hollow screw.

You can use this gas to run your vehicles engine.

MAKE SURE YOU HAVE SEALED ALL LEAKS.

I TAKE NO RESPONSIBILITY FOR ANY ACCIDENTS AND/OR CASUALTY CAUSED DURING TRYING
THIS EXPERIMENT.

VISIT www.hho4cars.com to know more about the use of this gas. Pass on this instructable to all your
friends and relatives and let them know the benefits of water.

Enjoy!
introHHO car adaptation
HHO is the gas resulting from electrolysis of water. Two H's and an O when seperated are very flamable. On
top of being abundant it is cheap and cleaner burning than gasoline. Operating on purley HHO requires lots
of modifications to a car but suplementing your gasoline with HHO requires little. There are a million sites
out there on HHO car conversion kits. All of them are building plans for anywhere between 50 to 500 dollars.
It seems odd that there is no instructable on it. So here, for free, is my attempt at making one. The text at the
top is my first try and the text under the "-" line is my second try.


   step 5From container to car
  Now do the same for your plastic hosing as you did for the electrodes. Melt(or
  cut) a hole IN THE TOP and seal your hose into it. The hose needs to be long
  enough to reach the outlet coming from your air filter in your car. Melt(or cut) a
  hole in the hose leaving your air filter and seal in the hose coming from your
  HHO container. Ouch, I hated to do that step. Willful destruction of car parts. It
helps a lot if you have an easily removable piece like I did.
I wanted to mention it somewhere and I thought the inserting your electrodes
step was already to long, wrap some teflon tape around the teeth that hold the
cap on. This will cause LESS HHO to leak out the top. I don't think its possible
to completly stop hydrogen from leaking out of a container while allowing easy
access to pour more water in.
The water you put in this container needs to have baking soda mixed in. I read
that using salt will produce chlorine gas. That seems likley to me as salt is NA
CL. Sodium and chloride on their own are deadly to you but combined they
sure taste good. In other words don't use it.

-updates-
-I was going to use baking soda origianly but I later read that it lets out
solutions that are corossive to aluminum. Chances are your car's engine is
made out of it. Furthermore, the chlorine will be coming out of your tail pipe.
Who breathes in car emissions that wants to live anyway? The chlorine
released is small ammounts too.


.

step 4Inserting your electrodes
I did this all wrong at first. I was cutting holes in the plastic with my knife. It is
so much better to use a soddering iron to melt a hole in your grape juice bottle
and then using a circular motion widden it it to fit your electrode. I had to seal
over and over again on the knife cuts but the soddering holes sealed in one try.
Now you ask where do I put these holes at? I placed my electrodes on
opposite sides of the container. I was thinking that the further apart they were
the more water the current would pass through and create more HHO. I later
read that having them closer together is actually more preferable as the
electricity is "burned up" in the resistance rather than actually doing work on
seperating the molecules. Please post if you think you know how it really
works.(update: not necessary. Put them very close together)
However it works, it is very important to know that the electrodes are NOT
continuous. That means they do not touch anywhere and they need to be
secured so that while driving they do not run into each other. To secure my
electrodes I soddered two holes next to it while it was in the container and fed
some wire sheathing through to tie it down. It is likley this step will frustrate you
unless you plan on big holes and more sealant. I would not recomend using
any sort of metal(tie wire)because it will corrode inside the container. A tie wrap
would probably be nice though.
The wire and connector on the electrode need to be on the outside of the
container. Then you can begin the sealing. Generously apply sealant to
anywhere water may leakout. Let it dry for 24 hours(so says the tube) then fill it
with water. If it leaks drain it and put more sealant where it was leaking.
Advice from a big dummy: If your electrode is hollow like mine seal one or both
ends. I will let you think why.(there's 24 hours wasted)

-updates-
-the graphite I used is much much smaller than the original electrodes but
produces almost the same ammount of gas because they are so close. Holding
the graphite down inside the container isn't as necessary because the tye
wraps will always hold them a certain distance apart.


step 3Building your electrodes
I originaly intended to sodder my wire to the stainless steel. Go ahead and try if
you like but it wont stick. So then I decided to drill and tap a hole in the pipe. I
feel a clamp on connector would work better but I didn't have one. I did have a
1/4" bolt though. Wrap one wire around the bolt and screw it in tight. The bolt I
used was very short and did not go through to the inside of the opposite side of
the pipe. The screw in method I used probably saves more space than a clamp
on.

-updates-
-Ok, so apparently regualr stainless steel does not work as an electrode. It
lasted for 8 operational hours. People have said that 316L stainless will work
better but I have my doubts. Instead I made them out of graphite. I give
complete credit to hooloovoo33 for the suggestion in his instructable
here( http://www.instructables.com/id/Separate-Hydrogen-and-Oxygen-from-
Water-Through-El/ ). It is a very long and tedious prcoess the way I did it. I
bought 2 jumbo sized kid's pencils(78 cents) and carved them down to the
graphite core. I originally thought "I will just carve down one side and lift it out
of the wood". WRONG. Pencil companys must use glue in their process
becuase it dosnt come out easy. Even thin solitary pieces of wood clung to the
graphite. What you can do is type in to google "buy graphite rod" and the
machine shops that sell it will pop up(along with fishing poles). I found it as
cheap as $5.86 for a single 1/2" by 10" rod, which would be enough when cut
in half.
To connect the wire to the pencil lead I stripped back a long section of wire
wrapped it around the lead twice and then twisted the wire back on itself and
twisted like crazy with pliers. At this point I broke open the tube of sealant and
dipped the end of the grapite with the wire in sealant. It gave me a great seal
doing it that way rather than going over and over it with the tube's end. This
was more a matter of frustration than technique. You need two conductors so
do this twice.
After it dried I wrapped a big thick tye wrap around the top and bottom of each
piece of graphite. Then wrap another tye wrap to hold them together. They
should still be the width of a thick tye wrap apart. This is to allow the electrodes
to be as close as possible without touching.
step 2Plan your build
  Before you start cutting into your own grape juice containers and sealing be
  sure it fits in your car. Find a spot to cram your plastic container into. It needs
  to be away from direct conact to the motor. Near the battery or air filter is
  preferable. I got lucky that my battery is directly beside my air filter and there is
  a huge space under the air intake piping. Also, when you have cramed it in
  there....be sure to close the hood and make sure that it really fits ;P. Chances
  are you will not be able to use the huge bottle I did.
  The bottle size will help you determine what kind of electrode you will be using
  and how much of it you need to obtain.
  The location will determine how much wire and plastic hose you will need.

  -updates-
  -In my picture you may see the plastic container is bent a little where the plastic
  hose comes into it. I didnt just start bashing it. I aplied gradually increasing
  preassure until it bent to the shape I desired.


step 6Giving life to your monster
This is going to be the scetchiest part of my instructable. I am still searching on a good way to power it only
when the car is on without having to drill through the fire wall, without having to connect some wires, or flip a
switch everytime I get in the car. A wire from one electrode needs to go to negative and the other to positive
of your car battery. I just ran the wires up to the top of the hood so I can connect them when I get to my car
and tuck them in neatly the rest of the time.

-updates-
-Going through the firewall wasn't as bad as I thought. I just looked under the steering wheel and saw all the
wires running through a rubber stopper. I rammed a fishtape through there and caught it inside the hood. I
pulled 1 wire through and cut it. To turn it on simply connect that 1 wire back together. For now I am using
wire nuts but it shouldn't be a problem to connect it to a button or switch. I took apart my dash because I
was going to connect it to the rear defrost button(I have used it maybe twice in 3 years) but there was all
kinds of circuit board wiring hooked up to it so I said forget it.


  i
http://www.instructables.com/id/SGX361EFHY0H5AJ/


tep 7Results
I have a 2003 Cavalier. The worst mpg I ever calculated was 28. I was purposfully flooring it every where I
went just to see what the worst case scenario was. The best I have ever calculated was 45 while following
closley behind truckers(they sure hate that). On average I fill my tank up and go 400 to 420 miles before my
"pull over and get gas" light comes on. When my light comes on I am able to put 13 gallons in the tank.
400/13=about 31
The electrodes lasted for half a tank and I got 500 miles out of it. Assuming I got 200 miles out of the other
half as usual: 500-200=300 300miles/6.5gallons=46mpg
46/31=1.48 thats a 48% increase in fuel economy!

-updates-
-With the graphite I got 510 miles out of a tank. 510/13=39
39/31=1.25 a 25% increase in fuel economy. I'm sure that if I increased the size of the electrode the mpg
would increase. The pencil lead is just so small. I will update again.

P.S. My wife ran off with the camera to a florida vacation in the middle of my build. Thats why there are no
pictures of the graphite electrodes. When she came back the camera wasn't working.


step 1Tools and Materials
This page ended up changing through the process and can vary depending on how you choose to improve
upon the design I used.
Tools:

knife or strippers
soddering iron(not essential but saves time)
screw driver
voltage tester(depends)
*drill
*#7 bit
*1/4" tap
*may change depending on the electrode you use and how you connect it to the wire
Materials:(Keep in mind all the materials I used are "borrowed" from work or I had around the house so they
won't be the most effective solutions. Be creative with what you use)

Plastic container (I used a grape juice bottle)
High temperature silicone sealant <-expensive; regular silicone sealant MAY work
Wire (I used some left over wire from the amp that went in my wife's car, 14awg)
Teflon tape
Plastic tubing (I had to siphon gas once to change the fuel pump and had this hose from it, not sure why I
kept it but I'm glad I did)
salt (for an electrolyte in the water)
Stainless Steel Electrode(update: THIS WILL NOT WORK)
I put this one on bottom because it will have the biggest explination. I am told stainless isn't esential but will
not corrode like other metals. I also read that coiled wire would be the best type(i.e. pipe, plate,
wire).Platinum would be your number 1 choice but who can afford that? I used some pipe I found at work.
-updates-
-I ended up using the graphite from 2 pencils as my electrodes

More Related Content

What's hot

Hydrogen production using solar energy (PV cell)
Hydrogen production using solar energy (PV cell)Hydrogen production using solar energy (PV cell)
Hydrogen production using solar energy (PV cell)
Mohamed Bn Younes
 
fuel cells in modren generating station
fuel cells in modren generating stationfuel cells in modren generating station
fuel cells in modren generating station
srikanth janjanam
 
Hydrogen as a fuel for future
Hydrogen as a fuel for futureHydrogen as a fuel for future
Hydrogen as a fuel for future
Wajihawaseem
 
technology used for storage of liquid hydrogen
technology used for storage of liquid hydrogentechnology used for storage of liquid hydrogen
technology used for storage of liquid hydrogen
bipin singh gariya
 
Hydrogen: The Future Fuel
Hydrogen: The Future FuelHydrogen: The Future Fuel
Hydrogen: The Future Fuel
Mahmud Hasan
 
Hydrogen Fuel Cell Technology
Hydrogen Fuel Cell TechnologyHydrogen Fuel Cell Technology
Hydrogen Fuel Cell Technology
Shanjul Shrivastava
 
Fuel cell: an Overview
Fuel cell: an OverviewFuel cell: an Overview
Fuel cell: an Overview
Bapi Mondal
 
PEM Water Electrolysis
PEM Water ElectrolysisPEM Water Electrolysis
PEM Water ElectrolysisRichard Smith
 
Hydrogen generation
Hydrogen generationHydrogen generation
Hydrogen generation
Sourav Bagchi
 
Electrochemistry of Lithium ion Battery
Electrochemistry of Lithium ion BatteryElectrochemistry of Lithium ion Battery
Electrochemistry of Lithium ion Battery
Saiful Islam
 
hydrogen energy fuel for the future
hydrogen energy fuel for the futurehydrogen energy fuel for the future
hydrogen energy fuel for the future
raja sekhara reddy janga
 
Introduction to ElectroChemistry
Introduction to ElectroChemistryIntroduction to ElectroChemistry
Introduction to ElectroChemistry
Azieda Dot
 
Batteries ppt
Batteries pptBatteries ppt
Solid oxide fuel cell technology
Solid oxide fuel cell technologySolid oxide fuel cell technology
Solid oxide fuel cell technology
A Reddy
 
High energy and capacity cathode material for li ion battries
High energy and capacity cathode material for li ion battriesHigh energy and capacity cathode material for li ion battries
High energy and capacity cathode material for li ion battries
Natraj Hulsure
 
How fuel cells work
How fuel cells workHow fuel cells work
How fuel cells work
Kamaraja AS
 

What's hot (20)

Hydrogen production using solar energy (PV cell)
Hydrogen production using solar energy (PV cell)Hydrogen production using solar energy (PV cell)
Hydrogen production using solar energy (PV cell)
 
fuel cells in modren generating station
fuel cells in modren generating stationfuel cells in modren generating station
fuel cells in modren generating station
 
Hydrogen as a fuel for future
Hydrogen as a fuel for futureHydrogen as a fuel for future
Hydrogen as a fuel for future
 
technology used for storage of liquid hydrogen
technology used for storage of liquid hydrogentechnology used for storage of liquid hydrogen
technology used for storage of liquid hydrogen
 
Hydrogen: The Future Fuel
Hydrogen: The Future FuelHydrogen: The Future Fuel
Hydrogen: The Future Fuel
 
Hydrogen Fuel Cell Technology
Hydrogen Fuel Cell TechnologyHydrogen Fuel Cell Technology
Hydrogen Fuel Cell Technology
 
Fuel cell: an Overview
Fuel cell: an OverviewFuel cell: an Overview
Fuel cell: an Overview
 
PEM Water Electrolysis
PEM Water ElectrolysisPEM Water Electrolysis
PEM Water Electrolysis
 
Hydrogen generation
Hydrogen generationHydrogen generation
Hydrogen generation
 
Electrochemistry of Lithium ion Battery
Electrochemistry of Lithium ion BatteryElectrochemistry of Lithium ion Battery
Electrochemistry of Lithium ion Battery
 
Fuel cells
Fuel cellsFuel cells
Fuel cells
 
hydrogen energy fuel for the future
hydrogen energy fuel for the futurehydrogen energy fuel for the future
hydrogen energy fuel for the future
 
Hydrogen energy
Hydrogen energyHydrogen energy
Hydrogen energy
 
Introduction to ElectroChemistry
Introduction to ElectroChemistryIntroduction to ElectroChemistry
Introduction to ElectroChemistry
 
Batteries ppt
Batteries pptBatteries ppt
Batteries ppt
 
Phosphoric acid fuel cell
Phosphoric acid fuel cellPhosphoric acid fuel cell
Phosphoric acid fuel cell
 
Solid oxide fuel cell technology
Solid oxide fuel cell technologySolid oxide fuel cell technology
Solid oxide fuel cell technology
 
High energy and capacity cathode material for li ion battries
High energy and capacity cathode material for li ion battriesHigh energy and capacity cathode material for li ion battries
High energy and capacity cathode material for li ion battries
 
Hydrogen energy
Hydrogen energyHydrogen energy
Hydrogen energy
 
How fuel cells work
How fuel cells workHow fuel cells work
How fuel cells work
 

Viewers also liked

C4 And C5 Multiple Choice Revision Quiz
C4 And C5 Multiple Choice Revision QuizC4 And C5 Multiple Choice Revision Quiz
C4 And C5 Multiple Choice Revision Quiz
Syed Kazmi
 
Electrolysis of brine
Electrolysis of brineElectrolysis of brine
Electrolysis of brine
Laura Ortega
 
Topic 7 Concept Electrolysis
Topic 7  Concept ElectrolysisTopic 7  Concept Electrolysis
Topic 7 Concept Electrolysisfalkirkvtc
 
Introduction to electrolysis(older)
Introduction to electrolysis(older)Introduction to electrolysis(older)
Introduction to electrolysis(older)
Laura Ortega
 
Testing and performance of IC engine
Testing and performance of IC engineTesting and performance of IC engine
Testing and performance of IC engine
Mustafa Bzu
 
Electrolysis
ElectrolysisElectrolysis
Electrolysis
lisa14hazel
 
Final ppt on water fuelled cars
Final ppt on water fuelled carsFinal ppt on water fuelled cars
Final ppt on water fuelled carsShantanu Chaudhary
 
ALL ABOUT OF HYDROGEN IN A PRESENTATION
ALL ABOUT OF HYDROGEN IN A PRESENTATIONALL ABOUT OF HYDROGEN IN A PRESENTATION
ALL ABOUT OF HYDROGEN IN A PRESENTATION
Abdullah Pathan
 
IGCSE Electricity
IGCSE ElectricityIGCSE Electricity
IGCSE Electricity
Carole Paquette
 
Electrolysis of water
Electrolysis of waterElectrolysis of water
Electrolysis of water
Gargie Das
 

Viewers also liked (15)

Harsh mangla
Harsh manglaHarsh mangla
Harsh mangla
 
A review on water electrolysis
A review on water electrolysisA review on water electrolysis
A review on water electrolysis
 
C4 And C5 Multiple Choice Revision Quiz
C4 And C5 Multiple Choice Revision QuizC4 And C5 Multiple Choice Revision Quiz
C4 And C5 Multiple Choice Revision Quiz
 
Electrolysis
Electrolysis Electrolysis
Electrolysis
 
An Introduction to Brine Waste
An Introduction to Brine WasteAn Introduction to Brine Waste
An Introduction to Brine Waste
 
Electrolysis of brine
Electrolysis of brineElectrolysis of brine
Electrolysis of brine
 
Water as fuel
Water as fuelWater as fuel
Water as fuel
 
Topic 7 Concept Electrolysis
Topic 7  Concept ElectrolysisTopic 7  Concept Electrolysis
Topic 7 Concept Electrolysis
 
Introduction to electrolysis(older)
Introduction to electrolysis(older)Introduction to electrolysis(older)
Introduction to electrolysis(older)
 
Testing and performance of IC engine
Testing and performance of IC engineTesting and performance of IC engine
Testing and performance of IC engine
 
Electrolysis
ElectrolysisElectrolysis
Electrolysis
 
Final ppt on water fuelled cars
Final ppt on water fuelled carsFinal ppt on water fuelled cars
Final ppt on water fuelled cars
 
ALL ABOUT OF HYDROGEN IN A PRESENTATION
ALL ABOUT OF HYDROGEN IN A PRESENTATIONALL ABOUT OF HYDROGEN IN A PRESENTATION
ALL ABOUT OF HYDROGEN IN A PRESENTATION
 
IGCSE Electricity
IGCSE ElectricityIGCSE Electricity
IGCSE Electricity
 
Electrolysis of water
Electrolysis of waterElectrolysis of water
Electrolysis of water
 

Similar to Intro separate hydrogen and oxygen from water through electrolysis

Slm continued pg13
Slm continued pg13Slm continued pg13
Slm continued pg13
sweetsakshi1529
 
Self Learning Material for Chemical Effects of Electric Current
Self Learning Material for  Chemical Effects of Electric CurrentSelf Learning Material for  Chemical Effects of Electric Current
Self Learning Material for Chemical Effects of Electric Current
heny2803
 
Slm chmicl effcts of elctrc currnt
Slm chmicl effcts of elctrc currntSlm chmicl effcts of elctrc currnt
Slm chmicl effcts of elctrc currnt
sweetsakshi1529
 
Chapter 14 class 8 pdf
Chapter 14 class 8 pdfChapter 14 class 8 pdf
Chapter 14 class 8 pdf
NMEGHANA8A
 
Electric arc welding through salt water converted (1)
Electric arc welding through salt water converted (1)Electric arc welding through salt water converted (1)
Electric arc welding through salt water converted (1)
S PARVEEN SINGH
 
Salt water welding
Salt water weldingSalt water welding
Salt water welding
S PARVEEN SINGH
 
Hydrogen fuel cell car
Hydrogen fuel cell carHydrogen fuel cell car
Hydrogen fuel cell carAnum Mairaj
 
Build-It: Dimmable LED lantern
Build-It: Dimmable LED lanternBuild-It: Dimmable LED lantern
Build-It: Dimmable LED lantern
International Development Innovation Network
 
DavidFselfpolari -01
DavidFselfpolari -01DavidFselfpolari -01
DavidFselfpolari -01John Giles
 
How to Get the Most from your Lead-Acid Battery
How to Get the Most from your Lead-Acid BatteryHow to Get the Most from your Lead-Acid Battery
How to Get the Most from your Lead-Acid Battery
buybls
 
Ionic vs cova conductiv honors
Ionic vs cova conductiv honorsIonic vs cova conductiv honors
Ionic vs cova conductiv honorsEsther Herrera
 
Natural science experiment 2 u9
Natural science experiment 2 u9Natural science experiment 2 u9
Natural science experiment 2 u9
ceipvictorjara
 
#1242 Chemical Reaction Battery Student workbook
#1242 Chemical Reaction Battery Student workbook#1242 Chemical Reaction Battery Student workbook
#1242 Chemical Reaction Battery Student workbook
Sandy Lu
 

Similar to Intro separate hydrogen and oxygen from water through electrolysis (20)

Slm continued pg13
Slm continued pg13Slm continued pg13
Slm continued pg13
 
Jille
JilleJille
Jille
 
Self Learning Material for Chemical Effects of Electric Current
Self Learning Material for  Chemical Effects of Electric CurrentSelf Learning Material for  Chemical Effects of Electric Current
Self Learning Material for Chemical Effects of Electric Current
 
Slm chmicl effcts of elctrc currnt
Slm chmicl effcts of elctrc currntSlm chmicl effcts of elctrc currnt
Slm chmicl effcts of elctrc currnt
 
Electrolysis
ElectrolysisElectrolysis
Electrolysis
 
Chapter 14 class 8 pdf
Chapter 14 class 8 pdfChapter 14 class 8 pdf
Chapter 14 class 8 pdf
 
Electric arc welding through salt water converted (1)
Electric arc welding through salt water converted (1)Electric arc welding through salt water converted (1)
Electric arc welding through salt water converted (1)
 
Electrolysis
ElectrolysisElectrolysis
Electrolysis
 
Salt water welding
Salt water weldingSalt water welding
Salt water welding
 
We
WeWe
We
 
hydrogen gas used as fuel
hydrogen gas used as fuelhydrogen gas used as fuel
hydrogen gas used as fuel
 
Hydrogen fuel cell car
Hydrogen fuel cell carHydrogen fuel cell car
Hydrogen fuel cell car
 
Qtr 1 module 4 elements & compounds
Qtr 1 module 4 elements & compoundsQtr 1 module 4 elements & compounds
Qtr 1 module 4 elements & compounds
 
Build-It: Dimmable LED lantern
Build-It: Dimmable LED lanternBuild-It: Dimmable LED lantern
Build-It: Dimmable LED lantern
 
DavidFselfpolari -01
DavidFselfpolari -01DavidFselfpolari -01
DavidFselfpolari -01
 
Resistor
ResistorResistor
Resistor
 
How to Get the Most from your Lead-Acid Battery
How to Get the Most from your Lead-Acid BatteryHow to Get the Most from your Lead-Acid Battery
How to Get the Most from your Lead-Acid Battery
 
Ionic vs cova conductiv honors
Ionic vs cova conductiv honorsIonic vs cova conductiv honors
Ionic vs cova conductiv honors
 
Natural science experiment 2 u9
Natural science experiment 2 u9Natural science experiment 2 u9
Natural science experiment 2 u9
 
#1242 Chemical Reaction Battery Student workbook
#1242 Chemical Reaction Battery Student workbook#1242 Chemical Reaction Battery Student workbook
#1242 Chemical Reaction Battery Student workbook
 

Intro separate hydrogen and oxygen from water through electrolysis

  • 1. introSeparate Hydrogen and Oxygen from Water Through Electrolysis Electrolysis a method of separating elements by pushing an electric current through a compound. It is used in various industrial applications such as removing copper from its ore. It is also used to separate hydrogen and oxygen from water. Electrolysis isn't the most efficient way to obtain hydrogen, but it is one of the easiest and cheapest ways to "homebrew" hydrogen. Hydrogen is the most abundant element in the universe. With the "green-energy" craze and talk of powering our future oil-free economy on hydrogen, it has gotten much attention in the last few years. Learning about this potential fuel of the future is important and interesting. Besides, hydrogen is a powerful fuel, and blowing stuff up in the name of science is fun . step 1Electrolysis of Water - An Explanation This section is an explanation of the electrolysis of water, feel free to skip it if you don't find it interesting. 2H2O(l) = 2H2(g) + O2(g) As everyone knows a wate… step 2Materials ****DISCLAIMER**** You are putting electricity into water. It has the potential to be dangerous. Do so at your own risk. Be smart about it. If you wouldn't touch it with yo…
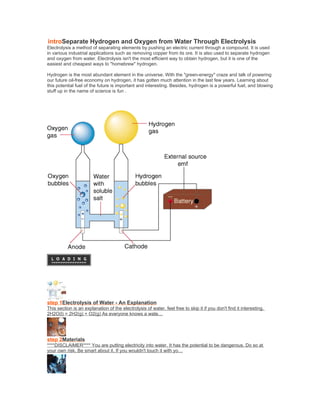
  • 2. step 3Water and Salt Water alone is not a very good conductor. You need to add some sort of electrolyte. Regular old table salt works fine. Add as much as will dissolve into the water, and don'… step 4The Tricky Part Ok, this is the tricky part. You need to flip the gas collecting container(s) upside down in the med. container, so that no air is trapped in the gas container(s). I do it … step 5The Electrodes Now take the two electrodes leading from your power source. The hydrogen will form on the positive electrode, and the oxygen on the negative. If you don't know which is whi… step 6Thats it! Thats it! Turn it on, and watch it bubble. The amount of time it takes depends on how powerful your power source is. Stronger it is, faster it bubbles. Mine takes about 5 … step 7Further Ideas When your gas collecting container is full, try lighting it. The hydrogen will give a very satisfying *POP*, and the oxygen won't do anything. Here's a Video (sorry for… tep 1Electrolysis of Water - An Explanation This section is an explanation of the electrolysis of water, feel free to skip it if you don't find it interesting. 2H2O(l) = 2H2(g) + O2(g) As everyone knows a water molecule is formed by two elements: two positive Hydrogen ions and one negative Oxygen ion. The water molecule is held together by the electromagnetic attraction between these ions. When electricity is introduced to water through two electrodes, a cathode (negative) and an anode (positive), these ions are attracted to the opposite charged electrode. Therefore the positively charged hydrogen ions will collect on the cathode and the negatively charged oxygen will collect on the anode. When these ions come into contact with their respective electrodes they either gain or lose electrons depending on there ionic charge. (In this case the hydrogen gains electrons and the oxygen loses them) In doing so these ions balance their charges, and become real, electrically balanced, bona fide atoms (or in the case of the hydrogen, a molecule). The reason this system isn't very efficient is because some of the electrical energy is converted into heat during the process. There have been reports of 50%-70% efficiency, but I doubt that is possible in a home environment. Anyway, enough with the boring stuff, lets go make some gas!
  • 3. i step 2Materials ****DISCLAIMER**** You are putting electricity into water. It has the potential to be dangerous. Do so at your own risk. Be smart about it. If you wouldn't touch it with your hands don't stick it in the water. If you're worried about it wearing rubber gloves will give some extra insulation. ****DISCLAIMER**** ****DISCLAIMER**** Hydrogen is highly flammable and explosive (think Hindenburg). The amount we're making isn't extremely dangerous, but be careful. Flying shards of glass are never fun.****DISCLAIMER**** Separating Hydrogen and oxygen from water is really simple. It can be as easy as sticking two wires leading from a battery into water and watching the bubbles form. We however want to collect all the little bubbles, so its just slightly more complicated. Things you will need: @ (1) Med.Container - To hold water. Preferably clear so you can see whats going on. @ (1 or 2) Gas Collecting Containers - A test tube, or an old soda bottle like me. Also clear. 2 if you want to collect both the hydrogen and the oxygen @ (1) Power Source - I use a 12v 1000mA adapter, 9v batteries (in a series) and other sources work too. Bigger the power source, faster the bubbles form. @ (2) Graphite Electrodes - Optional. You can stick a bare wire into the water, but it corrodes pretty quick.
  • 4. You can pull them out of a 6v Lantern Battery @ Salt @ Water step 3Water and Salt Water alone is not a very good conductor. You need to add some sort of electrolyte. Regular old table salt works fine. Add as much as will dissolve into the water, and don't worry about it if there is some sitting on the bottom, it really doesn't matter. Pour this salt/water solution into your med. container, and also fill your 1 or 2 gas collecting containers
  • 5. step 4The Tricky Part Ok, this is the tricky part. You need to flip the gas collecting container(s) upside down in the med. container, so that no air is trapped in the gas container(s). I do it by holding my thumb over the hole, and flip it really quickly. Its not a huge deal if air is trapped, your hydrogen just won't be pure.
  • 6. i
  • 7. step 5The Electrodes Now take the two electrodes leading from your power source. The hydrogen will form on the positive electrode, and the oxygen on the negative. If you don't know which is which, turn on the power source and stick the electrodes in the water. The one with more bubbles is the hydrogen. Now stick the electrode underneath the gas collecting container. (turn off the power first) If you're having trouble making the gas collecting container stay up, and the electrode stay in the right place, tape it. Thats what I do anyway. step 6Thats it! Thats it! Turn it on, and watch it bubble. The amount of time it takes depends on how powerful your power source is. Stronger it is, faster it bubbles. Mine takes about 5 min for a test tube. The electrodes do corrode if you don't have graphite, its pretty gross, but i don't think its dangerous. (don't quote me) Here is a video of it bubbling:
  • 8. i … introCollecting Hydrogen and Oxygen In this instructable I'll give you a simple way to collect Hydrogen gas and if you want also, to collect Oxygen. Depending on the voltage and current that you use for the project this could be hazardous. I used a 14.4 volt power drill battery pack for the process but don't recommend it, I only used it to achieve a noticeable effect in a short time period (about 20 minutes).
  • 9. i step 1Materials The required materials are: -Sufficient length of wire -DC power source -Deep water basin or bowl (preferably plastic, there is a chance you could ruin a metal one) -Water, logically -Weak acid (ex.vinegar as acetic acid) -At least two plastic bottles with caps (I like the Gatorade ones because they are thicker and for some reason the Hydrogen at least will compress itself after a few days) -A sacrificial pencil (or if you have lead [graphite] from an architect's pencil use that instead) -Small pencil lead case or even just the cap (the refill material case for mechanical pencils) -Tape -Putty -Marker to label the gases -Long piece of tubing if you cannot find a bowl deep enough -One sided blade or knife if you use a pencil -You may also want other materials to plate or turn into Oxide salts
  • 10. step 2The Non-Electric Setup Fill your bowl most of the way with water, the purity of which doesn't make much difference so long as you don't use mud or something. Now add your salt or weak acid to the water, it doesn't take a large amount of either to get a good result so be moderate with it you can always add more later but can't take it out. Fill the two bottles as full as you can with tap water and carefully put it into the water so that the lip of the bottle is turned down, do this with the second bottle. Make about two or three fingers worth of room between the bottom of the bowl and the lip of the bottle and tape it to the side so that the tape is not underwater. If you were unable to get all the air out this is the point where you want to get out that tubing and put it in the bottle while still underwater and suck the air out but try not to get a mouthful of acid or saltwater in your mouth.
  • 11. tep 3Electric Setup Take the pencil and shave off the wood so that all you have left is graphite, if it breaks wait to throw it way if it is long enough you may be fine. Then take two lengths of wire and strip the ends off for each wire wrap one end for both around a length of the graphite. Then take your pencil lead (graphite) case and push putty into it so that it is a solid mass and has no cracks. Take one of the wires and push the end with the graphite into it so that none of the metal of the wire is showing but the graphite is. Then secure the ends of the wires that do not have graphite to your DC source IMPORTANT-place the wire with the case on the positive (generally red) end of your source otherwise the unshielded wire will dissolve into an oxide salt
  • 12. step 4Combined Setup Now you're ready to place your electrodes into the electrolyte (saltwater / dilute acid). Arrange the electrodes so that the bubbles are floating into the bottles. If you have no bubbles then you did something wrong if you only have bubbles coming out of the negative side then you may be usingactual lead (unless you are intentionally oxidizing some other metal this is normal).
  • 13. step 5Filling and Conatainment Now all you have to do is wait for the bottles to become filled with the gas coming from the electrodes. When doing this the unshielded wire's bottle should be filling faster, about twice as fast because water is two parts Hydrogen and one part Oxygen (and because they are both part of the diatomic BrINClHOF [If you have not taken Chemistry disregard this statement it's not important]). If the unshielded wire is making less than the shielded one, turning blue or falls off then you may have switched the charges. If / when they do fill take the bottle cap of that bottle and make a ring around the inside of the cap and place it underwater and screw it on without letting air out or in. Once you do this use your marker to label it the bottle with the unshielded wire is Hydrogen and the shielded one is Oxygen if you did this correctly.
  • 14. step 6Extra Possibilities Along with making Hydrogen and Oxygen there are other things you can do with this concept. One is Making Oxide salts (i.e. metal+Oxygen such as Fe2O3) although this will not allow you to collect gaseous Oxygen, you can make pigments out of this such as turquoise blue with Copper or Orange with Iron. You can also make Aluminum powder for thermite, with the positive being Aluminum and the negative being Carbon (Graphite/pencil lead) the Aluminum either does not bond or it decomposes. If I'm wrong it will stay bonded but can still be used as a pyrotechnic. You may also plate a metal using this with the plating metal on the positive and the object to be plated on the negative although this will also crate it's oxide. All you have to remember is that the positive will dissolve into an oxide salt and the negative will be plated. Have fun experimenting
  • 15. i introHow to build a water assisted engine system
  • 16. Friends, I have an Idea budding in my head to run engines on water as fuel. Today, I will share my thoughts with you and provide you a good clue of what could be the solution of GAS alternative. Friends, before starting with the instructable I want to make it clear that I haven't build anything with this idea as of now. So, I am not completely sure how far it is safe and possible. With this in mind lets start the 'project ENVIRONMENT'..... I TAKE NO RESPONSIBILITY OF HARM CAUSED DUE TO THIS INSTRUCTABLE. P.S.: Those who are looking for the prototype, this instructable will not help you. I will like to thank all those whose instructables I have used here. step 1Basic Concept The concept is to generate hydrogen from water through electrolysis and use it to power the usual petrol engine. Electrolysis of water: Go to my instructable on 'HHO … step 2Supply hydrogen gas to engine Supply hydrogen generated from electrolysis to engine through the petrol intake valve. Petrol engine uses a mixture of petrol and air to fire. Instead of petrol we will … step 3Vary voltage of DC supply to control Electrolysis process THIS IS THE STEP WHERE I HAVE NO CLUE OF WHAT CAN BE USED TO VARY VOLTAGE. HOWEVER, I can help you of what can be done. Use a tachometer sensor (tachometer is used to r…
  • 17. step 4The DC supply DC supply powers the electrolysis process.... To charge the supply, use a battery or dynamo/alternator. Read the following instructable: http://www.instructables.c… introHHO generator Hi frnds! Here I am at my attempt to give you more information about powering engine using water. This instructable is a part of my previous one. Do visit that one to get a clear idea. I am posting a video on how to build a HHO generator which will produce HHO gas to power your car's engine. The video has part 2 for details. It leads you to a site and wants you to buy the guide. I am posting my version and giving you a detailed information on how to do it. Let's start! i tep 1Things we need Things we need. Parts:
  • 18. 1. Glass jar with plastic lid 2. Pet/squeeze bottle 3. 1000mm long braided wire 4. 500mm long water pipe 5. 1000mm long electric wire 6. CD case or thick plastic sheet 7. 2 screws with nut 8. Hollow screw with nut 9. Cheap pen without refill 10. Fuse Tools: 1. Drill machine with bits 2. Screw driver set 3. Saw 4. Ruler 5. Plase step 2Setting the plastic lid Remove the lid from the jar and with the help of ruler mark the centre of the lid. Mark four holes for HHO gas, 2screws and fuse. Drill holes through the marked points and insert screws and fuse respectively.
  • 19. Now, take the cheap pen and cut near the rear end and insert the piece in the HHO gas hole (watch the video). Now, insert the water pipe at one of the pen. Connect the wires to the screws. The lid is now ready.
  • 20. step 3Making the wire mesh for electrolysis For making wire mesh, take a plastic sheet and divide it from centre. Then cut into 2 pieces using a saw as shown below. Mark the center of each of 2 pieces and draw a line from the centre to one end. Cut using saw as shown below. Now, carefully drill holes and cut small grooves at the end of the piece and join them as shown below. Use the braided wire and cut it into 2 and insert in each of the 2 holes of the plastic sheet. Cover the sheet with the wire as shown below and then connect the 2 ends of the wire to each screw respectively. It should look similar to figure shown below.
  • 21. http://www.instructables.com/id/S8QMPLOFJ8OHYNN/ tep 4setting up the pet/squeeze bottle Make a hole and insert the pipe in the bottle. Make sure the pipe reaches to the bottom of the bottle. Now, drill a second hole and insert the hollow screw there. This hole is for using the HHO gas. Fill the bottle with water and leave some space for air. The Center one will pass the HHO gas through water and you will see bubbles coming out. The gas will than escape through the hollow screw which can then be used for combustion. tep 5Summary
  • 22. The assembly is complete. Fill some distilled water and 3-4 tea spoons of baking soda. Connect the electric wires to 6V to 12V battery to start the process. HHo gas is released from water. It travels through the pipe into the bottle releasing bubbles and escape from the hollow screw. You can use this gas to run your vehicles engine. MAKE SURE YOU HAVE SEALED ALL LEAKS. I TAKE NO RESPONSIBILITY FOR ANY ACCIDENTS AND/OR CASUALTY CAUSED DURING TRYING THIS EXPERIMENT. VISIT www.hho4cars.com to know more about the use of this gas. Pass on this instructable to all your friends and relatives and let them know the benefits of water. Enjoy!
  • 23. introHHO car adaptation HHO is the gas resulting from electrolysis of water. Two H's and an O when seperated are very flamable. On top of being abundant it is cheap and cleaner burning than gasoline. Operating on purley HHO requires lots of modifications to a car but suplementing your gasoline with HHO requires little. There are a million sites out there on HHO car conversion kits. All of them are building plans for anywhere between 50 to 500 dollars. It seems odd that there is no instructable on it. So here, for free, is my attempt at making one. The text at the top is my first try and the text under the "-" line is my second try. step 5From container to car Now do the same for your plastic hosing as you did for the electrodes. Melt(or cut) a hole IN THE TOP and seal your hose into it. The hose needs to be long enough to reach the outlet coming from your air filter in your car. Melt(or cut) a hole in the hose leaving your air filter and seal in the hose coming from your HHO container. Ouch, I hated to do that step. Willful destruction of car parts. It
  • 24. helps a lot if you have an easily removable piece like I did. I wanted to mention it somewhere and I thought the inserting your electrodes step was already to long, wrap some teflon tape around the teeth that hold the cap on. This will cause LESS HHO to leak out the top. I don't think its possible to completly stop hydrogen from leaking out of a container while allowing easy access to pour more water in. The water you put in this container needs to have baking soda mixed in. I read that using salt will produce chlorine gas. That seems likley to me as salt is NA CL. Sodium and chloride on their own are deadly to you but combined they sure taste good. In other words don't use it. -updates- -I was going to use baking soda origianly but I later read that it lets out solutions that are corossive to aluminum. Chances are your car's engine is made out of it. Furthermore, the chlorine will be coming out of your tail pipe. Who breathes in car emissions that wants to live anyway? The chlorine released is small ammounts too. . step 4Inserting your electrodes I did this all wrong at first. I was cutting holes in the plastic with my knife. It is so much better to use a soddering iron to melt a hole in your grape juice bottle and then using a circular motion widden it it to fit your electrode. I had to seal over and over again on the knife cuts but the soddering holes sealed in one try. Now you ask where do I put these holes at? I placed my electrodes on opposite sides of the container. I was thinking that the further apart they were the more water the current would pass through and create more HHO. I later read that having them closer together is actually more preferable as the electricity is "burned up" in the resistance rather than actually doing work on seperating the molecules. Please post if you think you know how it really works.(update: not necessary. Put them very close together) However it works, it is very important to know that the electrodes are NOT continuous. That means they do not touch anywhere and they need to be secured so that while driving they do not run into each other. To secure my electrodes I soddered two holes next to it while it was in the container and fed some wire sheathing through to tie it down. It is likley this step will frustrate you unless you plan on big holes and more sealant. I would not recomend using any sort of metal(tie wire)because it will corrode inside the container. A tie wrap would probably be nice though. The wire and connector on the electrode need to be on the outside of the container. Then you can begin the sealing. Generously apply sealant to anywhere water may leakout. Let it dry for 24 hours(so says the tube) then fill it with water. If it leaks drain it and put more sealant where it was leaking. Advice from a big dummy: If your electrode is hollow like mine seal one or both ends. I will let you think why.(there's 24 hours wasted) -updates- -the graphite I used is much much smaller than the original electrodes but produces almost the same ammount of gas because they are so close. Holding the graphite down inside the container isn't as necessary because the tye
  • 25. wraps will always hold them a certain distance apart. step 3Building your electrodes I originaly intended to sodder my wire to the stainless steel. Go ahead and try if you like but it wont stick. So then I decided to drill and tap a hole in the pipe. I feel a clamp on connector would work better but I didn't have one. I did have a 1/4" bolt though. Wrap one wire around the bolt and screw it in tight. The bolt I used was very short and did not go through to the inside of the opposite side of the pipe. The screw in method I used probably saves more space than a clamp on. -updates- -Ok, so apparently regualr stainless steel does not work as an electrode. It lasted for 8 operational hours. People have said that 316L stainless will work better but I have my doubts. Instead I made them out of graphite. I give complete credit to hooloovoo33 for the suggestion in his instructable here( http://www.instructables.com/id/Separate-Hydrogen-and-Oxygen-from- Water-Through-El/ ). It is a very long and tedious prcoess the way I did it. I bought 2 jumbo sized kid's pencils(78 cents) and carved them down to the graphite core. I originally thought "I will just carve down one side and lift it out of the wood". WRONG. Pencil companys must use glue in their process becuase it dosnt come out easy. Even thin solitary pieces of wood clung to the graphite. What you can do is type in to google "buy graphite rod" and the machine shops that sell it will pop up(along with fishing poles). I found it as cheap as $5.86 for a single 1/2" by 10" rod, which would be enough when cut in half. To connect the wire to the pencil lead I stripped back a long section of wire wrapped it around the lead twice and then twisted the wire back on itself and twisted like crazy with pliers. At this point I broke open the tube of sealant and dipped the end of the grapite with the wire in sealant. It gave me a great seal doing it that way rather than going over and over it with the tube's end. This was more a matter of frustration than technique. You need two conductors so do this twice. After it dried I wrapped a big thick tye wrap around the top and bottom of each piece of graphite. Then wrap another tye wrap to hold them together. They should still be the width of a thick tye wrap apart. This is to allow the electrodes to be as close as possible without touching.
  • 26. step 2Plan your build Before you start cutting into your own grape juice containers and sealing be sure it fits in your car. Find a spot to cram your plastic container into. It needs to be away from direct conact to the motor. Near the battery or air filter is preferable. I got lucky that my battery is directly beside my air filter and there is a huge space under the air intake piping. Also, when you have cramed it in there....be sure to close the hood and make sure that it really fits ;P. Chances are you will not be able to use the huge bottle I did. The bottle size will help you determine what kind of electrode you will be using and how much of it you need to obtain. The location will determine how much wire and plastic hose you will need. -updates- -In my picture you may see the plastic container is bent a little where the plastic hose comes into it. I didnt just start bashing it. I aplied gradually increasing preassure until it bent to the shape I desired. step 6Giving life to your monster This is going to be the scetchiest part of my instructable. I am still searching on a good way to power it only when the car is on without having to drill through the fire wall, without having to connect some wires, or flip a switch everytime I get in the car. A wire from one electrode needs to go to negative and the other to positive of your car battery. I just ran the wires up to the top of the hood so I can connect them when I get to my car and tuck them in neatly the rest of the time. -updates- -Going through the firewall wasn't as bad as I thought. I just looked under the steering wheel and saw all the wires running through a rubber stopper. I rammed a fishtape through there and caught it inside the hood. I pulled 1 wire through and cut it. To turn it on simply connect that 1 wire back together. For now I am using wire nuts but it shouldn't be a problem to connect it to a button or switch. I took apart my dash because I was going to connect it to the rear defrost button(I have used it maybe twice in 3 years) but there was all kinds of circuit board wiring hooked up to it so I said forget it. i
  • 27. http://www.instructables.com/id/SGX361EFHY0H5AJ/ tep 7Results I have a 2003 Cavalier. The worst mpg I ever calculated was 28. I was purposfully flooring it every where I went just to see what the worst case scenario was. The best I have ever calculated was 45 while following closley behind truckers(they sure hate that). On average I fill my tank up and go 400 to 420 miles before my "pull over and get gas" light comes on. When my light comes on I am able to put 13 gallons in the tank. 400/13=about 31 The electrodes lasted for half a tank and I got 500 miles out of it. Assuming I got 200 miles out of the other half as usual: 500-200=300 300miles/6.5gallons=46mpg 46/31=1.48 thats a 48% increase in fuel economy! -updates- -With the graphite I got 510 miles out of a tank. 510/13=39 39/31=1.25 a 25% increase in fuel economy. I'm sure that if I increased the size of the electrode the mpg would increase. The pencil lead is just so small. I will update again. P.S. My wife ran off with the camera to a florida vacation in the middle of my build. Thats why there are no pictures of the graphite electrodes. When she came back the camera wasn't working. step 1Tools and Materials This page ended up changing through the process and can vary depending on how you choose to improve upon the design I used. Tools: knife or strippers soddering iron(not essential but saves time) screw driver voltage tester(depends) *drill *#7 bit *1/4" tap *may change depending on the electrode you use and how you connect it to the wire Materials:(Keep in mind all the materials I used are "borrowed" from work or I had around the house so they won't be the most effective solutions. Be creative with what you use) Plastic container (I used a grape juice bottle) High temperature silicone sealant <-expensive; regular silicone sealant MAY work Wire (I used some left over wire from the amp that went in my wife's car, 14awg) Teflon tape Plastic tubing (I had to siphon gas once to change the fuel pump and had this hose from it, not sure why I kept it but I'm glad I did) salt (for an electrolyte in the water) Stainless Steel Electrode(update: THIS WILL NOT WORK) I put this one on bottom because it will have the biggest explination. I am told stainless isn't esential but will not corrode like other metals. I also read that coiled wire would be the best type(i.e. pipe, plate, wire).Platinum would be your number 1 choice but who can afford that? I used some pipe I found at work.
  • 28. -updates- -I ended up using the graphite from 2 pencils as my electrodes