Insight 360 and teacher app new users
•
1 like•299 views

Learn more about Insight 360 here : http://www.einstruction.com/insight-360-overview I am the authorized K-12 representative in South Carolina for eInstruction by Turning Point. Bill McIntosh SchoolVision Inc.. Authorized South Carolina K-12 Consultant for eInstruction by Turning Technologies Phone :843-442-8888 Email :WKMcIntosh@Comcast.net Twitter : @OtisTMcIntosh SchoolVision Website on Facebook: https://www.facebook.com/WKMIII Website : www.einstruction.com Stay Connected - @eInstruction • Facebook Turning Technologies | 255 West Federal Street | Youngstown, OH Main: 330-746-3015 | Toll Free: 866-746-3015 | Fax: 330-884-6065 www.TurningTechnologies.com

Recommended
More Related Content
Viewers also liked
Viewers also liked (13)
Similar to Insight 360 and teacher app new users
Similar to Insight 360 and teacher app new users (20)
More from William McIntosh
More from William McIntosh (20)
Recently uploaded
Recently uploaded (20)
Insight 360 and teacher app new users
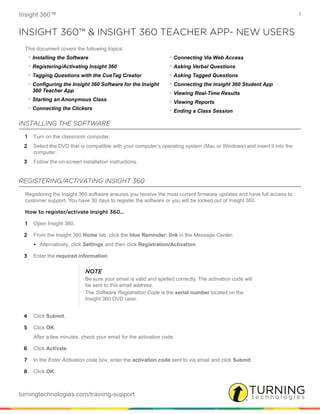
- 1. Insight 360™ 1 turningtechnologies.com/training-support INSIGHT 360™ & INSIGHT 360 TEACHER APP- NEW USERS This document covers the following topics: INSTALLING THE SOFTWARE 1 Turn on the classroom computer. 2 Select the DVD that is compatible with your computer’s operating system (Mac or Windows) and insert it into the computer. 3 Follow the on-screen installation instructions. REGISTERING/ACTIVATING INSIGHT 360 Registering the Insight 360 software ensures you receive the most current firmware updates and have full access to customer support. You have 30 days to register the software or you will be locked out of Insight 360. How to register/activate Insight 360... 1 Open Insight 360. 2 From the Insight 360 Home tab, click the blue Reminder: link in the Message Center. • Alternatively, click Settings and then click Registration/Activation. 3 Enter the required information. 4 Click Submit. 5 Click OK. After a few minutes, check your email for the activation code. 6 Click Activate. 7 In the Enter Activation code box, enter the activation code sent to via email and click Submit. 8 Click OK. • Installing the Software • Registering/Activating Insight 360 • Tagging Questions with the CueTag Creator • Configuring the Insight 360 Software for the Insight 360 Teacher App • Starting an Anonymous Class • Connecting the Clickers • Connecting Via Web Access • Asking Verbal Questions • Asking Tagged Questions • Connecting the Insight 360 Student App • Viewing Real-Time Results • Viewing Reports • Ending a Class Session NOTE Be sure your email is valid and spelled correctly. The activation code will be sent to this email address. The Software Registration Code is the serial number located on the Insight 360 DVD case.
- 2. Insight 360™ 2 turningtechnologies.com/training-support TAGGING QUESTIONS WITH THE CUETAG CREATOR The Start Tagging icon on the Insight 360 Home tab opens the CueTag Creator. Placing a CueTag on a page allows you to use the Insight 360 system to ask and record student responses to questions that you have already created in existing course materials. How to tag quiz questions in computer documents with the CueTag Creator... 1 Open the file to be tagged. 2 On the Insight 360 Home tab, click Start Tagging. The CueTag Creator window opens. 3 Select the type of question to be tagged from the Question drop-down menu. 4 Select the question format and click the button that represents the correct answer. A thin barcode is generated in the CueTag Preview box. 5 Enter a short description in the box provided if necessary. The short description is displayed on the Mobi 360 or the Insight 360 Teacher app. The short description is also displayed in the reports. 6 If an educational standard should be associated with this question, click Standard and select the applicable standard. 7 Drag and drop, or copy and paste the CueTag into the in the appropriate place in the document. CONFIGURING THE INSIGHT 360 SOFTWARE FOR THE INSIGHT 360 TEACHER APP Before connecting the Insight 360 Teacher app to the desktop computer, you must enable the feature in the Insight 360 software. How to configure the Insight 360 software for the Insight 360 Teacher app... 1 Download and install the Insight 360 Teacher app from the appropriate app store. 2 Open the Insight 360 desktop software, click My Settings and select the Mobile Devices tab. 3 Check the box labeled Enable Insight 360 Teacher app. NOTE You can only assign one standard per CueTag. NOTE DO NOT change the size and DO NOT “hide” the CueTag from the screen. The CueTag must be visible to be recognized.
- 3. Insight 360™ 3 turningtechnologies.com/training-support 4 Enter the Computer Name (Alias) and Password in the boxes provided. STARTING AN ANONYMOUS CLASS An anonymous class session can be used when you want to start an impromptu session or when a class has not been pre-configured in Insight 360. During an anonymous class student devices are not associated with specific students. Insight 360 will save data for an anonymous class session and you can associate the data to a class after the session ends. How to start an anonymous class... 1 Tap the Class. Confirm the class name, section, period number and days are correct. 2 Tap Start Anonymous Class. CONNECTING THE CLICKERS The Insight 360 software is compatible with the Pulse 360/Spark 360 and ResponseCard NXT clickers. How to connect the clickers... 1 Start a class session. 2 Plug in the clicker receiver. 3 If you are using the Pulse 360/Spark 360 clickers, press the power button to turn on the clicker. 4 If prompted, enter the Join Code (JC). CONNECTING VIA WEB ACCESS Web Access is a browser-based version of a clicker. How to connect via Web Access 1 Start a class session. 2 Instruct the students to go to insight360.einstruction.com. 3 Enter the Student ID/Sticker ID in box provided or leave the box blank to join the session anonymously. NOTE The computer name must be unique. This is the name you will select when connecting to the desktop computer form the iPad. NOTE If you are using the ResponseCard NXT the Join Code (JC) is the same as the Channel Number.
- 4. Insight 360™ 4 turningtechnologies.com/training-support 4 Enter the Session Code in the box provided. 5 Click Join. A welcome message is displayed. 6 Click Proceed to Class. Otherwise, click That’s Not Me to return to the Join Class screen. CONNECTING THE INSIGHT 360 STUDENT APP You may join the class session using a Sticker ID or Student ID, depending on the configuration the teacher chose. How to connect with the Insight 360 Student app... 1 On the student device, tap the Insight 360 Student icon. The Connect to Desktop screen is displayed. 2 Tap the computer desktop to connect. a Most recently connected desktops appear in the Previous Desktops area at the top of the screen. Swipe from right to left to access additional desktops when applicable. b If you know the IP address of your teacher’s computer, you can tap Connect by IP, type in the IP address, then tap Next. 3 On the Choose a Login Method screen, tap Join as a known user if your student ID or Device ID is recorded as part of the class roster. Otherwise, tap Join as a guest user, which allows you to participate as an Anonymous student. 4 Type Sticker ID, Student ID, or Name in the box provided. 5 To enter a session code, type the session code into the Session Code box. 6 Keep the Remember Me box checked if you will always use this ID and session code on this device. 7 Tap Join. A welcome message is displayed. 8 If the name is correct, tap OK to join the active class session. Otherwise, tap That’s Not Me to return to the Connect to Desktop screen. If you receive a message stating that the connection limitation has been reached, your device will not be allowed to join. The teacher may disconnect some student devices to allow others to join. If the device displays a message that you have already joined the session, the Student ID or Sticker ID has been entered on another device during the same session. Check both devices to ensure the correct ID is entered on the correct device. The second device will not be allowed to connect. When the Insight 360 Student app has successfully connected to a computer desktop, the desktop and connection information appears in the Previous Desktop list at the top of the Connect to Desktop screen the next time the app is opened. NOTE If you joined the class session anonymously, click Yes on the Join Anonymously? screen.
- 5. Insight 360™ 5 turningtechnologies.com/training-support ASKING VERBAL QUESTIONS Verbal questions allow you to set up an impromptu question and receive feedback through student response systems. You can ask the following types of questions through the Verbal Questions tab: True/False, Yes/No, Numeric, Multiple Choice (up to six options), Multiple Answer and Short Answer. How to ask verbal questions during instruction... 1 Tap the Question Zone icon. The Ask A Question Type screen is displayed. 2 Tap the Question Type. The Select Question Type window opens. 3 Tap the desired question and answer bullet (ABC or 123) types and tap Back. 4 Tap Answer. 5 Tap or enter the appropriate answer information based on the selected question type and tap Back. 6 Tap Timer to set the timer. Tap Plus or Minus to set the timer with more or less time. 7 Ask your students the question and include all options (if multiple choice). Request students to answer by pressing the corresponding key on their student response systems. 8 Tap Start. 9 If all students answer the question before the timer is finished, tap Stop. 10 To start another question, tap New. ASKING TAGGED QUESTIONS When the tagged question is visible on your classroom computer screen, the tagged question icon will be active. How to ask tagged questions... 1 Tap the Question Zone icon. The Ask a Question screen is displayed. 2 Tap Timer to set the timer. Tap Plus or Minus to set the timer with more or less time. 3 Ask your students the question and include all options (if multiple choice). Request students to answer by pressing the corresponding key on their clickers. Tap to display the results on the classroom computer screen. Tap to display the timer on the classroom computer screen. Tap to display the response grid on the classroom computer screen.
- 6. Insight 360™ 6 turningtechnologies.com/training-support 4 Tap Start. 5 If all students answer the question before the timer is finished, tap Stop. VIEWING REAL-TIME RESULTS The Response Distribution Chart displays the number of student responses for each answer choice in the most recent question and is compatible with all supported question types. The chart provides a summary of student responses for an individual question and can be displayed on the classroom computer desktop. The Student Performance Table lists question responses by student name and is compatible with all supported question types. Icons indicate whether each answer is correct or incorrect. A series of dashes indicates that a connected student has not yet responded to the question. How to view real-time results... 1 Start a Verbal, Tagged or ExamView question. 2 The Response Distribution is displayed as the students respond. • The total number of students who have answered the question is displayed in the upper-left corner; automatically updates as students enter responses. • Options are displayed in alphabetical or numerical order. The number of students who selected each option is displayed at the top of the column. • Where applicable, the correct answer is displayed in green. • If students did not select an option, that option is not displayed. 3 Swipe from right to left to view the Student Performance Table. Tap to display the results on the classroom computer screen. Tap to display the timer on the classroom computer screen. Tap to display the response grid on the classroom computer screen. NOTE The chart and table will appear slightly different for short answer questions to accommodate the responses. NOTE You can display this chart on-screen for students.
- 7. Insight 360™ 7 turningtechnologies.com/training-support VIEWING REPORTS There are two reports available on the Insight 360 Teacher app: • The Performance Summary displays the student name, number of correct answers and percentage of correct answers. The Performance Summary is similar to the Student Performance Summary report on the Insight 360 software’s My Results tab. • The Item Summary displays session question data by question number. The Item Summary also displays number of students who answered correctly, number of students who answered incorrectly, class percentage of correct answers, and type of question. The Item Summary is similar to the Question Analysis report on the My Results tab in the Insight 360 software. How to view the Performance Summary on the Insight 360 Teacher app... 1 Start a Verbal, Tagged or ExamView question. 2 Tap Session Results. 3 Swipe from right to left or left to right to view the Performance or Item Summary reports. ENDING A CLASS SESSION A class session does not end in Insight 360 until you tap End Class. If the device hibernates or is turned off, it will resume the current class session until the class is ended on the device. Insight 360 saves class session information while the session runs. When you end a class session, the Insight 360 software makes the session information available for review and editing. This information may include session date and start time, Screenshots and Question Results. You can retrieve session information in My Results in Insight 360. How to end a class session... 1 Tap the Session icon. 2 Tap End Class. NOTE The Performance and Item Summary reports cannot be displayed on the classroom computer screen.