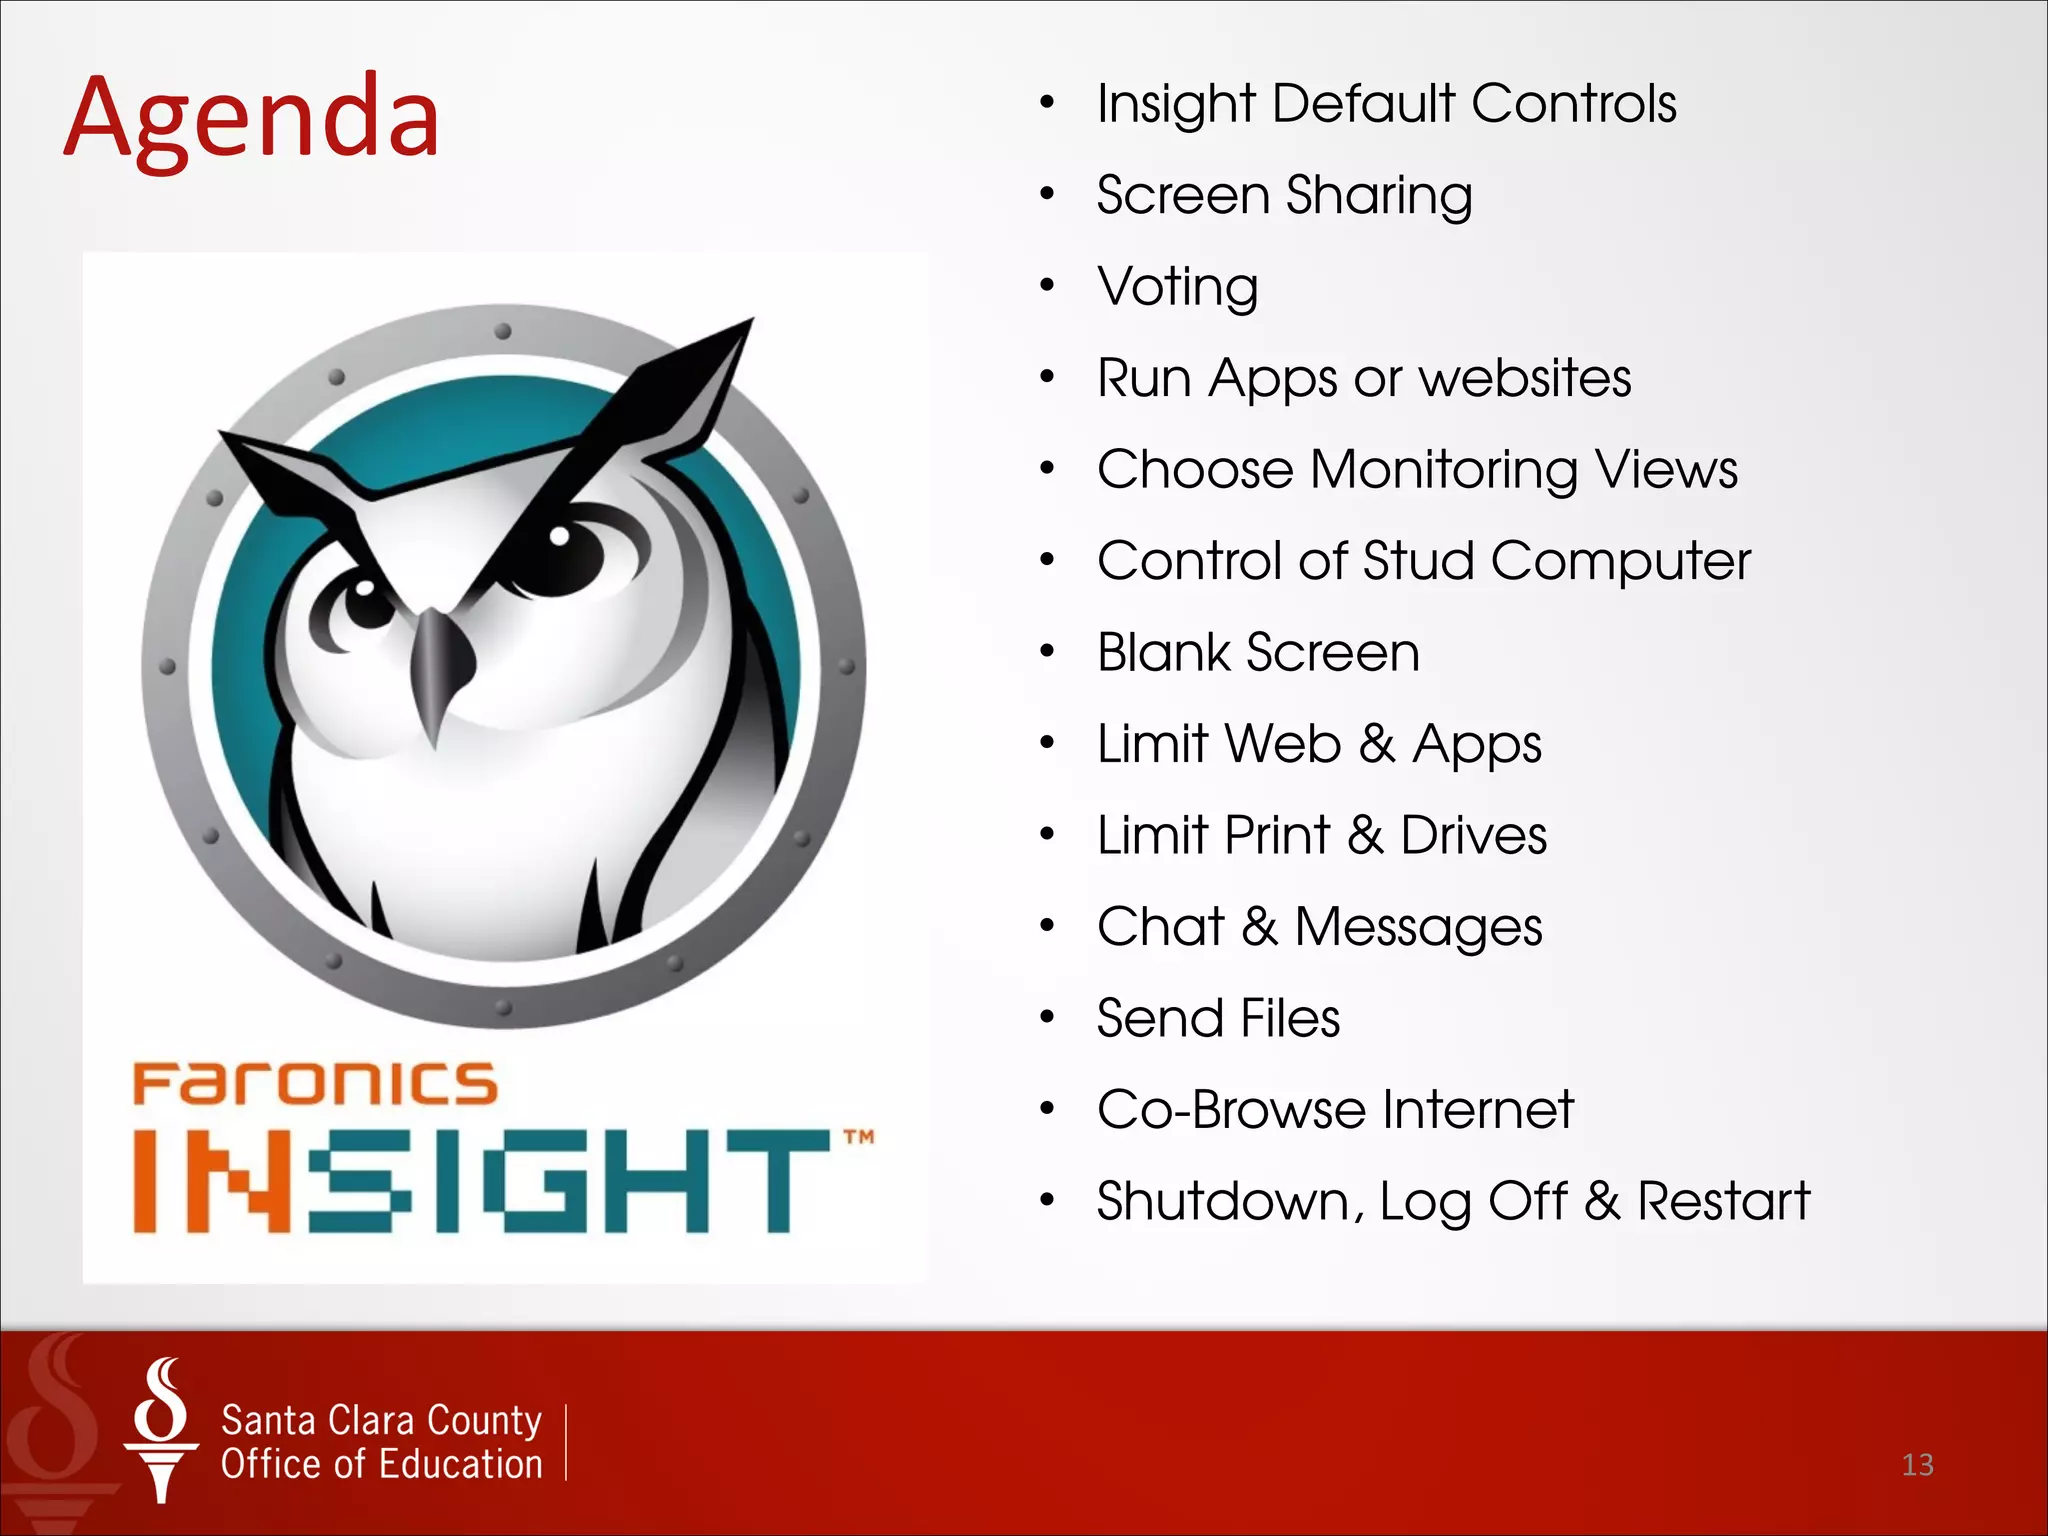
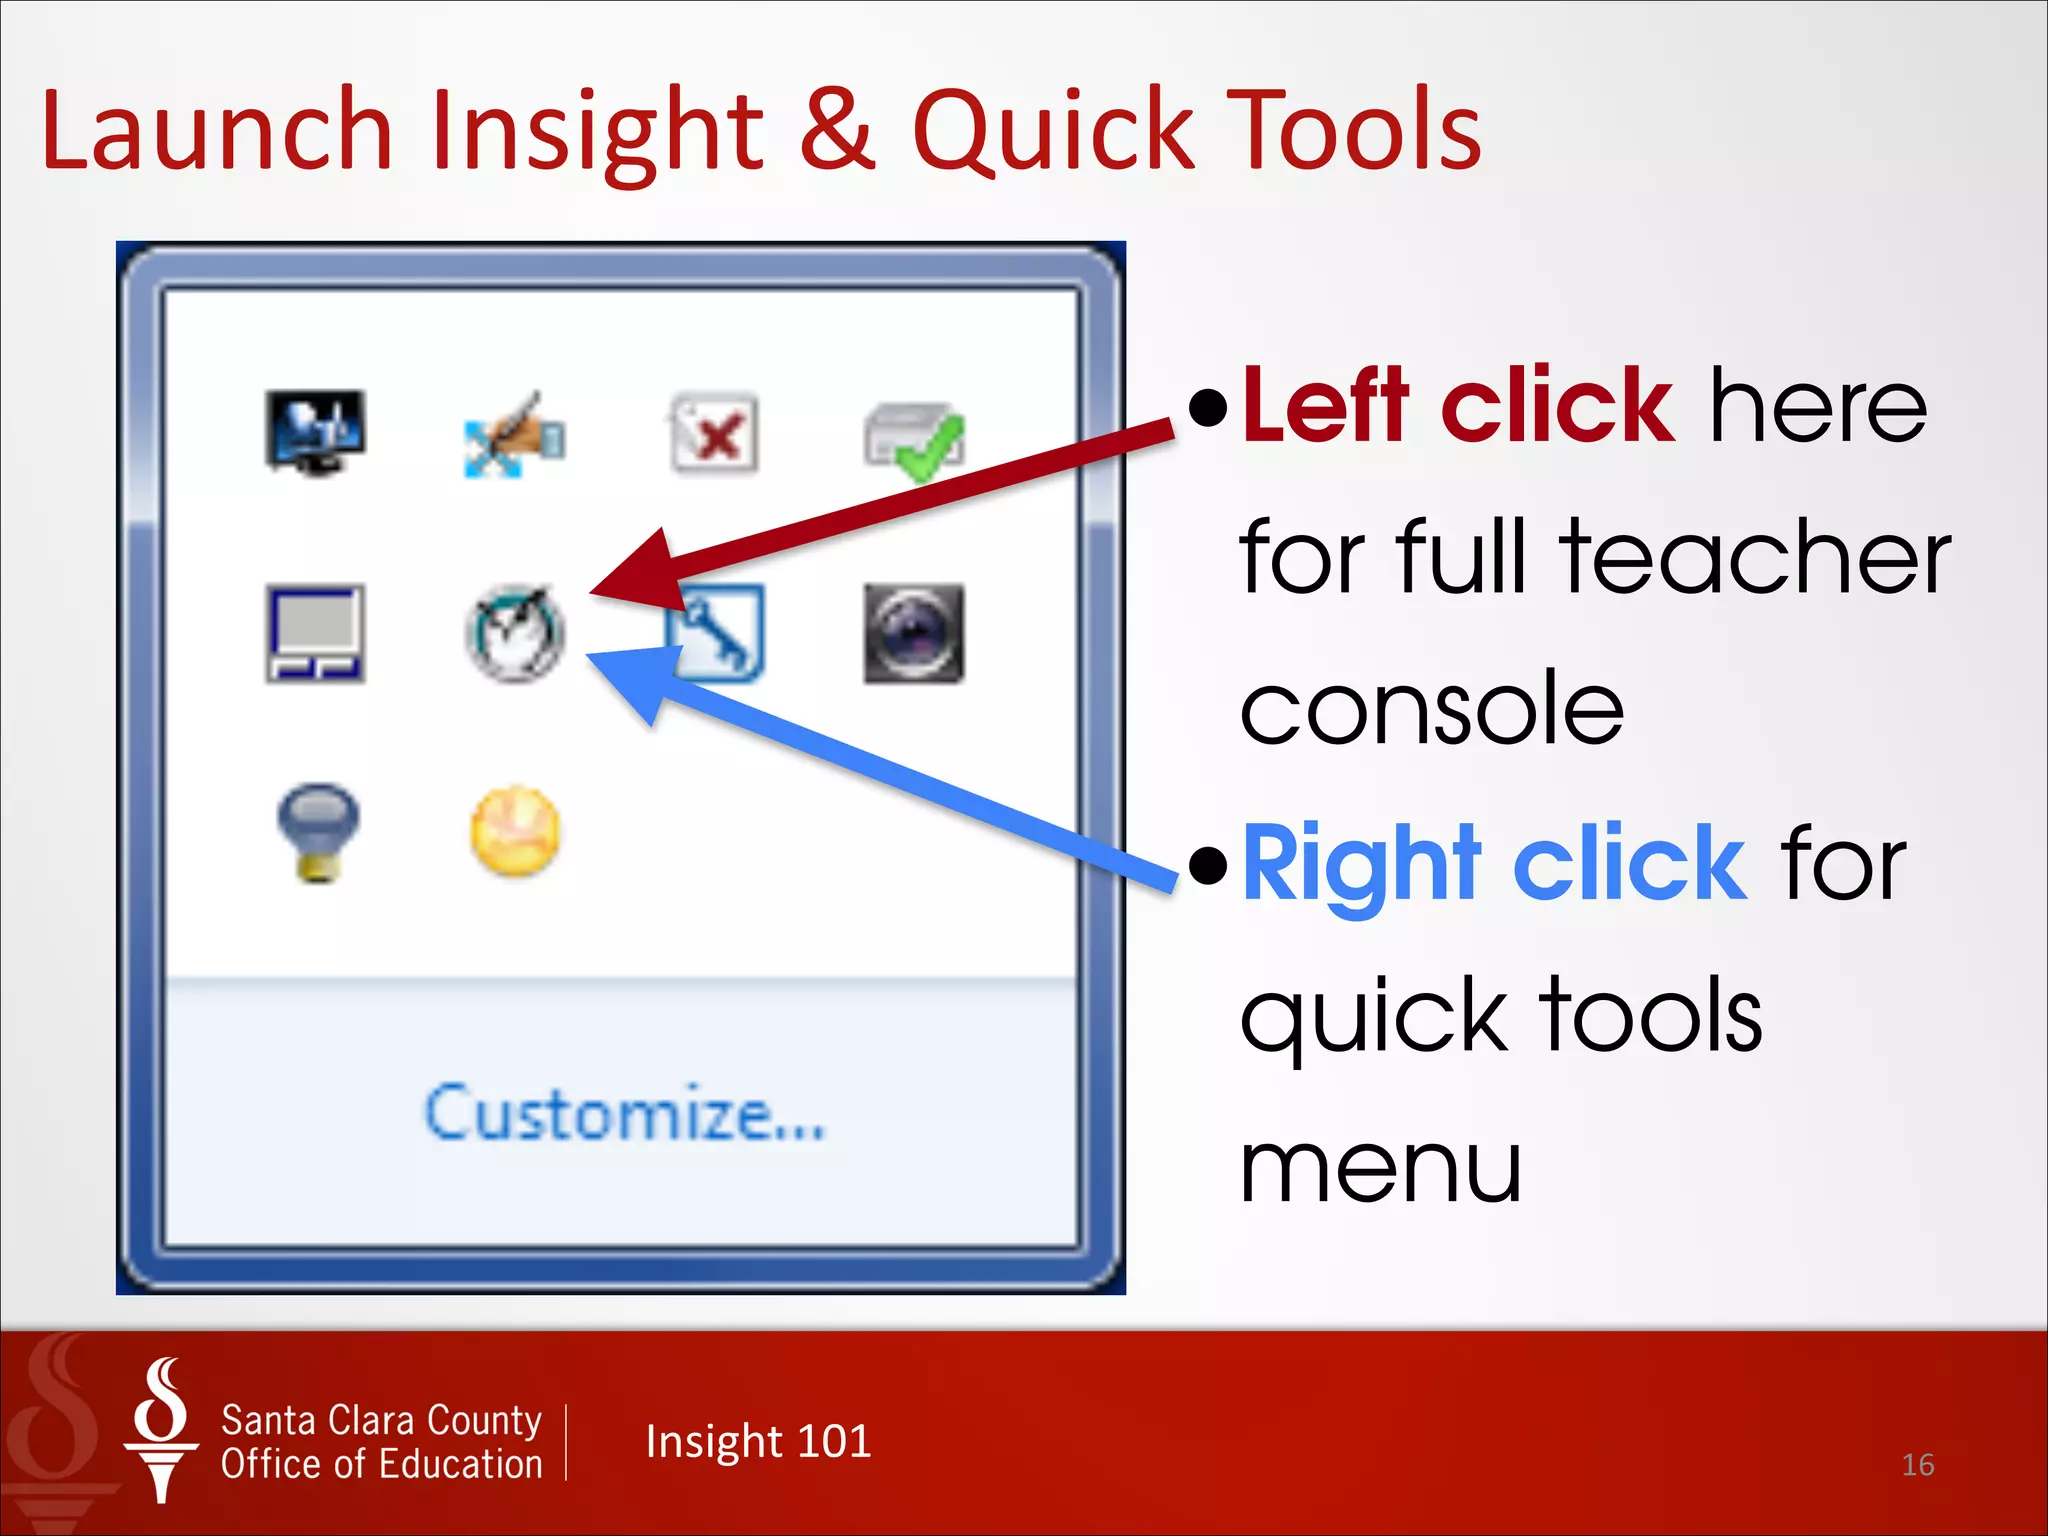
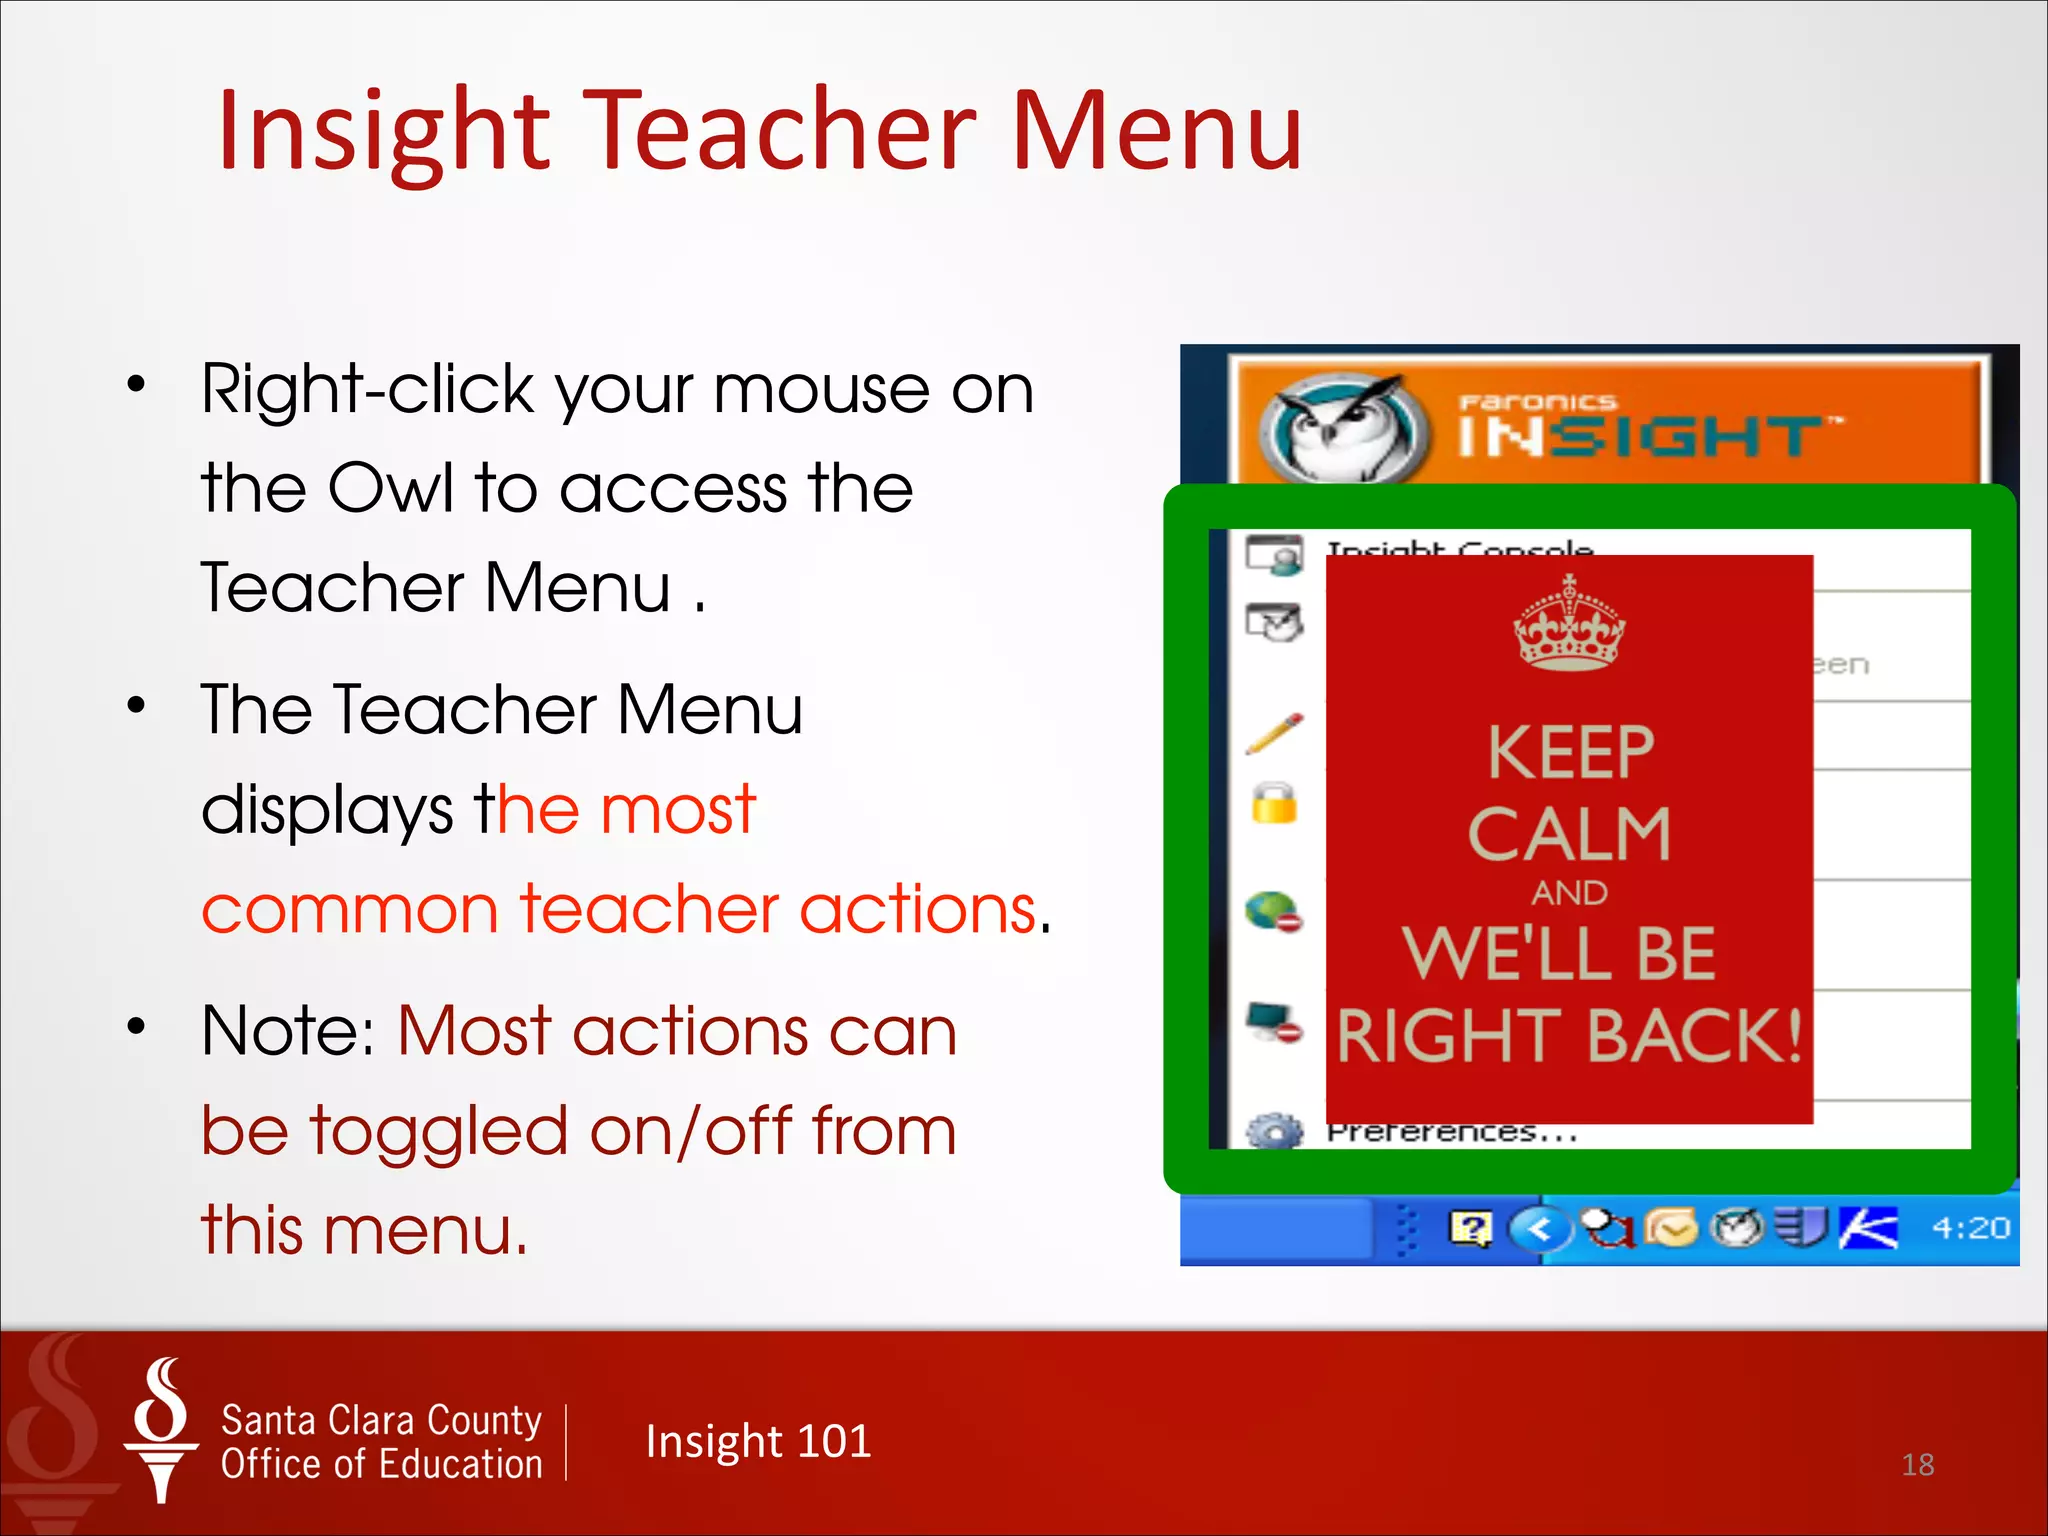
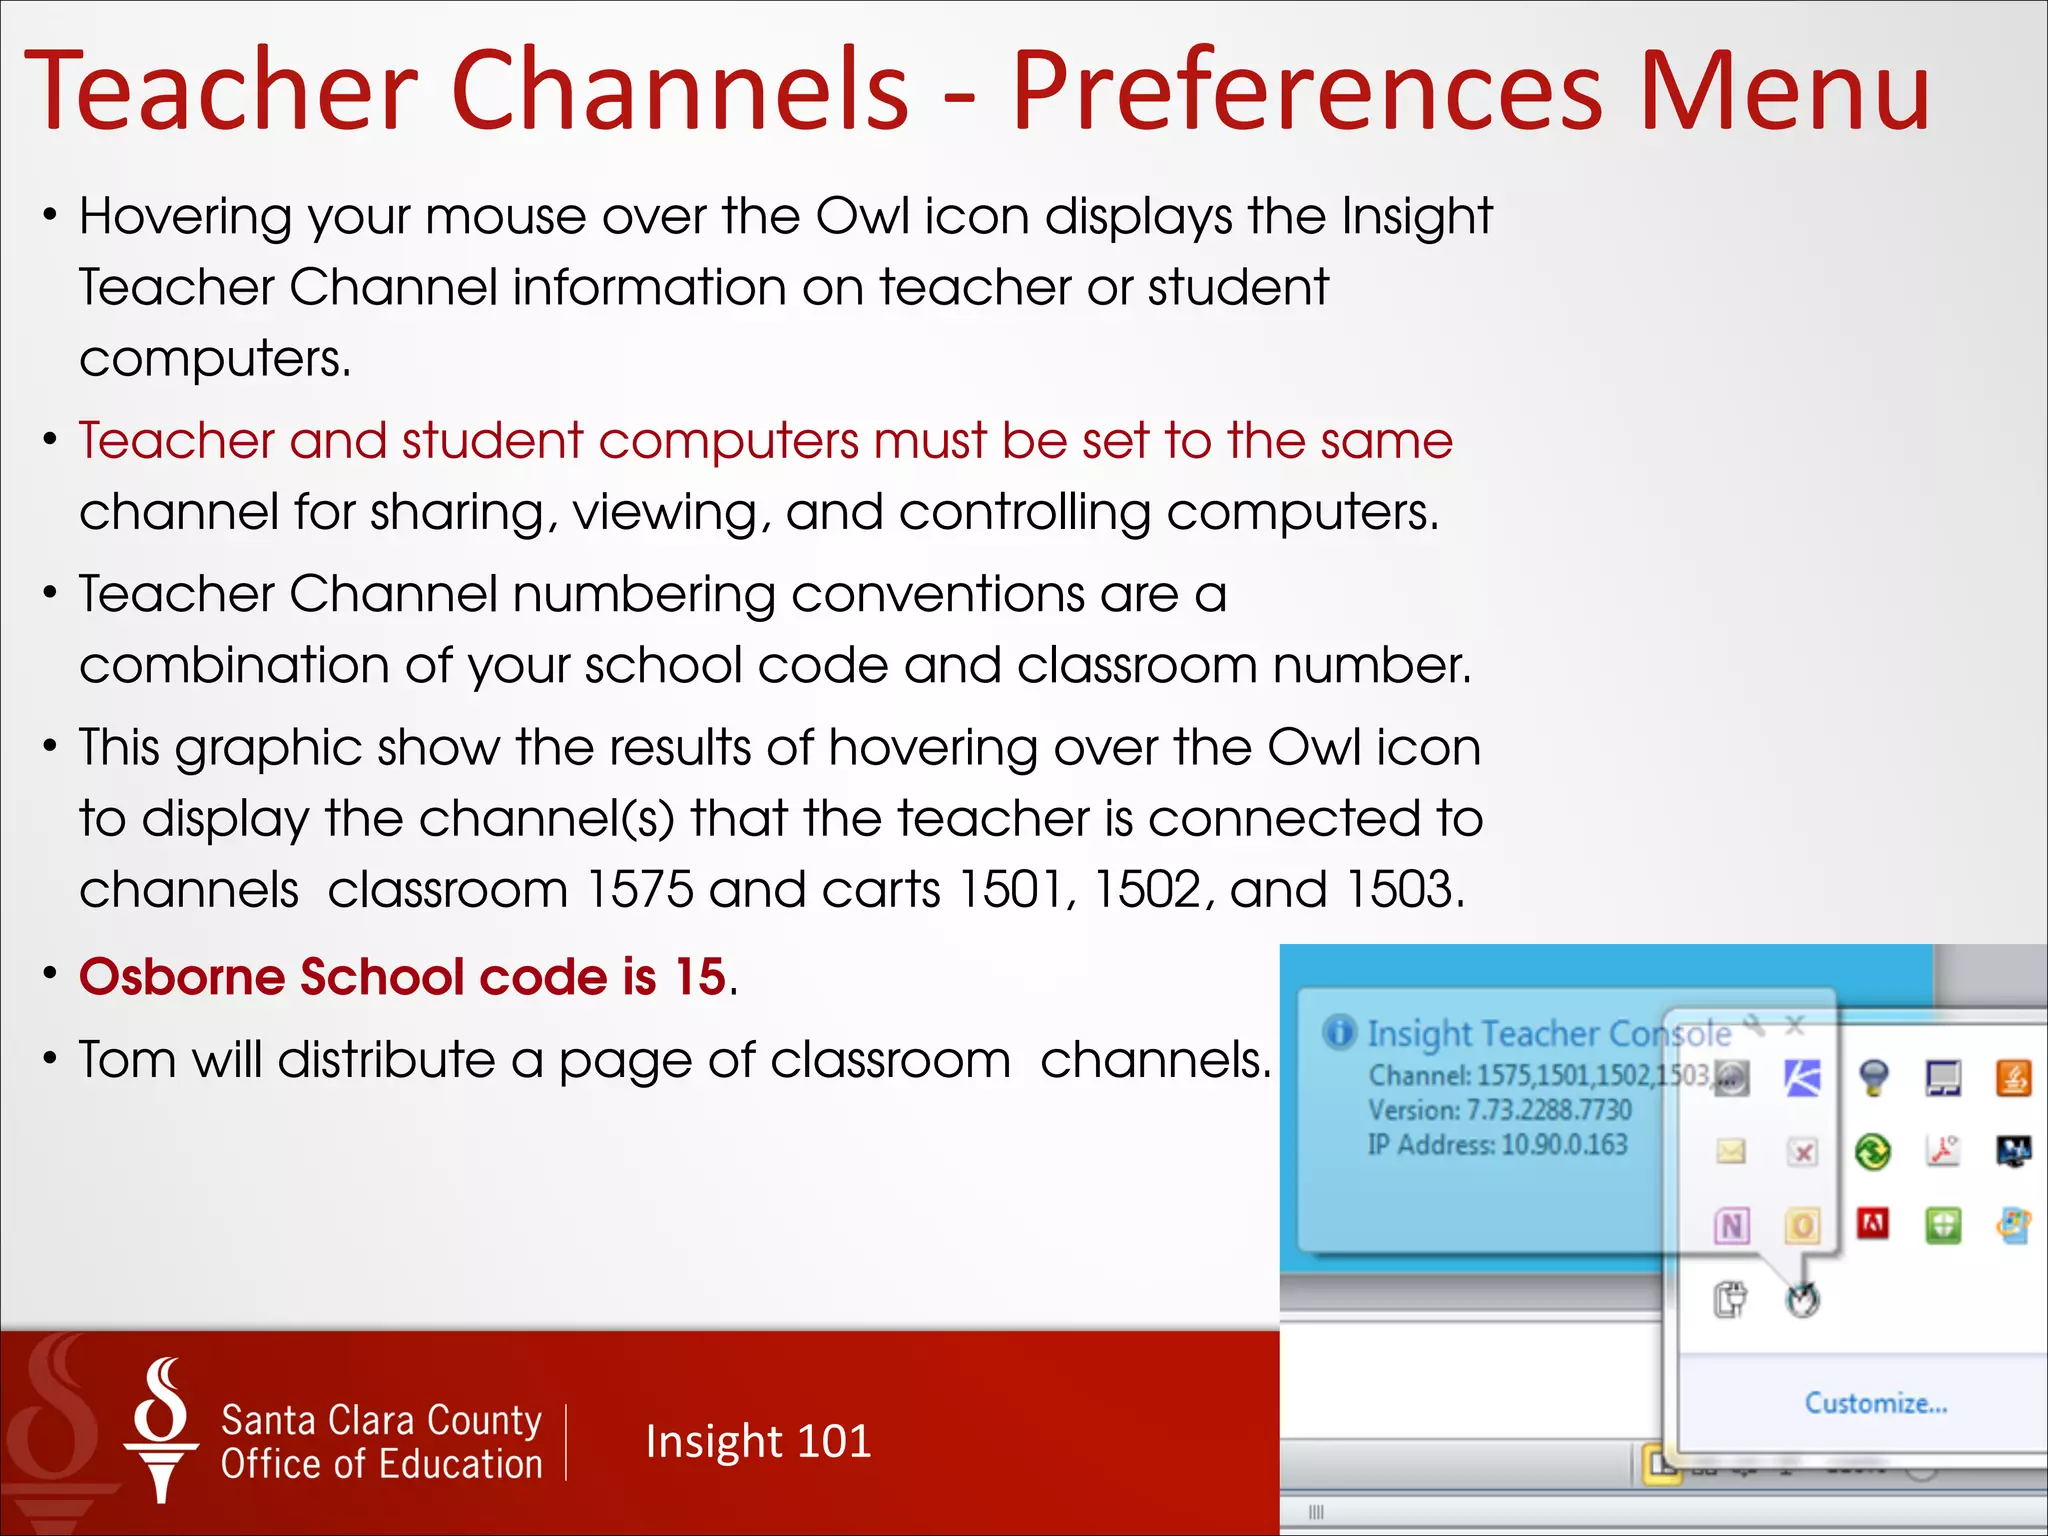
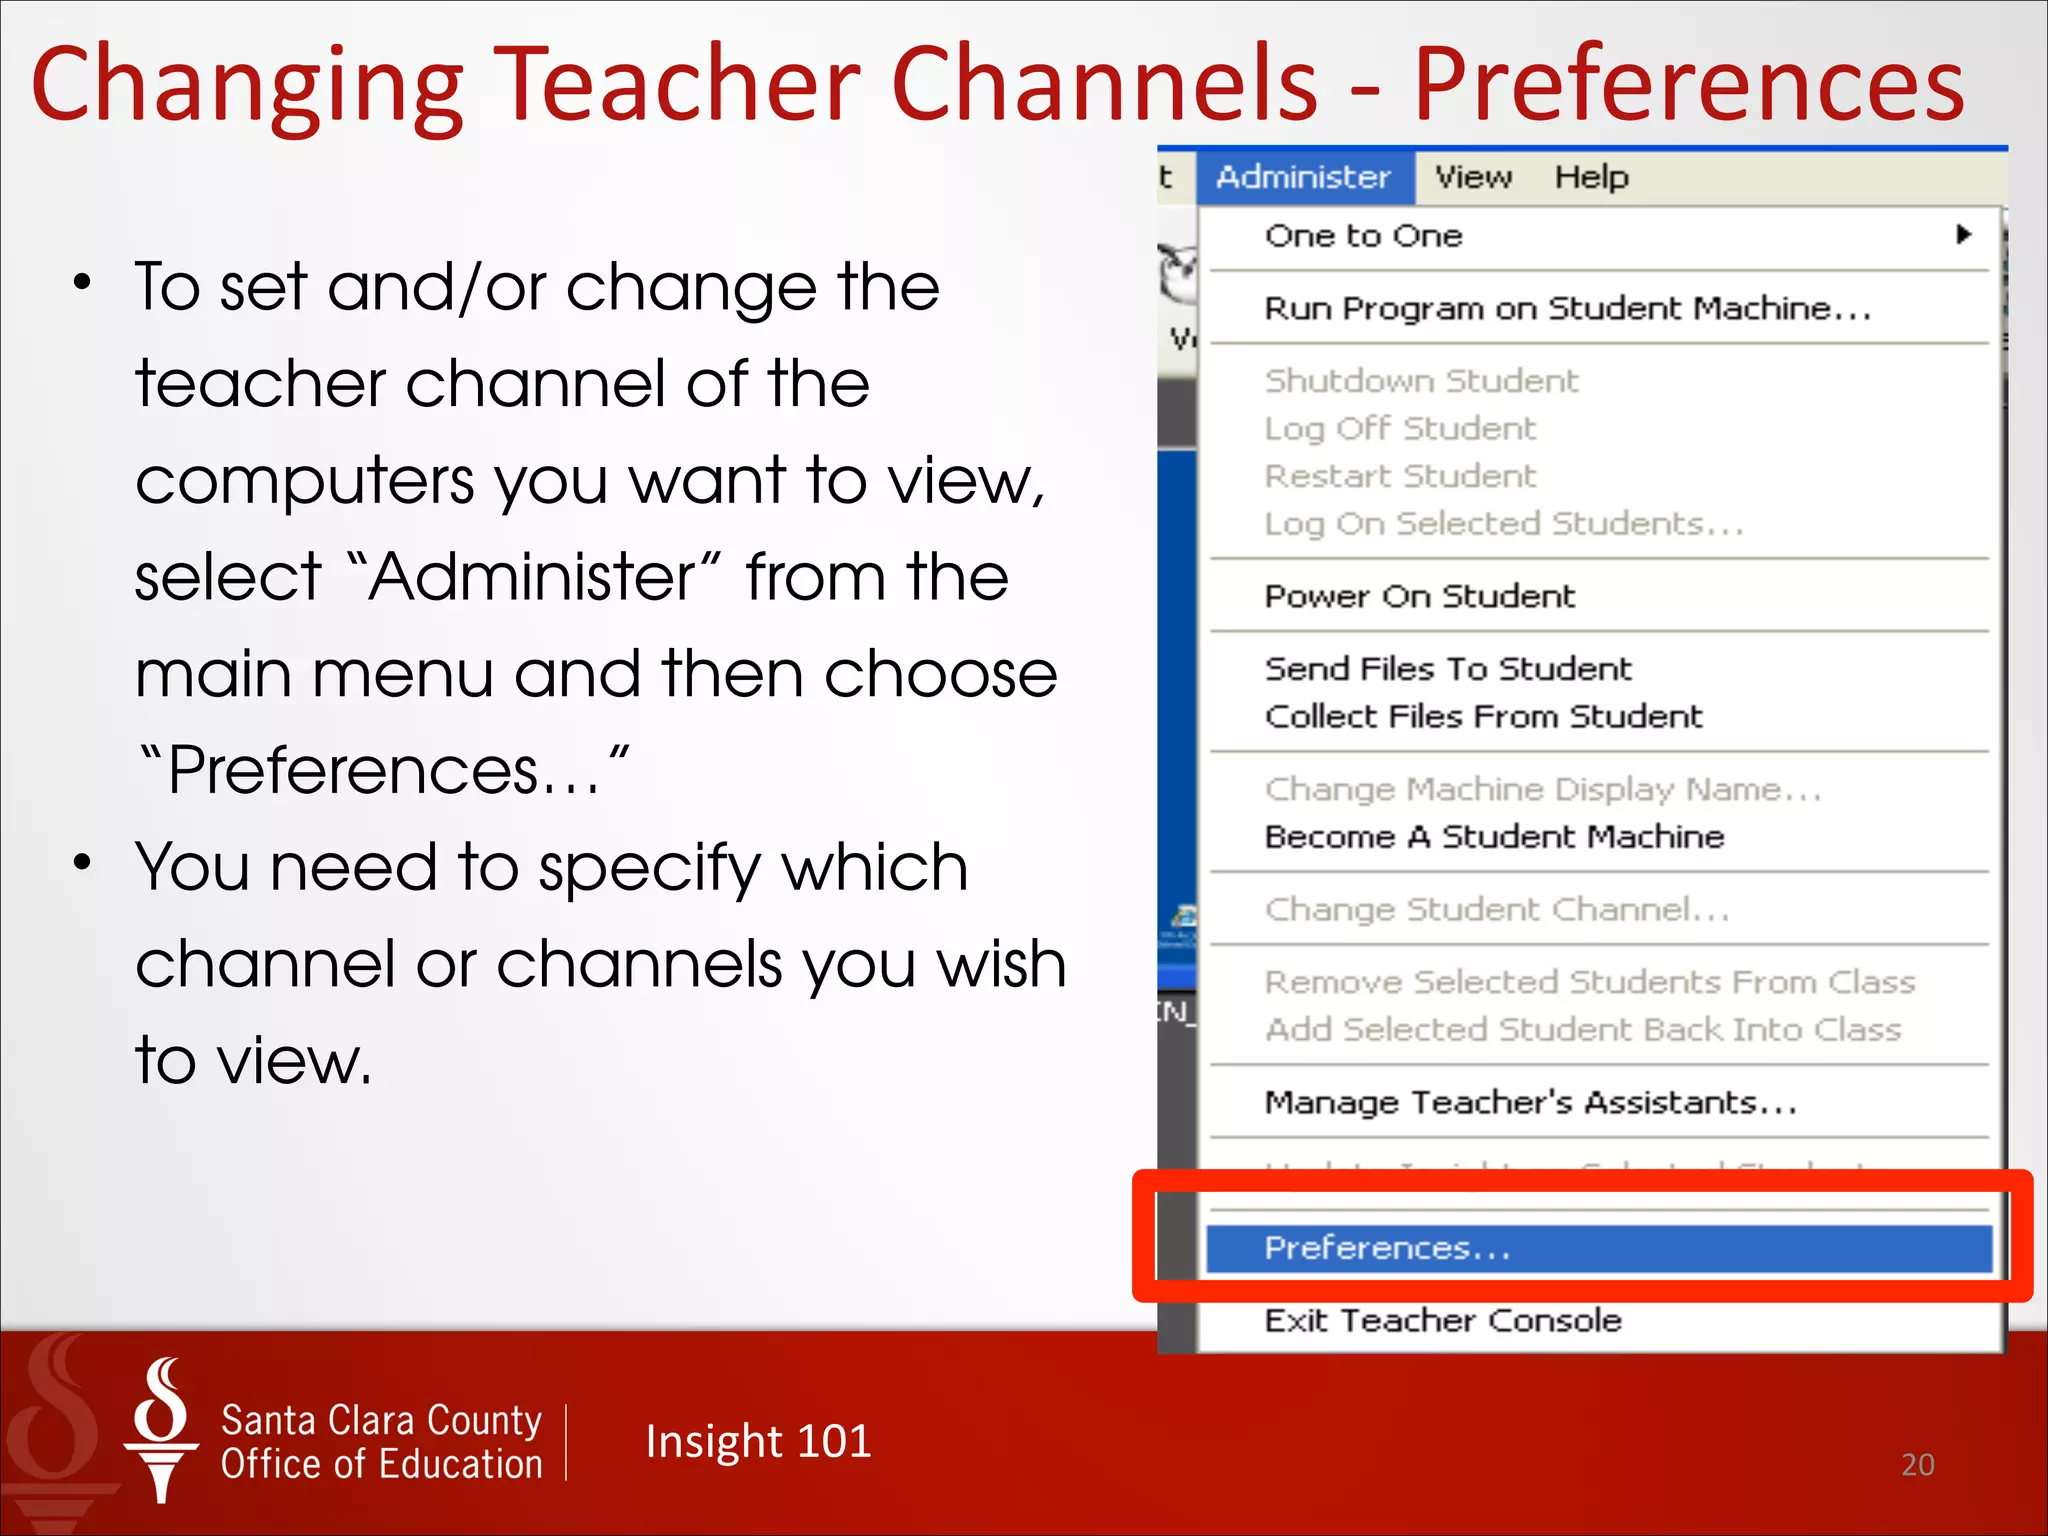
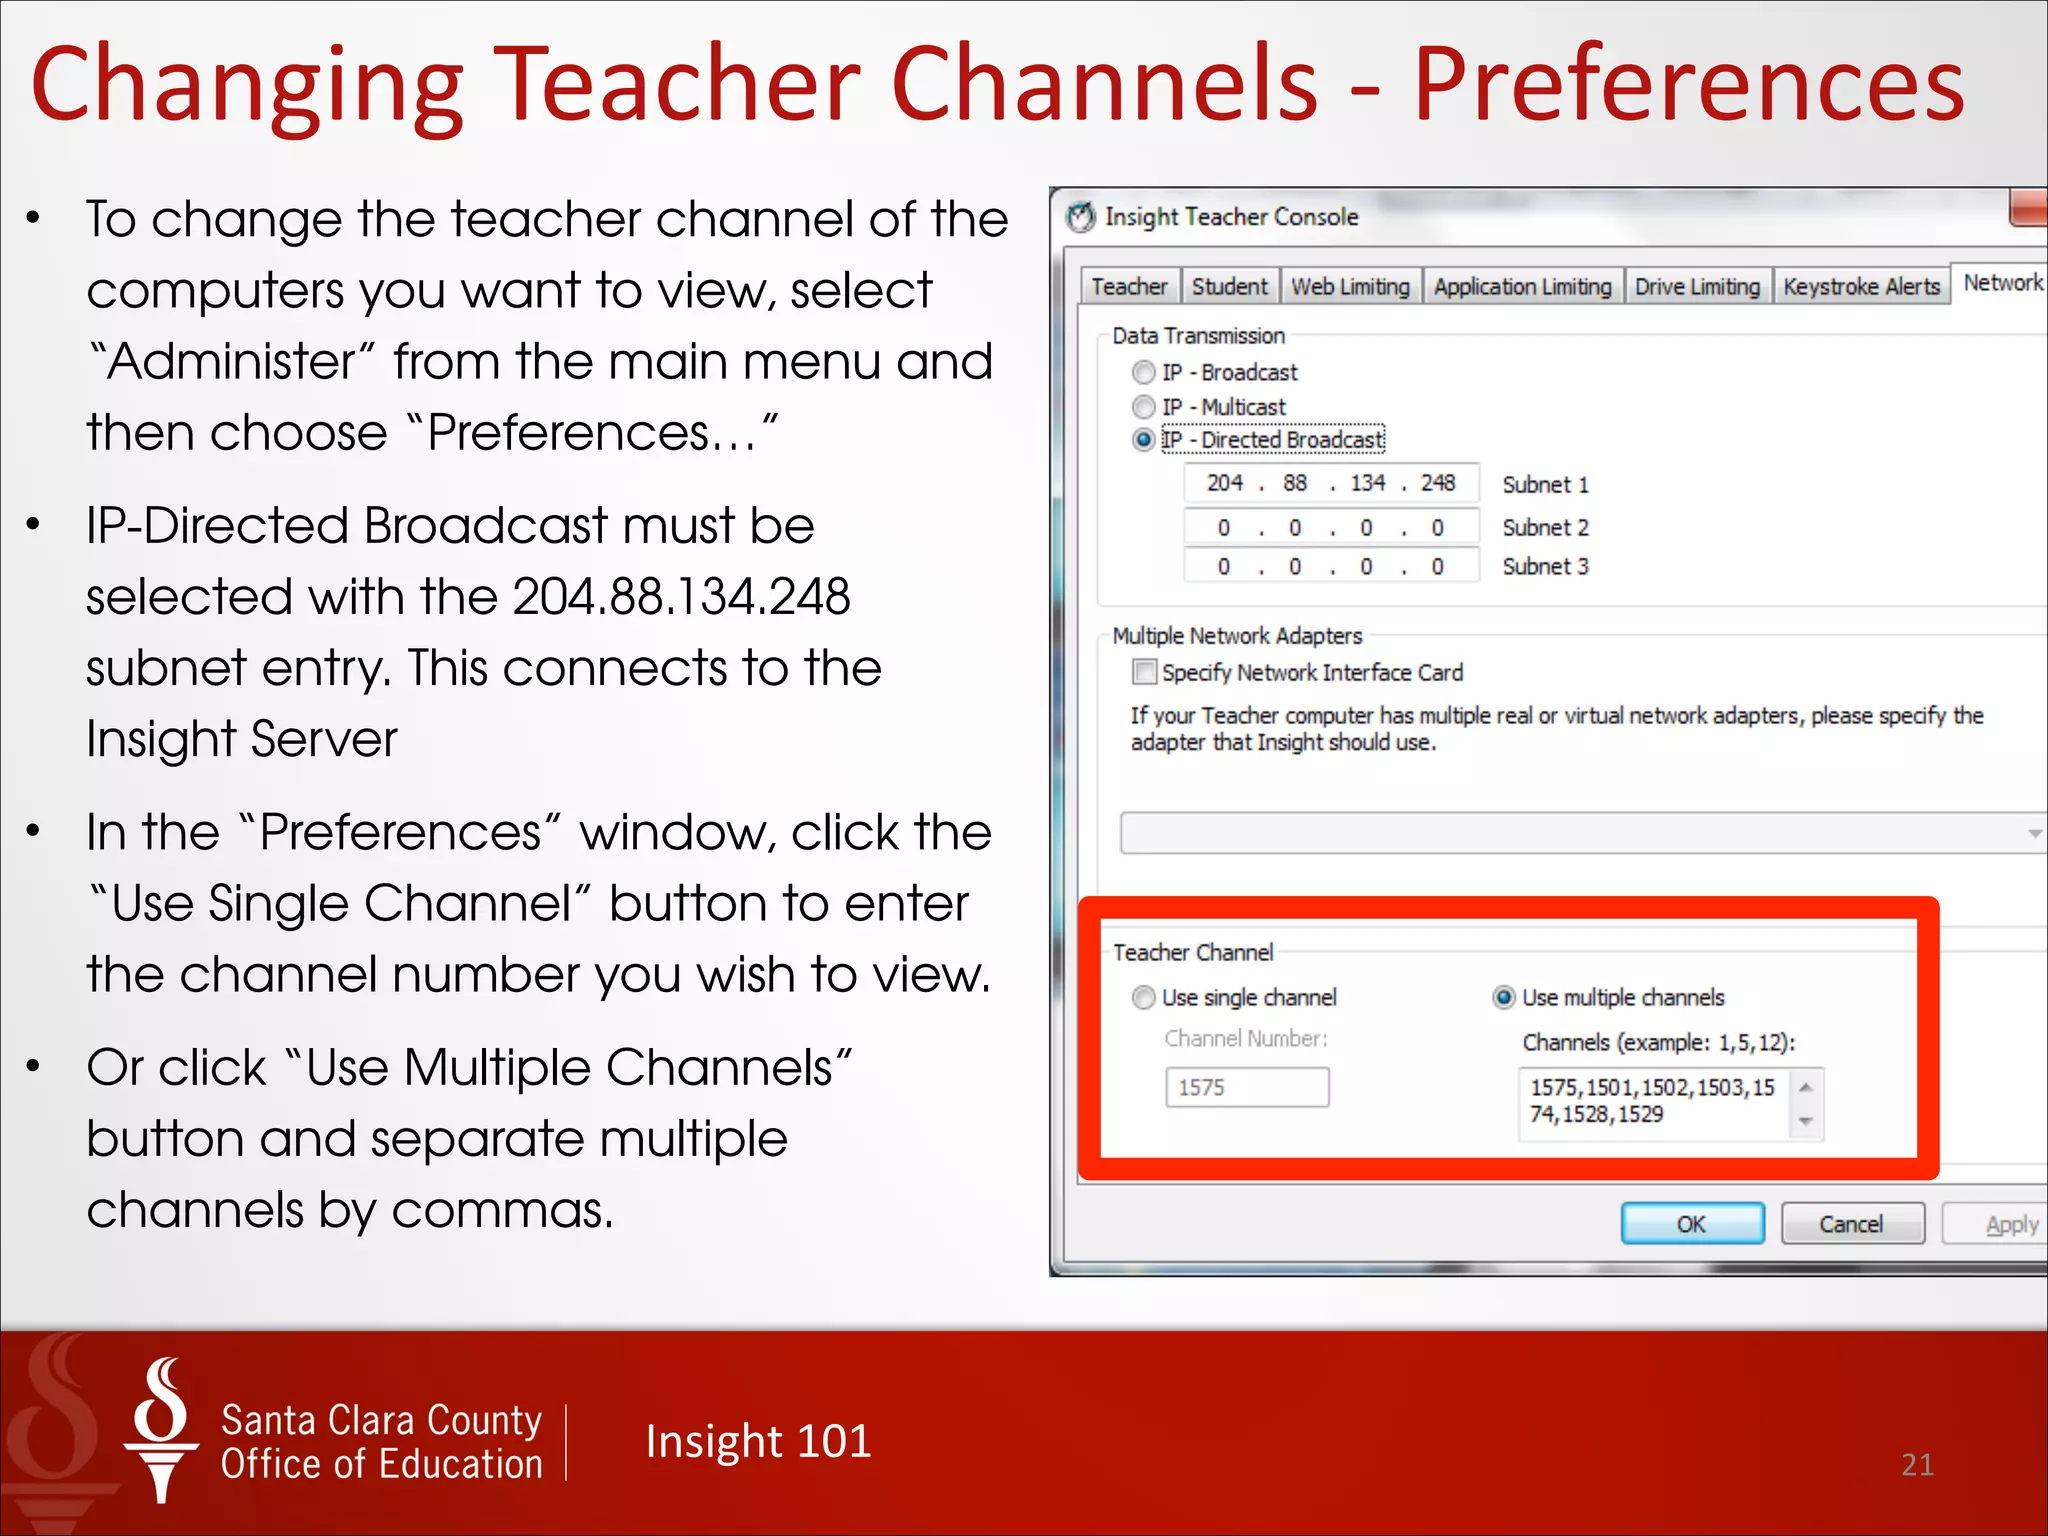
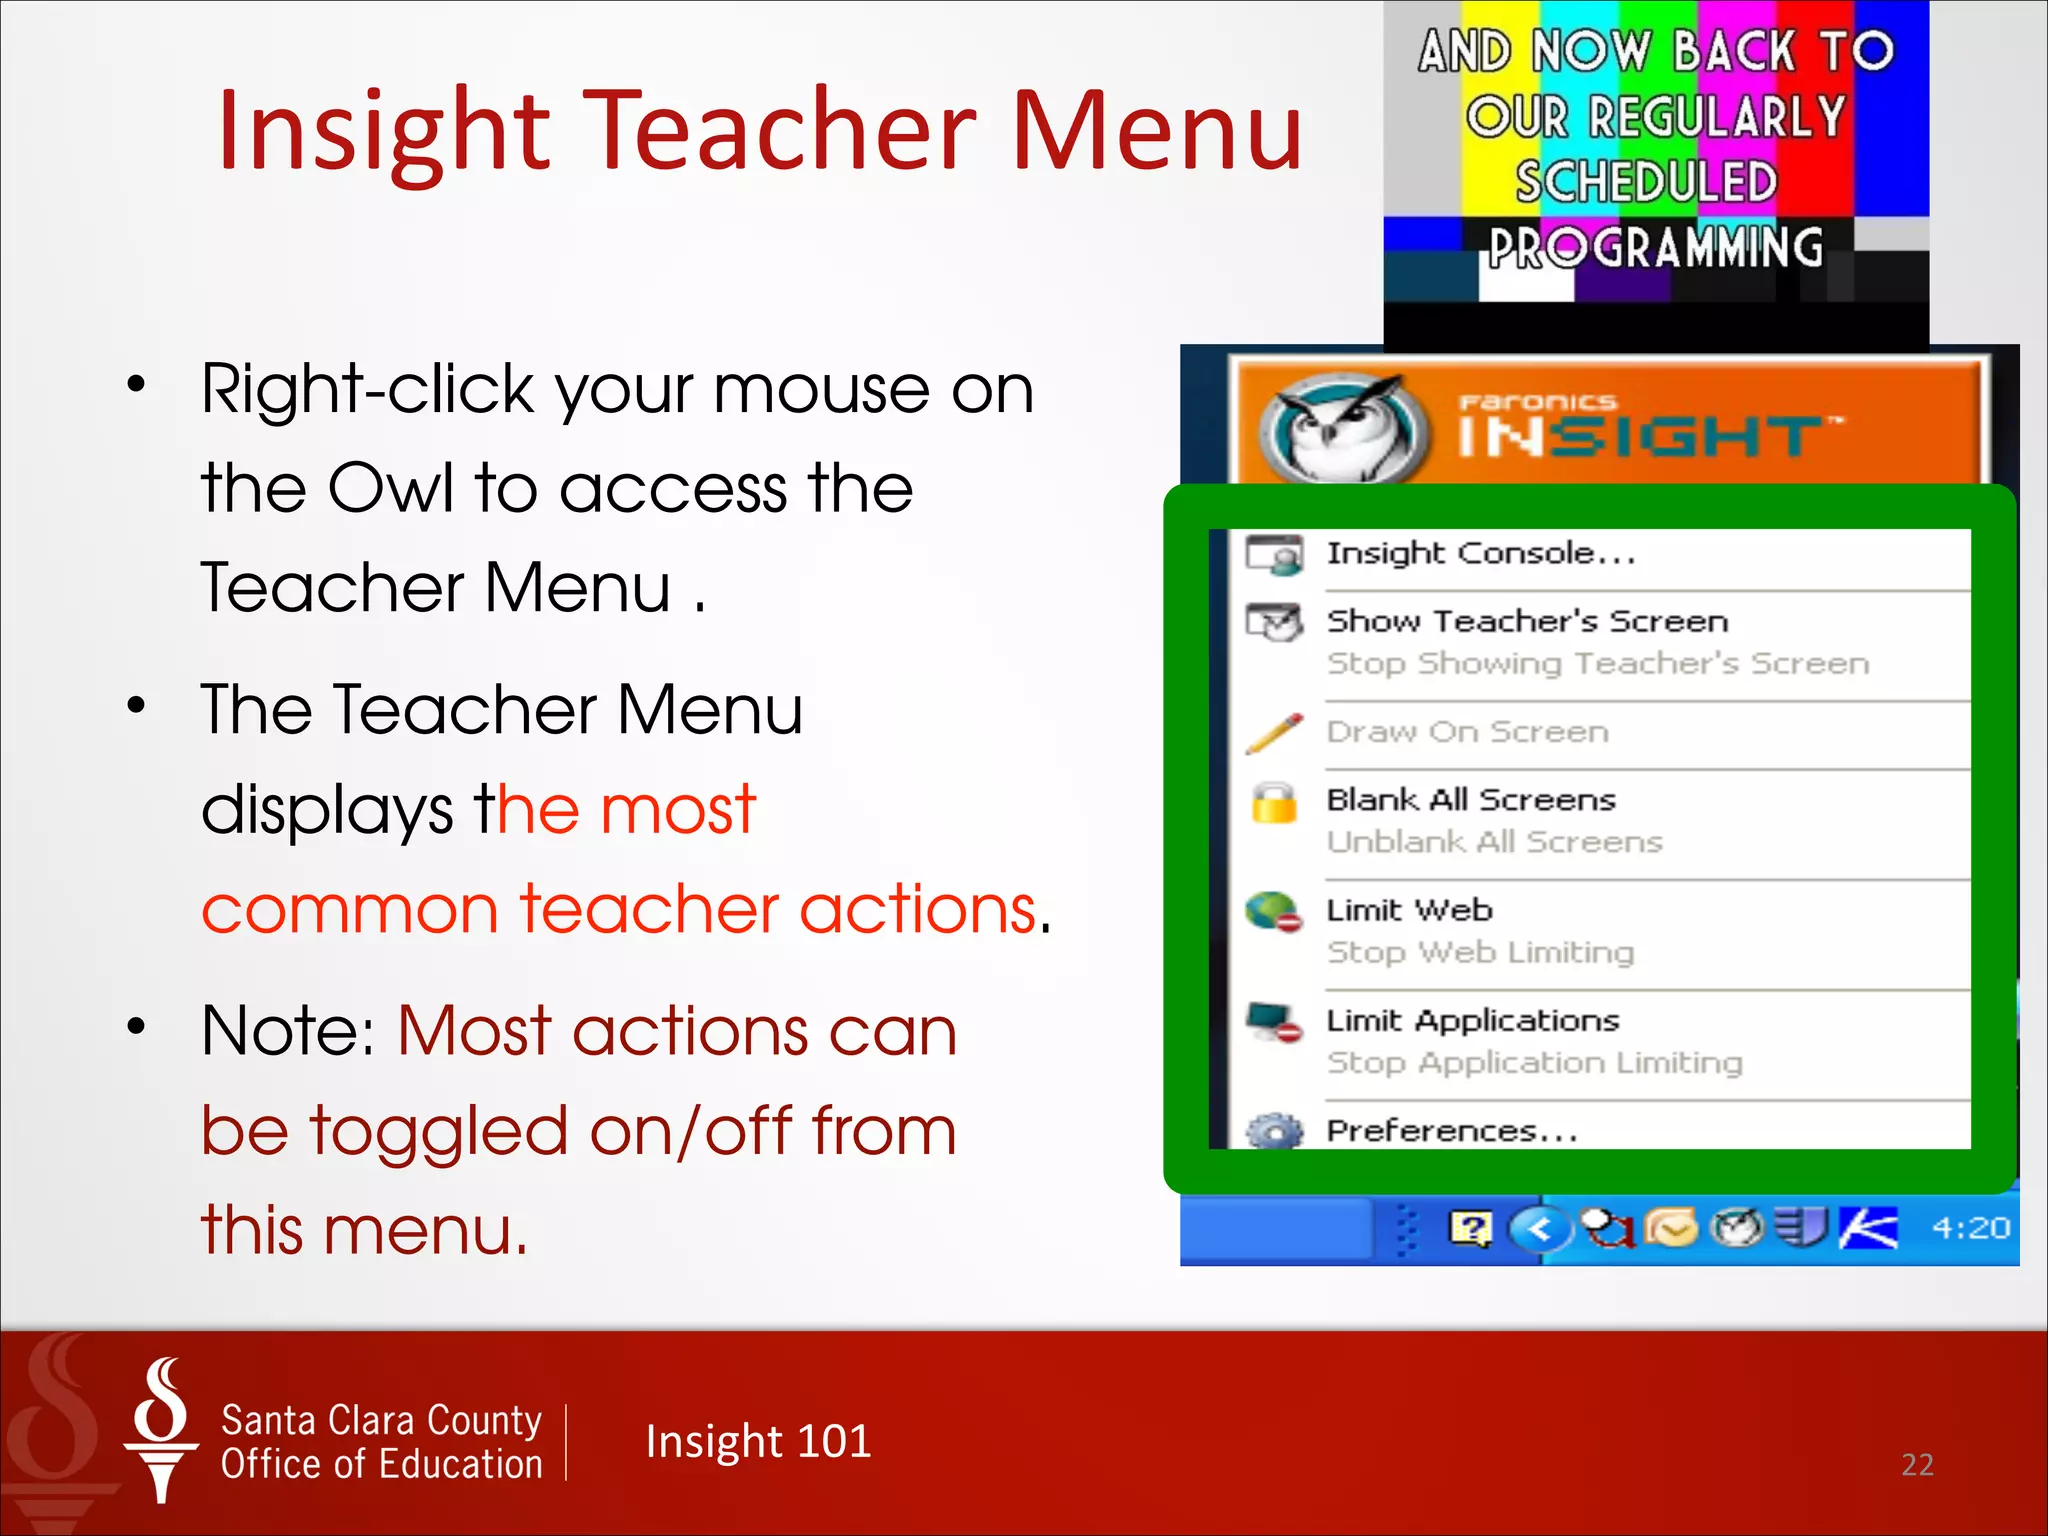
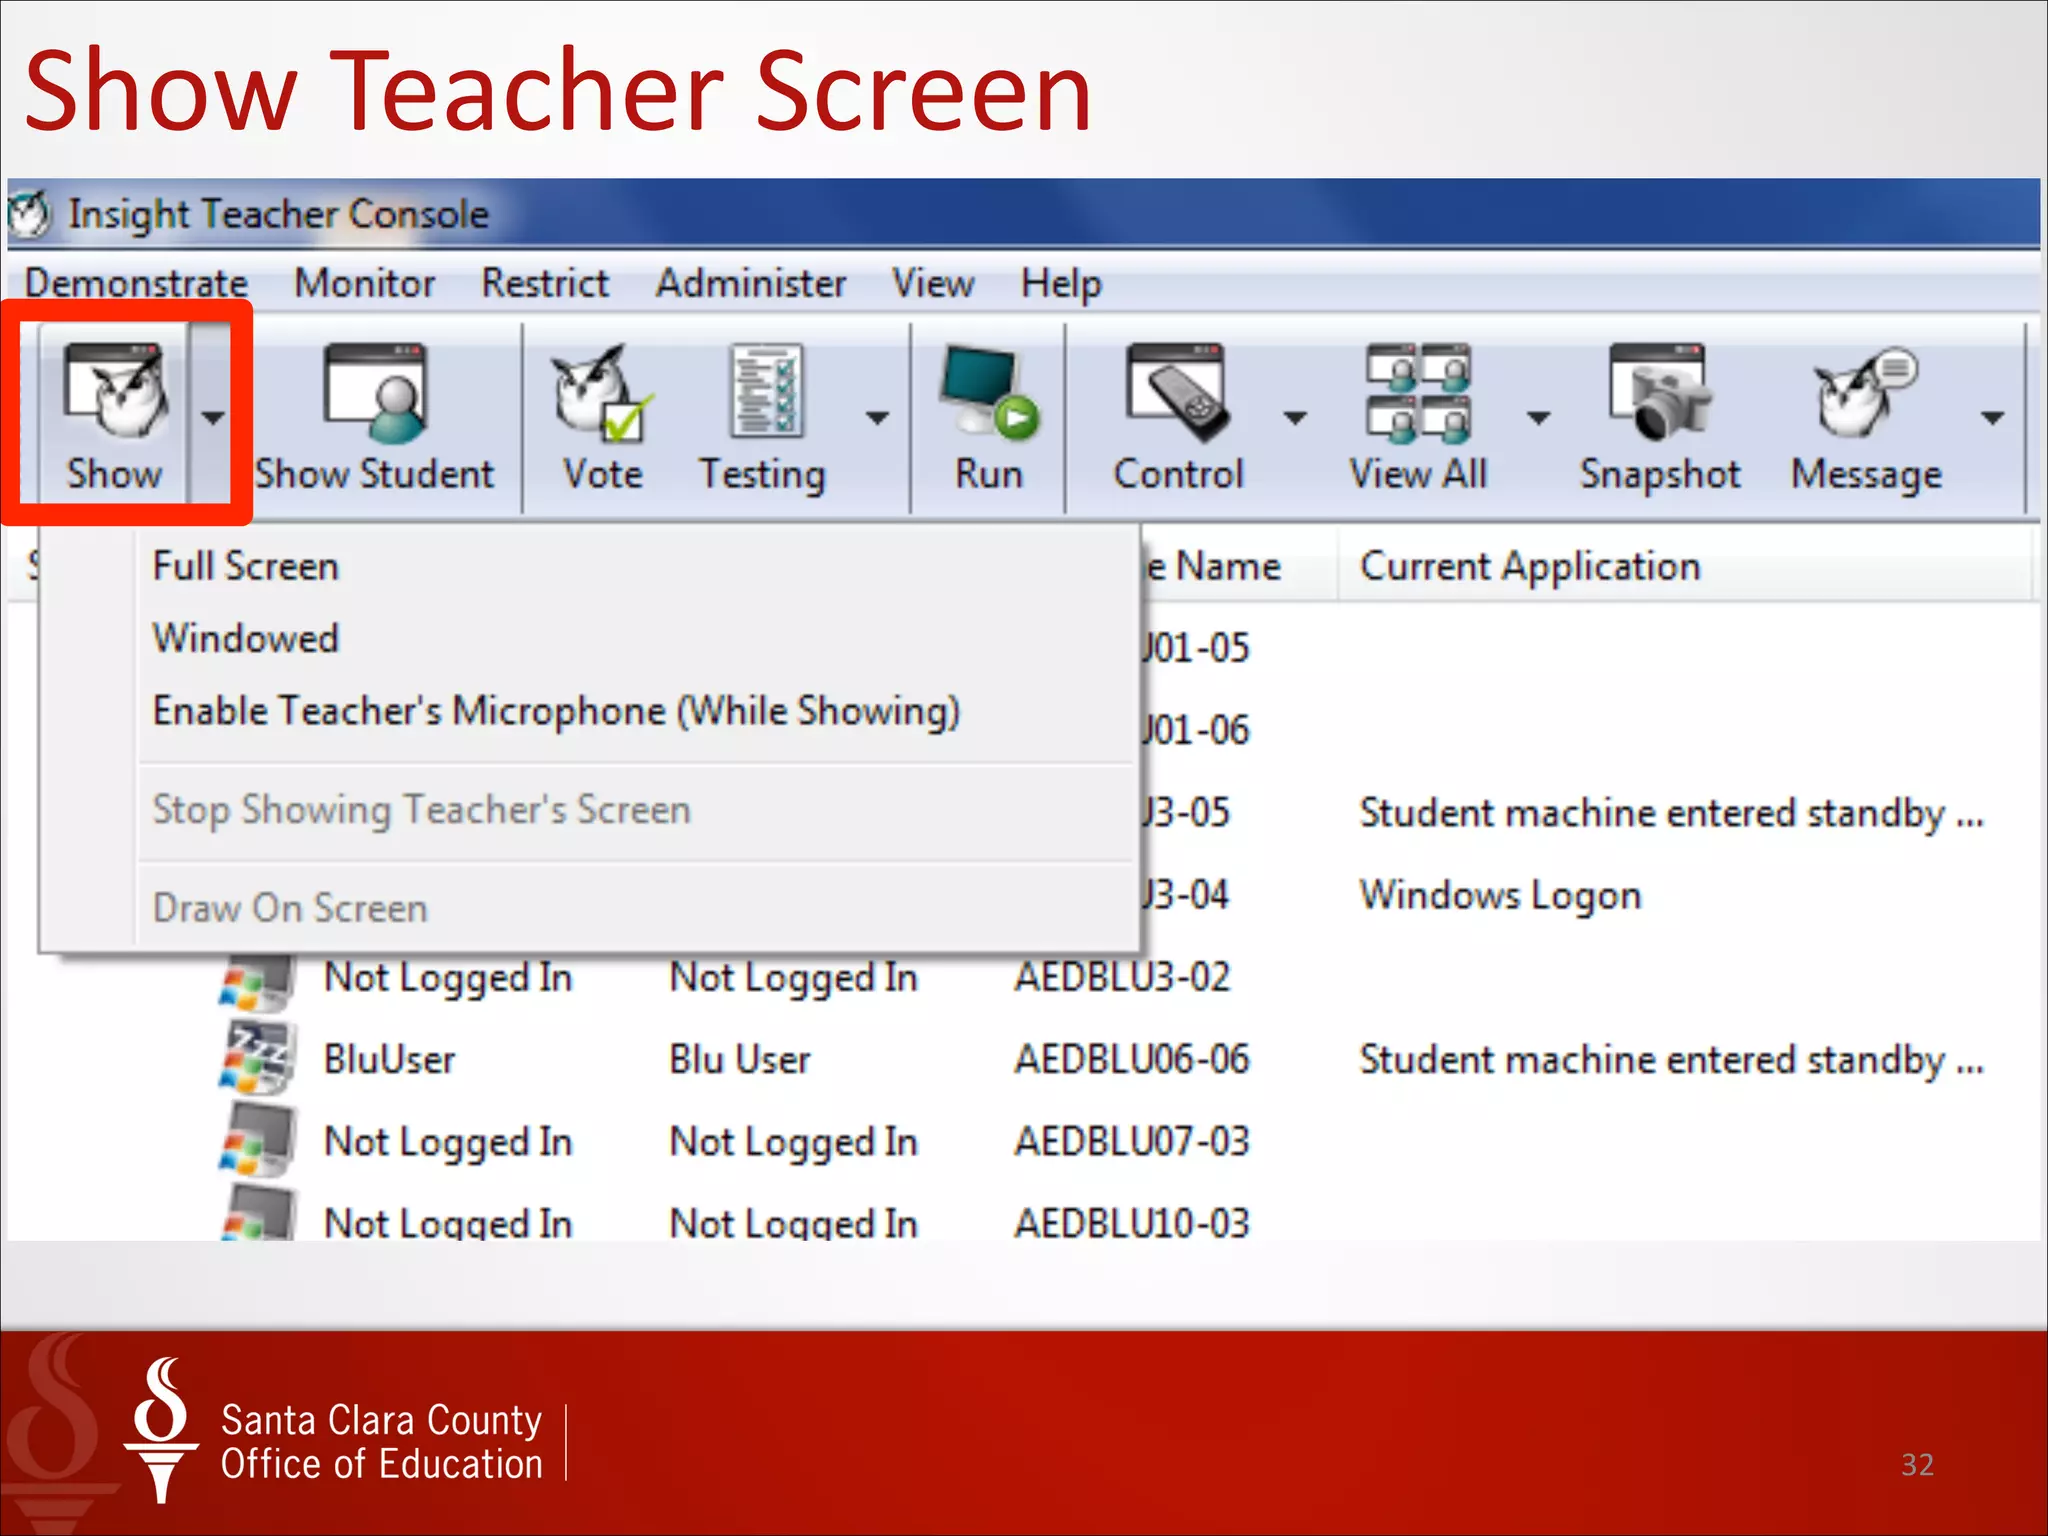
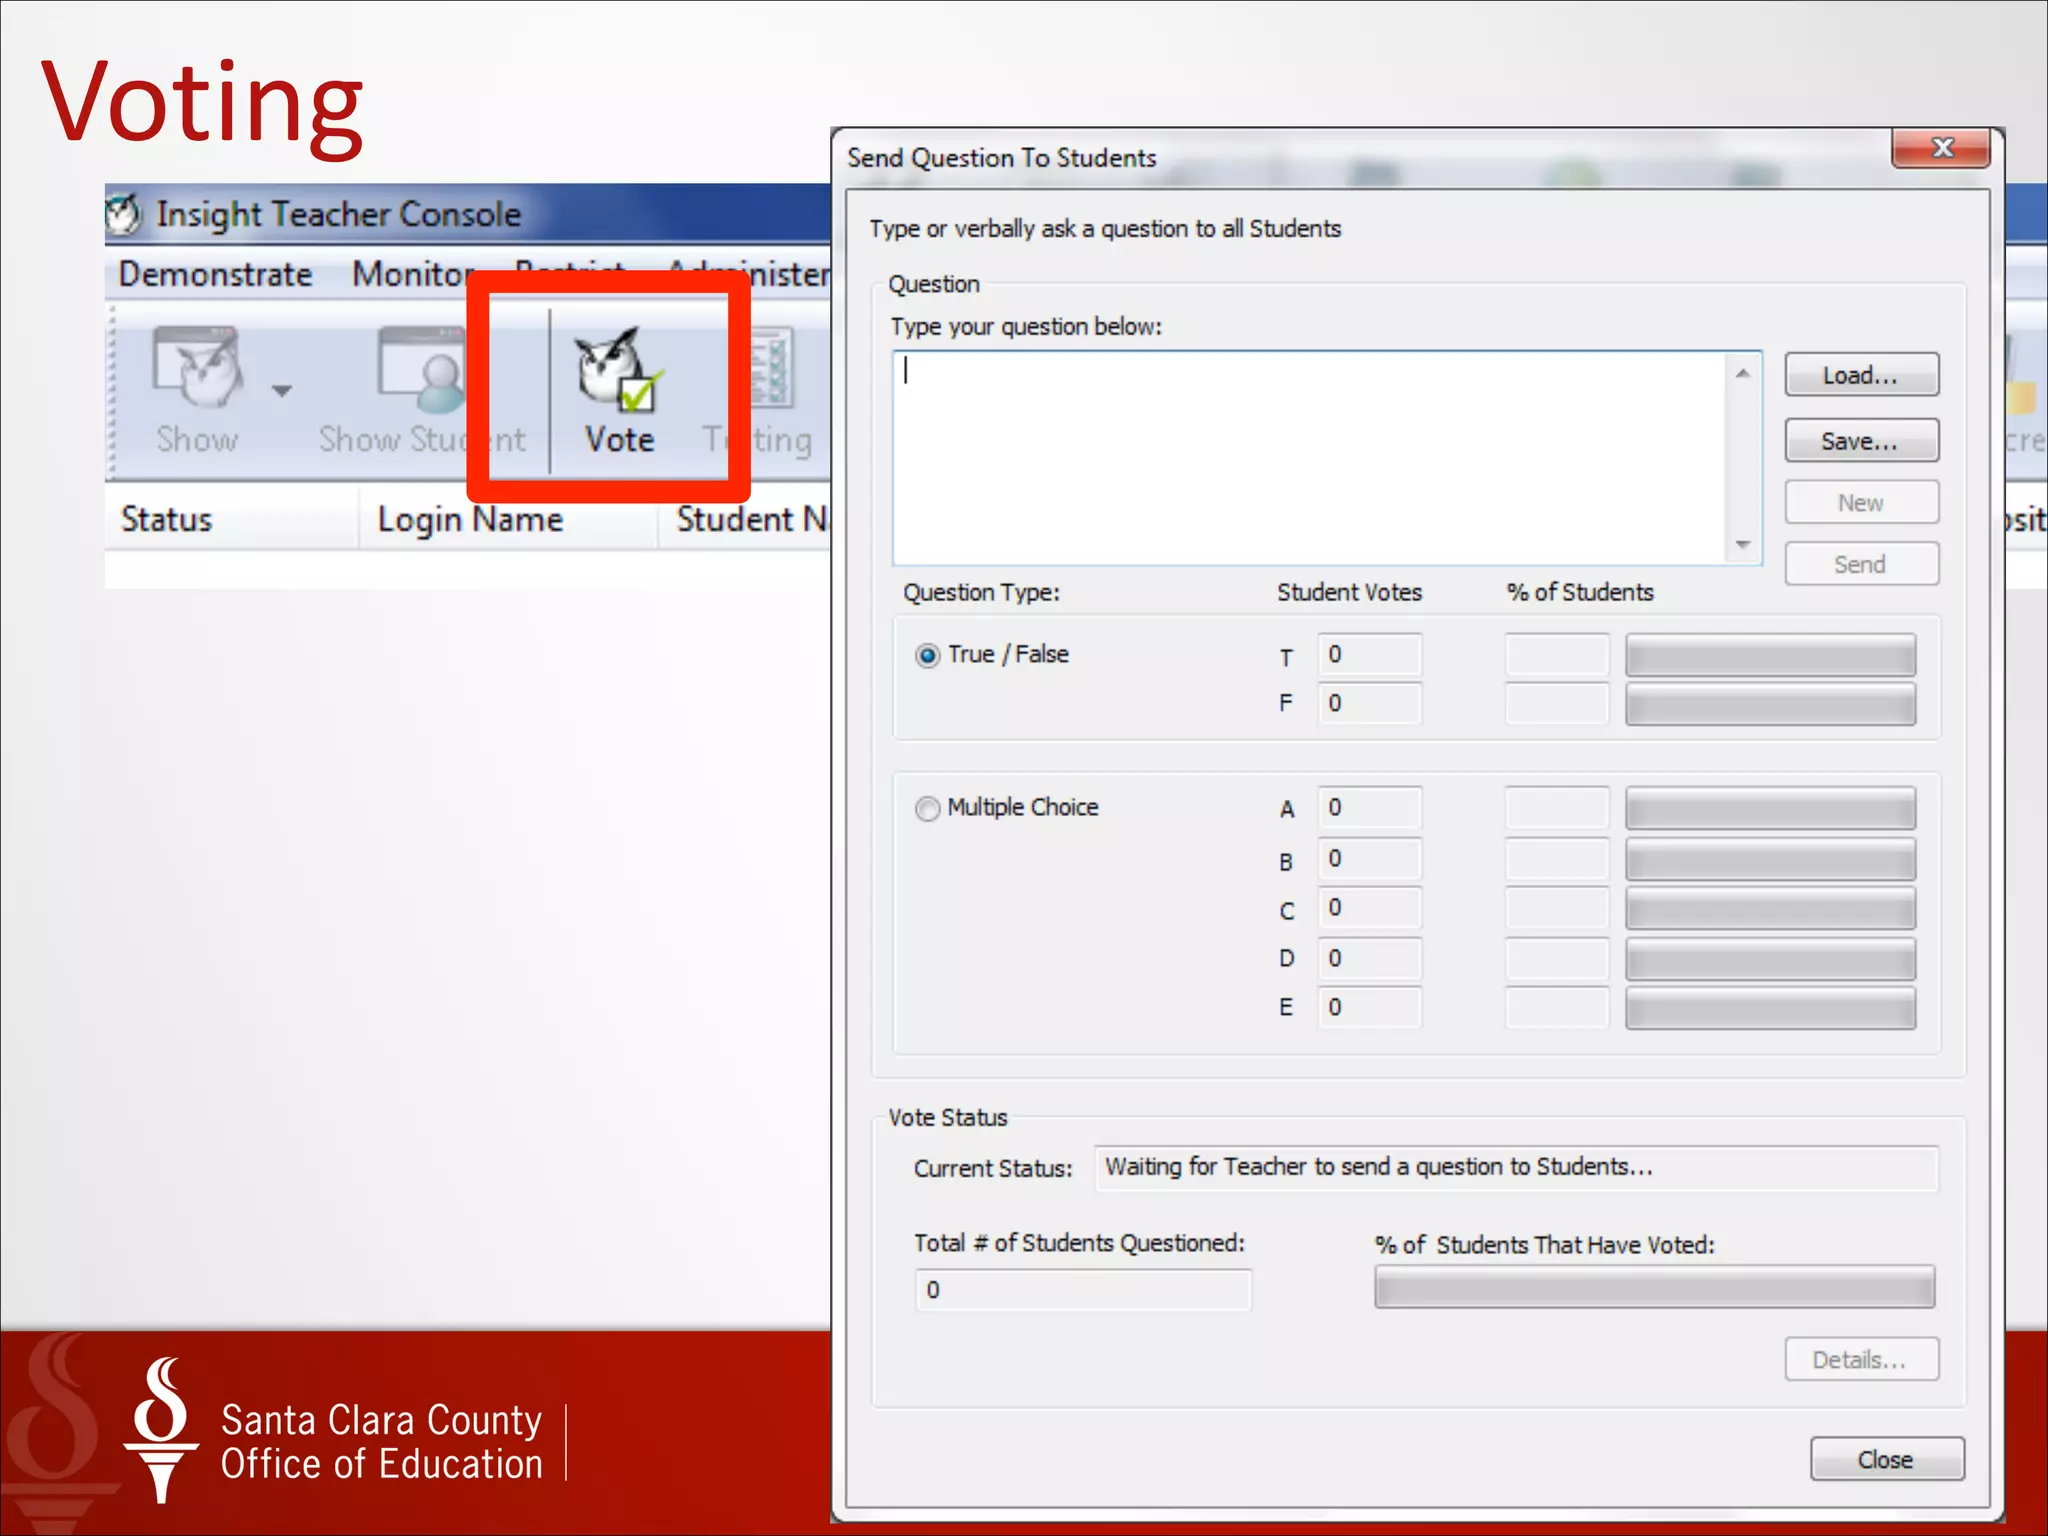
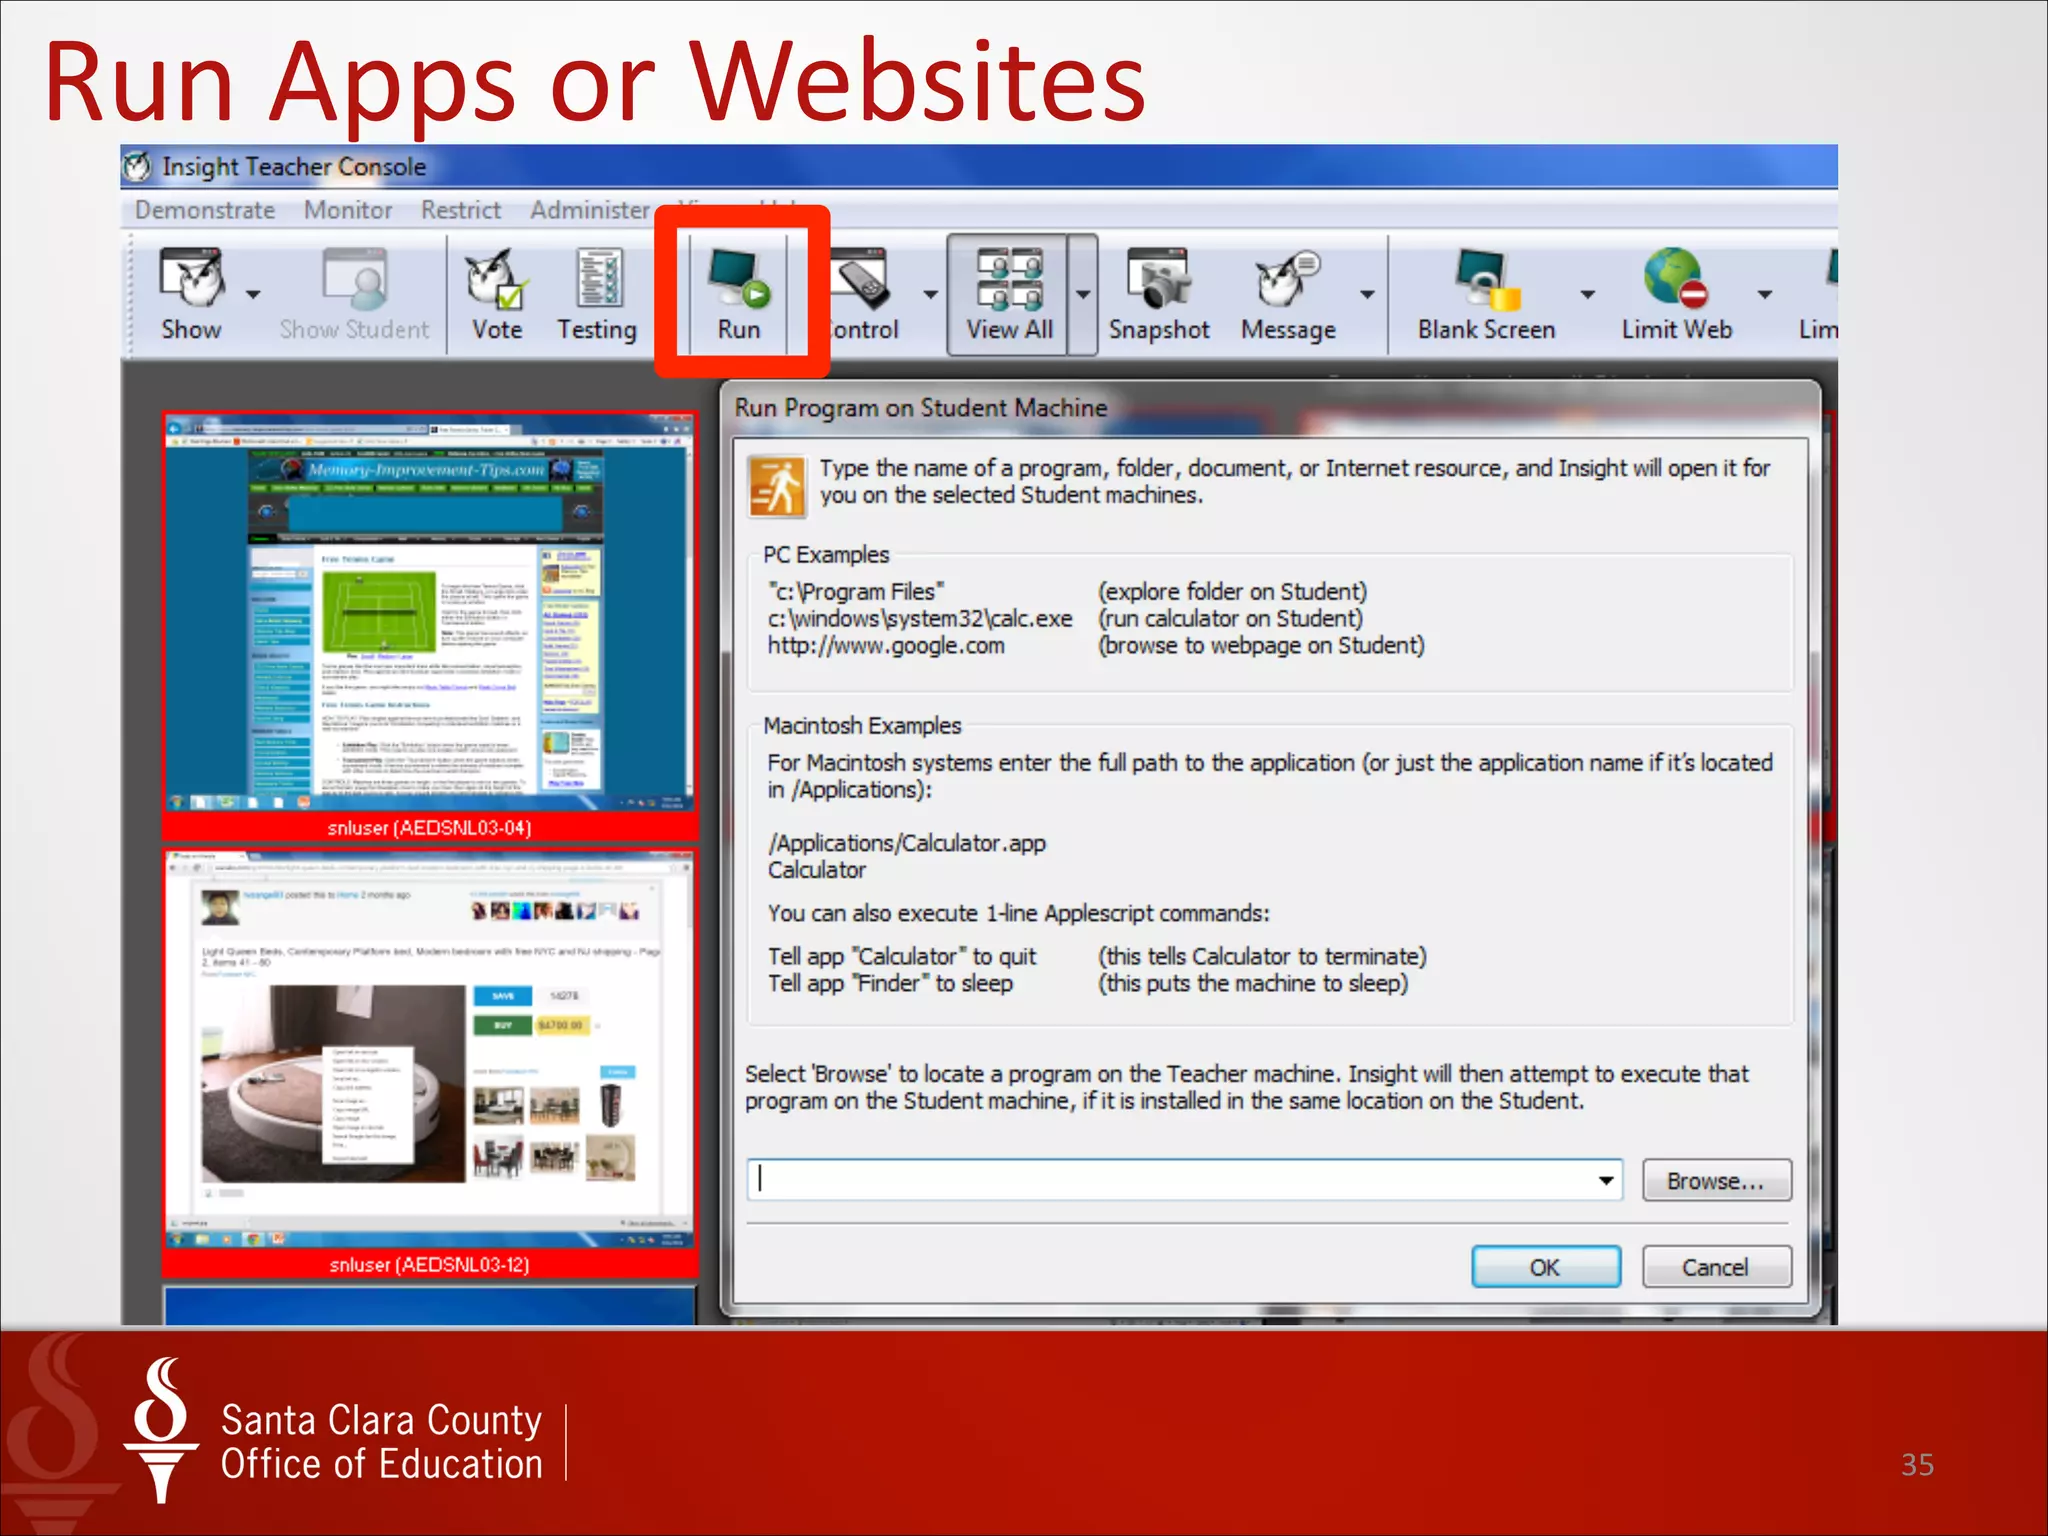
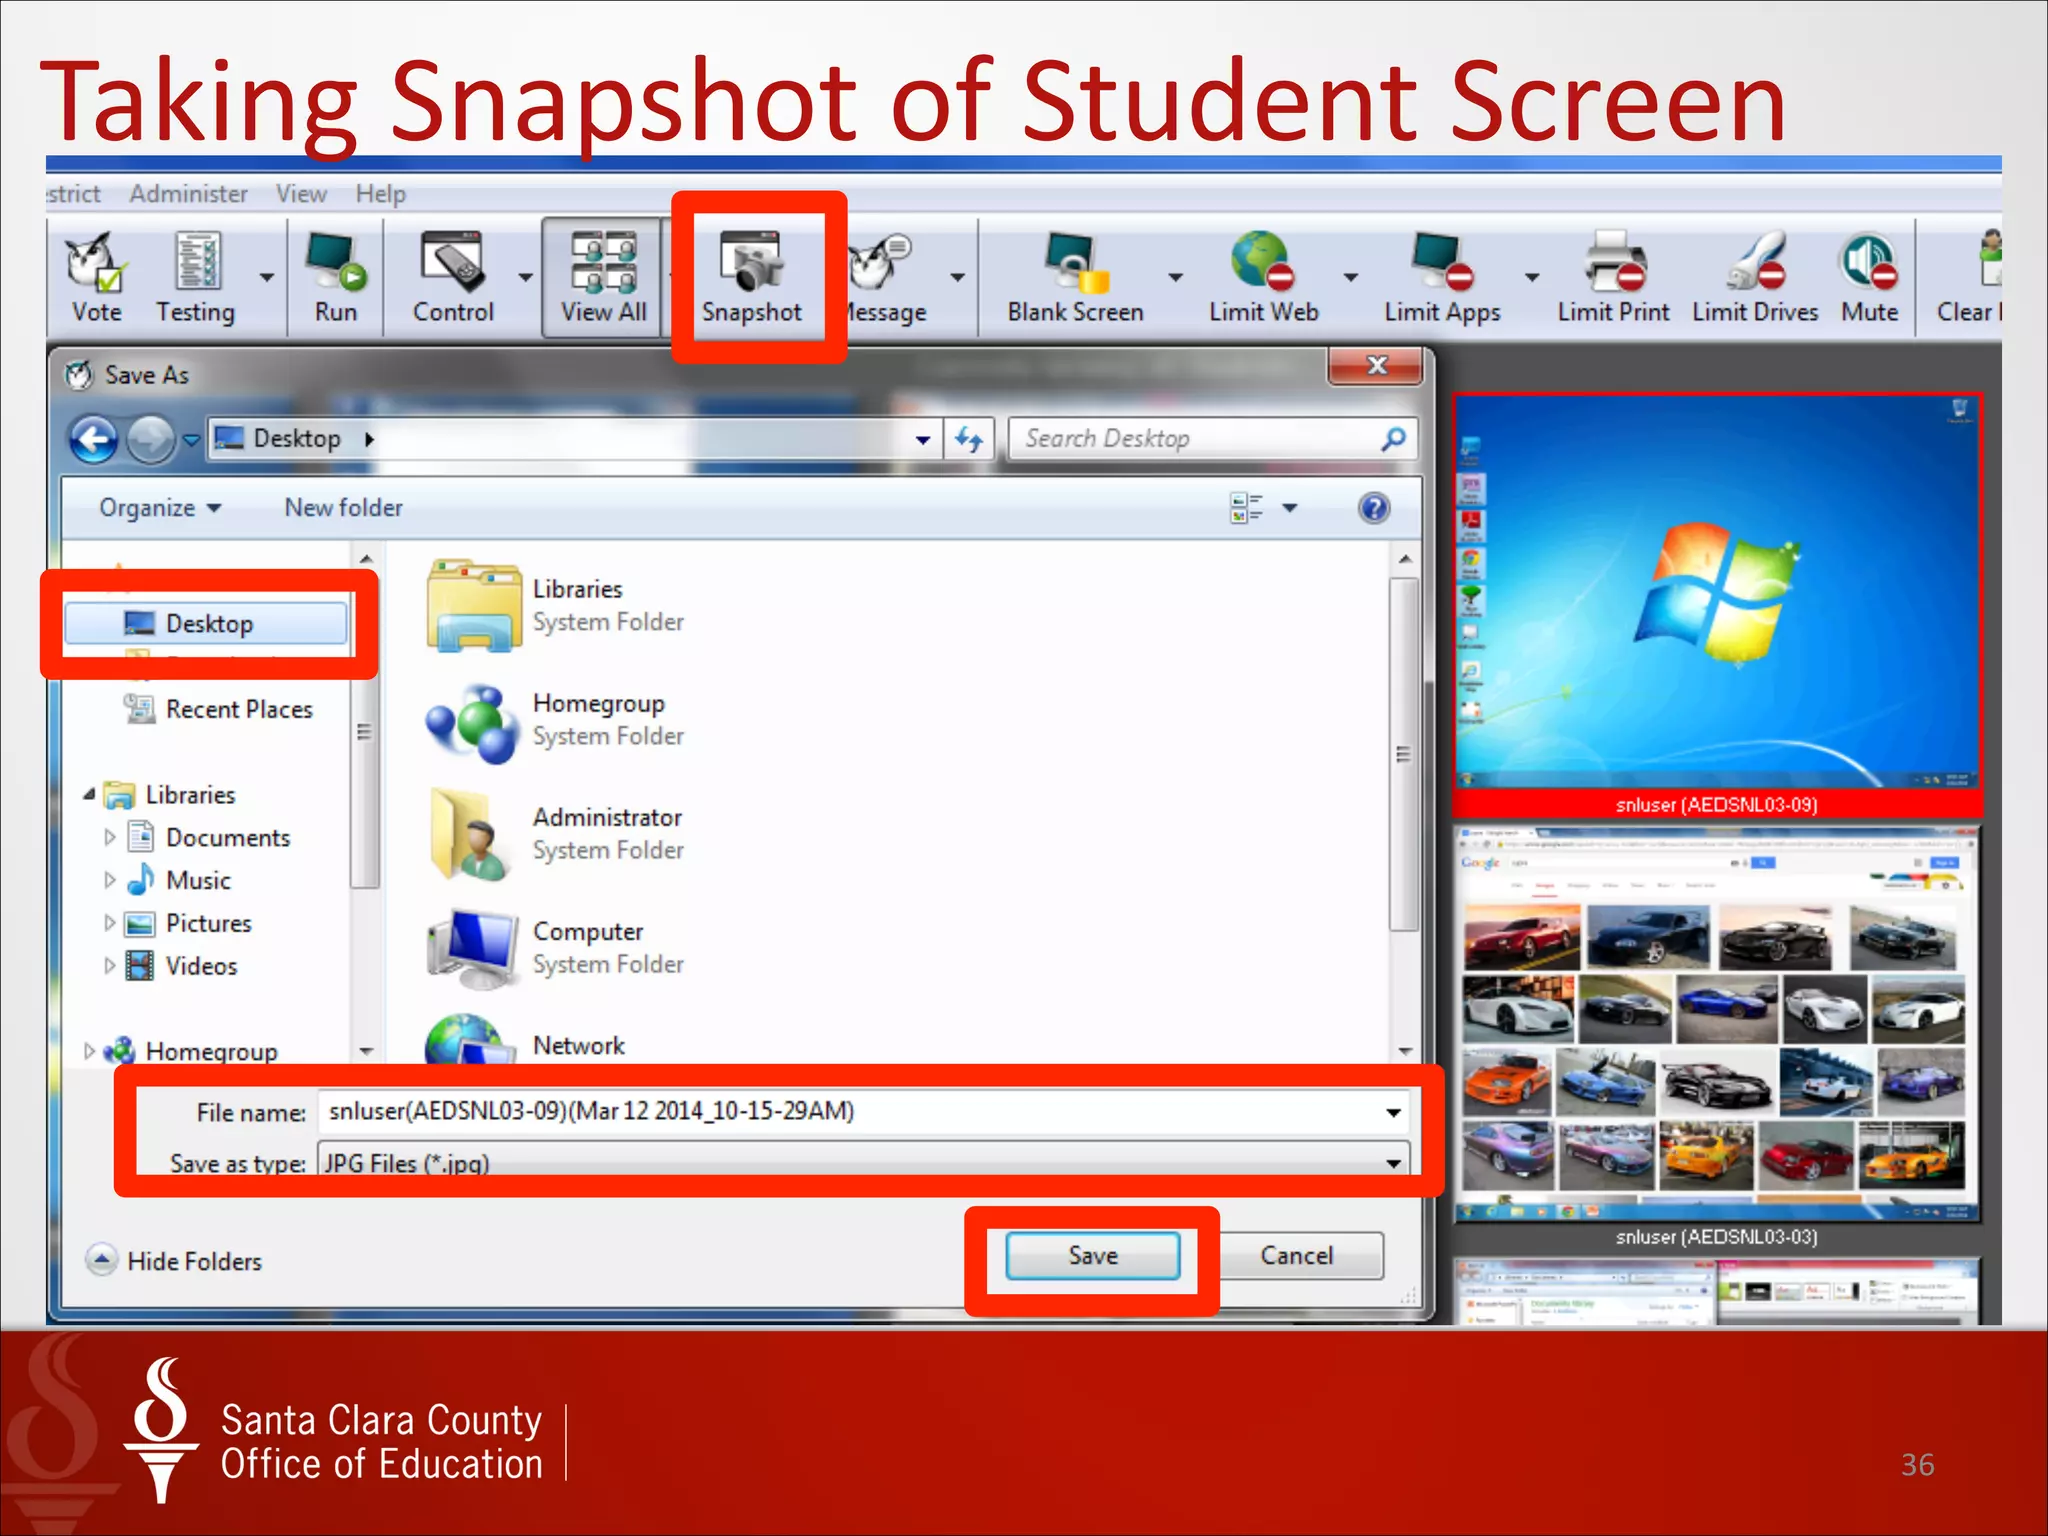
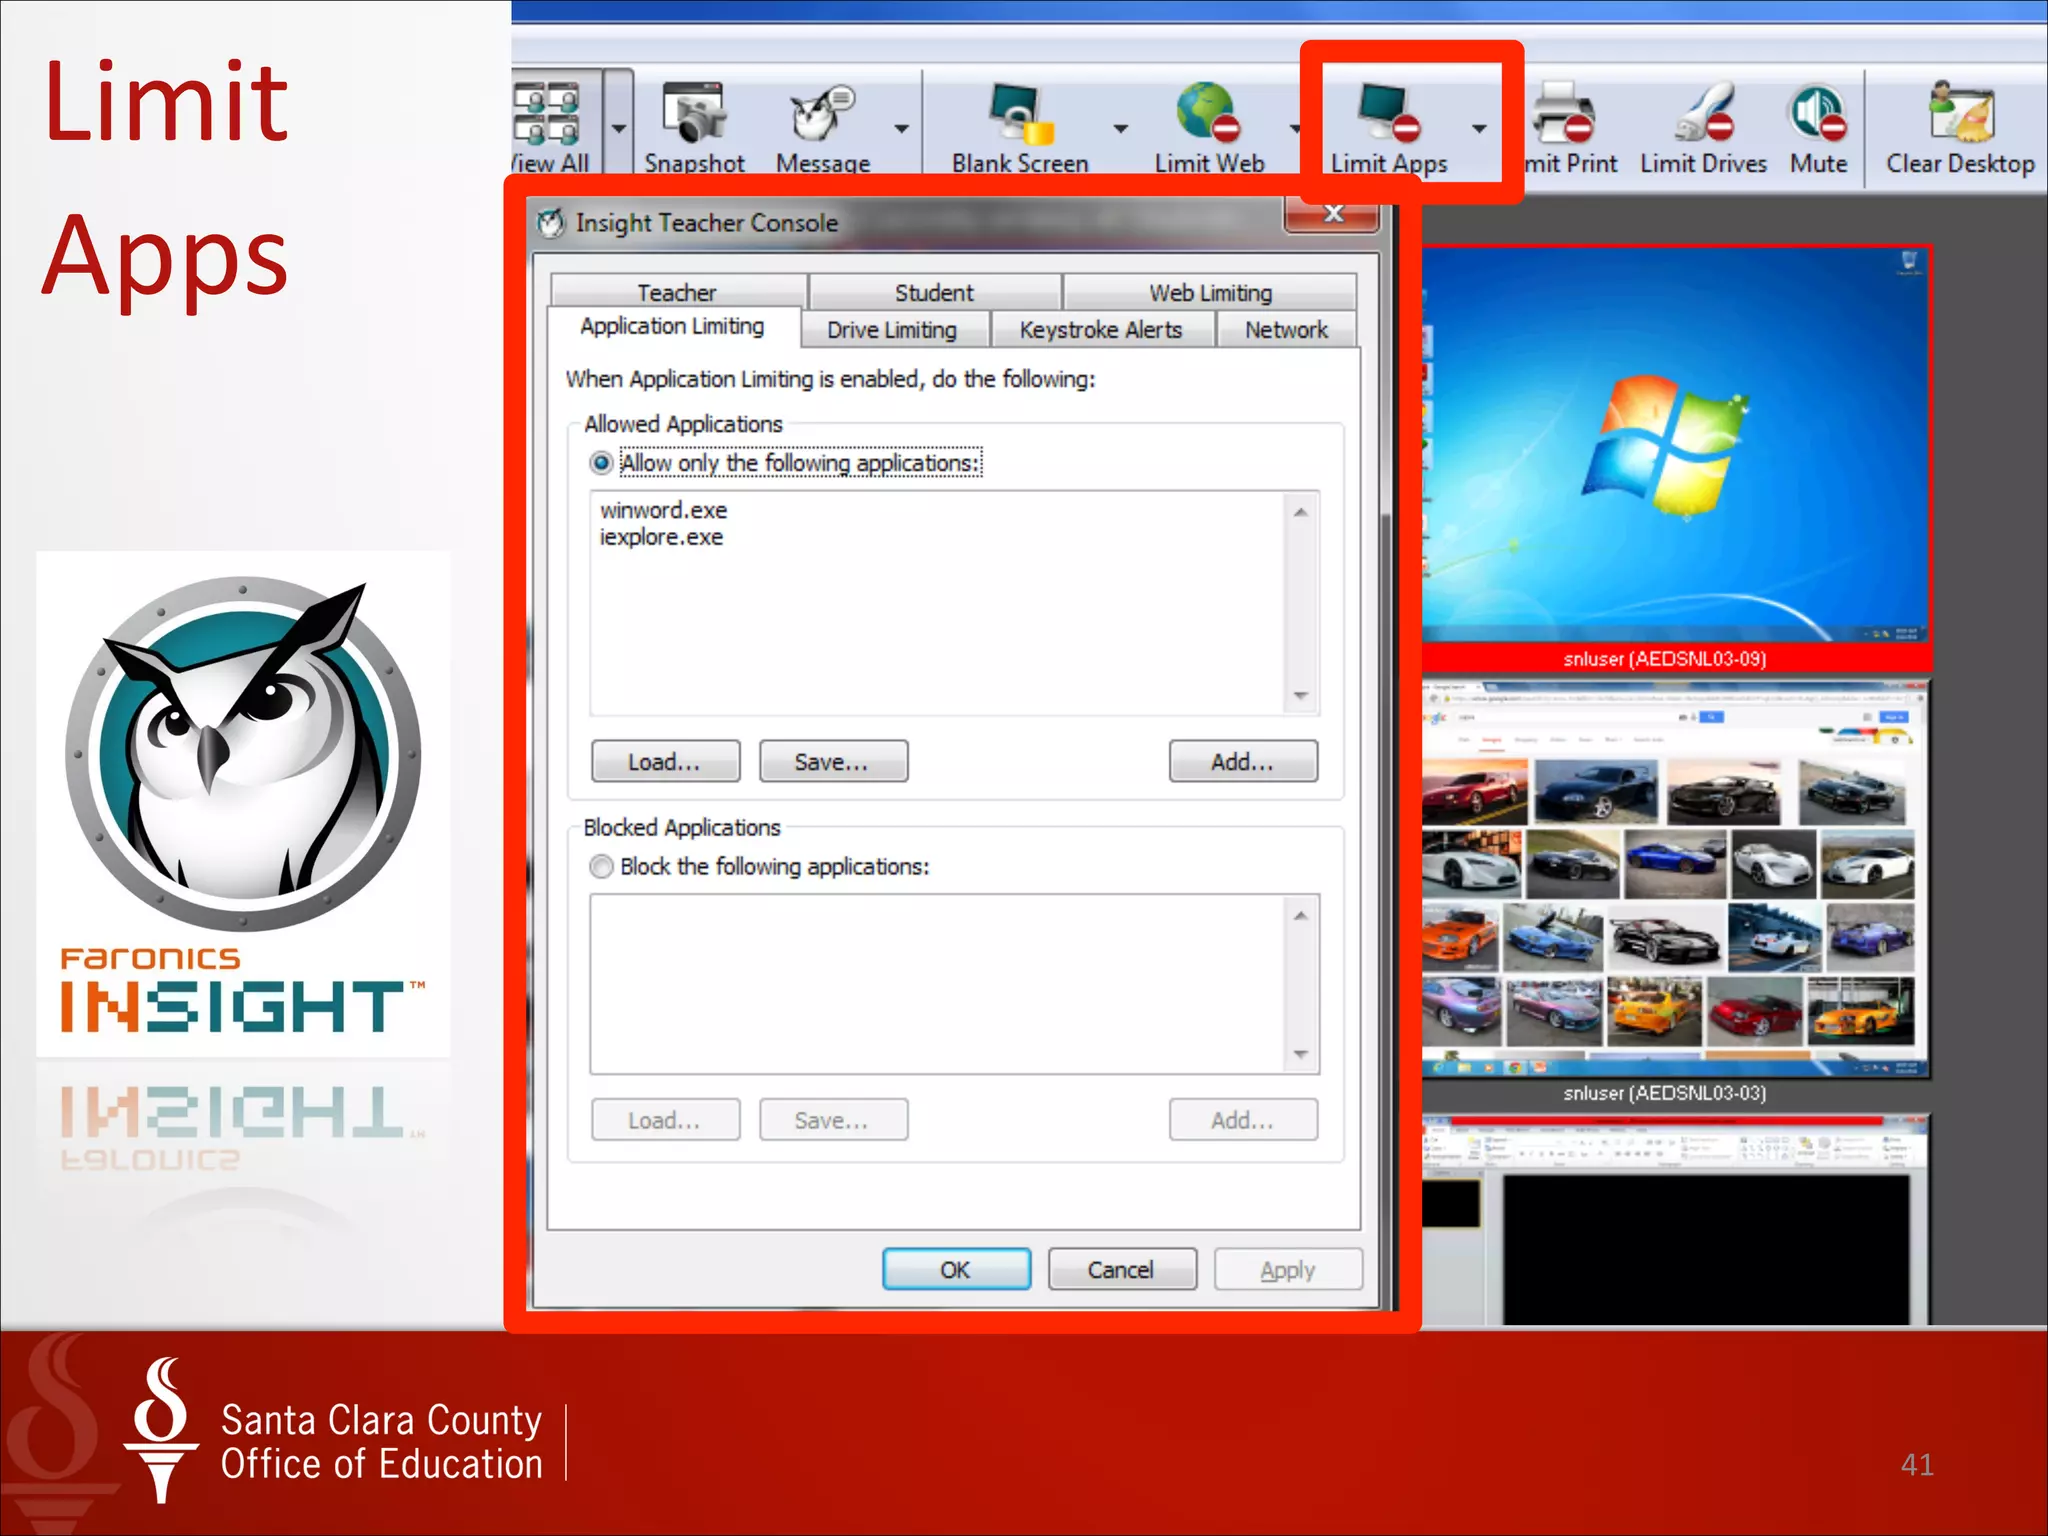
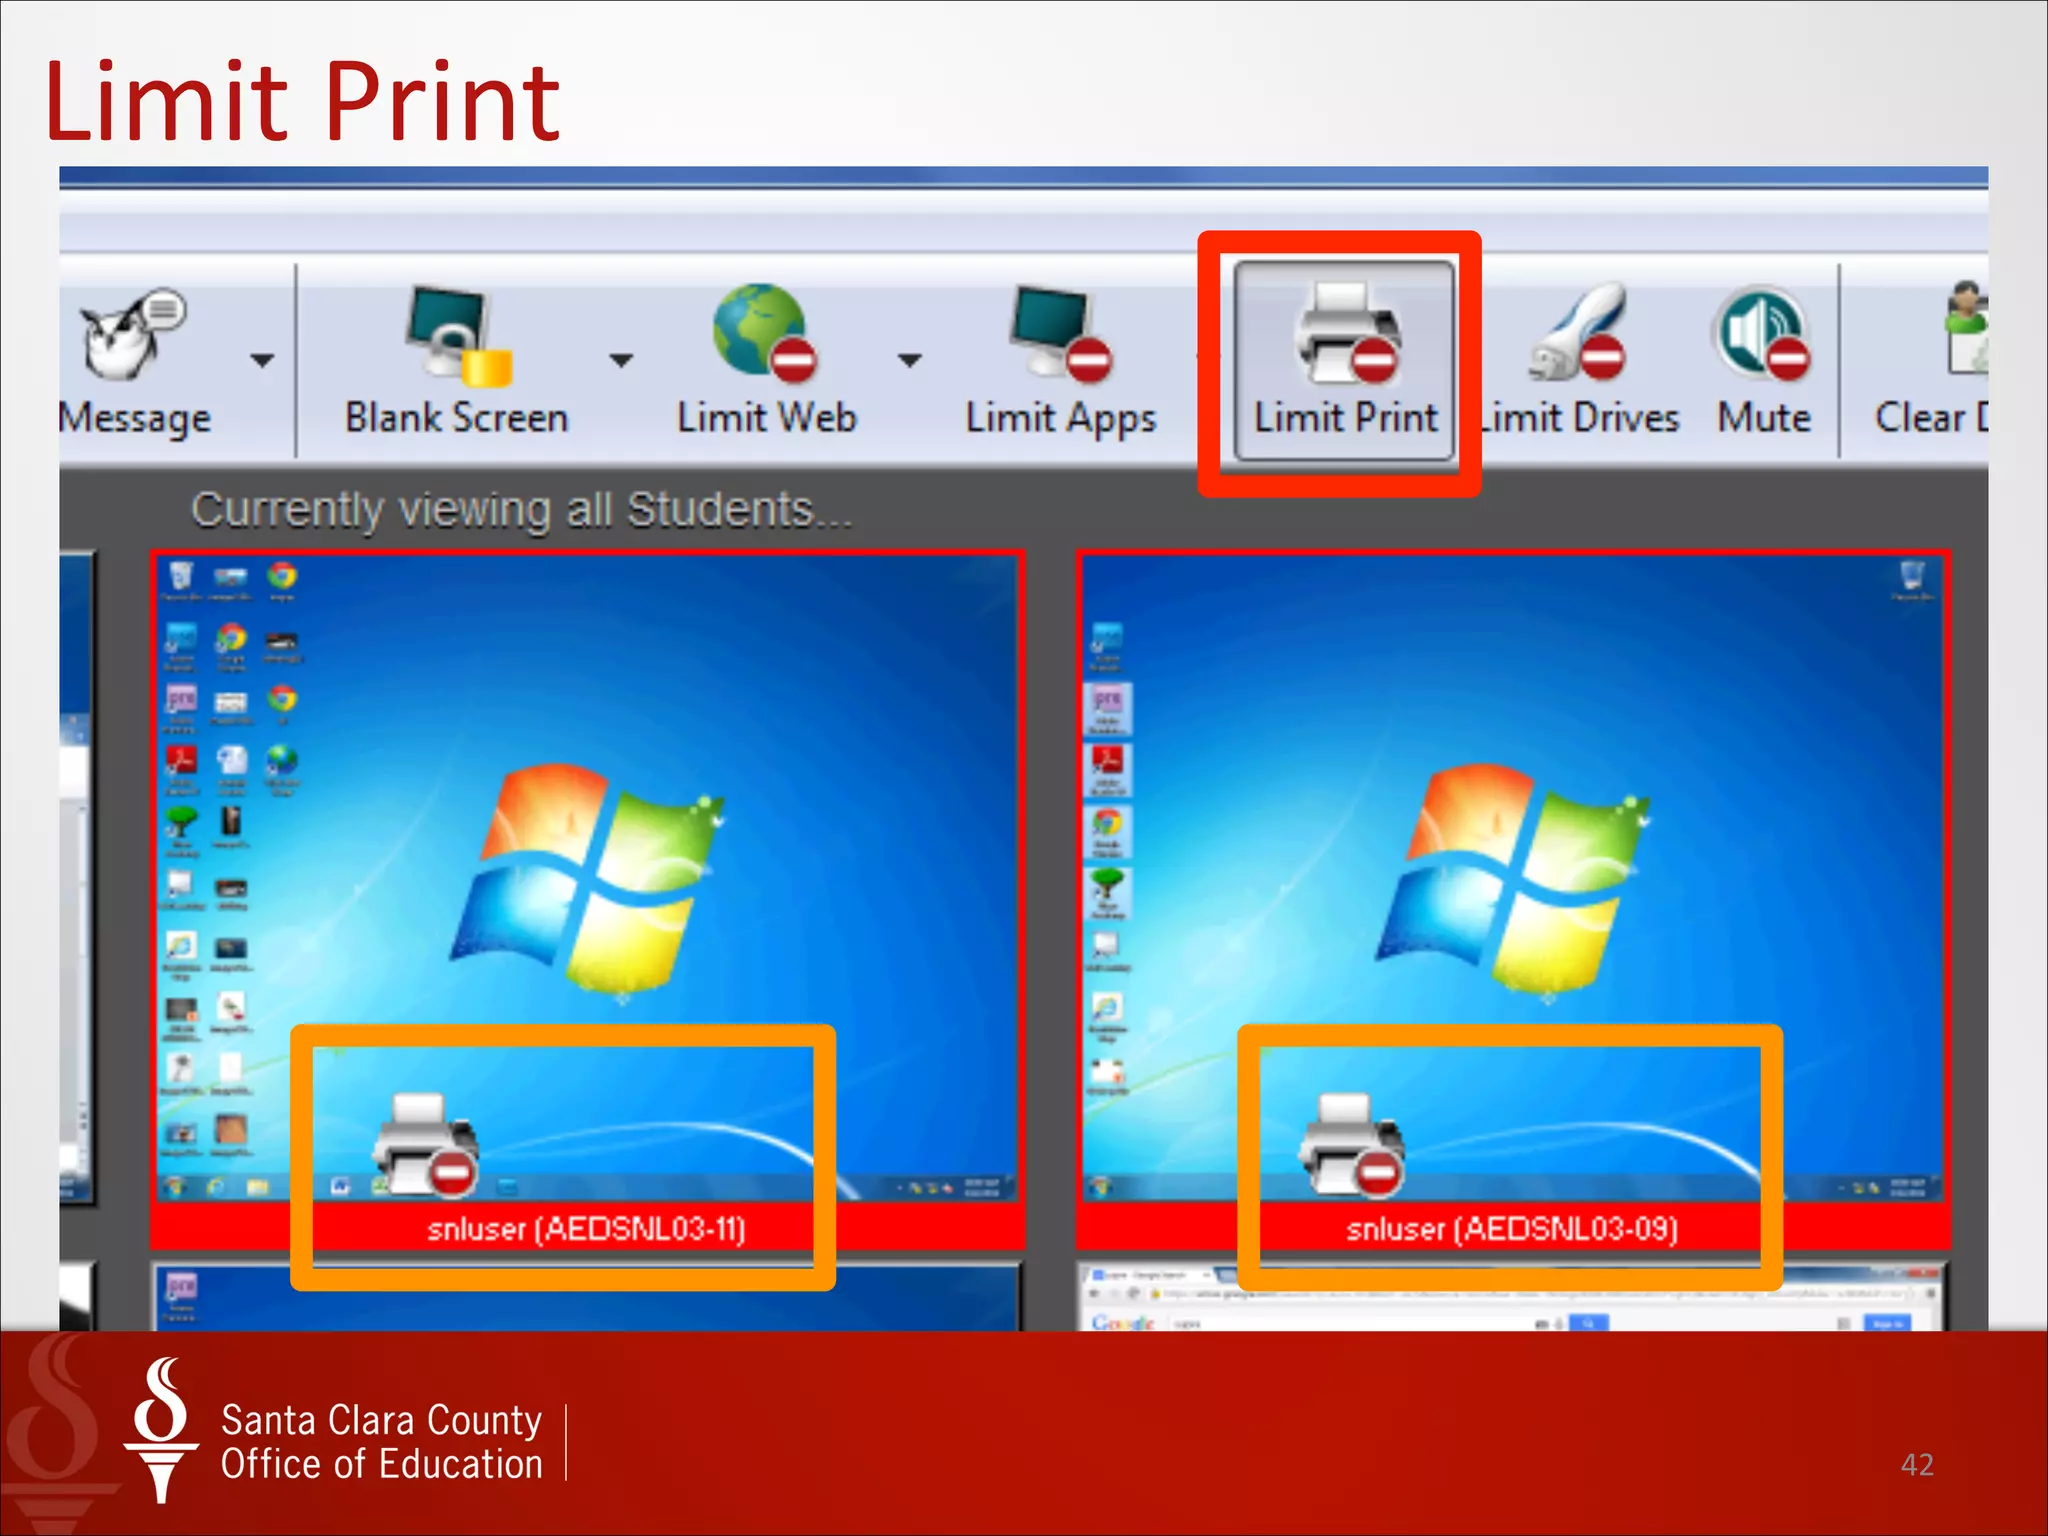
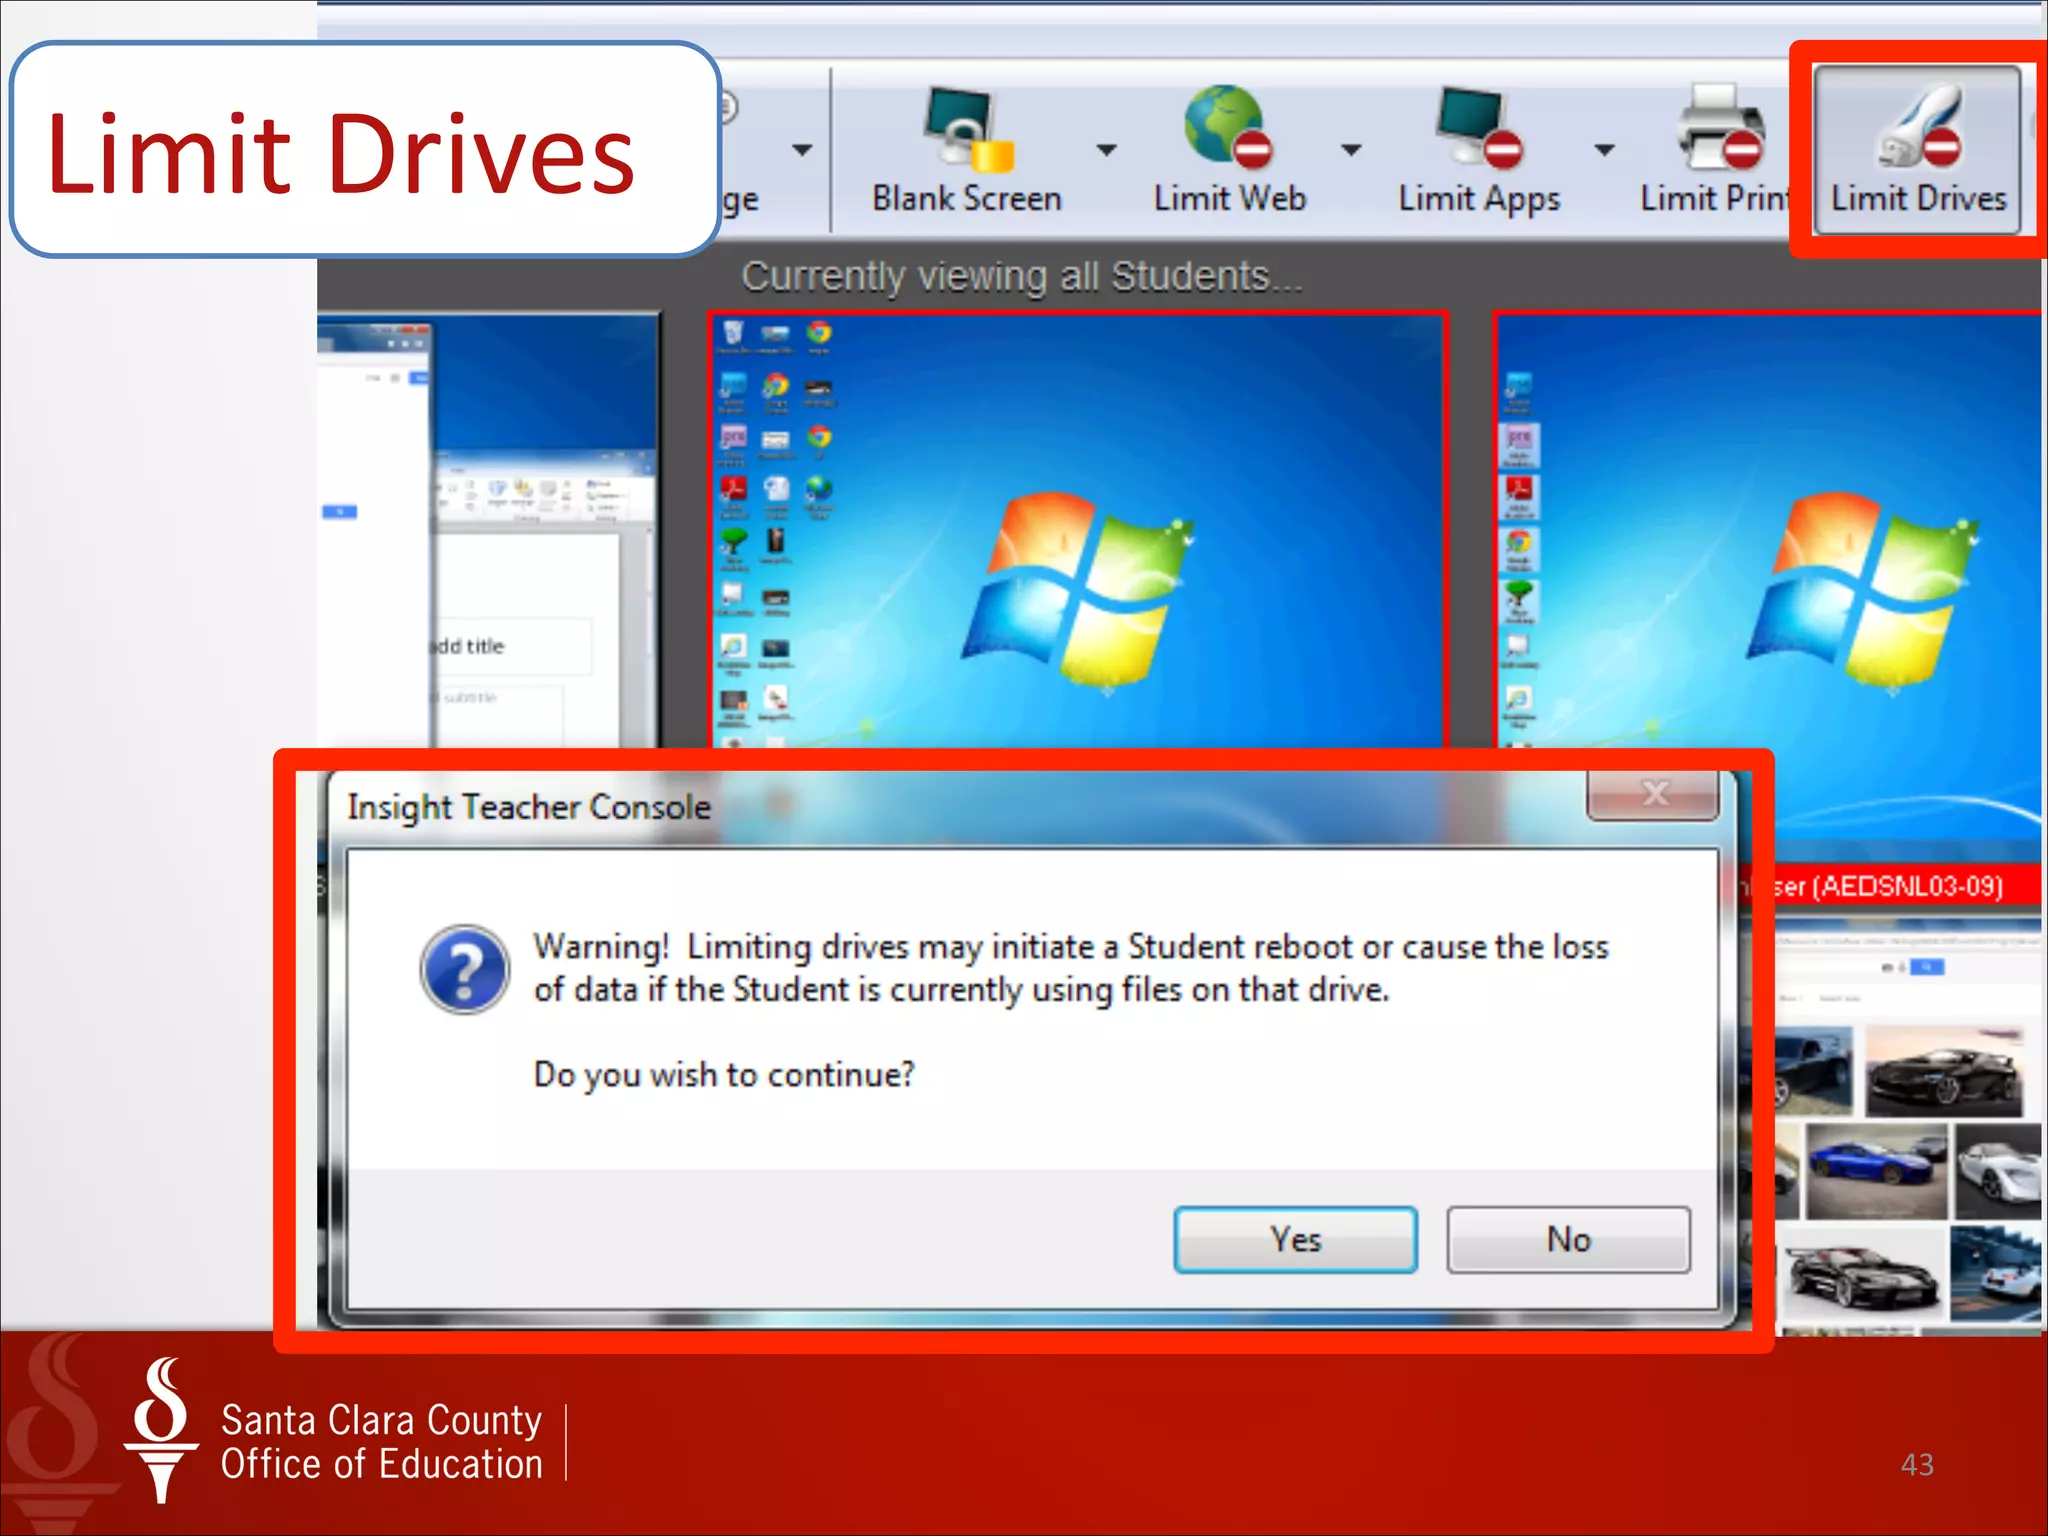
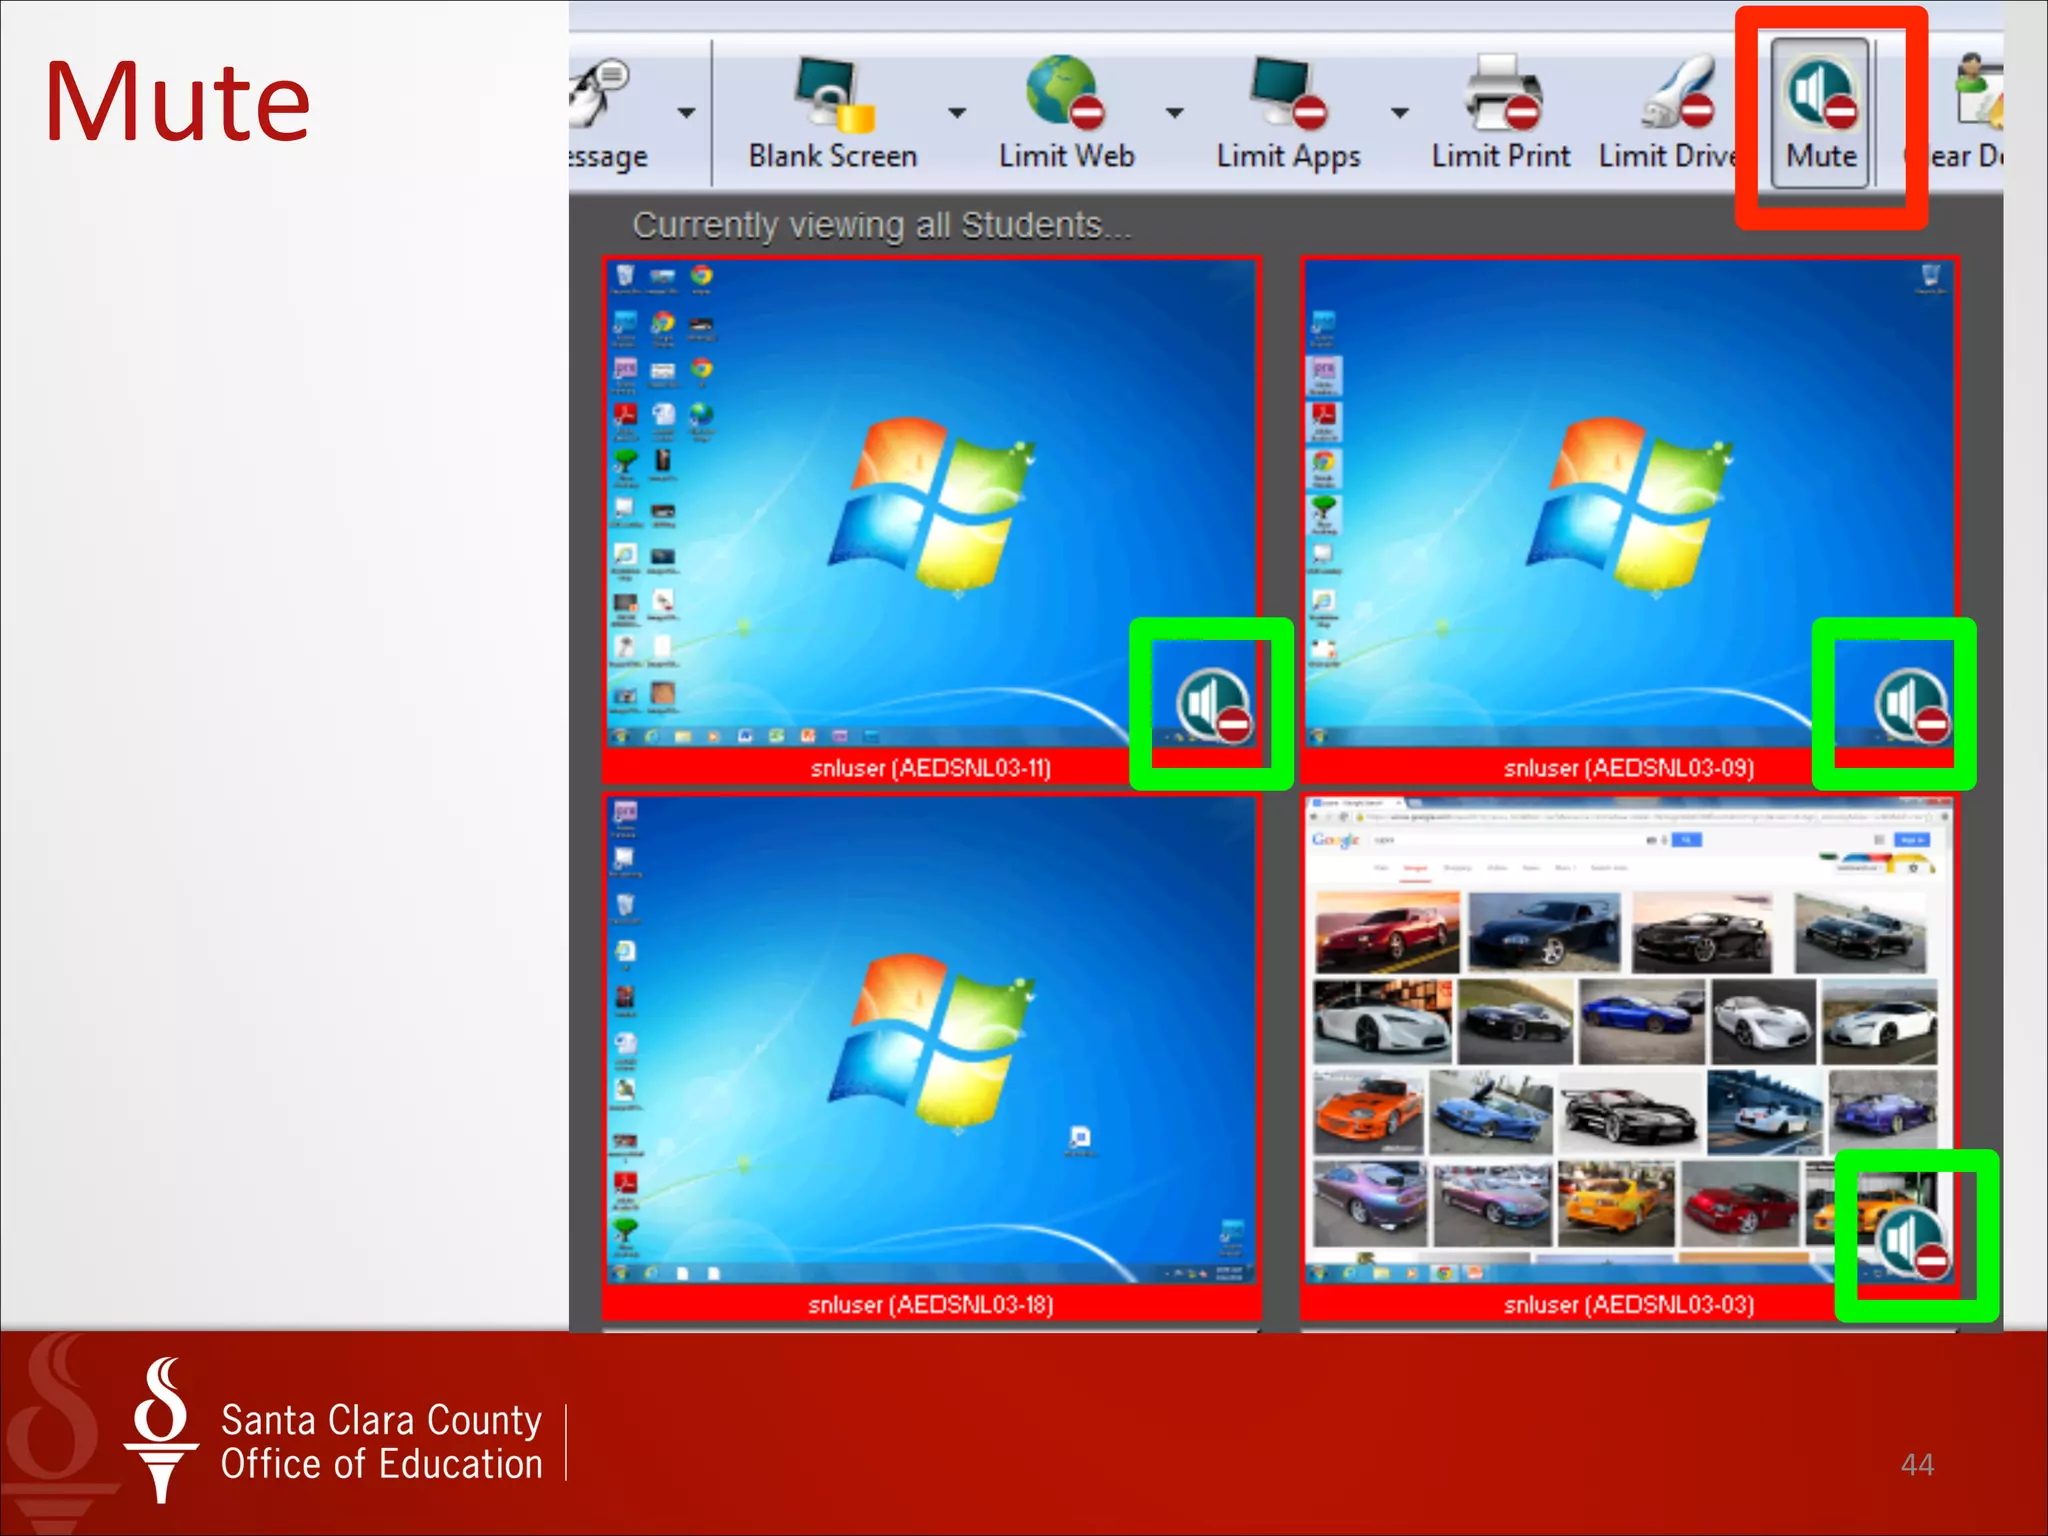
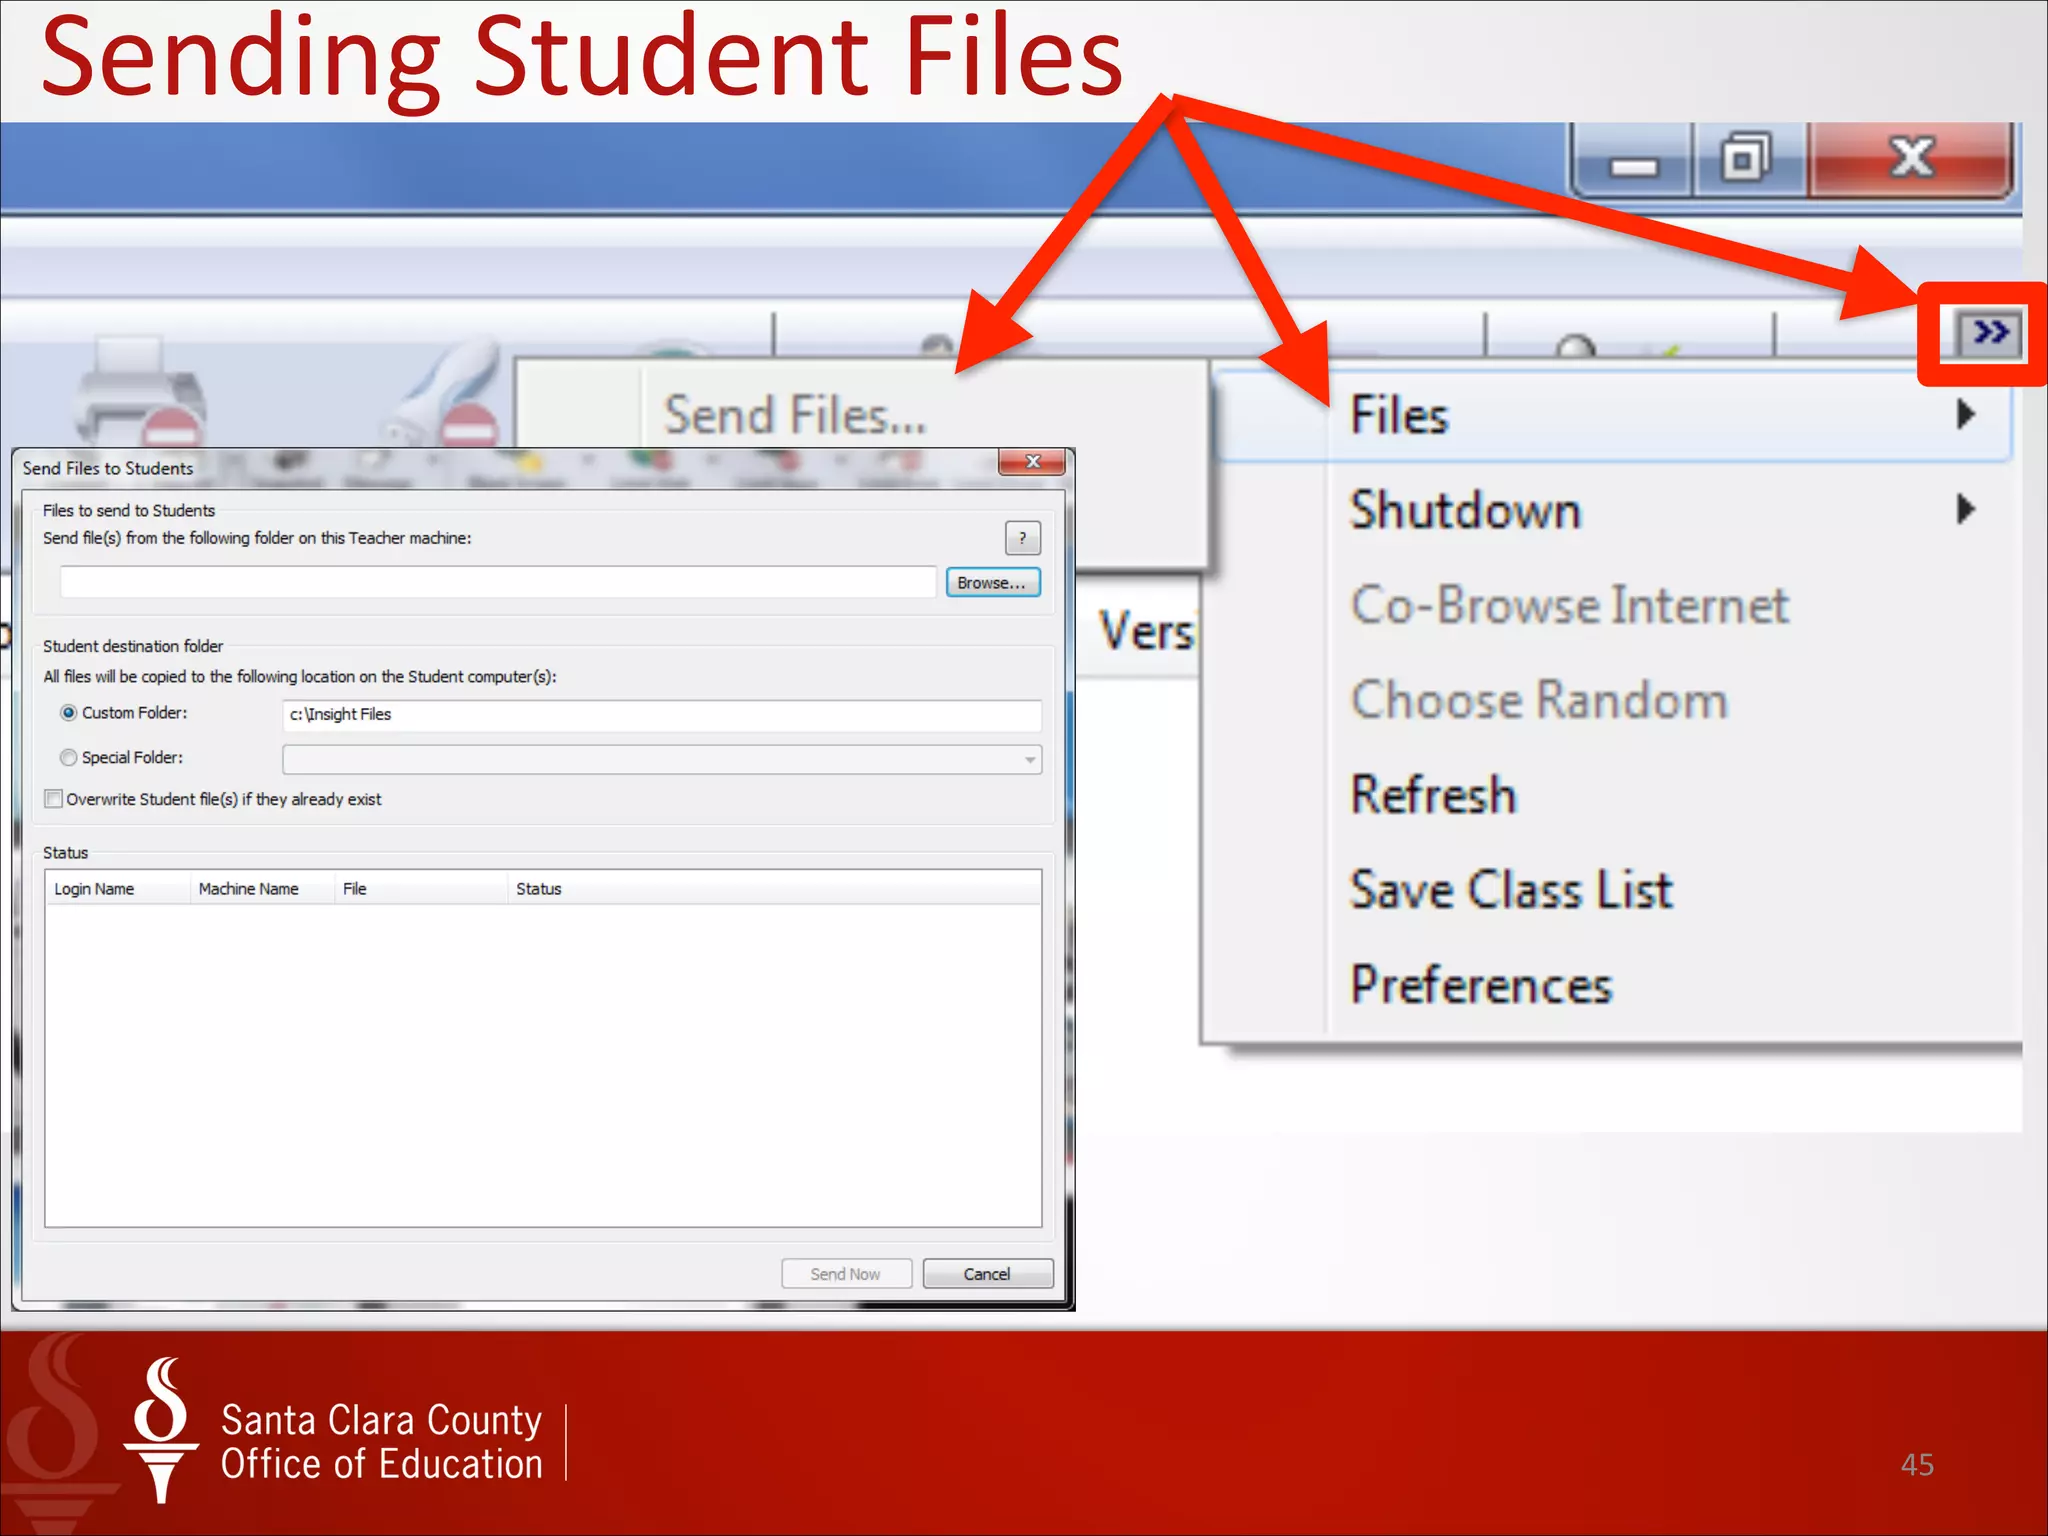
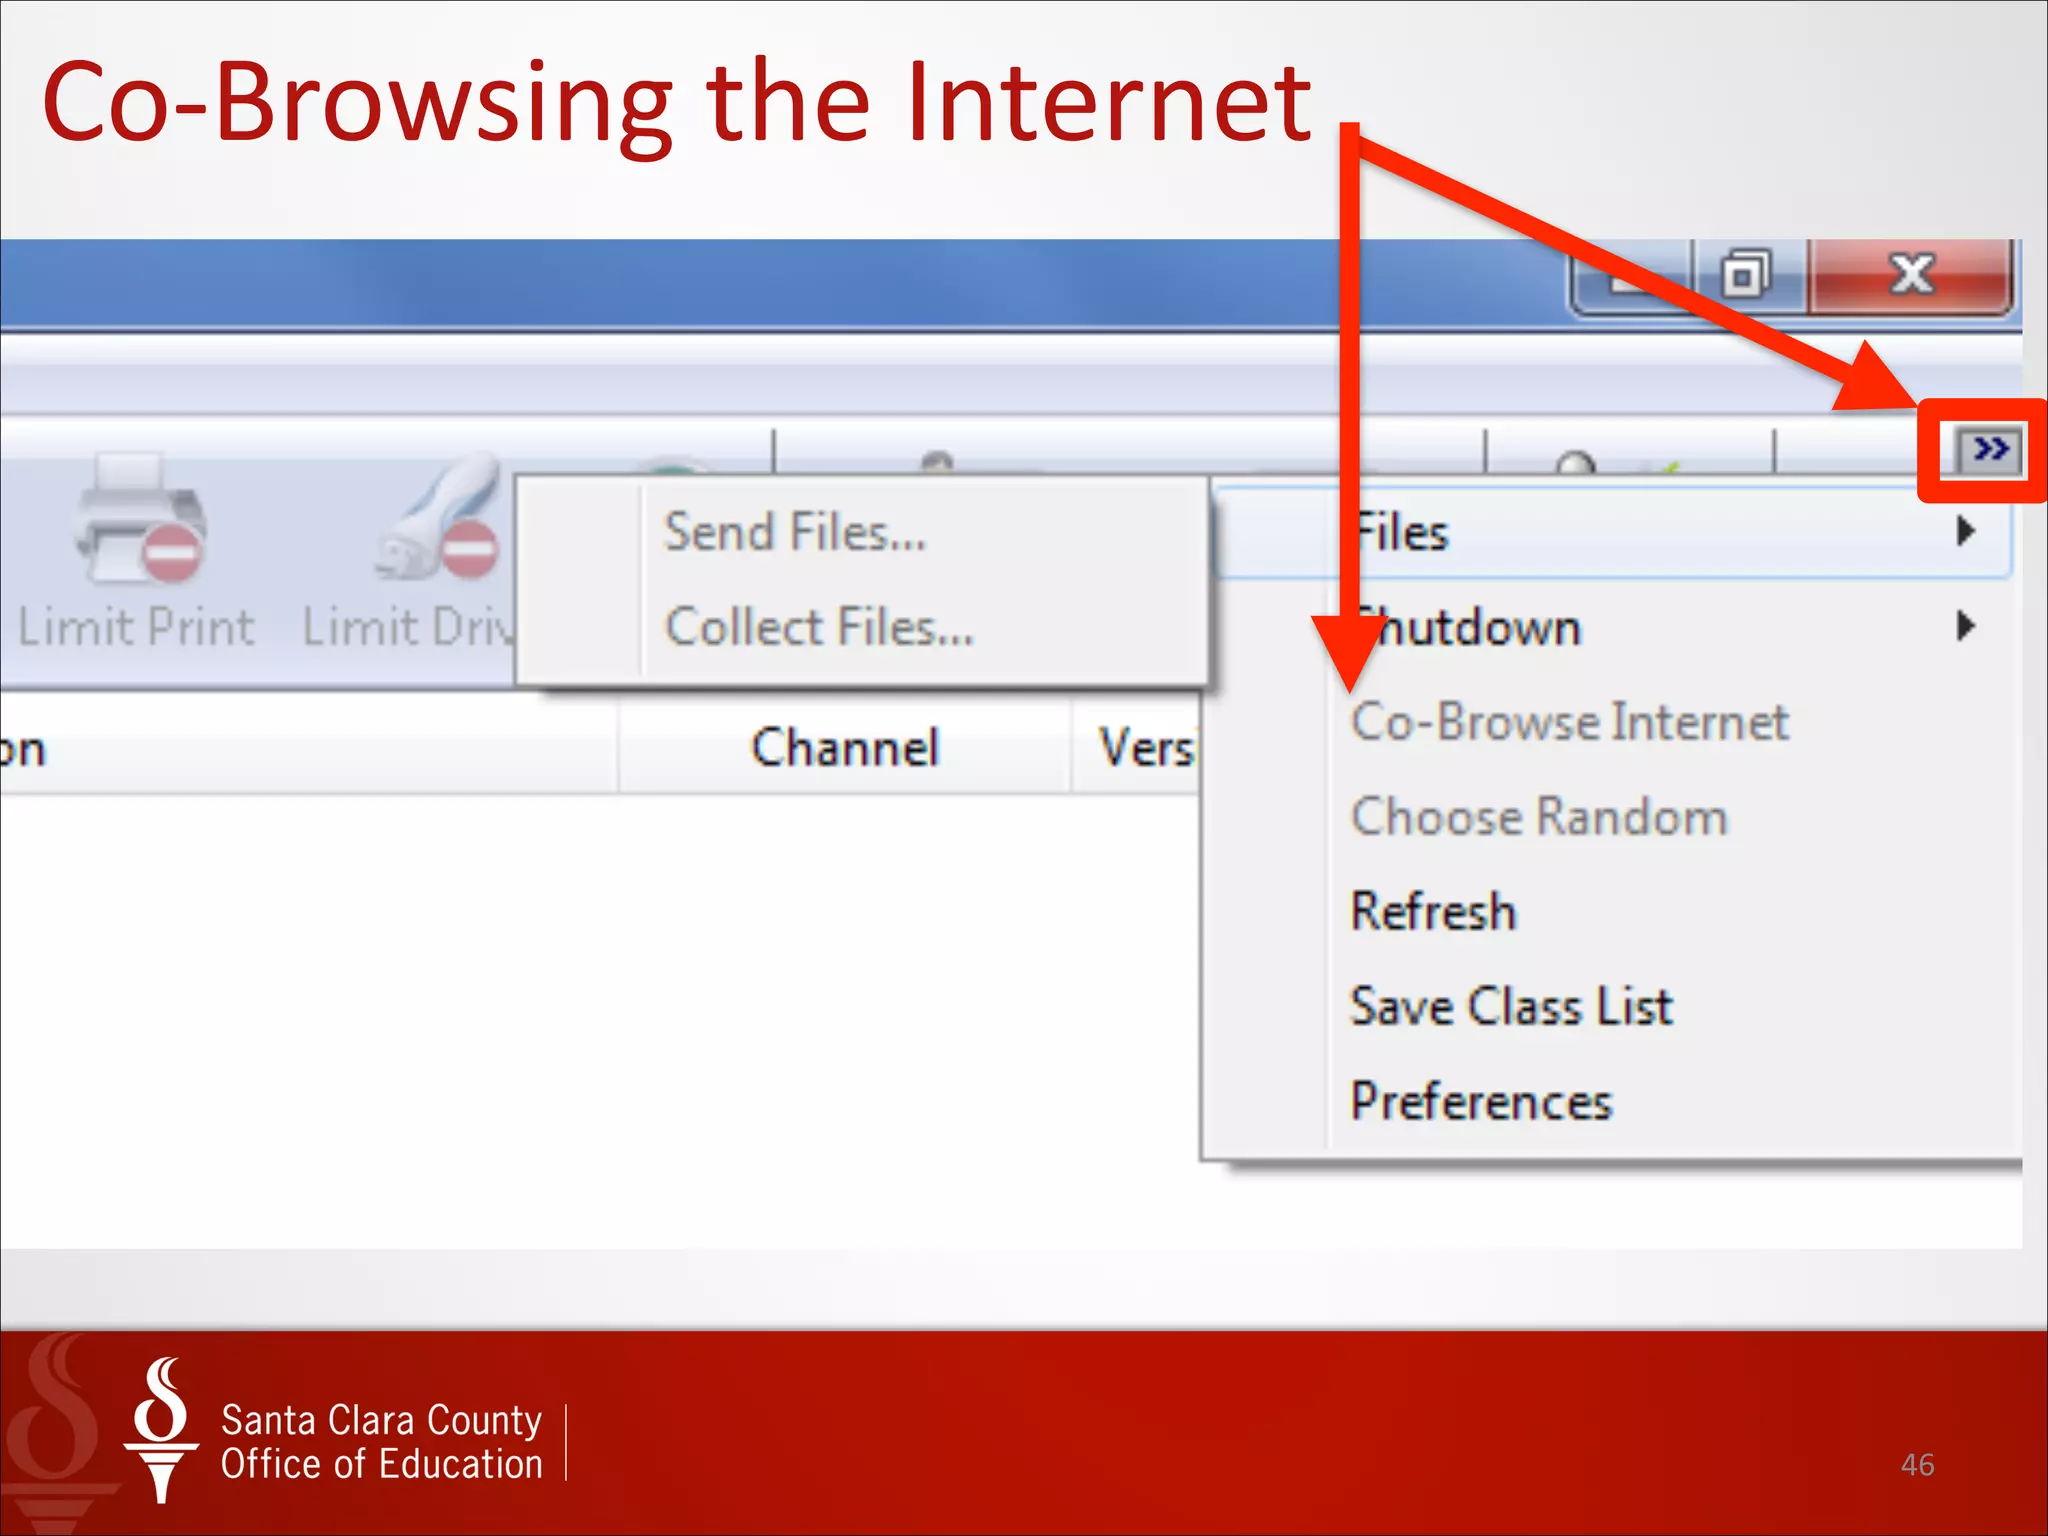
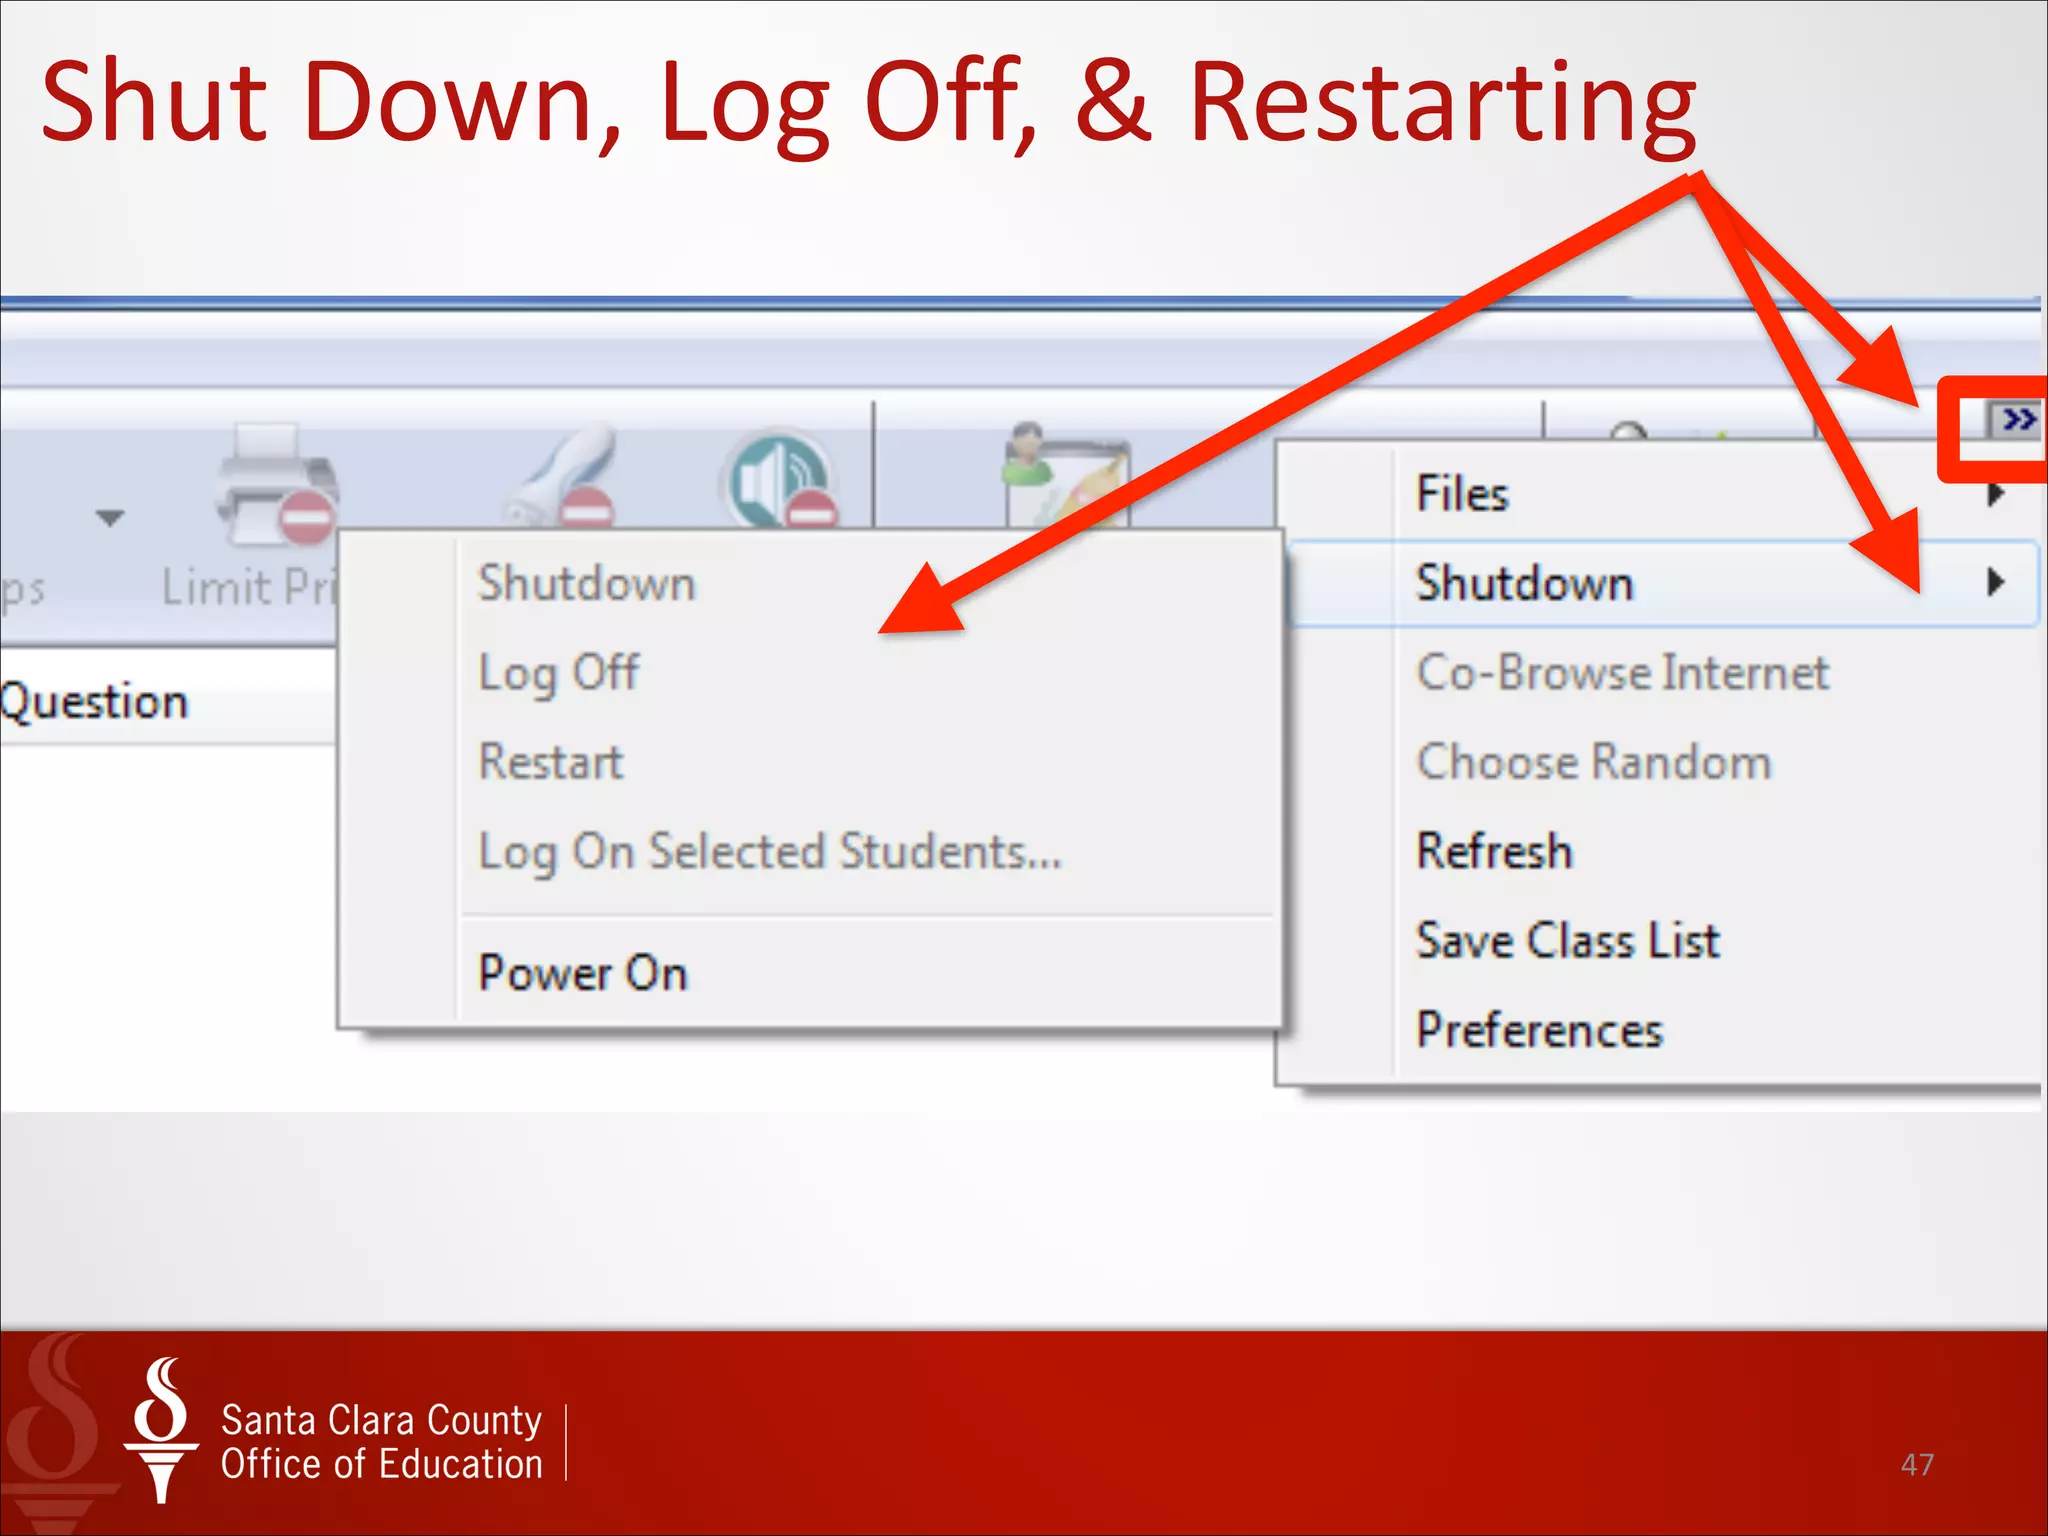
InSight 101
Monica Dvorsky
Network Enterprise
Engineer
monica_dvorsky@sccoe.org
Martin Cisneros
Academic Technology
Specialist
mcisneros@sccoe.org
2
3
bit.ly/Insight101
4
5
Digital Trends & Flow
For The Common Core Educator
6
ARE
YOU
READY?
7
8
9
10
Take a closer look @ Tech
11
Recommended Student Technology Skills for The Common Core
12
13
14
Agenda • Insight Default Controls
• Screen Sharing
• Voting
• Run Apps or websites
• Choose Monitoring Views
• Control of Stud Computer
• Blank Screen
• Limit Web & Apps
• Limit Print & Drives
• Chat & Messages
• Send Files
• Co-Browse Internet
• Shutdown, Log Off & Restart
15
todaysmeet.com/Insight101
16
17
Launch	
  Insight	
  &	
  Quick	
  Tools
Insight	
  101
•Left click here
for full teacher
console
•Right click for
quick tools
menu
18
Launch	
  Insight	
  &	
  	
  
Quick	
  Tools
Insight	
  101
•Right click for
quick tools
menu
• Right-click your mouse on
the Owl to access the
Teacher Menu .
• The Teacher Menu
displays the most
common teacher actions.
• Note: Most actions can
be toggled on/off from
this menu.
19
Insight	
  Teacher	
  Menu
Insight	
  101
20
Teacher	
  Channels	
  -­‐	
  Preferences	
  Menu
Insight	
  101
• Hovering your mouse over the Owl icon displays the Insight
Teacher Channel information on teacher or student
computers.
• Teacher and student computers must be set to the same
channel for sharing, viewing, and controlling computers.
• Teacher Channel numbering conventions are a
combination of your school code and classroom number.
• This graphic show the results of hovering over the Owl icon
to display the channel(s) that the teacher is connected to
channels classroom 1575 and carts 1501, 1502, and 1503.
• Osborne School code is 15.
• Tom will distribute a page of classroom channels.
21
Changing	
  Teacher	
  Channels	
  -­‐	
  Preferences
Insight	
  101
• To set and/or change the
teacher channel of the
computers you want to view,
select “Administer” from the
main menu and then choose
“Preferences…”
• You need to specify which
channel or channels you wish
to view.
22
Changing	
  Teacher	
  Channels	
  -­‐	
  Preferences
Insight	
  101
• To change the teacher channel of the
computers you want to view, select
“Administer” from the main menu and
then choose “Preferences…”
• IP-Directed Broadcast must be
selected with the 204.88.134.248
subnet entry. This connects to the
Insight Server
• In the “Preferences” window, click the
“Use Single Channel” button to enter
the channel number you wish to view.
• Or click “Use Multiple Channels”
button and separate multiple
channels by commas.
• Right-click your mouse on
the Owl to access the
Teacher Menu .
• The Teacher Menu
displays the most
common teacher actions.
• Note: Most actions can
be toggled on/off from
this menu.
23
Insight	
  Teacher	
  Menu
Insight	
  101
24
Insight	
  Teacher	
  Menu
Insight	
  101
• Show Teacher’s Screen
• This menu action displays
your screen on all student
monitors.
• Note that the Owl icon shows
a screen behind the Owl.
• Right-click on the Owl and
select “Stop Showing
Teacher’s Screen” to exit this
mode.
25
Insight	
  Teacher	
  Menu
Insight	
  101
• Blank All Screens
• This menu action locks all the lab
computers and displays the
message “Eyes to the front of the
classroom please…”
• The keyboard and mouse
functions are also disabled.
• Note that the Owl icon changes
to a padlock in this mode.
• Right-click on the Padlock and
choose “Unblank All Screens” to
exit.
26
Insight	
  Teacher	
  Menu
Insight	
  101
• Limit Web
• When selected, this menu action denies
Internet access to all student computers.
• There is no change to the Owl on the
teacher machine when “Web Limiting” is
enabled.
• However, the Owl icon on the student
computers is changed to a globe with a
minus symbol.
• Right-click on the globe to “Stop Web
Limiting.”
• Insight displays a notification on student
computers that the teacher has restricted
Web Browsing.
27
Insight	
  Teacher	
  Menu
Insight	
  101
• The “Insight Console” gives the
teacher access and
administrative control access to
all of the powerful tools available
monitor classroom computers.
• Choose Insight Console from the
popup menu (or just click on the
Own icon in the system tray) to
launch the Insight Console
window.
28
Console	
  &	
  Menu	
  Bar
Insight	
  101
• The main insight Console window displays a
toolbar that allows you to customize your
viewing environment options.
• The teacher can perform all operations from this
screen including, Blank Screens, Limit Web, etc.
29
Details	
  Views
Insight	
  101
• Select “Details” from the dropdown “View”
menu to display a list of all computers
viewable on your teacher channel.
• From the “Details” view, click on the
column name (login name, student name,
or machine name) in the title bar to sort by
that column.
!
• TIP: Sorting by the “Machine Name”
column will display the computers in
numerical order.
30
Control	
  Student	
  Machines
Insight	
  101
• One of the most powerful features of Insight is
the ability to control a single, several, or all
student computers at once.
• Click on the thumbnail icon of any computer/
s that you wish to control.
• The selected machine appears outlined in
red.
• Choose the “Control” icon to assume control
of a student machine.
• The keyboard and mouse will not be available
to the student.
• The student’s screen will appear in your
monitor screen.
• Press the “Control” icon again to toggle off.
31
Thumbnail	
  View	
  all	
  Monitors
!
• A thumbnail image of all student
screens appears on the teacher
monitor for viewing.
!
• Clicking on the “View All” button on
the toolbar will toggle the view
between “Details” and “Thumbnail.
!
• There are additional actions
available from the main toolbar if
you click on the arrows at the edge
of the toolbar.
BEST	
  for	
  showing	
  
on	
  projector
32
Thumbnail	
  View	
  all	
  Monitors
Insight	
  101
• It is very useful for a teacher to be
able to monitor what all students
are doing on their computers at any
given time.
• Once you have your computers in
the order you like to view them
select “View” from the main menu.
• Next, choose “Thumbnails” and
then select “Classroom Layout.”
!
• A thumbnail image of all student
screens appears on the teacher
monitor for viewing.
33
Show	
  Teacher	
  Screen
34
Show	
  Student	
  Screen	
  to	
  Class
35
Voting
36
Run	
  Apps	
  or	
  Websites
37
Taking	
  Snapshot	
  of	
  Student	
  Screen
38
Sending	
  Student	
  Messages
39
Blanking	
  Student	
  Screen
40
Limit	
  Websites
Insight	
  101
• One of the most useful actions is the
ability to restrict web browsing to specific
sites.
• Click the Limit Web button and then
choose Configure Web Limiting. This will
launch the configuration window
• Type in the sites that you wish to make
available to students and all other sites
will be blocked.
• Also you can type sites you specifically
wish to block and all others (that are not
restricted by our filters) are available.
41
Limit	
  Apps
42
Limit	
  	
  
Apps
43
Limit	
  Print
44
Limit	
  Drives
45
Mute
46
Sending	
  Student	
  Files
47
Co-­‐Browsing	
  the	
  Internet
48
Shut	
  Down,	
  Log	
  Off,	
  &	
  Restarting
49
bit.ly/insight101exam
50
Insight	
  101
todaysmeet.com/Insight101
51
Until	
  
Next	
  
Time!
March	
  26!
InSight 101
Monica Dvorsky
Network Enterprise
Engineer
monica_dvorsky@sccoe.org
Martin Cisneros
Academic Technology
Specialist
mcisneros@sccoe.org

Insight 101

  • 1.
    InSight 101 Monica Dvorsky NetworkEnterprise Engineer monica_dvorsky@sccoe.org Martin Cisneros Academic Technology Specialist mcisneros@sccoe.org
  • 2.
  • 3.
  • 4.
  • 5.
    5 Digital Trends &Flow For The Common Core Educator
  • 6.
  • 7.
  • 8.
  • 9.
  • 10.
    10 Take a closerlook @ Tech
  • 11.
    11 Recommended Student TechnologySkills for The Common Core
  • 12.
  • 13.
  • 14.
    14 Agenda • InsightDefault Controls • Screen Sharing • Voting • Run Apps or websites • Choose Monitoring Views • Control of Stud Computer • Blank Screen • Limit Web & Apps • Limit Print & Drives • Chat & Messages • Send Files • Co-Browse Internet • Shutdown, Log Off & Restart
  • 15.
  • 16.
  • 17.
    17 Launch  Insight  &  Quick  Tools Insight  101 •Left click here for full teacher console •Right click for quick tools menu
  • 18.
    18 Launch  Insight  &     Quick  Tools Insight  101 •Right click for quick tools menu
  • 19.
    • Right-click yourmouse on the Owl to access the Teacher Menu . • The Teacher Menu displays the most common teacher actions. • Note: Most actions can be toggled on/off from this menu. 19 Insight  Teacher  Menu Insight  101
  • 20.
    20 Teacher  Channels  -­‐  Preferences  Menu Insight  101 • Hovering your mouse over the Owl icon displays the Insight Teacher Channel information on teacher or student computers. • Teacher and student computers must be set to the same channel for sharing, viewing, and controlling computers. • Teacher Channel numbering conventions are a combination of your school code and classroom number. • This graphic show the results of hovering over the Owl icon to display the channel(s) that the teacher is connected to channels classroom 1575 and carts 1501, 1502, and 1503. • Osborne School code is 15. • Tom will distribute a page of classroom channels.
  • 21.
    21 Changing  Teacher  Channels  -­‐  Preferences Insight  101 • To set and/or change the teacher channel of the computers you want to view, select “Administer” from the main menu and then choose “Preferences…” • You need to specify which channel or channels you wish to view.
  • 22.
    22 Changing  Teacher  Channels  -­‐  Preferences Insight  101 • To change the teacher channel of the computers you want to view, select “Administer” from the main menu and then choose “Preferences…” • IP-Directed Broadcast must be selected with the 204.88.134.248 subnet entry. This connects to the Insight Server • In the “Preferences” window, click the “Use Single Channel” button to enter the channel number you wish to view. • Or click “Use Multiple Channels” button and separate multiple channels by commas.
  • 23.
    • Right-click yourmouse on the Owl to access the Teacher Menu . • The Teacher Menu displays the most common teacher actions. • Note: Most actions can be toggled on/off from this menu. 23 Insight  Teacher  Menu Insight  101
  • 24.
    24 Insight  Teacher  Menu Insight  101 • Show Teacher’s Screen • This menu action displays your screen on all student monitors. • Note that the Owl icon shows a screen behind the Owl. • Right-click on the Owl and select “Stop Showing Teacher’s Screen” to exit this mode.
  • 25.
    25 Insight  Teacher  Menu Insight  101 • Blank All Screens • This menu action locks all the lab computers and displays the message “Eyes to the front of the classroom please…” • The keyboard and mouse functions are also disabled. • Note that the Owl icon changes to a padlock in this mode. • Right-click on the Padlock and choose “Unblank All Screens” to exit.
  • 26.
    26 Insight  Teacher  Menu Insight  101 • Limit Web • When selected, this menu action denies Internet access to all student computers. • There is no change to the Owl on the teacher machine when “Web Limiting” is enabled. • However, the Owl icon on the student computers is changed to a globe with a minus symbol. • Right-click on the globe to “Stop Web Limiting.” • Insight displays a notification on student computers that the teacher has restricted Web Browsing.
  • 27.
    27 Insight  Teacher  Menu Insight  101 • The “Insight Console” gives the teacher access and administrative control access to all of the powerful tools available monitor classroom computers. • Choose Insight Console from the popup menu (or just click on the Own icon in the system tray) to launch the Insight Console window.
  • 28.
    28 Console  &  Menu  Bar Insight  101 • The main insight Console window displays a toolbar that allows you to customize your viewing environment options. • The teacher can perform all operations from this screen including, Blank Screens, Limit Web, etc.
  • 29.
    29 Details  Views Insight  101 •Select “Details” from the dropdown “View” menu to display a list of all computers viewable on your teacher channel. • From the “Details” view, click on the column name (login name, student name, or machine name) in the title bar to sort by that column. ! • TIP: Sorting by the “Machine Name” column will display the computers in numerical order.
  • 30.
    30 Control  Student  Machines Insight  101 • One of the most powerful features of Insight is the ability to control a single, several, or all student computers at once. • Click on the thumbnail icon of any computer/ s that you wish to control. • The selected machine appears outlined in red. • Choose the “Control” icon to assume control of a student machine. • The keyboard and mouse will not be available to the student. • The student’s screen will appear in your monitor screen. • Press the “Control” icon again to toggle off.
  • 31.
    31 Thumbnail  View  all  Monitors ! • A thumbnail image of all student screens appears on the teacher monitor for viewing. ! • Clicking on the “View All” button on the toolbar will toggle the view between “Details” and “Thumbnail. ! • There are additional actions available from the main toolbar if you click on the arrows at the edge of the toolbar. BEST  for  showing   on  projector
  • 32.
    32 Thumbnail  View  all  Monitors Insight  101 • It is very useful for a teacher to be able to monitor what all students are doing on their computers at any given time. • Once you have your computers in the order you like to view them select “View” from the main menu. • Next, choose “Thumbnails” and then select “Classroom Layout.” ! • A thumbnail image of all student screens appears on the teacher monitor for viewing.
  • 33.
  • 34.
  • 35.
  • 36.
  • 37.
    37 Taking  Snapshot  of  Student  Screen
  • 38.
  • 39.
  • 40.
    40 Limit  Websites Insight  101 •One of the most useful actions is the ability to restrict web browsing to specific sites. • Click the Limit Web button and then choose Configure Web Limiting. This will launch the configuration window • Type in the sites that you wish to make available to students and all other sites will be blocked. • Also you can type sites you specifically wish to block and all others (that are not restricted by our filters) are available.
  • 41.
  • 42.
  • 43.
  • 44.
  • 45.
  • 46.
  • 47.
  • 48.
    48 Shut  Down,  Log  Off,  &  Restarting
  • 49.
  • 50.
  • 51.
  • 52.
    InSight 101 Monica Dvorsky NetworkEnterprise Engineer monica_dvorsky@sccoe.org Martin Cisneros Academic Technology Specialist mcisneros@sccoe.org