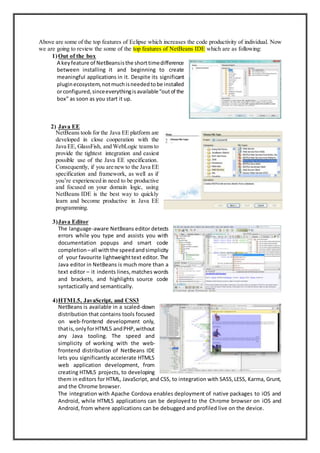
TOP FEATURES OF IDE’S
NOVEMBER 19, 2017
COMSATS INSTITUTE OF INFORMATION TECHNOLOGY
Three IDE’s which are MOSTLY used now a day are:
1. Visual Studio
2. Netbeans
3. Eclipse
First, we are going to discuss the top features of Visual Studio Which increases the programmer
productivity are as following:
1. Automatic Indentation:
Visual studio provides this feature to its user to organize their code which helps in better
understanding of code and programmer can format its code also using the shortcut keys i.e.
Ctrl+D.
2. Side-by-Side Editing:
VS Code supports one of the most sought-after developer requests – editing code side by side.
Simply Control+click on a file from your project explorer and multiple files open up side by
side, pre-docked and ready for edits. VS Code can support up to three simultaneous file edits,
each of which can be launched from the command prompt as well.
3. Always-On IntelliSense
IntelliSense window will increase the productivity of programmer now u don’t need to write
complete code just you have to start typing VS IntelliSense window will prompt all best related
language features and from that programmer just have to select and move on.
4. Command Palette:
One of the powerful utilities of VS Code
that you may want to keep handy is the
Command Palette – simply hit
Command/Control+Shift+P (⇧⌘P) to
bring it up. Think of it as PowerShell
inside your IDE, ready to serve up
commonly used tasks with a shortcuts.
5. Function Parameters:
One of the nifty IntelliSense features of VS Code is helping out with typed function parameters
during corresponding invocation, thus allowing easy code completion. This obviously works
with programming language/system functions, but is also smart enough to offer help on custom
functions that you have in your code.
6. Peek Information:
You may often want to peek at a different file or check a function definition. But a full-on
context switch can be expensive, since it takes you away from what you were about to type.
Enter Peek help from VS Code. Simply Right Click or (⌥F12) – and Peek Definition is here
to help, as shown below. The results of the peek are embedded inline and the inline peek
information goes away on hitting Escape, saving you the big context switch.
7. Debugging
The debuggerwill make itfasterand easierto findand resolve issuesinyourapp.While you
navigate code in the debugger,youcan inspectthe state of yourapp or learnmore about its
execution flow.
Start debugging: Often, you start a debugging session using F5 (Debug / Start Debugging).
When you debug, the yellow line shows you the code that will execute next.
F10 Step
Over
If the current line contains a function call, Step Over runs the code
then suspends execution at the first line of code after the called
function returns.
Shift+F11 Step
Out
StepOut continuesrunningcode andsuspendsexecutionwhenthe
current function returns (the debugger skips through the current
function).
8. Place Reusable Code Into Toolbox
Sometimes we need a small piece of code in many places of our application or in some different
application. What we do? We just copy the code from one page and paste it to the destination
page.
Visual Studio having a great feature, that we
can place over code snippet inside the
toolbox. For that we need to just select the
code snippet and drag the selected snippet on
to the general Tab. Now, you can use it
anywhere in your application or in any VS
Application by just drag and drop of the
selected snippet.
9. Use VA Hashtags:
Add hashtags to comments and navigate among them with Shift+Alt+G. Hashtags are
effectively bookmarks and tasks that move with your code. Create new hashtags or add # to
existing keywords,e.g. TODOto #TODO.Ifyou like hashtags,you will love their tool window
and advanced functionality
10. Quick actions and refactoring menu (Shift+Alt+Q)
Access the features of Visual Assist applicable to the current context with Shift+Alt+Q. The
content of the menu varies greatly. Experiment from symbols of different types, expressions,
lines, and whitespace.
Now that you use Shift+Alt+Q, disable the
floating button that opens the same menu.
Above are some of the top featuresofVisual Studio which increasesthe code productivity of individual.
Now we are going to review the some of the top features of Eclipse IDE which are as following:
1) Text File Encoding:
The default setting for saving files in your Eclipse
workspace is to use the file encoding of the underlying
operating system. However,you usually want to create
a platform independent application. To accommodate
this, set the file encoding to UTF-8. Using UTF-8 will
prevent problems with special characters if you deploy to a system that runs a different OS, run
your build on a UNIX machine or if somebody else works on the code using a different OS.
You’ll find the settings in: Preferences > General > Workspace or in your project specific
settings.
2) Save automatically before build:
One thing I noticed is that people (including me) are constantly hitting Ctrl+S to save or even
worse — grabbing the mouse to hit the Save action in the toolbar. This behavior seems to
originate from experienceswhere an application wasstartedfrom the workspace without saving
and of course, changes were then lost. You can save some keystrokes and mouse clicks by
enabling Save automatically before build. This is in: Preferences > General > Workspace
3) Type Filters (for PDE / RCP developers:
Type Filters remove suggestions for certain types (e.g. classes, interfaces) from the “Open
Type” dialog, content assist and quick fix proposals. Especially as an RCP / SWT developer
you most likely don’t want suggestions for Swing components like Button, Label, etc.
You’ll find this setting in: Preferences > Java > Appearance > Type Filters
4) Use “Step Filtering” for Debugging:
With “Step Filters” you can filter out types that you do not wish to see, or step through while
debugging. This helps you to stay focused on the actual code and does not expose you to the
inner workings where you might not even have the source. Have a
look at Holger’s Effective Mockito post about Step Filtering in
conjunction with Mockito.
You’ll find this in: Preferences > Java > Debug > Step Filtering
5) Always launch the previously launched application:
This option will ensure your last launched configuration is used. In the default setting, Eclipse
tries to determine the most appropriate configuration for the currently selected resource —
which can be quite annoying. Set this under: Preferences > Run/Debug > Launching
6) Store your Launch Configuration in a Project:
You probably spend a good amount of time crafting your launch configuration. You can
actually store it as a file in one of your projects so you
cancheck it in. This way you canshare it with colleagues
and save them from reinventing the wheel.
You’ll find this in: Menu: Run > Run Configurations...
> Launch Configuration Tab: Common
7) Make a Launch Configuration always appear in the Menu
If you have multiple Launch Configurations, you can
choose your favorite ones and stick them permanently to
your Launch/Debug menu.
Go to: Menu: Run > Run Configurations... > Launch
Configuration Tab: Common
8) Organize imports on save
The imports are automatically added to the class file.
But, changing or removing code might make some
imports obsolete. To fix that, you can Organize
Imports by hitting shift+crtl+o or shift+cmd+o on a
Mac and your imports will be cleaned up. Or you can
enable Organize imports on save and Eclipse will take
care of that automatically.
You’ll find this in: Preferences > Java > Editor >
Save Actions or in your project specific settings.
9) Format edited lines on save:
The code formatter in Eclipse is a very useful thing. It
ensures that the code looks consistent in your projects
— no matter who wrote it — and can be easily read
and understood by anyone else. But, formatting the
whole file can seriously mess up a diff between two
versions of the file. So ‘format only edited lines on
save’ might be the right choice if you want the have your code formatted and still be able to
see what was changed in your code later on.
You’ll find this in: Preferences > Java > Editor > Save Actions or in your project specific
settings.
10) Let Eclipse do the typing
A good IDE should support the developer in writing his code at nearly the speed of thought.
And Eclipse comes quite close to this with Refactorings, Quick Fixes, Code Assist/Code
completion and more:
o Quick Fix: ctrl+1 or cmd+1 on a Mac
o Content Assist: ctrl+space (for Mac and PC)
o Quick Access: ctrl+3 or cmd+3 on a Macaka ctrl+awesome™
o Open Type: shift+ctrl+T or shift+cmd+T on a Mac
Above are some of the top features of Eclipse which increases the code productivity of individual. Now
we are going to review the some of the top features of NetBeans IDE which are as following:
1)Out of the box
A keyfeature of NetBeansisthe shorttimedifference
between installing it and beginning to create
meaningful applications in it. Despite its significant
pluginecosystem,notmuchisneededtobe installed
orconfigured,sinceeverythingisavailable“outof the
box” as soon as you start it up.
2) Java EE
NetBeans tools for the Java EE platform are
developed in close cooperation with the
Java EE, GlassFish, and WebLogic teamsto
provide the tightest integration and easiest
possible use of the Java EE specification.
Consequently, if you are newto the Java EE
specification and framework, as well as if
you’re experienced in need to be productive
and focused on your domain logic, using
NetBeans IDE is the best way to quickly
learn and become productive in Java EE
programming.
3)Java Editor
The language-aware NetBeans editor detects
errors while you type and assists you with
documentation popups and smart code
completion –all withthe speedandsimplicity
of your favourite lightweighttext editor. The
Java editor in NetBeans is much more than a
text editor – it indents lines,matches words
and brackets, and highlights source code
syntactically and semantically.
4)HTML5, JavaScript, and CSS3
NetBeans is available in a scaled-down
distribution that contains tools focused
on web-frontend development only,
thatis, onlyforHTML5 andPHP,without
any Java tooling. The speed and
simplicity of working with the web-
frontend distribution of NetBeans IDE
lets you significantly accelerate HTML5
web application development, from
creating HTML5 projects, to developing
them in editors for HTML, JavaScript, and CSS, to integration with SASS,LESS, Karma, Grunt,
and the Chrome browser.
The integration with Apache Cordova enables deployment of native packages to iOS and
Android, while HTML5 applications can be deployed to the Chrome browser on iOS and
Android, from where applications can be debugged and profiled live on the device.

ID E's features

  • 1.
    TOP FEATURES OFIDE’S NOVEMBER 19, 2017 COMSATS INSTITUTE OF INFORMATION TECHNOLOGY
  • 2.
    Three IDE’s whichare MOSTLY used now a day are: 1. Visual Studio 2. Netbeans 3. Eclipse First, we are going to discuss the top features of Visual Studio Which increases the programmer productivity are as following: 1. Automatic Indentation: Visual studio provides this feature to its user to organize their code which helps in better understanding of code and programmer can format its code also using the shortcut keys i.e. Ctrl+D. 2. Side-by-Side Editing: VS Code supports one of the most sought-after developer requests – editing code side by side. Simply Control+click on a file from your project explorer and multiple files open up side by side, pre-docked and ready for edits. VS Code can support up to three simultaneous file edits, each of which can be launched from the command prompt as well. 3. Always-On IntelliSense IntelliSense window will increase the productivity of programmer now u don’t need to write complete code just you have to start typing VS IntelliSense window will prompt all best related language features and from that programmer just have to select and move on. 4. Command Palette: One of the powerful utilities of VS Code that you may want to keep handy is the Command Palette – simply hit Command/Control+Shift+P (⇧⌘P) to bring it up. Think of it as PowerShell inside your IDE, ready to serve up commonly used tasks with a shortcuts. 5. Function Parameters: One of the nifty IntelliSense features of VS Code is helping out with typed function parameters during corresponding invocation, thus allowing easy code completion. This obviously works with programming language/system functions, but is also smart enough to offer help on custom functions that you have in your code. 6. Peek Information: You may often want to peek at a different file or check a function definition. But a full-on context switch can be expensive, since it takes you away from what you were about to type. Enter Peek help from VS Code. Simply Right Click or (⌥F12) – and Peek Definition is here to help, as shown below. The results of the peek are embedded inline and the inline peek information goes away on hitting Escape, saving you the big context switch. 7. Debugging The debuggerwill make itfasterand easierto findand resolve issuesinyourapp.While you navigate code in the debugger,youcan inspectthe state of yourapp or learnmore about its execution flow.
  • 3.
    Start debugging: Often,you start a debugging session using F5 (Debug / Start Debugging). When you debug, the yellow line shows you the code that will execute next. F10 Step Over If the current line contains a function call, Step Over runs the code then suspends execution at the first line of code after the called function returns. Shift+F11 Step Out StepOut continuesrunningcode andsuspendsexecutionwhenthe current function returns (the debugger skips through the current function). 8. Place Reusable Code Into Toolbox Sometimes we need a small piece of code in many places of our application or in some different application. What we do? We just copy the code from one page and paste it to the destination page. Visual Studio having a great feature, that we can place over code snippet inside the toolbox. For that we need to just select the code snippet and drag the selected snippet on to the general Tab. Now, you can use it anywhere in your application or in any VS Application by just drag and drop of the selected snippet. 9. Use VA Hashtags: Add hashtags to comments and navigate among them with Shift+Alt+G. Hashtags are effectively bookmarks and tasks that move with your code. Create new hashtags or add # to existing keywords,e.g. TODOto #TODO.Ifyou like hashtags,you will love their tool window and advanced functionality 10. Quick actions and refactoring menu (Shift+Alt+Q) Access the features of Visual Assist applicable to the current context with Shift+Alt+Q. The content of the menu varies greatly. Experiment from symbols of different types, expressions, lines, and whitespace.
  • 4.
    Now that youuse Shift+Alt+Q, disable the floating button that opens the same menu. Above are some of the top featuresofVisual Studio which increasesthe code productivity of individual. Now we are going to review the some of the top features of Eclipse IDE which are as following: 1) Text File Encoding: The default setting for saving files in your Eclipse workspace is to use the file encoding of the underlying operating system. However,you usually want to create a platform independent application. To accommodate this, set the file encoding to UTF-8. Using UTF-8 will prevent problems with special characters if you deploy to a system that runs a different OS, run your build on a UNIX machine or if somebody else works on the code using a different OS. You’ll find the settings in: Preferences > General > Workspace or in your project specific settings. 2) Save automatically before build: One thing I noticed is that people (including me) are constantly hitting Ctrl+S to save or even worse — grabbing the mouse to hit the Save action in the toolbar. This behavior seems to originate from experienceswhere an application wasstartedfrom the workspace without saving and of course, changes were then lost. You can save some keystrokes and mouse clicks by enabling Save automatically before build. This is in: Preferences > General > Workspace 3) Type Filters (for PDE / RCP developers: Type Filters remove suggestions for certain types (e.g. classes, interfaces) from the “Open Type” dialog, content assist and quick fix proposals. Especially as an RCP / SWT developer you most likely don’t want suggestions for Swing components like Button, Label, etc. You’ll find this setting in: Preferences > Java > Appearance > Type Filters 4) Use “Step Filtering” for Debugging: With “Step Filters” you can filter out types that you do not wish to see, or step through while debugging. This helps you to stay focused on the actual code and does not expose you to the inner workings where you might not even have the source. Have a look at Holger’s Effective Mockito post about Step Filtering in conjunction with Mockito. You’ll find this in: Preferences > Java > Debug > Step Filtering
  • 5.
    5) Always launchthe previously launched application: This option will ensure your last launched configuration is used. In the default setting, Eclipse tries to determine the most appropriate configuration for the currently selected resource — which can be quite annoying. Set this under: Preferences > Run/Debug > Launching 6) Store your Launch Configuration in a Project: You probably spend a good amount of time crafting your launch configuration. You can actually store it as a file in one of your projects so you cancheck it in. This way you canshare it with colleagues and save them from reinventing the wheel. You’ll find this in: Menu: Run > Run Configurations... > Launch Configuration Tab: Common 7) Make a Launch Configuration always appear in the Menu If you have multiple Launch Configurations, you can choose your favorite ones and stick them permanently to your Launch/Debug menu. Go to: Menu: Run > Run Configurations... > Launch Configuration Tab: Common 8) Organize imports on save The imports are automatically added to the class file. But, changing or removing code might make some imports obsolete. To fix that, you can Organize Imports by hitting shift+crtl+o or shift+cmd+o on a Mac and your imports will be cleaned up. Or you can enable Organize imports on save and Eclipse will take care of that automatically. You’ll find this in: Preferences > Java > Editor > Save Actions or in your project specific settings. 9) Format edited lines on save: The code formatter in Eclipse is a very useful thing. It ensures that the code looks consistent in your projects — no matter who wrote it — and can be easily read and understood by anyone else. But, formatting the whole file can seriously mess up a diff between two versions of the file. So ‘format only edited lines on save’ might be the right choice if you want the have your code formatted and still be able to see what was changed in your code later on. You’ll find this in: Preferences > Java > Editor > Save Actions or in your project specific settings. 10) Let Eclipse do the typing A good IDE should support the developer in writing his code at nearly the speed of thought. And Eclipse comes quite close to this with Refactorings, Quick Fixes, Code Assist/Code completion and more: o Quick Fix: ctrl+1 or cmd+1 on a Mac o Content Assist: ctrl+space (for Mac and PC) o Quick Access: ctrl+3 or cmd+3 on a Macaka ctrl+awesome™ o Open Type: shift+ctrl+T or shift+cmd+T on a Mac
  • 6.
    Above are someof the top features of Eclipse which increases the code productivity of individual. Now we are going to review the some of the top features of NetBeans IDE which are as following: 1)Out of the box A keyfeature of NetBeansisthe shorttimedifference between installing it and beginning to create meaningful applications in it. Despite its significant pluginecosystem,notmuchisneededtobe installed orconfigured,sinceeverythingisavailable“outof the box” as soon as you start it up. 2) Java EE NetBeans tools for the Java EE platform are developed in close cooperation with the Java EE, GlassFish, and WebLogic teamsto provide the tightest integration and easiest possible use of the Java EE specification. Consequently, if you are newto the Java EE specification and framework, as well as if you’re experienced in need to be productive and focused on your domain logic, using NetBeans IDE is the best way to quickly learn and become productive in Java EE programming. 3)Java Editor The language-aware NetBeans editor detects errors while you type and assists you with documentation popups and smart code completion –all withthe speedandsimplicity of your favourite lightweighttext editor. The Java editor in NetBeans is much more than a text editor – it indents lines,matches words and brackets, and highlights source code syntactically and semantically. 4)HTML5, JavaScript, and CSS3 NetBeans is available in a scaled-down distribution that contains tools focused on web-frontend development only, thatis, onlyforHTML5 andPHP,without any Java tooling. The speed and simplicity of working with the web- frontend distribution of NetBeans IDE lets you significantly accelerate HTML5 web application development, from creating HTML5 projects, to developing them in editors for HTML, JavaScript, and CSS, to integration with SASS,LESS, Karma, Grunt, and the Chrome browser. The integration with Apache Cordova enables deployment of native packages to iOS and Android, while HTML5 applications can be deployed to the Chrome browser on iOS and Android, from where applications can be debugged and profiled live on the device.