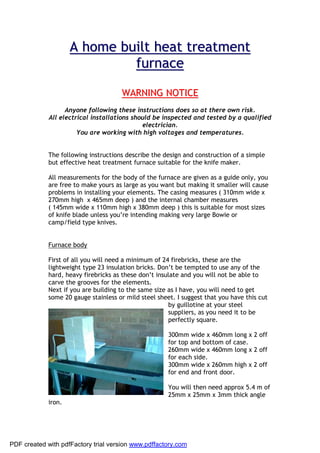
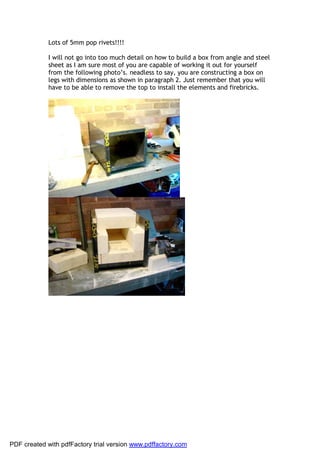
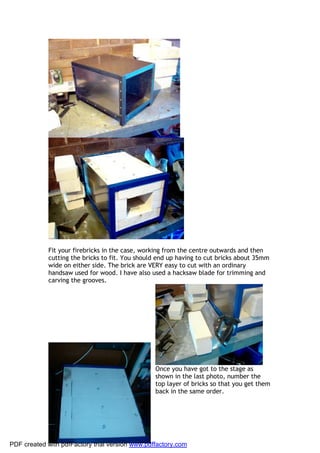
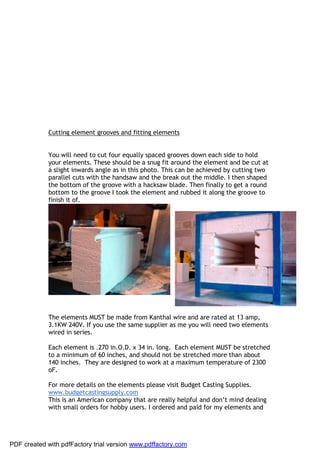
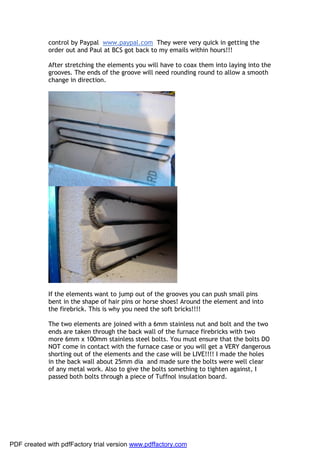
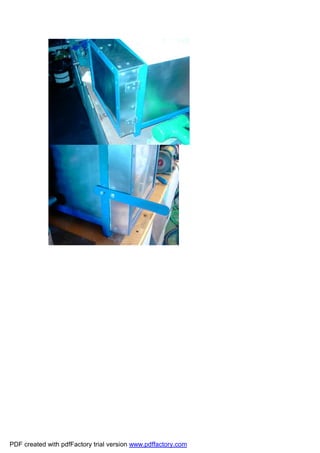
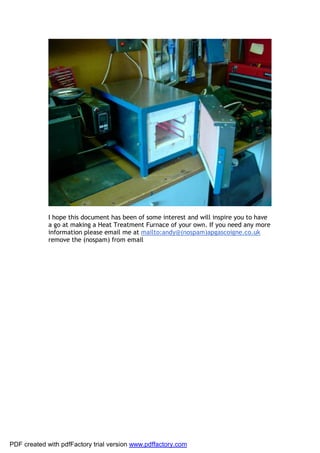
A home built heat treatment
                              furnace

                                      WARNING NOTICE
                   Anyone following these instructions does so at there own risk.
             All electrical installations should be inspected and tested by a qualified
                                             electrician.
                       You are working with high voltages and temperatures.


             The following instructions describe the design and construction of a simple
             but effective heat treatment furnace suitable for the knife maker.

             All measurements for the body of the furnace are given as a guide only, you
             are free to make yours as large as you want but making it smaller will cause
             problems in installing your elements. The casing measures ( 310mm wide x
             270mm high x 465mm deep ) and the internal chamber measures
             ( 145mm wide x 110mm high x 380mm deep ) this is suitable for most sizes
             of knife blade unless you’re intending making very large Bowie or
             camp/field type knives.


             Furnace body

             First of all you will need a minimum of 24 firebricks, these are the
             lightweight type 23 insulation bricks. Don’t be tempted to use any of the
             hard, heavy firebricks as these don’t insulate and you will not be able to
             carve the grooves for the elements.
             Next if you are building to the same size as I have, you will need to get
             some 20 gauge stainless or mild steel sheet. I suggest that you have this cut
                                                       by guillotine at your steel
                                                       suppliers, as you need it to be
                                                       perfectly square.

                                                       300mm wide x 460mm long x 2 off
                                                       for top and bottom of case.
                                                       260mm wide x 460mm long x 2 off
                                                       for each side.
                                                       300mm wide x 260mm high x 2 off
                                                       for end and front door.

                                                       You will then need approx 5.4 m of
                                                       25mm x 25mm x 3mm thick angle
             iron.


PDF created with pdfFactory trial version www.pdffactory.com
Lots of 5mm pop rivets!!!!

             I will not go into too much detail on how to build a box from angle and steel
             sheet as I am sure most of you are capable of working it out for yourself
             from the following photo’s. neadless to say, you are constructing a box on
             legs with dimensions as shown in paragraph 2. Just remember that you will
             have to be able to remove the top to install the elements and firebricks.


PDF created with pdfFactory trial version www.pdffactory.com
Fit your firebricks in the case, working from the centre outwards and then
             cutting the bricks to fit. You should end up having to cut bricks about 35mm
             wide on either side. The brick are VERY easy to cut with an ordinary
             handsaw used for wood. I have also used a hacksaw blade for trimming and
             carving the grooves.


                                                 Once you have got to the stage as
                                                 shown in the last photo, number the
                                                 top layer of bricks so that you get them
                                                 back in the same order.


PDF created with pdfFactory trial version www.pdffactory.com
Cutting element grooves and fitting elements


             You will need to cut four equally spaced grooves down each side to hold
             your elements. These should be a snug fit around the element and be cut at
             a slight inwards angle as in this photo. This can be achieved by cutting two
             parallel cuts with the handsaw and the break out the middle. I then shaped
             the bottom of the groove with a hacksaw blade. Then finally to get a round
             bottom to the groove I took the element and rubbed it along the groove to
             finish it of.


             The elements MUST be made from Kanthal wire and are rated at 13 amp,
             3.1KW 240V. If you use the same supplier as me you will need two elements
             wired in series.

             Each element is .270 in.O.D. x 34 in. long. Each element MUST be stretched
             to a minimum of 60 inches, and should not be stretched more than about
             140 inches. They are designed to work at a maximum temperature of 2300
             oF.

             For more details on the elements please visit Budget Casting Supplies.
             www.budgetcastingsupply.com
             This is an American company that are really helpful and don’t mind dealing
             with small orders for hobby users. I ordered and paid for my elements and


PDF created with pdfFactory trial version www.pdffactory.com
control by Paypal www.paypal.com They were very quick in getting the
             order out and Paul at BCS got back to my emails within hours!!!

             After stretching the elements you will have to coax them into laying into the
             grooves. The ends of the groove will need rounding round to allow a smooth
             change in direction.


             If the elements want to jump out of the grooves you can push small pins
             bent in the shape of hair pins or horse shoes! Around the element and into
             the firebrick. This is why you need the soft bricks!!!!

             The two elements are joined with a 6mm stainless nut and bolt and the two
             ends are taken through the back wall of the furnace firebricks with two
             more 6mm x 100mm stainless steel bolts. You must ensure that the bolts DO
             NOT come in contact with the furnace case or you will get a VERY dangerous
             shorting out of the elements and the case will be LIVE!!!! I made the holes
             in the back wall about 25mm dia and made sure the bolts were well clear
             of any metal work. Also to give the bolts something to tighten against, I
             passed both bolts through a piece of Tuffnol insulation board.


PDF created with pdfFactory trial version www.pdffactory.com
The wires from the element bolts to the control should be high temperature
             insulated wire used specifically in wiring of furnaces and kilns. The above
             connections should be covered by an insulated cover before use.


             The above diagram shows the wiring for an infinite heat control. More
             details on this control can be found on the BCS site.
             www.budgetcastingsupply.com/Heating_Elements_Controllers.html

             BCS also will supply a detailed sheet with the elements, which contains lots
             of useful information on installing and looking after your elements.

             This is the same type of control you would have on a domestic oven. You
             will need some other method of measuring the temperature with a K type
             thermocouple. You can get reasonably priced digital multimeters with K


PDF created with pdfFactory trial version www.pdffactory.com
type thermocouple connections but make sure the meter will measure up to
             at least 1100 oC if you intend heat treating stainless steel.

             You can also use a programmable control and thermocouple that will not
             only read temperature but will maintain a set temperature or ramp up and
             down as required.

             Front door


             The front door is yet again constructed from 25mm x25mm angle iron and
             stainless sheet. The overall thickness is about 50mm. You will have to
             construct it in such a way as you can remove to top of the door in slide the
             firebricks into place. I have made by door top about 15mm wider so that it
             laps over the top of the furnace. This not only helps with the seal but also
             helps support the weight of the door when closed. I have fixed 25mm wide
             asbestos substitute tape to the face of the door to form a seal. The better
             the seal on your furnace door the faster you will be able to reach your
             desired temperatures and also prevent fluctuation in temperatures. The
             door is mounted on simple metal hinges riveted to the door and furnace
             side. The latch was made as simple as possible and holds the door on the
             seal.


PDF created with pdfFactory trial version www.pdffactory.com
I hope this document has been of some interest and will inspire you to have
             a go at making a Heat Treatment Furnace of your own. If you need any more
             information please email me at mailto:andy@(nospam)apgascoigne.co.uk
             remove the (nospam) from email


PDF created with pdfFactory trial version www.pdffactory.com

Ht furnace

  • 1.
    A home builtheat treatment furnace WARNING NOTICE Anyone following these instructions does so at there own risk. All electrical installations should be inspected and tested by a qualified electrician. You are working with high voltages and temperatures. The following instructions describe the design and construction of a simple but effective heat treatment furnace suitable for the knife maker. All measurements for the body of the furnace are given as a guide only, you are free to make yours as large as you want but making it smaller will cause problems in installing your elements. The casing measures ( 310mm wide x 270mm high x 465mm deep ) and the internal chamber measures ( 145mm wide x 110mm high x 380mm deep ) this is suitable for most sizes of knife blade unless you’re intending making very large Bowie or camp/field type knives. Furnace body First of all you will need a minimum of 24 firebricks, these are the lightweight type 23 insulation bricks. Don’t be tempted to use any of the hard, heavy firebricks as these don’t insulate and you will not be able to carve the grooves for the elements. Next if you are building to the same size as I have, you will need to get some 20 gauge stainless or mild steel sheet. I suggest that you have this cut by guillotine at your steel suppliers, as you need it to be perfectly square. 300mm wide x 460mm long x 2 off for top and bottom of case. 260mm wide x 460mm long x 2 off for each side. 300mm wide x 260mm high x 2 off for end and front door. You will then need approx 5.4 m of 25mm x 25mm x 3mm thick angle iron. PDF created with pdfFactory trial version www.pdffactory.com
  • 2.
    Lots of 5mmpop rivets!!!! I will not go into too much detail on how to build a box from angle and steel sheet as I am sure most of you are capable of working it out for yourself from the following photo’s. neadless to say, you are constructing a box on legs with dimensions as shown in paragraph 2. Just remember that you will have to be able to remove the top to install the elements and firebricks. PDF created with pdfFactory trial version www.pdffactory.com
  • 3.
    Fit your firebricksin the case, working from the centre outwards and then cutting the bricks to fit. You should end up having to cut bricks about 35mm wide on either side. The brick are VERY easy to cut with an ordinary handsaw used for wood. I have also used a hacksaw blade for trimming and carving the grooves. Once you have got to the stage as shown in the last photo, number the top layer of bricks so that you get them back in the same order. PDF created with pdfFactory trial version www.pdffactory.com
  • 4.
    Cutting element groovesand fitting elements You will need to cut four equally spaced grooves down each side to hold your elements. These should be a snug fit around the element and be cut at a slight inwards angle as in this photo. This can be achieved by cutting two parallel cuts with the handsaw and the break out the middle. I then shaped the bottom of the groove with a hacksaw blade. Then finally to get a round bottom to the groove I took the element and rubbed it along the groove to finish it of. The elements MUST be made from Kanthal wire and are rated at 13 amp, 3.1KW 240V. If you use the same supplier as me you will need two elements wired in series. Each element is .270 in.O.D. x 34 in. long. Each element MUST be stretched to a minimum of 60 inches, and should not be stretched more than about 140 inches. They are designed to work at a maximum temperature of 2300 oF. For more details on the elements please visit Budget Casting Supplies. www.budgetcastingsupply.com This is an American company that are really helpful and don’t mind dealing with small orders for hobby users. I ordered and paid for my elements and PDF created with pdfFactory trial version www.pdffactory.com
  • 5.
    control by Paypalwww.paypal.com They were very quick in getting the order out and Paul at BCS got back to my emails within hours!!! After stretching the elements you will have to coax them into laying into the grooves. The ends of the groove will need rounding round to allow a smooth change in direction. If the elements want to jump out of the grooves you can push small pins bent in the shape of hair pins or horse shoes! Around the element and into the firebrick. This is why you need the soft bricks!!!! The two elements are joined with a 6mm stainless nut and bolt and the two ends are taken through the back wall of the furnace firebricks with two more 6mm x 100mm stainless steel bolts. You must ensure that the bolts DO NOT come in contact with the furnace case or you will get a VERY dangerous shorting out of the elements and the case will be LIVE!!!! I made the holes in the back wall about 25mm dia and made sure the bolts were well clear of any metal work. Also to give the bolts something to tighten against, I passed both bolts through a piece of Tuffnol insulation board. PDF created with pdfFactory trial version www.pdffactory.com
  • 6.
    The wires fromthe element bolts to the control should be high temperature insulated wire used specifically in wiring of furnaces and kilns. The above connections should be covered by an insulated cover before use. The above diagram shows the wiring for an infinite heat control. More details on this control can be found on the BCS site. www.budgetcastingsupply.com/Heating_Elements_Controllers.html BCS also will supply a detailed sheet with the elements, which contains lots of useful information on installing and looking after your elements. This is the same type of control you would have on a domestic oven. You will need some other method of measuring the temperature with a K type thermocouple. You can get reasonably priced digital multimeters with K PDF created with pdfFactory trial version www.pdffactory.com
  • 7.
    type thermocouple connectionsbut make sure the meter will measure up to at least 1100 oC if you intend heat treating stainless steel. You can also use a programmable control and thermocouple that will not only read temperature but will maintain a set temperature or ramp up and down as required. Front door The front door is yet again constructed from 25mm x25mm angle iron and stainless sheet. The overall thickness is about 50mm. You will have to construct it in such a way as you can remove to top of the door in slide the firebricks into place. I have made by door top about 15mm wider so that it laps over the top of the furnace. This not only helps with the seal but also helps support the weight of the door when closed. I have fixed 25mm wide asbestos substitute tape to the face of the door to form a seal. The better the seal on your furnace door the faster you will be able to reach your desired temperatures and also prevent fluctuation in temperatures. The door is mounted on simple metal hinges riveted to the door and furnace side. The latch was made as simple as possible and holds the door on the seal. PDF created with pdfFactory trial version www.pdffactory.com
  • 8.
    PDF created withpdfFactory trial version www.pdffactory.com
  • 9.
    I hope thisdocument has been of some interest and will inspire you to have a go at making a Heat Treatment Furnace of your own. If you need any more information please email me at mailto:andy@(nospam)apgascoigne.co.uk remove the (nospam) from email PDF created with pdfFactory trial version www.pdffactory.com