How to make a mask for an XCT reconstructed volume with ImageJ
•
0 likes•245 views

Guide for volume masking after X-Ray Computed Tomography reconstruction. This is one of multiple ways to make a mask for a volume at IMDEA Materials Institute (Getafe, Spain, 2018). ImageJ software is used.

Recommended
Recommended
More Related Content
What's hot
Similar to How to make a mask for an XCT reconstructed volume with ImageJ
Similar to How to make a mask for an XCT reconstructed volume with ImageJ (13)
More from Javier García Molleja
More from Javier García Molleja (20)
Recently uploaded
Recently uploaded (20)
How to make a mask for an XCT reconstructed volume with ImageJ
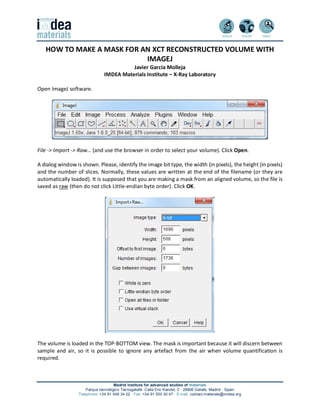
- 1. Madrid institute for advanced studies of materials Parque tecnológico Tecnogetafe· Calle Eric Kandel, 2 · 28906 Getafe, Madrid · Spain Telephone: +34 91 549 34 22 · Fax: +34 91 550 30 47 · E-mail: contact.materials@imdea.org HOW TO MAKE A MASK FOR AN XCT RECONSTRUCTED VOLUME WITH IMAGEJ Javier García Molleja IMDEA Materials Institute – X-Ray Laboratory Open ImageJ software. File -> Import -> Raw… (and use the browser in order to select your volume). Click Open. A dialog window is shown. Please, identify the image bit type, the width (in pixels), the height (in pixels) and the number of slices. Normally, these values are written at the end of the filename (or they are automatically loaded). It is supposed that you are making a mask from an aligned volume, so the file is saved as raw (then do not click Little-endian byte order). Click OK. The volume is loaded in the TOP-BOTTOM view. The mask is important because it will discern between sample and air, so it is possible to ignore any artefact from the air when volume quantification is required.
- 2. Madrid institute for advanced studies of materials Parque tecnológico Tecnogetafe· Calle Eric Kandel, 2 · 28906 Getafe, Madrid · Spain Telephone: +34 91 549 34 22 · Fax: +34 91 550 30 47 · E-mail: contact.materials@imdea.org Sample is considered as a whole, without regarding its internal features, pores or components. Image -> Adjust -> Threshold… will show the histogram of grey levels and some options. This dialog enables several global thresholding modes. Default, Huang and Otsu, for example, are typical choices. See in the histogram two peaks separated by a valley. One peak distribution (low grey values) is for air and another peak distribution (high grey values) is for sample. Top slider should be at 0 and move the other one in order to select (in red colour in this case) the air. Auto is the best initial guessing and with Set button you can write these two grey values. Reset button will abort all operations. Try to select all air and the air-sample border must be clear and definite, mimicking the real air-sample border.
- 3. Madrid institute for advanced studies of materials Parque tecnológico Tecnogetafe· Calle Eric Kandel, 2 · 28906 Getafe, Madrid · Spain Telephone: +34 91 549 34 22 · Fax: +34 91 550 30 47 · E-mail: contact.materials@imdea.org When you are sure click Apply and uncheck all options in the new dialog window. Click OK. Now the volume is changed to 8-bit (if you are working in 16-bit) and the LUT (look-up table) is inverted, that is, black is 255 and white is 0. Check the status bar (under the window name) for detailed information. For the following operations this inverted LUT is not a good option, so we need to change to black 0 and white 255. Image -> Lookup Tables -> Invert LUT
- 4. Madrid institute for advanced studies of materials Parque tecnológico Tecnogetafe· Calle Eric Kandel, 2 · 28906 Getafe, Madrid · Spain Telephone: +34 91 549 34 22 · Fax: +34 91 550 30 47 · E-mail: contact.materials@imdea.org We have many pores inside the sample so we should remove them in one step. Process -> Binary -> Fill Holes will act in black regions, so if a white pixel is surrounded by black pixels it will be converted into a black one. Click Yes to apply to all slices. Process -> Binary -> Erode (click Yes to apply to all slices) in order to smooth the air-sample border. Furthermore, any black region will lose one pixel of surface, so the air artefacts will be deleted. You can try several times. In this example, four Erode operations were performed. Process -> Binary -> Dilate (click Yes to apply to all slices) in order to recover the initial size. With this operation, any black region will gain one pixel of surface. Remember that you need to perform the same number of Dilate operations than the previous number of Erode operations. We need to be sure that there is no artefacts in the air. We can know the maximum extension of the sample, so any black pixel outside this region is an artefact. Image -> Stacks -> Z-Project… all slices to Minimum Intensity, so we will obtain one slice with the minimum grey (i.e., black 0 in the present case) per pixel position. Click OK.
- 5. Madrid institute for advanced studies of materials Parque tecnológico Tecnogetafe· Calle Eric Kandel, 2 · 28906 Getafe, Madrid · Spain Telephone: +34 91 549 34 22 · Fax: +34 91 550 30 47 · E-mail: contact.materials@imdea.org Outside of this black region there is no sample. Go to the ImageJ main window and click Wand (tracing) tool in this image (for more precision, in any black pixel). A yellow line will surround the black region. Analyze -> Tools -> ROI Manager… and then click Add. With Rename… you can give another meaningful filename. Furthermore, click More >> Save… in order to save in roi format your Region Of Interest. Now you need to go to your volume and click the ROI in the ROI Manager. The yellow line will be replicated in the complete stack. This shape will be replicated in every slice. Edit -> Options -> Colors… and check that background is in white colour. Click OK for confirmation. In the ImageJ main window you can do this by double-clicking Color Picker button.
- 6. Madrid institute for advanced studies of materials Parque tecnológico Tecnogetafe· Calle Eric Kandel, 2 · 28906 Getafe, Madrid · Spain Telephone: +34 91 549 34 22 · Fax: +34 91 550 30 47 · E-mail: contact.materials@imdea.org Edit -> Clear Outside (click Yes to apply to all slices) and outside of this ROI all pixels are forced to be in background colour (white in this case). Now, deselect the ROI. Edit -> Invert (click Yes to apply to all slices) in order to obtain the sample in white 255 and the air in black 0. Congratulations! You did your mask for further operations in your volume. Of course, this is not the only way to obtain it (maybe you need to change the order of Erode/Dilate operations, for example). Furthermore, if you need to binarize the volume, i.e., air in black 0 and sample in white 1 you need to perform a mathematical operation. Process -> Math -> Divide… (click Yes to apply to all slices) by 255, so 0/255 = 0 and 255/255 = 1.
- 7. Madrid institute for advanced studies of materials Parque tecnológico Tecnogetafe· Calle Eric Kandel, 2 · 28906 Getafe, Madrid · Spain Telephone: +34 91 549 34 22 · Fax: +34 91 550 30 47 · E-mail: contact.materials@imdea.org File -> Save As -> Raw Data… and you will finish all steps. Remember that in the filename you need to know the name of the sample, the bit type, all previous operations, that this is a mask and the volume size. The format will be raw. 03_Lath_50_HR_A1_8b_Median3D2p0_MASK_1690x500x1736.raw Yes, we previously performed a Median filtering. This will smooth each grey pixel using the median of its neighbourhood. This operation will help the local segmentation of sample features. Image -> Type -> 8-bit in order to reduce the file size. Process -> Filters -> Median 3D… and we used a neighbourhood of 2.0 pixels in the X, Y and Z directions. (Thanks to Federico Sket for the idea).