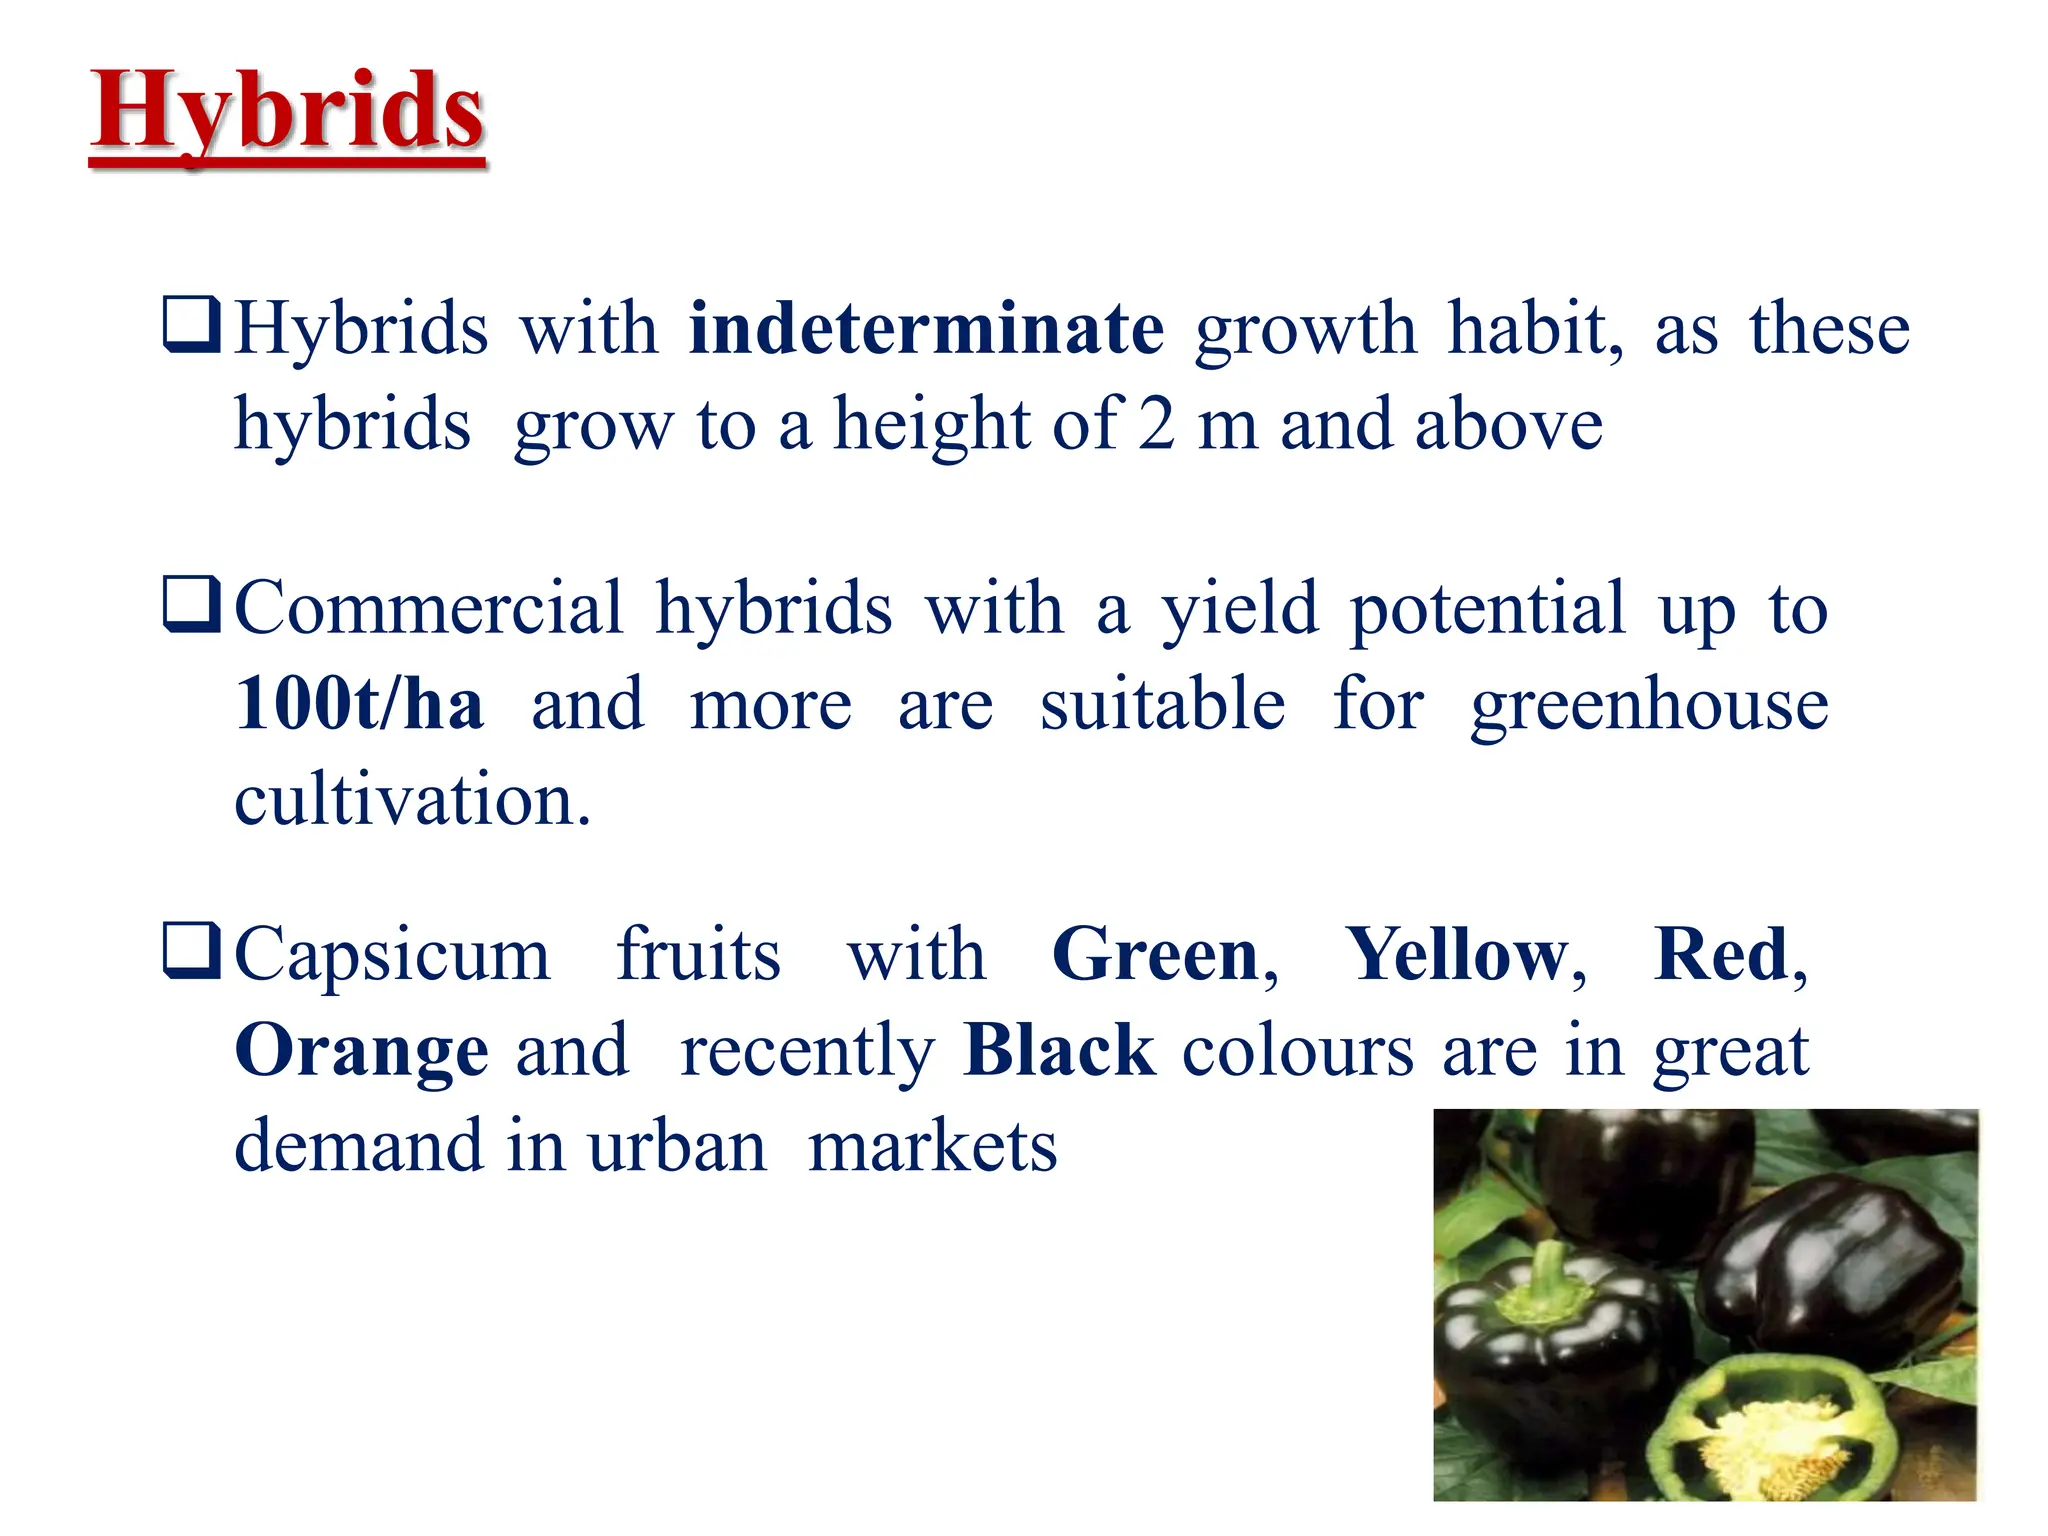
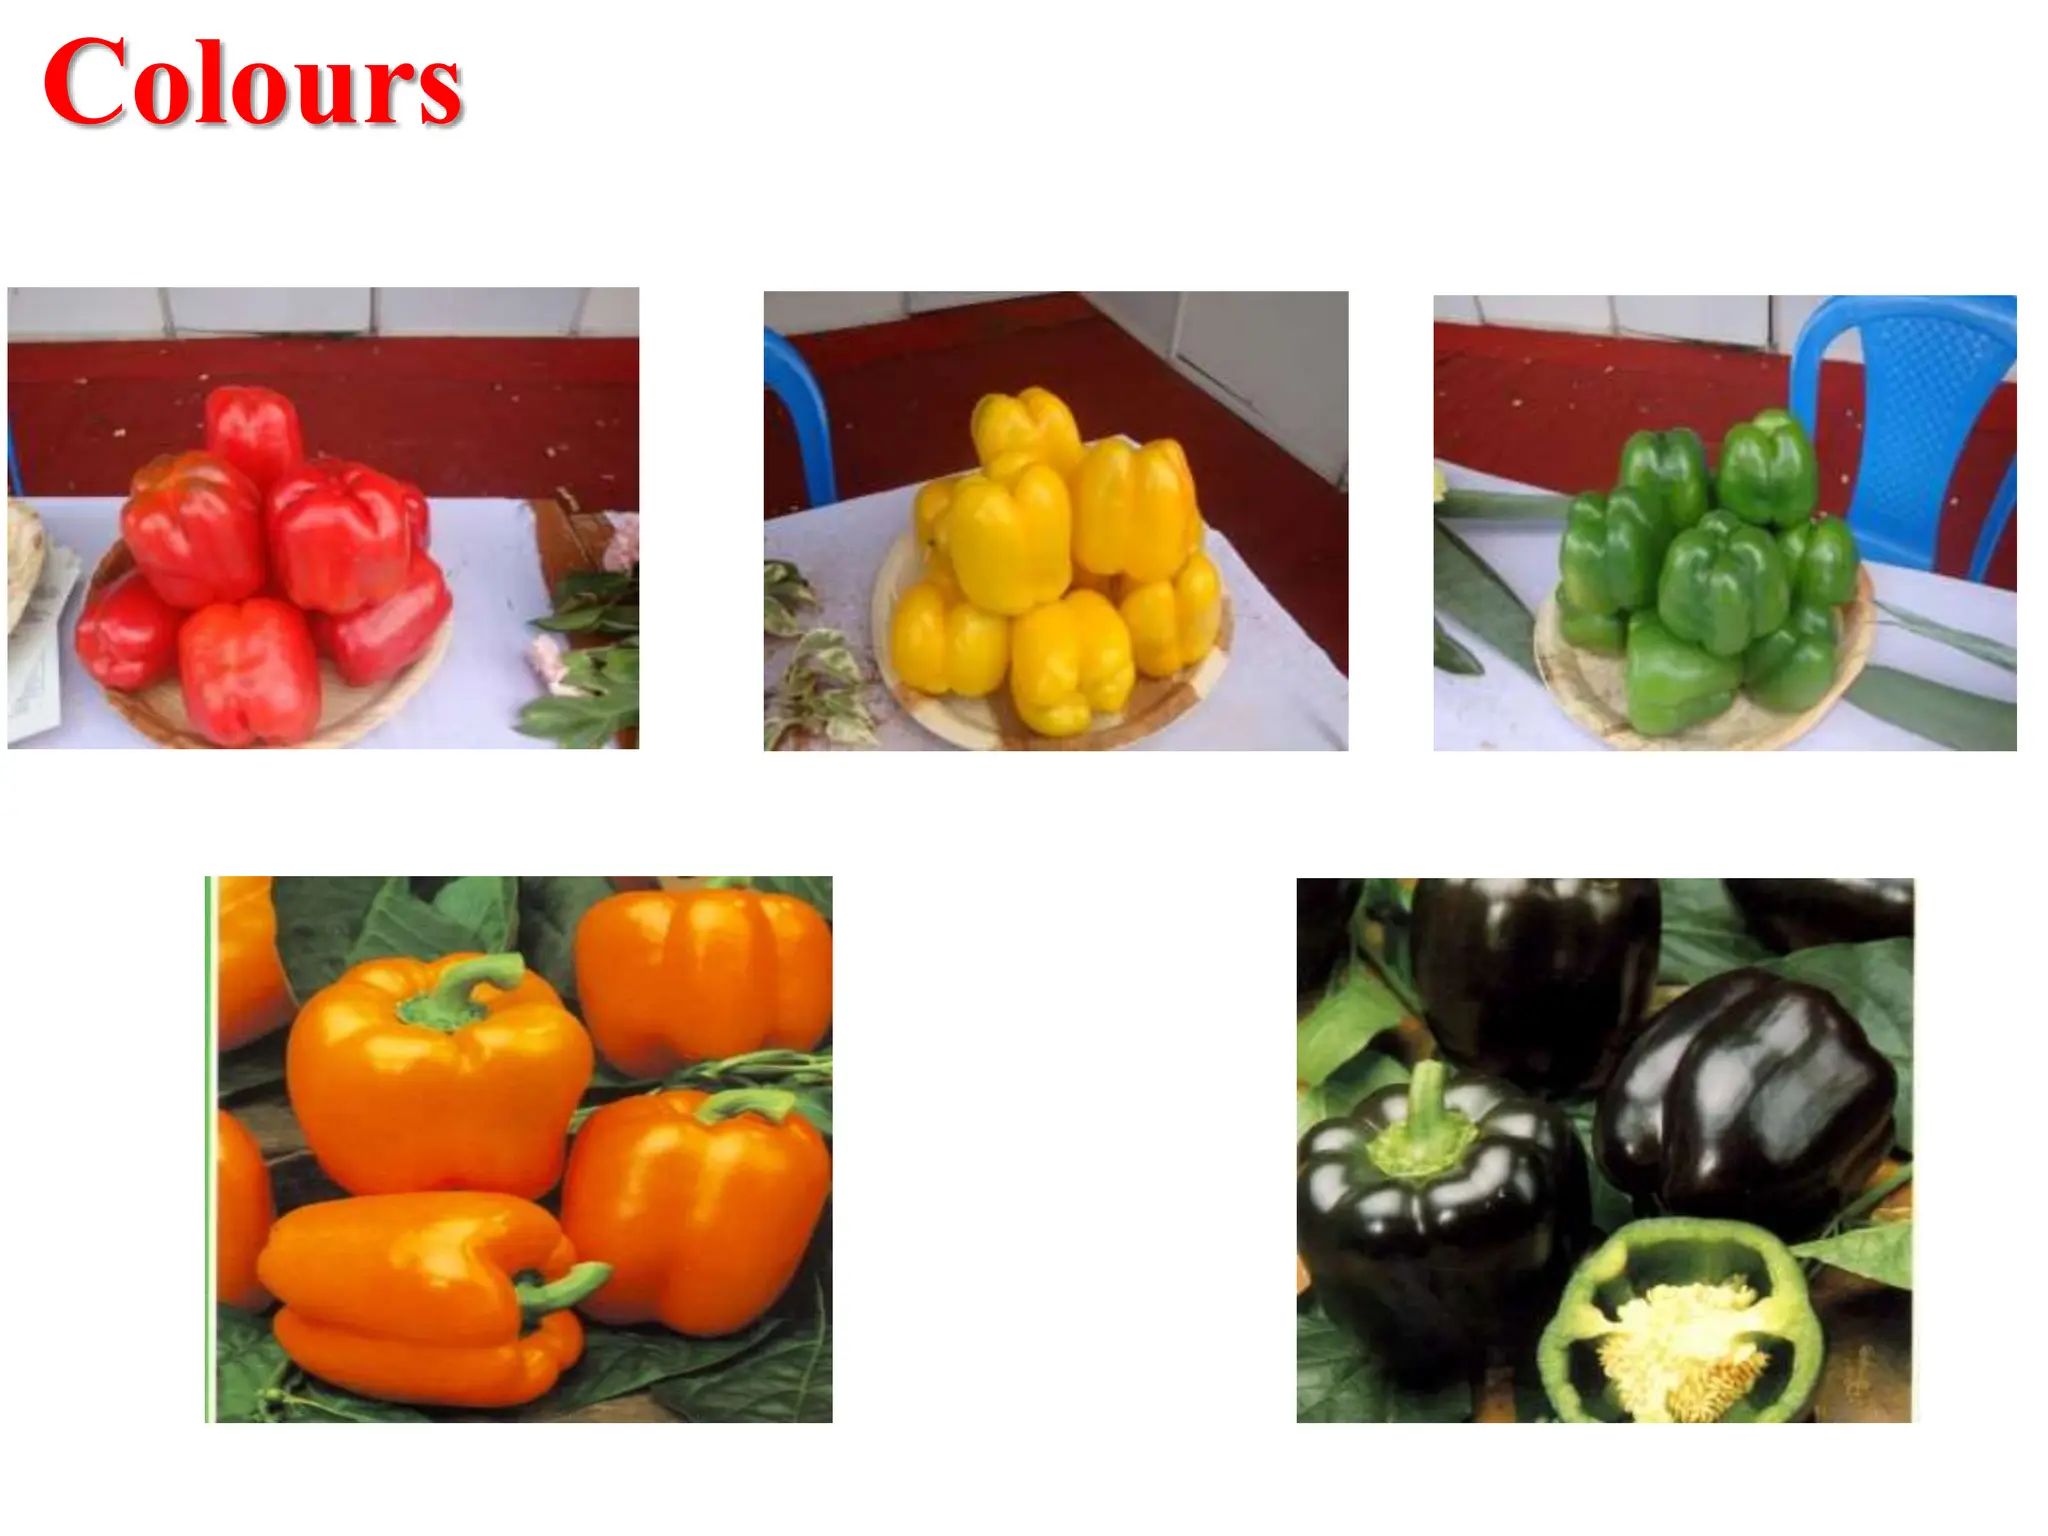
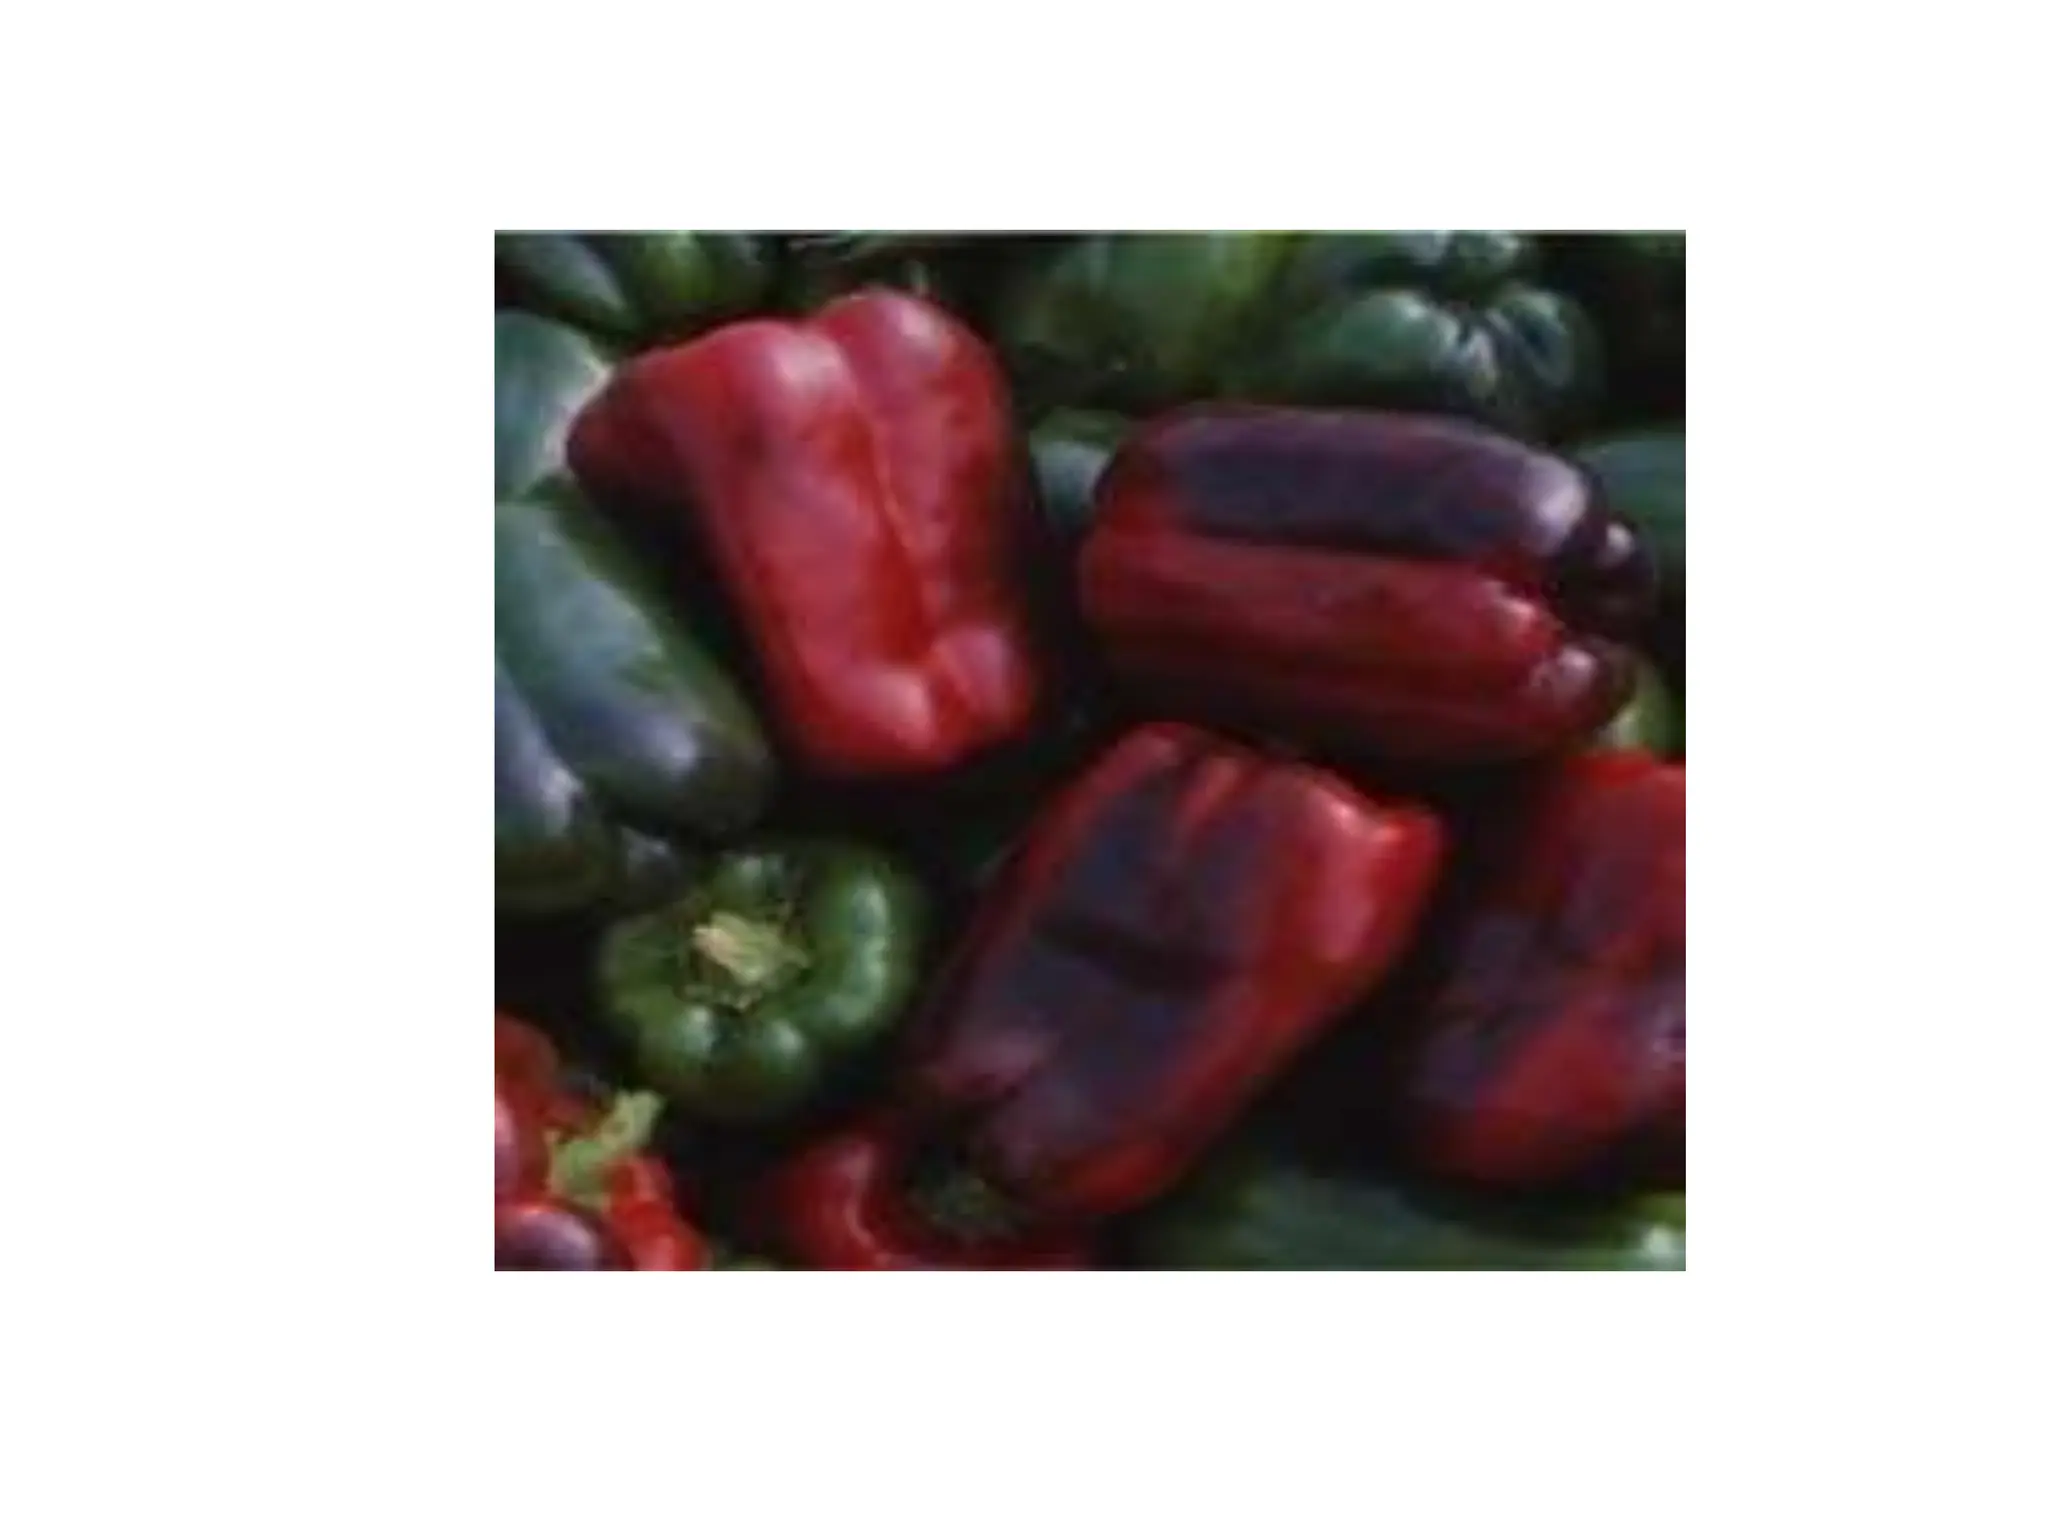
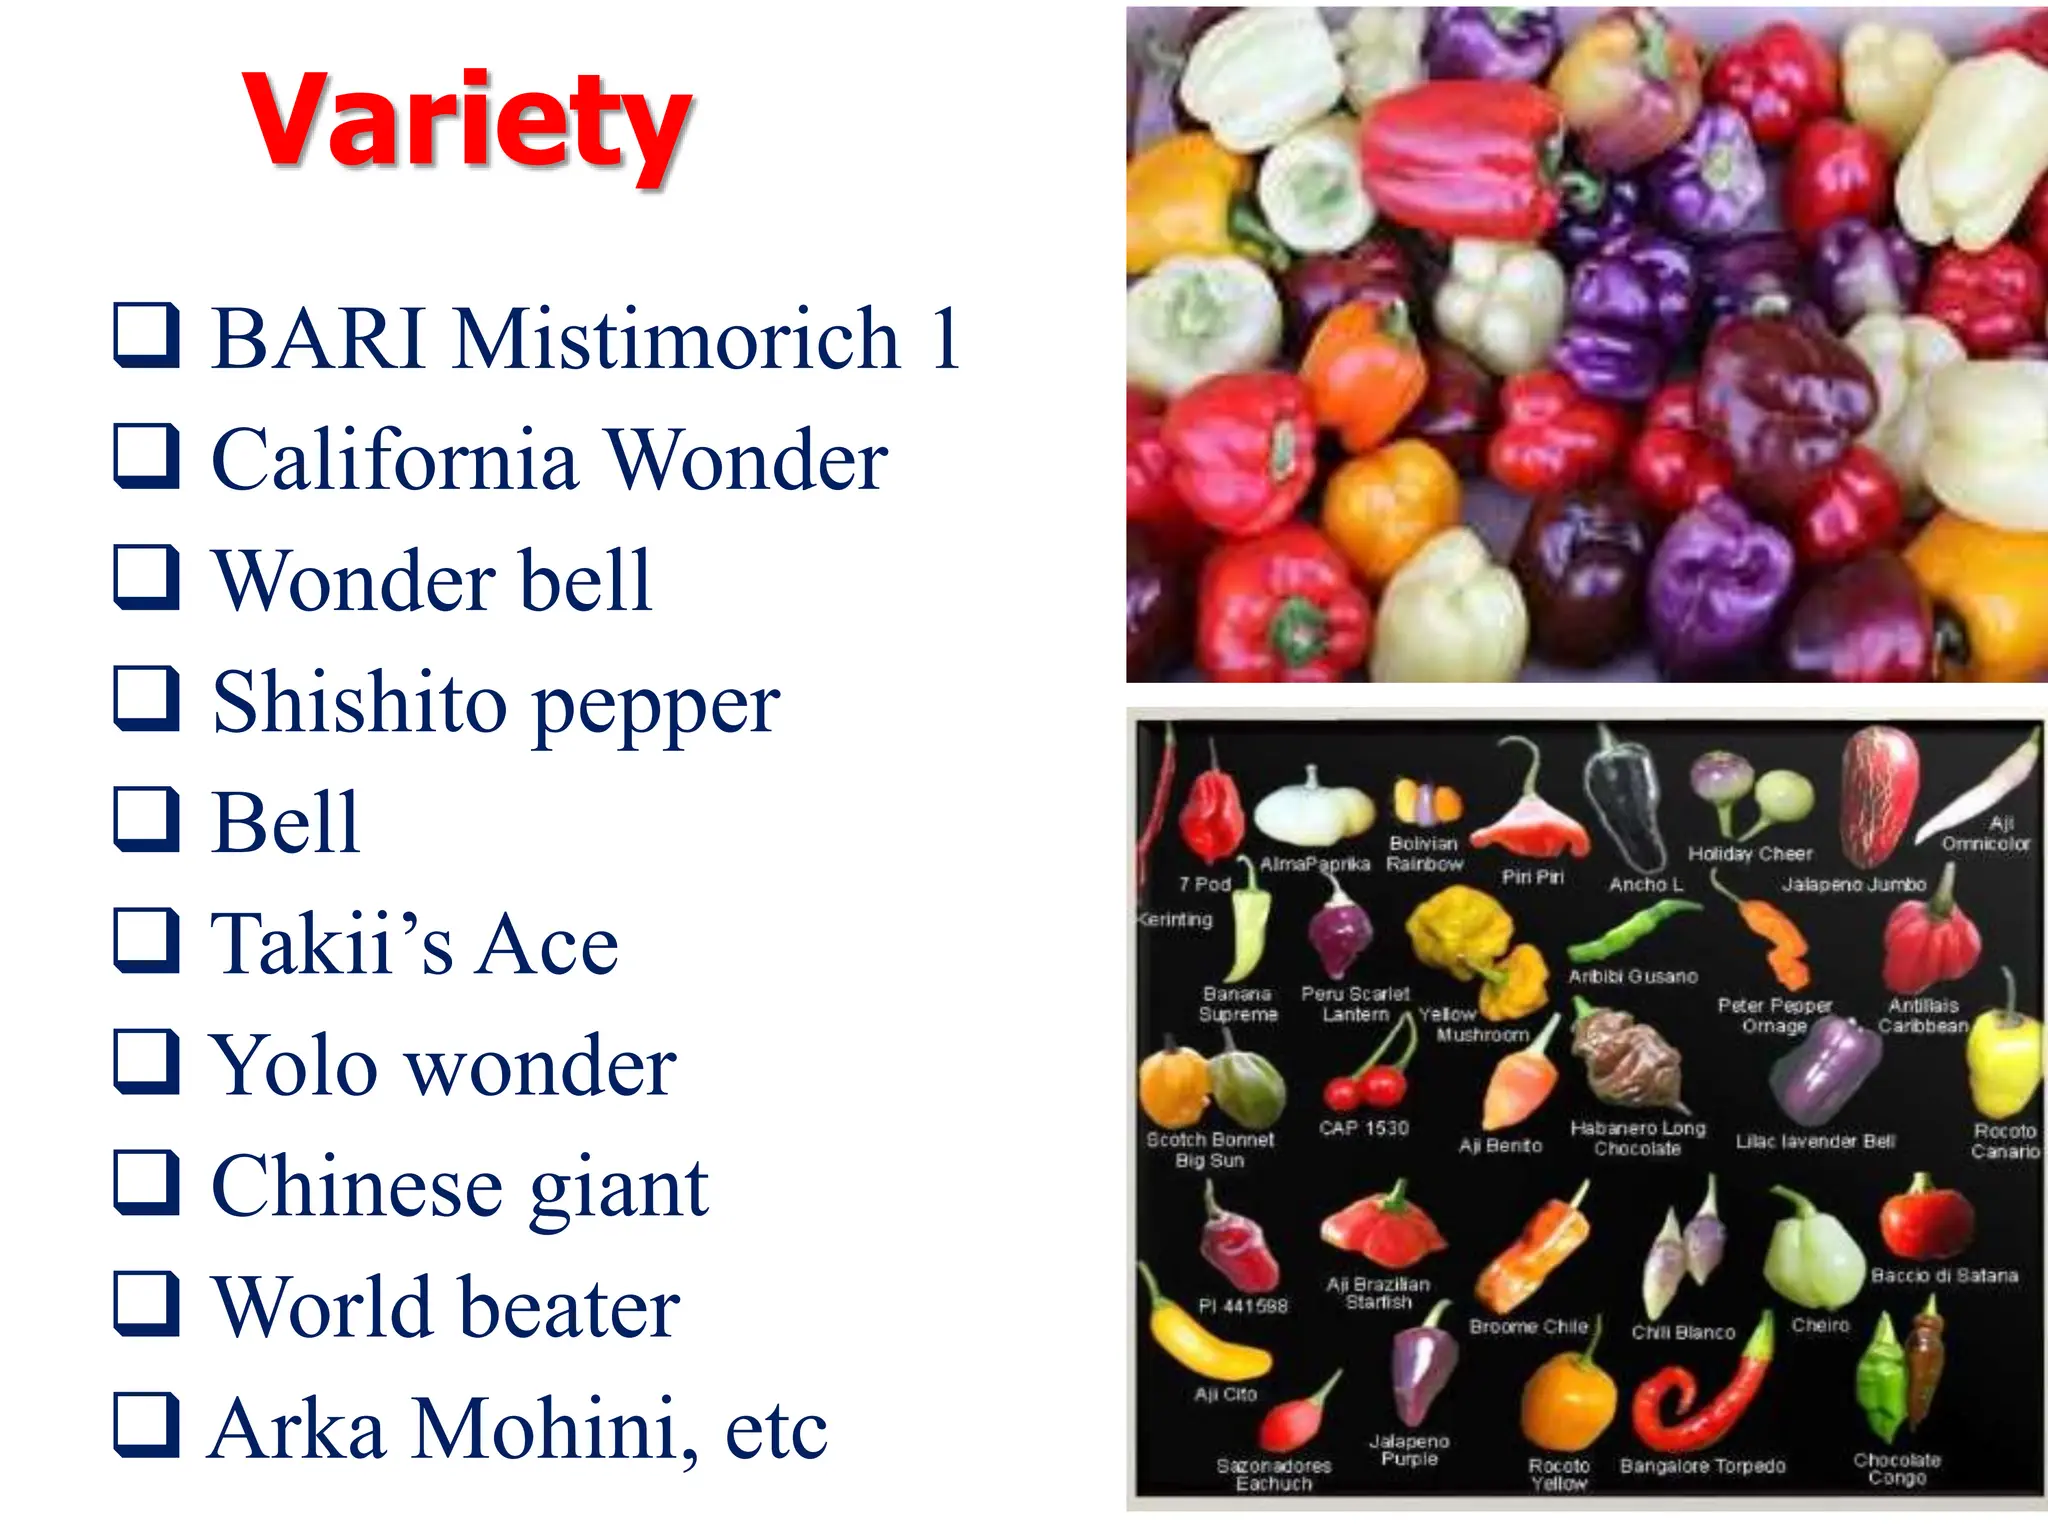
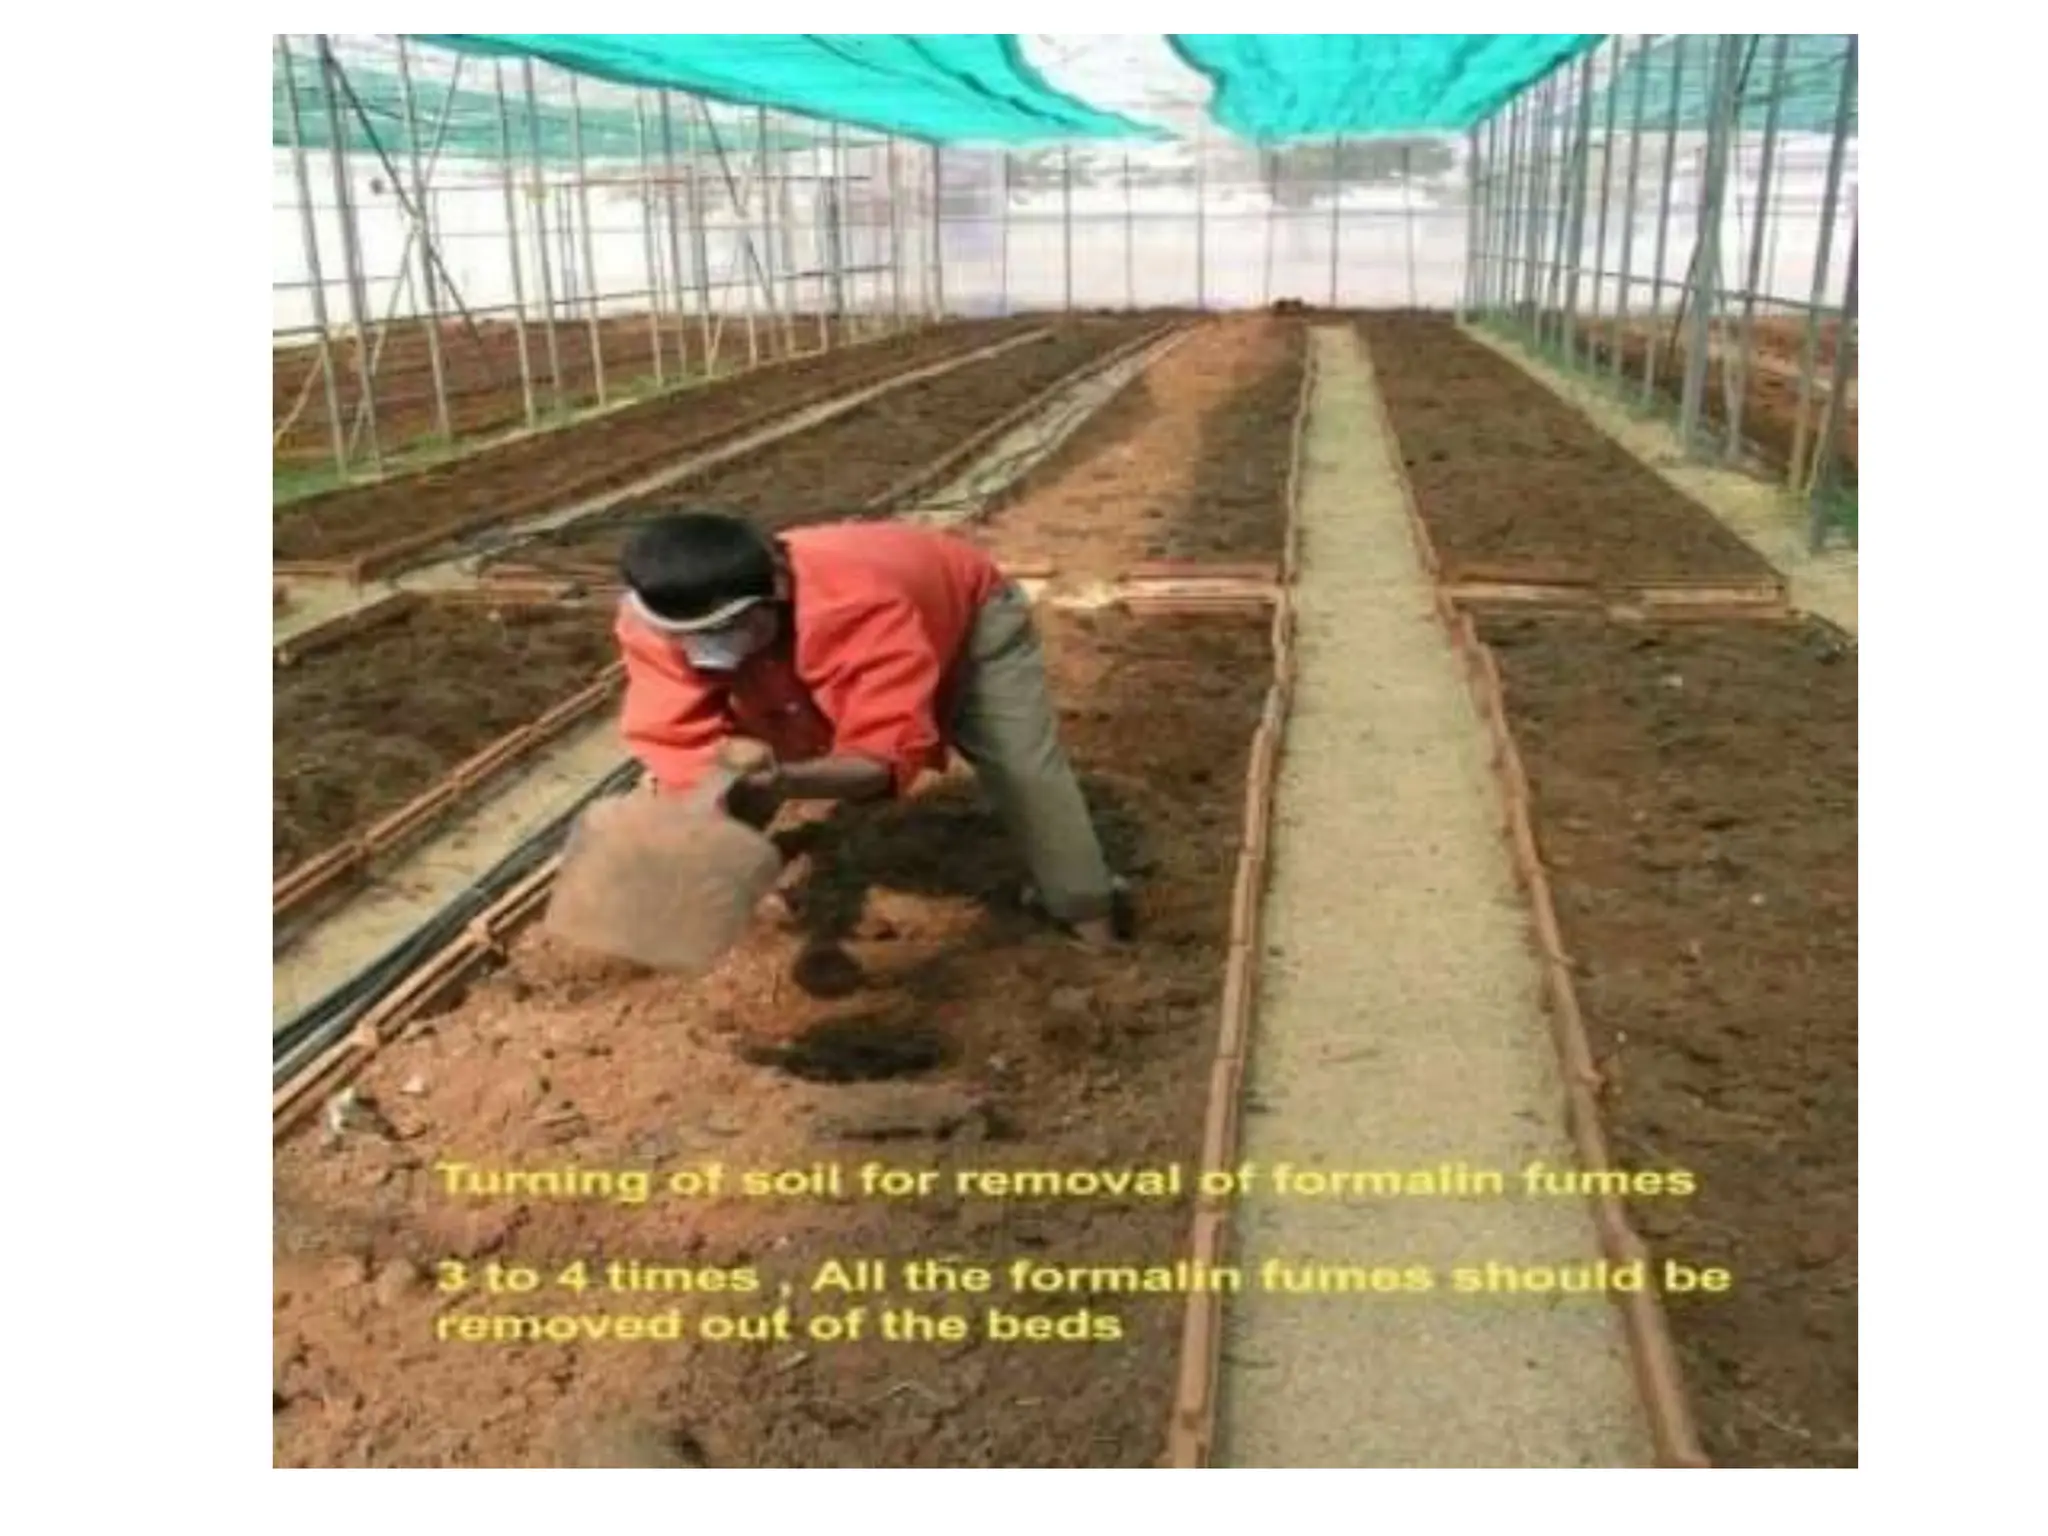
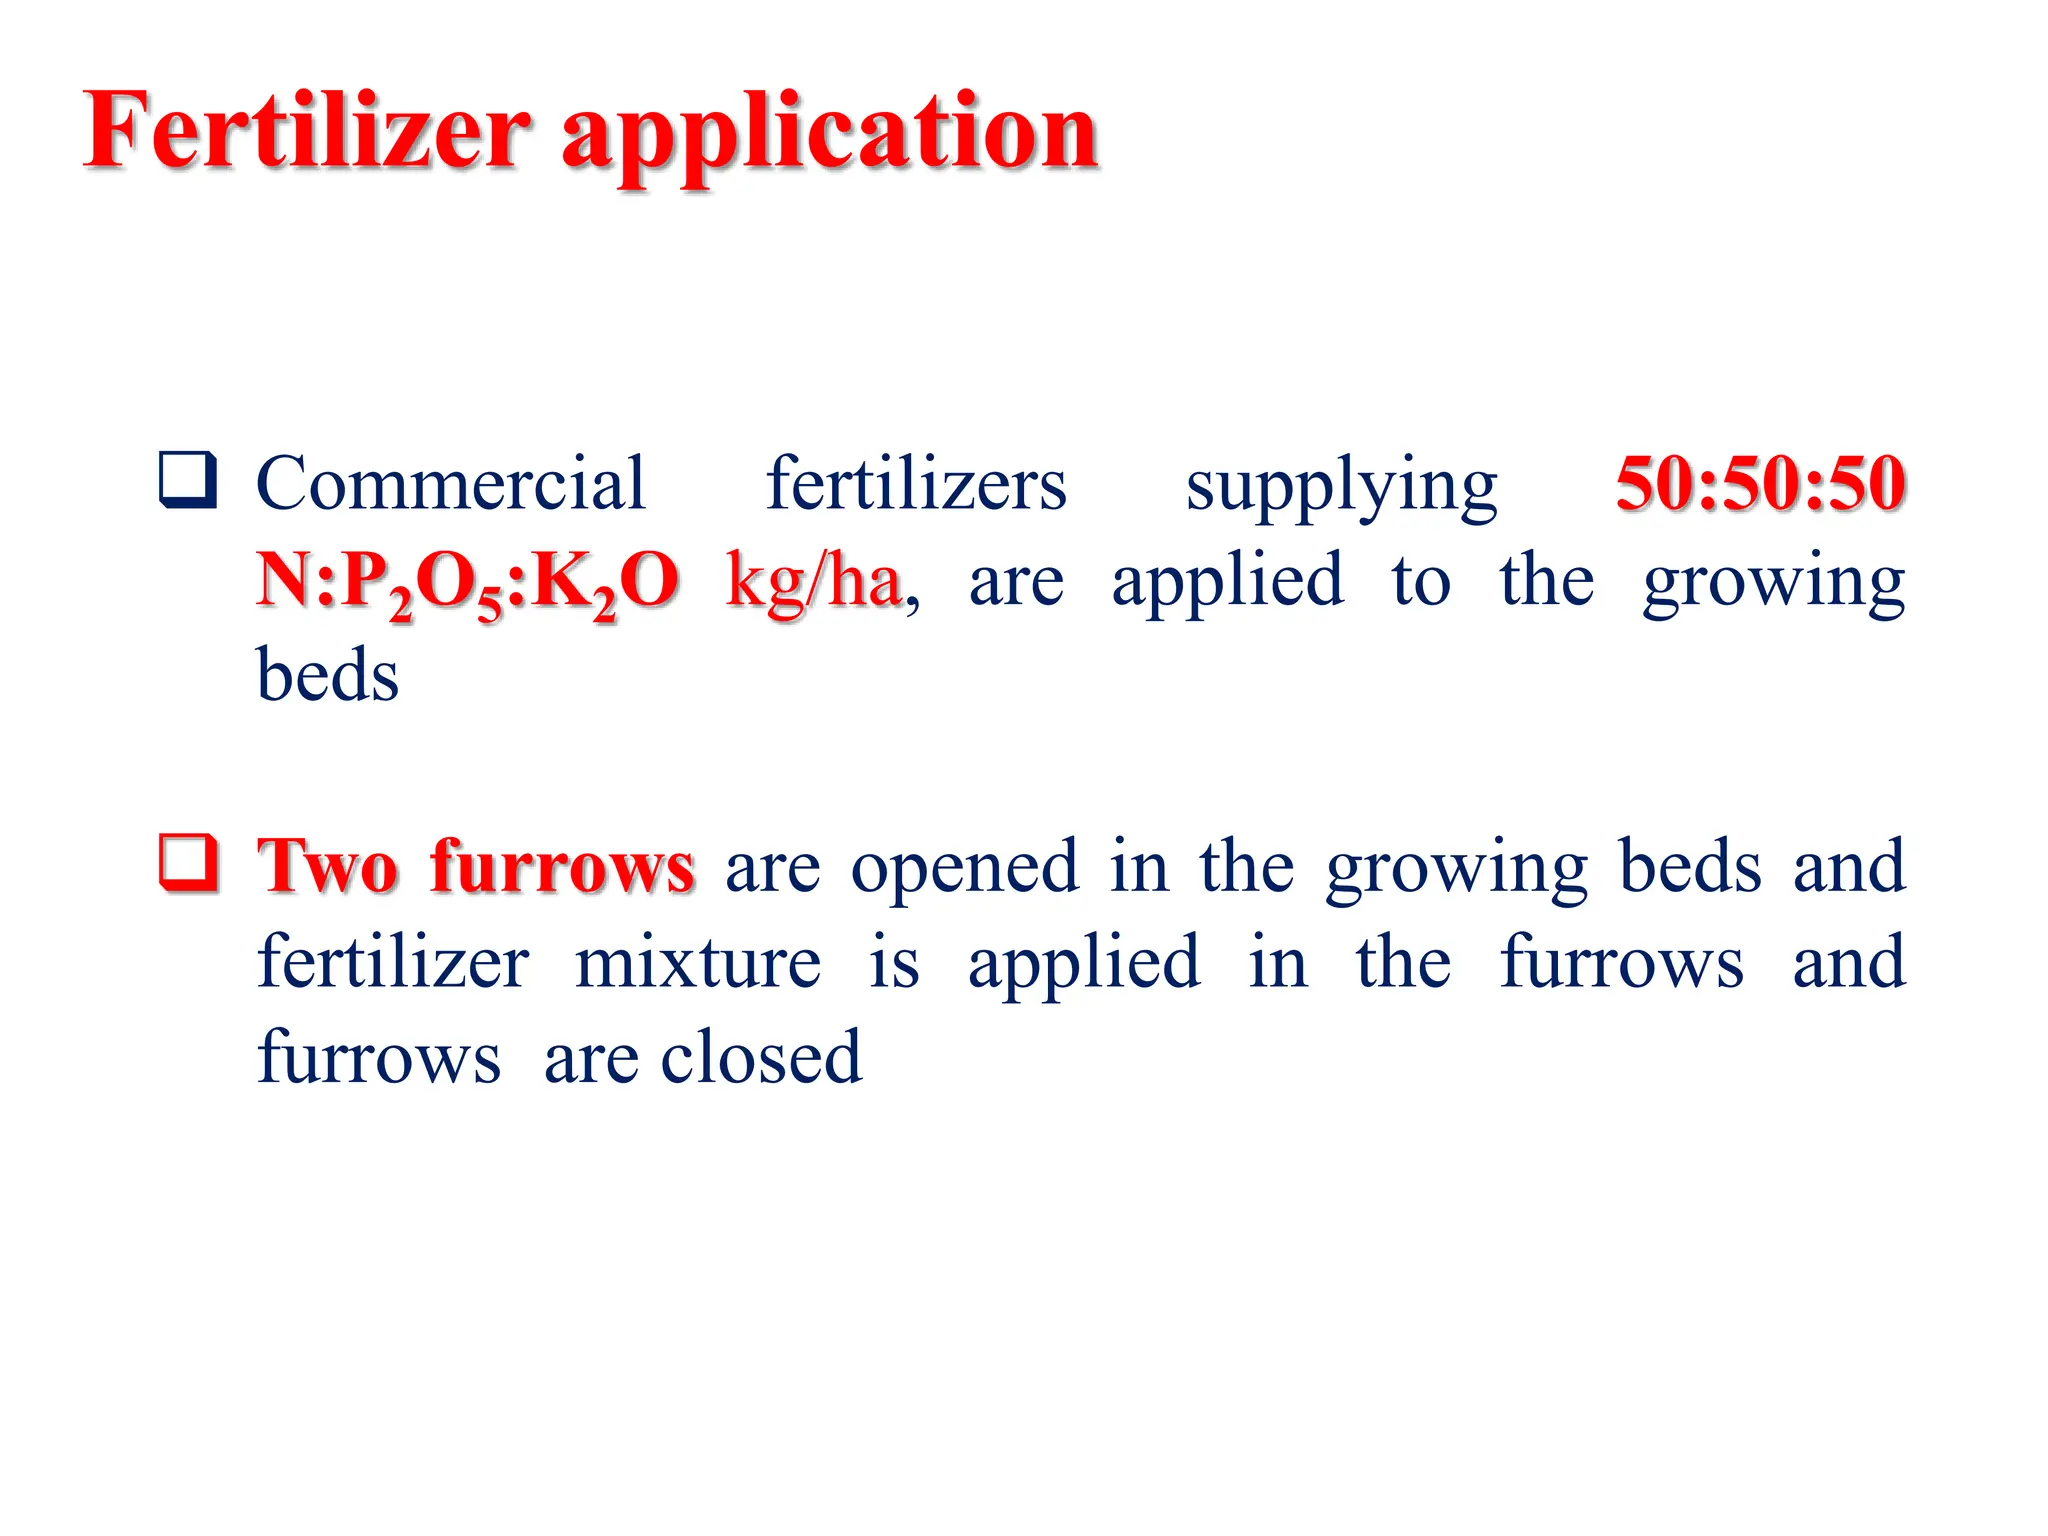
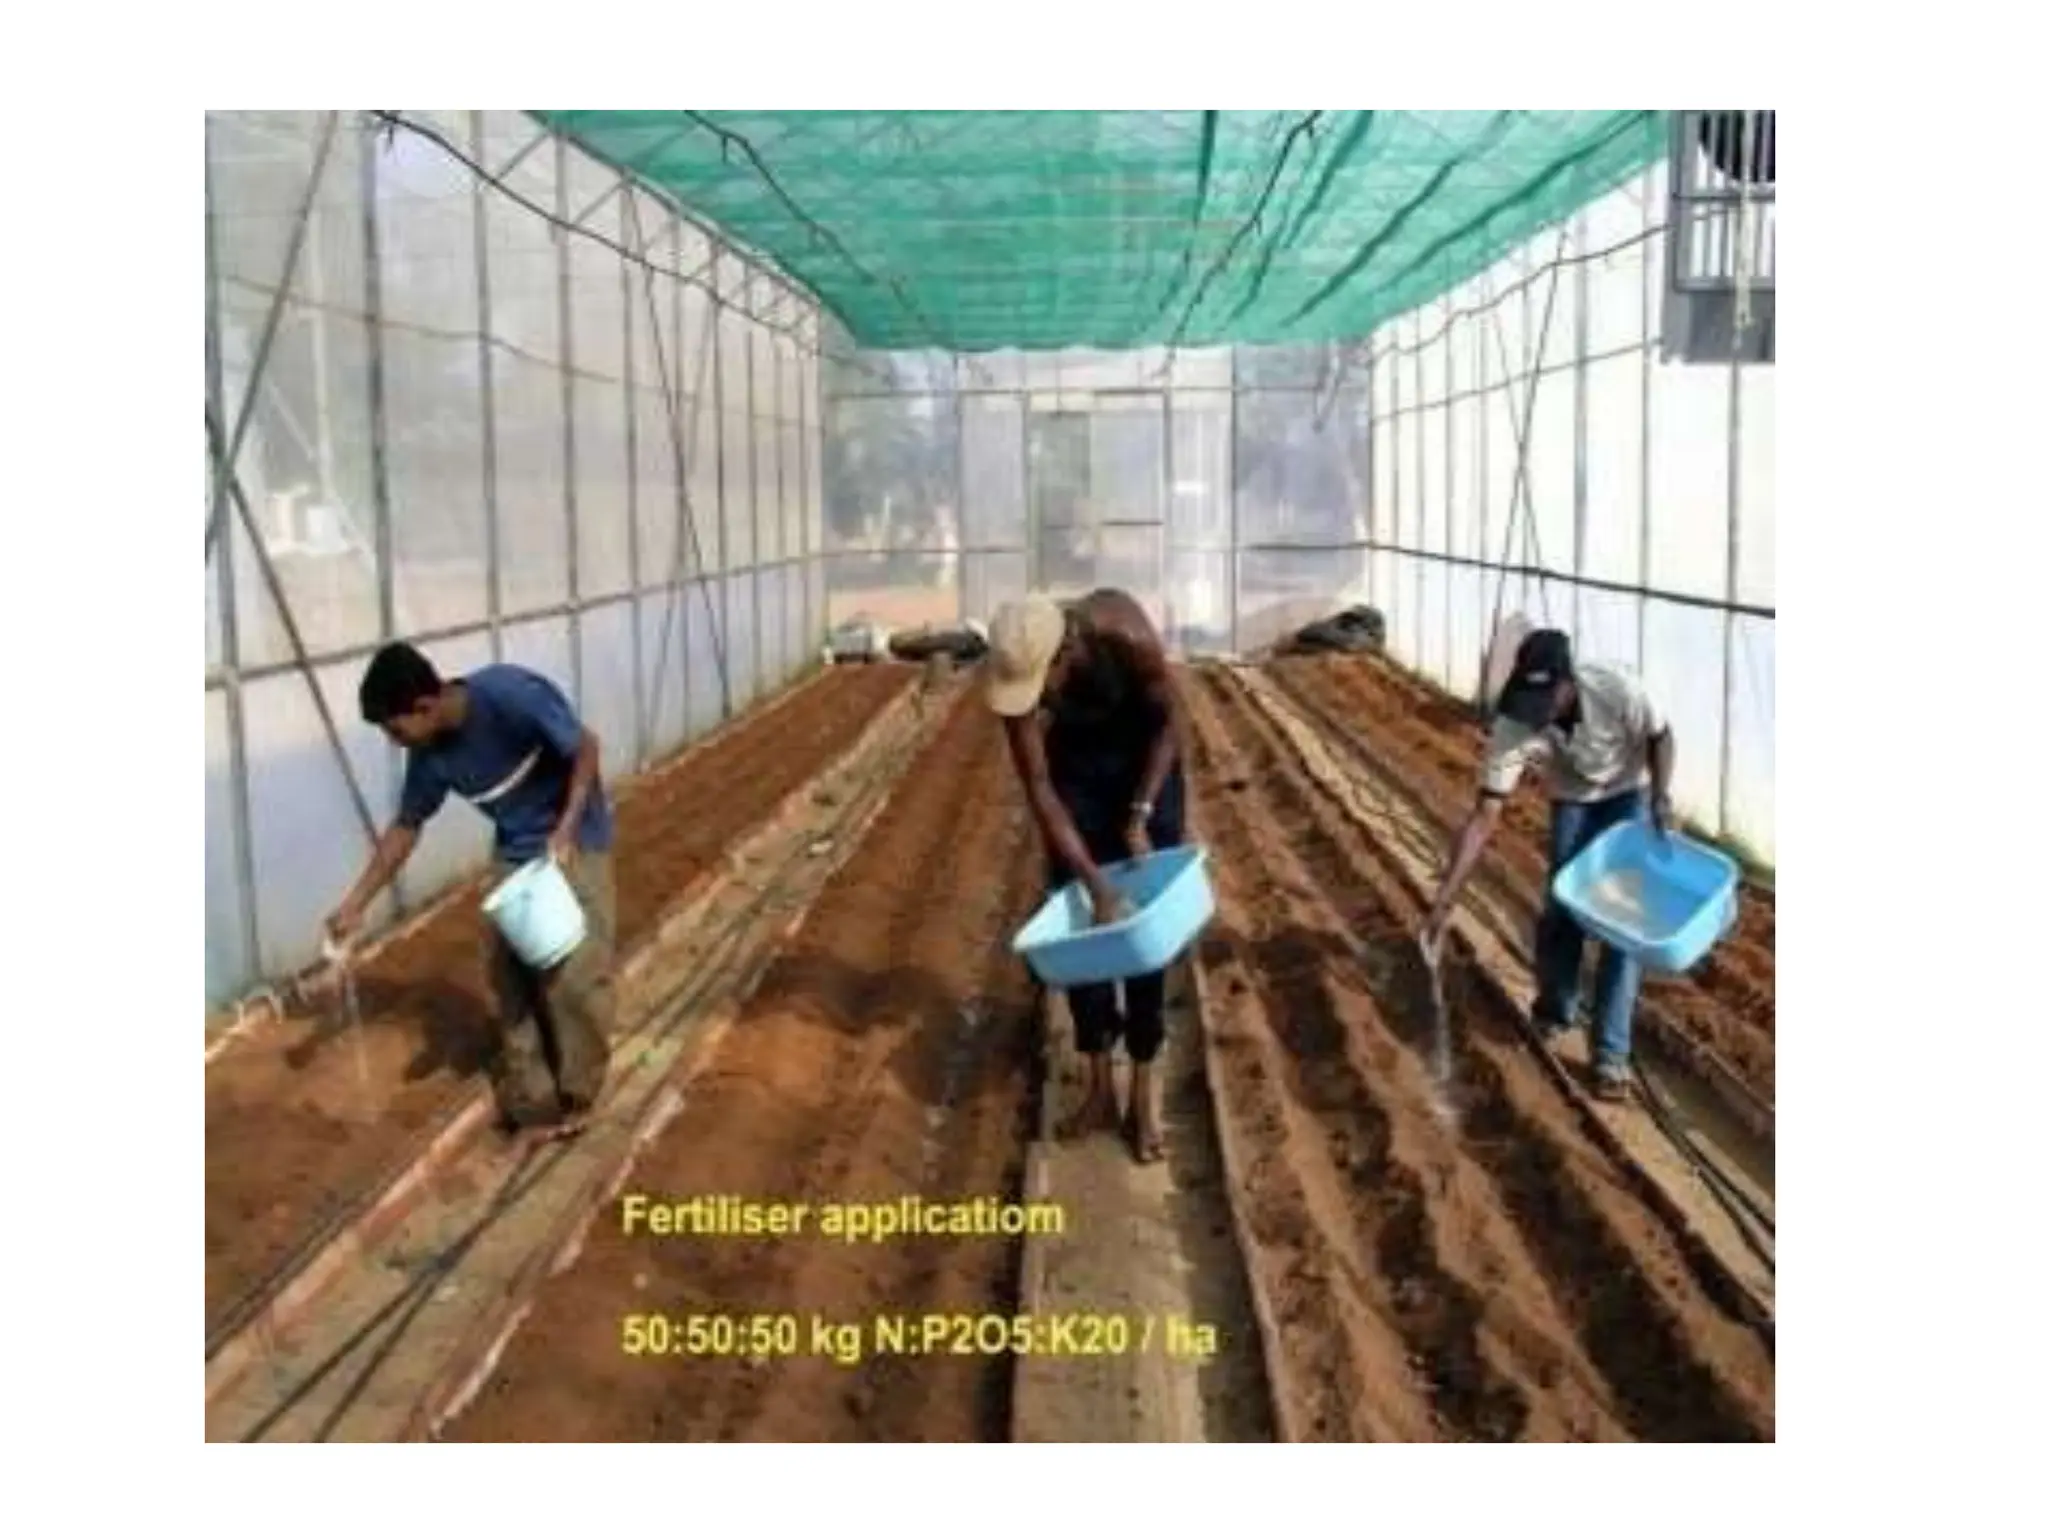
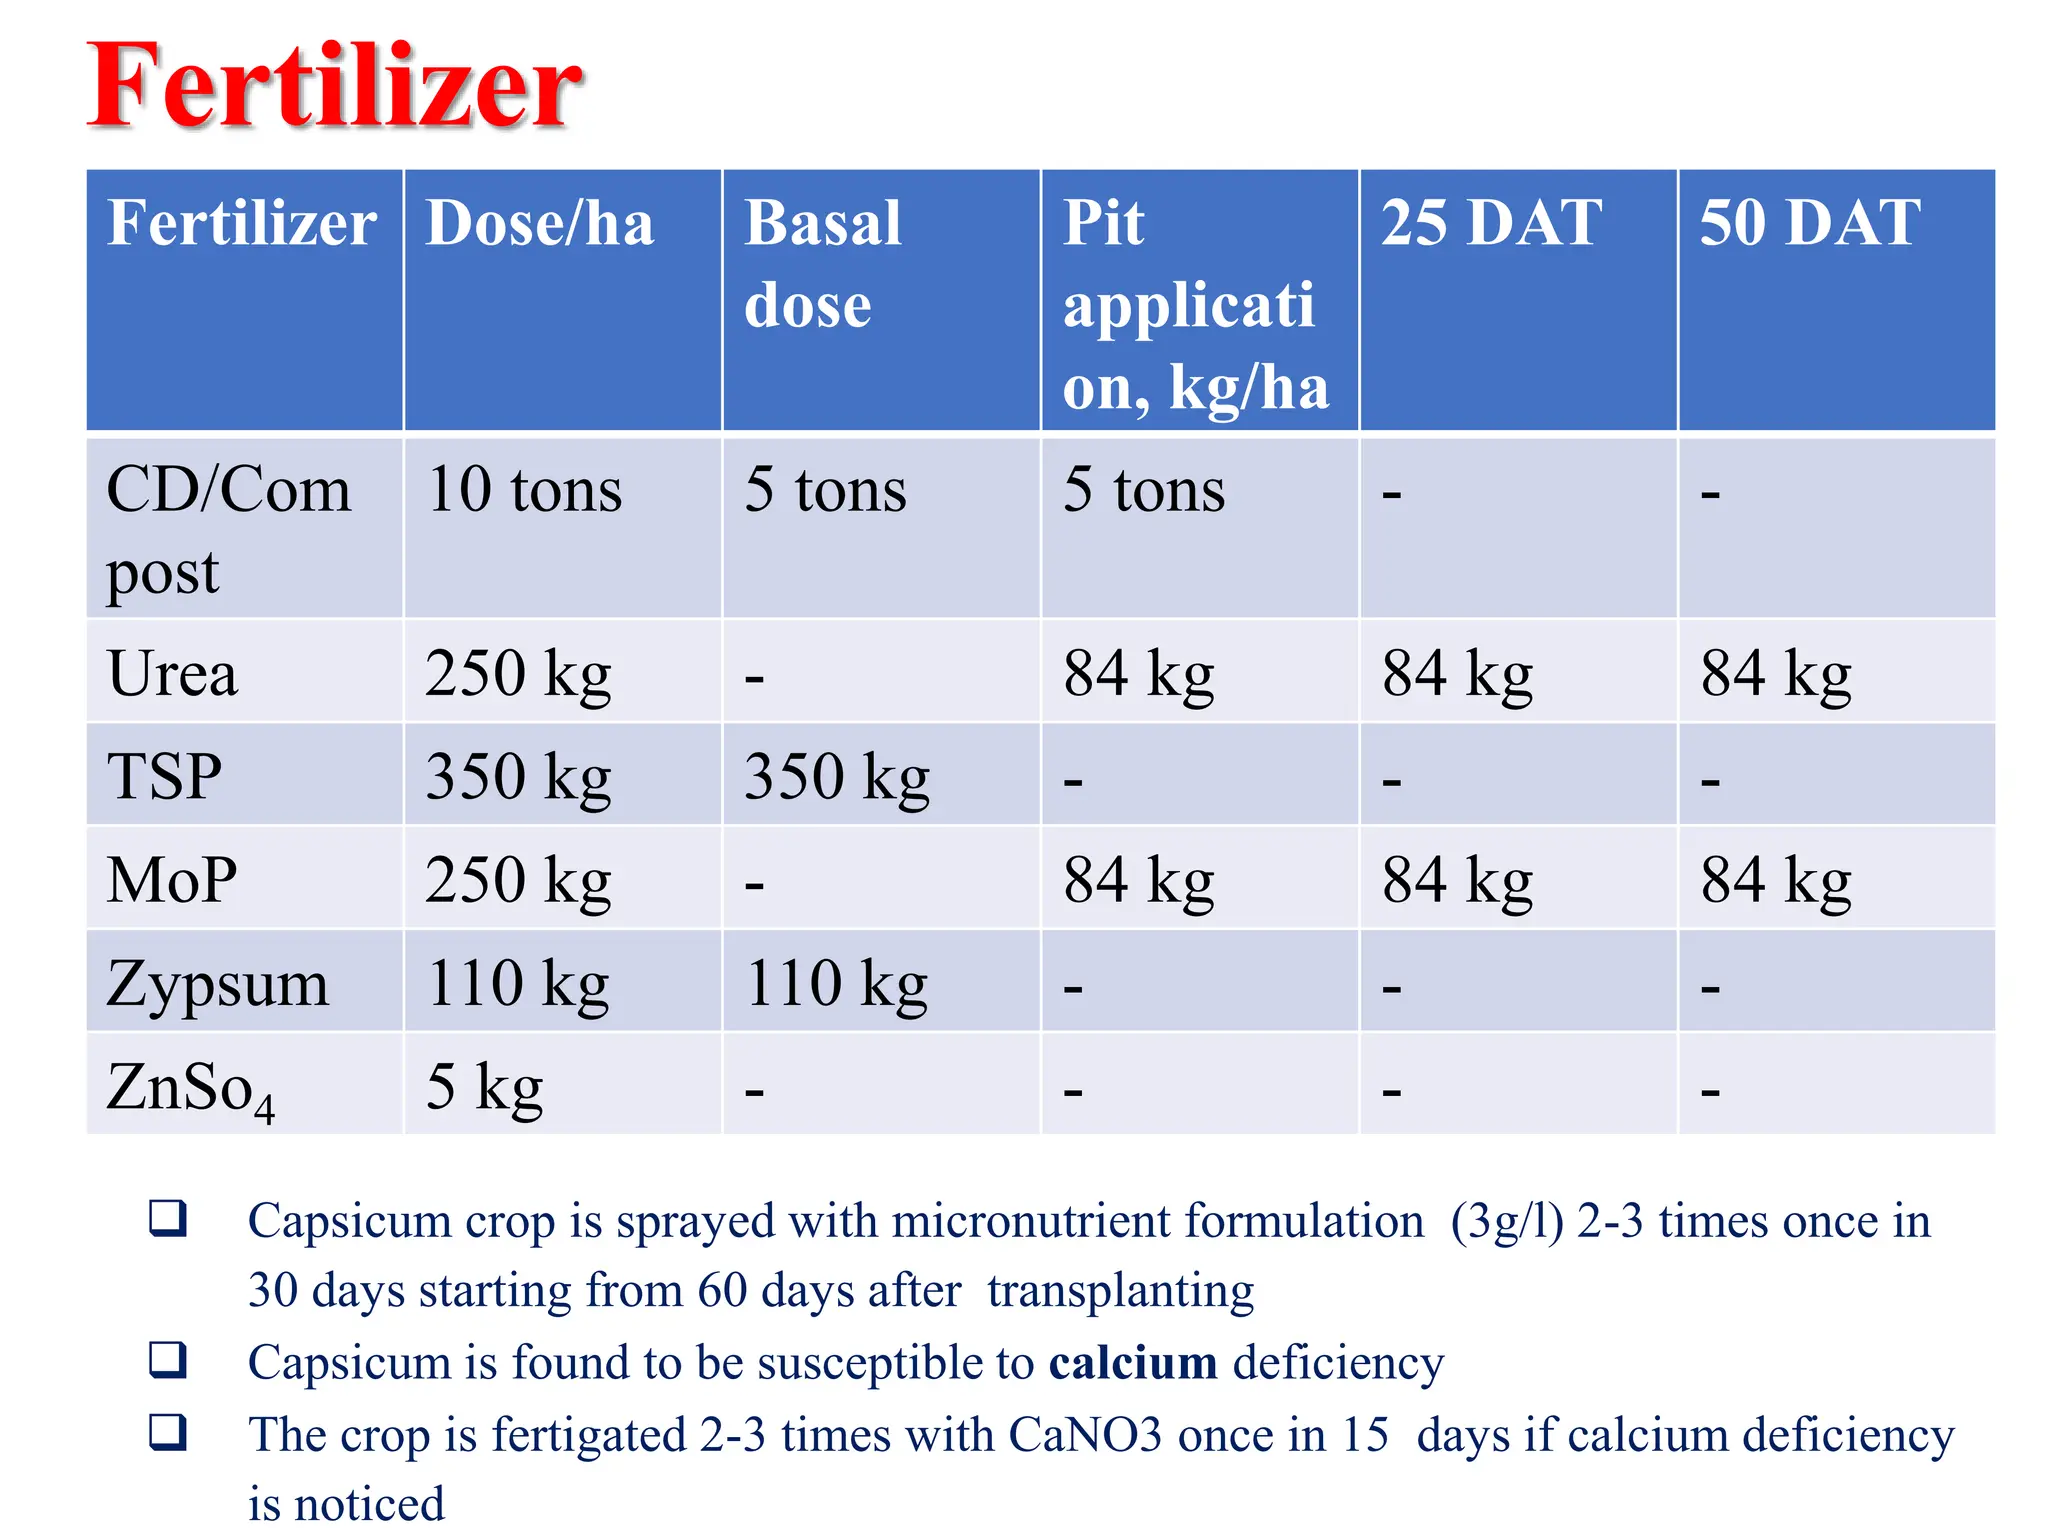
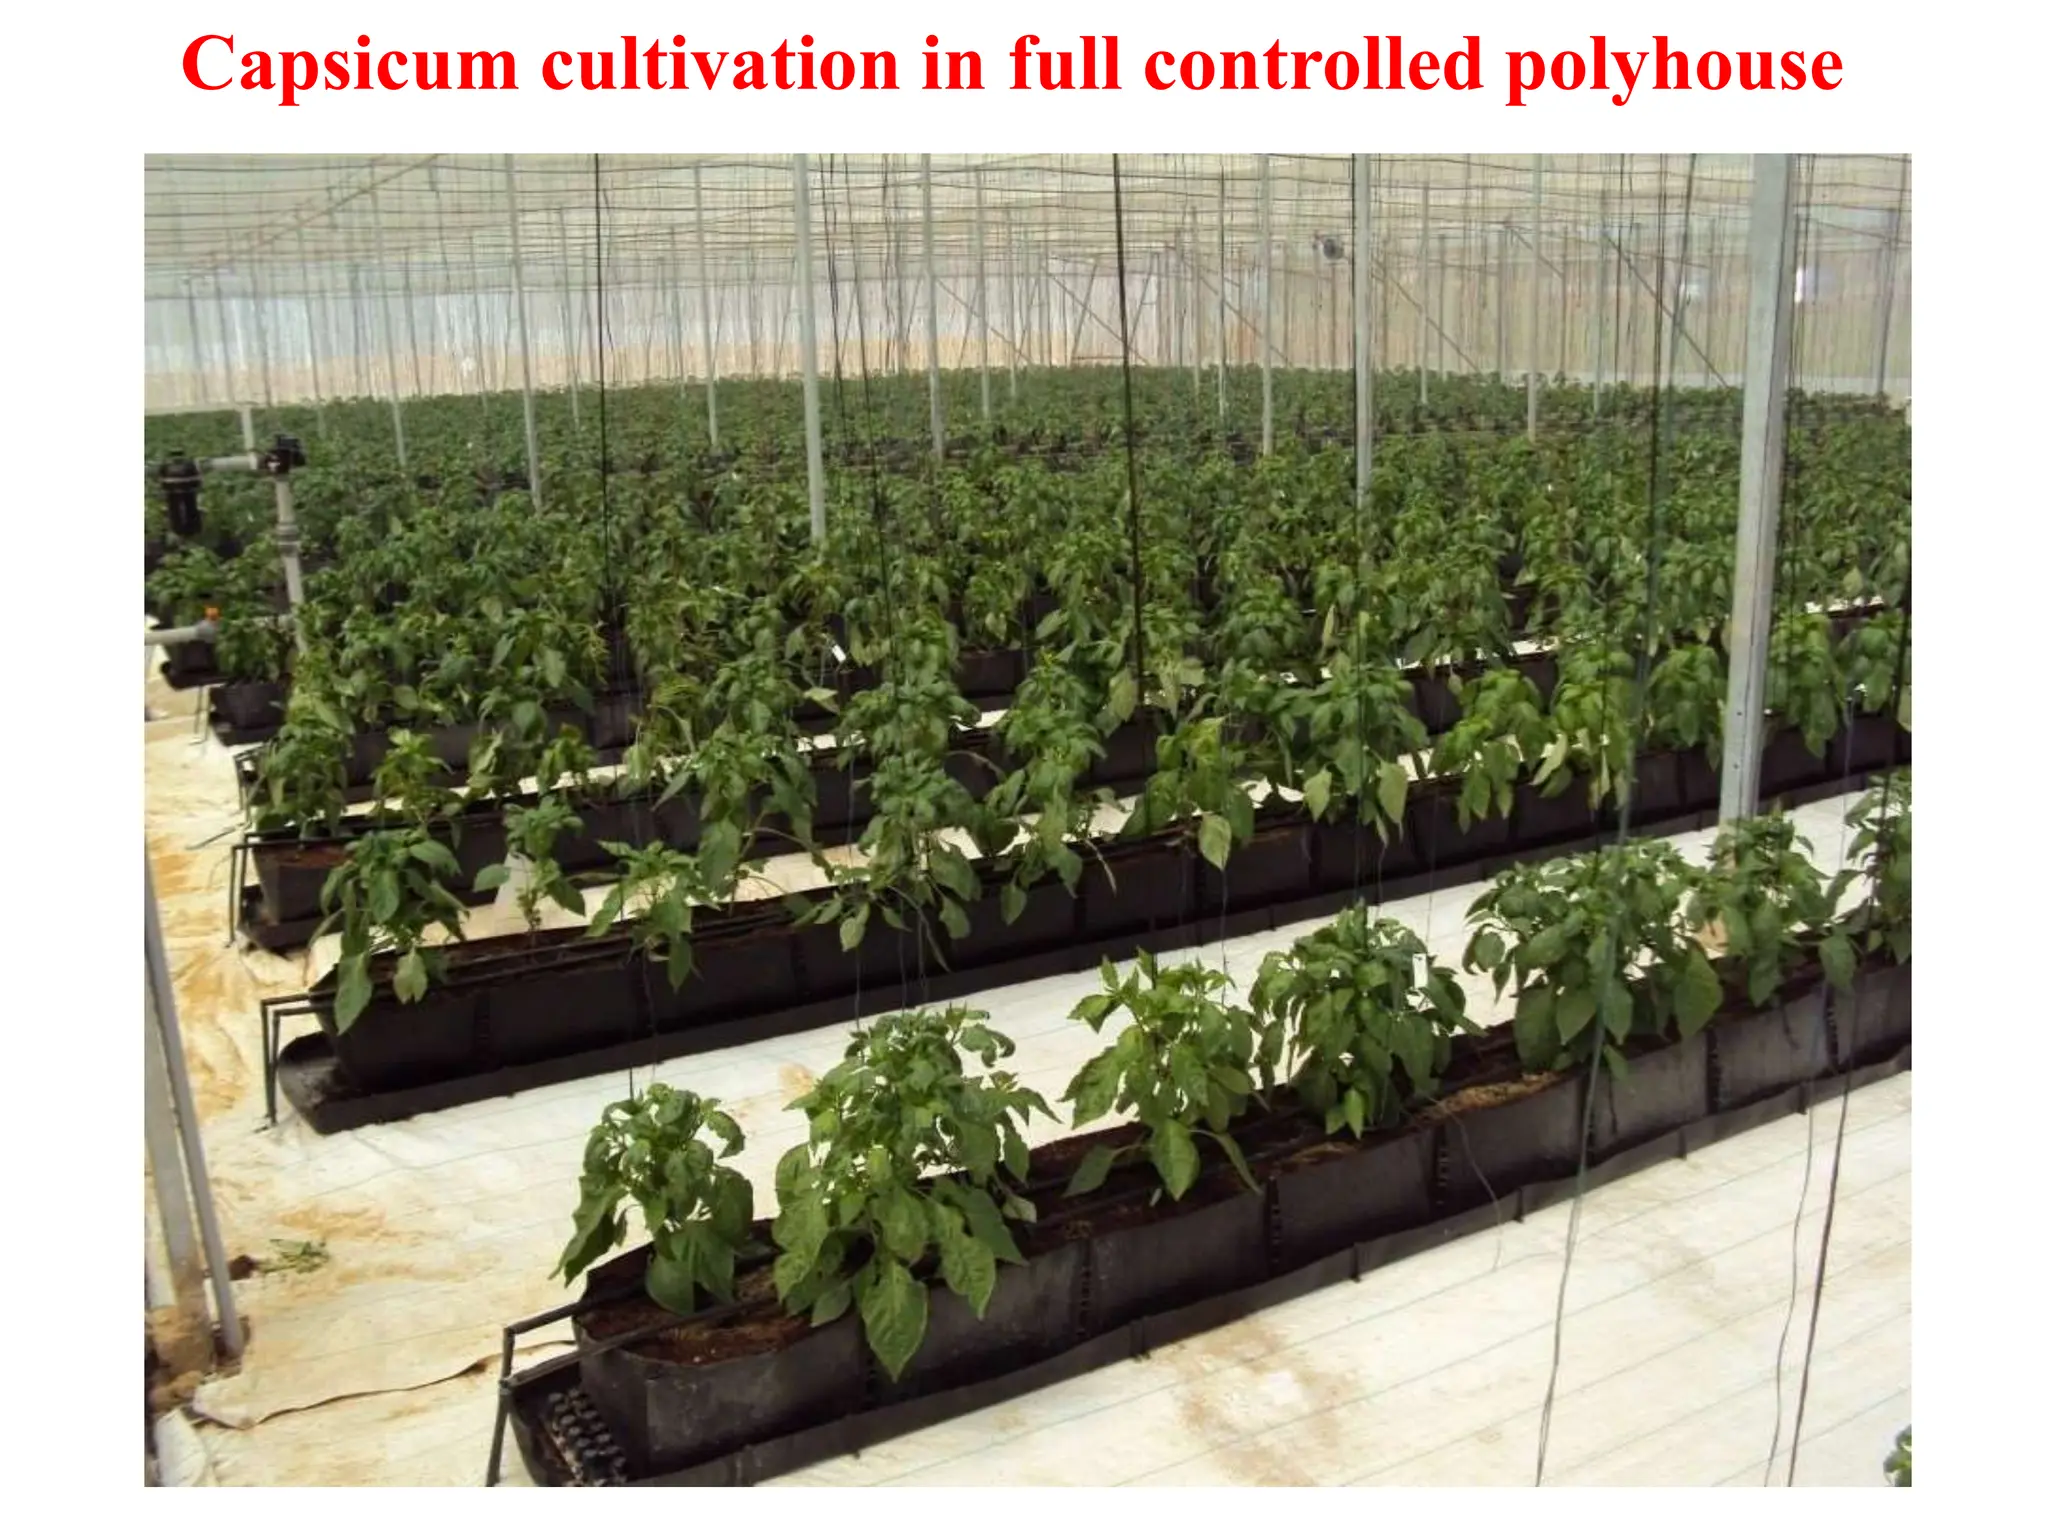
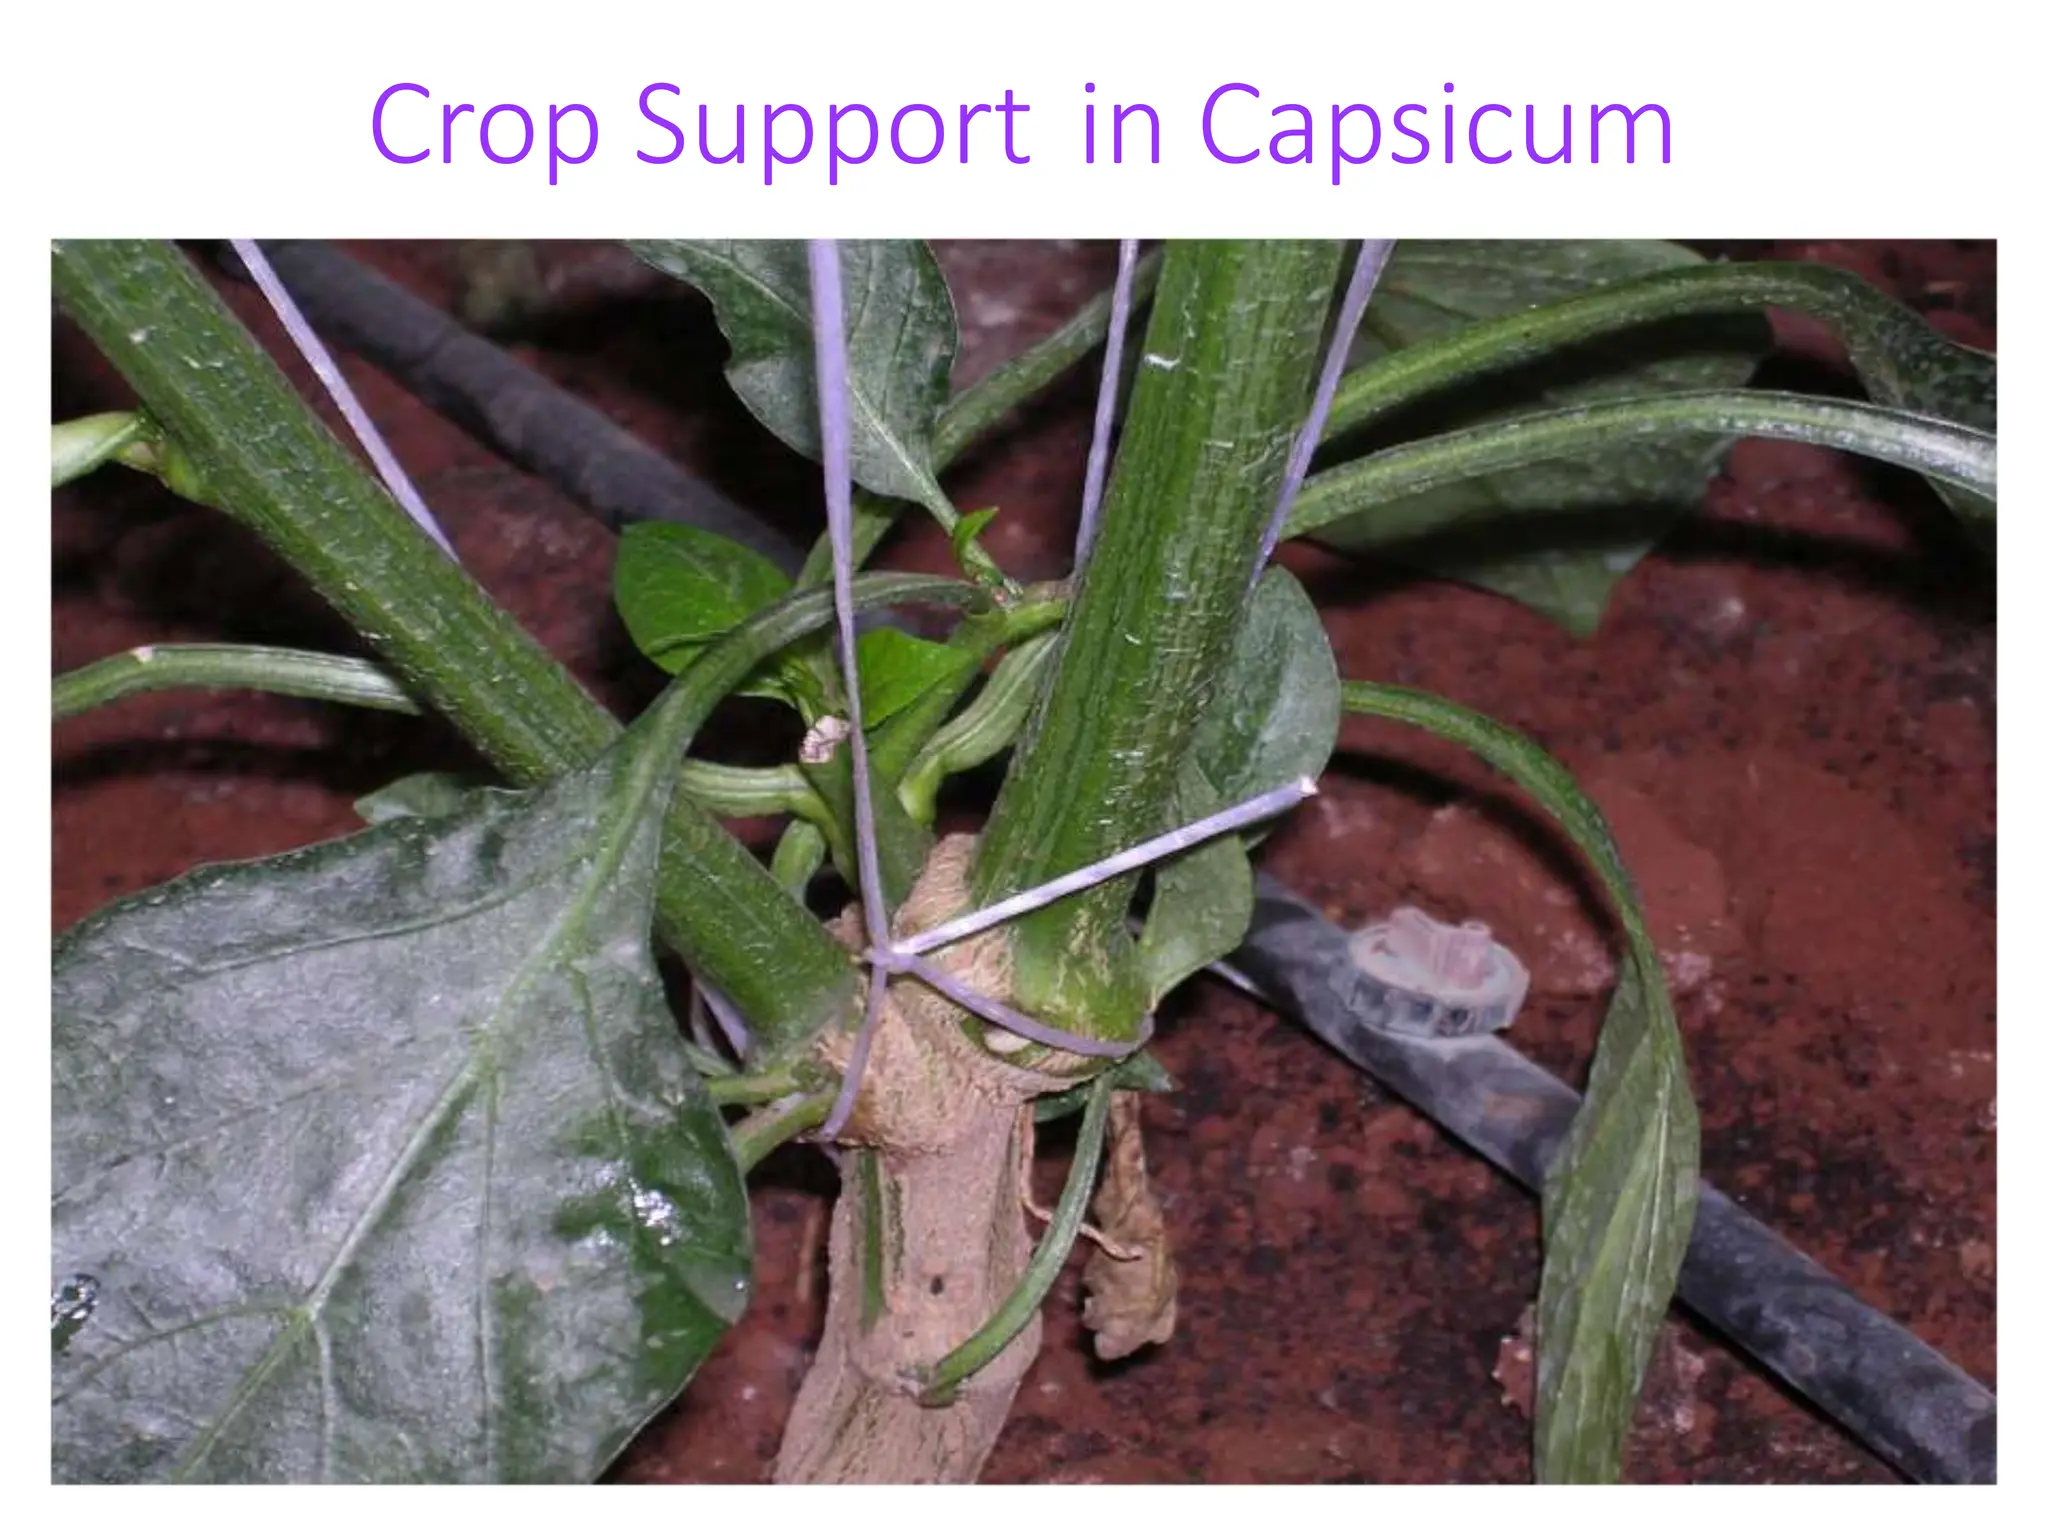
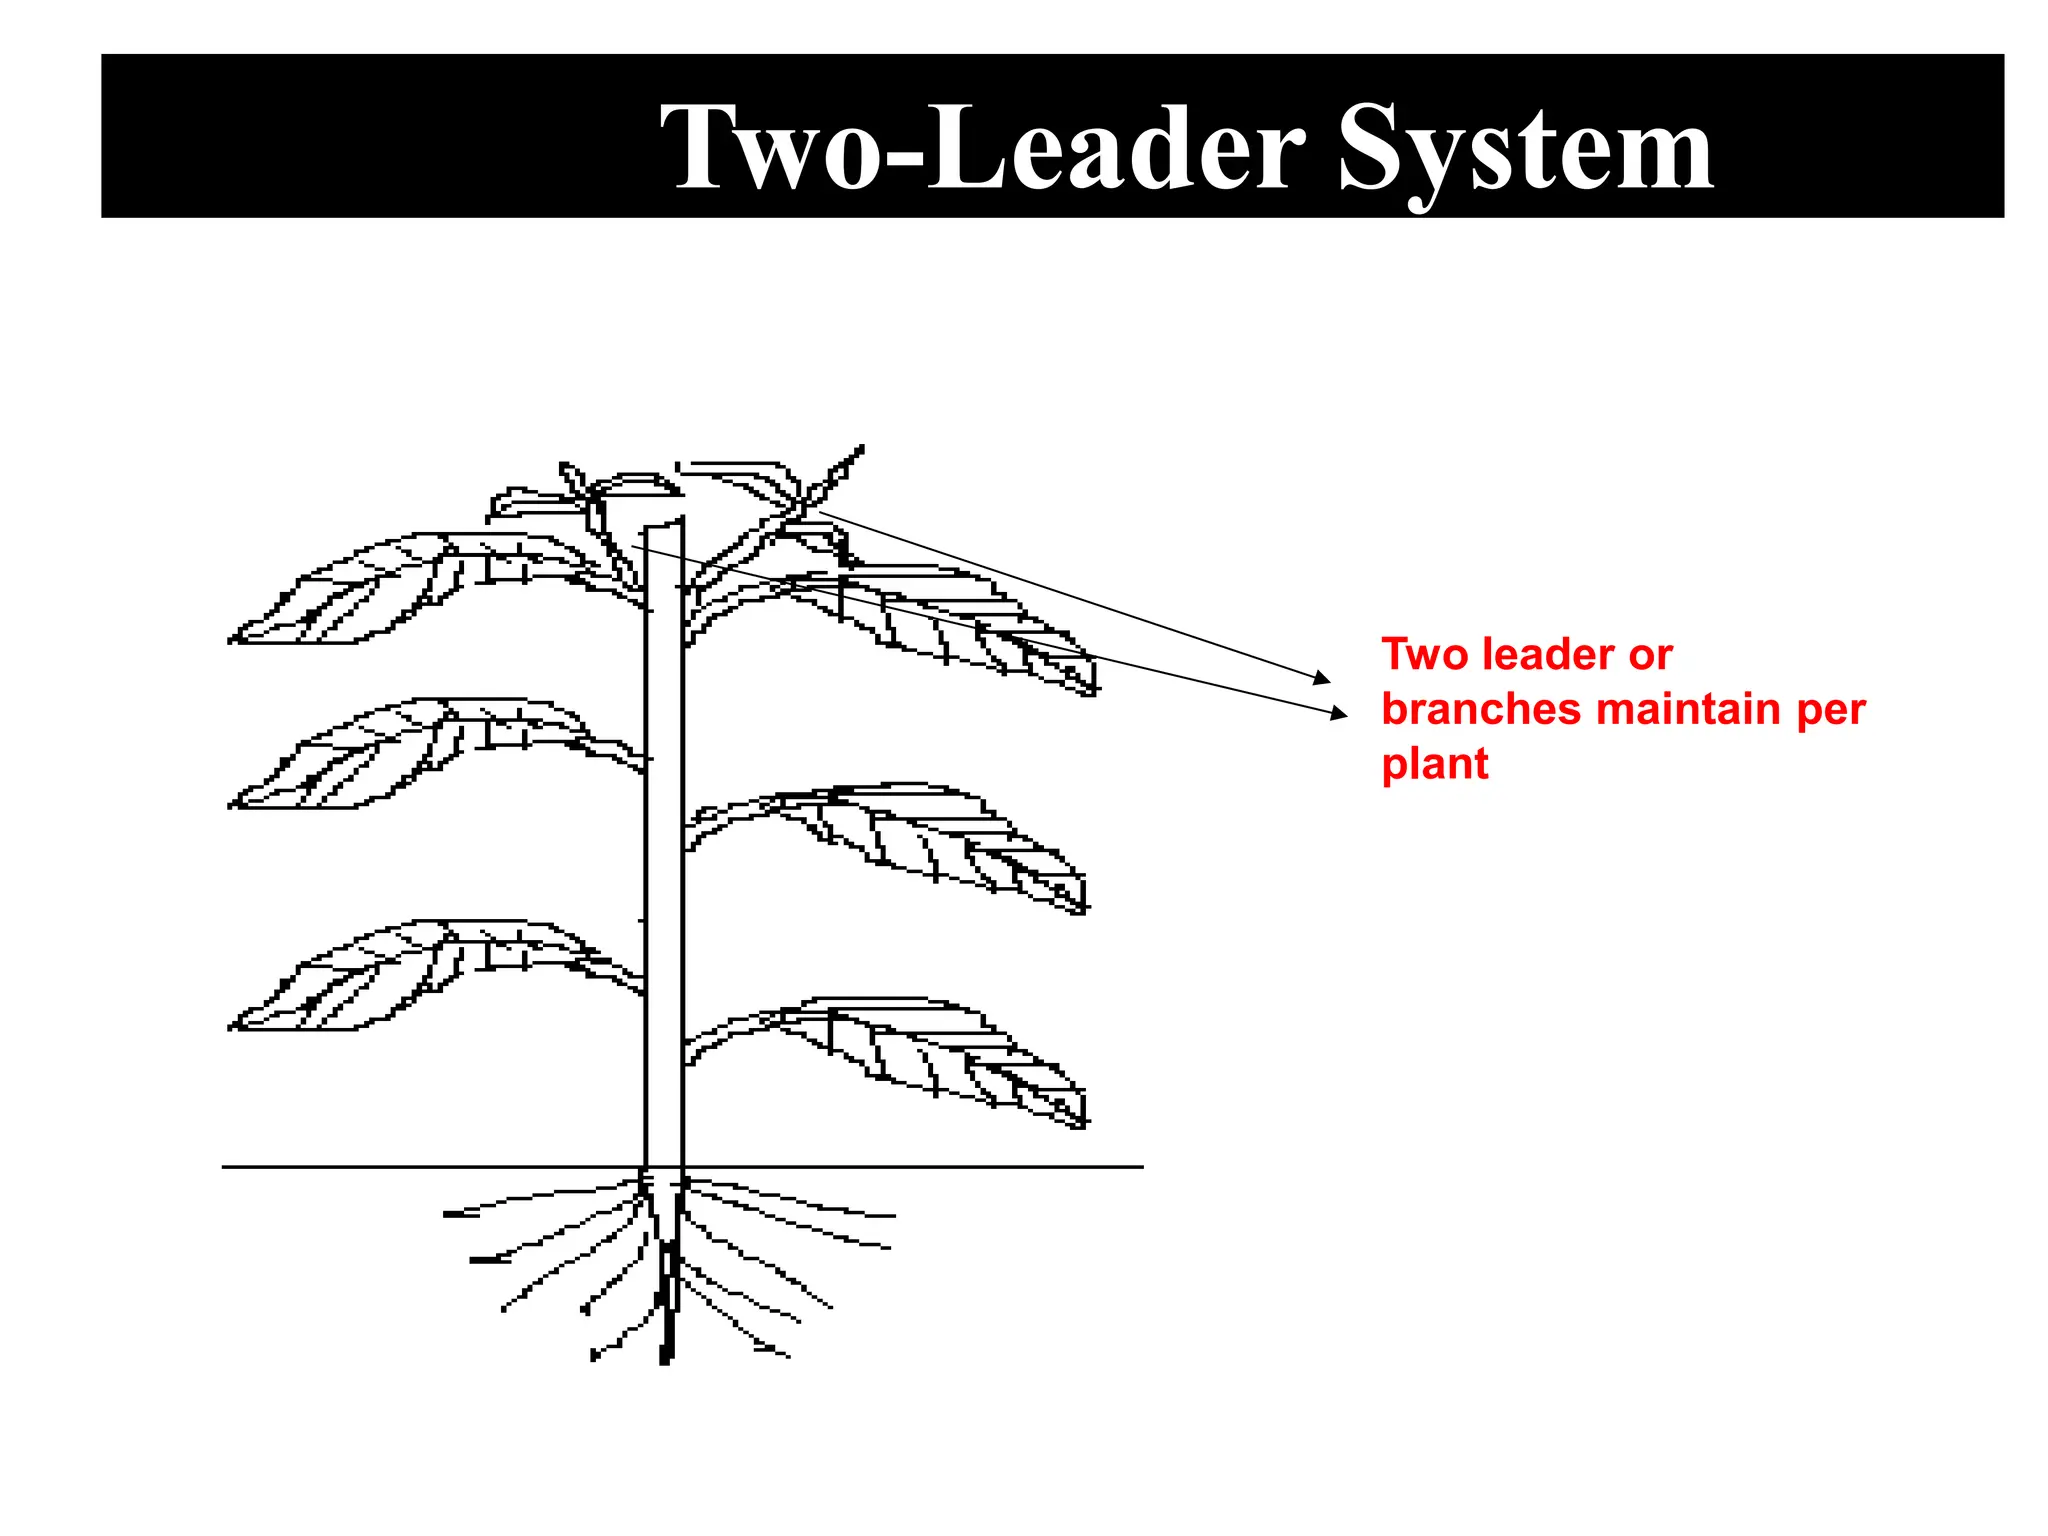
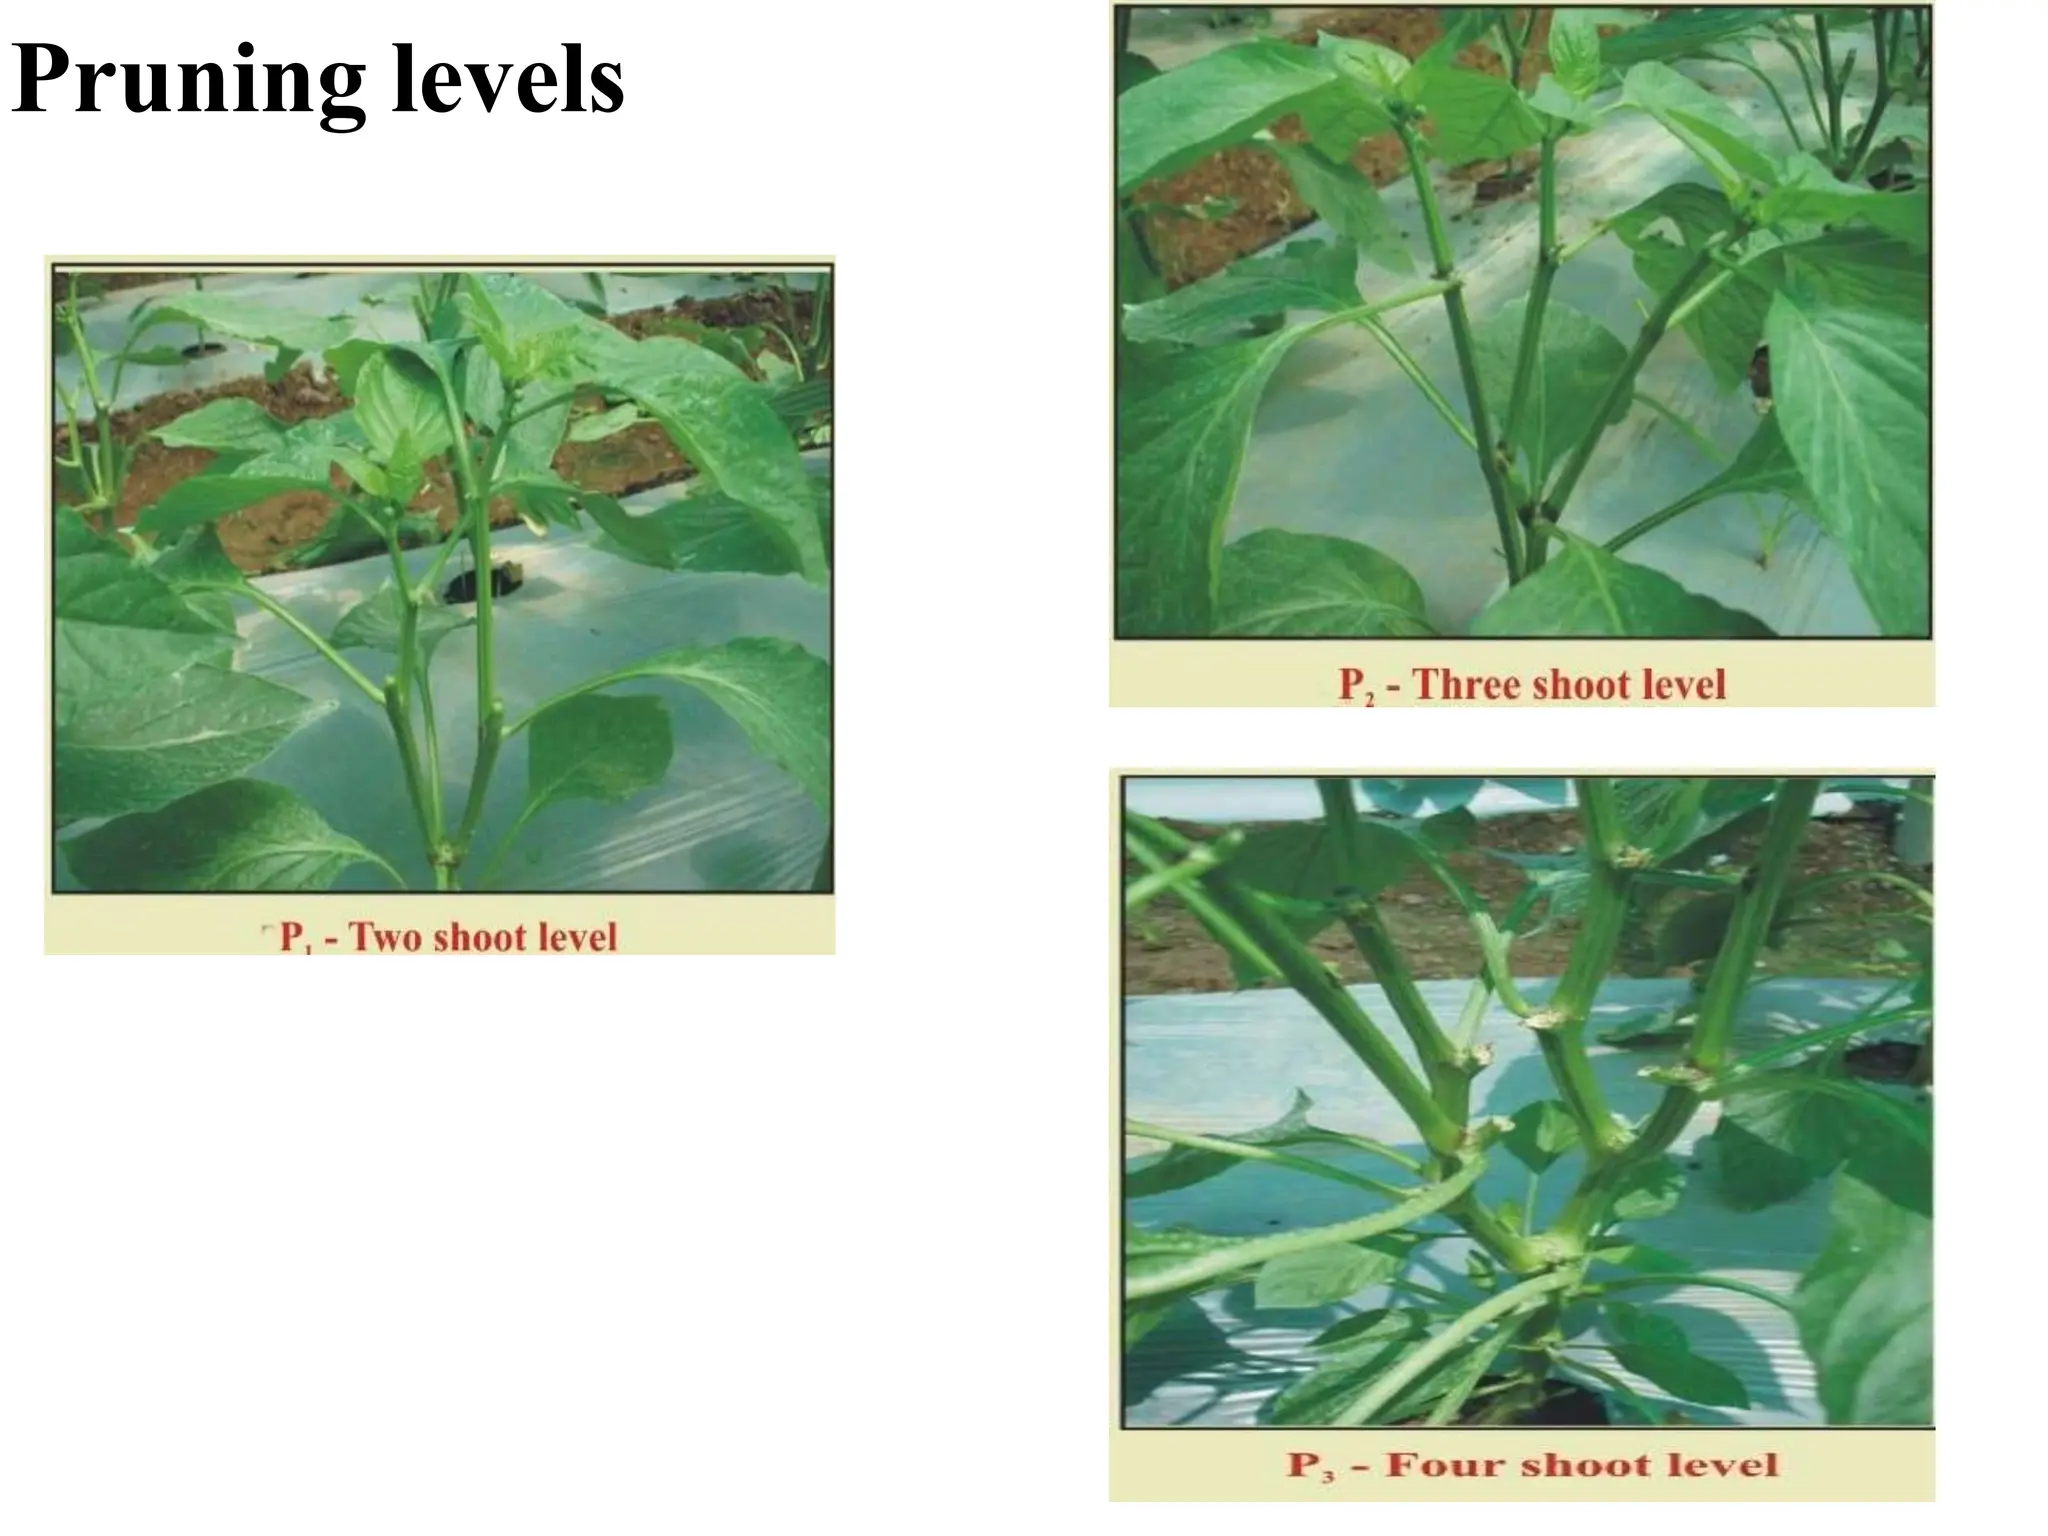
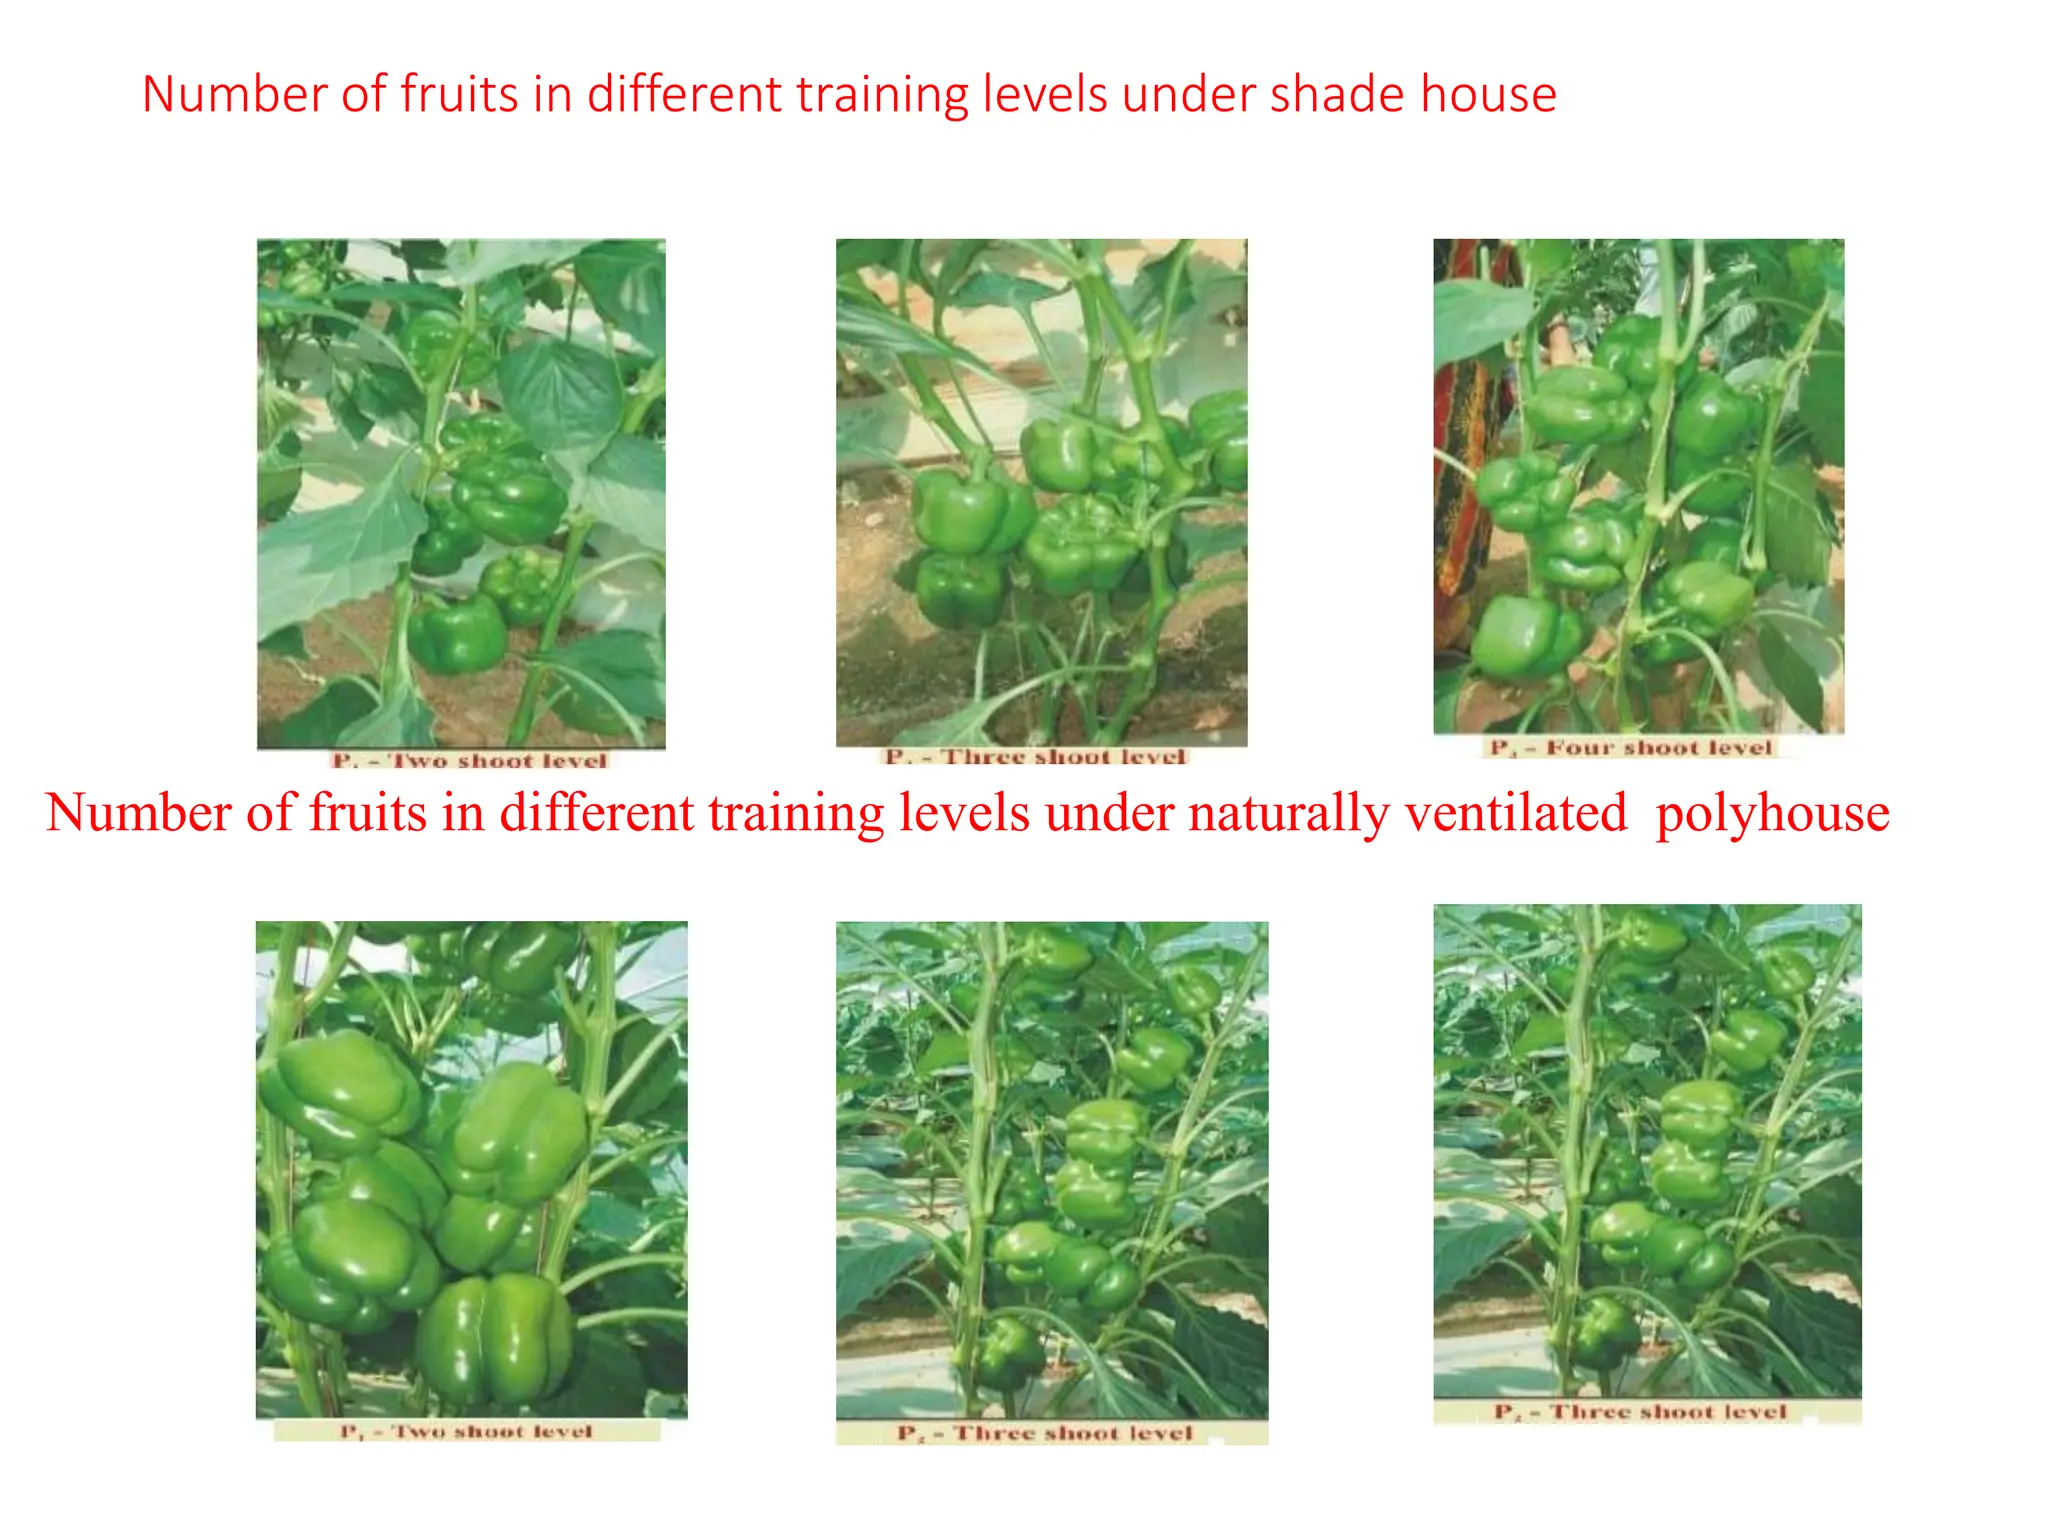
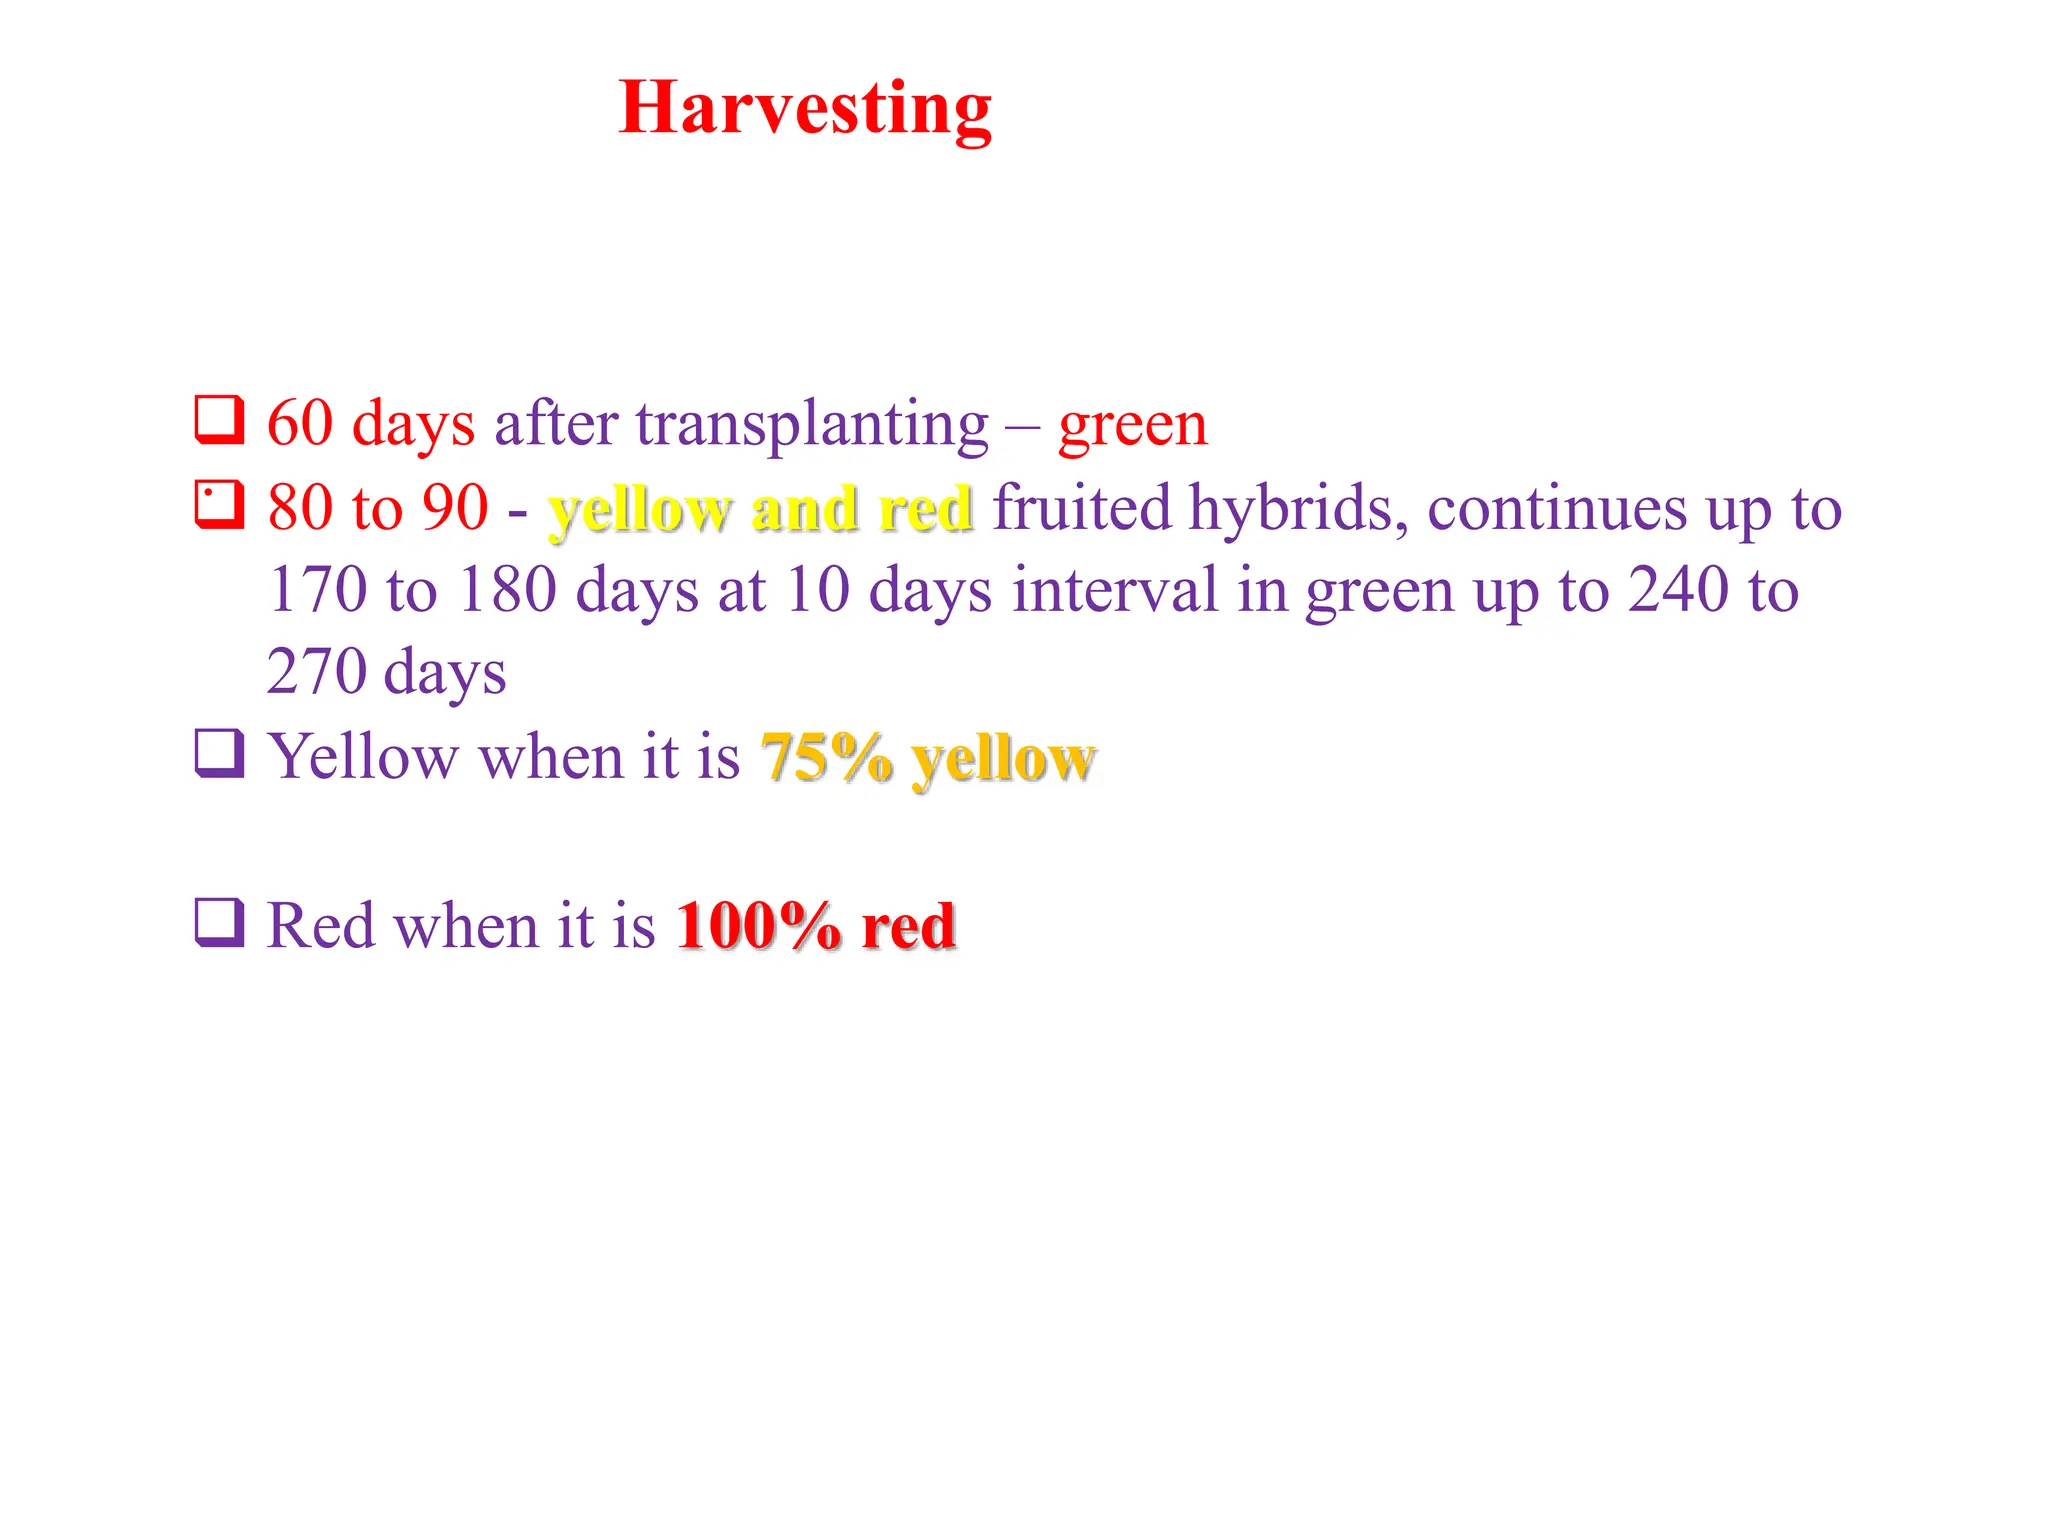
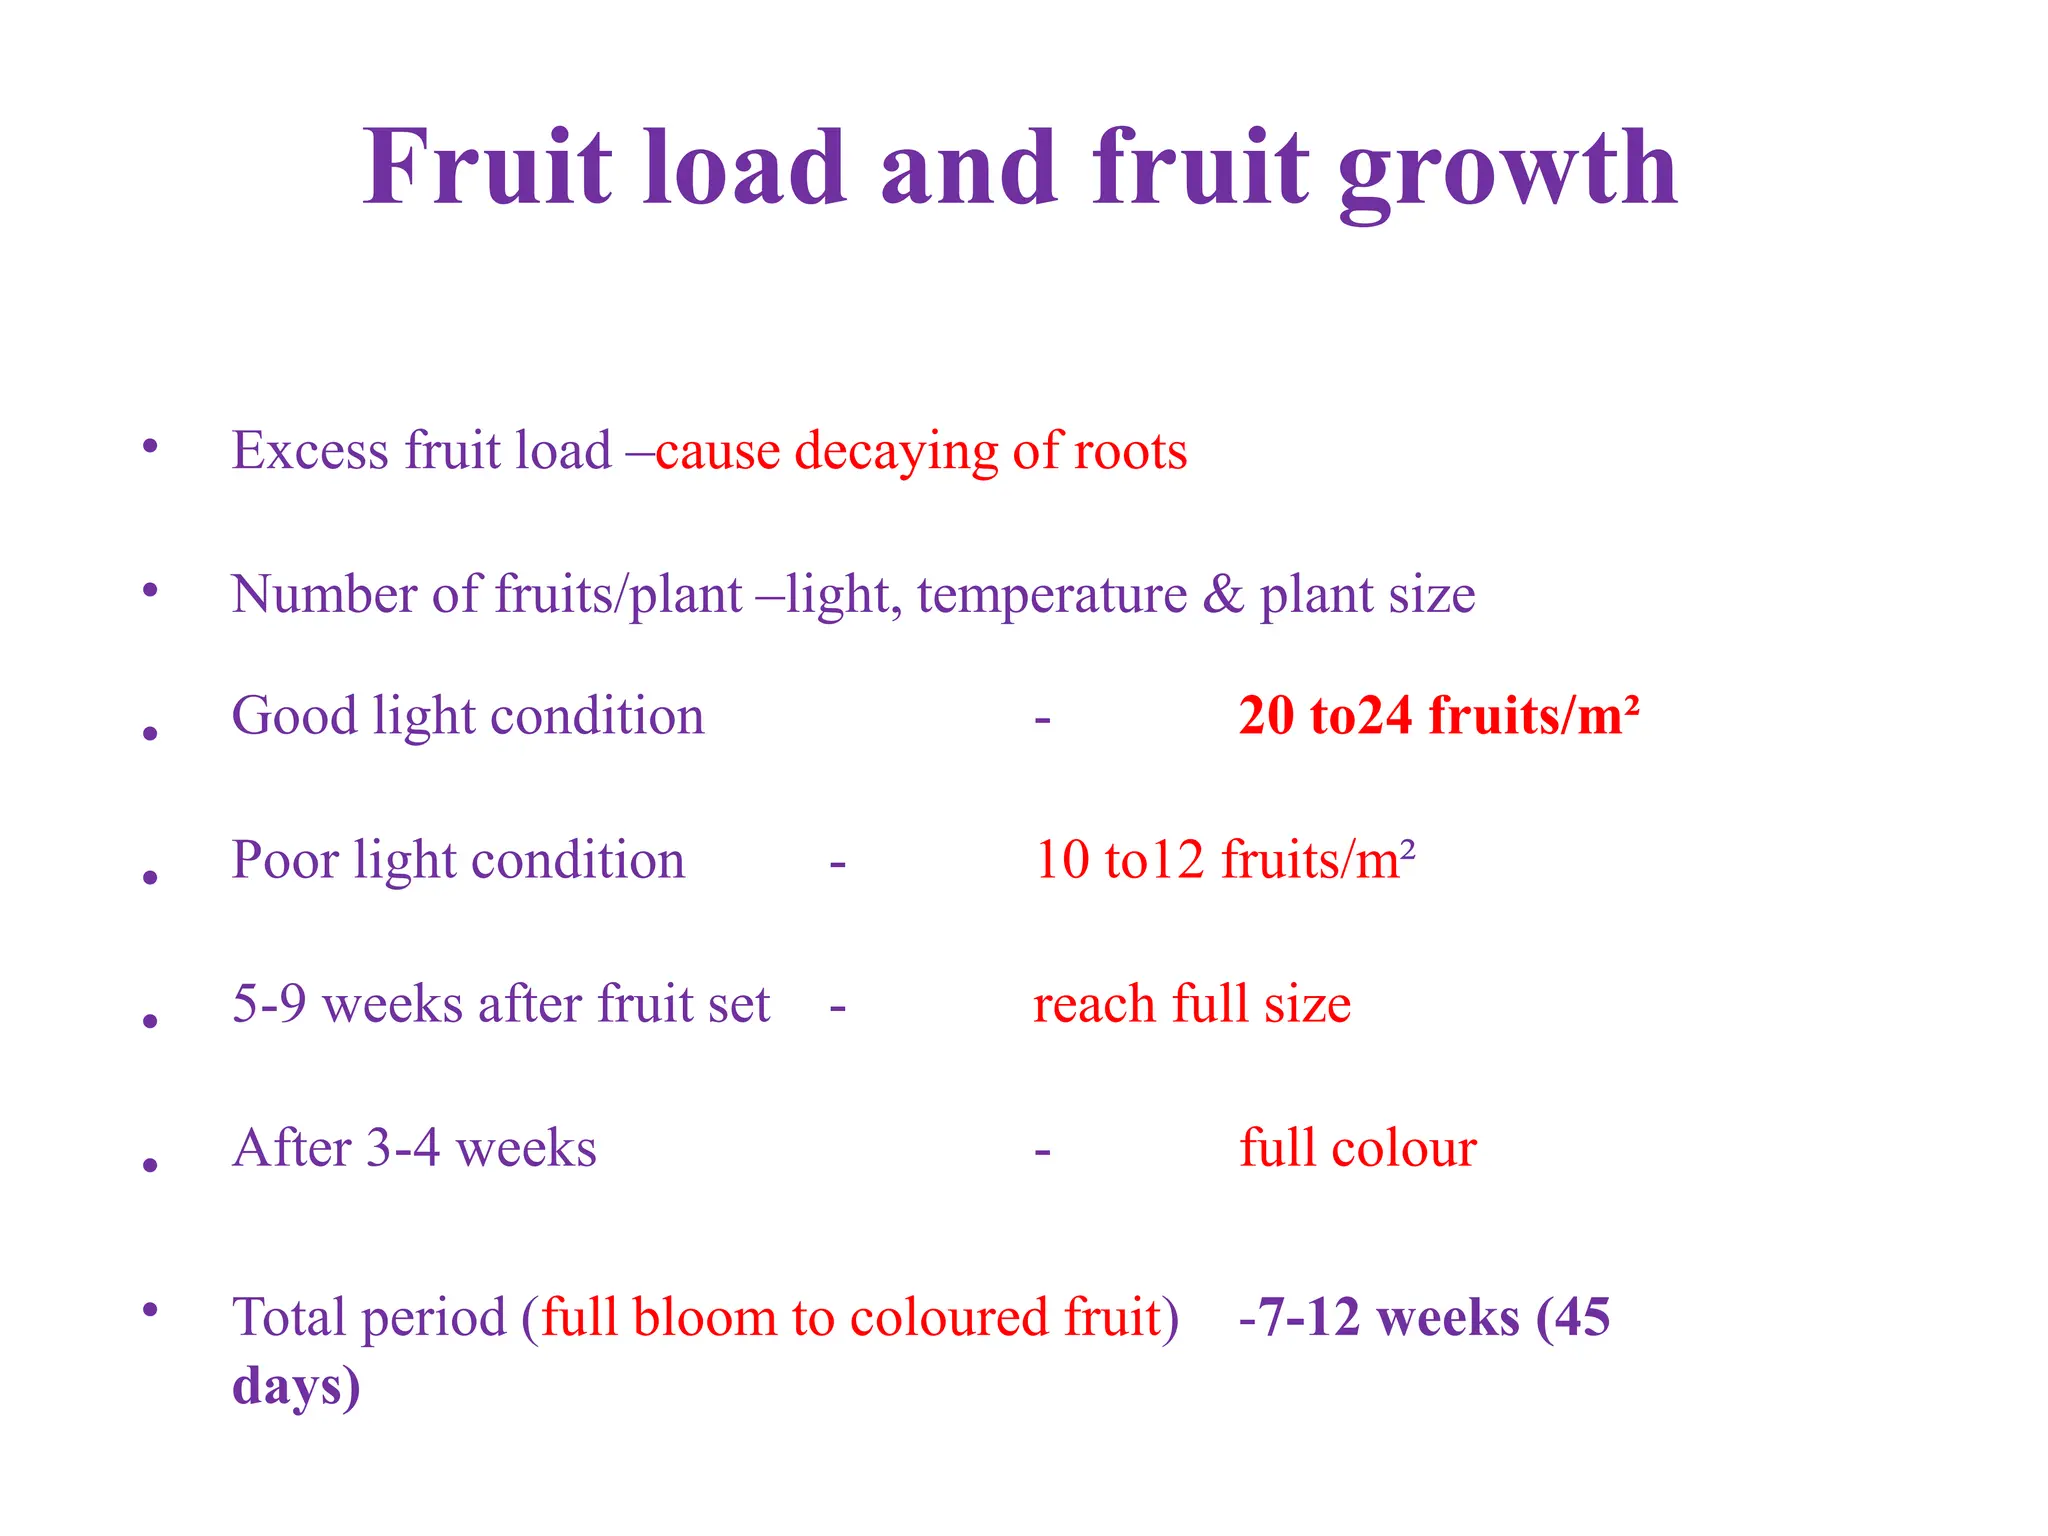
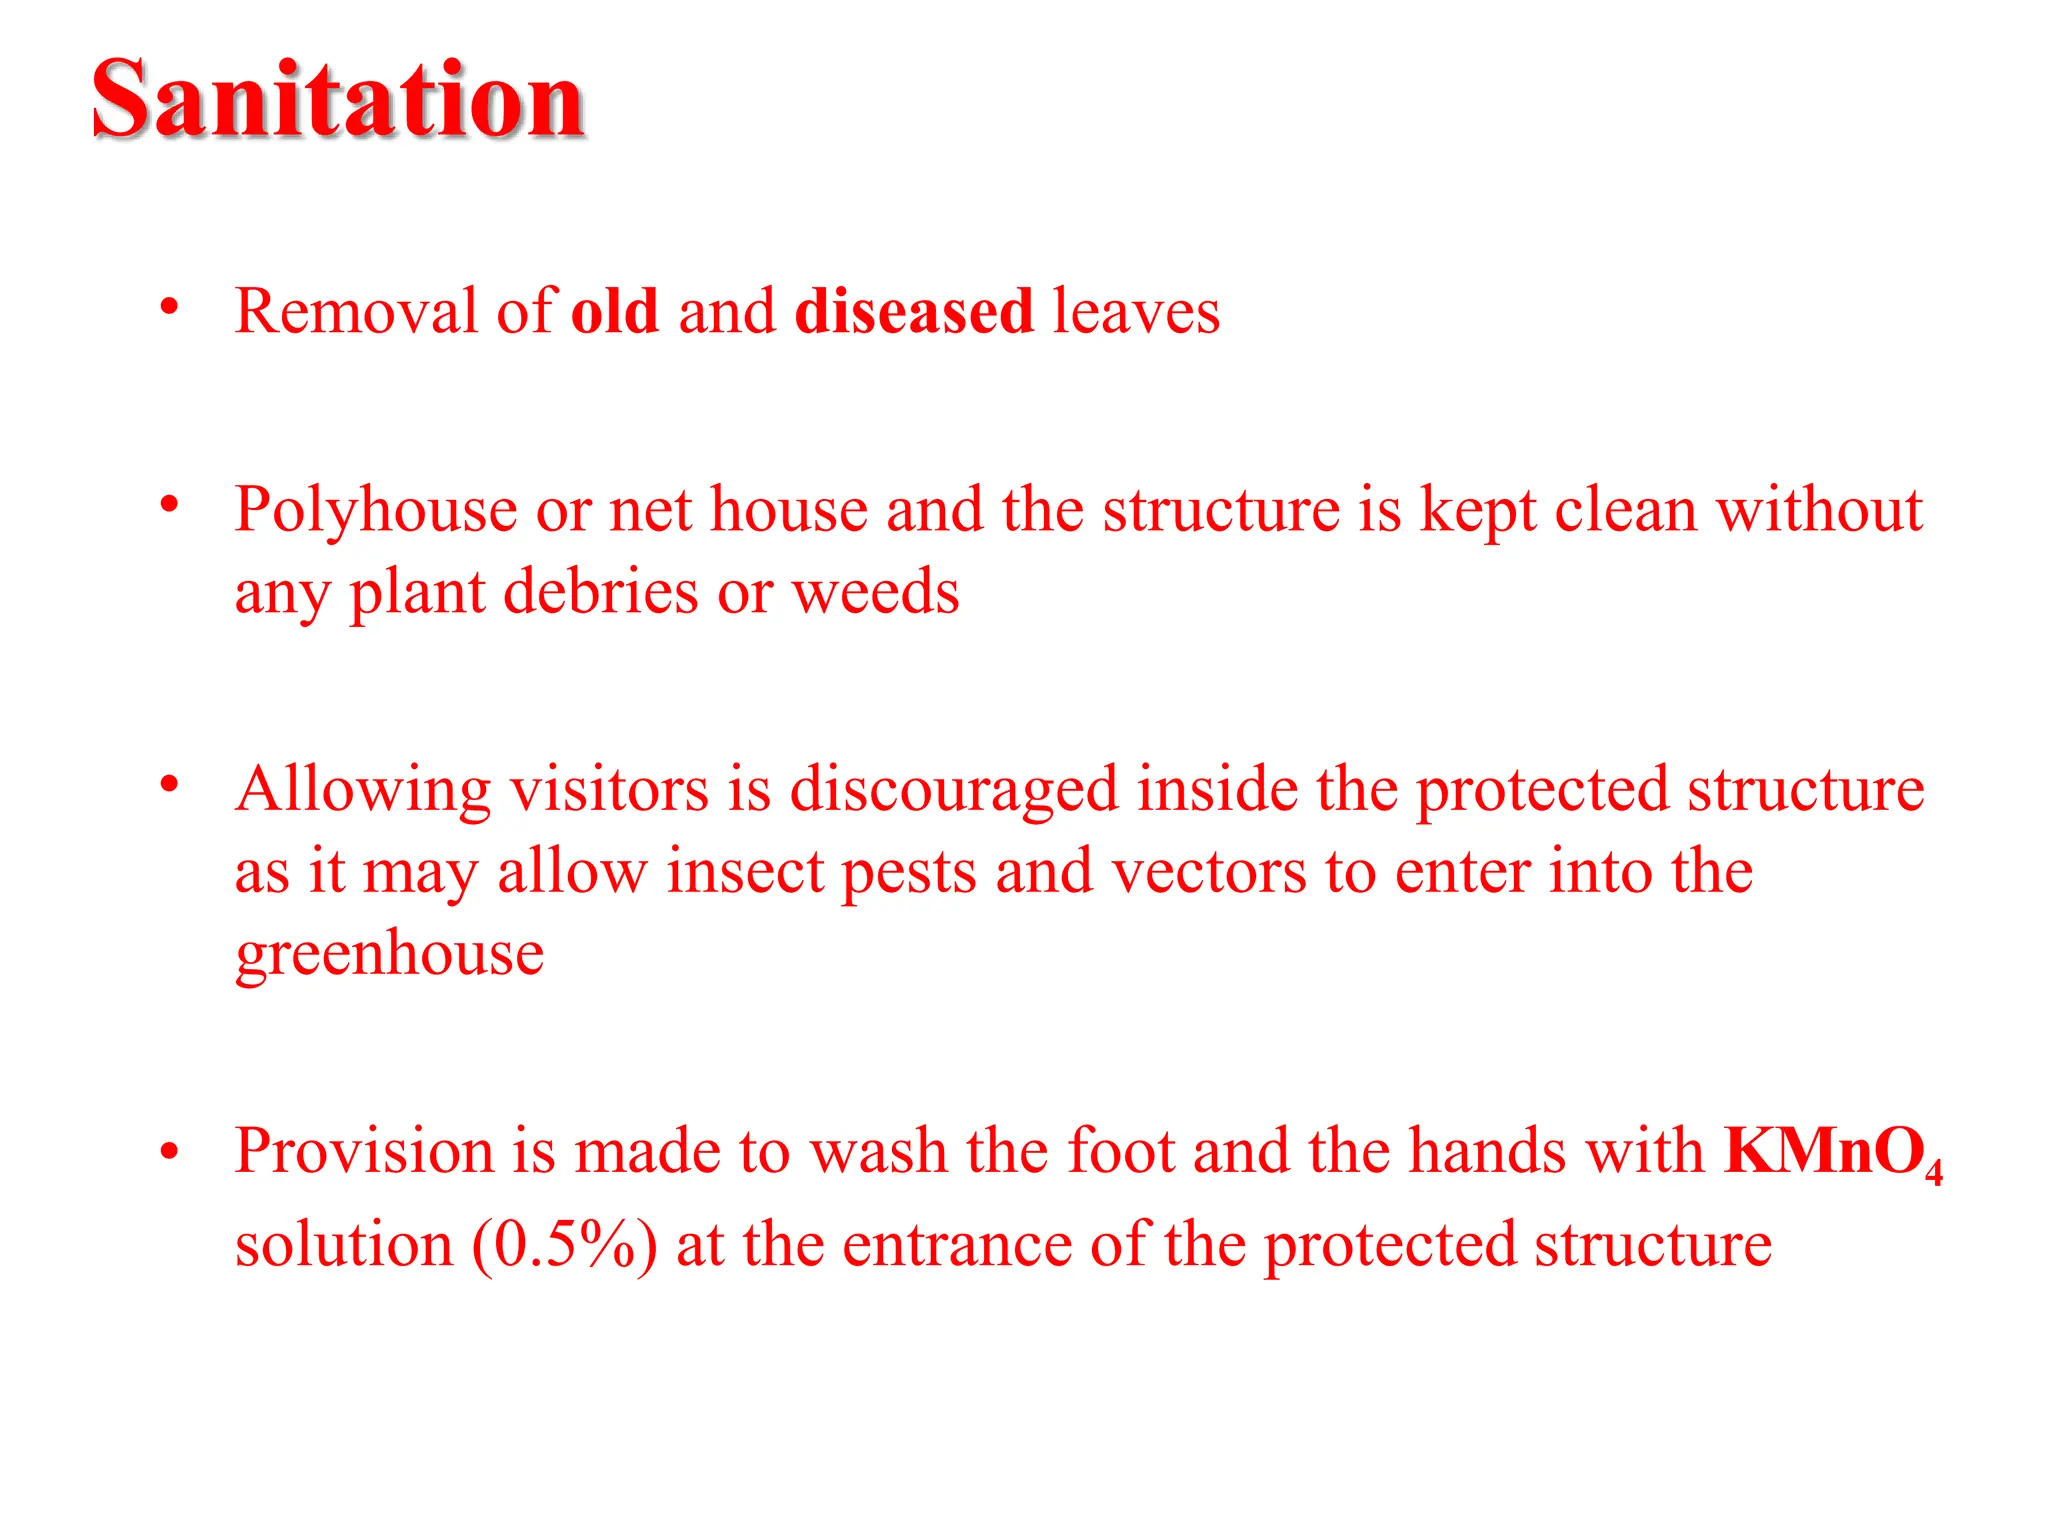
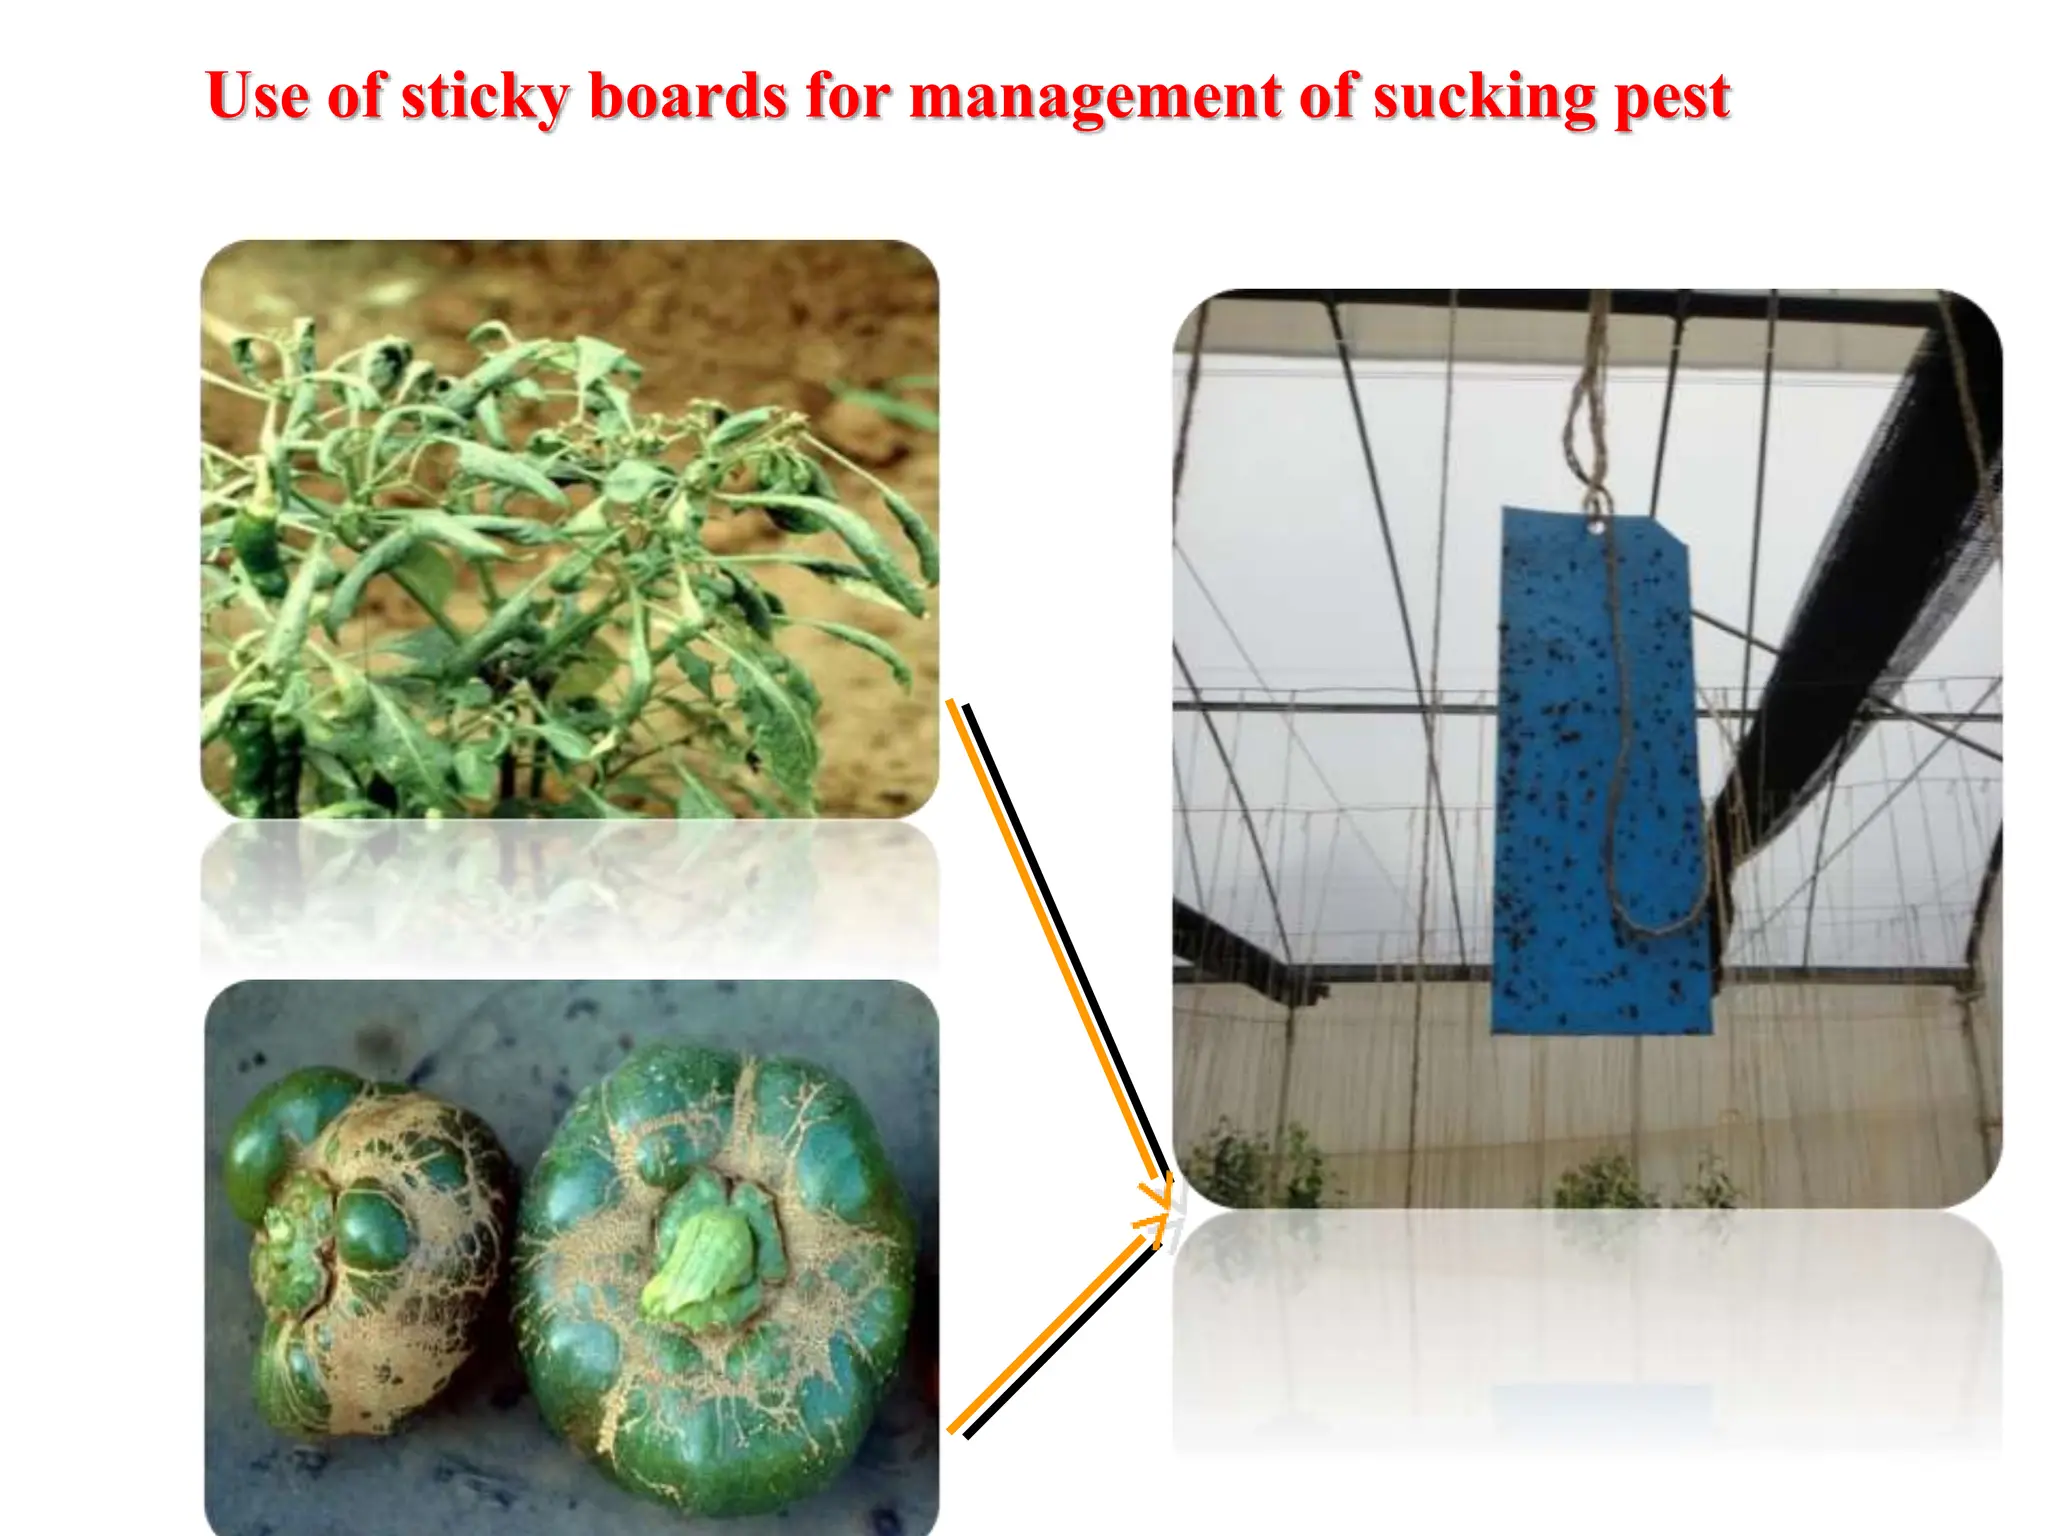
2. Kingdom : Plantae
Division : Magnoliophyta
Class : magnoliopsida
Order : Solanales
Family : Solanaceae
Genus : Capsicum
Species : C. annum; C. frutescence; C.
baccatum; C. pubescence; C. chinense etc.
Systematic classification
3. Chilies are known from pre-historic times in
Peru. They are believed to have originated in
the tropical America.
It is also said that chilies have originated in
the Latin American regions of the New
Mexico and Guatemala as a wild crop around
7500BC.
The people native to these places
domesticated this crop in and around 5000
BC,. Chilli is said to be the first ever
domesticated crop in America.
The three species C. annuum, C. frutescens
and C. chinense evolved from a common
ancestor located in the North of the Amazon
basin.
History
4. Introduction
Capsicum (Capsicum annuum) known as bell pepper or sweet
pepper, leading vegetable grown in greenhouses in the world
It is rich in vitamin A, C and minerals
Gaining popularity in peri-urban production systems because
of easy access to urban markets
There are more than 400 different varieties of chillie’s found all
over the world.
It is also called as hot pepper, sweet pepper, bell pepper, etc.
Both chilli and capsicum belong to same family as well as same
genus that is Capsicum.
C. frutescens are used for their small and very pungent fruits in
hot sauces and as a spices.
The species C. pubescens and C. baccatum are grown on a very
small scale.
China is a major capsicum producing country.
5. Capsicum or bell pepper is one of the important
vegetable which is less pungent.
Chillies are hot and grown for curry powder.
Pungency in chillies/capsicum is due to alkaloid
capsaicin.
The red color of chillies is due to the presence
ofpigment capsanthin.
The hottest chillie is bhuut jhalokiya variety.
Capsicum is used as salad/curry/sauce, etc.
6. Parameters CHILLIES DRY CHILLIES (GREEN)
Moisture 10.000 gm 85.700 gm
Protein 15.000 gm 2.900 gm
Fat 6.200 gm 0.600 gm
Minerals 6.100 gm 1.000 gm
Fiber 30.200 gm 6.800 gm
Carbohydrates 31.600 gm 3.000 gm
Energy 246.000 K cal 29.000 K cal
Calcium 160.000 mg 30.000 mg
Phosphorus 370.000 mg 80.000 mg
Iron 2.300 mg 4.400 mg
Nutritional Facts (per 100 g)
9. CHILLI
C. frutescence known as hot
pepper.
Perennial in nature.
White colored flower.
Frits born in clusters and thin
peel.
Growth determinate.
More pungent.
Vit. - c content high.
Self pollinated.
Used as spices.
CAPSICUM
C. annum known as
sweet or bell pepper.
Annual in nature.
White, purple &
radish colored flower.
Fruits born singly and
thick peel.
Growth indeterminate.
Less pungent.
Vit.- c content low.
Cross pollinated.
Used as vegetable.
Difference between chilli and capsicum
11. Climate
Capsicum is a cool season crop and day
temperature less than 30°C is favourable
Higher temperature results in rapid plant growth and
affects fruit set
Ideal temperature for flowering is 26-28°C day and
16-18°C night
Shading is required during summer to avoid
temperature build up in the greenhouses and
moderately high RH (50-60%) is preferred
12. Soil
Sandy loam soil is preferred for cultivation
Soil with pH of 5.5-6.8 is ideal
High acidic soil reclaimed by using lime
Capsicum has bidirectional root system, so
soil should be loose
13. Hybrids
Hybrids with indeterminate growth habit, as these
hybrids grow to a height of 2 m and above
Commercial hybrids with a yield potential up to
100t/ha and more are suitable for greenhouse
cultivation.
Capsicum fruits with Green, Yellow, Red,
Orange and recently Black colours are in great
demand in urban markets
15. Selection of varieties
Thick fleshed - best for roasting and cooking,
Thinner - suitable for eating as raw.
Four lobbed peppers with square shapes are more
suitable
Green and violet are the strongest in flavour
Yellow, red and orange coloured are milder and
sweeter.
16.
17.
18.
19.
20.
21.
22.
23. Variety
BARI Mistimorich 1
California Wonder
Wonder bell
Shishito pepper
Bell
Takii’s Ace
Yolo wonder
Chinese giant
World beater
Arka Mohini, etc
24. Nursery
Cell-trays are filled with growing medium and
tapped gently to fill the cells properly
Shallow depressions of about 5mm depth are made
in each cell
Commercial cocopeat having enough moisture is
used, no irrigation is required till seeds germinate
Filled trays are staked one above the other and
covered with a plastic sheet to create warmth and
humidity require for germination
Seedlings are raised in seedling trays placed inside
a net house or polyhouse
25.
26. Growing beds
Digging loosens the soil, then clods are
broken and soil is brought to fine tilth
Beds of 100 cm width and 15 cm height are
prepared leaving 50 cm working space
between the beds
Well decomposed organic manure, at the rate
of one bamboo basket per square meter of the
bed is added, mixed thoroughly and the beds
are levelled
In heavy soils mixing sand up to 25% is
required to provide aeration at the root zone
27. Disinfecting the growing beds
Beds are drenched using 4% formaldehyde (4 lit/m2)
of the bed and covered with polyethylene sheet
Care should be taken to wear mask, gloves and
apron to avoid direct contact with formaldehyde
fumes
Four days after formaldehyde treatment, the
polyethylene cover removed, the beds are raked
repeatedly every day
28.
29.
30.
31.
32. Application of neem cake and Trichoderma
o Neem cake is slightly watered to moisten and kept
for two days, and then it is mixed with
Trichoderma formulation at the rate of 1
kg/100kg neem cake
o Mixture is closed with plastic sheet and turned
thoroughly on alternate days
o After 15 days, the neem cake + Trichoderma
formulation will be ready for application
o Neem cake plus Trichoderma formulation is
applied before planting @ of 200 g/ m2
33. Fertilizer application
Commercial fertilizers supplying 50:50:50
N:P2O5:K2O kg/ha, are applied to the growing
beds
Two furrows are opened in the growing beds and
fertilizer mixture is applied in the furrows and
furrows are closed
34.
35. Laying of drip line
Place one inline drip lateral at the centre of the
bed
Inline lateral having an emitting point for every 30
cm interval with discharge of 2 L/hr.
Run drip system with water to check each emitting
points for uniform discharge of water
36.
37. Mulching
o 100 micron thick polyethylene mulch film of 1.2 m width
is used to cover the planting bed
o Holes of 5 cm diameter are made on the mulch film as
per recommended spacing (45 x 30 cm)
o The planting beds are covered with the mulch by securing
the edges of the sheet firmly in the soil
40. Transplanting
Seedlings of 35-42 days old, vigorous and uniform
sized are selected.
Early morning hours or preferably in the evening
Capsicum seedlings are planted in the holes made in
the polyethylene mulch film so that the seedlings do
not touch the film
Watering the beds is done daily with a rose can till the
seedlings get established well
Drenching with 0.3% COC –cooper oxychlorite if
mortality of the seedlings is noticed
41.
42. Irrigation
Drip irrigation starts 10 days after transplanting
Drip irrigation is given daily to supply 2-3 liters of
water per square meter per day depending on
local weather condition
Capsicum extract 70-80% of water used from a
depth of 0-30 cm
43. Fertilizer
Capsicum crop is sprayed with micronutrient formulation (3g/l) 2-3 times once in
30 days starting from 60 days after transplanting
Capsicum is found to be susceptible to calcium deficiency
The crop is fertigated 2-3 times with CaNO3 once in 15 days if calcium deficiency
is noticed
Fertilizer Dose/ha Basal
dose
Pit
applicati
on, kg/ha
25 DAT 50 DAT
CD/Com
post
10 tons 5 tons 5 tons - -
Urea 250 kg - 84 kg 84 kg 84 kg
TSP 350 kg 350 kg - - -
MoP 250 kg - 84 kg 84 kg 84 kg
Zypsum 110 kg 110 kg - - -
ZnSo4 5 kg - - - -
49. The nutrient film technique
(NFT)
The closed insulated pallet system
(CIPS)
50. Pruning
Capsicum plants are pruned to retain four stems.
Pruning is done at weekly interval starting from 15 to 20 days
after transplanting.
From 4th month onwards once in 10 days.
Plants show dichotomous branching.
The tip of the plant splits into two at 5th or 6th node on 15 to
20 days after transplanting (DAT).
These two branches again split into two giving rise to four
branches by 25 to 30 DAT
Operations
51. Pruning
•
•
At every node the tip splits into two giving rise to one strong
branch and one weak branch
Only these four main branches are maintained till the end of
the crop.
•
•
All the flowers that appear till one month after transplanting
are removed.
Only one fruit per node is allowed to develop.
5th or 6th
node
52. PRUNING IN CAPSICUM
All the shoots appearing at the base of the plants are removed, as they are
not productive.
53. Pinching / Topping
• Lateral shoots or
branches are pinched on
first leaf (internodes) or
second-leaf (internodes)
58. Training
The plants are trained along a plastic
twine. Each branch should have a separate plastic
twine to train along.
The plastic twines are tied to the GI wire grid
provided at 2.5 to 3.0 meter height and then to the
base of the plant.
Tying plants to the plastic twine
starts from 6th week after planting at
20 days interval.
64. Number of fruits in different training levels under naturally ventilated polyhouse
Number of fruits in different training levels under shade house
65. 60 days after transplanting – green
80 to 90 - yellow and red fruited hybrids, continues up to
170 to 180 days at 10 days interval in green up to 240 to
270 days
Yellow when it is 75% yellow
Red when it is 100% red
.
Harvesting
66. Yield
100 to 120 t/ha
10 to 12 kg / m2, 2.25 to 2.70 kg / plant
Average individual fruit weight 180 g in initial
harvests, 100 g in last harvests.
Packing
Packed in card board boxes/trays using paper shreds
as the padding material.
Storage
Shrink wrapping each fruit and storing at 7 to 80C-
storability up to 45 to 60 days
69. Flat fruits
•
•
Caused by low temperature
Night temperatures of around
18°C ensure an ideal seed set and
fruit shape
• Low-night temperatures decrease
pollen viability
• Modify flower structure making
self pollination less effective
• Bumblebees for pollination -help
greatly to improve fruit shape
71. Blossom end rot
• Excess of nitrogen &
water stress
• Water soaked area near
blossom end
• Later become light
brown and leathery
• Spraying of 2% CaCl2
72. Fruit load and fruit growth
• Excess fruit load –cause decaying of roots
•
•
•
•
•
•
Number of fruits/plant –light, temperature & plant size
Good light condition - 20 to24 fruits/m²
Poor light condition - 10 to12 fruits/m²
5-9 weeks after fruit set - reach full size
After 3-4 weeks - full colour
Total period (full bloom to coloured fruit) -7-12 weeks (45
days)
74. Sanitation
• Removal of old and diseased leaves
• Polyhouse or net house and the structure is kept clean without
any plant debries or weeds
• Allowing visitors is discouraged inside the protected structure
as it may allow insect pests and vectors to enter into the
greenhouse
• Provision is made to wash the foot and the hands with KMnO4
solution (0.5%) at the entrance of the protected structure
75. Diseases of capsicum under protected condition and their management
Disease
Powdery mildew:
Laveillula taurica
Control
Karathane (0.1%) Calixin
(0.1%)
Sulfex (0.3%)
Downy Mildew
Peronospora tabacini
Symptoms
Whitish patches appear on the
leaves, stem and rarely on fruit.
pale yellow areas on the upper
sides of the leaves. On the lower
side of the leaf the downy growth
appears in cool moist weather.
Karathane (0.1%) Calixin (0.1%)
contaf(0.05%),Rubigon(0.025%)
Bacterial diseases
a)Soft rot (Erwinia carotovora)
b)Bacterial spot (Xanthomonas
versicatoria)
Which causes a soft slimy rot.
Which forms a raised rough
pimply area on the fruit, On the
leaves, the spot is first raised
and wart like, and becomes
necrotic spots with dark
margins. The affected leaves
turn yellow and drop.
*Hot water treatments, clean
cultivation
*Streptomycin spray
Clean cultivation, vector control,
etc…
Viral diseases
a)Leaf curl virus
b) CMV
Fusarium wilt
Fusarium oxysporum
Yellowing, curling, mottling of
leaves and ultimately death of
plant is seen.
Yellowing of leaves, Wilting, coller
rot, death of root
COC drench, Carbendizim,
Dithane M-45
76. Pests of capsicum under protected condition and their management
Pest Symptoms and damage
serious during dry periods, Both adult
Thrips:
Scirtothrips dorsalis and nymphs suck the sap from
developing leaves. Affected leaves
curl upwards along the margin and
are reduced in size.
Management
Acephate (Starthane 75WP) 1.5g/ or
Imidacloprid (confidor)0.5ml/l
Damage is more in hot and humid
seasons and greenhouse (when
temperature is high).
-Application of Neem cake 250 kg/ha
to kill pupae
Spray Abamectin (Vertimec) (0.5ml/l)
or Dicofol (Kelthane) (2ml/l)
4% (NSKE) in rotation.
White or yellow
mite:
Polyphgotersonemus
latus
Aphids: Aphis
gossypi,
Myzus persicae
Minute insects, colonies of aphids
suck the sap from tender leaves and
flower buds.
Aphids act as a vector for
transmitting mosaic virus disease
-Remove all the virus affected plants
and destroy.
-Spray Imidacloprid (Confidor)
(0.5ml/l) or
Dimethoate (Rogor) 1 ml/l in
rotation
Fruit borer,
Helicoverpa armigera
This pest is not serious in greenhouse. Spray Nuclear PolyhedrosisVirus
(NPV) (Helicoverpa NPV)
250 LE/ha + teepol or any sticker1%
during evening to protect NPV from
UV rays
78. References
1. Singh D.K and K.V. Peter. (2013). Protected Cultivation of
Horticultural crops. New India Publishing Agency. New
Delhi.
2. Swain S.C. (2014). Precision Farming in Horticulture
Approaches and Strategies. Narendra Publishing House.
New Delhi.
3. Selvakumar R. (2014). A textbook of Glaustas Olericulture.
New Vishal Publications. New Delhi