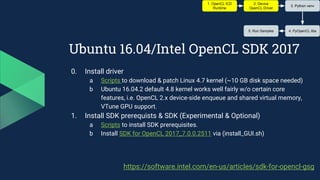
Download as PDF, PPTX


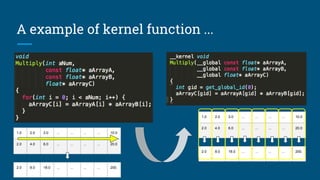


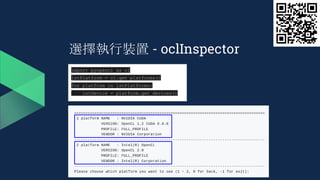
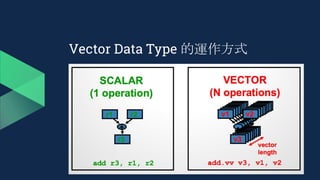
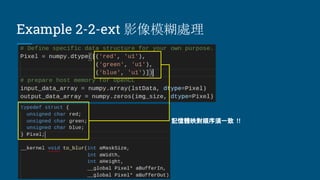
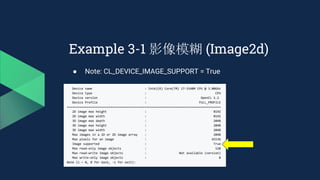
![Windows
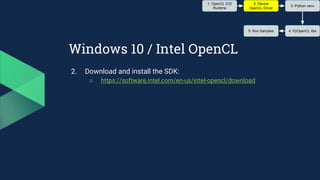
3. Prepare venv
○ $> python3 -m venv [NameOfEnv]
○ $> NameOfEnvScriptsactivate.bat
○ <NameOfEnv>$> pip3 install --upgrade pip
4. Download and install the pre-built python modules:
○ http://www.lfd.uci.edu/~gohlke/pythonlibs/#numpy
■ pip install "numpy‑1.13.1+mkl‑cp36‑cp36m‑win_amd64.whl"
○ http://www.lfd.uci.edu/~gohlke/pythonlibs/#pyopencl
■ pip install "pyopencl‑2017.2+cl12‑cp36‑cp36m‑win_amd64.whl”
■ pip install "pyopencl‑2017.2+cl21‑cp36‑cp36m‑win_amd64.whl"
1. OpenCL ICD
Runtime
2. Device
OpenCL Driver
3. Python venv
4. PyOpenCL libs5. Run Samples](https://image.slidesharecdn.com/gpu-170909135531/85/GPU-26-320.jpg)
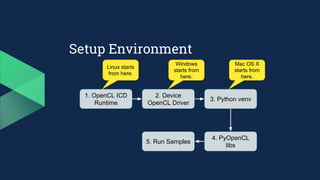
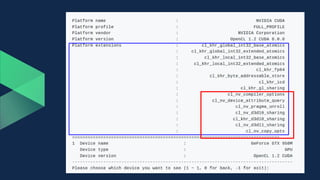
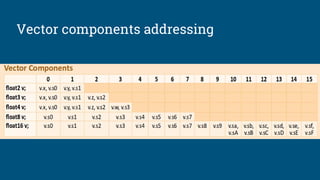
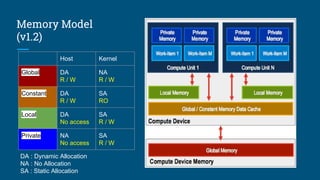
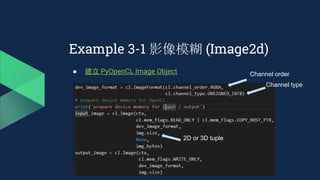
![Mac OS X / Ubuntu
3. Prepare venv
○ $> python3 -m venv [NameOfEnv]
○ $> source ./NameOfEnv/bin/activate
○ <NameOfEnv>$> pip3 install --upgrade pip
4. Install Python modules:
○ <NameOfEnv>$> pip3 install numpy
○ <NameOfEnv>$> pip3 install pyopencl
1. OpenCL ICD
Runtime
2. Device
OpenCL Driver
3. Python venv
4. PyOpenCL libs5. Run Samples](https://image.slidesharecdn.com/gpu-170909135531/85/GPU-27-320.jpg)

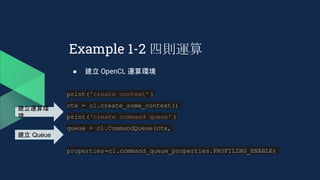

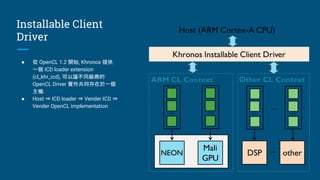
![Example 1-2 四則運算
● kernel code
__kernel void adjust_score(__global int* values,
__global int* final)
{
int global_id = get_global_id(0);
final[global_id] =
convert_int(sqrt(convert_float(values[global_id])) * 10);
}](https://image.slidesharecdn.com/gpu-170909135531/85/GPU-37-320.jpg)


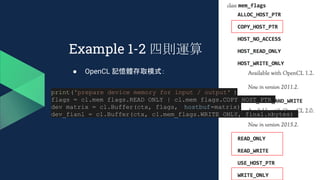
![Example 2-1 四則運算加速版
● int v.s. int4
__kernel void adjust_score(__global int4* values,
__global int4* final) {
int global_id = get_global_id(0);
final[global_id] =
convert_int4(sqrt(convert_float4 (values[global_id])) * 10);
}](https://image.slidesharecdn.com/gpu-170909135531/85/GPU-46-320.jpg)
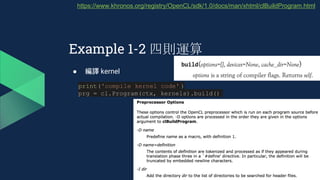
![Example 2-1 四則運算加速版
__kernel void adjust_score(__global int4* values, __global int4* final)
{
int global_id = get_global_id(0);
// convert int4 to float4 with implicit data type conversion
float4 float_value = (float4) (values[global_id]. x,
values[global_id]. y,
values[global_id]. z,
values[global_id]. w);
// do calculation
float4 float_final = sqrt(float_value) * 10;
// convert float4 to int4 with implicit data type conversion
final[global_id] = (int4) (float_final. x,
float_final. y,
float_final. z,
float_final. w);
}](https://image.slidesharecdn.com/gpu-170909135531/85/GPU-47-320.jpg)

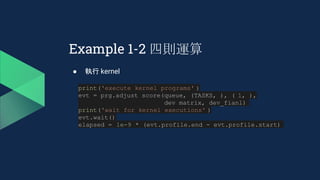
![Example 2-2 影像灰階處理
lstData = [(1,2,3,4), (5,6,7,8), ...]
image_size = 1920 * 1080
# prepare host memory for OpenCL
if strChoice == '1':
pixel_type = numpy.dtype(( 'B', 1))
input_data_array = numpy.array(lstData, dtype=pixel_type)
output_data_array = numpy.zeros(img_size * 4,
dtype =pixel_type)
else:
pixel_type = numpy.dtype(( 'B', 4))
input_data_array = numpy.array(lstData, dtype=pixel_type)
output_data_array = numpy.zeros(img_size, dtype=pixel_type)](https://image.slidesharecdn.com/gpu-170909135531/85/GPU-49-320.jpg)


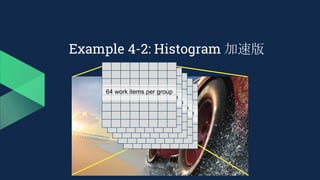
![Example 3-2 Histogram
● 圖片直方圖的計算方法:
○ R, G, B 分開處理
○ 對其值從 0 ~ 255 進行統計,以得出每個 值的分佈情況
__kernel void histogram(__global Pixel* pixels,
volatile __global unsigned int* result)
{
unsigned int gid = get_global_id(0);
atomic_inc(result + pixels[gid]. red);
atomic_inc(result + pixels[gid]. green + 256);
atomic_inc(result + pixels[gid]. blue + 512);
}](https://image.slidesharecdn.com/gpu-170909135531/85/GPU-64-320.jpg)


This document introduces PyOpenCL and provides examples for using it to perform GPU computing via Python. It begins with an overview of GPU computing and OpenCL. It then discusses setting up the PyOpenCL environment on different platforms like Windows, MacOS, and Linux. Examples shown include printing "Hello Taiwan" on the GPU, performing arithmetic operations on arrays in parallel, and image processing tasks like grayscale conversion and blurring using OpenCL data types and memory models. Atomic functions and synchronization are also covered.


![[Harvard CS264] 10a - Easy, Effective, Efficient: GPU Programming in Python w...](https://cdn.slidesharecdn.com/ss_thumbnails/andreas-cs264-110331202547-phpapp02-thumbnail.jpg?width=640&height=640&fit=bounds)