Download as PDF, PPTX


![Configuration file walkthrough
• Structure based on .ini format:
[Section]
Option
• Most common options to configure
Hostname
Public
RestrictedPaths
Sharing
SharingRestrictedPaths
IdentityMethod (CILogon, OAuth)
• More details are available at:
support.globus.org/forums/22095911](https://image.slidesharecdn.com/140714xsedeglobustutorial2endpointsetup-140711175249-phpapp01/85/Globus-Endpoint-Setup-and-Configuration-XSEDE14-Tutorial-14-320.jpg)
![Basic Configuration
• Change your endpoint’s name in the
Globus Connect Server configuration file:
vim /etc/globus-connect-server.conf
– Set [Endpoint] Name = “dtn”
• Run: globus-connect-server-setup
– Enter your Globus username and password when
prompted
• Access the endpoint in your browser using
the new name](https://image.slidesharecdn.com/140714xsedeglobustutorial2endpointsetup-140711175249-phpapp01/85/Globus-Endpoint-Setup-and-Configuration-XSEDE14-Tutorial-15-320.jpg)

![Making endpoint public
• On your Globus Connect Server server:
– sudo vim /etc/globus-connect-server.conf
– Uncomment [Endpoint] Public = False
– Replace ‘False’ with ‘True’
– Run sudo globus-connect-server-setup
• Try accessing your neighbor’s endpoint:
you will be prompted for credentials…
• …but you cannot access it, since you do
not have an account on that server](https://image.slidesharecdn.com/140714xsedeglobustutorial2endpointsetup-140711175249-phpapp01/85/Globus-Endpoint-Setup-and-Configuration-XSEDE14-Tutorial-19-320.jpg)
![Making endpoint public
• On your Globus Connect Server server:
– sudo vim /etc/globus-connect-
server.conf
– Uncomment [Endpoint] Public = False
– Replace ‘False’ with ‘True’
– Run sudo globus-connect-server-
setup](https://image.slidesharecdn.com/140714xsedeglobustutorial2endpointsetup-140711175249-phpapp01/85/Globus-Endpoint-Setup-and-Configuration-XSEDE14-Tutorial-20-320.jpg)
![Enable sharing on your endpoint
• sudo vim /etc/globus-connect-server.conf
• Uncomment [GridFTP] Sharing = True
• Go to the Web UI Start Transfer page
• Select endpoint <username>#dtn
• Users can create shared endpoints that
point to a specific directory on this
endpoint and share with other Globus
users](https://image.slidesharecdn.com/140714xsedeglobustutorial2endpointsetup-140711175249-phpapp01/85/Globus-Endpoint-Setup-and-Configuration-XSEDE14-Tutorial-21-320.jpg)
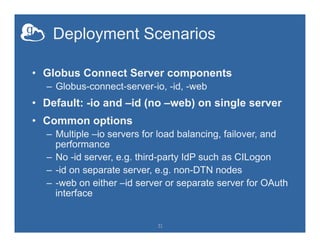
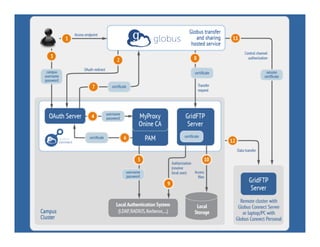
![Setting up multiple –io servers
• Guidelines
– Use the same .conf file on all servers
– First install on the server running the –id component, then all others
1. Install Globus Connect Server on all servers
2. Edit .conf file on one of the servers and set [MyProxy]
Server to the hostname of the server you want the –id
component installed on
3. Copy the configuration file to all servers
– /etc/globus-connect-server.conf
4. Run globus-connect-server-setup on the server running
the –id component
5. Run globus-connect-server-setup on all other servers
6. Repeat steps 2-5 as necessary to update configurations
32](https://image.slidesharecdn.com/140714xsedeglobustutorial2endpointsetup-140711175249-phpapp01/85/Globus-Endpoint-Setup-and-Configuration-XSEDE14-Tutorial-32-320.jpg)

This document provides an overview of how to create and manage Globus endpoints. It discusses installing and configuring Globus Connect Server to set up an endpoint on an Amazon EC2 server. The key steps are to install Globus Connect Server, run the setup process, and configure options in the configuration file like making the endpoint public or enabling sharing. Advanced configuration topics covered include using host certificates, single sign-on with CILogon, restricting file paths for transfers and sharing, and setting up multiple Globus Connect Server instances for load balancing.