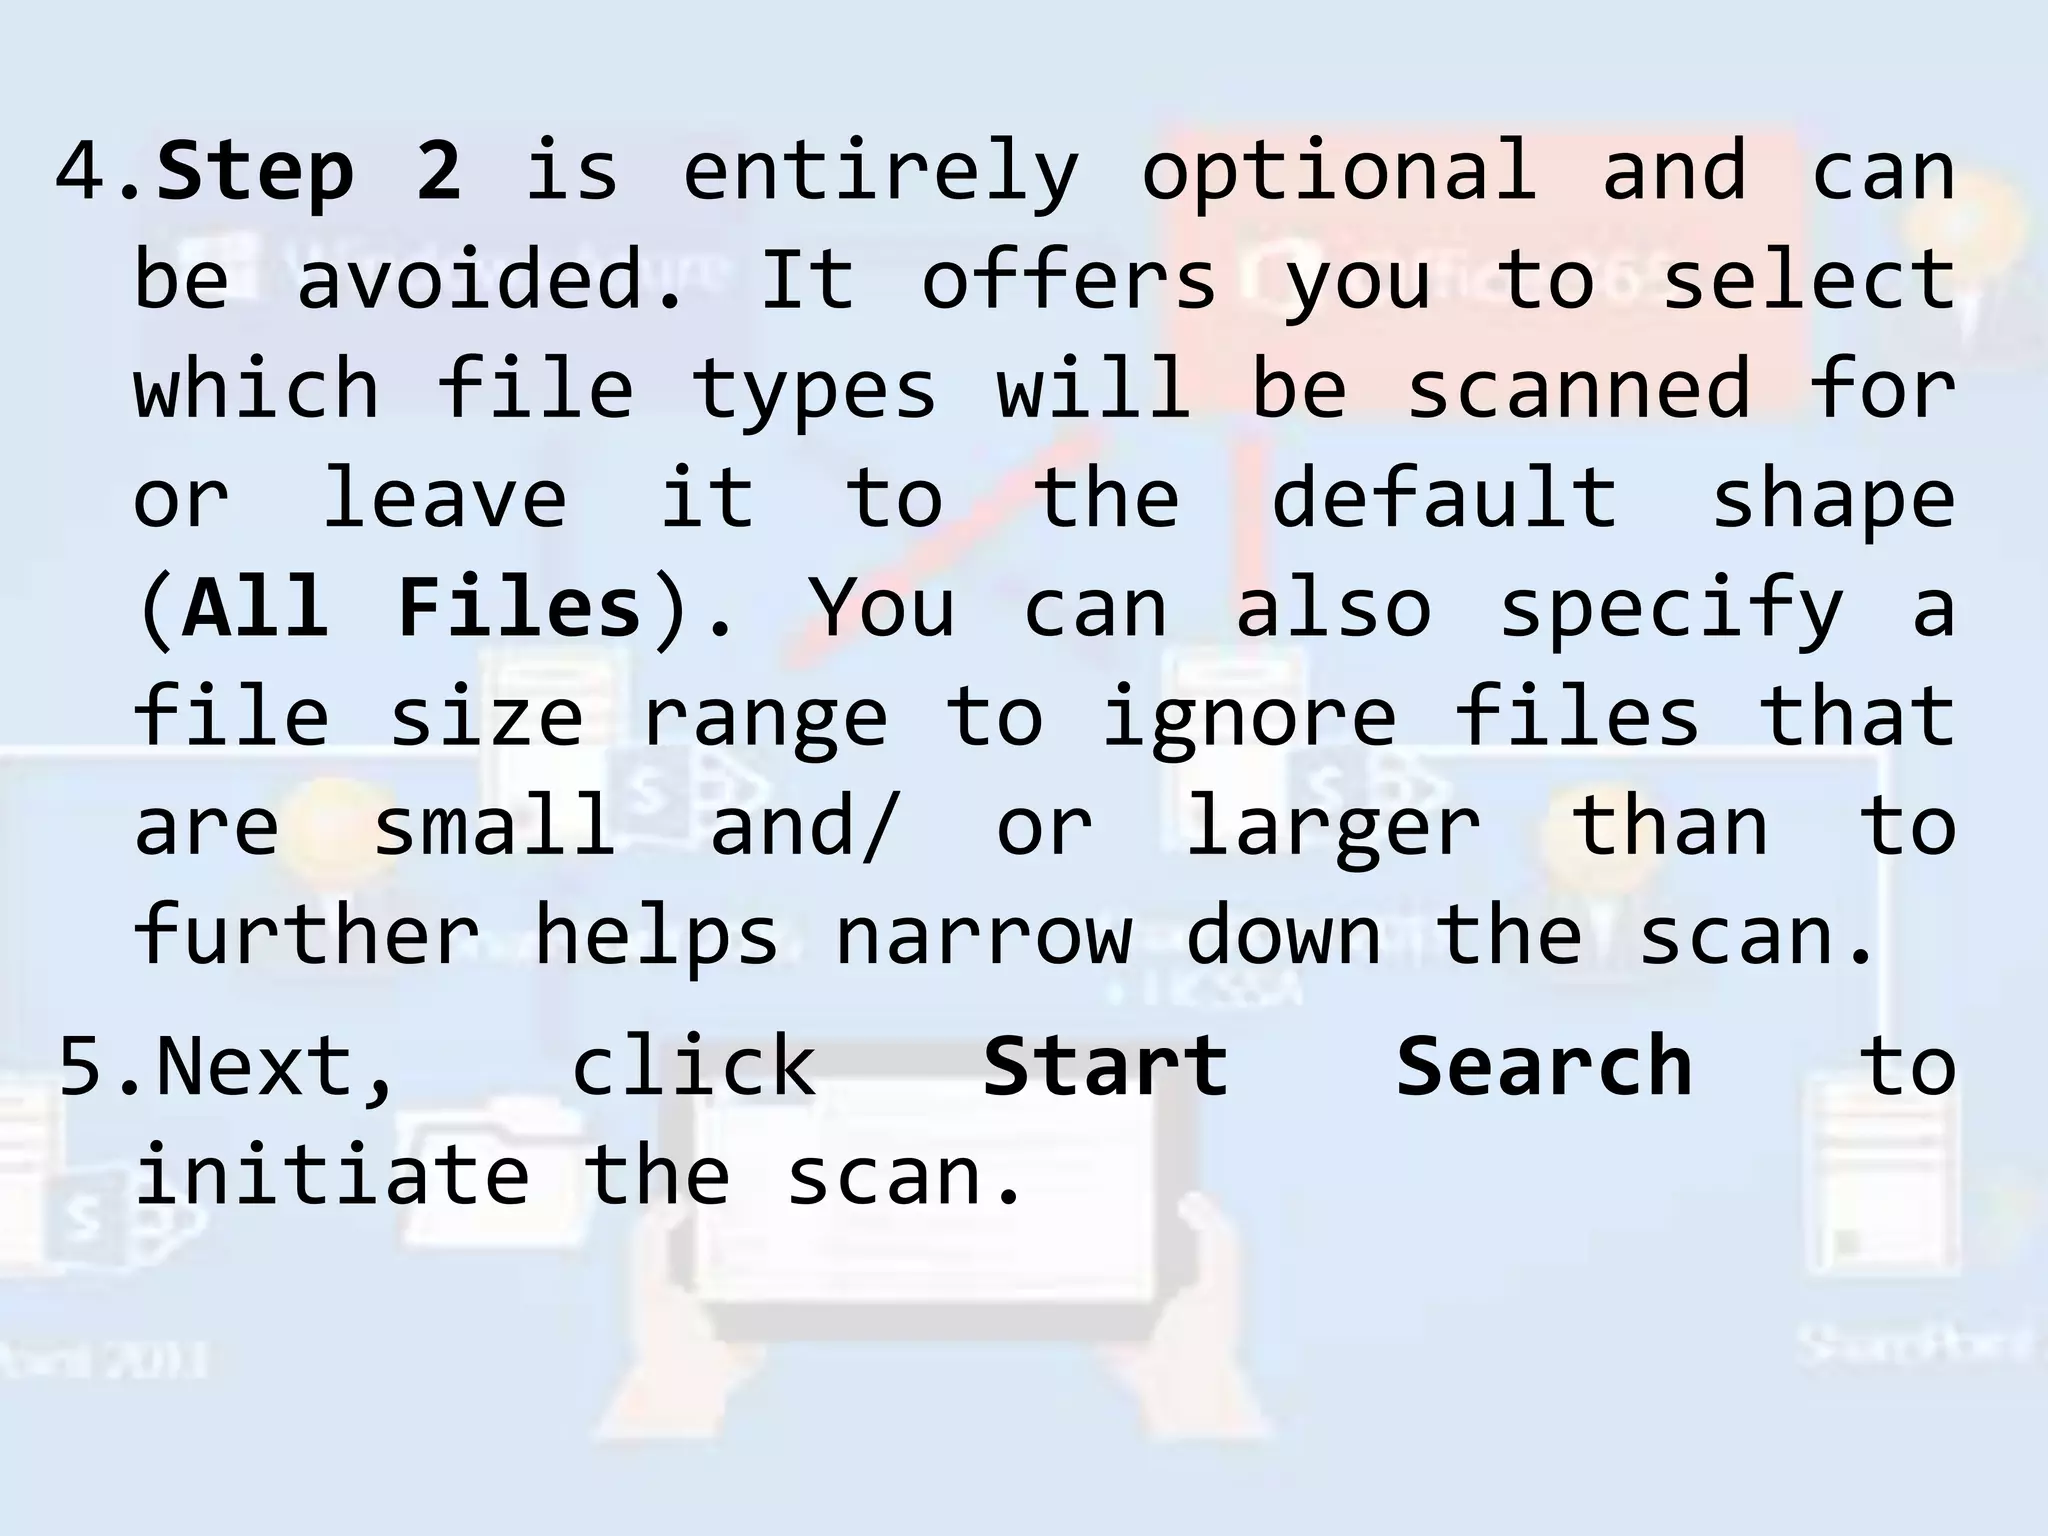
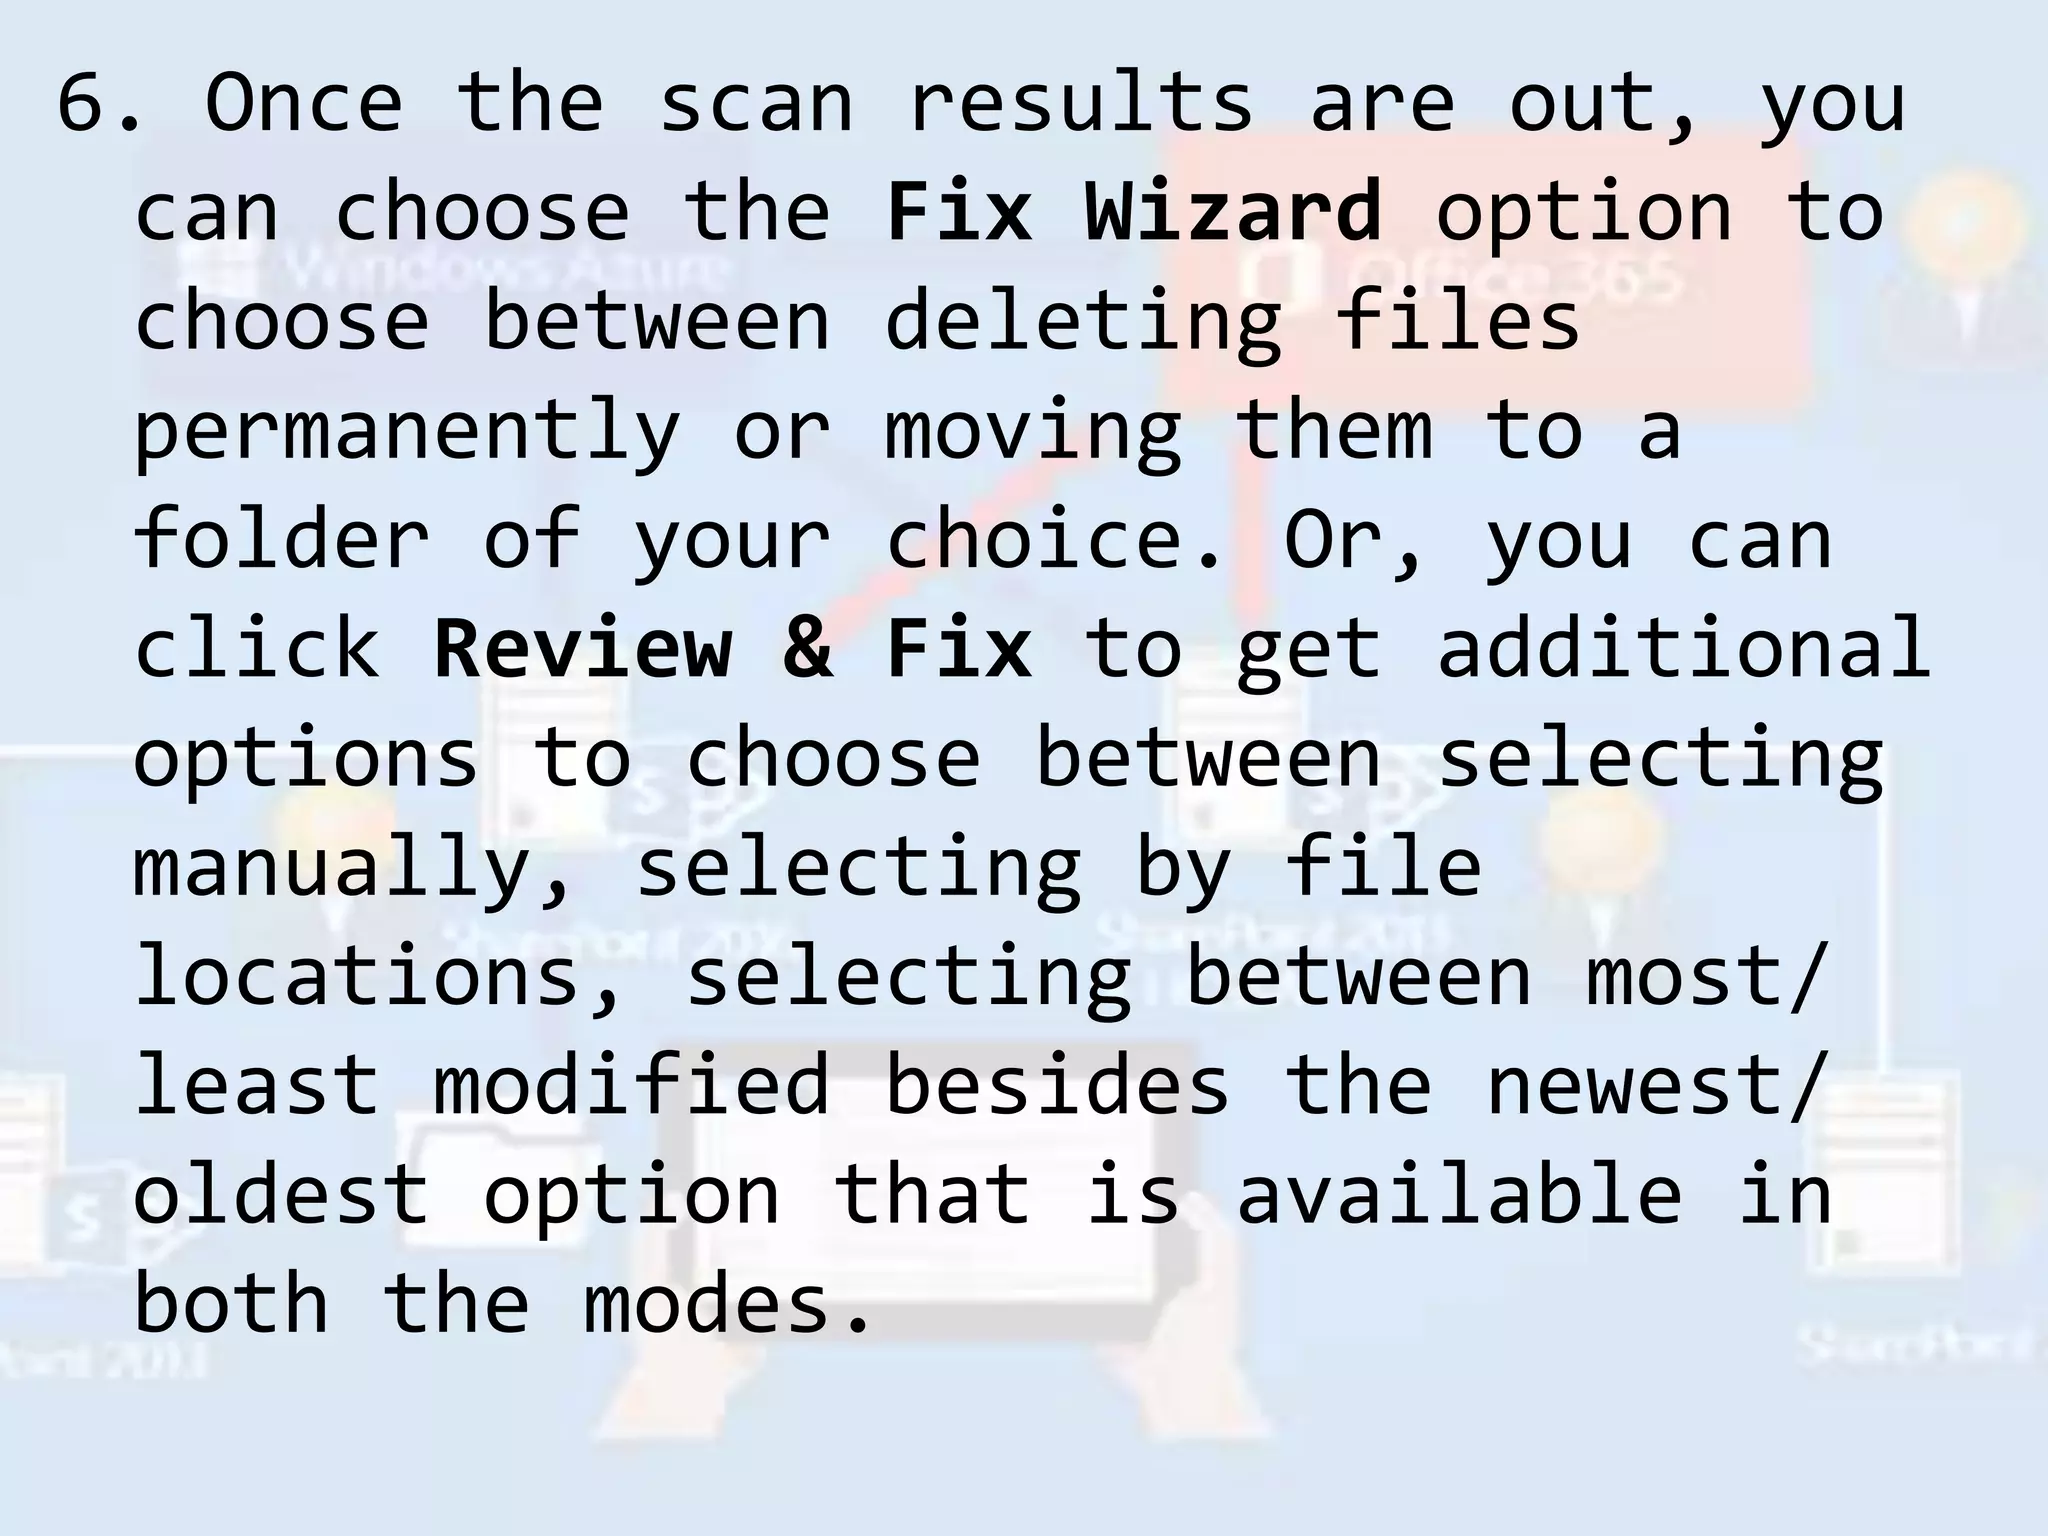
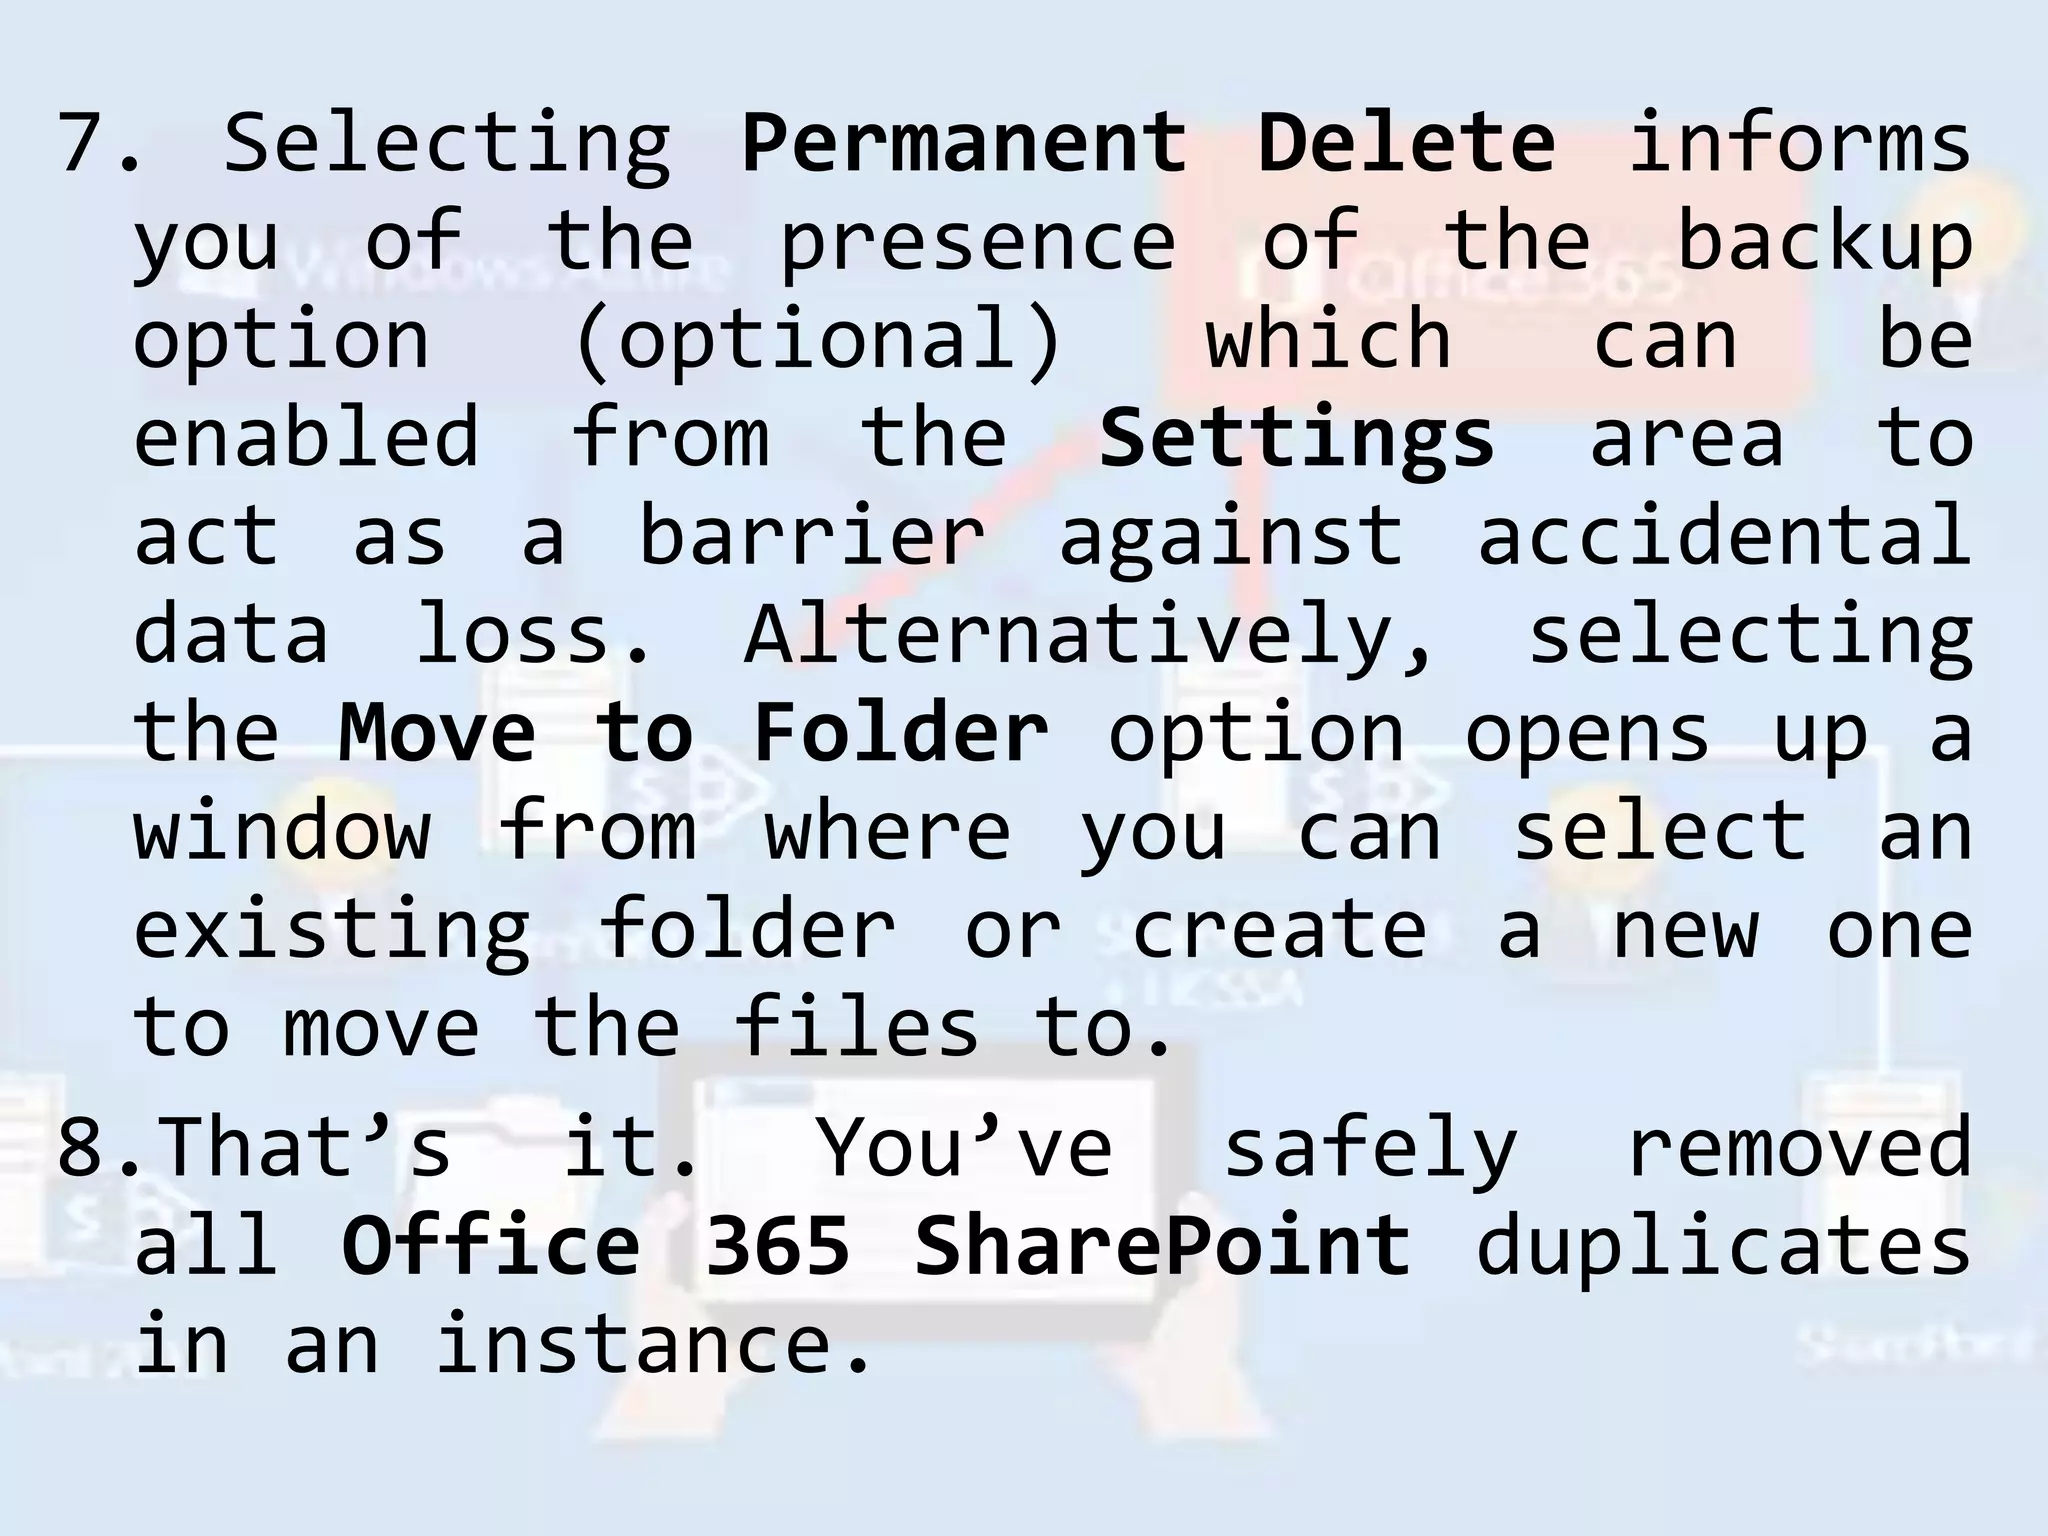
• Being a Microsoft SharePoint user means
the user often comes across multiple files
that are duplicate on the server.
• Though these duplicate files don’t
actually have any demerits, except that
they begin to occupy a really big chunk of
storage space once they start piling up.
• Most SharePoint users aren’t aware of the
fact that there is a native option
available to remove duplicate files from
the server that have been shared with them
or are located on their drive.
• Here are a few options to get it done
seamlessly.
REMOVING DUPLICATE FILES
FROM SHAREPOINT LIBRARY
Microsoft SharePoint Office 365 is
the latest edition of SharePoint. It
is widely used in enterprise-level
workspaces and therefore the issue of
finding duplicates with accuracy is
imperative.
However, that isn’t always the case as we will
discuss below.
Once on the server, you can search
for duplicate files if they are
available in a single library. The
duplicate option isn’t available by
default so you will have to enable
it by:
• Go to SYSTEM ACCOUNTS and then EDIT
PAGE.
• Now go to Search Results and click
the Settings icon (gear).
• A new page will open up showing
the Search Results feature. Inside
it, go to Settings | Show Duplicate
Links.
Now go back to the library and
search for the file that you were
previously searching for.
You will get a single file. But when
you click on it, it will show some
options including the View Duplicate
Link. Click that.
Finally, you will be able to see all
the files that are duplicate or near
duplicate. Optionally, you can choose
to open each of them individually to
check if they are duplicates or
similar ones.
SharePoint uses a hashing technique
called Shingling and a document
signature to determine if the file is
a duplicate. The files that contain a
bulk of content identical to each
other are shown in the Search
Results.
• However, the problem is that the
similar files contain other data as
well, which comes up in the Search
Results as well. This leads to the
problematic possibility where someone
could simply delete all the files
from the Search Results thinking of
all of them as duplicates, whereas
some were duplicates and some were
similar ones.
REMOVING DUPLICATES WITH A
SOFTWARE PROGRAM
Clone Files Checker offers the
accuracy, speed and reliability
that SharePoint users dreams about
if they’re in the need to clean up a
huge volume of duplicates. Clone
Files Checker dives into the hash of
every single file and brings up
highly accurate results within
moments.
1. Download Clone Files Checker from
the official website and install
it.
2. Launch the software and select the
server files you want to scan.
3. You can include the files by
selecting them through the Step
1 section.
4.Step 2 is entirely optional and can
be avoided. It offers you to select
which file types will be scanned for
or leave it to the default shape
(All Files). You can also specify a
file size range to ignore files that
are small and/ or larger than to
further helps narrow down the scan.
5.Next, click Start Search to
initiate the scan.
6. Once the scan results are out, you
can choose the Fix Wizard option to
choose between deleting files
permanently or moving them to a
folder of your choice. Or, you can
click Review & Fix to get additional
options to choose between selecting
manually, selecting by file
locations, selecting between most/
least modified besides the newest/
oldest option that is available in
both the modes.
7. Selecting Permanent Delete informs
you of the presence of the backup
option (optional) which can be
enabled from the Settings area to
act as a barrier against accidental
data loss. Alternatively, selecting
the Move to Folder option opens up a
window from where you can select an
existing folder or create a new one
to move the files to.
8.That’s it. You’ve safely removed
all Office 365 SharePoint duplicates
in an instance.
FINAL WORD
Microsoft SharePoint Office
365 files are stored on the server
folder. Therefore, Administrator
access will be required to perform
the duplicate cleanup by Clone Files
Checker.

Find Duplicate Files in Office 365 SharePoint

  • 2.
    • Being aMicrosoft SharePoint user means the user often comes across multiple files that are duplicate on the server. • Though these duplicate files don’t actually have any demerits, except that they begin to occupy a really big chunk of storage space once they start piling up. • Most SharePoint users aren’t aware of the fact that there is a native option available to remove duplicate files from the server that have been shared with them or are located on their drive. • Here are a few options to get it done seamlessly.
  • 3.
    REMOVING DUPLICATE FILES FROMSHAREPOINT LIBRARY Microsoft SharePoint Office 365 is the latest edition of SharePoint. It is widely used in enterprise-level workspaces and therefore the issue of finding duplicates with accuracy is imperative. However, that isn’t always the case as we will discuss below.
  • 4.
    Once on theserver, you can search for duplicate files if they are available in a single library. The duplicate option isn’t available by default so you will have to enable it by: • Go to SYSTEM ACCOUNTS and then EDIT PAGE. • Now go to Search Results and click the Settings icon (gear).
  • 5.
    • A newpage will open up showing the Search Results feature. Inside it, go to Settings | Show Duplicate Links. Now go back to the library and search for the file that you were previously searching for.
  • 6.
    You will geta single file. But when you click on it, it will show some options including the View Duplicate Link. Click that. Finally, you will be able to see all the files that are duplicate or near duplicate. Optionally, you can choose to open each of them individually to check if they are duplicates or similar ones.
  • 7.
    SharePoint uses ahashing technique called Shingling and a document signature to determine if the file is a duplicate. The files that contain a bulk of content identical to each other are shown in the Search Results.
  • 8.
    • However, theproblem is that the similar files contain other data as well, which comes up in the Search Results as well. This leads to the problematic possibility where someone could simply delete all the files from the Search Results thinking of all of them as duplicates, whereas some were duplicates and some were similar ones.
  • 9.
    REMOVING DUPLICATES WITHA SOFTWARE PROGRAM Clone Files Checker offers the accuracy, speed and reliability that SharePoint users dreams about if they’re in the need to clean up a huge volume of duplicates. Clone Files Checker dives into the hash of every single file and brings up highly accurate results within moments.
  • 10.
    1. Download CloneFiles Checker from the official website and install it. 2. Launch the software and select the server files you want to scan. 3. You can include the files by selecting them through the Step 1 section.
  • 11.
    4.Step 2 isentirely optional and can be avoided. It offers you to select which file types will be scanned for or leave it to the default shape (All Files). You can also specify a file size range to ignore files that are small and/ or larger than to further helps narrow down the scan. 5.Next, click Start Search to initiate the scan.
  • 12.
    6. Once thescan results are out, you can choose the Fix Wizard option to choose between deleting files permanently or moving them to a folder of your choice. Or, you can click Review & Fix to get additional options to choose between selecting manually, selecting by file locations, selecting between most/ least modified besides the newest/ oldest option that is available in both the modes.
  • 13.
    7. Selecting PermanentDelete informs you of the presence of the backup option (optional) which can be enabled from the Settings area to act as a barrier against accidental data loss. Alternatively, selecting the Move to Folder option opens up a window from where you can select an existing folder or create a new one to move the files to. 8.That’s it. You’ve safely removed all Office 365 SharePoint duplicates in an instance.
  • 14.
    FINAL WORD Microsoft SharePointOffice 365 files are stored on the server folder. Therefore, Administrator access will be required to perform the duplicate cleanup by Clone Files Checker.