This document provides information about the 8th edition of the textbook "Financial Analysis with Microsoft Excel 2016" by Timothy R. Mayes. It includes the table of contents, preface, acknowledgments, and copyright information. The summary highlights that this document describes the 8th edition of a textbook on conducting financial analysis in Microsoft Excel 2016. It provides an overview of the book's content and organization through the table of contents and preface. The document also recognizes those involved in its publication.


![CHAPTER 2: The Basic Financial Statements
52
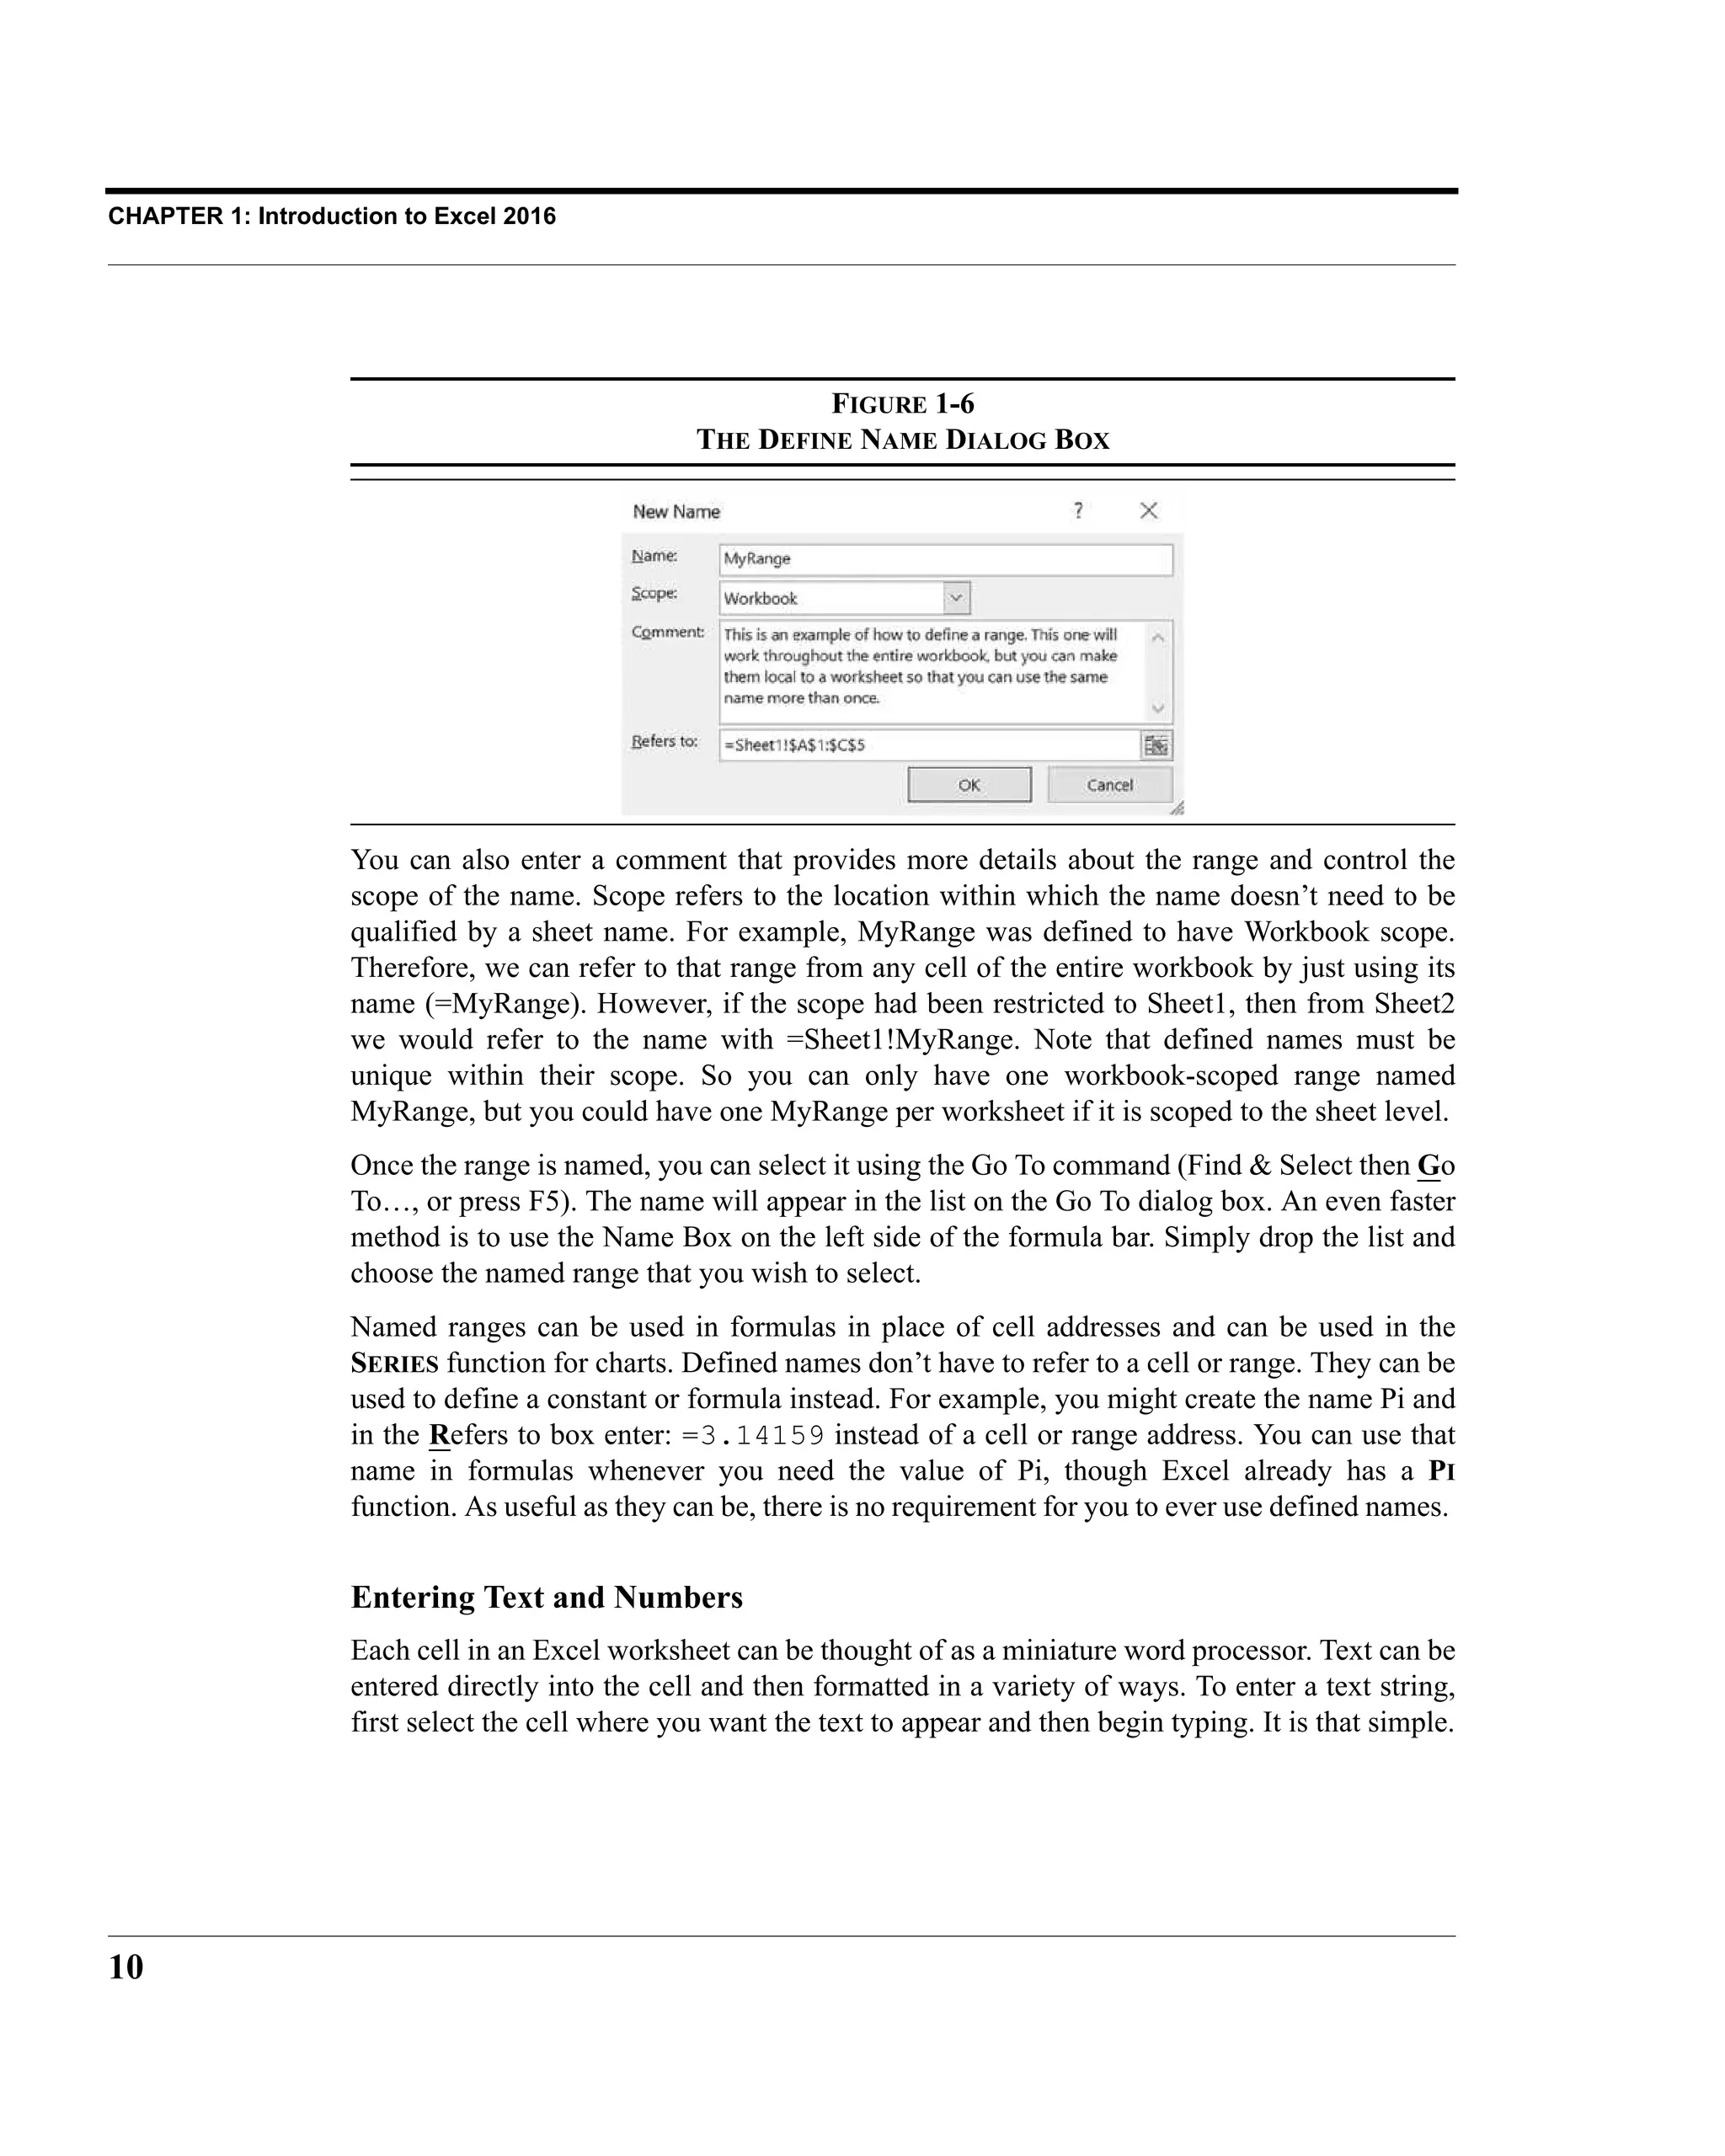
Common-Size Financial Statements
A technique widely used by financial analysts is to examine common-size financial
statements, which display the data not as dollar amounts, but as percentages. These
statements provide the analyst with two key benefits:
1. They allow for easy comparisons between firms of different sizes.
2. They can aid in spotting important trends, which otherwise might not be
obvious when looking at dollar amounts.
As we’ll see, common-size financial statements are easy to create and make it simple to
glean important insights that are not immediately obvious when looking at dollar amounts.
Creating Common-Size Income Statements
A common-size income statement is one that shows all of the data as a percentage of the
firm’s total revenues. Before beginning, remember that we want to make full use of Excel’s
capabilities to be as productive as possible. Instead of creating a new, blank worksheet and
retyping all of the labels, we will make a copy of the Income Statement worksheet. Right-
click on the sheet tab and choose Move or Copy… from the shortcut menu. To create a copy,
be sure to click on “Create a copy” at the bottom of the dialog box. Note that the copy can be
placed anywhere in the current workbook, in a new workbook, or any other open workbook.
Place it before the Balance Sheet workbook. Right-click on the sheet tab and rename the
worksheet to Common-Size Income Statement.
We now have a perfect copy of the income statement that we can convert into a common-
size income statement. The formulas that we use will reference data from the Income
Statement worksheet; so it is helpful to understand how these references are created. In order
for Excel to know where to get the data, it has to be told the location and name of the file, the
name of the worksheet, and the cell address. For example, a reference to a cell in another
workbook would look something like the following:
=C:'[File Name.xlsx]Sheet1'!A1
Notice that the path to the file is listed first, then the name of the file is in brackets. This
allows Excel to find the file on your computer. The file name is followed by the name of the
worksheet, then an exclamation point, and then the cell address. If the path, file name, or
worksheet name contains spaces, then everything after the equals sign and before the
exclamation point will be enclosed in single quotes. Fortunately, you won’t have to type all
of this. Instead, just type an equals sign and then switch to the appropriate worksheet and
click on the cell you want to reference. Excel will fill in all of the details. If the data in the
original worksheet changes, then the data will be updated automatically in the worksheet
with the reference.](https://image.slidesharecdn.com/financialanalysiswithmicrosoftexcel-240208030318-77e948d9/75/Financial-analysis-with-microsoft-excel-pdf-73-2048.jpg)


![251
Determining the Required Rate of Return
A Simple Risk Premium Model
An easy method of determining the required rate of return for a security can be derived by
assuming that the relationship pictured in Figure 9-1 is constant. If this is the case, then we
can define the expected rate of return for an asset as a base rate (y-axis intercept) plus a
premium that is based on the riskiness of the security. In equation form:
E(Ri) = Base Rate + Risk Premium
where E(Ri) is the expected rate of return for security i, the base rate is the rate of return on
some benchmark security, and the risk premium is subjectively determined (though it must
be greater than zero).
The problem with this model is that it is entirely subjective. Both the security chosen to provide
the base rate and the risk premium are defined by the individual using the model. For example,
one individual might choose the rate of return on bonds issued by his or her company as the base
rate, while another might choose the average rate paid on AAA-rated corporate bonds.
Furthermore, because of individual differences in risk preferences, each individual is likely to
assign a different value to the risk premium. Obviously, what is needed is a more objective
approach that applies to the entire market instead of just to individual investors if we are to
develop an explanation of security values.
CAPM: A More Scientific Model
The Capital Asset Pricing Model (CAPM) provides us with a more objective version of the
simple risk premium model for determining expected returns. For our purposes, we can
consider the CAPM to be a version of the simple risk premium model, with its inputs more
rigorously defined. The CAPM is given by (we will see how to derive this equation in
Chapter 13):
(9-2)
where Rf is the risk-free rate of interest, βi is a measure of the riskiness of security i relative
to the riskiness of the market portfolio, and E(Rm) is the expected rate of return on the
market portfolio.
In the CAPM, Rf serves as the base rate of interest. It is defined as the rate of return on a
security with zero risk. Sometimes Rf is referred to as the “pure time value of money,” or,
in other words, the rate of return earned for agreeing to delay consumption but not
accepting any risk. Because it is risk-free, we know Rf with certainty in advance.
Ordinarily, Rf is assumed to be the rate of return on a U.S. Treasury security with time to
maturity equal to the expected holding period of the security in question. Treasury
securities are chosen as a proxy for the theoretical risk-free rate because they are free of
default risk and are therefore the closest of all securities to being truly risk-free.
E Ri
( ) Rf βi E Rm
( ) Rf
–
[ ]
+
=](https://image.slidesharecdn.com/financialanalysiswithmicrosoftexcel-240208030318-77e948d9/75/Financial-analysis-with-microsoft-excel-pdf-272-2048.jpg)


![CHAPTER 9: Common Stock Valuation
254
EXHIBIT 9-2
EXPECTED RETURNS AND THE SECURITY MARKET LINE
Valuing Common Stocks
The first question to ask when attempting to value any security is, “What are the expected
cash flows?” In the case of common stocks, there are two types of cash flows: dividends and
the price received at the time of the sale. Consider the following problem:
Suppose that you are interested in purchasing shares of the common stock
of the XYZ Corporation. XYZ recently paid a dividend of $2.40, and you
expect that this dividend will continue to be paid into the foreseeable
future. Furthermore, you believe (for reasons that will become clear) that
you will be able to sell this stock in three years for $20 per share. If your
required return is 12% per year, what is the maximum amount that you
should be willing to pay for a share of XYZ common stock?
To clarify the problem, it helps to examine it in terms of a timeline as in Figure 9-3.
FIGURE 9-3
TIMELINE FOR XYZ COMMON STOCK
Calculating the value of this stock is a simple matter of calculating the present value of its
cash flows [equation (9-1)]. Given your required return of 12%, the intrinsic value must be:](https://image.slidesharecdn.com/financialanalysiswithmicrosoftexcel-240208030318-77e948d9/75/Financial-analysis-with-microsoft-excel-pdf-275-2048.jpg)


![CHAPTER 9: Common Stock Valuation
264
The declining growth rate complicates the model because we have to calculate each dividend
during the transition phase. The formula is:
(9-7)
where all variables are as defined earlier, and the transition phase goes from period n+1 to
n + T. Note that T is the length of the transition phase. The growth rates in the transition
are given by:
Because of the changing growth rates during the transition, this model is very difficult to use
in a spreadsheet without a user-defined function. Therefore, we have included one:
FAME_THREESTAGEVALUE(DIV1, REQRATE, GROWTHRATE1, GROWTHRATE2,
G1PERIODS, TRANSPERIODS)
where all arguments are the same as in the FAME_TWOSTAGEVALUE function, except for
TRANSPERIODS, which is the length of the transition phase.
Our spreadsheet already has all of the needed information, so we only need to add a label
and the calculation. In A12 enter the label: Three-Stage Value of Stock, and in B12
enter: =FAME_ThreeStageValue(B2*(1+B3),B8,B3,B5,B6,B7). The value
using this model is $13.38, slightly higher than the result of the three-step model.
The H-Model
Because of the complexity of the three-stage model (as well as the three-step model), Fuller
and Hsia developed the H-Model as an approximation.7
This model assumes that the growth
rate declines linearly from the first period to the beginning of the constant-growth phase.
The “H” in the name refers to the “halfway” point between now and the constant-growth
phase. Mathematically, the H-Model is given by:
(9-8)
where H is often substituted for the term.
7. R. J. Fuller and C.-C. Hsia, “A Simplified Common Stock Valuation Model,” Financial Analysts
Journal, September–October 1984, pp. 49–56.
VCS
D0 1 g1
+
( )
kCS g1
–
-------------------------
- 1
1 g1
+
1 kCS
+
----------------
-
⎝ ⎠
⎛ ⎞
n
–
Dt 1
– 1 gt
+
( )
1 kCS
+
( )
t
------------------------------
-
t n 1
+
=
n T
+
∑
Dn T
+ 1 g2
+
( )
kCS g2
–
( ) 1 kCS
+
( )
n T
+
-------------------------------------------------------
-
+ +
=
gt g1 g1 g2
–
( )
t n
–
( )
T
--------------
-
–
=
VCS
D0
kCS g2
–
------------------
- 1 g2
+
( ) n T 2
⁄
+
( ) g1 g2
–
( )
+
[ ]
=
n T 2
⁄
+
( )](https://image.slidesharecdn.com/financialanalysiswithmicrosoftexcel-240208030318-77e948d9/75/Financial-analysis-with-microsoft-excel-pdf-285-2048.jpg)
![265
Valuing Common Stocks
Note that equation (9-8) looks quite similar to the constant-growth equation (9-3). The
difference is that rather than using a single growth rate, the term in brackets in the H-Model
represents a factor by which the constant-growth model must be multiplied to account for
the higher initial growth rates.
It should be obvious that the average growth rate in the H-Model will be higher than the
average growth rate in the two-stage model. For this reason, the H-Model will always give a
somewhat higher valuation than the two-stage model. How much higher depends on the
length of the transition period. It will tend to be near the values given by the three-step and
three-stage models (sometimes higher, sometimes lower).
Let’s return to our example using Oviedo Paper, Inc. Recall that the growth rate will
transition from 15% to 8% over a three-year period. That makes the time in the first stage
five years (n), and the transition phase (T) equals three. Using equation (9-8), we find that
the value of the stock is:
As with the other models, we have written a user-defined function to do the calculations for
the H-Model. This function is defined as:
FAME_HModelValue(DIV1, REQRATE, GROWTHRATE1, GROWTHRATE2,
G1PERIODS,TRANSPERIODS)
All of the function’s arguments are the same as before. Note that even though equation (9-8)
uses D0, we have set up the function to ask for D1 for consistency with the other user-defined
functions.
In A13 enter: H-Model Value of Stock. In B13, use the Insert Function dialog box to
enter the function (note that you will have to scroll down in the dialog box to enter the last
argument). It is: =FAME_HModelValue(B2*(1+B3),B8,B3,B5,B6,B7). As you
can see in Exhibit 9-6, the three-year transition period adds $0.75 to the value of the stock as
compared to the two-stage model.
Ultimately, it’s important to remember that all of these common stock valuation models are nothing
more than present value functions. Each uses a different assumption about the growth pattern of
the dividends, but they are still present value calculations. When faced with a problem that
doesn’t fit the assumptions of any of these models, simply forecast the dividends in the future
using whatever growth assumptions are appropriate. Then, calculate the present value of the
future dividends using the NPV function. This is the method that was used to find the value of
ABC common stock in the example problem on page 256.
VCS
0.35
0.12 0.08
–
--------------------------
- 1.08 5 3 2
⁄
+
( ) 0.15 0.08
–
( )
+
[ ] 13.43
= =](https://image.slidesharecdn.com/financialanalysiswithmicrosoftexcel-240208030318-77e948d9/75/Financial-analysis-with-microsoft-excel-pdf-286-2048.jpg)


![277
Summary
Summary
The valuation process is important to both financial managers and investors. As we will see
in future chapters, understanding the valuation process is crucial to making sound financial
decisions.
In this chapter, we found that the value of a security depends on several factors:
• The size of the expected future cash flows
• The timing of the expected cash flows
• The perceived riskiness of the expected cash flows
Once the cash flows and required rate of return have been determined, we can value the
security by finding the present value of its future cash flows. We presented several dividend
discount models that differ only in the expected pattern of dividend growth. They all reduce
to the present value of future cash flows to the stockholders.
We also derived the earnings model, which is important because it shows that the firm must
make productive investments (ROE > k) in order to increase the stock price. The free cash
flow model shows that the value of the entire firm is the present value of the expected future
operating cash flows less expected investments.
Finally, we examined relative value models. These models do not rely (at least directly) on
the present value of future cash flows. Instead, they attempt to value a stock much like
houses are valued: by looking at “comparables” and then assuming that the valuation should
be similar, though some adjustments can be made.
TABLE 9-1
SELECTED FORMULAS USED IN THIS CHAPTER
Model Formula Page
Constant-growth
common stock
256
Two-stage
growth common
stock
260
H-Model
common stock
264
VCS
D0 1 g
+
( )
kCS g
–
-----------------------
-
D1
kCS g
–
----------------
-
= =
VCS
D0 1 g1
+
( )
kCS g1
–
-------------------------
- 1
1 g1
+
1 kCS
+
----------------
-
⎝ ⎠
⎛ ⎞
n
–
D0 1 g1
+
( )
n
1 g2
+
( )
kCS g2
–
------------------------------------------------
1 kCS
+
( )
n
------------------------------------------------
-
+
=
VCS
D0
kCS g2
–
------------------
- 1 g2
+
( ) n T 2
⁄
+
( ) g1 g2
–
( )
+
[ ]
=](https://image.slidesharecdn.com/financialanalysiswithmicrosoftexcel-240208030318-77e948d9/75/Financial-analysis-with-microsoft-excel-pdf-298-2048.jpg)


![371
Making the Decision
Excel has a built-in function to calculate the MIRR. The function is defined as:
MIRR(VALUES, FINANCE_RATE, REINVEST_RATE)
where VALUES is the range of cash flows, FINANCE_RATE is the required rate of return, and
REINVEST_RATE is the rate at which the cash flows are to be reinvested. To calculate the
MIRR in your Supreme Shoe worksheet, enter: =MIRR(D19:D24,B17,B17) into B30.
Exactly as we calculated earlier, the answer is 23.69%. In this example, we have used the
same rate for the required return and the reinvestment rate. This is normally the appropriate
assumption to make (it is the same assumption that is implicit within the NPV calculation).
But if you have other information that suggests a different reinvestment rate, then that
different rate should be used.
An alternative calculation method shows the relationship between the profitability index
(and therefore the NPV) and the MIRR:9
(12-4)
So, for this example we have:
This method will not give the same answer as Excel’s MIRR function if you have nonnormal
cash flows, given the way that we have defined PI [see equation (12-2) on page 365]. That is
because there is more than one methodology for calculating MIRR and PI when you have
cash outflows after the initial outlay. Excel calculates the MIRR by finding the discount rate
that equates the present value of the outflows to the future value of the cash inflows.
The methodology used in equation (12-4) is different from the one used by Excel. It finds the
discount rate that equates the initial outlay to the future value of all other cash flows,
regardless of the sign. This methodology, while different, is just as valid and is preferred by
some (your author included). Both methodologies will give the same accept/reject decision
(though different numbers for nonnormal cash flows), and this useful equation will always
give the same answer as Excel’s MIRR function when you have normal cash flows.
9. See T. Arnold and T. Nixon, “An Easy Method to Introduce MIRR into Introductory Finance,”
Advances in Financial Education, Vol 11 (2013), pp. 70–74.
MIRR PI
N 1 WACC
+
( ) 1
–
×
NPV
IO
-----------
- 1
+
⎝ ⎠
⎛ ⎞
N 1 WACC
+
( ) 1
–
×
= =
MIRR 1.4396
5 1.15 1
–
× 0.2369
= =](https://image.slidesharecdn.com/financialanalysiswithmicrosoftexcel-240208030318-77e948d9/75/Financial-analysis-with-microsoft-excel-pdf-392-2048.jpg)


![CHAPTER 16: Analyzing Datasets with Tables and Pivot Tables
500
EXHIBIT 16-4
PROSHARES ADVISORS ETFS IN TOP 10 PERFORMERS FOR 2013
(You can choose a different number in the dialog box, but 10 is the default.) This operation
results in only one fund being displayed, as seen in Exhibit 16-4. The reason that you don’t
see the top 10 ProShares funds is because multiple filters do not build upon each other. As
we will soon see, pivot tables can do this and much more.
Structured Referencing for Formulas in Tables
Unlike in an ordinary range, when you add a formula to a cell in a table it is automatically
extended to all other cells in the column. This is a great time saver, and it helps to ensure
consistency and avoid errors. If necessary you can override this default behavior, but most of
the time this is what you want.
Table formulas use a different style of cell referencing than the usual A1 style. Tables
typically use a structured reference, though you can still force the A1 style by typing cell
addresses directly. The advantage of structured referencing is primarily that it allows you to
easily refer to entire columns of data, to special items such as column headers, or to the totals
row. These formulas are also easier to understand as they use column header names in a way
that is similar to defined names (see page 9).
Creating a structured reference can be complex, but Excel helps by automatically creating
the references when you click on cells in the table while entering the formula. For example,
we might want to calculate the average of the expense ratios for all of the funds. Select a
blank cell outside of the table and enter: =AVERAGE(Table1[Expense Ratio]). Note
that we use the AVERAGE function as usual, but the range is specified using a structured
reference. The first part of the reference, Table1, specifies the name of the table from which
the data is to be obtained.4
The second part, [Expense Ratio], specifies the column to use.
The square brackets make it clear that we are using structured references as opposed to
standard references. By using structured references, the formula is easy to understand, and
the reference will automatically include new data as it gets added to the bottom of the table.
Let’s now create a calculated column in our table. A calculated column is a data field that
wasn’t included in the original data but is calculated using data in the table (or elsewhere).
Our formula will calculate the average return in 2016 for all funds in the same category as
4. Tables are automatically named Table1, Table2, and so on. You can rename them on the Design tab.
Note that table names must be unique within a workbook.](https://image.slidesharecdn.com/financialanalysiswithmicrosoftexcel-240208030318-77e948d9/75/Financial-analysis-with-microsoft-excel-pdf-521-2048.jpg)
![501
Using Get & Transform
the one in the current row. To do this, we need a function that will average only those items
that meet certain criteria. The AVERAGEIF function does exactly this and is defined as:
AVERAGEIF(RANGE, CRITERIA, AVERAGE_RANGE)
where RANGE is the range of cells to check against the CRITERIA, and AVERAGE_RANGE is
the range of cells to use in the calculation. If AVERAGE_RANGE is omitted, then the cells
in Range will be averaged. So, Range will refer to the entire column of fund categories,
Criteria will be the category of the fund in the current row, and Average_Range will be the
Total Return 2016 values. Using the traditional A1 referencing, the formula would be:
=AVERAGEIF($M$2:$M$989,M2,$W$2:$W$989). Since it uses absolute references,
this formula will only work until we add new data at the bottom of the table. However, if we
use structured referencing, the ranges will automatically expand if we add new data.
To create the formula using structured references, first insert a new column to the left of
column W. In W1, overwrite the default column header with Cat 2016 Return. In W2,
type: =AVERAGEIF([Category],[@Category],[Total Return 2016]). Again, you
don’t need to actually type the parts in square brackets, you can select the ranges or click the
cells and Excel will automatically enter the column names.
In this formula, [Category] tells Excel to use the entire range of categories (column M),
while [@Category] tells it to use just the single value in the current row. The @ sign is
interpreted to mean “this row.” Similarly, [Total Return 2016] refers to the entire column
because it lacks the @ sign. Note also that you don’t need to use the table name in the
reference because it is implicitly assumed to be in the same table as the formula. If you were
referencing data from outside of the table, then you would have to explicitly reference the
table name as we did in our first formula.
Structured referencing is a powerful tool, and we have just scratched the surface. You can
also use structured references to refer to special items such as the column headers, grand
totals, and more. Check Excel’s help for more information.
Using Get & Transform
Get & Transform provides a set of tools for querying data sources and then manipulating the
resulting data into a form that provides the data that you need. The queries and refinements
that you make to the data are saved as a series of steps (much like a macro) so that you can
refresh (or edit) them at any time. For example, in Chapter 10 (see page 298), we queried the
U.S. Treasury Web site to get the most recent yields so that we could create a yield curve.
Using the features in Get & Transform, we could have limited the query so that it only
returned the most recent data. We also could have divided the yields by 100 so that we didn’t](https://image.slidesharecdn.com/financialanalysiswithmicrosoftexcel-240208030318-77e948d9/75/Financial-analysis-with-microsoft-excel-pdf-522-2048.jpg)