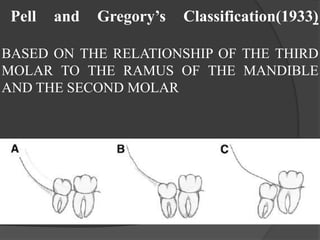
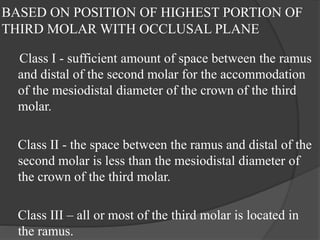
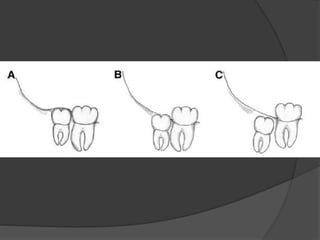
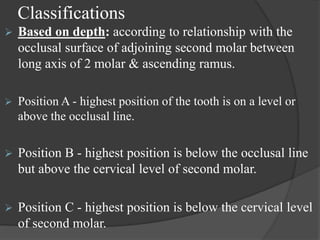
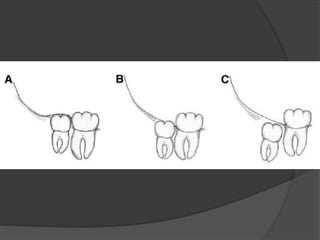
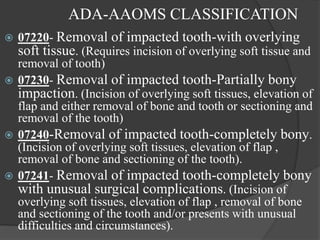
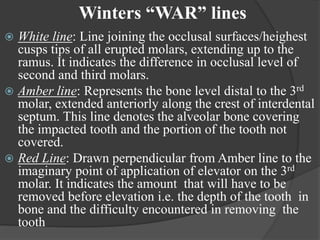
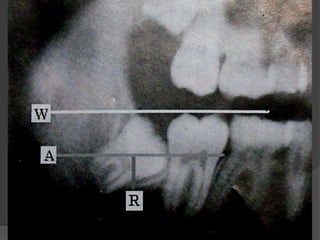
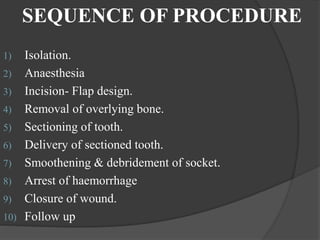
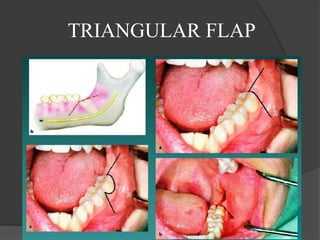
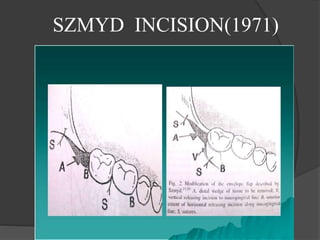
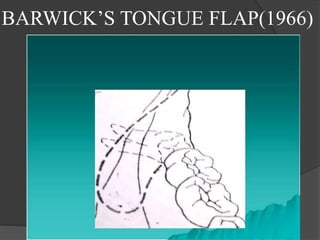
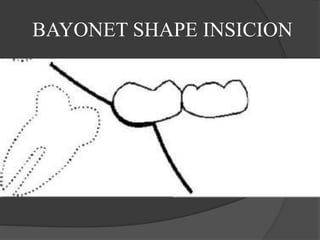
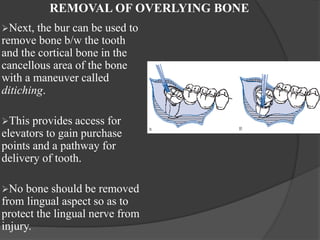
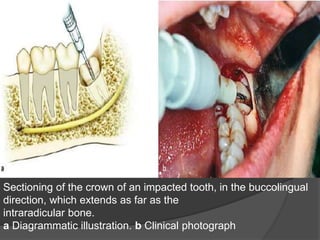
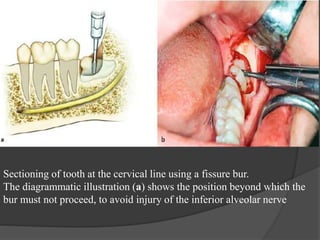
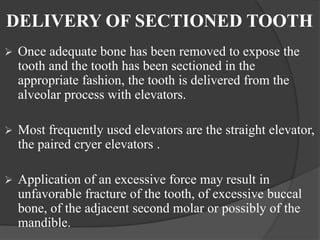
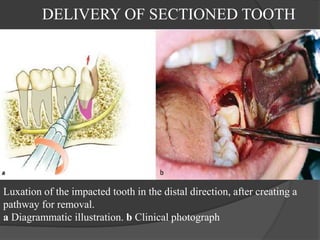
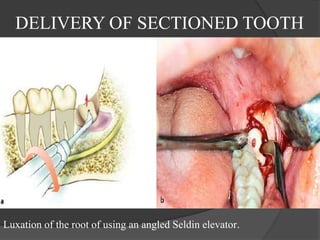
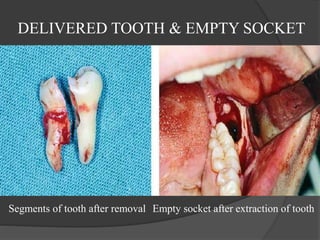
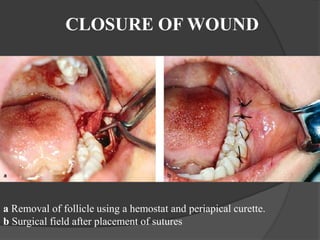
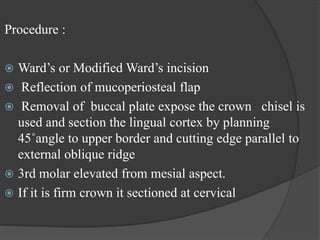
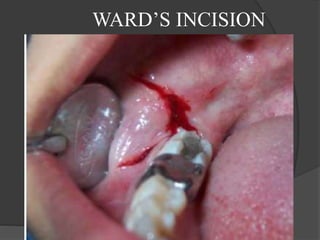
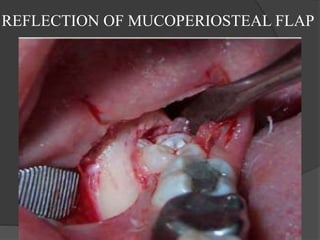
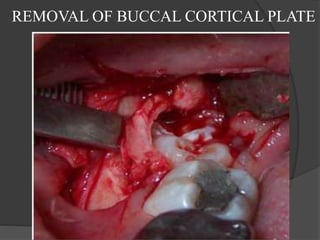
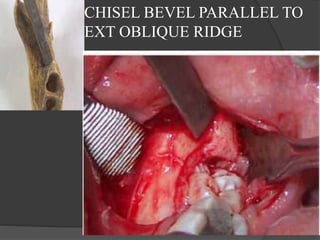
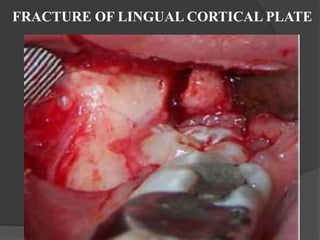
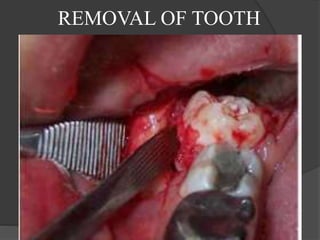
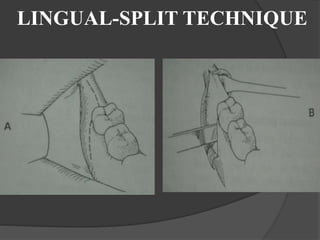
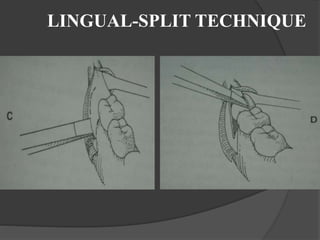
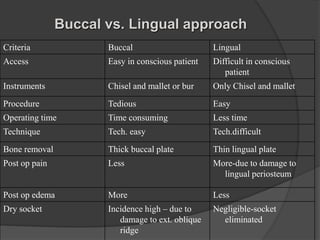
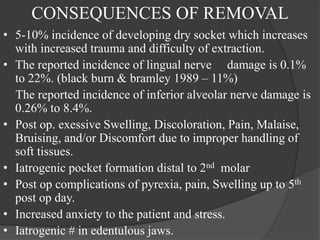
Contemporary philippine arts from the regions_PPT_Module_12 [Autosaved] (1).pptx
FINAL IMPACTED THIRD MOLARS.pptx
1. IMPACTED THIRD MOLAR
SURGERY &
COMPLICATIONS
Prof. Shadab Mohammad
Professor and Head,
Department of Oral and Maxillofacial Surgery,
Faculty Of Dental Sciences,
King George’s Medical University,
Lucknow,
India.
2. DEFINITIONS:
IMPACTED TOOTH
IMPACTED TOOTH IS DEFINED AS THE TOOTH WHICH HAS
ALREADY PASSED CHRONOLOGICALAGE OF ERUPTION
AND FAILED TO COME TO ORAL CAVITY INSPITE OF
NORMAL ERRUPTIVE FORCES DUE TO SOME
MECHANICAL OBSTRUCTION.
UNERUPTED TOOTH
A TOOTH THAT FAILS TO ERUPT DUE TO LOSS OF
ERUPTIVE FORCES.
3. Origin – Latin– Impactus
Impactus: Cessation of eruption caused by
physical barrier / ectopic eruption.
An impacted tooth is partially erupted or
unerupted tooth and is positioned against
another tooth , bone or soft tissue so that its
further eruption is unlikely and will not
eventually assume a normal arch relationship
with the other teeth or tissues
4. Cessation of eruption before gingival
emergence without a specific physical barrier
or ectopic positioning is called primary
retention, e.g. Endocrinal disturbances
Arrested eruption of tooth after initial
emergence without any obvious barrier is
called secondary retention,e.g. Ankylosed
tooth
5. CAUSES OF IMPACTION
LOCAL
Lack of Space b/w 2nd molar and ramus.
Overretained decidous teeth.
Ectopic position
Dilaceration of roots
Inclination of tooth
Associated soft tissue or bony pathology
Heredity
Endocrinal causes
7. CLASSIFICATIONS OF MANDIBULAR
THIRD MOLAR IMPACTION
Winter’s Classification (1926):
Based on angulations : according to the position of the
impacted third molar to the long axis of second molar
Mesioangular -45%
Horizontal - 10%
Vertical - 40%
Distoangular – 5%
These may occur simultaneously in:
Buccal version
Lingual version
Torsoversion
8.
9. WINTER’S SUB CLASSES
The angle between the occlusal plane or line parallel to it
and the longitudinal axis of the impacted third molar, in
turn, allowed objective classification of the third molars
within the Winter subclasses as follows
1. Third molars with negative angles (_0°) were considered
to be inverted
2. Third molars with an angle between 0° to 30° were
considered to be horizontal,
3. Third molars with an angle between 31° to 60° were
considered to be mesioangular,
4. Third molars with an angle between 61° to 90° were
considered to be vertical,
5. Third molars with an angle _90° were considered to be
distoangular.
10. Pell and Gregory’s Classification(1933)
BASED ON THE RELATIONSHIP OF THE THIRD
MOLAR TO THE RAMUS OF THE MANDIBLE
AND THE SECOND MOLAR
11. BASED ON POSITION OF HIGHEST PORTION OF
THIRD MOLAR WITH OCCLUSAL PLANE
Class I - sufficient amount of space between the ramus
and distal of the second molar for the accommodation
of the mesiodistal diameter of the crown of the third
molar.
Class II - the space between the ramus and distal of the
second molar is less than the mesiodistal diameter of
the crown of the third molar.
Class III – all or most of the third molar is located in
the ramus.
12.
13. Classifications
Based on depth: according to relationship with the
occlusal surface of adjoining second molar between
long axis of 2 molar & ascending ramus.
Position A - highest position of the tooth is on a level or
above the occlusal line.
Position B - highest position is below the occlusal line
but above the cervical level of second molar.
Position C - highest position is below the cervical level
of second molar.
14.
15. ADA-AAOMS CLASSIFICATION
07220- Removal of impacted tooth-with overlying
soft tissue. (Requires incision of overlying soft tissue and
removal of tooth)
07230- Removal of impacted tooth-Partially bony
impaction. (Incision of overlying soft tissues, elevation of
flap and either removal of bone and tooth or sectioning and
removal of the tooth)
07240-Removal of impacted tooth-completely bony.
(Incision of overlying soft tissues, elevation of flap ,
removal of bone and sectioning of the tooth).
07241- Removal of impacted tooth-completely bony
with unusual surgical complications. (Incision of
overlying soft tissues, elevation of flap , removal of bone
and sectioning of the tooth and/or presents with unusual
difficulties and circumstances).
16.
17. Winters “WAR” lines
White line: Line joining the occlusal surfaces/heighest
cusps tips of all erupted molars, extending up to the
ramus. It indicates the difference in occlusal level of
second and third molars.
Amber line: Represents the bone level distal to the 3rd
molar, extended anteriorly along the crest of interdental
septum. This line denotes the alveolar bone covering
the impacted tooth and the portion of the tooth not
covered.
Red Line: Drawn perpendicular from Amber line to the
imaginary point of application of elevator on the 3rd
molar. It indicates the amount that will have to be
removed before elevation i.e. the depth of the tooth in
bone and the difficulty encountered in removing the
tooth
18.
19. PEDERSON’S DIFFICULTY INDEX
Very difficult: 7 to 10
Moderataly difficult: 5 to 7
Minimally difficult: 3 to 4
Scoring
Mesio angular 1
Horizontal 2
Vertical 3
Distoangular 4
Level A 1
Level B 2
Level C 3
Class I 1
Class II 2
Class III 3
Large bulbous crown increases the difficulty
20. Criteria Category Score
Winters Classifications Horizontal 2
Distoangular 2
Mesioangular 1
Vertical 0
Height of mandible 1-30 mm 0
31-34 mm 1
35-39 mm 2
Angulation of 3rd molar 1-50 deg. 0
60-69 1
70-79 2
80-89 3
90+ 4
WHARFE’S ASSESSMENT
21. Root shape & development Complex 3 (more than 2/3 complete)
unFavourable curvature 2 (less than1/3 complete)
favourable Curvature 1
Follicals Normal 0
Possibly enlarged 1
Enlarged 2
Path of exit Space available 0
Distal cusps covered 1
Mesial cusps also covered 2
Both covered 3
TOTAL 33
WHARFE’S ASSESSMENT
22. SEQUENCE OF PROCEDURE
1) Isolation.
2) Anaesthesia
3) Incision- Flap design.
4) Removal of overlying bone.
5) Sectioning of tooth.
6) Delivery of sectioned tooth.
7) Smoothening & debridement of socket.
8) Arrest of haemorrhage
9) Closure of wound.
10) Follow up
24. Incision-flap design
Must be of adequate dimensions to allow adequate
exposure.
“Bone belongs to the patient and Tooth belongs to
you”
Three corner flap…….
32. BONE REMOVAL
BUR TECHNIQUE
(a)Postage stamp technique
(b)Moore and Gillby’s guttering technique
(c)Bowdler Henry’s Lateral trephination(1969)-for
germectomy,partialy formed and unerrupted third
molar(9-18 yr age)
CHIESEL AND MALLET
(a) through Buccal approach
(b) Lingual split technique
33. REMOVAL OF OVERLYING BONE
Once the soft tissue is elevated and retracted, the
surgeon must make a judgment concerning the amount
of bone to be removed.
Bone must be removed in an atraumatic, aseptic, and
non–heat-producing technique, with as little bone
removed and damaged as possible.
The amount of bone that must be removed varies with
the depth of impaction, the morphology of roots, and
the angulation of tooth.
The speed of micromotor should be 12000- 20000 rpm.
34. REMOVAL OF OVERLYING BONE
A large round bur ( No. 8 ) is desirable, because it is an
end cutting bur and can be effectively used for drilling
with a pushing motion.
The tip of a fissure bur ( No. 703 ) does not cut well,
but the edge rapidly removes bone and quickly sections
teeth when used in lateral direction.
The bone on the occlusal aspect of the tooth is removed
first to expose the crown of the tooth.
Then the cortical bone on the buccal aspect of the tooth
is removed down to cervical line.
35. Exposure of the crown of the tooth using a round bur.
a Diagrammatic illustration. b Clinical photograph
36. REMOVAL OF OVERLYING BONE
Next, the bur can be used to
remove bone b/w the tooth
and the cortical bone in the
cancellous area of the bone
with a maneuver called
ditiching.
This provides access for
elevators to gain purchase
points and a pathway for
delivery of tooth.
No bone should be removed
from lingual aspect so as to
protect the lingual nerve from
injury.
37. SECTIONING OF TOOTH
Reduces the amount of bone removal required prior to
elevation of tooth.
Reducing the risk of damage to the adjacent tooth.
Once sufficient amount of bone removed, the surgeon
should access the need to section the tooth.
The direction in which the impacted tooth should be
divided depends primarily on the angulation of the
impacted tooth & root curvature.
38. SECTIONING OF TOOTH
The sectioning can be performed with a bur or
chisel.
The bur is used by most surgeons, but if a chisel is
used it must be sharp.
When the bur is used, the tooth is sectioned three-
fourth of the way towards the lingual aspect.
A straight elevator is inserted into the slot made by
the bur and rotated to split the tooth.
39. Sectioning of the crown of an impacted tooth, in the buccolingual
direction, which extends as far as the
intraradicular bone.
a Diagrammatic illustration. b Clinical photograph
40. Sectioning of the distal portion of the crown of the impacted tooth
using a fissure bur.
a Diagrammatic illustration. b Clinical photograph
41. Sectioning of tooth at the cervical line using a fissure bur.
The diagrammatic illustration (a) shows the position beyond which the
bur must not proceed, to avoid injury of the inferior alveolar nerve
42. DELIVERY OF SECTIONED TOOTH
Once adequate bone has been removed to expose the
tooth and the tooth has been sectioned in the
appropriate fashion, the tooth is delivered from the
alveolar process with elevators.
Most frequently used elevators are the straight elevator,
the paired cryer elevators .
Application of an excessive force may result in
unfavorable fracture of the tooth, of excessive buccal
bone, of the adjacent second molar or possibly of the
mandible.
43. DELIVERY OF SECTIONED TOOTH
Luxation of the distal segment of the tooth with rotation of the elevator
distally.
a Diagrammatic illustration. b Clinical photograph
44. DELIVERY OF SECTIONED TOOTH
Luxation of the impacted tooth in the distal direction, after creating a
pathway for removal.
a Diagrammatic illustration. b Clinical photograph
45. DELIVERY OF SECTIONED TOOTH
Luxation of the root of using an angled Seldin elevator.
46. DELIVERED TOOTH & EMPTY SOCKET
Segments of tooth after removal Empty socket after extraction of tooth
47. SMOOTHENING & DEBRIDEMENT OF SOCKET
Attention must be given to debriding the wound of all
particulate bone chips and debris.
Wound should be irrigated with sterile saline, taking special care
to irrigate thoroughly under the reflected soft tissue flap.
Remove any remaining dental follicle and epithelium.
The bone file is used to smooth any sharp, rough edges of bone.
A final irrigation and a thorough inspection should be performed
before the wound is closed.
48. CLOSURE OF WOUND
The closure of the incision should be a primary closure.
The initial suture should be placed through the attached
tissue on the posterior aspect of the second molar.
Additional sutures are placed posteriorly from that
position and anteriorly through the papilla on the
mesial side of the second molar.
Usually three or four sutures are necessary to close an
envelope incision.
If a releasing incision was used, attention must be
directed to closing that portion of incision as well.
49. CLOSURE OF WOUND
a Removal of follicle using a hemostat and periapical curette.
b Surgical field after placement of sutures
50. LINGUAL-SPLIT TECHNIQUE
Described by Sir William Kelsey Fry (1933).
Later popularized by Terence G ward(1956)
Specially for lingually placed tooth.
Modified by Dr. Davis & Lewis in 1960
SURGICAL BASIS OF LINGUAL SPLIT TECHNIQUE
Whenever tooth is extracted
Lingual cortical plate is resorbed
51. Procedure :
Ward’s or Modified Ward’s incision
Reflection of mucoperiosteal flap
Removal of buccal plate expose the crown chisel is
used and section the lingual cortex by planning
45˚angle to upper border and cutting edge parallel to
external oblique ridge
3rd molar elevated from mesial aspect.
If it is firm crown it sectioned at cervical
61. Criteria Buccal Lingual
Access Easy in conscious patient Difficult in conscious
patient
Instruments Chisel and mallet or bur Only Chisel and mallet
Procedure Tedious Easy
Operating time Time consuming Less time
Technique Tech. easy Tech.difficult
Bone removal Thick buccal plate Thin lingual plate
Post op pain Less More-due to damage to
lingual periosteum
Post op edema More Less
Dry socket Incidence high – due to
damage to ext. oblique
ridge
Negligible-socket
eliminated
Buccal vs. Lingual approach
62. CONSEQUENCES OF REMOVAL
• 5-10% incidence of developing dry socket which increases
with increased trauma and difficulty of extraction.
• The reported incidence of lingual nerve damage is 0.1%
to 22%. (black burn & bramley 1989 – 11%)
The reported incidence of inferior alveolar nerve damage is
0.26% to 8.4%.
• Post op. exessive Swelling, Discoloration, Pain, Malaise,
Bruising, and/or Discomfort due to improper handling of
soft tissues.
• Iatrogenic pocket formation distal to 2nd molar
• Post op complications of pyrexia, pain, Swelling up to 5th
post op day.
• Increased anxiety to the patient and stress.
• Iatrogenic # in edentulous jaws.
63. Mandible fracture
Alveolar Process Fracture
the lingual plate, alveolar plate, buccal cortical plate, palatal
cortical plate, and labial cortical plate(s) may fracture during
procedure.
64. -Secondary Infection
About 1 or 2 %
Signs of infection include fever above 100 degrees, abnormal swelling,
pain or a salty or prolonged bad taste, with or without evidence of
discharge from the surgical site.
-Injury to Adjacent Teeth
any fillings, crowns, bridges adjacent tooth
etc.
-Displacement of Root Fragments into adjacent facial spaces or
may be swallowed or aspirated
Exessive bleeding.
Trismus
Dislocation