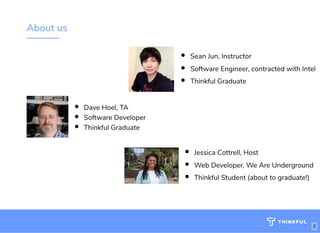
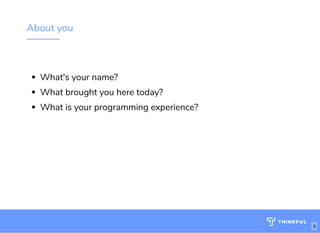
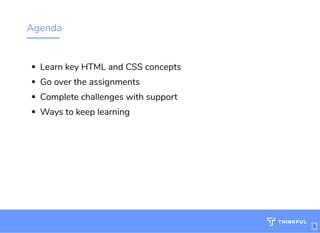
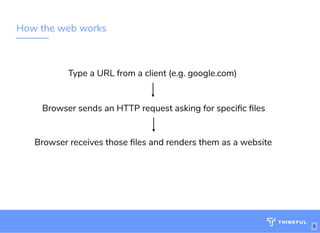
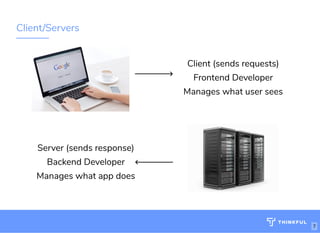
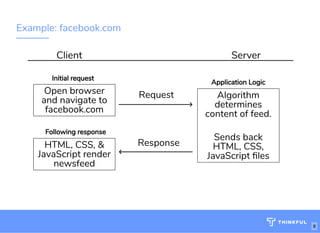
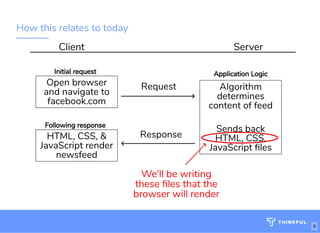
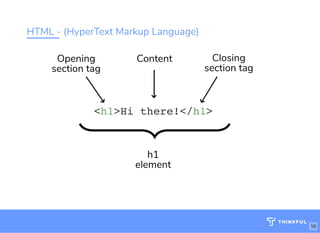
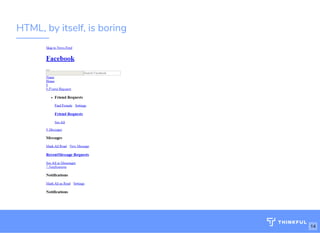
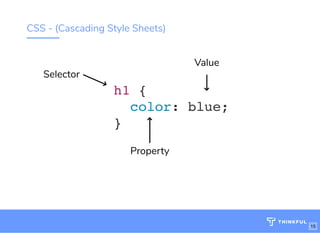
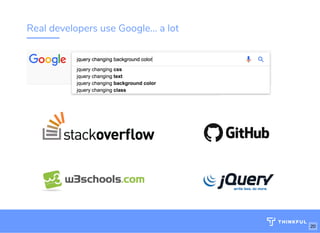
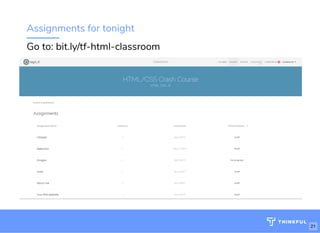
Frontend Crash Course:Frontend Crash Course:
HTML & CSSHTML & CSS
March 2018
bit.ly/frontend-phxbit.ly/frontend-phx
codepen.io
1
Welcome to "Frontend Crash Course" sponsored by Thinkful. The Wi-Fi network is X and the password is Y The
website for this class is Z.
Speaker notes
About us
Dave Hoel, TA
Software Developer
Thinkful Graduate
Sean Jun, Instructor
Software Engineer, contracted with Intel
Thinkful Graduate
Jessica Cottrell, Host
Web Developer, We Are Underground
Thinkful Student (about to graduate!)
2
I’m _______. I’m a ___________. Here with me today are my assistants ______________.
Speaker notes
About you
What's your name? 
What brought you here today?
What is your programming experience?
3
So now I'd like to go around the room and hear about each of you. If you could tell us your name, and share what
brought you here today, and what your programming experience is, and it's totally okay if it's nothing at all, you are
exactly who we've designed this workshop for.
Speaker notes
About Thinkful
We train developers and data scientists through
1x1 mentorship and project-based learning.
 
Guaranteed.
4
Agenda
Learn key HTML and CSS concepts 
Go over the assignments 
Complete challenges with support 
Ways to keep learning
5
Here’s our agenda for tonight. First, I’ll talk about conceptually how the web works and how that relates to our code
tonight. Then I’ll go over the fundamentals of the code you’ll be writing to complete the challenges we’re going to
give you. Then I’ll show you where the assignments are located and go over the first one with you. Then for the
bulk of the night, you will have the opportunity to code on your own, using myself and the TA’s as needed to assist
with completing the assignments. Then I'll turn it back over to Shannon to go over some next steps for learning.
Speaker notes
How the web works
Type a URL from a client (e.g. google.com)
Browser sends an HTTP request asking for speci c les
Browser receives those les and renders them as a website
6
On a basic level, the web works through communication between a browser like google chrome and a server. The
user enters a web address like google.com into a browser and hits enter. Then the browser sends a request to the
server that has the files for google.com on it. And the server sends back those files to the browser to load.
Speaker notes
Client/Servers
Client (sends requests)
Frontend Developer
Manages what user sees
Server (sends response)
Backend Developer
Manages what app does
7
A browser, also called the client, can be anything that connects to the internet. Your laptop, your phone, all those
things are clients. They’re responsible for sending requests and loading the pages from files sent back from the
server. It manages what the app looks like. This is the responsibility of a frontend developer. The server holds all
those files. Its job is to shoot specific files to the client based on its requests. It manages what the app actually does
and is the responsibility of the backend developer
Speaker notes
Example: facebook.com
Client Server
Open browser
and navigate to
facebook.com
HTML, CSS, &
JavaScript render
newsfeed
Request
Response
8
Algorithm
determines
content of feed.
 
Sends back
HTML, CSS,
JavaScript les
Application Logic
Initial request
Following response
Let's break it down with an example. Let's say I log into facebook. When I try to go to that page, my computer is
going to send a request to facebook’s server. Facebook’s server is going to look at that request and think, “okay,
what should I send back to ${your name}’s computer?” Its going to look through my friend’s posts and determine
using an algorithm what’s most important to put in my feed. Then it’ll send all that info, including the files to display
the info, to my computer. My computer will then read and interpret those files and display the information on my
screen.
Speaker notes
How this relates to today
Client Server
Open browser
and navigate to
facebook.com
HTML, CSS, &
JavaScript render
newsfeed
Request
9
Response
Algorithm
determines
content of feed
 
Sends back
HTML, CSS,
JavaScript les
Application LogicInitial request
Following response
We'll be writing
these les that the
browser will render
We’ll be writing the HTML and CSS files that the server is sending back to the client to load.
Speaker notes
HTML - (HyperText Markup Language)
<h1>Hi there!</h1>
ContentOpening
section tag
h1
element
Closing
section tag
bit.ly/website-la
10
HTML stands for Hypertext Markup Language and is used to create the structure of a website. It can create
hundreds of sections on a page that all have different purposes. Each of these sections is called an element. This is
the most basic form of an element. You have the opening tag, which tells you which type of element it is (h1 stands
for Header 1, so this is a header tag that will be the largest header on the page. h2 would be the next smaller, h3
would be smaller than h2, and so on). The opening tag essentially tells the computer what to do to the content.
Then you have the content. Then you have the closing tag, in which the type will match the opening tag, and you'll
put a forward slash in front of it.
Speaker notes
HTML - (HyperText Markup Language)
<h1 class="intro">Hi there!</h1>
Attribute
Opening
section tag
h1
element
Closing
section tag
bit.ly/website-la
11
You can also add other commands inside the opening tag, we call these "attributes". An attribute is a way to
identify a specific element so we can refer to that element elsewhere in our code. Here our attribute is called
"class". Class is used to create a label for an element that we can refer back to elsewhere in our code. In this
case, we set the class attribute to "intro". We can use "intro" to refer to this specific element, which we will do when
we get to CSS.
Speaker notes
HTML - structure
<html>
<body>
<h1 class="title">Hello world!</h1>
</body>
</html>
bit.ly/website-la
12
This is the typical structure of a html file. Every file will start with an html tag, creating an html element, and inside
that will be other elements like the body element. Everything inside the body element will actually show up on the
page, like this h1 tag.
Speaker notes
HTML tags, elements, attributes
13
Notes for Slide 13:
HTML end code:
Hey, I'm ${your name}Hey, I'm ${your name}
This is a different header tag:
Hey, I'm ${your name} alsoHey, I'm ${your name} also
This is a link, property is hypertext reference:
Put elements inside each other:
This is a paragraph
Tell them they don't need to know all the tags!
Speaker notes
Google
I’m going to show you a few different elements and explain how they work. First we have our basic h1 element
that’s displaying “Hey, I’m ${your name}”. We can use a different element if we wanted to change the size of our
header, an h2 element, like this (write out
Hey, I’m ${your name} tooHey, I’m ${your name} too
). This makes another element on our page and uses the rules associated with that element to display the text.
Another really common element is the anchor tag. Anytime you’ve ever seen a link on a page that sends you to
another page on the internet, chances are that that link is an anchor tag. Anchor tags are special because, for them
to work, we need to have an attribute called href which stands for hypertext reference. We can make a link using an
anchor tag, like this (write Google) then we write our closing tag (write ). Another important tag is the div tag. A div
tag doesn’t really show up on the screen until you style it to show up, which I’ll show you in a second, but it's used
to create sections on the page that other elements can go inside of. For example, we can make a div tag and then
put a paragraph inside that div element (write
This is a paragraph
) then we close it. I wanted to show you that so you know that you can put elements inside other elements. I’ll
explain the benefits of that in just a bit.
HTML, by itself, is boring
14
HTML by itself looks like this. It's just the structure and content of the page. This is a screenshot of facebook after I
removed all the CSS files from the page. I’m going to go over the basics of CSS that would allow us to improve
upon this plain structure.
Speaker notes
CSS - (Cascading Style Sheets)
h1 {
color: blue;
}
Value
Property
Selector
bit.ly/website-la
15
CSS, cascading style sheets, are rulesets that use the class labels and change how the elements look. In order to
do that, we have to target the element we want to change. In this example, we’re targeting h1 elements. Everything
inside the curly brackets are the properties that will be changed. (...)
Speaker notes
CSS selectors, properties, values
16
Going back to our html, I’ll show you a few properties you can manipulate to change what the page looks like. First,
we’ll use the code from that example and say h1 and set the color to blue (write h1 { color: blue; }). Make sure to
always end your property value statements with a semi-colon. Now, if I didn’t want to change all the h1 elements,
but only a specific one, I would need to somehow target that specific element by using its class name. So let’s give
this h2 a class of purple (write class=”purple”), then make a rule set in the CSS area for purple (write .purple {
color:purple;}). We’re targeting a class here, not an element, so in CSS we have to put a period before the name of
the class to tell the computer we’re talking about a class. Next, let's change up our link. We already have an
attribute for our link, href, but HTML allows us to set as many attributes as we want inside out opening tag. So lets
give our anchor tag a class of link (write class=”link”) and now we can change how the link looks. The default look
of a link is blue with an underline under it. But maybe that’s not really how we want links to look on our site. So let's
change the color from blue to yellow. In our CSS we write out the class name then set the property color to yellow
(write .link { color: yellow;}). But, I also don’t really want this underline here. I want my link to look just like text, but
yellow. So how do I remove that underline? Well, let's pretend I completely forgot what that property is to remove
the underline. This is where a developer’s most powerful tool comes in: Google. I’m going to go to google and I’ll
look up how to remove an underline (google how to remove underline css). And I want to put CSS at the end to
help google narrow down my searches. Okay, so lets try the first link. This is w3schools, a fantastic resource for
looking up answers about coding. Lets just do a quick find on the page for underline and here we go. This says I
can use the property text-decoration to manipulate my underline and I would just set the value to none. Let's try
that. (write text-decoration: none;) And there we go. Now my links don’t have underlines. Now the next thing I’d like
to explain are is the div. Like I said before, the div acts like a section on the page that separates elements. So first,
let's give the div some space on the page so you can see how we can use it to create sections. I’ll give it a
background color (write div {background-color: red;}) and then I can also set values for size of the div. I’m going to
set the height of the div (write height: 100px;). Now we’ve made a section. This is the div element that has the
paragraph element inside of it, but we can still move the paragraph element around inside the div. Let’s give the
paragraph a class (write class=”indented”) then use that class to target the paragraph and make it move to the
Speaker notes
center of the div. We can do that using a property called text-align (write .indented { text-align:center;}) Now the
paragraph is moved to the center of the div. Any questions.
Notes for slide 16:
CSS end code:
Use example to change color:
Hey, I'm ${your name}Hey, I'm ${your name}
h1 {
color: blue;
}
Class name instead of element name:
Hey, I'm ${your name} also
.purple {
color: purple;
}
Multiple attributes: have them Google!!
.link {
color: yellow;
text-decoration: none;
}
Google
We can position text
This is a paragraph
.centered {
text-align: center;
}
CSS has lots of properties and values
p {
color: #CCCCCC;
font-family: helvetica;
border: 5px solid blue;
}
div {
background-image: url("imageFile.jpg");
width: 50%;
height: 70%;
}
.loginButton {
border: none;
background-color: rgba(34, 124, 45, 0.5);
}
Lots of properties:
www.htmldog.com/references/css/properties/
17
CSS has lots of properties and each of those has certain values that they can be given. These are just a few
examples. For instance, color can we set with keywords that the browser recognizes, or it can be set with hex
codes like this one that consist of letters and numbers allowing for more specific shades of colors. You can also use
rgb colors like here. We can set font type using font-family. You can see width and height to pixels or percentages.
For a full list of them, feel free to go to this website or just google what you’re looking for and chances are you’ll find
it.
Speaker notes
Margin, border, and padding
18
CSS also allows us to size and shape our elements. You can think of HTML elements as boxes on the screen.
These boxes have a couple different ways of being moved around the screen and sized. Going from inner-most to
outer-most, there’s width and height, padding, the border of the box, and then margin.
Speaker notes
Margin, border, and padding
19
Here, I have a div with a red background and with a paragraph inside of it. I’m going to use those sizing properties
to show you how to manipulate the div around the paragraph. The first is width and height. I can set the height to
300 pixels and the div fills up more on the page (write height: 300px;). “Px” the way of writing pixels in CSS. You
could also use percentages if you wanted to. One level up from that is padding. You can set padding to pixels or
percentages as well. I’ll set the padding for this div to 20px (write padding: 20px;). Notice how the paragraph moves
away from the edge of the div its inside. I created padding between the content of the div and the edge of it. Then
we have borders. We can use the border property to change our div’s border. Border takes three values inside it. Its
needs the width of the border, the type of border, and the color. Let’s go ahead and make the border 10 pixels,
solid, and black (write border: 10px solid black;). Now our div has a thickened border around it. The last sizing
property is margin. You can think of margin just like the margin on a piece of paper you print out. Generally those
have a 1 inch default margin. Lets add a margin of 30 pixels (write margin: 30px;). Notice how the edge of the div
now has space between it and the edge of the webpage.
Code:
.redbackground {
background-color: red;
height: 300px;
padding: 20px;
border: 10px solid black;
margin: 30px;
}
.centered {
text-align: center;
Speaker notes
}
Real developers use Google... a lot
20
Google is one of your most valuable tools as a developer. Finding the solution to a new problem through research
is a very common task of a real developer. I encourage you to, if you’re unsure of how to solve a problem, to google
a question and look for an answer. If you encounter a problem, it more than likely that another developer has had
the same problem and have posted it online.
Speaker notes
Assignments for tonight
Go to: bit.ly/tf-html-classroom
21
Here is the link to the assignments. Once you open it, sign up for repl.it and then click on the classroom on the left.
Work through these challenges as best you can. Make sure to google things you’re unsure on and if you’re stuck,
we’re here to help you out. Don’t hesitate to ask!
Speaker notes
22
Thinkful's free course
75+ hours of curriculum for two weeks
HTML, CSS and JavaScript
Unlimited mentor-led Q&A sessions
Personal Program Manager
bit.ly/freetrial-webdevbit.ly/freetrial-webdev
Thinkful Coding Prep Course
$1500 FREE
23

Fccwc326

  • 1.
    Frontend Crash Course:FrontendCrash Course: HTML & CSSHTML & CSS March 2018 bit.ly/frontend-phxbit.ly/frontend-phx codepen.io 1
  • 2.
    Welcome to "FrontendCrash Course" sponsored by Thinkful. The Wi-Fi network is X and the password is Y The website for this class is Z. Speaker notes
  • 3.
    About us Dave Hoel,TA Software Developer Thinkful Graduate Sean Jun, Instructor Software Engineer, contracted with Intel Thinkful Graduate Jessica Cottrell, Host Web Developer, We Are Underground Thinkful Student (about to graduate!) 2
  • 4.
    I’m _______. I’ma ___________. Here with me today are my assistants ______________. Speaker notes
  • 5.
    About you What's yourname?  What brought you here today? What is your programming experience? 3
  • 6.
    So now I'dlike to go around the room and hear about each of you. If you could tell us your name, and share what brought you here today, and what your programming experience is, and it's totally okay if it's nothing at all, you are exactly who we've designed this workshop for. Speaker notes
  • 7.
    About Thinkful We traindevelopers and data scientists through 1x1 mentorship and project-based learning.   Guaranteed. 4
  • 8.
    Agenda Learn key HTMLand CSS concepts  Go over the assignments  Complete challenges with support  Ways to keep learning 5
  • 9.
    Here’s our agendafor tonight. First, I’ll talk about conceptually how the web works and how that relates to our code tonight. Then I’ll go over the fundamentals of the code you’ll be writing to complete the challenges we’re going to give you. Then I’ll show you where the assignments are located and go over the first one with you. Then for the bulk of the night, you will have the opportunity to code on your own, using myself and the TA’s as needed to assist with completing the assignments. Then I'll turn it back over to Shannon to go over some next steps for learning. Speaker notes
  • 10.
    How the webworks Type a URL from a client (e.g. google.com) Browser sends an HTTP request asking for speci c les Browser receives those les and renders them as a website 6
  • 11.
    On a basiclevel, the web works through communication between a browser like google chrome and a server. The user enters a web address like google.com into a browser and hits enter. Then the browser sends a request to the server that has the files for google.com on it. And the server sends back those files to the browser to load. Speaker notes
  • 12.
    Client/Servers Client (sends requests) FrontendDeveloper Manages what user sees Server (sends response) Backend Developer Manages what app does 7
  • 13.
    A browser, alsocalled the client, can be anything that connects to the internet. Your laptop, your phone, all those things are clients. They’re responsible for sending requests and loading the pages from files sent back from the server. It manages what the app looks like. This is the responsibility of a frontend developer. The server holds all those files. Its job is to shoot specific files to the client based on its requests. It manages what the app actually does and is the responsibility of the backend developer Speaker notes
  • 14.
    Example: facebook.com Client Server Openbrowser and navigate to facebook.com HTML, CSS, & JavaScript render newsfeed Request Response 8 Algorithm determines content of feed.   Sends back HTML, CSS, JavaScript les Application Logic Initial request Following response
  • 15.
    Let's break itdown with an example. Let's say I log into facebook. When I try to go to that page, my computer is going to send a request to facebook’s server. Facebook’s server is going to look at that request and think, “okay, what should I send back to ${your name}’s computer?” Its going to look through my friend’s posts and determine using an algorithm what’s most important to put in my feed. Then it’ll send all that info, including the files to display the info, to my computer. My computer will then read and interpret those files and display the information on my screen. Speaker notes
  • 16.
    How this relatesto today Client Server Open browser and navigate to facebook.com HTML, CSS, & JavaScript render newsfeed Request 9 Response Algorithm determines content of feed   Sends back HTML, CSS, JavaScript les Application LogicInitial request Following response We'll be writing these les that the browser will render
  • 17.
    We’ll be writingthe HTML and CSS files that the server is sending back to the client to load. Speaker notes
  • 18.
    HTML - (HyperTextMarkup Language) <h1>Hi there!</h1> ContentOpening section tag h1 element Closing section tag bit.ly/website-la 10
  • 19.
    HTML stands forHypertext Markup Language and is used to create the structure of a website. It can create hundreds of sections on a page that all have different purposes. Each of these sections is called an element. This is the most basic form of an element. You have the opening tag, which tells you which type of element it is (h1 stands for Header 1, so this is a header tag that will be the largest header on the page. h2 would be the next smaller, h3 would be smaller than h2, and so on). The opening tag essentially tells the computer what to do to the content. Then you have the content. Then you have the closing tag, in which the type will match the opening tag, and you'll put a forward slash in front of it. Speaker notes
  • 20.
    HTML - (HyperTextMarkup Language) <h1 class="intro">Hi there!</h1> Attribute Opening section tag h1 element Closing section tag bit.ly/website-la 11
  • 21.
    You can alsoadd other commands inside the opening tag, we call these "attributes". An attribute is a way to identify a specific element so we can refer to that element elsewhere in our code. Here our attribute is called "class". Class is used to create a label for an element that we can refer back to elsewhere in our code. In this case, we set the class attribute to "intro". We can use "intro" to refer to this specific element, which we will do when we get to CSS. Speaker notes
  • 22.
    HTML - structure <html> <body> <h1class="title">Hello world!</h1> </body> </html> bit.ly/website-la 12
  • 23.
    This is thetypical structure of a html file. Every file will start with an html tag, creating an html element, and inside that will be other elements like the body element. Everything inside the body element will actually show up on the page, like this h1 tag. Speaker notes
  • 24.
    HTML tags, elements,attributes 13
  • 25.
    Notes for Slide13: HTML end code: Hey, I'm ${your name}Hey, I'm ${your name} This is a different header tag: Hey, I'm ${your name} alsoHey, I'm ${your name} also This is a link, property is hypertext reference: Put elements inside each other: This is a paragraph Tell them they don't need to know all the tags! Speaker notes Google
  • 26.
    I’m going toshow you a few different elements and explain how they work. First we have our basic h1 element that’s displaying “Hey, I’m ${your name}”. We can use a different element if we wanted to change the size of our header, an h2 element, like this (write out Hey, I’m ${your name} tooHey, I’m ${your name} too ). This makes another element on our page and uses the rules associated with that element to display the text. Another really common element is the anchor tag. Anytime you’ve ever seen a link on a page that sends you to another page on the internet, chances are that that link is an anchor tag. Anchor tags are special because, for them to work, we need to have an attribute called href which stands for hypertext reference. We can make a link using an anchor tag, like this (write Google) then we write our closing tag (write ). Another important tag is the div tag. A div tag doesn’t really show up on the screen until you style it to show up, which I’ll show you in a second, but it's used to create sections on the page that other elements can go inside of. For example, we can make a div tag and then put a paragraph inside that div element (write This is a paragraph ) then we close it. I wanted to show you that so you know that you can put elements inside other elements. I’ll explain the benefits of that in just a bit.
  • 27.
    HTML, by itself,is boring 14
  • 28.
    HTML by itselflooks like this. It's just the structure and content of the page. This is a screenshot of facebook after I removed all the CSS files from the page. I’m going to go over the basics of CSS that would allow us to improve upon this plain structure. Speaker notes
  • 29.
    CSS - (CascadingStyle Sheets) h1 { color: blue; } Value Property Selector bit.ly/website-la 15
  • 30.
    CSS, cascading stylesheets, are rulesets that use the class labels and change how the elements look. In order to do that, we have to target the element we want to change. In this example, we’re targeting h1 elements. Everything inside the curly brackets are the properties that will be changed. (...) Speaker notes
  • 31.
  • 32.
    Going back toour html, I’ll show you a few properties you can manipulate to change what the page looks like. First, we’ll use the code from that example and say h1 and set the color to blue (write h1 { color: blue; }). Make sure to always end your property value statements with a semi-colon. Now, if I didn’t want to change all the h1 elements, but only a specific one, I would need to somehow target that specific element by using its class name. So let’s give this h2 a class of purple (write class=”purple”), then make a rule set in the CSS area for purple (write .purple { color:purple;}). We’re targeting a class here, not an element, so in CSS we have to put a period before the name of the class to tell the computer we’re talking about a class. Next, let's change up our link. We already have an attribute for our link, href, but HTML allows us to set as many attributes as we want inside out opening tag. So lets give our anchor tag a class of link (write class=”link”) and now we can change how the link looks. The default look of a link is blue with an underline under it. But maybe that’s not really how we want links to look on our site. So let's change the color from blue to yellow. In our CSS we write out the class name then set the property color to yellow (write .link { color: yellow;}). But, I also don’t really want this underline here. I want my link to look just like text, but yellow. So how do I remove that underline? Well, let's pretend I completely forgot what that property is to remove the underline. This is where a developer’s most powerful tool comes in: Google. I’m going to go to google and I’ll look up how to remove an underline (google how to remove underline css). And I want to put CSS at the end to help google narrow down my searches. Okay, so lets try the first link. This is w3schools, a fantastic resource for looking up answers about coding. Lets just do a quick find on the page for underline and here we go. This says I can use the property text-decoration to manipulate my underline and I would just set the value to none. Let's try that. (write text-decoration: none;) And there we go. Now my links don’t have underlines. Now the next thing I’d like to explain are is the div. Like I said before, the div acts like a section on the page that separates elements. So first, let's give the div some space on the page so you can see how we can use it to create sections. I’ll give it a background color (write div {background-color: red;}) and then I can also set values for size of the div. I’m going to set the height of the div (write height: 100px;). Now we’ve made a section. This is the div element that has the paragraph element inside of it, but we can still move the paragraph element around inside the div. Let’s give the paragraph a class (write class=”indented”) then use that class to target the paragraph and make it move to the Speaker notes
  • 33.
    center of thediv. We can do that using a property called text-align (write .indented { text-align:center;}) Now the paragraph is moved to the center of the div. Any questions. Notes for slide 16: CSS end code: Use example to change color: Hey, I'm ${your name}Hey, I'm ${your name} h1 { color: blue; } Class name instead of element name: Hey, I'm ${your name} also .purple { color: purple; } Multiple attributes: have them Google!! .link { color: yellow; text-decoration: none; } Google
  • 34.
    We can positiontext This is a paragraph .centered { text-align: center; }
  • 35.
    CSS has lotsof properties and values p { color: #CCCCCC; font-family: helvetica; border: 5px solid blue; } div { background-image: url("imageFile.jpg"); width: 50%; height: 70%; } .loginButton { border: none; background-color: rgba(34, 124, 45, 0.5); } Lots of properties: www.htmldog.com/references/css/properties/ 17
  • 36.
    CSS has lotsof properties and each of those has certain values that they can be given. These are just a few examples. For instance, color can we set with keywords that the browser recognizes, or it can be set with hex codes like this one that consist of letters and numbers allowing for more specific shades of colors. You can also use rgb colors like here. We can set font type using font-family. You can see width and height to pixels or percentages. For a full list of them, feel free to go to this website or just google what you’re looking for and chances are you’ll find it. Speaker notes
  • 37.
  • 38.
    CSS also allowsus to size and shape our elements. You can think of HTML elements as boxes on the screen. These boxes have a couple different ways of being moved around the screen and sized. Going from inner-most to outer-most, there’s width and height, padding, the border of the box, and then margin. Speaker notes
  • 39.
  • 40.
    Here, I havea div with a red background and with a paragraph inside of it. I’m going to use those sizing properties to show you how to manipulate the div around the paragraph. The first is width and height. I can set the height to 300 pixels and the div fills up more on the page (write height: 300px;). “Px” the way of writing pixels in CSS. You could also use percentages if you wanted to. One level up from that is padding. You can set padding to pixels or percentages as well. I’ll set the padding for this div to 20px (write padding: 20px;). Notice how the paragraph moves away from the edge of the div its inside. I created padding between the content of the div and the edge of it. Then we have borders. We can use the border property to change our div’s border. Border takes three values inside it. Its needs the width of the border, the type of border, and the color. Let’s go ahead and make the border 10 pixels, solid, and black (write border: 10px solid black;). Now our div has a thickened border around it. The last sizing property is margin. You can think of margin just like the margin on a piece of paper you print out. Generally those have a 1 inch default margin. Lets add a margin of 30 pixels (write margin: 30px;). Notice how the edge of the div now has space between it and the edge of the webpage. Code: .redbackground { background-color: red; height: 300px; padding: 20px; border: 10px solid black; margin: 30px; } .centered { text-align: center; Speaker notes
  • 41.
  • 42.
    Real developers useGoogle... a lot 20
  • 43.
    Google is oneof your most valuable tools as a developer. Finding the solution to a new problem through research is a very common task of a real developer. I encourage you to, if you’re unsure of how to solve a problem, to google a question and look for an answer. If you encounter a problem, it more than likely that another developer has had the same problem and have posted it online. Speaker notes
  • 44.
    Assignments for tonight Goto: bit.ly/tf-html-classroom 21
  • 45.
    Here is thelink to the assignments. Once you open it, sign up for repl.it and then click on the classroom on the left. Work through these challenges as best you can. Make sure to google things you’re unsure on and if you’re stuck, we’re here to help you out. Don’t hesitate to ask! Speaker notes
  • 46.
  • 47.
    Thinkful's free course 75+hours of curriculum for two weeks HTML, CSS and JavaScript Unlimited mentor-led Q&A sessions Personal Program Manager bit.ly/freetrial-webdevbit.ly/freetrial-webdev Thinkful Coding Prep Course $1500 FREE 23