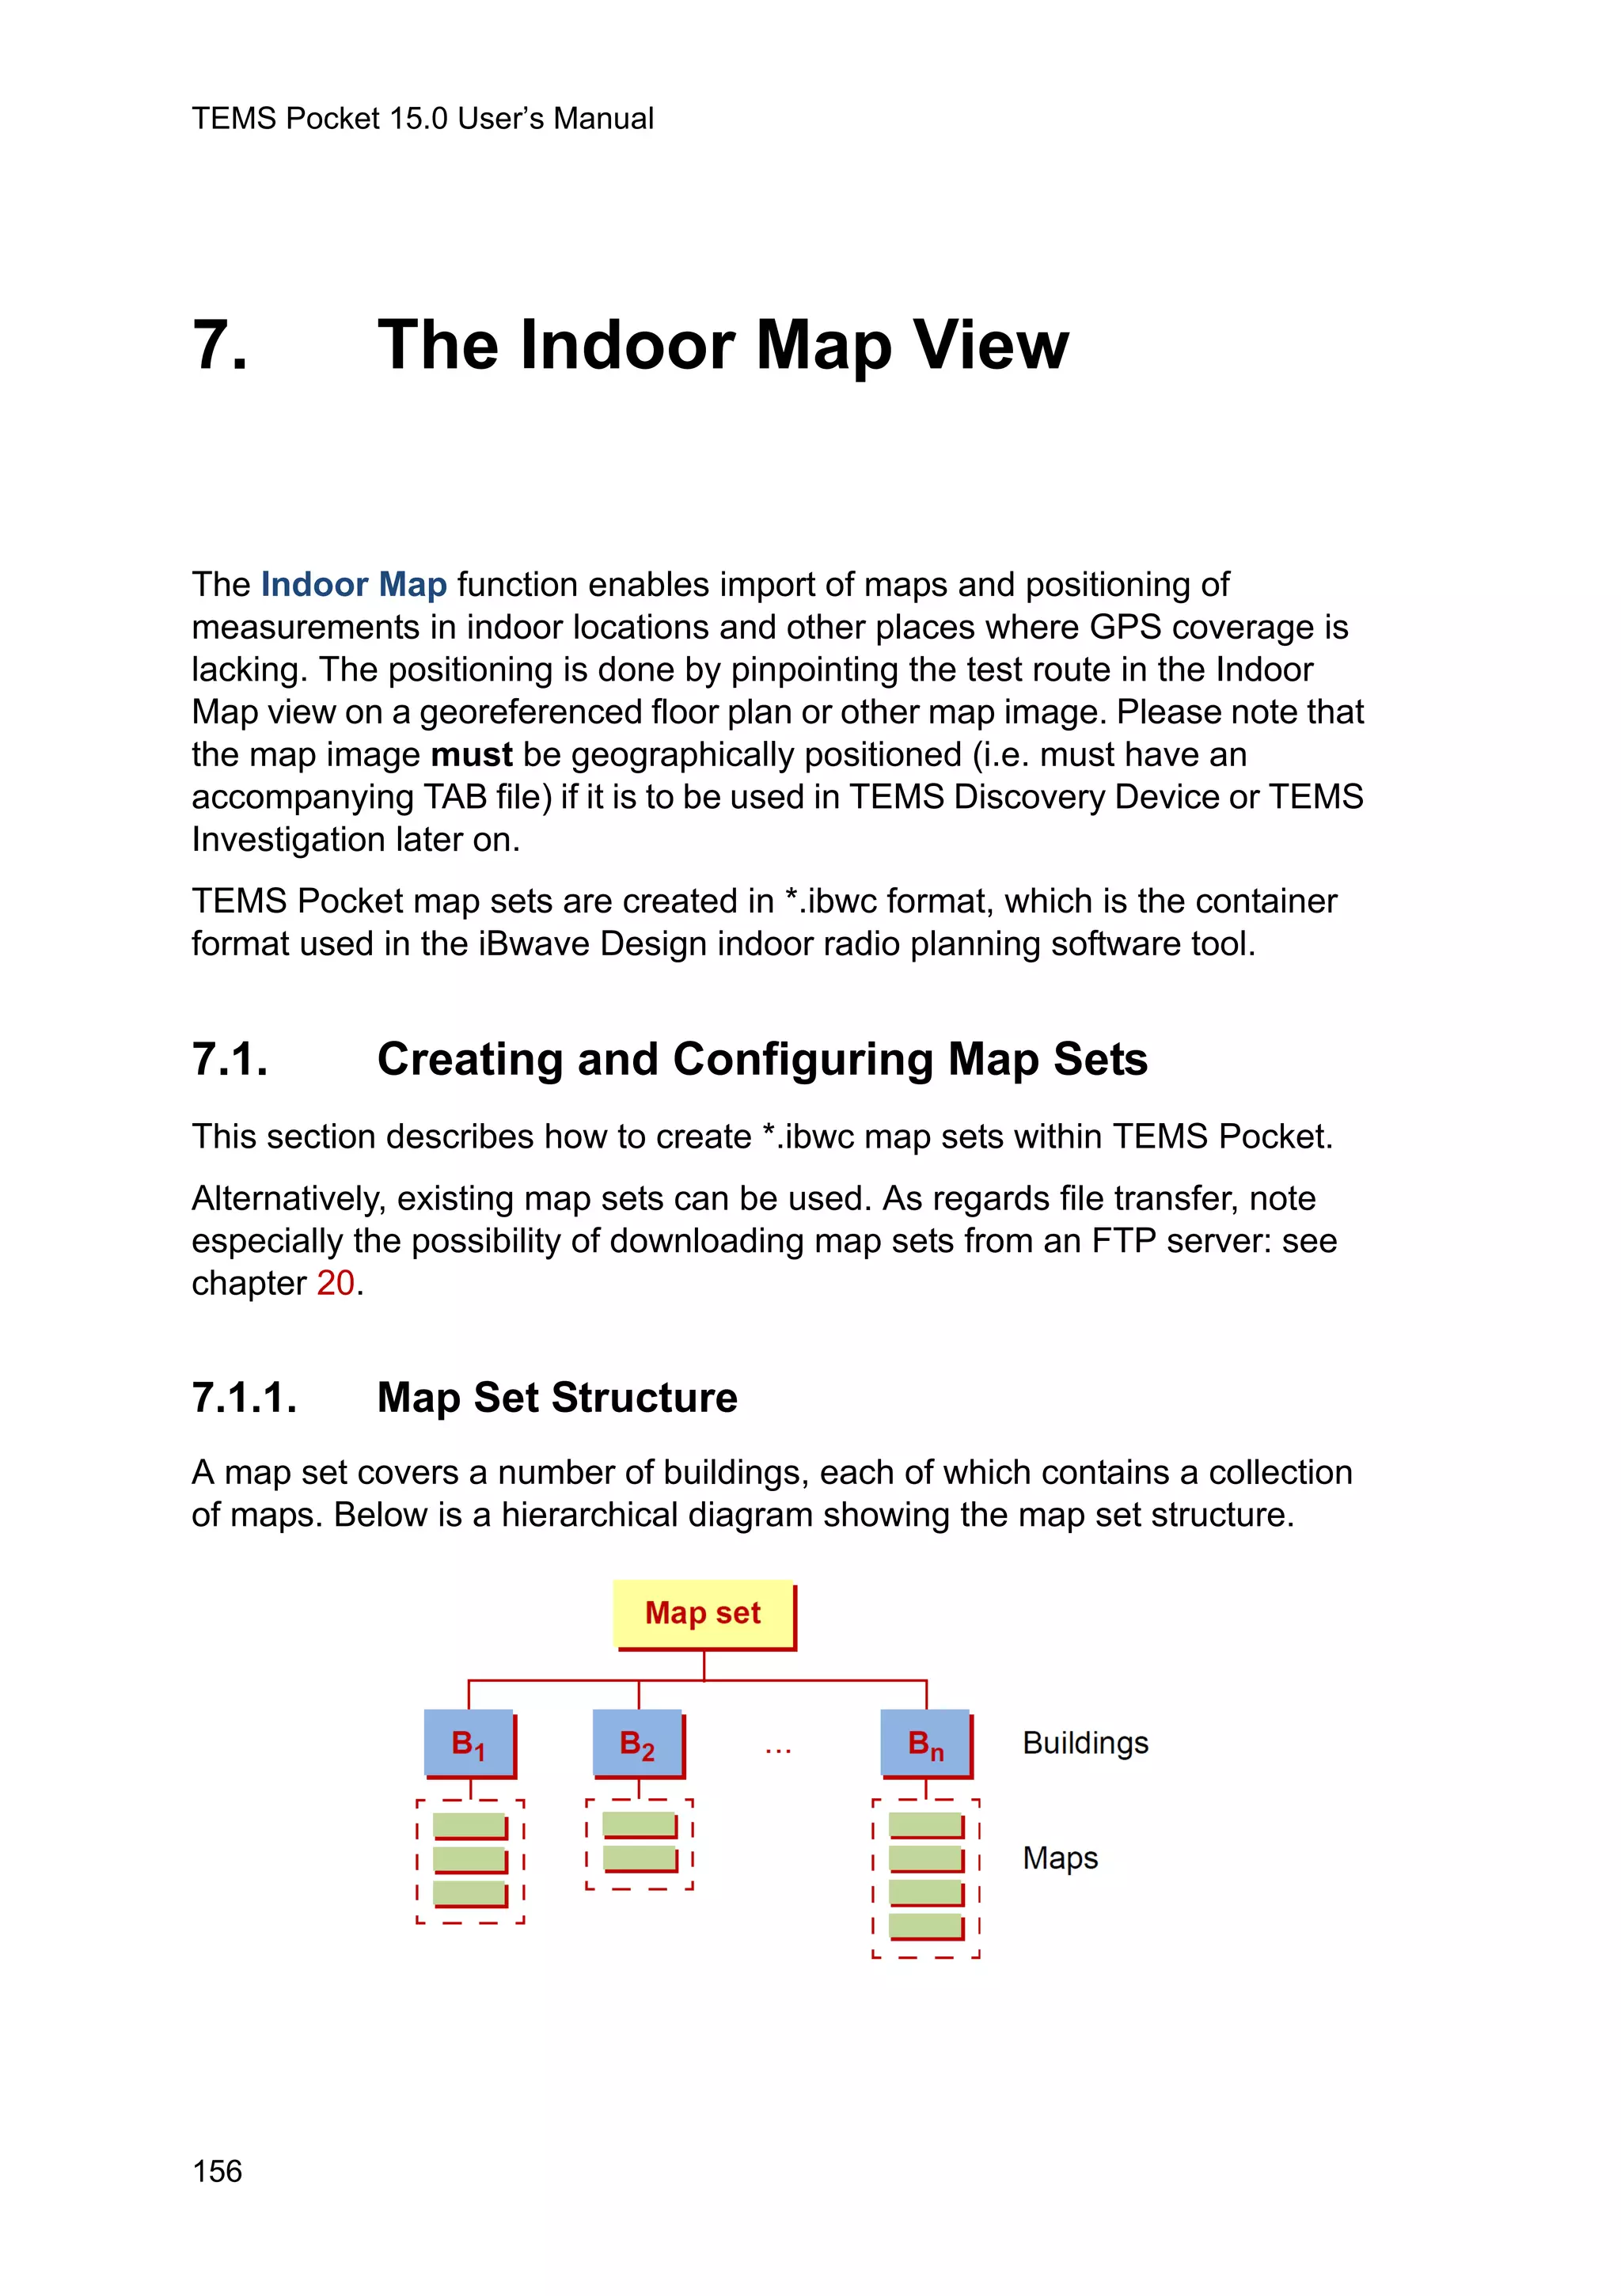
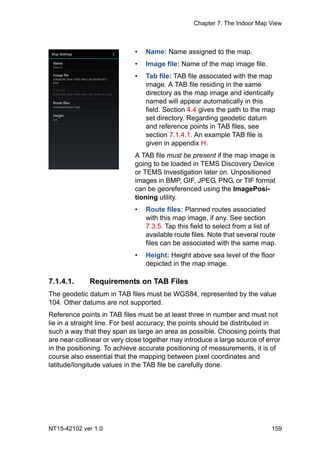
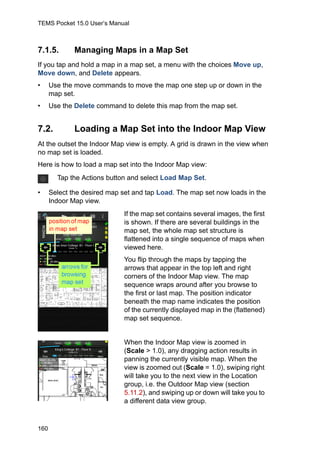
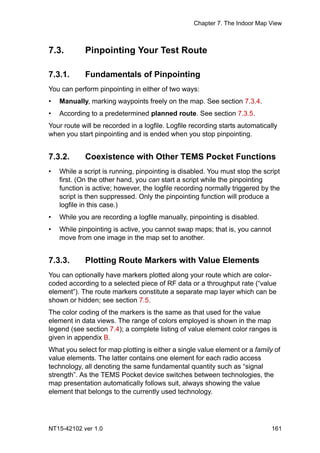
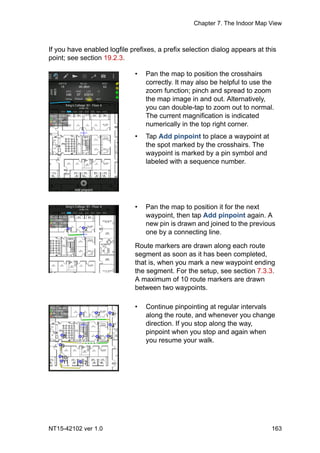
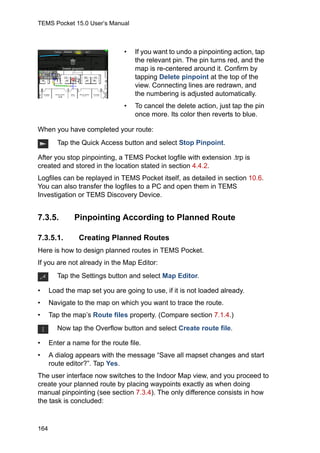
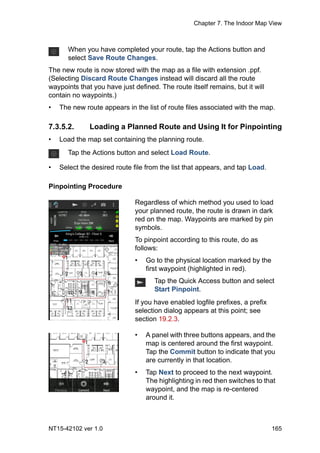
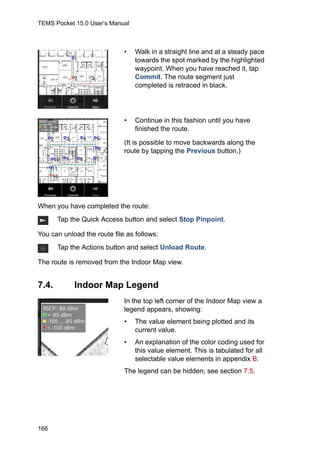
SlideShare a Scribd company logo
1 of 13
Download to read offline
TEMS Pocket 15.0 User’s Manual
156
7. The Indoor Map View
The Indoor Map function enables import of maps and positioning of
measurements in indoor locations and other places where GPS coverage is
lacking. The positioning is done by pinpointing the test route in the Indoor
Map view on a georeferenced floor plan or other map image. Please note that
the map image must be geographically positioned (i.e. must have an
accompanying TAB file) if it is to be used in TEMS Discovery Device or TEMS
Investigation later on.
TEMS Pocket map sets are created in *.ibwc format, which is the container
format used in the iBwave Design indoor radio planning software tool.
7.1. Creating and Configuring Map Sets
This section describes how to create *.ibwc map sets within TEMS Pocket.
Alternatively, existing map sets can be used. As regards file transfer, note
especially the possibility of downloading map sets from an FTP server: see
chapter 20.
7.1.1. Map Set Structure
A map set covers a number of buildings, each of which contains a collection
of maps. Below is a hierarchical diagram showing the map set structure.
Chapter 7. The Indoor Map View
NT15-42102 ver 1.0 157
7.1.2. Obtaining Map Images
First you need to obtain images of the environment that is going to be
covered during measurement. For example, use the device’s camera to
photograph the emergency or evacuation plan for the relevant floor(s) of the
building. The best image quality is obtained if the camera is set in black-and-
white mode. Also avoid using the flash. If you are using an image from a
different source, it must be in JPEG, PNG, or BMP format.
7.1.3. Creating a New Map Set
• Tap Name and enter a name for the new map set.
Now for each building to be covered by the map set, do the following:
• Tap Buildings.
• Tap Name and enter a name for the building.
• Then tap Maps.
• You are now invited to pick an image to use as a map. Select your floor
plans or other background images that you want to use. The selected
image files are added to the map set. A map set can contain up to 99
images.
Map sets are saved in the iBwave container format (extension .ibwc). These
files are self-contained and can easily be transferred to other devices. Map
sets are saved to the directory specified in section 4.4.2.
It is also possible to store a logfile (*.trp) containing a map set in the map set
directory, and then load it into the Indoor Map view just like a map set
(*.ibwc), as described in section 7.2.
7.1.4. Specifying Map Set Properties
You can set some position properties and other metadata for the map set.
Tap the Settings button and select Map Editor.
Tap the Overflow button and select New Map Set.
Tap the Overflow button and select Add Building.
Tap the Overflow button and select Add Indoor Map.
TEMS Pocket 15.0 User’s Manual
158
If you are not already in the Map Editor:
A list of the map sets you have already created appears.
Tap the Settings button and select Map Editor.
• Tap the map set you want to define
properties for.
• Here you can edit the map set name by
tapping it.
• The map set file name also appears,
identical with the Name string plus the
extension .ibwc.
• Tap Buildings to access a list of the
buildings defined in the map set.
• Tap an individual building to access its
constituent parts (maps).
• You can edit the building name by
tapping it.
• Tap Maps to access a list of the maps
defined for this building.
• Then tap an individual map to access its
properties.
The map properties are as follows:
Chapter 7. The Indoor Map View
NT15-42102 ver 1.0 159
7.1.4.1. Requirements on TAB Files
The geodetic datum in TAB files must be WGS84, represented by the value
104. Other datums are not supported.
Reference points in TAB files must be at least three in number and must not
lie in a straight line. For best accuracy, the points should be distributed in
such a way that they span as large an area as possible. Choosing points that
are near-collinear or very close together may introduce a large source of error
in the positioning. To achieve accurate positioning of measurements, it is of
course also essential that the mapping between pixel coordinates and
latitude/longitude values in the TAB file be carefully done.
• Name: Name assigned to the map.
• Image file: Name of the map image file.
• Tab file: TAB file associated with the map
image. A TAB file residing in the same
directory as the map image and identically
named will appear automatically in this
field. Section 4.4 gives the path to the map
set directory. Regarding geodetic datum
and reference points in TAB files, see
section 7.1.4.1. An example TAB file is
given in appendix H.
A TAB file must be present if the map image is
going to be loaded in TEMS Discovery Device
or TEMS Investigation later on. Unpositioned
images in BMP, GIF, JPEG, PNG, or TIF format
can be georeferenced using the ImagePosi-
tioning utility.
• Route files: Planned routes associated
with this map image, if any. See section
7.3.5. Tap this field to select from a list of
available route files. Note that several route
files can be associated with the same map.
• Height: Height above sea level of the floor
depicted in the map image.
TEMS Pocket 15.0 User’s Manual
160
7.1.5. Managing Maps in a Map Set
If you tap and hold a map in a map set, a menu with the choices Move up,
Move down, and Delete appears.
• Use the move commands to move the map one step up or down in the
map set.
• Use the Delete command to delete this map from the map set.
7.2. Loading a Map Set into the Indoor Map View
At the outset the Indoor Map view is empty. A grid is drawn in the view when
no map set is loaded.
Here is how to load a map set into the Indoor Map view:
• Select the desired map set and tap Load. The map set now loads in the
Indoor Map view.
Tap the Actions button and select Load Map Set.
If the map set contains several images, the first
is shown. If there are several buildings in the
map set, the whole map set structure is
flattened into a single sequence of maps when
viewed here.
You flip through the maps by tapping the
arrows that appear in the top left and right
corners of the Indoor Map view. The map
sequence wraps around after you browse to
the first or last map. The position indicator
beneath the map name indicates the position
of the currently displayed map in the (flattened)
map set sequence.
When the Indoor Map view is zoomed in
(Scale > 1.0), any dragging action results in
panning the currently visible map. When the
view is zoomed out (Scale = 1.0), swiping right
will take you to the next view in the Location
group, i.e. the Outdoor Map view (section
5.11.2), and swiping up or down will take you to
a different data view group.
Chapter 7. The Indoor Map View
NT15-42102 ver 1.0 161
7.3. Pinpointing Your Test Route
7.3.1. Fundamentals of Pinpointing
You can perform pinpointing in either of two ways:
• Manually, marking waypoints freely on the map. See section 7.3.4.
• According to a predetermined planned route. See section 7.3.5.
Your route will be recorded in a logfile. Logfile recording starts automatically
when you start pinpointing and is ended when you stop pinpointing.
7.3.2. Coexistence with Other TEMS Pocket Functions
• While a script is running, pinpointing is disabled. You must stop the script
first. (On the other hand, you can start a script while the pinpointing
function is active; however, the logfile recording normally triggered by the
script is then suppressed. Only the pinpointing function will produce a
logfile in this case.)
• While you are recording a logfile manually, pinpointing is disabled.
• While pinpointing is active, you cannot swap maps; that is, you cannot
move from one image in the map set to another.
7.3.3. Plotting Route Markers with Value Elements
You can optionally have markers plotted along your route which are color-
coded according to a selected piece of RF data or a throughput rate (“value
element”). The route markers constitute a separate map layer which can be
shown or hidden; see section 7.5.
The color coding of the markers is the same as that used for the value
element in data views. The range of colors employed is shown in the map
legend (see section 7.4); a complete listing of value element color ranges is
given in appendix B.
What you select for map plotting is either a single value element or a family of
value elements. The latter contains one element for each radio access
technology, all denoting the same fundamental quantity such as “signal
strength”. As the TEMS Pocket device switches between technologies, the
map presentation automatically follows suit, always showing the value
element that belongs to the currently used technology.
TEMS Pocket 15.0 User’s Manual
162
The feature is customized as follows:
The waypoints that you mark on the map are always indicated by pin symbols
colored blue, and the straight-line segments connecting them are drawn in
black. Neither of these colors is affected by the Select Value Element
command.
Route markers are plotted also during logfile replay (covered in section 10.6).
7.3.4. Manual Pinpointing
Tap the Actions button and select Select Value Element.
Value element families
Advanced: Individual value
elements
• A list appears with a number of value
element families plus an item Advanced
for selecting a single value element. Pick
what you want to show; selecting
Advanced calls up a new list holding all
plottable value elements, from which you
pick one.
• Tap Select.
By default, the Signal Strength value element
family is plotted. Full explanations of what
these designations mean for each technology
are given in appendix C.
From now on, all pinpointed routes will be
traced by dot-shaped markers whose color
encodes the appropriate value element as
measured at each point. Refer to the map
legend for an explanation of the color coding
(again, see section 7.4).
If you want to plot a different value element or
value element family, simply make a new
selection as described above. Note, however,
that if you do this in the middle of pinpointing a
route, the value element markers already
plotted will be erased.
Tap the Quick Access button and select Start Pinpoint.
Chapter 7. The Indoor Map View
NT15-42102 ver 1.0 163
If you have enabled logfile prefixes, a prefix selection dialog appears at this
point; see section 19.2.3.
• Pan the map to position the crosshairs
correctly. It may also be helpful to use the
zoom function; pinch and spread to zoom
the map image in and out. Alternatively,
you can double-tap to zoom out to normal.
The current magnification is indicated
numerically in the top right corner.
• Tap Add pinpoint to place a waypoint at
the spot marked by the crosshairs. The
waypoint is marked by a pin symbol and
labeled with a sequence number.
• Pan the map to position it for the next
waypoint, then tap Add pinpoint again. A
new pin is drawn and joined to the previous
one by a connecting line.
Route markers are drawn along each route
segment as soon as it has been completed,
that is, when you mark a new waypoint ending
the segment. For the setup, see section 7.3.3.
A maximum of 10 route markers are drawn
between two waypoints.
• Continue pinpointing at regular intervals
along the route, and whenever you change
direction. If you stop along the way,
pinpoint when you stop and again when
you resume your walk.
TEMS Pocket 15.0 User’s Manual
164
When you have completed your route:
After you stop pinpointing, a TEMS Pocket logfile with extension .trp is
created and stored in the location stated in section 4.4.2.
Logfiles can be replayed in TEMS Pocket itself, as detailed in section 10.6.
You can also transfer the logfiles to a PC and open them in TEMS
Investigation or TEMS Discovery Device.
7.3.5. Pinpointing According to Planned Route
7.3.5.1. Creating Planned Routes
Here is how to design planned routes in TEMS Pocket.
If you are not already in the Map Editor:
• Load the map set you are going to use, if it is not loaded already.
• Navigate to the map on which you want to trace the route.
• Tap the map’s Route files property. (Compare section 7.1.4.)
• Enter a name for the route file.
• A dialog appears with the message “Save all mapset changes and start
route editor?”. Tap Yes.
The user interface now switches to the Indoor Map view, and you proceed to
create your planned route by placing waypoints exactly as when doing
manual pinpointing (see section 7.3.4). The only difference consists in how
the task is concluded:
• If you want to undo a pinpointing action, tap
the relevant pin. The pin turns red, and the
map is re-centered around it. Confirm by
tapping Delete pinpoint at the top of the
view. Connecting lines are redrawn, and
the numbering is adjusted automatically.
• To cancel the delete action, just tap the pin
once more. Its color then reverts to blue.
Tap the Quick Access button and select Stop Pinpoint.
Tap the Settings button and select Map Editor.
Now tap the Overflow button and select Create route file.
Chapter 7. The Indoor Map View
NT15-42102 ver 1.0 165
The new route is now stored with the map as a file with extension .ppf.
(Selecting Discard Route Changes instead will discard all the route
waypoints that you have just defined. The route itself remains, but it will
contain no waypoints.)
• The new route appears in the list of route files associated with the map.
7.3.5.2. Loading a Planned Route and Using It for Pinpointing
• Load the map set containing the planning route.
• Select the desired route file from the list that appears, and tap Load.
Pinpointing Procedure
When you have completed your route, tap the Actions button and
select Save Route Changes.
Tap the Actions button and select Load Route.
Regardless of which method you used to load
your planned route, the route is drawn in dark
red on the map. Waypoints are marked by pin
symbols.
To pinpoint according to this route, do as
follows:
• Go to the physical location marked by the
first waypoint (highlighted in red).
Tap the Quick Access button and select
Start Pinpoint.
If you have enabled logfile prefixes, a prefix
selection dialog appears at this point; see
section 19.2.3.
• A panel with three buttons appears, and the
map is centered around the first waypoint.
Tap the Commit button to indicate that you
are currently in that location.
• Tap Next to proceed to the next waypoint.
The highlighting in red then switches to that
waypoint, and the map is re-centered
around it.
TEMS Pocket 15.0 User’s Manual
166
When you have completed the route:
You can unload the route file as follows:
The route is removed from the Indoor Map view.
7.4. Indoor Map Legend
• Walk in a straight line and at a steady pace
towards the spot marked by the highlighted
waypoint. When you have reached it, tap
Commit. The route segment just
completed is retraced in black.
• Continue in this fashion until you have
finished the route.
(It is possible to move backwards along the
route by tapping the Previous button.)
Tap the Quick Access button and select Stop Pinpoint.
Tap the Actions button and select Unload Route.
In the top left corner of the Indoor Map view a
legend appears, showing:
• The value element being plotted and its
current value.
• An explanation of the color coding used for
this value element. This is tabulated for all
selectable value elements in appendix B.
The legend can be hidden; see section 7.5.
Chapter 7. The Indoor Map View
NT15-42102 ver 1.0 167
7.5. Showing and Hiding Indoor Map Layers
You can turn the visibility on and off for various map layers individually.
7.6. Presentation of iBwave Transmitter Files
The iBwave indoor map set container format (*.ibwc) includes a “transmitter”
file in XML format, holding data on indoor cells. One transmitter file can be
provided with each map in the indoor map set. If transmitter files are present
in a map set, the cells they describe are automatically plotted in the Indoor
Map view. The presentation is the same as for TEMS-specific cell files in the
Outdoor Map view (see section 8.4), except that no lines are drawn to the
current serving cell or active set. Cells can be displayed selectively with
respect to radio access technology, as explained in section 7.5.
Note that TEMS-specific cell files are not used in the Indoor Map view. See
chapter 12 for full coverage of this type of cell file.
Tap the Actions button and select Select Map Layers.
• Map: Google Maps imagery.
• Zones: Zones defined in the indoor map
set. See section 7.7.
• Pinpoints: Routes made up of pin symbols
and connecting lines.
• Value trails: Route markers encoding a
value element.
• Events: Event presentation. If this is
unchecked, no events will appear in the
Indoor Map view regardless of the Show in
map setting for individual events (see
section 6.2).
• Cell sites GSM, etc.: Cell site data for
various radio access technologies, as
found in transmitter files included in the
indoor map set. See section 7.6.
• Legend: Map legend explaining value
element color ranges.
Check a layer to show it; uncheck to hide it.
TEMS Pocket 15.0 User’s Manual
168
Cells listed in the transmitter file for the map (floor) currently displayed in the
Indoor Map view are also presented in other places in TEMS Pocket:
• The cells are included in the results of cell searches performed as an aid
to target selection for the RAT, band, and cell lock functions; see various
subsections of chapter 13.
7.7. Presentation of iBwave Zones
iBwave indoor map sets (*.ibwc) may define a collection of zones for each
map it contains. Each zone consists of a closed polygon covering some part
of the map.
If you do not want the zones shown, deselect the Zones map layer as
described in section 7.5.
7.8. Unloading a Map Set
To unload the currently loaded map set:
• Cell names appear in the data view header
and in cell list data views, just like cell
names from TEMS-specific cell files. These
names are enclosed within square brackets
[ ], which are meant to symbolize the walls
of a building.
These zones are by default displayed in TEMS
Pocket if present, colored and labeled
according to their definitions. Zones are drawn
on top of the map image itself but beneath
everything else (waypoints, value element
markers, events, transmitters).
Tap the Actions button and select Unload Map Set.

More Related Content

What's hot

NSN NOKIA 3G KPI for Network planning and optimization
NSN NOKIA 3G KPI for Network planning and optimizationNSN NOKIA 3G KPI for Network planning and optimization
NSN NOKIA 3G KPI for Network planning and optimizationYogender Singh Rana
 
COMPATIBILITY STUDY FOR UMTS OPERATING WITHIN THE GSM 900 AND GSM 1800 FREQUE...
COMPATIBILITY STUDY FOR UMTS OPERATING WITHIN THE GSM 900 AND GSM 1800 FREQUE...COMPATIBILITY STUDY FOR UMTS OPERATING WITHIN THE GSM 900 AND GSM 1800 FREQUE...
COMPATIBILITY STUDY FOR UMTS OPERATING WITHIN THE GSM 900 AND GSM 1800 FREQUE...Humber_12345
 
Lte kp is calculation
Lte kp is calculationLte kp is calculation
Lte kp is calculationKlajdi Husi
 
422738668-LTE-Downlink-Throughput-Optimization-Based-on-Performance-Data [Rep...
422738668-LTE-Downlink-Throughput-Optimization-Based-on-Performance-Data [Rep...422738668-LTE-Downlink-Throughput-Optimization-Based-on-Performance-Data [Rep...
422738668-LTE-Downlink-Throughput-Optimization-Based-on-Performance-Data [Rep...SudheeraIndrajith
 
02 gsm bss network kpi (sdcch call drop rate) optimization manual
02 gsm bss network kpi (sdcch call drop rate) optimization manual02 gsm bss network kpi (sdcch call drop rate) optimization manual
02 gsm bss network kpi (sdcch call drop rate) optimization manualtharinduwije
 
Layer 3 messages
Layer 3 messagesLayer 3 messages
Layer 3 messagesJohn Samir
 
Ericsson optimization opti
Ericsson optimization optiEricsson optimization opti
Ericsson optimization optiTerra Sacrifice
 
How to perform trouble shooting based on counters
How to perform trouble shooting based on countersHow to perform trouble shooting based on counters
How to perform trouble shooting based on countersAbdul Muin
 
Call Setup Success Rate Definition and Troubleshooting
Call Setup Success Rate Definition and Troubleshooting Call Setup Success Rate Definition and Troubleshooting
Call Setup Success Rate Definition and Troubleshooting Assim Mubder
 
Lte kpis, counters & amp; timers
Lte kpis, counters & amp; timers Lte kpis, counters & amp; timers
Lte kpis, counters & amp; timers Abhishek Jena
 
UMTS Drive Test Analysis and Examples
UMTS Drive Test Analysis and ExamplesUMTS Drive Test Analysis and Examples
UMTS Drive Test Analysis and ExamplesAssim Mubder
 
8 wcdma rf optimization&case study-60
8 wcdma rf optimization&case study-608 wcdma rf optimization&case study-60
8 wcdma rf optimization&case study-60Ba Quynh Nguyen
 
08 gsm bss network kpi (immediate assignment success rate) optimization manual
08 gsm bss network kpi (immediate assignment success rate) optimization manual08 gsm bss network kpi (immediate assignment success rate) optimization manual
08 gsm bss network kpi (immediate assignment success rate) optimization manualtharinduwije
 
Ericsson SDCCH establishment Issue
Ericsson SDCCH establishment IssueEricsson SDCCH establishment Issue
Ericsson SDCCH establishment IssueHoussein Abou Chacra
 
Optimisation guide line ver1.1
Optimisation guide line ver1.1Optimisation guide line ver1.1
Optimisation guide line ver1.1Chandra Deria
 
08102014_Huawei handovers-handover-algo
08102014_Huawei handovers-handover-algo08102014_Huawei handovers-handover-algo
08102014_Huawei handovers-handover-algoherobinh
 
GPRS KPIs based on network performance
GPRS KPIs based on network performance GPRS KPIs based on network performance
GPRS KPIs based on network performance Mehmet Beyaz
 
15 gsm bss network kpi (rx quality) optimization manual[1].doc
15 gsm bss network kpi (rx quality) optimization manual[1].doc15 gsm bss network kpi (rx quality) optimization manual[1].doc
15 gsm bss network kpi (rx quality) optimization manual[1].doctharinduwije
 

What's hot (20)

NSN NOKIA 3G KPI for Network planning and optimization
NSN NOKIA 3G KPI for Network planning and optimizationNSN NOKIA 3G KPI for Network planning and optimization
NSN NOKIA 3G KPI for Network planning and optimization
 
COMPATIBILITY STUDY FOR UMTS OPERATING WITHIN THE GSM 900 AND GSM 1800 FREQUE...
COMPATIBILITY STUDY FOR UMTS OPERATING WITHIN THE GSM 900 AND GSM 1800 FREQUE...COMPATIBILITY STUDY FOR UMTS OPERATING WITHIN THE GSM 900 AND GSM 1800 FREQUE...
COMPATIBILITY STUDY FOR UMTS OPERATING WITHIN THE GSM 900 AND GSM 1800 FREQUE...
 
Lte kp is calculation
Lte kp is calculationLte kp is calculation
Lte kp is calculation
 
422738668-LTE-Downlink-Throughput-Optimization-Based-on-Performance-Data [Rep...
422738668-LTE-Downlink-Throughput-Optimization-Based-on-Performance-Data [Rep...422738668-LTE-Downlink-Throughput-Optimization-Based-on-Performance-Data [Rep...
422738668-LTE-Downlink-Throughput-Optimization-Based-on-Performance-Data [Rep...
 
02 gsm bss network kpi (sdcch call drop rate) optimization manual
02 gsm bss network kpi (sdcch call drop rate) optimization manual02 gsm bss network kpi (sdcch call drop rate) optimization manual
02 gsm bss network kpi (sdcch call drop rate) optimization manual
 
Layer 3 messages
Layer 3 messagesLayer 3 messages
Layer 3 messages
 
Ericsson optimization opti
Ericsson optimization optiEricsson optimization opti
Ericsson optimization opti
 
How to perform trouble shooting based on counters
How to perform trouble shooting based on countersHow to perform trouble shooting based on counters
How to perform trouble shooting based on counters
 
Call Setup Success Rate Definition and Troubleshooting
Call Setup Success Rate Definition and Troubleshooting Call Setup Success Rate Definition and Troubleshooting
Call Setup Success Rate Definition and Troubleshooting
 
Lte kpis, counters & amp; timers
Lte kpis, counters & amp; timers Lte kpis, counters & amp; timers
Lte kpis, counters & amp; timers
 
UMTS Drive Test Analysis and Examples
UMTS Drive Test Analysis and ExamplesUMTS Drive Test Analysis and Examples
UMTS Drive Test Analysis and Examples
 
2G Optimization
2G Optimization2G Optimization
2G Optimization
 
8 wcdma rf optimization&case study-60
8 wcdma rf optimization&case study-608 wcdma rf optimization&case study-60
8 wcdma rf optimization&case study-60
 
Umts Kpi
Umts KpiUmts Kpi
Umts Kpi
 
08 gsm bss network kpi (immediate assignment success rate) optimization manual
08 gsm bss network kpi (immediate assignment success rate) optimization manual08 gsm bss network kpi (immediate assignment success rate) optimization manual
08 gsm bss network kpi (immediate assignment success rate) optimization manual
 
Ericsson SDCCH establishment Issue
Ericsson SDCCH establishment IssueEricsson SDCCH establishment Issue
Ericsson SDCCH establishment Issue
 
Optimisation guide line ver1.1
Optimisation guide line ver1.1Optimisation guide line ver1.1
Optimisation guide line ver1.1
 
08102014_Huawei handovers-handover-algo
08102014_Huawei handovers-handover-algo08102014_Huawei handovers-handover-algo
08102014_Huawei handovers-handover-algo
 
GPRS KPIs based on network performance
GPRS KPIs based on network performance GPRS KPIs based on network performance
GPRS KPIs based on network performance
 
15 gsm bss network kpi (rx quality) optimization manual[1].doc
15 gsm bss network kpi (rx quality) optimization manual[1].doc15 gsm bss network kpi (rx quality) optimization manual[1].doc
15 gsm bss network kpi (rx quality) optimization manual[1].doc
 

Viewers also liked

Value Proposition Worksheet
Value Proposition WorksheetValue Proposition Worksheet
Value Proposition WorksheetMs Angela Spragg
 
How to cut logfile and check logfiles covering area v1.0
How to cut logfile and check logfiles covering area v1.0How to cut logfile and check logfiles covering area v1.0
How to cut logfile and check logfiles covering area v1.0rorelland
 
2. fundamentals of global strategy 2014 2 st
2. fundamentals of global strategy 2014 2 st2. fundamentals of global strategy 2014 2 st
2. fundamentals of global strategy 2014 2 stAlejandra Pasqualotto
 
Tems 8 Basic steps for beginners
Tems 8 Basic steps for beginners Tems 8 Basic steps for beginners
Tems 8 Basic steps for beginners Syed Muhammad Zaidi
 
What Makes Great Infographics
What Makes Great InfographicsWhat Makes Great Infographics
What Makes Great InfographicsSlideShare
 
Masters of SlideShare
Masters of SlideShareMasters of SlideShare
Masters of SlideShareKapost
 
STOP! VIEW THIS! 10-Step Checklist When Uploading to Slideshare
STOP! VIEW THIS! 10-Step Checklist When Uploading to SlideshareSTOP! VIEW THIS! 10-Step Checklist When Uploading to Slideshare
STOP! VIEW THIS! 10-Step Checklist When Uploading to SlideshareEmpowered Presentations
 
10 Ways to Win at SlideShare SEO & Presentation Optimization
10 Ways to Win at SlideShare SEO & Presentation Optimization10 Ways to Win at SlideShare SEO & Presentation Optimization
10 Ways to Win at SlideShare SEO & Presentation OptimizationOneupweb
 
How To Get More From SlideShare - Super-Simple Tips For Content Marketing
How To Get More From SlideShare - Super-Simple Tips For Content MarketingHow To Get More From SlideShare - Super-Simple Tips For Content Marketing
How To Get More From SlideShare - Super-Simple Tips For Content MarketingContent Marketing Institute
 
How to Make Awesome SlideShares: Tips & Tricks
How to Make Awesome SlideShares: Tips & TricksHow to Make Awesome SlideShares: Tips & Tricks
How to Make Awesome SlideShares: Tips & TricksSlideShare
 

Viewers also liked (14)

Value Proposition Worksheet
Value Proposition WorksheetValue Proposition Worksheet
Value Proposition Worksheet
 
Value propositions matrix diagram
Value propositions matrix diagramValue propositions matrix diagram
Value propositions matrix diagram
 
How to cut logfile and check logfiles covering area v1.0
How to cut logfile and check logfiles covering area v1.0How to cut logfile and check logfiles covering area v1.0
How to cut logfile and check logfiles covering area v1.0
 
Quy trình drive test
Quy trình drive testQuy trình drive test
Quy trình drive test
 
2. fundamentals of global strategy 2014 2 st
2. fundamentals of global strategy 2014 2 st2. fundamentals of global strategy 2014 2 st
2. fundamentals of global strategy 2014 2 st
 
Tems 8 Basic steps for beginners
Tems 8 Basic steps for beginners Tems 8 Basic steps for beginners
Tems 8 Basic steps for beginners
 
Drive test from a to z (part 2)
Drive test from a to z (part 2)Drive test from a to z (part 2)
Drive test from a to z (part 2)
 
What Makes Great Infographics
What Makes Great InfographicsWhat Makes Great Infographics
What Makes Great Infographics
 
Masters of SlideShare
Masters of SlideShareMasters of SlideShare
Masters of SlideShare
 
STOP! VIEW THIS! 10-Step Checklist When Uploading to Slideshare
STOP! VIEW THIS! 10-Step Checklist When Uploading to SlideshareSTOP! VIEW THIS! 10-Step Checklist When Uploading to Slideshare
STOP! VIEW THIS! 10-Step Checklist When Uploading to Slideshare
 
You Suck At PowerPoint!
You Suck At PowerPoint!You Suck At PowerPoint!
You Suck At PowerPoint!
 
10 Ways to Win at SlideShare SEO & Presentation Optimization
10 Ways to Win at SlideShare SEO & Presentation Optimization10 Ways to Win at SlideShare SEO & Presentation Optimization
10 Ways to Win at SlideShare SEO & Presentation Optimization
 
How To Get More From SlideShare - Super-Simple Tips For Content Marketing
How To Get More From SlideShare - Super-Simple Tips For Content MarketingHow To Get More From SlideShare - Super-Simple Tips For Content Marketing
How To Get More From SlideShare - Super-Simple Tips For Content Marketing
 
How to Make Awesome SlideShares: Tips & Tricks
How to Make Awesome SlideShares: Tips & TricksHow to Make Awesome SlideShares: Tips & Tricks
How to Make Awesome SlideShares: Tips & Tricks
 

Similar to Extract 1 from TEMS Pocket 15.0 User's Manual

Gis arc map& georeferencing-arcgis
Gis arc map& georeferencing-arcgisGis arc map& georeferencing-arcgis
Gis arc map& georeferencing-arcgisAshok Peddi
 
Manual to basic gis
Manual to basic gisManual to basic gis
Manual to basic gisQust04
 
Manual gis
Manual gisManual gis
Manual gissaha232
 
Introduction to ArcGIS 10.1
Introduction to ArcGIS 10.1Introduction to ArcGIS 10.1
Introduction to ArcGIS 10.1Claudio Montoni
 
Arc Gis Traininng.pptx
Arc Gis Traininng.pptxArc Gis Traininng.pptx
Arc Gis Traininng.pptxImran khan
 
Introduction to-arc map
Introduction to-arc mapIntroduction to-arc map
Introduction to-arc mapAshok Peddi
 
Remote Sensing: Georeferencing
Remote Sensing: GeoreferencingRemote Sensing: Georeferencing
Remote Sensing: GeoreferencingKamlesh Kumar
 
Quick Start Guide to Maps4News
Quick Start Guide to Maps4NewsQuick Start Guide to Maps4News
Quick Start Guide to Maps4NewsMaps4News
 
Geographical Information System (GIS) Georeferencing and Digitization, Bihar ...
Geographical Information System (GIS) Georeferencing and Digitization, Bihar ...Geographical Information System (GIS) Georeferencing and Digitization, Bihar ...
Geographical Information System (GIS) Georeferencing and Digitization, Bihar ...Kamlesh Kumar
 
Lab report 2 image to image georeferencing
Lab report 2  image to image georeferencingLab report 2  image to image georeferencing
Lab report 2 image to image georeferencingSharik Shamsudhien
 
pdfcoffee.com_pathloss-5-pdf-free.pdf
pdfcoffee.com_pathloss-5-pdf-free.pdfpdfcoffee.com_pathloss-5-pdf-free.pdf
pdfcoffee.com_pathloss-5-pdf-free.pdfDenissShala
 
Gis application tutorial
Gis application tutorialGis application tutorial
Gis application tutorialBikram singh
 
Coord transform 082014
Coord transform 082014Coord transform 082014
Coord transform 082014PramodPandit9
 

Similar to Extract 1 from TEMS Pocket 15.0 User's Manual (20)

Gis arc map& georeferencing-arcgis
Gis arc map& georeferencing-arcgisGis arc map& georeferencing-arcgis
Gis arc map& georeferencing-arcgis
 
Manual to basic gis
Manual to basic gisManual to basic gis
Manual to basic gis
 
Manual gis
Manual gisManual gis
Manual gis
 
Introduction to ArcGIS 10.1
Introduction to ArcGIS 10.1Introduction to ArcGIS 10.1
Introduction to ArcGIS 10.1
 
QGIS Tutorial 1
QGIS Tutorial 1QGIS Tutorial 1
QGIS Tutorial 1
 
Arc Gis Traininng.pptx
Arc Gis Traininng.pptxArc Gis Traininng.pptx
Arc Gis Traininng.pptx
 
Introduction to-arc map
Introduction to-arc mapIntroduction to-arc map
Introduction to-arc map
 
Dips.pdf
Dips.pdfDips.pdf
Dips.pdf
 
Remote Sensing: Georeferencing
Remote Sensing: GeoreferencingRemote Sensing: Georeferencing
Remote Sensing: Georeferencing
 
Tutorial20
Tutorial20Tutorial20
Tutorial20
 
Quick Start Guide to Maps4News
Quick Start Guide to Maps4NewsQuick Start Guide to Maps4News
Quick Start Guide to Maps4News
 
Geographical Information System (GIS) Georeferencing and Digitization, Bihar ...
Geographical Information System (GIS) Georeferencing and Digitization, Bihar ...Geographical Information System (GIS) Georeferencing and Digitization, Bihar ...
Geographical Information System (GIS) Georeferencing and Digitization, Bihar ...
 
Lab report 2 image to image georeferencing
Lab report 2  image to image georeferencingLab report 2  image to image georeferencing
Lab report 2 image to image georeferencing
 
pdfcoffee.com_pathloss-5-pdf-free.pdf
pdfcoffee.com_pathloss-5-pdf-free.pdfpdfcoffee.com_pathloss-5-pdf-free.pdf
pdfcoffee.com_pathloss-5-pdf-free.pdf
 
MSC Generator
MSC GeneratorMSC Generator
MSC Generator
 
02+ +step+by+step+qgis
02+ +step+by+step+qgis02+ +step+by+step+qgis
02+ +step+by+step+qgis
 
Gis application tutorial
Gis application tutorialGis application tutorial
Gis application tutorial
 
Map Browser Training
Map Browser TrainingMap Browser Training
Map Browser Training
 
Get the Sheet out of here! Plan production for jobs due yesterday
Get the Sheet out of here! Plan production for jobs due yesterdayGet the Sheet out of here! Plan production for jobs due yesterday
Get the Sheet out of here! Plan production for jobs due yesterday
 
Coord transform 082014
Coord transform 082014Coord transform 082014
Coord transform 082014
 

Extract 1 from TEMS Pocket 15.0 User's Manual

  • 1. TEMS Pocket 15.0 User’s Manual 156 7. The Indoor Map View The Indoor Map function enables import of maps and positioning of measurements in indoor locations and other places where GPS coverage is lacking. The positioning is done by pinpointing the test route in the Indoor Map view on a georeferenced floor plan or other map image. Please note that the map image must be geographically positioned (i.e. must have an accompanying TAB file) if it is to be used in TEMS Discovery Device or TEMS Investigation later on. TEMS Pocket map sets are created in *.ibwc format, which is the container format used in the iBwave Design indoor radio planning software tool. 7.1. Creating and Configuring Map Sets This section describes how to create *.ibwc map sets within TEMS Pocket. Alternatively, existing map sets can be used. As regards file transfer, note especially the possibility of downloading map sets from an FTP server: see chapter 20. 7.1.1. Map Set Structure A map set covers a number of buildings, each of which contains a collection of maps. Below is a hierarchical diagram showing the map set structure.
  • 2. Chapter 7. The Indoor Map View NT15-42102 ver 1.0 157 7.1.2. Obtaining Map Images First you need to obtain images of the environment that is going to be covered during measurement. For example, use the device’s camera to photograph the emergency or evacuation plan for the relevant floor(s) of the building. The best image quality is obtained if the camera is set in black-and- white mode. Also avoid using the flash. If you are using an image from a different source, it must be in JPEG, PNG, or BMP format. 7.1.3. Creating a New Map Set • Tap Name and enter a name for the new map set. Now for each building to be covered by the map set, do the following: • Tap Buildings. • Tap Name and enter a name for the building. • Then tap Maps. • You are now invited to pick an image to use as a map. Select your floor plans or other background images that you want to use. The selected image files are added to the map set. A map set can contain up to 99 images. Map sets are saved in the iBwave container format (extension .ibwc). These files are self-contained and can easily be transferred to other devices. Map sets are saved to the directory specified in section 4.4.2. It is also possible to store a logfile (*.trp) containing a map set in the map set directory, and then load it into the Indoor Map view just like a map set (*.ibwc), as described in section 7.2. 7.1.4. Specifying Map Set Properties You can set some position properties and other metadata for the map set. Tap the Settings button and select Map Editor. Tap the Overflow button and select New Map Set. Tap the Overflow button and select Add Building. Tap the Overflow button and select Add Indoor Map.
  • 3. TEMS Pocket 15.0 User’s Manual 158 If you are not already in the Map Editor: A list of the map sets you have already created appears. Tap the Settings button and select Map Editor. • Tap the map set you want to define properties for. • Here you can edit the map set name by tapping it. • The map set file name also appears, identical with the Name string plus the extension .ibwc. • Tap Buildings to access a list of the buildings defined in the map set. • Tap an individual building to access its constituent parts (maps). • You can edit the building name by tapping it. • Tap Maps to access a list of the maps defined for this building. • Then tap an individual map to access its properties. The map properties are as follows:
  • 4. Chapter 7. The Indoor Map View NT15-42102 ver 1.0 159 7.1.4.1. Requirements on TAB Files The geodetic datum in TAB files must be WGS84, represented by the value 104. Other datums are not supported. Reference points in TAB files must be at least three in number and must not lie in a straight line. For best accuracy, the points should be distributed in such a way that they span as large an area as possible. Choosing points that are near-collinear or very close together may introduce a large source of error in the positioning. To achieve accurate positioning of measurements, it is of course also essential that the mapping between pixel coordinates and latitude/longitude values in the TAB file be carefully done. • Name: Name assigned to the map. • Image file: Name of the map image file. • Tab file: TAB file associated with the map image. A TAB file residing in the same directory as the map image and identically named will appear automatically in this field. Section 4.4 gives the path to the map set directory. Regarding geodetic datum and reference points in TAB files, see section 7.1.4.1. An example TAB file is given in appendix H. A TAB file must be present if the map image is going to be loaded in TEMS Discovery Device or TEMS Investigation later on. Unpositioned images in BMP, GIF, JPEG, PNG, or TIF format can be georeferenced using the ImagePosi- tioning utility. • Route files: Planned routes associated with this map image, if any. See section 7.3.5. Tap this field to select from a list of available route files. Note that several route files can be associated with the same map. • Height: Height above sea level of the floor depicted in the map image.
  • 5. TEMS Pocket 15.0 User’s Manual 160 7.1.5. Managing Maps in a Map Set If you tap and hold a map in a map set, a menu with the choices Move up, Move down, and Delete appears. • Use the move commands to move the map one step up or down in the map set. • Use the Delete command to delete this map from the map set. 7.2. Loading a Map Set into the Indoor Map View At the outset the Indoor Map view is empty. A grid is drawn in the view when no map set is loaded. Here is how to load a map set into the Indoor Map view: • Select the desired map set and tap Load. The map set now loads in the Indoor Map view. Tap the Actions button and select Load Map Set. If the map set contains several images, the first is shown. If there are several buildings in the map set, the whole map set structure is flattened into a single sequence of maps when viewed here. You flip through the maps by tapping the arrows that appear in the top left and right corners of the Indoor Map view. The map sequence wraps around after you browse to the first or last map. The position indicator beneath the map name indicates the position of the currently displayed map in the (flattened) map set sequence. When the Indoor Map view is zoomed in (Scale > 1.0), any dragging action results in panning the currently visible map. When the view is zoomed out (Scale = 1.0), swiping right will take you to the next view in the Location group, i.e. the Outdoor Map view (section 5.11.2), and swiping up or down will take you to a different data view group.
  • 6. Chapter 7. The Indoor Map View NT15-42102 ver 1.0 161 7.3. Pinpointing Your Test Route 7.3.1. Fundamentals of Pinpointing You can perform pinpointing in either of two ways: • Manually, marking waypoints freely on the map. See section 7.3.4. • According to a predetermined planned route. See section 7.3.5. Your route will be recorded in a logfile. Logfile recording starts automatically when you start pinpointing and is ended when you stop pinpointing. 7.3.2. Coexistence with Other TEMS Pocket Functions • While a script is running, pinpointing is disabled. You must stop the script first. (On the other hand, you can start a script while the pinpointing function is active; however, the logfile recording normally triggered by the script is then suppressed. Only the pinpointing function will produce a logfile in this case.) • While you are recording a logfile manually, pinpointing is disabled. • While pinpointing is active, you cannot swap maps; that is, you cannot move from one image in the map set to another. 7.3.3. Plotting Route Markers with Value Elements You can optionally have markers plotted along your route which are color- coded according to a selected piece of RF data or a throughput rate (“value element”). The route markers constitute a separate map layer which can be shown or hidden; see section 7.5. The color coding of the markers is the same as that used for the value element in data views. The range of colors employed is shown in the map legend (see section 7.4); a complete listing of value element color ranges is given in appendix B. What you select for map plotting is either a single value element or a family of value elements. The latter contains one element for each radio access technology, all denoting the same fundamental quantity such as “signal strength”. As the TEMS Pocket device switches between technologies, the map presentation automatically follows suit, always showing the value element that belongs to the currently used technology.
  • 7. TEMS Pocket 15.0 User’s Manual 162 The feature is customized as follows: The waypoints that you mark on the map are always indicated by pin symbols colored blue, and the straight-line segments connecting them are drawn in black. Neither of these colors is affected by the Select Value Element command. Route markers are plotted also during logfile replay (covered in section 10.6). 7.3.4. Manual Pinpointing Tap the Actions button and select Select Value Element. Value element families Advanced: Individual value elements • A list appears with a number of value element families plus an item Advanced for selecting a single value element. Pick what you want to show; selecting Advanced calls up a new list holding all plottable value elements, from which you pick one. • Tap Select. By default, the Signal Strength value element family is plotted. Full explanations of what these designations mean for each technology are given in appendix C. From now on, all pinpointed routes will be traced by dot-shaped markers whose color encodes the appropriate value element as measured at each point. Refer to the map legend for an explanation of the color coding (again, see section 7.4). If you want to plot a different value element or value element family, simply make a new selection as described above. Note, however, that if you do this in the middle of pinpointing a route, the value element markers already plotted will be erased. Tap the Quick Access button and select Start Pinpoint.
  • 8. Chapter 7. The Indoor Map View NT15-42102 ver 1.0 163 If you have enabled logfile prefixes, a prefix selection dialog appears at this point; see section 19.2.3. • Pan the map to position the crosshairs correctly. It may also be helpful to use the zoom function; pinch and spread to zoom the map image in and out. Alternatively, you can double-tap to zoom out to normal. The current magnification is indicated numerically in the top right corner. • Tap Add pinpoint to place a waypoint at the spot marked by the crosshairs. The waypoint is marked by a pin symbol and labeled with a sequence number. • Pan the map to position it for the next waypoint, then tap Add pinpoint again. A new pin is drawn and joined to the previous one by a connecting line. Route markers are drawn along each route segment as soon as it has been completed, that is, when you mark a new waypoint ending the segment. For the setup, see section 7.3.3. A maximum of 10 route markers are drawn between two waypoints. • Continue pinpointing at regular intervals along the route, and whenever you change direction. If you stop along the way, pinpoint when you stop and again when you resume your walk.
  • 9. TEMS Pocket 15.0 User’s Manual 164 When you have completed your route: After you stop pinpointing, a TEMS Pocket logfile with extension .trp is created and stored in the location stated in section 4.4.2. Logfiles can be replayed in TEMS Pocket itself, as detailed in section 10.6. You can also transfer the logfiles to a PC and open them in TEMS Investigation or TEMS Discovery Device. 7.3.5. Pinpointing According to Planned Route 7.3.5.1. Creating Planned Routes Here is how to design planned routes in TEMS Pocket. If you are not already in the Map Editor: • Load the map set you are going to use, if it is not loaded already. • Navigate to the map on which you want to trace the route. • Tap the map’s Route files property. (Compare section 7.1.4.) • Enter a name for the route file. • A dialog appears with the message “Save all mapset changes and start route editor?”. Tap Yes. The user interface now switches to the Indoor Map view, and you proceed to create your planned route by placing waypoints exactly as when doing manual pinpointing (see section 7.3.4). The only difference consists in how the task is concluded: • If you want to undo a pinpointing action, tap the relevant pin. The pin turns red, and the map is re-centered around it. Confirm by tapping Delete pinpoint at the top of the view. Connecting lines are redrawn, and the numbering is adjusted automatically. • To cancel the delete action, just tap the pin once more. Its color then reverts to blue. Tap the Quick Access button and select Stop Pinpoint. Tap the Settings button and select Map Editor. Now tap the Overflow button and select Create route file.
  • 10. Chapter 7. The Indoor Map View NT15-42102 ver 1.0 165 The new route is now stored with the map as a file with extension .ppf. (Selecting Discard Route Changes instead will discard all the route waypoints that you have just defined. The route itself remains, but it will contain no waypoints.) • The new route appears in the list of route files associated with the map. 7.3.5.2. Loading a Planned Route and Using It for Pinpointing • Load the map set containing the planning route. • Select the desired route file from the list that appears, and tap Load. Pinpointing Procedure When you have completed your route, tap the Actions button and select Save Route Changes. Tap the Actions button and select Load Route. Regardless of which method you used to load your planned route, the route is drawn in dark red on the map. Waypoints are marked by pin symbols. To pinpoint according to this route, do as follows: • Go to the physical location marked by the first waypoint (highlighted in red). Tap the Quick Access button and select Start Pinpoint. If you have enabled logfile prefixes, a prefix selection dialog appears at this point; see section 19.2.3. • A panel with three buttons appears, and the map is centered around the first waypoint. Tap the Commit button to indicate that you are currently in that location. • Tap Next to proceed to the next waypoint. The highlighting in red then switches to that waypoint, and the map is re-centered around it.
  • 11. TEMS Pocket 15.0 User’s Manual 166 When you have completed the route: You can unload the route file as follows: The route is removed from the Indoor Map view. 7.4. Indoor Map Legend • Walk in a straight line and at a steady pace towards the spot marked by the highlighted waypoint. When you have reached it, tap Commit. The route segment just completed is retraced in black. • Continue in this fashion until you have finished the route. (It is possible to move backwards along the route by tapping the Previous button.) Tap the Quick Access button and select Stop Pinpoint. Tap the Actions button and select Unload Route. In the top left corner of the Indoor Map view a legend appears, showing: • The value element being plotted and its current value. • An explanation of the color coding used for this value element. This is tabulated for all selectable value elements in appendix B. The legend can be hidden; see section 7.5.
  • 12. Chapter 7. The Indoor Map View NT15-42102 ver 1.0 167 7.5. Showing and Hiding Indoor Map Layers You can turn the visibility on and off for various map layers individually. 7.6. Presentation of iBwave Transmitter Files The iBwave indoor map set container format (*.ibwc) includes a “transmitter” file in XML format, holding data on indoor cells. One transmitter file can be provided with each map in the indoor map set. If transmitter files are present in a map set, the cells they describe are automatically plotted in the Indoor Map view. The presentation is the same as for TEMS-specific cell files in the Outdoor Map view (see section 8.4), except that no lines are drawn to the current serving cell or active set. Cells can be displayed selectively with respect to radio access technology, as explained in section 7.5. Note that TEMS-specific cell files are not used in the Indoor Map view. See chapter 12 for full coverage of this type of cell file. Tap the Actions button and select Select Map Layers. • Map: Google Maps imagery. • Zones: Zones defined in the indoor map set. See section 7.7. • Pinpoints: Routes made up of pin symbols and connecting lines. • Value trails: Route markers encoding a value element. • Events: Event presentation. If this is unchecked, no events will appear in the Indoor Map view regardless of the Show in map setting for individual events (see section 6.2). • Cell sites GSM, etc.: Cell site data for various radio access technologies, as found in transmitter files included in the indoor map set. See section 7.6. • Legend: Map legend explaining value element color ranges. Check a layer to show it; uncheck to hide it.
  • 13. TEMS Pocket 15.0 User’s Manual 168 Cells listed in the transmitter file for the map (floor) currently displayed in the Indoor Map view are also presented in other places in TEMS Pocket: • The cells are included in the results of cell searches performed as an aid to target selection for the RAT, band, and cell lock functions; see various subsections of chapter 13. 7.7. Presentation of iBwave Zones iBwave indoor map sets (*.ibwc) may define a collection of zones for each map it contains. Each zone consists of a closed polygon covering some part of the map. If you do not want the zones shown, deselect the Zones map layer as described in section 7.5. 7.8. Unloading a Map Set To unload the currently loaded map set: • Cell names appear in the data view header and in cell list data views, just like cell names from TEMS-specific cell files. These names are enclosed within square brackets [ ], which are meant to symbolize the walls of a building. These zones are by default displayed in TEMS Pocket if present, colored and labeled according to their definitions. Zones are drawn on top of the map image itself but beneath everything else (waypoints, value element markers, events, transmitters). Tap the Actions button and select Unload Map Set.