www.actoolsupply.com

User Guide


 Heavy Duty Vibration Meter     407860 Vibration Meter
 Model 407860                   Extech Vibration Meter


                      www.actoolsupply.com
www.actoolsupply.com

Introduction
 Congratulations on your purchase of the Extech 407860 Vibration Meter. The Model
 407860 measures vibration levels in industrial machinery. Misalignment, poor balancing,
 structural compromises, and other factors can cause unwanted vibration increases. The
 Model 407860 has a frequency sensitivity that meets ISO-2954 and offers Displacement,
 Velocity and Acceleration features. This meter is shipped fully tested and calibrated and,
 with proper use, will provide years of reliable service.


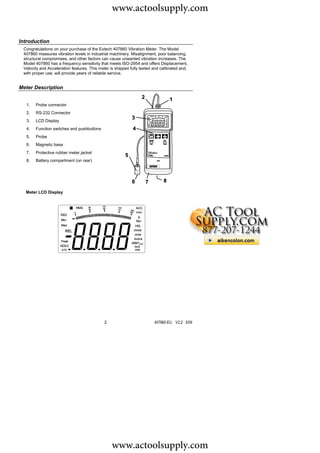
Meter Description


  1.   Probe connector
  2.   RS-232 Connector
  3.   LCD Display
  4.   Function switches and pushbuttons
  5.   Probe
  6.   Magnetic base
  7.   Protective rubber meter jacket
  8.   Battery compartment (on rear)


  Meter LCD Display


                                             2                          407860-EU V2.2 5/09


                                                 www.actoolsupply.com
www.actoolsupply.com

Meter Operation
Connecting the Probe
  1. Note that this meter accepts only the supplied vibration probe.
  2. Plug the BNC connector end of the probe cable onto the BNC connector at the top of
     the meter.
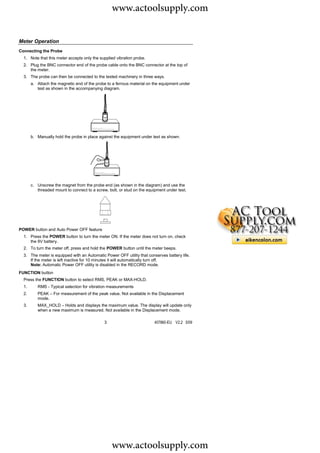
  3. The probe can then be connected to the tested machinery in three ways.
       a. Attach the magnetic end of the probe to a ferrous material on the equipment under
          test as shown in the accompanying diagram.


       b. Manually hold the probe in place against the equipment under test as shown.


       c. Unscrew the magnet from the probe end (as shown in the diagram) and use the
          threaded mount to connect to a screw, bolt, or stud on the equipment under test.


POWER button and Auto Power OFF feature
  1. Press the POWER button to turn the meter ON. If the meter does not turn on, check
     the 9V battery.
  2. To turn the meter off, press and hold the POWER button until the meter beeps.
  3. The meter is equipped with an Automatic Power OFF utility that conserves battery life.
     If the meter is left inactive for 10 minutes it will automatically turn off.
     Note: Automatic Power OFF utility is disabled in the RECORD mode.
FUNCTION button
  Press the FUNCTION button to select RMS, PEAK or MAX-HOLD.
  1.      RMS - Typical selection for vibration measurements
  2.      PEAK – For measurement of the peak value. Not available in the Displacement
          mode.
  3.      MAX_HOLD – Holds and displays the maximum value. The display will update only
          when a new maximum is measured. Not available in the Displacement mode.

                                              3                         407860-EU V2.2 5/09


                                                  www.actoolsupply.com
www.actoolsupply.com

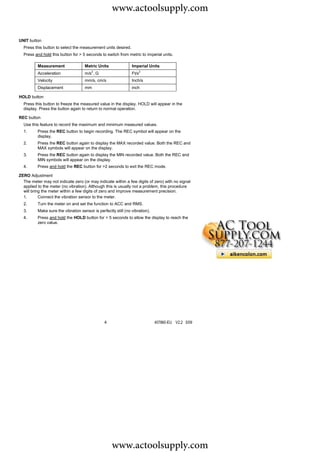
UNIT button
  Press this button to select the measurement units desired.
  Press and hold this button for > 5 seconds to switch from metric to imperial units.

          Measurement                Metric Units               Imperial Units
                                         2                             2
          Acceleration               m/s , G                    Ft/s
          Velocity                   mm/s, cm/s                 Inch/s
          Displacement               mm                         inch

HOLD button
  Press this button to freeze the measured value in the display. HOLD will appear in the
  display. Press the button again to return to normal operation.

REC button
  Use this feature to record the maximum and minimum measured values.
  1.      Press the REC button to begin recording. The REC symbol will appear on the
          display.
  2.      Press the REC button again to display the MAX recorded value. Both the REC and
          MAX symbols will appear on the display.
  3.      Press the REC button again to display the MIN recorded value. Both the REC and
          MIN symbols will appear on the display.
  4.      Press and hold the REC button for >2 seconds to exit the REC mode.

ZERO Adjustment
  The meter may not indicate zero (or may indicate within a few digits of zero) with no signal
  applied to the meter (no vibration). Although this is usually not a problem, this procedure
  will bring the meter within a few digits of zero and improve measurement precision.
  1.       Connect the vibration sensor to the meter.
  2.      Turn the meter on and set the function to ACC and RMS.
  3.      Make sure the vibration sensor is perfectly still (no vibration).
  4.      Press and hold the HOLD button for > 5 seconds to allow the display to reach the
          zero value.


                                                4                             407860-EU V2.2 5/09


                                                    www.actoolsupply.com
www.actoolsupply.com

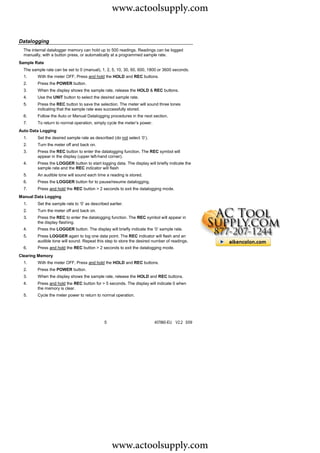
Datalogging
  The internal datalogger memory can hold up to 500 readings. Readings can be logged
  manually, with a button press, or automatically at a programmed sample rate.
Sample Rate
  The sample rate can be set to 0 (manual), 1, 2, 5, 10, 30, 60, 600, 1800 or 3600 seconds.
  1.     With the meter OFF, Press and hold the HOLD and REC buttons.
  2.     Press the POWER button.
  3.     When the display shows the sample rate, release the HOLD & REC buttons.
  4.     Use the UNIT button to select the desired sample rate.
  5.     Press the REC button to save the selection. The meter will sound three tones
         indicating that the sample rate was successfully stored.
  6.     Follow the Auto or Manual Datalogging procedures in the next section.
  7.     To return to normal operation, simply cycle the meter’s power.
Auto Data Logging
  1.     Set the desired sample rate as described (do not select ‘0’).
  2.     Turn the meter off and back on.
  3.     Press the REC button to enter the datalogging function. The REC symbol will
         appear in the display (upper left-hand corner).
  4.     Press the LOGGER button to start logging data. The display will briefly indicate the
         sample rate and the REC indicator will flash
  5.     An audible tone will sound each time a reading is stored.
  6.     Press the LOGGER button for to pause/resume datalogging.
  7.     Press and hold the REC button > 2 seconds to exit the datalogging mode.
Manual Data Logging
  1.     Set the sample rate to ‘0’ as described earlier.
  2.     Turn the meter off and back on.
  3.     Press the REC to enter the datalogging function. The REC symbol will appear in
         the display flashing.
  4.     Press the LOGGER button. The display will briefly indicate the ‘0’ sample rate.
  5.     Press LOGGER again to log one data point. The REC indicator will flash and an
         audible tone will sound. Repeat this step to store the desired number of readings.
  6.     Press and hold the REC button > 2 seconds to exit the datalogging mode.
Clearing Memory
  1.     With the meter OFF, Press and hold the HOLD and REC buttons.
  2.     Press the POWER button.
  3.     When the display shows the sample rate, release the HOLD and REC buttons.
  4.     Press and hold the REC button for > 5 seconds. The display will indicate 0 when
         the memory is clear.
  5.     Cycle the meter power to return to normal operation.


                                              5                           407860-EU V2.2 5/09


                                                  www.actoolsupply.com
www.actoolsupply.com

Memory Full Indication
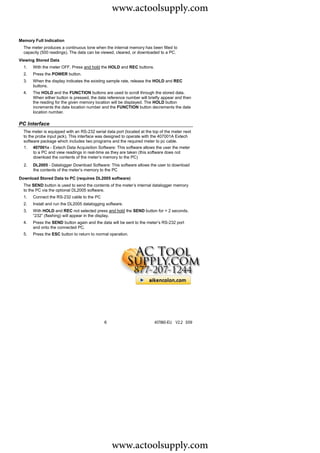
  The meter produces a continuous tone when the internal memory has been filled to
  capacity (500 readings). The data can be viewed, cleared, or downloaded to a PC.
Viewing Stored Data
  1.   With the meter OFF, Press and hold the HOLD and REC buttons.
  2.   Press the POWER button.
  3.   When the display indicates the existing sample rate, release the HOLD and REC
       buttons.
  4.   The HOLD and the FUNCTION buttons are used to scroll through the stored data.
       When either button is pressed, the data reference number will briefly appear and then
       the reading for the given memory location will be displayed. The HOLD button
       increments the data location number and the FUNCTION button decrements the data
       location number.

PC Interface
  The meter is equipped with an RS-232 serial data port (located at the top of the meter next
  to the probe input jack). This interface was designed to operate with the 407001A Extech
  software package which includes two programs and the required meter to pc cable.
  1. 407001A - Extech Data Acquisition Software: This software allows the user the meter
        to a PC and view readings in real-time as they are taken (this software does not
        download the contents of the meter’s memory to the PC)
  2.   DL2005 - Datalogger Download Software: This software allows the user to download
       the contents of the meter’s memory to the PC
Download Stored Data to PC (requires DL2005 software)
  The SEND button is used to send the contents of the meter’s internal datalogger memory
  to the PC via the optional DL2005 software.
  1.   Connect the RS-232 cable to the PC
  2.   Install and run the DL2005 datalogging software.
  3.   With HOLD and REC not selected press and hold the SEND button for > 2 seconds.
       “232” (flashing) will appear in the display.
  4.   Press the SEND button again and the data will be sent to the meter’s RS-232 port
       and onto the connected PC.
  5.   Press the ESC button to return to normal operation.


                                             6                           407860-EU V2.2 5/09


                                                  www.actoolsupply.com
www.actoolsupply.com

Battery Replacement
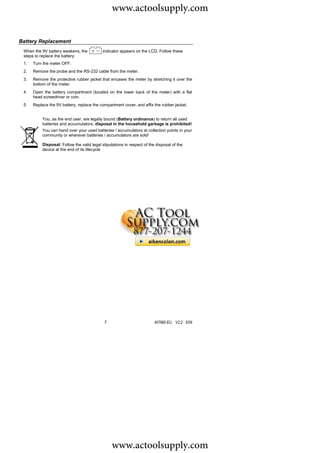
 When the 9V battery weakens, the           indicator appears on the LCD. Follow these
 steps to replace the battery:
 1.   Turn the meter OFF.
 2.   Remove the probe and the RS-232 cable from the meter.
 3.   Remove the protective rubber jacket that encases the meter by stretching it over the
      bottom of the meter.
 4.   Open the battery compartment (located on the lower back of the meter) with a flat
      head screwdriver or coin.
 5.   Replace the 9V battery, replace the compartment cover, and affix the rubber jacket.


           You, as the end user, are legally bound (Battery ordinance) to return all used
           batteries and accumulators; disposal in the household garbage is prohibited!
           You can hand over your used batteries / accumulators at collection points in your
           community or wherever batteries / accumulators are sold!

           Disposal: Follow the valid legal stipulations in respect of the disposal of the
           device at the end of its lifecycle


                                             7                            407860-EU V2.2 5/09


                                                  www.actoolsupply.com
www.actoolsupply.com

Specifications

General Specifications

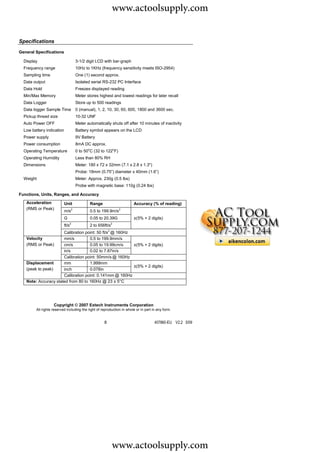
  Display                          3-1/2 digit LCD with bar-graph
  Frequency range                  10Hz to 1KHz (frequency sensitivity meets ISO-2954)
  Sampling time                    One (1) second approx.
  Data output                      Isolated serial RS-232 PC Interface
  Data Hold                        Freezes displayed reading
  Min/Max Memory                   Meter stores highest and lowest readings for later recall
  Data Logger                      Store up to 500 readings
  Data logger Sample Time          0 (manual), 1, 2, 10, 30, 60, 600, 1800 and 3600 sec.
  Pickup thread size               10-32 UNF
  Auto Power OFF                   Meter automatically shuts off after 10 minutes of inactivity
  Low battery indication           Battery symbol appears on the LCD
  Power supply                     9V Battery
  Power consumption                8mA DC approx.
                                          o                   o
  Operating Temperature            0 to 50 C (32 to 122 F)
  Operating Humidity               Less than 80% RH
  Dimensions                       Meter: 180 x 72 x 32mm (7.1 x 2.8 x 1.3")
                                   Probe: 18mm (0.75”) diameter x 40mm (1.6”)
  Weight                           Meter: Approx. 230g (0.5 lbs)
                                   Probe with magnetic base: 110g (0.24 lbs)

Functions, Units, Ranges, and Accuracy
   Acceleration            Unit               Range                    Accuracy (% of reading)
   (RMS or Peak)
                           m/s2               0.5 to 199.9m/s2
                           G                  0.05 to 20.39G           ±(5% + 2 digits)
                           ft/s2              2 to 656ft/s2
                      Calibration point: 50 ft/s2 @ 160Hz
   Velocity           mm/s          0.5 to 199.9mm/s
   (RMS or Peak)      cm/s          0.05 to 19.99cm/s     ±(5% + 2 digits)
                      in/s          0.02 to 7.87in/s
                      Calibration point: 50mm/s @ 160Hz
   Displacement       mm            1.999mm
                                                          ±(5% + 2 digits)
   (peak to peak)     inch          0.078in
                      Calibration point: 0.141mm @ 160Hz
   Note: Accuracy stated from 80 to 160Hz @ 23 ± 5°C


                   Copyright © 2007 Extech Instruments Corporation
        All rights reserved including the right of reproduction in whole or in part in any form.


                                                      8                              407860-EU V2.2 5/09


                                                          www.actoolsupply.com
www.actoolsupply.com

Appendix A: Machinery Classification
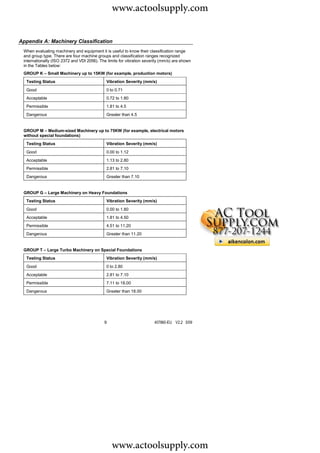
 When evaluating machinery and equipment it is useful to know their classification range
 and group type. There are four machine groups and classification ranges recognized
 internationally (ISO 2372 and VDI 2056). The limits for vibration severity (mm/s) are shown
 in the Tables below:
 GROUP K – Small Machinery up to 15KW (for example, production motors)
  Testing Status                              Vibration Severity (mm/s)
  Good                                        0 to 0.71
  Acceptable                                  0.72 to 1.80
  Permissible                                 1.81 to 4.5
  Dangerous                                   Greater than 4.5


 GROUP M – Medium-sized Machinery up to 75KW (for example, electrical motors
 without special foundations)
  Testing Status                              Vibration Severity (mm/s)
  Good                                        0.00 to 1.12
  Acceptable                                  1.13 to 2.80
  Permissible                                 2.81 to 7.10
  Dangerous                                   Greater than 7.10


 GROUP G – Large Machinery on Heavy Foundations
  Testing Status                              Vibration Severity (mm/s)
  Good                                        0.00 to 1.80
  Acceptable                                  1.81 to 4.50
  Permissible                                 4.51 to 11.20
  Dangerous                                   Greater than 11.20


 GROUP T – Large Turbo Machinery on Special Foundations
  Testing Status                              Vibration Severity (mm/s)
  Good                                        0 to 2.80
  Acceptable                                  2.81 to 7.10
  Permissible                                 7.11 to 18.00
  Dangerous                                   Greater than 18.00


                                            9                           407860-EU V2.2 5/09


                                                 www.actoolsupply.com
www.actoolsupply.com

Appendix B: Relative Sensitivity Table (ISO 2954)
                                               Relative sensitivity
   Frequency (Hz)         Normal value            Minimum value          Maximum value
          10                   1.0                     0.8                     1.1
          20                   1.0                     0.9                      1.1
          40                   1.0                     0.9                      1.1
          80                   1.0                     1.0                      1.0
         160                   1.0                     0.9                      1.1
         500                   1.0                     0.9                      1.1
        1000                   1.0                     0.8                      1.1


Appendix C: Glossary
 Vibration: Vibration is an oscillation or repetitive motion of an object around an equilibrium
 position.
 Displacement: Displacement is the peak-to-peak distance from a reference position, or
 equilibrium point, of an object under test.
 Peak to Peak Amplitude: Peak –to-peak amplitude is the displacement of an object (see
 above). It can be thought of as the distance from the maximum positive deviation point to
 the maximum negative deviation point with respect to an object’s equilibrium position.
 Velocity: Velocity is the rate of change of displacement. Velocity is measured in
 inches/second (mm/second) units.
 Acceleration: Acceleration is the rate of change of velocity. Units of measure for
 Acceleration is feet per second squared (meters per second squared)
 Peak Amplitude: Maximum deviation of an object from its equilibrium position.

 RMS: Root Mean Square Amplitude (RMS) is the square root of the average of the
 squared values of a waveform. The RMS amplitude of vibration is 0.707 times the peak
 amplitude value The RMS value of a vibration signal is an important measure of its
 amplitude.


                                             10                           407860-EU V2.2 5/09


                                                   www.actoolsupply.com

Extech 407860

  • 1.
    www.actoolsupply.com User Guide HeavyDuty Vibration Meter 407860 Vibration Meter Model 407860 Extech Vibration Meter www.actoolsupply.com
  • 2.
    www.actoolsupply.com Introduction Congratulations onyour purchase of the Extech 407860 Vibration Meter. The Model 407860 measures vibration levels in industrial machinery. Misalignment, poor balancing, structural compromises, and other factors can cause unwanted vibration increases. The Model 407860 has a frequency sensitivity that meets ISO-2954 and offers Displacement, Velocity and Acceleration features. This meter is shipped fully tested and calibrated and, with proper use, will provide years of reliable service. Meter Description 1. Probe connector 2. RS-232 Connector 3. LCD Display 4. Function switches and pushbuttons 5. Probe 6. Magnetic base 7. Protective rubber meter jacket 8. Battery compartment (on rear) Meter LCD Display 2 407860-EU V2.2 5/09 www.actoolsupply.com
  • 3.
    www.actoolsupply.com Meter Operation Connecting theProbe 1. Note that this meter accepts only the supplied vibration probe. 2. Plug the BNC connector end of the probe cable onto the BNC connector at the top of the meter. 3. The probe can then be connected to the tested machinery in three ways. a. Attach the magnetic end of the probe to a ferrous material on the equipment under test as shown in the accompanying diagram. b. Manually hold the probe in place against the equipment under test as shown. c. Unscrew the magnet from the probe end (as shown in the diagram) and use the threaded mount to connect to a screw, bolt, or stud on the equipment under test. POWER button and Auto Power OFF feature 1. Press the POWER button to turn the meter ON. If the meter does not turn on, check the 9V battery. 2. To turn the meter off, press and hold the POWER button until the meter beeps. 3. The meter is equipped with an Automatic Power OFF utility that conserves battery life. If the meter is left inactive for 10 minutes it will automatically turn off. Note: Automatic Power OFF utility is disabled in the RECORD mode. FUNCTION button Press the FUNCTION button to select RMS, PEAK or MAX-HOLD. 1. RMS - Typical selection for vibration measurements 2. PEAK – For measurement of the peak value. Not available in the Displacement mode. 3. MAX_HOLD – Holds and displays the maximum value. The display will update only when a new maximum is measured. Not available in the Displacement mode. 3 407860-EU V2.2 5/09 www.actoolsupply.com
  • 4.
    www.actoolsupply.com UNIT button Press this button to select the measurement units desired. Press and hold this button for > 5 seconds to switch from metric to imperial units. Measurement Metric Units Imperial Units 2 2 Acceleration m/s , G Ft/s Velocity mm/s, cm/s Inch/s Displacement mm inch HOLD button Press this button to freeze the measured value in the display. HOLD will appear in the display. Press the button again to return to normal operation. REC button Use this feature to record the maximum and minimum measured values. 1. Press the REC button to begin recording. The REC symbol will appear on the display. 2. Press the REC button again to display the MAX recorded value. Both the REC and MAX symbols will appear on the display. 3. Press the REC button again to display the MIN recorded value. Both the REC and MIN symbols will appear on the display. 4. Press and hold the REC button for >2 seconds to exit the REC mode. ZERO Adjustment The meter may not indicate zero (or may indicate within a few digits of zero) with no signal applied to the meter (no vibration). Although this is usually not a problem, this procedure will bring the meter within a few digits of zero and improve measurement precision. 1. Connect the vibration sensor to the meter. 2. Turn the meter on and set the function to ACC and RMS. 3. Make sure the vibration sensor is perfectly still (no vibration). 4. Press and hold the HOLD button for > 5 seconds to allow the display to reach the zero value. 4 407860-EU V2.2 5/09 www.actoolsupply.com
  • 5.
    www.actoolsupply.com Datalogging Theinternal datalogger memory can hold up to 500 readings. Readings can be logged manually, with a button press, or automatically at a programmed sample rate. Sample Rate The sample rate can be set to 0 (manual), 1, 2, 5, 10, 30, 60, 600, 1800 or 3600 seconds. 1. With the meter OFF, Press and hold the HOLD and REC buttons. 2. Press the POWER button. 3. When the display shows the sample rate, release the HOLD & REC buttons. 4. Use the UNIT button to select the desired sample rate. 5. Press the REC button to save the selection. The meter will sound three tones indicating that the sample rate was successfully stored. 6. Follow the Auto or Manual Datalogging procedures in the next section. 7. To return to normal operation, simply cycle the meter’s power. Auto Data Logging 1. Set the desired sample rate as described (do not select ‘0’). 2. Turn the meter off and back on. 3. Press the REC button to enter the datalogging function. The REC symbol will appear in the display (upper left-hand corner). 4. Press the LOGGER button to start logging data. The display will briefly indicate the sample rate and the REC indicator will flash 5. An audible tone will sound each time a reading is stored. 6. Press the LOGGER button for to pause/resume datalogging. 7. Press and hold the REC button > 2 seconds to exit the datalogging mode. Manual Data Logging 1. Set the sample rate to ‘0’ as described earlier. 2. Turn the meter off and back on. 3. Press the REC to enter the datalogging function. The REC symbol will appear in the display flashing. 4. Press the LOGGER button. The display will briefly indicate the ‘0’ sample rate. 5. Press LOGGER again to log one data point. The REC indicator will flash and an audible tone will sound. Repeat this step to store the desired number of readings. 6. Press and hold the REC button > 2 seconds to exit the datalogging mode. Clearing Memory 1. With the meter OFF, Press and hold the HOLD and REC buttons. 2. Press the POWER button. 3. When the display shows the sample rate, release the HOLD and REC buttons. 4. Press and hold the REC button for > 5 seconds. The display will indicate 0 when the memory is clear. 5. Cycle the meter power to return to normal operation. 5 407860-EU V2.2 5/09 www.actoolsupply.com
  • 6.
    www.actoolsupply.com Memory Full Indication The meter produces a continuous tone when the internal memory has been filled to capacity (500 readings). The data can be viewed, cleared, or downloaded to a PC. Viewing Stored Data 1. With the meter OFF, Press and hold the HOLD and REC buttons. 2. Press the POWER button. 3. When the display indicates the existing sample rate, release the HOLD and REC buttons. 4. The HOLD and the FUNCTION buttons are used to scroll through the stored data. When either button is pressed, the data reference number will briefly appear and then the reading for the given memory location will be displayed. The HOLD button increments the data location number and the FUNCTION button decrements the data location number. PC Interface The meter is equipped with an RS-232 serial data port (located at the top of the meter next to the probe input jack). This interface was designed to operate with the 407001A Extech software package which includes two programs and the required meter to pc cable. 1. 407001A - Extech Data Acquisition Software: This software allows the user the meter to a PC and view readings in real-time as they are taken (this software does not download the contents of the meter’s memory to the PC) 2. DL2005 - Datalogger Download Software: This software allows the user to download the contents of the meter’s memory to the PC Download Stored Data to PC (requires DL2005 software) The SEND button is used to send the contents of the meter’s internal datalogger memory to the PC via the optional DL2005 software. 1. Connect the RS-232 cable to the PC 2. Install and run the DL2005 datalogging software. 3. With HOLD and REC not selected press and hold the SEND button for > 2 seconds. “232” (flashing) will appear in the display. 4. Press the SEND button again and the data will be sent to the meter’s RS-232 port and onto the connected PC. 5. Press the ESC button to return to normal operation. 6 407860-EU V2.2 5/09 www.actoolsupply.com
  • 7.
    www.actoolsupply.com Battery Replacement Whenthe 9V battery weakens, the indicator appears on the LCD. Follow these steps to replace the battery: 1. Turn the meter OFF. 2. Remove the probe and the RS-232 cable from the meter. 3. Remove the protective rubber jacket that encases the meter by stretching it over the bottom of the meter. 4. Open the battery compartment (located on the lower back of the meter) with a flat head screwdriver or coin. 5. Replace the 9V battery, replace the compartment cover, and affix the rubber jacket. You, as the end user, are legally bound (Battery ordinance) to return all used batteries and accumulators; disposal in the household garbage is prohibited! You can hand over your used batteries / accumulators at collection points in your community or wherever batteries / accumulators are sold! Disposal: Follow the valid legal stipulations in respect of the disposal of the device at the end of its lifecycle 7 407860-EU V2.2 5/09 www.actoolsupply.com
  • 8.
    www.actoolsupply.com Specifications General Specifications Display 3-1/2 digit LCD with bar-graph Frequency range 10Hz to 1KHz (frequency sensitivity meets ISO-2954) Sampling time One (1) second approx. Data output Isolated serial RS-232 PC Interface Data Hold Freezes displayed reading Min/Max Memory Meter stores highest and lowest readings for later recall Data Logger Store up to 500 readings Data logger Sample Time 0 (manual), 1, 2, 10, 30, 60, 600, 1800 and 3600 sec. Pickup thread size 10-32 UNF Auto Power OFF Meter automatically shuts off after 10 minutes of inactivity Low battery indication Battery symbol appears on the LCD Power supply 9V Battery Power consumption 8mA DC approx. o o Operating Temperature 0 to 50 C (32 to 122 F) Operating Humidity Less than 80% RH Dimensions Meter: 180 x 72 x 32mm (7.1 x 2.8 x 1.3") Probe: 18mm (0.75”) diameter x 40mm (1.6”) Weight Meter: Approx. 230g (0.5 lbs) Probe with magnetic base: 110g (0.24 lbs) Functions, Units, Ranges, and Accuracy Acceleration Unit Range Accuracy (% of reading) (RMS or Peak) m/s2 0.5 to 199.9m/s2 G 0.05 to 20.39G ±(5% + 2 digits) ft/s2 2 to 656ft/s2 Calibration point: 50 ft/s2 @ 160Hz Velocity mm/s 0.5 to 199.9mm/s (RMS or Peak) cm/s 0.05 to 19.99cm/s ±(5% + 2 digits) in/s 0.02 to 7.87in/s Calibration point: 50mm/s @ 160Hz Displacement mm 1.999mm ±(5% + 2 digits) (peak to peak) inch 0.078in Calibration point: 0.141mm @ 160Hz Note: Accuracy stated from 80 to 160Hz @ 23 ± 5°C Copyright © 2007 Extech Instruments Corporation All rights reserved including the right of reproduction in whole or in part in any form. 8 407860-EU V2.2 5/09 www.actoolsupply.com
  • 9.
    www.actoolsupply.com Appendix A: MachineryClassification When evaluating machinery and equipment it is useful to know their classification range and group type. There are four machine groups and classification ranges recognized internationally (ISO 2372 and VDI 2056). The limits for vibration severity (mm/s) are shown in the Tables below: GROUP K – Small Machinery up to 15KW (for example, production motors) Testing Status Vibration Severity (mm/s) Good 0 to 0.71 Acceptable 0.72 to 1.80 Permissible 1.81 to 4.5 Dangerous Greater than 4.5 GROUP M – Medium-sized Machinery up to 75KW (for example, electrical motors without special foundations) Testing Status Vibration Severity (mm/s) Good 0.00 to 1.12 Acceptable 1.13 to 2.80 Permissible 2.81 to 7.10 Dangerous Greater than 7.10 GROUP G – Large Machinery on Heavy Foundations Testing Status Vibration Severity (mm/s) Good 0.00 to 1.80 Acceptable 1.81 to 4.50 Permissible 4.51 to 11.20 Dangerous Greater than 11.20 GROUP T – Large Turbo Machinery on Special Foundations Testing Status Vibration Severity (mm/s) Good 0 to 2.80 Acceptable 2.81 to 7.10 Permissible 7.11 to 18.00 Dangerous Greater than 18.00 9 407860-EU V2.2 5/09 www.actoolsupply.com
  • 10.
    www.actoolsupply.com Appendix B: RelativeSensitivity Table (ISO 2954) Relative sensitivity Frequency (Hz) Normal value Minimum value Maximum value 10 1.0 0.8 1.1 20 1.0 0.9 1.1 40 1.0 0.9 1.1 80 1.0 1.0 1.0 160 1.0 0.9 1.1 500 1.0 0.9 1.1 1000 1.0 0.8 1.1 Appendix C: Glossary Vibration: Vibration is an oscillation or repetitive motion of an object around an equilibrium position. Displacement: Displacement is the peak-to-peak distance from a reference position, or equilibrium point, of an object under test. Peak to Peak Amplitude: Peak –to-peak amplitude is the displacement of an object (see above). It can be thought of as the distance from the maximum positive deviation point to the maximum negative deviation point with respect to an object’s equilibrium position. Velocity: Velocity is the rate of change of displacement. Velocity is measured in inches/second (mm/second) units. Acceleration: Acceleration is the rate of change of velocity. Units of measure for Acceleration is feet per second squared (meters per second squared) Peak Amplitude: Maximum deviation of an object from its equilibrium position. RMS: Root Mean Square Amplitude (RMS) is the square root of the average of the squared values of a waveform. The RMS amplitude of vibration is 0.707 times the peak amplitude value The RMS value of a vibration signal is an important measure of its amplitude. 10 407860-EU V2.2 5/09 www.actoolsupply.com