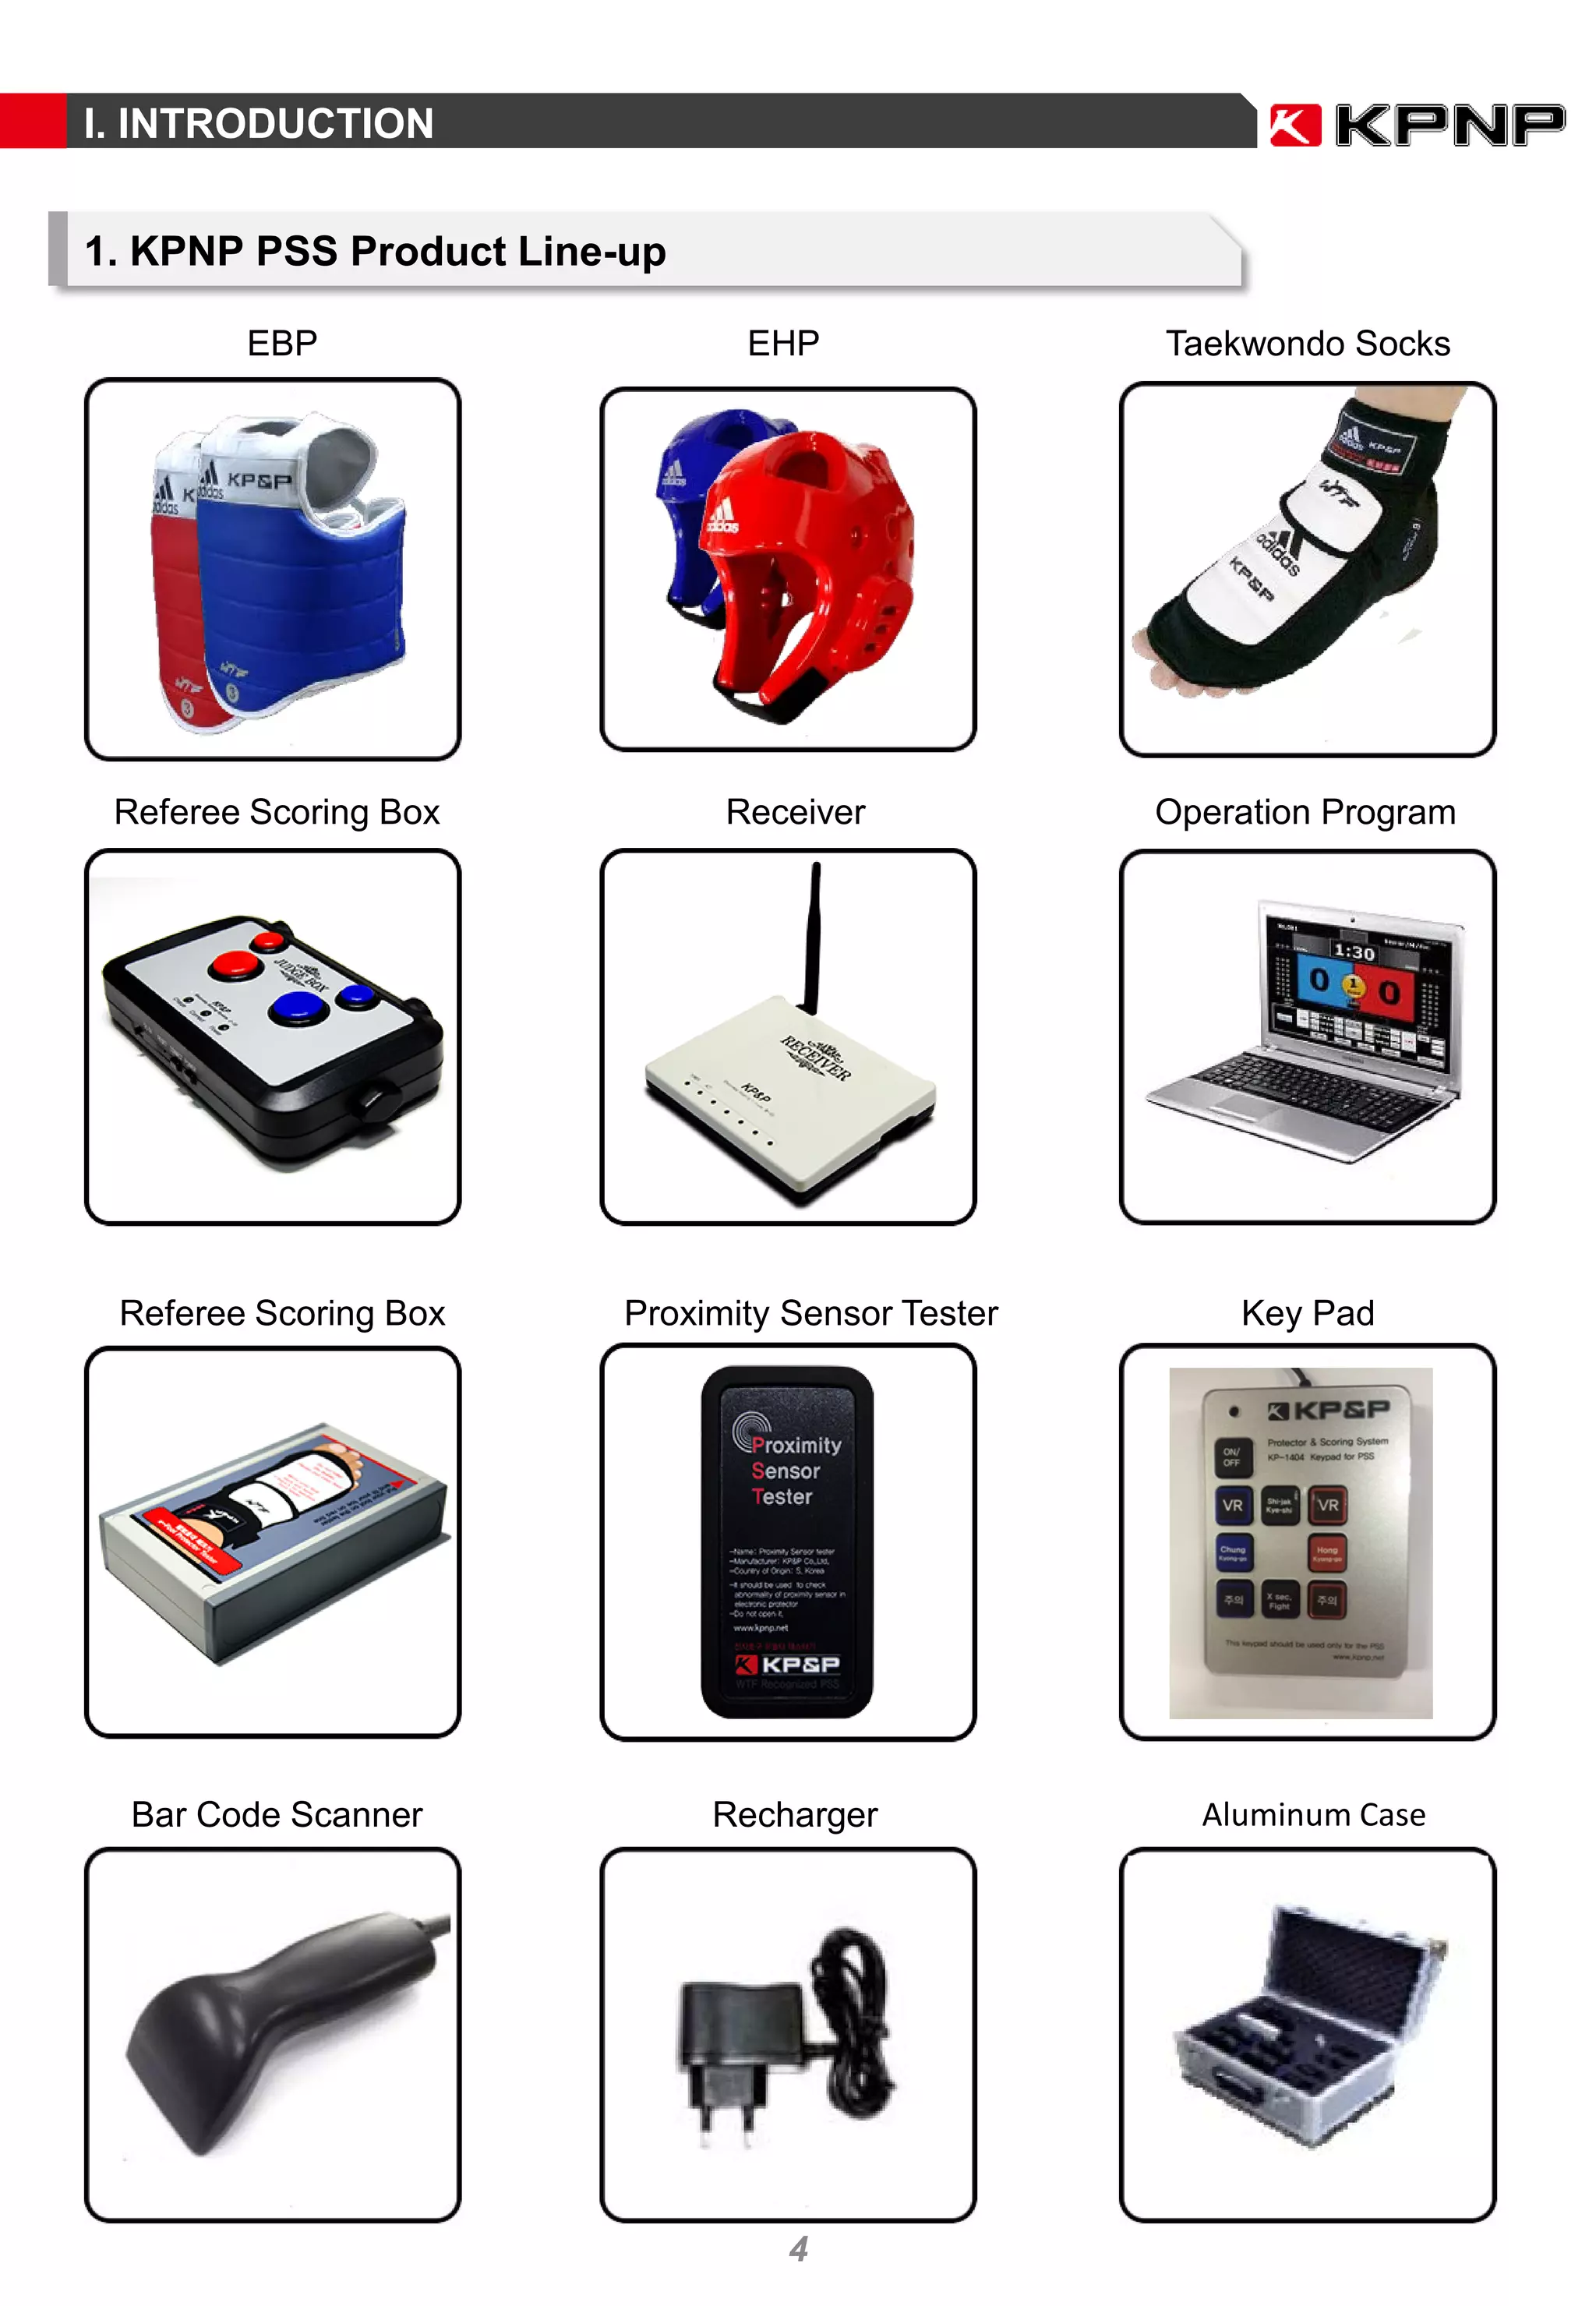
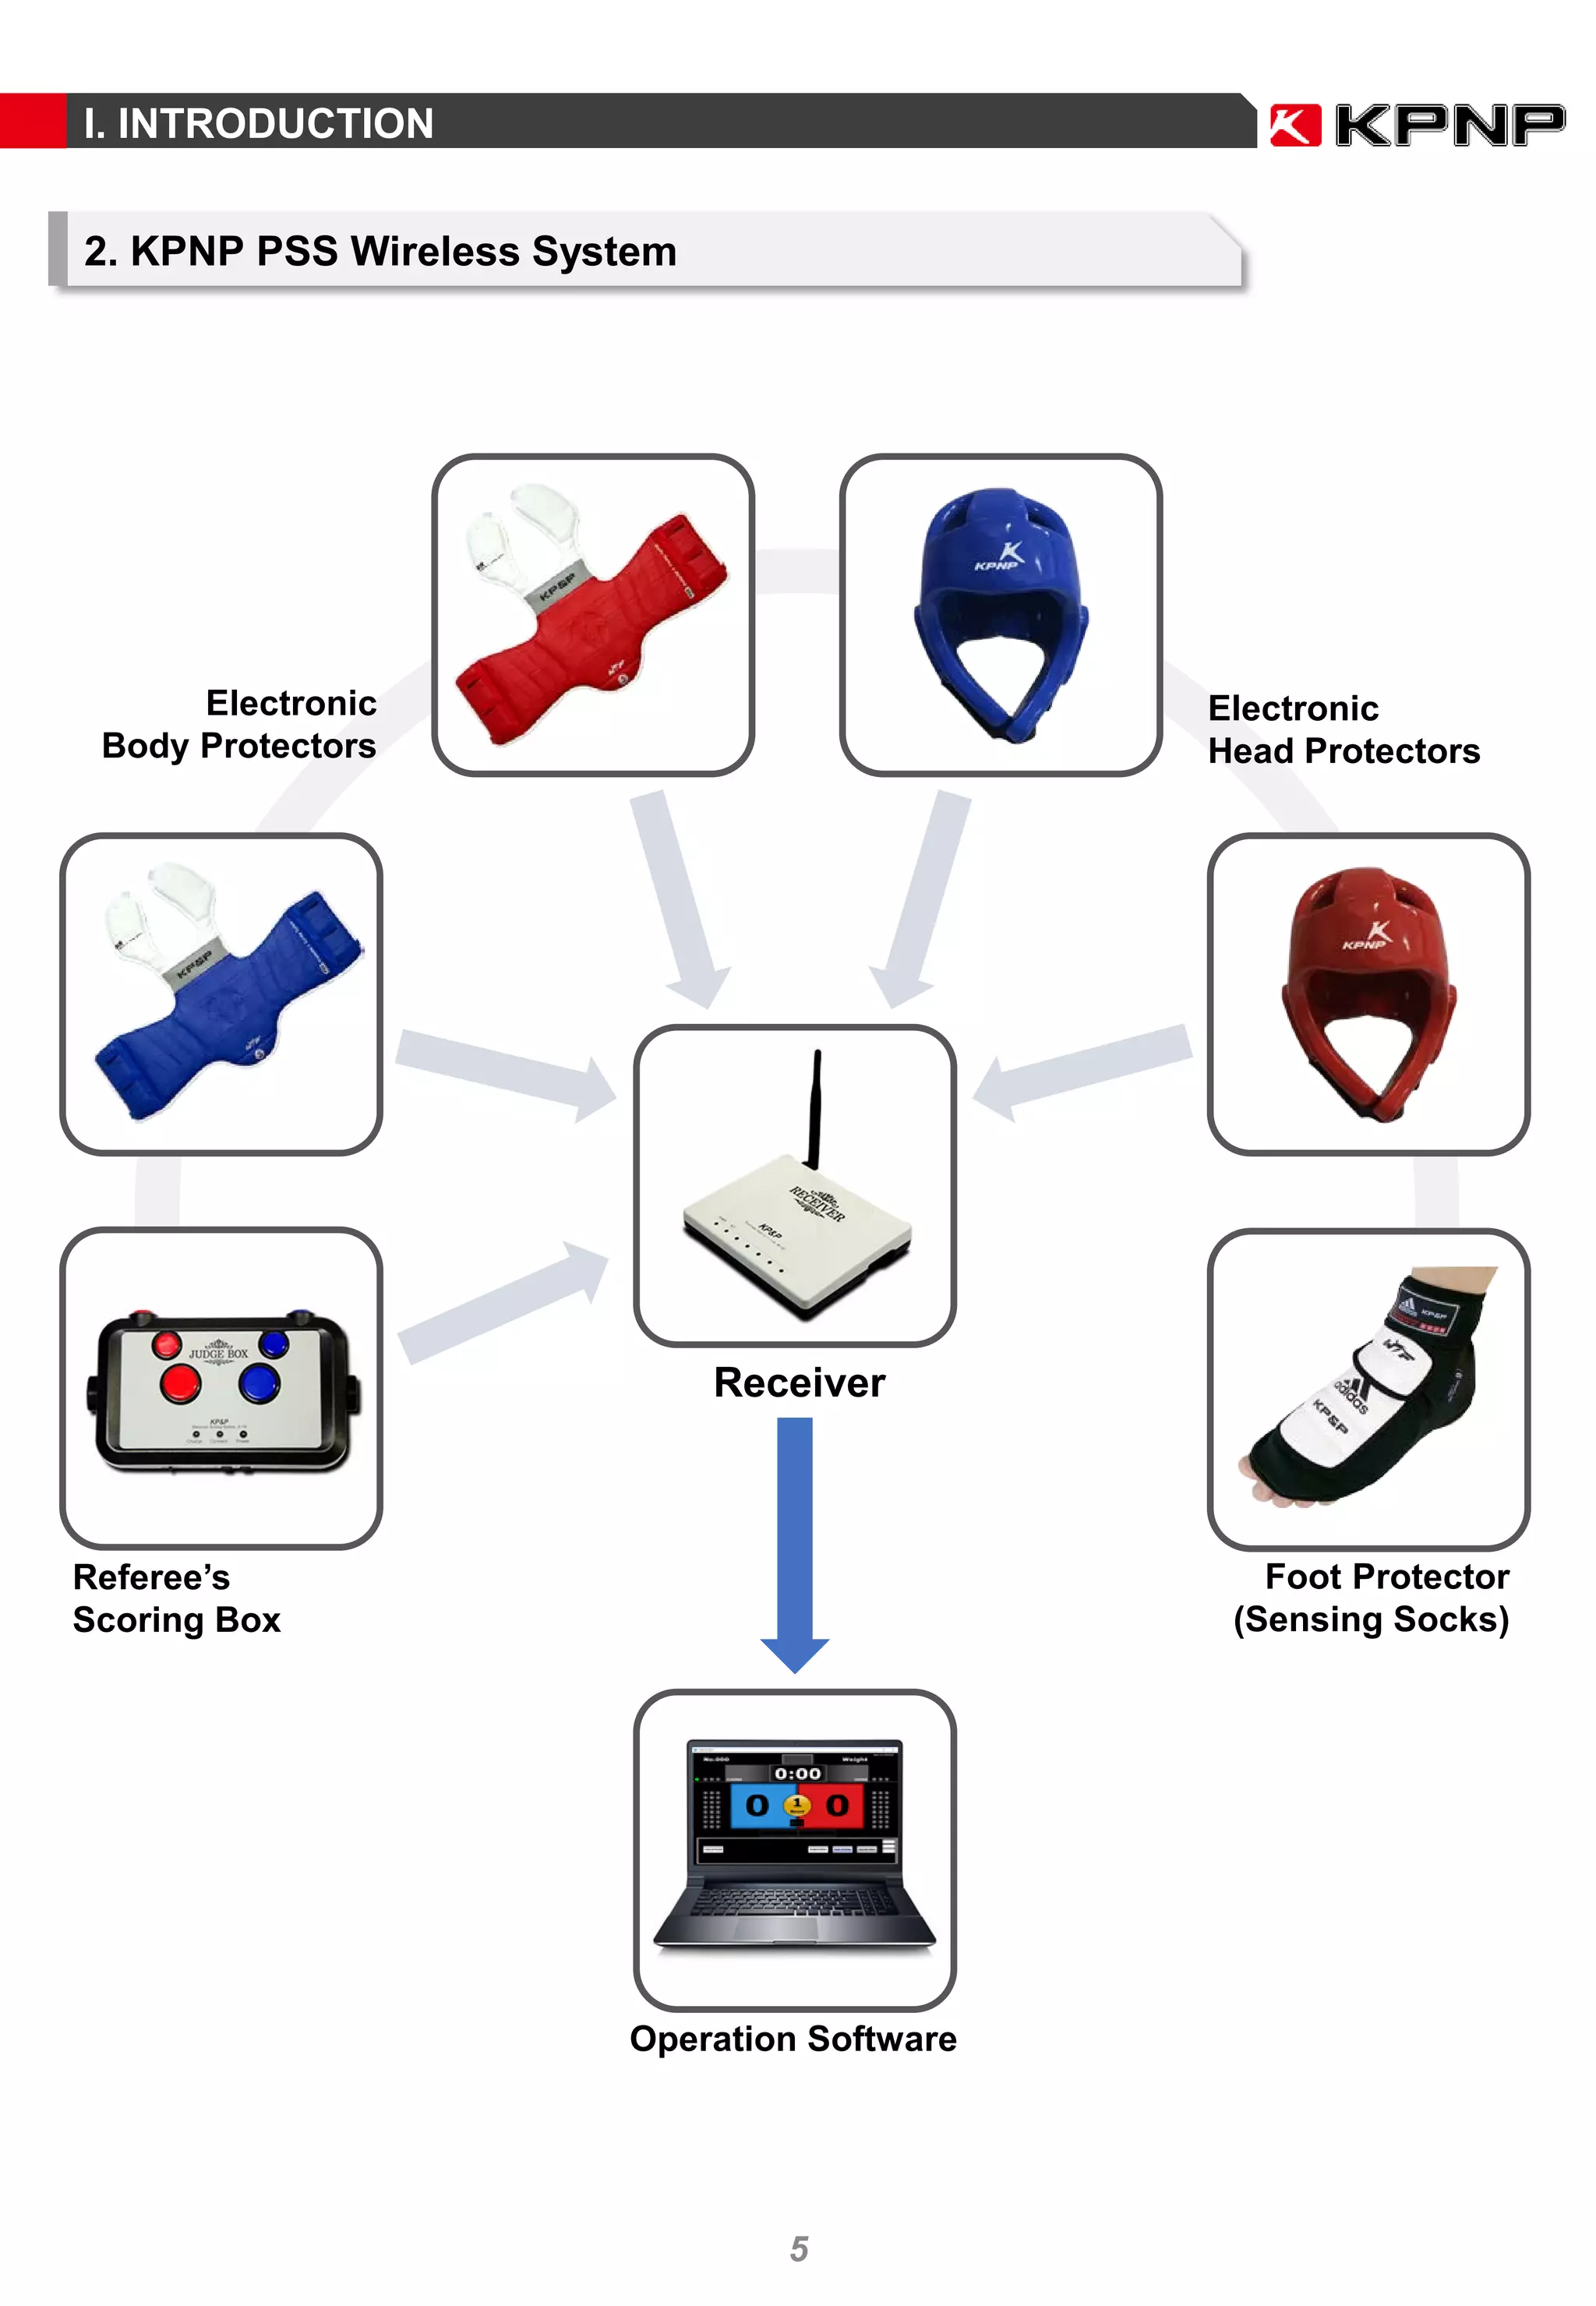
SlideShare a Scribd company logo
KPNP PSS User’s Guide
March 2017
CONTENTS
2
I. INTRODUCTION
1. KPNP PSS LINE UP 4
2. KPNP Wireless System 5
II. GETTING STARTED
1. E-Body Protector 7
2. E-Head Protector 9
3. Referee’s Scoring Box 11
4. Connecting Receiver to PC 13
5. Installing Driver for Receiver 14
6. Scoring System Setup – Case Study 16
7. Display Setting – Screen Resolution 17
III. PROGRAM & RULE SETTING
1. Start the Program 20
2. Main Display 21
3. Rule Setting 22
4. Court No. & Channel Setting 23
5. Rule Setting Options 24
6. Scoring Mode 25
i. Full PSS Scoring Mode 26
ii. E-Body Protector Only Mode (Without Head Gear) 28
iii. Manual Scoring Mode (Without PSS) 30
7. Referee’s Scoring Box Registration 32
IV. COMPETITION OPERATION
1. Creating Games 34
2. Score Board Display Setting (From) 35
3. Protector Registration 36
4. Disconnect, Change Protectors 37
5. Using Device List 38
V. DURING THE GAME
1. Control Panel – Key Board Shortcut 42
2. Score Board Display Component 43
3. Test Mode 44
4. Starting the Competition 45
5. Changing Game Time during the competition 46
6. Entering Golden Point Round 47
7. Golden Point Round Display 48
8. Reverse Screen 49
9. Finishing Games 50
VI. ERROR HANDLING
1. Error Messages 52
2. Other Problems 54
VII. REFERENCES
1. Scoring Mechanism 56
KPNP PSS User Guide
I. INTRODUCTION
I. INTRODUCTION
EBP Taekwondo Socks
Referee Scoring Box Operation ProgramReceiver
EHP
Referee Scoring Box Proximity Sensor Tester Key Pad
Bar Code Scanner Recharger Aluminum Case
1. KPNP PSS Product Line-up
4
I. INTRODUCTION
Foot Protector
(Sensing Socks)
Referee’s
Scoring Box
Receiver
Operation Software
Electronic
Body Protectors
Electronic
Head Protectors
2. KPNP PSS Wireless System
5
KPNP PSS User Guide
II. GETTING STARTED
II. GETTING STARTED
How to power on/off and Register
① Power ON / OFF
- Press the power button for more than
3 sec. until hearing the Beep sound
- ‘Power LED (red)’ ON / OFF
② Registration
- Press ‘Registration’ button after pressing
‘Vest Reg’ icon in operation program.
- “Registered’ message will be shown on the
program display and a green light will be
turned on with a beep sound when
registered.
Reset
USB Connector
Register LED
Register Button
Power Button
Power LED
How to Recharge
1. E-Body Protector
① Beware of discharge of electricity (recharge it before there is 25% left)
② 2 hours required for full-charge (EBP runs for approximately 10 hours normally)
③ Green light is on while recharging and off after recharging is complete.
④ If fully charged, Green Light blinks and goes off.
7
II. GETTING STARTED
Test Mode
① Entering into Test Mode
- Turn on the Power.
- Press the Power Button & Register Button
exactly at the same time.
- It sounds ‘Bee-bee-bee-beep’
② Test Impact Sensor
- After entering into Test Mode, place the
Protector on the floor or any flat surface
(such as on top of desk) and hit 3 points as
shown on the picture on the right.
- If you hear ‘Beep’ sound from the
transmitter, the impact sensor is OK.
- If you don’t hear ‘Beep’ sound on any spot,
the impact sensor might be broken. Contact
the seller immediately.
③ Test Proximity Sensor (Antenna)
- After entering into Test Mode, place the
Proximity Tester on the Point Area of the
Body Protector as shown on the right
picture.
- Consistent ‘Beeping’ sound must be heard.
- If you cannot hear any sound, or significant
inconsistency in Beeping sound, please
contact the seller.
Reset
USB Connector
Register LED
Register Button Power Button
Power LED
Press the Two
(2) Buttons at
the same time
Proximity
Sensor Tester
◈ Beware to TURN-OFF the power after Test is done!
8
II. GETTING STARTED
How to power on/off and Register
① Power ON / OFF
- Press the power button for more than
3 sec. until hearing the Beep sound
- ‘Power LED (red)’ ON / OFF
② Registration
- Press ‘Registration’ button after pressing
‘Head Reg’ icon in operation program.
- “Registered’ message will be shown on the
program display and a green light will be
turned on with a beep sound when
registered.
Reset
USB Connector
Register LED
Register Button
Power Button
Power LED
How to Recharge
2. E-Head Protector
① Beware of discharge of electricity (recharge it before there is 25% left)
② 2 hours required for full-charge (EBP runs for approximately 10 hours normally)
③ Green light is on while recharging and off after recharging is complete.
④ If fully charged, Green Light blinks and goes off.
1) Green Light is turned on when recharging
2) Green Light goes off if fully charged.
9
II. GETTING STARTED
Test Mode
① Entering into Test Mode
- Turn on the Power.
- Press the Power Button & Register Button
exactly at the same time.
- It sounds ‘Bee-bee-bee-beep’
② Test Impact Sensor
- After entering into Test Mode, place the
Protector on the floor or any flat surface
(such as on top of desk) and hit 3 points as
shown on the picture on the right.
- If you hear ‘Beep’ sound from the
transmitter, the impact sensor is OK.
- If you don’t hear ‘Beep’ sound on any spot,
the impact sensor might be broken. Contact
the seller immediately.
③ Test Proximity Sensor (Antenna)
- After entering into Test Mode, place the
Proximity Tester on all Area of the Head
Protector as shown on the right picture.
- Consistent ‘Beeping’ sound must be heard.
- If you cannot hear any sound, or significant
inconsistency in Beeping sound, please
contact the seller.
Reset
USB Connector
Register LED
Register Button Power Button
Power LED
Press the Two
(2) Buttons at
the same time
Proximity
Sensor Tester
◈ Beware to TURN-OFF the power after Test is done!
10
II. GETTING STARTED
How to power on/off and Register
3. Referee’s Scoring Box
① Power ON / OFF
- Press the power button for more
than 3 seconds until hearing the
Beep sounds
- ‘Power LED (red)’ ON / OFF
② Registration
- Press ‘Registration’ button after
pressing ‘vest reg’ icon in
operation program.
- “Registered’ message will be
shown on the program display and
a green light will be turned on with
a beep sound when registered.
Reset Button
Recharge Connector Power Button
Register Button
How to Recharge
① Beware of discharge of electricity (recharge it before there is 25% left)
② 2 hours required for full-charge (EBP runs for approx. 10 hours normally)
③ Green light is on while recharging and off after recharging is complete.
④ If fully charged, Green Light blinks and goes off.
③
11
II. GETTING STARTED
Test Mode
① Entering into Test Mode
- Turn on the Power.
- Press the Power Button & Register Button exactly at the same time.
- It sounds ‘Bee-bee-bee-beep’
② Test Buttons
- After entering into Test Mode, press each button.
- When buttons are pressed, the box will vibrate.
③ Malfunction
- If the box vibrates from time to time or does not vibrate at all on the button press, the button is
malfunctioning. Please contact the seller.
◈ Beware to TURN-OFF the power after Test is done!
Press the Two (2) Buttons
at the same time
Power ButtonRegister Button
12
II. GETTING STARTED
How to connect to computer
① ‘Power LED’ is on when the receiver is connected to the powered computer
② ‘Activation LED’ is on when the operation software is activated.
Activation LED
Power LED
4. Connecting RECEIVER to PC
13
II. GETTING STARTED
5. Installing Driver for Receiver
① From the KPNP Operation Software folder,
double click and go into the ‘USB Driver’
Folder
② Right click the ‘USBXpressInstaller.exe’
③ Click ‘Run as administrator’
④ Press ‘Insatall’
⑤ Press ‘Yes’
⑥ Installation is complete. Press ‘OK’ and
finish installation of USB Driver.
14
II. GETTING STARTED
How to check if USB Driver is properly installed
① Open Explorer
window.
② Right Click ‘This PC’
and click ‘Property’ to
enter System Setting.
③ Click ‘Device
Manager’
④ Find if there is
‘USBXpress Device’ in
the list as shown in the
picture.
15
II. GETTING STARTED
6. Scoring System Setting – Case Study
RGB/HDMI
Display Cable InterfaceUSB Cable Interface
Using 2 Dual Monitors
Operation Software
Display 2
Display 1
Receiver
For multiple Display, use
Video Splitter or Video
Switcher.
(VGA or HDMI)
Court 2
IVR SYSTEM
IVR PSS
J1
J2J3
VGA(RGB)
or HDMI
Cable
16
II. GETTING STARTED
7. Display Setting – Screen Resolution
Screen Resolution Setting (Windows 7)
Run the software after PC setting is finished.
① Click ‘Right Button’ on the mouse at the Desk Top
screen
② Click ‘Screen resolution‘
③ Multiple display : Select Extend these display
④ Display : Select 2 screen model
⑤ Resolutions : Select 1024 × 768
※ If you are unable to find 1024 × 768 resolution, you can click the ‘Advanced Setting’ and change
the display setting. Display setting menu can be different from the system.
17
II. GETTING STARTED
Screen Resolution Setting (Windows 10)
Run the software after PC setting is finished.
① Click ‘Right Button’ on the mouse at the Desk Top
screen
② Click ‘Display Setting‘
③ Click ‘2’, the secondary monitor
④ Set the ‘2nd Screen’ as ‘Extended Display’
⑤ Click ‘Apply’ button
⑥ Then go to ‘Advanced Settings’
Display Setting
④
⑦ Select ‘2nd Screen’
⑧ From the list, choose ‘1024x768’ for 2nd
screen
⑨ Click ‘Apply’ button
⑦
⑧
③
18
KPNP PSS User Guide
III. PROGRAM & RULE
SETTING
III. PROGRAM & RULE SETTING
1. Start the Program
① Open KPNP Client program folder and
Double click “CTaekwondo.exe”
20
III. PROGRAM & RULE SETTING
2. Main Display
Operator’s Screen
Score Board Screen – Extended Display
1 423
[Procedure]
1. Rule Setting
2. Registration
3. Control Panel
4. Result View
21
III. PROGRAM & RULE SETTING
3. Rule Setting
In order to start to use PSS Software to match the required devices and rules, Rule Setting must
be done properly.
Rule Setting is where you setup basic rules and operational options for scoring.
Once the settings configured here are applied, you must restart the software to change any
settings losing all connections with Hardware such as Receiver, Referee’s Scoring Box and
Protectors.
22
①
After Court No. is selected, you can change the Channel manually.
Change the channel only when there are continuous device disconnection problem.
To change the channel, you must re-start the program and register all devices again!
①
III. PROGRAM & RULE SETTING
4. Court No. & Channel Setting
The FIRST THING you need to do to operate KPNP PSS software is to connect the Receiver and
set the channel. Change the number of court and press “SET” button on the right. Then, the Court
No. will change Green if the Receiver is properly connected.
If error occurs, follow this steps:
① Close the program.
② Remove the Receiver USB Cable and re-connect to the PC.
③ Run Software again and try ‘Set’ the receiver again.
If the receiver is properly connected, the Court No. changes to GREEN.
You can check the Receiver version.
①
①
②
②
23
III. PROGRAM & RULE SETTING
5. Rule Setting - Options
①
②
③
⑤
④
⑥
⑦
⑧
⑨
⑩
⑪
⑫
⑬
① Court No.
- Set the Court No.
- For multiple court, choose different
No. for other court.
② Competition Class
- Set Threshold Level
- Current WTF Threshold level are
set as default (2017)
③ Equipment Setting
④ Without PSS Option
- If checked, you can use Manual
Scoring Mode only using Referee’s
Scoring Boxes without any PSS
(Body & Head Protectors)
⑤ Referee Setting
- Set the number of corner judges
who will score using Referee’s
Scoring Boxes.
- Referee’s Scoring Boxes can be
used maximum 3 per court.
⑥ Use Vibration Mode (Only works on PSS Mode)
- If checked, the Referee’s Scoring Box vibrates when proper points on the Body protector is
made.
- It alerts Corner Judges to give Technical points if necessary.
⑦ Match Time Setting
⑧ Point Ceiling Setting – If checked, competition automatically stops if the condition set here is
met.
⑨ Point Gap Setting – If checked, competition automatically stops if the condition is met. You
can change the Point Gap in accordance with the regulation.
⑩ Round Setting – You can change the round setting.
⑪ Reverse Screen – Changes the location of Chung(blue) and Hong(red) on extended screen.
- Unchecked: Blue-Red, Checked: Red-Blue
⑫ Button Point Setting
- You can change the value of the button input by Corner Judges (Scoring Box)
- If the rule is changed, you can change the button setting here to follow the changed rules.
⑬ Protector Point Setting
- You can change the Points automatically registered by the Protectors here. In 2017, Body
Protector point was changed from 1 to 2.
24
Equipment 1) Full E-Protector
Mode
2) Body Protector
Only Mode
3) Manual Scoring
Mode
E-Head Protector
○
E-Body Protector
○ ○
Referee’s Scoring Box
○ ○ ○
Receiver
○ ○ ○
E-Foot Protector
○ ○
Users may choose different Scoring Mode according to the Equipment they have, or the necessity
by Divisions. KPNP Scoring System supports all kinds of Scoring Mode to meet the needs for
training or championships management.
III. PROGRAM & RULE SETTING
6. Scoring Mode
25
III. PROGRAM & RULE SETTING
6-1. Full E-Protector Scoring Mode
26
III. PROGRAM & RULE SETTING
① Fist point (1 point)
- Referee pressed ‘fist’ button when the attack is a fist punch.
- Valid point is expressed when at least two out of three referees presses the button.
② Technical Point - Body (1 additional point)
- This button only works when valid point was made on Body Trunk.
- Referee pressed ‘technical’ button when the attack is a technical kick.
- Valid point is expressed when at least two out of three referees presses the button.
③ Technical Point – Head (1 additional points)
- Valid point is expressed when at least two out of three referees presses the button.
③ Technical Point (Head)③ Technical Point (Head)
② Technical
Point (Body)
① Fist Point
② Technical
Point (Body)
① Fist Point
6-1. Full E-Protector Scoring Mode
Referee’s Box Configuration
27
III. PROGRAM & RULE SETTING
6-2. E-Body Protector Only Scoring Mode
28
III. PROGRAM & RULE SETTING
① Fist point (1 point)
- Referee pressed ‘fist’ button when the attack is a fist punch.
- Valid point is expressed when at least two out of three referees presses the button.
② Technical Point - Body (1 additional point)
- This button only works when valid point was made on Body Trunk.
- Referee pressed ‘technical’ button when the attack is a technical kick.
- Valid point is expressed when at least two out of three referees presses the button.
③ Head Point (3 points)
- Valid point is expressed when at least two out of three referees presses the button.
④ Technical Point – Head (4 points)
- Referee must press the Head point button and Fist point button at the same time.
- Or press the Head point button and Technical point button at the same time.
③ Head Point (3 pts)③ Head Point (3 pts)
② Technical
Point (Body)
① Fist Point
② Technical
Point (Body)
① Fist Point
④ Technical point (head)
(4 pts)
Press together
6-2. E-Body Protector Only Scoring Mode
Referee’s Box Configuration
29
III. PROGRAM & RULE SETTING
6-3. Manual Scoring Mode (Without PSS)
30
III. PROGRAM & RULE SETTING
Users can change the button mapping on the PSS Operation Program.
① Fist point (1 point)
- Referee pressed ‘fist’ button when the attack is a fist punch.
- Valid point is expressed when at least two out of three referees presses the button.
② Technical Point - Body (1 additional point)
- This button only works when valid point was made on Body Trunk.
- Referee pressed ‘technical’ button when the attack is a technical kick.
- Valid point is expressed when at least two out of three referees presses the button.
③ Head Point (3 points)
- Valid point is expressed when at least two out of three referees presses the button.
④ Technical Head Point(4 points)
- Referee must press the Head point button and Fist point button at the same time.
- Or press the Head point button and Technical point button at the same time.
③ 3 Points③ 3 Points
② 2 Points
① 1 Point
② 2 Points
① 1 Point
④ 4 Points
Press together
6-3. Manual Scoring Mode
Referee’s Box Configuration
31
III. PROGRAM & RULE SETTING
7. Referee’s Scoring Box Registration
Register Button
① Turn on the Power of Referee’s
Scoring Box.
② Press the Button on the Screen to
register.
③ Press ‘Register Button on
Referee’s Scoring Box before ④
progress bar runs out.
④ Progress Bar
⑤ If error occurs repeatedly, turn off
the Scoring Box and try again
from step ①.
⑥ If devices are successfully
connected, you can see the MAC
Address of the device and the
Button changes from ‘Reg’ to ‘Off’
⑦ If you press ‘Off’ button, you can
turn-off the Scoring Box by
software and the Button changes
to ‘Reg’ again.
①Power Button
②
③
④
⑤
Figure II.
Figure I.
⑦
⑥
32
KPNP PSS User Guide
IV. Competition Operation
IV. COMPETITION OPERATION
1. Creating Games
①
②
③
① Extend the Registration
window by clicking
‘Correction’ button.
② Set the Game information and
input Names and Teams of
players.
③ Threshold levels are
automatically applied by
selected Division and Weight-
category.
※ Tip
If you want to ADD games
without Names or From, just
press ‘REGISTRATION’ button
repeatedly, and games will be
added automatically increasing
Game No.
In order to begin the Competition, you must apply a
game onto the System.
Simply ‘Double Click’ any game you added on the list.
Then, the game will be set on the screen.
If you want to change the current game, then ‘Double
Click’ another game and it automatically applied to the
system.
This can be used when there was a mistake in any
information (eg. Gender, Division or Weight category)
during the game.
1-1. Player Registration
1-2. Applying Game to the System
34
IV. COMPETITION OPERATION
2. Score Board Display Setting
If you want to use National Flag on the Score Board Screen, DO NOT input ‘From’ when you enter
the name of the Players.
If you want to use Team Name instead of the National Flag on the Score Board Screen, input
‘From’ when you enter the name of the Players.
1-1. Using Natinoal Flags
1-2. Using Team Names
35
IV. COMPETITION OPERATION
3. Protector Registration
Reset Register LED
Register Button
Power Button
Power LED①
②
③
To register Protectors to the system, follow the procedure below:
① Press ‘Reg’ Button to match the Protector to register.
② Progress bar runs about 10 seconds.
③ Press and hold ‘Register Button’ on the Protector for more than 3 seconds until ‘Beep’
sound is heard.
④ If the Protector is properly registered, the MAC address (16 digit code) registers and the
box turns to Green.
⑤ Repeat ①~④ until you finish registering all protectors.
※ To ensure the protector is registered to the Right Place, compare the Number on the
program, and the number on the Protector.
④
Compare the
Number to
ensure correct
registration
36
IV. COMPETITION OPERATION
4. Disconnect, Change Protectors
For any reason, if you should disconnect and change the Protector, press ‘Off’ button. The
Button will be changed go ‘Reg’ again.
37
IV. COMPETITION OPERATION
① If you want to use designated
Protectors on the court, you can
check this button and register
Device List.
This option is used when you want
to place the limited set of Body &
Head Protectors on 1 court and
use them repeatedly only changing
Athletes.
①
5. Using Device List
1-1. Using Device List
38
IV. COMPETITION OPERATION
① Displays the list of registered MAC Address of Chung Hogu (Body protector Blue).
② Input the 16 digit MAC Address of the device using keyboard or bar-code reader and click
ADD button to register new protector.
Maximum number of each devices are up to 6. Total 24 (6 Blue Body Protectors, 6 Red Body
Protectors, 6 Blue Head Gears, 6 Red Head Gears) devices can be registered on 1 court.
①
②
1-2. Using Device List – Device Registration
39
IV. COMPETITION OPERATION
① If you want to remove any of the registered devices, check the box on the device
you want to delete, and then press “DELETE’ button above.
①
1-3. Using Device List – Deleting Device from the list
40
KPNP PSS User Guide
V. During the Game
V. DURING THE GAME
1. Control Panel
If everything is set and you want to begin the competition, close the Registration Window and
press “ > “ button to open Operation Panel.
OPEN / CLOSE
Control Panel
Start / Stop
Chung Gamjeom
※ Keyboard Shortcut
Fight within X sec
Hong Gajeom
Referee
Battery
Protector
Battery
Threshold
Level
Receiver
Connection
Checker
TEST Mode
(Equipment Test)
Control Keys
In Taekwondo Competition, what operators do
is to follow order of Center Referee and manage
the Time and Scores.
In KPNP Scoring System, keys are mapped for
most used functions as described on the left.
Most of the operation can be done in one hand.
Start/Stop : Shijak (Start the game), Gal-ryeo,
Keuman(Stop)
Chung Gamjeom: Give 1 Gamjoem to Chung
Hong Gamjeom: Give 1 Gamjeom to Hong
The rest of the operations such as cancelling
Gamjeom must be done with Computer Mouse.
42
V. DURING THE GAME
2. Score Board Display Component
Registered E-Protector Threshold
(Most recent one at the center)
White: Body Protector
Green: Head Protector
Base Threshold Level
(Power Value)
V( ) – Body Protector
H( ) – Head Protector
GamjeomRegistered Corner
Judge’s Button
Press
This stack builds the
result of Corner
Judge’s Button Press
to give points.
Fist Points, Technical
Points are registered if
the point was made by
1 second scoring
window.
Rest / Kyeshi Time Count
Displays Rest or Kyeshi Time
Fist Point (+1)
All 3 corner Judges pressed right button
Body-Technical Point (+1)
Judge No. 1 missed button press
Head-Technical Point (+1)
All 3 corner Judges pressed button right
Registered Corner Judge’s Button Press
Explaination
43
V. DURING THE GAME
3. TEST MODE
In PSS Competition, Protectors are tested before beginning the game. KPNP supports PSS Test
mode simulating real competition environment.
When Test is done, all scores and records are initialized.
Press “TEST” Button
Press “RETURN”
Button to go back to
Operation mode
In TEST Mode, scores are not
reflected in the actual game.
When scores appear after strikes, the
EBP & EHP system is functioning
normally.
Hong’s Body Hit Power Level
Chungs Body Hit Power Level
44
V. DURING THE GAME
4. Starting the Game
To begin the competition, press ‘SHI-JAK’ button with Mouse, or, press ↑ arrow on the KeyBoard.
During the game, using Keyboard helps you to focus on Referee’s hand signal.
- Button: Decrease
+ Button: Increase
Start / Stop
Chung Gamjeom + Hong Gajeom +
※ Keyboard Mapping
(Shortcut)
For other functions mapped
on Keyboard, you should
use Mouse to operate.
45
V. DURING THE GAME
5. Changing Game Time during the game
Sometimes, operator need to turn the time back to certain Minutes and Seconds.
You can modify Game Time manually.
① Press <- button to exit
Operation Panel and go to
‘REGISTRATION’
② Check ‘Start Option’
③ Change the ‘Time’
④ Select the ‘Round’
⑤ Then, press ‘APPLY’ button on
the right.
※ CAUTION
If you’ve finished the game and pressed ‘C.Win or H.Win’ and the game is over on the
system, you cannot set the time back.
You have to create the game again, register Protectors all over again and then use ‘Start
Option’ to change the time setting.
So, DO NOT FINISH THE GAME BEFORE THE CENTER REFEREE OFFICIALLY DECLARES THE
END OF THE GAME.
46
V. DURING THE GAME
6. Entering Golden Point Round
If the 3rd Round Match finishes tie, the system automatically alerts if you want to enter into
‘Golden Point Round (4th Round)’.
Press ‘Yes’, and the Rest Time begins and prepare for Golden Point Round.
※ CAUTION
Even though the 3rd Round finishes by tie, the final result may not be tie in several cases:
- Referee gives Gamjeom to a player when the round was finished.
- A player protest with Video Replay and accepted to get more point.
In those cases, operator must change the final result at the command of the Center Referee
and finish the game without entering into Golden Point. The opposite situation might
happen. So, it is critical to wait until the CENTER REFEREE DECLARES THE FINAL RESULT.
47
V. DURING THE GAME
7. Golden Point Round Display
In Golden Point Round, KPNP Scoring System displays assistive information for Referees and
Operators. Also, the game automatically STOPs if one of the condition below is met:
Those conditions are:
① A player scores point by Fist(1), Body(2) or Head(3)
② A player gets 1 point by opponent’s Gamjoem and scores point in ①
③ A player gets 2 points by consecutive Gamjeom of the opponent
Additional information is displayed to
help decide ‘Superiority’ in case of tie
in compliance with WTF Competition
Rule.
① H – Hit
Registered Hit (under Threshold
Level) during the Golden Point
Round
② R – Round Winner
Number of round won during 1 ~3
round
③ G – Gamjeom
All gamjeom accumulated from
Round 1 to Golden Point Round.
※ KPNP Strictly follows the WTF
Competition Rules and reflect any
changes.
If the Golden Point Round ends up
TIE, the system automatically displays
final result as below:
Since the Hit Count is also an important factor in deciding
Winner in Golden Point Round, you can ADD or DELETE
Hit Count record using ‘Hit Count’ button above.
All operation should be done in command of Center
Referee.
You may uncheck O.T if you don’t want
to show the final result below.
48
V. DURING THE GAME
8. Reverse Screen
Flip the Score board of Blue – Red location
You can change the layout of the Score Board Screen on the extended display at your disposal.
Changing Screen Layout does not affect any data.
49
V. DURING THE GAME
9. Finishing Games
Game finishes automatically when conditions are met.
However, the Operator must finish the game by pressing C.Win (Blue wins) or H.Win (Red wins)
button to declare Winner.
Next, operator must press ‘END’ button to initialize the system.
When C.Win (Blue wins) or H.Win (Red wins)
button is pressed, you can choose Win Type.
Choose the right ‘Win Type’ and press ‘OK’
button.
1. Win Type Selection
2. Final Screen
3. Initialize the System
Press ‘END’ button to initialize the System.
① If ‘PSS OFF’ is CHECKED, all registered Equipment (Body & Head Protectors)
are automatically TURN-OFF.
② If ‘PSS OFF’ is UNCHECKED, the system initializes and Equipment stay
registered. This is used when Equipment stay registered in the court and players
just change the protector for the next game.
50
KPNP PSS User Guide
VI. Error Handling
VI. ERROR HANDLING
1. Error Messages
KPNP PSS Software provides various Error Messages
to handle errors.
If any of the errors occur, the system stops and displays
Error message on operator’s screen (below), and
displays ‘PAUSE’ on extended Score Board Display.
1. USB Connection Error
Receiver Connection Problem
① Receiver is not connected properly.
=> Check the Receiver Connection - Page 13
② Receiver Driver is not installed properly.
=> Check driver installation - Page 14
If problems are solved, you must restart the program.
52
2. REFEREE X – ( Referee device Communication Error! )
Referee device is disconnected due to
① Battery Low
② Operator turned off the Referee’s box to change the device due to
defection/malfunction
=> ① & ② Bring new device and register again. - Page 32
③ Temporary Wireless communication error
=> If the Refree’s box is turned off, turn it on again and re-register.
※ When battery of all devices has no problem, but disconnection
problem happens repeatedly, you musts change the Channel
Setting. - Page 22
3. Please select a game to play first
This error message pops up when you try to press ‘Control Panel’
without applying a game on the system.
You must create or apply the game to open Control Panel.
- Page 34
VI. ERROR HANDLING
1. Error Messages - continued
4. Registration Timeout! Please check the (Body or Head) of (Chung or Hong) player.
Registration of Protectors failed because
① Registration button was not pressed on time.
=> Reset the Transmitter and try again. - Page 7, 9, 11
② Registration Button on protector (Body or Head) is broken.
=> Change the Equipment and register again.
③ Temporary wireless connection problem.
=> Reset the Transmitter and try again. - Page 7, 9, 11
※ When battery of all equipment has no problem, but disconnection
problem happens repeatedly, you musts change the Channel Setting.
- Page 22
53
5. Some equipment are not registered!
This happens when you try to start the game when there are
unregistered device.
Go to the ‘REGISTRATION’ panel again and register unregistered
device.
Ex) Ref.2 and Ref 3 are not registered.
This also happens when you want to use only 1 referee’s
box but the number of Referee’s box in the system is set to
3. In this case, you must restart the program and change
the rule setting to disable Ref. 2 & 3.
- Page 24, ⑤
VI. ERROR HANDLING
2. Other Problems
1. Score Board Screen on the Extended Display returns to the main Screen.
This happens when there’s problem with Display cable connection due to
① Physical disconnection of RGB/HDMI cable (unplugged, or cut my mistake)
② Temporary RGB/HDMI caused by RGB/HDMI port
③ Permanently broken RGB/HDMI cable
For all cases above, you must close and restart the program to restore the Display Setting.
Then, all PSS devices must be connected again.
Before you restart the program, you must WRITE DOWN the current Time, Scores and number of
Gamjeom on the paper to resume the game.
For restoration of time, please refer to the Page 48, using Start Option.
If you cannot find [X] button to close the program, press Alt+F4 on keyboard to close the program.
54
Operation Software
Score Board
2. This version of Receiver is not support on this software.
If you receive any message regarding the software / firmware version, please contact the seller or contact
KPNP on the contact information below:
Email: sales3@kpnp.kr
Facebook: www.facebook.com/kpnppss
KPNP PSS User Guide
VII. Reference
VII. REFERENCE
Scoring by Corner Judges Mechanism
Point Scored
Point Not Scored
1 Point – Fist
3 Point – Head
0 sec 1 sec
1st Judge 2nd Judge
EBP Power
Detection
1st Judge 2nd Judge
0 sec 1 sec
Point Scored
Point Not Scored
Technical Point
1st Judge 2nd Judge
1st Judge 2nd Judge
1 Second Scoring Window
Gives corner Judges maximum 2 Seconds
(1.99 sec) to press the Technical Point button
1 Second Scoring Window
Judge Box
Vibration
(Option)
SCORING BOX
56
VII. REFERENCE
SCORING BOX
Scoring by Corner Judges Mechanism
2 out of 3 judges
pressed the 4
point technical
head kick.
Judge 1 – 3 points
Judge 2 – 4 points
3 points is given.
2 out of 3 judges
pressed the extra
technical point
button.
2 out of 3 judges
pressed the fist
point button.
3 out of 3 judges
pressed the head
point button.
57

More Related Content

What's hot

Extech 407860
Extech 407860Extech 407860
Extech 407860
videoborescope
 
Fgkf 601-en-t-v1.0
Fgkf 601-en-t-v1.0Fgkf 601-en-t-v1.0
Fgkf 601-en-t-v1.0
Domotica daVinci
 
manual de usuario videograbador 4 canales sinrobos.com
manual de usuario videograbador 4 canales sinrobos.commanual de usuario videograbador 4 canales sinrobos.com
manual de usuario videograbador 4 canales sinrobos.com
Simon Chaler
 
Comcast on demand_remote_manual
Comcast on demand_remote_manualComcast on demand_remote_manual
Comcast on demand_remote_manual
Alexis Sanchez Venero
 
LPK25 Keyboard Controller Quickstart Guide
LPK25 Keyboard Controller Quickstart GuideLPK25 Keyboard Controller Quickstart Guide
LPK25 Keyboard Controller Quickstart Guide
Akai Pro
 
Plantronics savi w730 user guide
Plantronics savi w730 user guidePlantronics savi w730 user guide
Plantronics savi w730 user guide
best4systems
 
Plantronics savi w440 m user guide
Plantronics savi w440 m user guidePlantronics savi w440 m user guide
Plantronics savi w440 m user guide
best4systems
 
CL140
CL140CL140
Guia rapida POP-HUB-V2-(POP-011801)
Guia rapida POP-HUB-V2-(POP-011801)Guia rapida POP-HUB-V2-(POP-011801)
Guia rapida POP-HUB-V2-(POP-011801)
Domotica daVinci
 

What's hot (9)

Extech 407860
Extech 407860Extech 407860
Extech 407860
 
Fgkf 601-en-t-v1.0
Fgkf 601-en-t-v1.0Fgkf 601-en-t-v1.0
Fgkf 601-en-t-v1.0
 
manual de usuario videograbador 4 canales sinrobos.com
manual de usuario videograbador 4 canales sinrobos.commanual de usuario videograbador 4 canales sinrobos.com
manual de usuario videograbador 4 canales sinrobos.com
 
Comcast on demand_remote_manual
Comcast on demand_remote_manualComcast on demand_remote_manual
Comcast on demand_remote_manual
 
LPK25 Keyboard Controller Quickstart Guide
LPK25 Keyboard Controller Quickstart GuideLPK25 Keyboard Controller Quickstart Guide
LPK25 Keyboard Controller Quickstart Guide
 
Plantronics savi w730 user guide
Plantronics savi w730 user guidePlantronics savi w730 user guide
Plantronics savi w730 user guide
 
Plantronics savi w440 m user guide
Plantronics savi w440 m user guidePlantronics savi w440 m user guide
Plantronics savi w440 m user guide
 
CL140
CL140CL140
CL140
 
Guia rapida POP-HUB-V2-(POP-011801)
Guia rapida POP-HUB-V2-(POP-011801)Guia rapida POP-HUB-V2-(POP-011801)
Guia rapida POP-HUB-V2-(POP-011801)
 

Similar to Kpnp pss user guide20170330

InfiRay Thermal E3 Max V2 Instruction Manual - Optics Trade
InfiRay Thermal E3 Max V2 Instruction Manual - Optics TradeInfiRay Thermal E3 Max V2 Instruction Manual - Optics Trade
InfiRay Thermal E3 Max V2 Instruction Manual - Optics Trade
Optics-Trade
 
InfiRay Thermal Monocular E6+ V2.pdf
InfiRay Thermal Monocular E6+ V2.pdfInfiRay Thermal Monocular E6+ V2.pdf
InfiRay Thermal Monocular E6+ V2.pdf
Optics-Trade
 
InfiRay Thermal Monocular E6 Pro V2 Instruction Manual - Optics Trade
InfiRay Thermal Monocular E6 Pro V2 Instruction Manual - Optics TradeInfiRay Thermal Monocular E6 Pro V2 Instruction Manual - Optics Trade
InfiRay Thermal Monocular E6 Pro V2 Instruction Manual - Optics Trade
Optics-Trade
 
Uv820 usb3.0 user manual 2014.7.14
Uv820 usb3.0 user manual 2014.7.14Uv820 usb3.0 user manual 2014.7.14
Uv820 usb3.0 user manual 2014.7.14
Jill Liang
 
Instruction Manual | Sytong HT-66 | Optics Trade
Instruction Manual | Sytong HT-66 | Optics TradeInstruction Manual | Sytong HT-66 | Optics Trade
Instruction Manual | Sytong HT-66 | Optics Trade
Optics-Trade
 
2021 TIOT System Manual.pdf
2021 TIOT System Manual.pdf2021 TIOT System Manual.pdf
2021 TIOT System Manual.pdf
AhmadSayed47
 
Aeotec Multisensor 7 Manual
Aeotec Multisensor 7 ManualAeotec Multisensor 7 Manual
Aeotec Multisensor 7 Manual
Domotica daVinci
 
Paxton Access 337-967-US Instruction Manual
Paxton Access 337-967-US Instruction ManualPaxton Access 337-967-US Instruction Manual
Paxton Access 337-967-US Instruction Manual
JMAC Supply
 
Paxton Access 337-957-US Instruction Manual
Paxton Access 337-957-US Instruction ManualPaxton Access 337-957-US Instruction Manual
Paxton Access 337-957-US Instruction Manual
JMAC Supply
 
Canon printer reset instructions
Canon printer reset instructionsCanon printer reset instructions
Canon printer reset instructions
Michael Davis
 
Kjr 29 b (termostato alam. fan coil)
Kjr 29 b (termostato alam. fan coil)Kjr 29 b (termostato alam. fan coil)
Kjr 29 b (termostato alam. fan coil)
German Nava
 
HVAC 2 التدفئة والتهوية و تكييف الهواء
HVAC  2  التدفئة والتهوية و تكييف الهواءHVAC  2  التدفئة والتهوية و تكييف الهواء
HVAC 2 التدفئة والتهوية و تكييف الهواء
maymohamed29
 
الهندسيه الميكانيكيه الشامله hvac 1
الهندسيه   الميكانيكيه  الشامله  hvac  1الهندسيه   الميكانيكيه  الشامله  hvac  1
الهندسيه الميكانيكيه الشامله hvac 1
maymohamed29
 
الهندسيه الميكانيكيه الشامله hvac 1
الهندسيه   الميكانيكيه  الشامله  hvac  1الهندسيه   الميكانيكيه  الشامله  hvac  1
الهندسيه الميكانيكيه الشامله hvac 1
maymohamed29
 
InfiRay Mini ML19 Thermal Helmet Mountable Monocular Instruction Manual - Opt...
InfiRay Mini ML19 Thermal Helmet Mountable Monocular Instruction Manual - Opt...InfiRay Mini ML19 Thermal Helmet Mountable Monocular Instruction Manual - Opt...
InfiRay Mini ML19 Thermal Helmet Mountable Monocular Instruction Manual - Opt...
Optics-Trade
 
InfiRay Mini MH25 Instruction Manual - Optics Trade
InfiRay Mini MH25  Instruction Manual - Optics TradeInfiRay Mini MH25  Instruction Manual - Optics Trade
InfiRay Mini MH25 Instruction Manual - Optics Trade
Optics-Trade
 
Instruction Manual | Burris BTC 35 / BTC 50 | Optics Trade
Instruction Manual | Burris BTC 35 / BTC 50 | Optics TradeInstruction Manual | Burris BTC 35 / BTC 50 | Optics Trade
Instruction Manual | Burris BTC 35 / BTC 50 | Optics Trade
Optics-Trade
 
COGITO CLASSIC tutorial (Android)
COGITO CLASSIC tutorial (Android)COGITO CLASSIC tutorial (Android)
COGITO CLASSIC tutorial (Android)
CONNECTEDEVICE Ltd
 
Pc trouble shouting by memon
Pc trouble shouting by memonPc trouble shouting by memon
Printing pages2
Printing pages2Printing pages2
Printing pages2
Wilfredo Beralde
 

Similar to Kpnp pss user guide20170330 (20)

InfiRay Thermal E3 Max V2 Instruction Manual - Optics Trade
InfiRay Thermal E3 Max V2 Instruction Manual - Optics TradeInfiRay Thermal E3 Max V2 Instruction Manual - Optics Trade
InfiRay Thermal E3 Max V2 Instruction Manual - Optics Trade
 
InfiRay Thermal Monocular E6+ V2.pdf
InfiRay Thermal Monocular E6+ V2.pdfInfiRay Thermal Monocular E6+ V2.pdf
InfiRay Thermal Monocular E6+ V2.pdf
 
InfiRay Thermal Monocular E6 Pro V2 Instruction Manual - Optics Trade
InfiRay Thermal Monocular E6 Pro V2 Instruction Manual - Optics TradeInfiRay Thermal Monocular E6 Pro V2 Instruction Manual - Optics Trade
InfiRay Thermal Monocular E6 Pro V2 Instruction Manual - Optics Trade
 
Uv820 usb3.0 user manual 2014.7.14
Uv820 usb3.0 user manual 2014.7.14Uv820 usb3.0 user manual 2014.7.14
Uv820 usb3.0 user manual 2014.7.14
 
Instruction Manual | Sytong HT-66 | Optics Trade
Instruction Manual | Sytong HT-66 | Optics TradeInstruction Manual | Sytong HT-66 | Optics Trade
Instruction Manual | Sytong HT-66 | Optics Trade
 
2021 TIOT System Manual.pdf
2021 TIOT System Manual.pdf2021 TIOT System Manual.pdf
2021 TIOT System Manual.pdf
 
Aeotec Multisensor 7 Manual
Aeotec Multisensor 7 ManualAeotec Multisensor 7 Manual
Aeotec Multisensor 7 Manual
 
Paxton Access 337-967-US Instruction Manual
Paxton Access 337-967-US Instruction ManualPaxton Access 337-967-US Instruction Manual
Paxton Access 337-967-US Instruction Manual
 
Paxton Access 337-957-US Instruction Manual
Paxton Access 337-957-US Instruction ManualPaxton Access 337-957-US Instruction Manual
Paxton Access 337-957-US Instruction Manual
 
Canon printer reset instructions
Canon printer reset instructionsCanon printer reset instructions
Canon printer reset instructions
 
Kjr 29 b (termostato alam. fan coil)
Kjr 29 b (termostato alam. fan coil)Kjr 29 b (termostato alam. fan coil)
Kjr 29 b (termostato alam. fan coil)
 
HVAC 2 التدفئة والتهوية و تكييف الهواء
HVAC  2  التدفئة والتهوية و تكييف الهواءHVAC  2  التدفئة والتهوية و تكييف الهواء
HVAC 2 التدفئة والتهوية و تكييف الهواء
 
الهندسيه الميكانيكيه الشامله hvac 1
الهندسيه   الميكانيكيه  الشامله  hvac  1الهندسيه   الميكانيكيه  الشامله  hvac  1
الهندسيه الميكانيكيه الشامله hvac 1
 
الهندسيه الميكانيكيه الشامله hvac 1
الهندسيه   الميكانيكيه  الشامله  hvac  1الهندسيه   الميكانيكيه  الشامله  hvac  1
الهندسيه الميكانيكيه الشامله hvac 1
 
InfiRay Mini ML19 Thermal Helmet Mountable Monocular Instruction Manual - Opt...
InfiRay Mini ML19 Thermal Helmet Mountable Monocular Instruction Manual - Opt...InfiRay Mini ML19 Thermal Helmet Mountable Monocular Instruction Manual - Opt...
InfiRay Mini ML19 Thermal Helmet Mountable Monocular Instruction Manual - Opt...
 
InfiRay Mini MH25 Instruction Manual - Optics Trade
InfiRay Mini MH25  Instruction Manual - Optics TradeInfiRay Mini MH25  Instruction Manual - Optics Trade
InfiRay Mini MH25 Instruction Manual - Optics Trade
 
Instruction Manual | Burris BTC 35 / BTC 50 | Optics Trade
Instruction Manual | Burris BTC 35 / BTC 50 | Optics TradeInstruction Manual | Burris BTC 35 / BTC 50 | Optics Trade
Instruction Manual | Burris BTC 35 / BTC 50 | Optics Trade
 
COGITO CLASSIC tutorial (Android)
COGITO CLASSIC tutorial (Android)COGITO CLASSIC tutorial (Android)
COGITO CLASSIC tutorial (Android)
 
Pc trouble shouting by memon
Pc trouble shouting by memonPc trouble shouting by memon
Pc trouble shouting by memon
 
Printing pages2
Printing pages2Printing pages2
Printing pages2
 

Recently uploaded

真实可查(uofo毕业证书)俄勒冈大学毕业证学位证书范本原版一模一样
真实可查(uofo毕业证书)俄勒冈大学毕业证学位证书范本原版一模一样真实可查(uofo毕业证书)俄勒冈大学毕业证学位证书范本原版一模一样
真实可查(uofo毕业证书)俄勒冈大学毕业证学位证书范本原版一模一样
ra9gairo
 
MESH IPL 2024 REport_Wavemaker India.pdf
MESH IPL 2024 REport_Wavemaker India.pdfMESH IPL 2024 REport_Wavemaker India.pdf
MESH IPL 2024 REport_Wavemaker India.pdf
Social Samosa
 
Belgium vs Slovakia Belgium Euro 2024 Golden Generation Faces Euro Cup Final ...
Belgium vs Slovakia Belgium Euro 2024 Golden Generation Faces Euro Cup Final ...Belgium vs Slovakia Belgium Euro 2024 Golden Generation Faces Euro Cup Final ...
Belgium vs Slovakia Belgium Euro 2024 Golden Generation Faces Euro Cup Final ...
Eticketing.co
 
Georgia vs Portugal Georgia UEFA Euro 2024 Squad Khvicha Kvaratskhelia Leads ...
Georgia vs Portugal Georgia UEFA Euro 2024 Squad Khvicha Kvaratskhelia Leads ...Georgia vs Portugal Georgia UEFA Euro 2024 Squad Khvicha Kvaratskhelia Leads ...
Georgia vs Portugal Georgia UEFA Euro 2024 Squad Khvicha Kvaratskhelia Leads ...
Eticketing.co
 
Psaroudakis: Family and Football – The Psaroudakis Success Story
Psaroudakis: Family and Football – The Psaroudakis Success StoryPsaroudakis: Family and Football – The Psaroudakis Success Story
Psaroudakis: Family and Football – The Psaroudakis Success Story
Psaroudakis
 
Italy vs Albania Soul and sacrifice' are the keys to success for Albania at E...
Italy vs Albania Soul and sacrifice' are the keys to success for Albania at E...Italy vs Albania Soul and sacrifice' are the keys to success for Albania at E...
Italy vs Albania Soul and sacrifice' are the keys to success for Albania at E...
Eticketing.co
 
Belgium vs Romania Injuries and Patience in Belgium’s Euro Cup Germany Squad....
Belgium vs Romania Injuries and Patience in Belgium’s Euro Cup Germany Squad....Belgium vs Romania Injuries and Patience in Belgium’s Euro Cup Germany Squad....
Belgium vs Romania Injuries and Patience in Belgium’s Euro Cup Germany Squad....
Eticketing.co
 
Belgium vs Romania Ultimate Guide to Euro Cup 2024 Tactics, Ticketing, and Qu...
Belgium vs Romania Ultimate Guide to Euro Cup 2024 Tactics, Ticketing, and Qu...Belgium vs Romania Ultimate Guide to Euro Cup 2024 Tactics, Ticketing, and Qu...
Belgium vs Romania Ultimate Guide to Euro Cup 2024 Tactics, Ticketing, and Qu...
Eticketing.co
 
JORNADA 10 LIGA MURO 2024BASQUETBOL1.pdf
JORNADA 10 LIGA MURO 2024BASQUETBOL1.pdfJORNADA 10 LIGA MURO 2024BASQUETBOL1.pdf
JORNADA 10 LIGA MURO 2024BASQUETBOL1.pdf
Arturo Pacheco Alvarez
 
Luciano Spalletti Leads Italy's Transition at UEFA Euro 2024.docx
Luciano Spalletti Leads Italy's Transition at UEFA Euro 2024.docxLuciano Spalletti Leads Italy's Transition at UEFA Euro 2024.docx
Luciano Spalletti Leads Italy's Transition at UEFA Euro 2024.docx
Euro Cup 2024 Tickets
 
Spain vs Croatia Euro 2024 Spain's Chance to Shine on the International Stage...
Spain vs Croatia Euro 2024 Spain's Chance to Shine on the International Stage...Spain vs Croatia Euro 2024 Spain's Chance to Shine on the International Stage...
Spain vs Croatia Euro 2024 Spain's Chance to Shine on the International Stage...
Eticketing.co
 
JORNADA 11 LIGA MURO 2024BASQUETBOL1.pdf
JORNADA 11 LIGA MURO 2024BASQUETBOL1.pdfJORNADA 11 LIGA MURO 2024BASQUETBOL1.pdf
JORNADA 11 LIGA MURO 2024BASQUETBOL1.pdf
Arturo Pacheco Alvarez
 
Netherlands vs Austria Netherlands Face Familiar Foes in Euro Cup Germany Gro...
Netherlands vs Austria Netherlands Face Familiar Foes in Euro Cup Germany Gro...Netherlands vs Austria Netherlands Face Familiar Foes in Euro Cup Germany Gro...
Netherlands vs Austria Netherlands Face Familiar Foes in Euro Cup Germany Gro...
Eticketing.co
 
Match By Match Detailed Schedule Of The ICC Men's T20 World Cup 2024.pdf
Match By Match Detailed Schedule Of The ICC Men's T20 World Cup 2024.pdfMatch By Match Detailed Schedule Of The ICC Men's T20 World Cup 2024.pdf
Match By Match Detailed Schedule Of The ICC Men's T20 World Cup 2024.pdf
mouthhunt5
 
Croatia vs Italy Modric's Last Dance Croatia's UEFA Euro 2024 Journey and Ita...
Croatia vs Italy Modric's Last Dance Croatia's UEFA Euro 2024 Journey and Ita...Croatia vs Italy Modric's Last Dance Croatia's UEFA Euro 2024 Journey and Ita...
Croatia vs Italy Modric's Last Dance Croatia's UEFA Euro 2024 Journey and Ita...
Eticketing.co
 
Switzerland vs Germany At UEFA Euro 2024 the Full squad, preview, match sched...
Switzerland vs Germany At UEFA Euro 2024 the Full squad, preview, match sched...Switzerland vs Germany At UEFA Euro 2024 the Full squad, preview, match sched...
Switzerland vs Germany At UEFA Euro 2024 the Full squad, preview, match sched...
Eticketing.co
 
Hesan Soufi's Legacy: Inspiring the Next Generation
Hesan Soufi's Legacy: Inspiring the Next GenerationHesan Soufi's Legacy: Inspiring the Next Generation
Hesan Soufi's Legacy: Inspiring the Next Generation
Hesan Soufi 
 
Turkey UEFA Euro 2024 Journey A Quest for Redemption and Success.docx
Turkey UEFA Euro 2024 Journey A Quest for Redemption and Success.docxTurkey UEFA Euro 2024 Journey A Quest for Redemption and Success.docx
Turkey UEFA Euro 2024 Journey A Quest for Redemption and Success.docx
Eticketing.co
 
Euro Cup Group E Preview, Team Strategies, Key Players, and Tactical Insights...
Euro Cup Group E Preview, Team Strategies, Key Players, and Tactical Insights...Euro Cup Group E Preview, Team Strategies, Key Players, and Tactical Insights...
Euro Cup Group E Preview, Team Strategies, Key Players, and Tactical Insights...
Eticketing.co
 
Tennis rules and techniques with information
Tennis rules and techniques with informationTennis rules and techniques with information
Tennis rules and techniques with information
mohsintariq167876
 

Recently uploaded (20)

真实可查(uofo毕业证书)俄勒冈大学毕业证学位证书范本原版一模一样
真实可查(uofo毕业证书)俄勒冈大学毕业证学位证书范本原版一模一样真实可查(uofo毕业证书)俄勒冈大学毕业证学位证书范本原版一模一样
真实可查(uofo毕业证书)俄勒冈大学毕业证学位证书范本原版一模一样
 
MESH IPL 2024 REport_Wavemaker India.pdf
MESH IPL 2024 REport_Wavemaker India.pdfMESH IPL 2024 REport_Wavemaker India.pdf
MESH IPL 2024 REport_Wavemaker India.pdf
 
Belgium vs Slovakia Belgium Euro 2024 Golden Generation Faces Euro Cup Final ...
Belgium vs Slovakia Belgium Euro 2024 Golden Generation Faces Euro Cup Final ...Belgium vs Slovakia Belgium Euro 2024 Golden Generation Faces Euro Cup Final ...
Belgium vs Slovakia Belgium Euro 2024 Golden Generation Faces Euro Cup Final ...
 
Georgia vs Portugal Georgia UEFA Euro 2024 Squad Khvicha Kvaratskhelia Leads ...
Georgia vs Portugal Georgia UEFA Euro 2024 Squad Khvicha Kvaratskhelia Leads ...Georgia vs Portugal Georgia UEFA Euro 2024 Squad Khvicha Kvaratskhelia Leads ...
Georgia vs Portugal Georgia UEFA Euro 2024 Squad Khvicha Kvaratskhelia Leads ...
 
Psaroudakis: Family and Football – The Psaroudakis Success Story
Psaroudakis: Family and Football – The Psaroudakis Success StoryPsaroudakis: Family and Football – The Psaroudakis Success Story
Psaroudakis: Family and Football – The Psaroudakis Success Story
 
Italy vs Albania Soul and sacrifice' are the keys to success for Albania at E...
Italy vs Albania Soul and sacrifice' are the keys to success for Albania at E...Italy vs Albania Soul and sacrifice' are the keys to success for Albania at E...
Italy vs Albania Soul and sacrifice' are the keys to success for Albania at E...
 
Belgium vs Romania Injuries and Patience in Belgium’s Euro Cup Germany Squad....
Belgium vs Romania Injuries and Patience in Belgium’s Euro Cup Germany Squad....Belgium vs Romania Injuries and Patience in Belgium’s Euro Cup Germany Squad....
Belgium vs Romania Injuries and Patience in Belgium’s Euro Cup Germany Squad....
 
Belgium vs Romania Ultimate Guide to Euro Cup 2024 Tactics, Ticketing, and Qu...
Belgium vs Romania Ultimate Guide to Euro Cup 2024 Tactics, Ticketing, and Qu...Belgium vs Romania Ultimate Guide to Euro Cup 2024 Tactics, Ticketing, and Qu...
Belgium vs Romania Ultimate Guide to Euro Cup 2024 Tactics, Ticketing, and Qu...
 
JORNADA 10 LIGA MURO 2024BASQUETBOL1.pdf
JORNADA 10 LIGA MURO 2024BASQUETBOL1.pdfJORNADA 10 LIGA MURO 2024BASQUETBOL1.pdf
JORNADA 10 LIGA MURO 2024BASQUETBOL1.pdf
 
Luciano Spalletti Leads Italy's Transition at UEFA Euro 2024.docx
Luciano Spalletti Leads Italy's Transition at UEFA Euro 2024.docxLuciano Spalletti Leads Italy's Transition at UEFA Euro 2024.docx
Luciano Spalletti Leads Italy's Transition at UEFA Euro 2024.docx
 
Spain vs Croatia Euro 2024 Spain's Chance to Shine on the International Stage...
Spain vs Croatia Euro 2024 Spain's Chance to Shine on the International Stage...Spain vs Croatia Euro 2024 Spain's Chance to Shine on the International Stage...
Spain vs Croatia Euro 2024 Spain's Chance to Shine on the International Stage...
 
JORNADA 11 LIGA MURO 2024BASQUETBOL1.pdf
JORNADA 11 LIGA MURO 2024BASQUETBOL1.pdfJORNADA 11 LIGA MURO 2024BASQUETBOL1.pdf
JORNADA 11 LIGA MURO 2024BASQUETBOL1.pdf
 
Netherlands vs Austria Netherlands Face Familiar Foes in Euro Cup Germany Gro...
Netherlands vs Austria Netherlands Face Familiar Foes in Euro Cup Germany Gro...Netherlands vs Austria Netherlands Face Familiar Foes in Euro Cup Germany Gro...
Netherlands vs Austria Netherlands Face Familiar Foes in Euro Cup Germany Gro...
 
Match By Match Detailed Schedule Of The ICC Men's T20 World Cup 2024.pdf
Match By Match Detailed Schedule Of The ICC Men's T20 World Cup 2024.pdfMatch By Match Detailed Schedule Of The ICC Men's T20 World Cup 2024.pdf
Match By Match Detailed Schedule Of The ICC Men's T20 World Cup 2024.pdf
 
Croatia vs Italy Modric's Last Dance Croatia's UEFA Euro 2024 Journey and Ita...
Croatia vs Italy Modric's Last Dance Croatia's UEFA Euro 2024 Journey and Ita...Croatia vs Italy Modric's Last Dance Croatia's UEFA Euro 2024 Journey and Ita...
Croatia vs Italy Modric's Last Dance Croatia's UEFA Euro 2024 Journey and Ita...
 
Switzerland vs Germany At UEFA Euro 2024 the Full squad, preview, match sched...
Switzerland vs Germany At UEFA Euro 2024 the Full squad, preview, match sched...Switzerland vs Germany At UEFA Euro 2024 the Full squad, preview, match sched...
Switzerland vs Germany At UEFA Euro 2024 the Full squad, preview, match sched...
 
Hesan Soufi's Legacy: Inspiring the Next Generation
Hesan Soufi's Legacy: Inspiring the Next GenerationHesan Soufi's Legacy: Inspiring the Next Generation
Hesan Soufi's Legacy: Inspiring the Next Generation
 
Turkey UEFA Euro 2024 Journey A Quest for Redemption and Success.docx
Turkey UEFA Euro 2024 Journey A Quest for Redemption and Success.docxTurkey UEFA Euro 2024 Journey A Quest for Redemption and Success.docx
Turkey UEFA Euro 2024 Journey A Quest for Redemption and Success.docx
 
Euro Cup Group E Preview, Team Strategies, Key Players, and Tactical Insights...
Euro Cup Group E Preview, Team Strategies, Key Players, and Tactical Insights...Euro Cup Group E Preview, Team Strategies, Key Players, and Tactical Insights...
Euro Cup Group E Preview, Team Strategies, Key Players, and Tactical Insights...
 
Tennis rules and techniques with information
Tennis rules and techniques with informationTennis rules and techniques with information
Tennis rules and techniques with information
 

Kpnp pss user guide20170330

  • 1. KPNP PSS User’s Guide March 2017
  • 2. CONTENTS 2 I. INTRODUCTION 1. KPNP PSS LINE UP 4 2. KPNP Wireless System 5 II. GETTING STARTED 1. E-Body Protector 7 2. E-Head Protector 9 3. Referee’s Scoring Box 11 4. Connecting Receiver to PC 13 5. Installing Driver for Receiver 14 6. Scoring System Setup – Case Study 16 7. Display Setting – Screen Resolution 17 III. PROGRAM & RULE SETTING 1. Start the Program 20 2. Main Display 21 3. Rule Setting 22 4. Court No. & Channel Setting 23 5. Rule Setting Options 24 6. Scoring Mode 25 i. Full PSS Scoring Mode 26 ii. E-Body Protector Only Mode (Without Head Gear) 28 iii. Manual Scoring Mode (Without PSS) 30 7. Referee’s Scoring Box Registration 32 IV. COMPETITION OPERATION 1. Creating Games 34 2. Score Board Display Setting (From) 35 3. Protector Registration 36 4. Disconnect, Change Protectors 37 5. Using Device List 38 V. DURING THE GAME 1. Control Panel – Key Board Shortcut 42 2. Score Board Display Component 43 3. Test Mode 44 4. Starting the Competition 45 5. Changing Game Time during the competition 46 6. Entering Golden Point Round 47 7. Golden Point Round Display 48 8. Reverse Screen 49 9. Finishing Games 50 VI. ERROR HANDLING 1. Error Messages 52 2. Other Problems 54 VII. REFERENCES 1. Scoring Mechanism 56
  • 3. KPNP PSS User Guide I. INTRODUCTION
  • 4. I. INTRODUCTION EBP Taekwondo Socks Referee Scoring Box Operation ProgramReceiver EHP Referee Scoring Box Proximity Sensor Tester Key Pad Bar Code Scanner Recharger Aluminum Case 1. KPNP PSS Product Line-up 4
  • 5. I. INTRODUCTION Foot Protector (Sensing Socks) Referee’s Scoring Box Receiver Operation Software Electronic Body Protectors Electronic Head Protectors 2. KPNP PSS Wireless System 5
  • 6. KPNP PSS User Guide II. GETTING STARTED
  • 7. II. GETTING STARTED How to power on/off and Register ① Power ON / OFF - Press the power button for more than 3 sec. until hearing the Beep sound - ‘Power LED (red)’ ON / OFF ② Registration - Press ‘Registration’ button after pressing ‘Vest Reg’ icon in operation program. - “Registered’ message will be shown on the program display and a green light will be turned on with a beep sound when registered. Reset USB Connector Register LED Register Button Power Button Power LED How to Recharge 1. E-Body Protector ① Beware of discharge of electricity (recharge it before there is 25% left) ② 2 hours required for full-charge (EBP runs for approximately 10 hours normally) ③ Green light is on while recharging and off after recharging is complete. ④ If fully charged, Green Light blinks and goes off. 7
  • 8. II. GETTING STARTED Test Mode ① Entering into Test Mode - Turn on the Power. - Press the Power Button & Register Button exactly at the same time. - It sounds ‘Bee-bee-bee-beep’ ② Test Impact Sensor - After entering into Test Mode, place the Protector on the floor or any flat surface (such as on top of desk) and hit 3 points as shown on the picture on the right. - If you hear ‘Beep’ sound from the transmitter, the impact sensor is OK. - If you don’t hear ‘Beep’ sound on any spot, the impact sensor might be broken. Contact the seller immediately. ③ Test Proximity Sensor (Antenna) - After entering into Test Mode, place the Proximity Tester on the Point Area of the Body Protector as shown on the right picture. - Consistent ‘Beeping’ sound must be heard. - If you cannot hear any sound, or significant inconsistency in Beeping sound, please contact the seller. Reset USB Connector Register LED Register Button Power Button Power LED Press the Two (2) Buttons at the same time Proximity Sensor Tester ◈ Beware to TURN-OFF the power after Test is done! 8
  • 9. II. GETTING STARTED How to power on/off and Register ① Power ON / OFF - Press the power button for more than 3 sec. until hearing the Beep sound - ‘Power LED (red)’ ON / OFF ② Registration - Press ‘Registration’ button after pressing ‘Head Reg’ icon in operation program. - “Registered’ message will be shown on the program display and a green light will be turned on with a beep sound when registered. Reset USB Connector Register LED Register Button Power Button Power LED How to Recharge 2. E-Head Protector ① Beware of discharge of electricity (recharge it before there is 25% left) ② 2 hours required for full-charge (EBP runs for approximately 10 hours normally) ③ Green light is on while recharging and off after recharging is complete. ④ If fully charged, Green Light blinks and goes off. 1) Green Light is turned on when recharging 2) Green Light goes off if fully charged. 9
  • 10. II. GETTING STARTED Test Mode ① Entering into Test Mode - Turn on the Power. - Press the Power Button & Register Button exactly at the same time. - It sounds ‘Bee-bee-bee-beep’ ② Test Impact Sensor - After entering into Test Mode, place the Protector on the floor or any flat surface (such as on top of desk) and hit 3 points as shown on the picture on the right. - If you hear ‘Beep’ sound from the transmitter, the impact sensor is OK. - If you don’t hear ‘Beep’ sound on any spot, the impact sensor might be broken. Contact the seller immediately. ③ Test Proximity Sensor (Antenna) - After entering into Test Mode, place the Proximity Tester on all Area of the Head Protector as shown on the right picture. - Consistent ‘Beeping’ sound must be heard. - If you cannot hear any sound, or significant inconsistency in Beeping sound, please contact the seller. Reset USB Connector Register LED Register Button Power Button Power LED Press the Two (2) Buttons at the same time Proximity Sensor Tester ◈ Beware to TURN-OFF the power after Test is done! 10
  • 11. II. GETTING STARTED How to power on/off and Register 3. Referee’s Scoring Box ① Power ON / OFF - Press the power button for more than 3 seconds until hearing the Beep sounds - ‘Power LED (red)’ ON / OFF ② Registration - Press ‘Registration’ button after pressing ‘vest reg’ icon in operation program. - “Registered’ message will be shown on the program display and a green light will be turned on with a beep sound when registered. Reset Button Recharge Connector Power Button Register Button How to Recharge ① Beware of discharge of electricity (recharge it before there is 25% left) ② 2 hours required for full-charge (EBP runs for approx. 10 hours normally) ③ Green light is on while recharging and off after recharging is complete. ④ If fully charged, Green Light blinks and goes off. ③ 11
  • 12. II. GETTING STARTED Test Mode ① Entering into Test Mode - Turn on the Power. - Press the Power Button & Register Button exactly at the same time. - It sounds ‘Bee-bee-bee-beep’ ② Test Buttons - After entering into Test Mode, press each button. - When buttons are pressed, the box will vibrate. ③ Malfunction - If the box vibrates from time to time or does not vibrate at all on the button press, the button is malfunctioning. Please contact the seller. ◈ Beware to TURN-OFF the power after Test is done! Press the Two (2) Buttons at the same time Power ButtonRegister Button 12
  • 13. II. GETTING STARTED How to connect to computer ① ‘Power LED’ is on when the receiver is connected to the powered computer ② ‘Activation LED’ is on when the operation software is activated. Activation LED Power LED 4. Connecting RECEIVER to PC 13
  • 14. II. GETTING STARTED 5. Installing Driver for Receiver ① From the KPNP Operation Software folder, double click and go into the ‘USB Driver’ Folder ② Right click the ‘USBXpressInstaller.exe’ ③ Click ‘Run as administrator’ ④ Press ‘Insatall’ ⑤ Press ‘Yes’ ⑥ Installation is complete. Press ‘OK’ and finish installation of USB Driver. 14
  • 15. II. GETTING STARTED How to check if USB Driver is properly installed ① Open Explorer window. ② Right Click ‘This PC’ and click ‘Property’ to enter System Setting. ③ Click ‘Device Manager’ ④ Find if there is ‘USBXpress Device’ in the list as shown in the picture. 15
  • 16. II. GETTING STARTED 6. Scoring System Setting – Case Study RGB/HDMI Display Cable InterfaceUSB Cable Interface Using 2 Dual Monitors Operation Software Display 2 Display 1 Receiver For multiple Display, use Video Splitter or Video Switcher. (VGA or HDMI) Court 2 IVR SYSTEM IVR PSS J1 J2J3 VGA(RGB) or HDMI Cable 16
  • 17. II. GETTING STARTED 7. Display Setting – Screen Resolution Screen Resolution Setting (Windows 7) Run the software after PC setting is finished. ① Click ‘Right Button’ on the mouse at the Desk Top screen ② Click ‘Screen resolution‘ ③ Multiple display : Select Extend these display ④ Display : Select 2 screen model ⑤ Resolutions : Select 1024 × 768 ※ If you are unable to find 1024 × 768 resolution, you can click the ‘Advanced Setting’ and change the display setting. Display setting menu can be different from the system. 17
  • 18. II. GETTING STARTED Screen Resolution Setting (Windows 10) Run the software after PC setting is finished. ① Click ‘Right Button’ on the mouse at the Desk Top screen ② Click ‘Display Setting‘ ③ Click ‘2’, the secondary monitor ④ Set the ‘2nd Screen’ as ‘Extended Display’ ⑤ Click ‘Apply’ button ⑥ Then go to ‘Advanced Settings’ Display Setting ④ ⑦ Select ‘2nd Screen’ ⑧ From the list, choose ‘1024x768’ for 2nd screen ⑨ Click ‘Apply’ button ⑦ ⑧ ③ 18
  • 19. KPNP PSS User Guide III. PROGRAM & RULE SETTING
  • 20. III. PROGRAM & RULE SETTING 1. Start the Program ① Open KPNP Client program folder and Double click “CTaekwondo.exe” 20
  • 21. III. PROGRAM & RULE SETTING 2. Main Display Operator’s Screen Score Board Screen – Extended Display 1 423 [Procedure] 1. Rule Setting 2. Registration 3. Control Panel 4. Result View 21
  • 22. III. PROGRAM & RULE SETTING 3. Rule Setting In order to start to use PSS Software to match the required devices and rules, Rule Setting must be done properly. Rule Setting is where you setup basic rules and operational options for scoring. Once the settings configured here are applied, you must restart the software to change any settings losing all connections with Hardware such as Receiver, Referee’s Scoring Box and Protectors. 22 ① After Court No. is selected, you can change the Channel manually. Change the channel only when there are continuous device disconnection problem. To change the channel, you must re-start the program and register all devices again! ①
  • 23. III. PROGRAM & RULE SETTING 4. Court No. & Channel Setting The FIRST THING you need to do to operate KPNP PSS software is to connect the Receiver and set the channel. Change the number of court and press “SET” button on the right. Then, the Court No. will change Green if the Receiver is properly connected. If error occurs, follow this steps: ① Close the program. ② Remove the Receiver USB Cable and re-connect to the PC. ③ Run Software again and try ‘Set’ the receiver again. If the receiver is properly connected, the Court No. changes to GREEN. You can check the Receiver version. ① ① ② ② 23
  • 24. III. PROGRAM & RULE SETTING 5. Rule Setting - Options ① ② ③ ⑤ ④ ⑥ ⑦ ⑧ ⑨ ⑩ ⑪ ⑫ ⑬ ① Court No. - Set the Court No. - For multiple court, choose different No. for other court. ② Competition Class - Set Threshold Level - Current WTF Threshold level are set as default (2017) ③ Equipment Setting ④ Without PSS Option - If checked, you can use Manual Scoring Mode only using Referee’s Scoring Boxes without any PSS (Body & Head Protectors) ⑤ Referee Setting - Set the number of corner judges who will score using Referee’s Scoring Boxes. - Referee’s Scoring Boxes can be used maximum 3 per court. ⑥ Use Vibration Mode (Only works on PSS Mode) - If checked, the Referee’s Scoring Box vibrates when proper points on the Body protector is made. - It alerts Corner Judges to give Technical points if necessary. ⑦ Match Time Setting ⑧ Point Ceiling Setting – If checked, competition automatically stops if the condition set here is met. ⑨ Point Gap Setting – If checked, competition automatically stops if the condition is met. You can change the Point Gap in accordance with the regulation. ⑩ Round Setting – You can change the round setting. ⑪ Reverse Screen – Changes the location of Chung(blue) and Hong(red) on extended screen. - Unchecked: Blue-Red, Checked: Red-Blue ⑫ Button Point Setting - You can change the value of the button input by Corner Judges (Scoring Box) - If the rule is changed, you can change the button setting here to follow the changed rules. ⑬ Protector Point Setting - You can change the Points automatically registered by the Protectors here. In 2017, Body Protector point was changed from 1 to 2. 24
  • 25. Equipment 1) Full E-Protector Mode 2) Body Protector Only Mode 3) Manual Scoring Mode E-Head Protector ○ E-Body Protector ○ ○ Referee’s Scoring Box ○ ○ ○ Receiver ○ ○ ○ E-Foot Protector ○ ○ Users may choose different Scoring Mode according to the Equipment they have, or the necessity by Divisions. KPNP Scoring System supports all kinds of Scoring Mode to meet the needs for training or championships management. III. PROGRAM & RULE SETTING 6. Scoring Mode 25
  • 26. III. PROGRAM & RULE SETTING 6-1. Full E-Protector Scoring Mode 26
  • 27. III. PROGRAM & RULE SETTING ① Fist point (1 point) - Referee pressed ‘fist’ button when the attack is a fist punch. - Valid point is expressed when at least two out of three referees presses the button. ② Technical Point - Body (1 additional point) - This button only works when valid point was made on Body Trunk. - Referee pressed ‘technical’ button when the attack is a technical kick. - Valid point is expressed when at least two out of three referees presses the button. ③ Technical Point – Head (1 additional points) - Valid point is expressed when at least two out of three referees presses the button. ③ Technical Point (Head)③ Technical Point (Head) ② Technical Point (Body) ① Fist Point ② Technical Point (Body) ① Fist Point 6-1. Full E-Protector Scoring Mode Referee’s Box Configuration 27
  • 28. III. PROGRAM & RULE SETTING 6-2. E-Body Protector Only Scoring Mode 28
  • 29. III. PROGRAM & RULE SETTING ① Fist point (1 point) - Referee pressed ‘fist’ button when the attack is a fist punch. - Valid point is expressed when at least two out of three referees presses the button. ② Technical Point - Body (1 additional point) - This button only works when valid point was made on Body Trunk. - Referee pressed ‘technical’ button when the attack is a technical kick. - Valid point is expressed when at least two out of three referees presses the button. ③ Head Point (3 points) - Valid point is expressed when at least two out of three referees presses the button. ④ Technical Point – Head (4 points) - Referee must press the Head point button and Fist point button at the same time. - Or press the Head point button and Technical point button at the same time. ③ Head Point (3 pts)③ Head Point (3 pts) ② Technical Point (Body) ① Fist Point ② Technical Point (Body) ① Fist Point ④ Technical point (head) (4 pts) Press together 6-2. E-Body Protector Only Scoring Mode Referee’s Box Configuration 29
  • 30. III. PROGRAM & RULE SETTING 6-3. Manual Scoring Mode (Without PSS) 30
  • 31. III. PROGRAM & RULE SETTING Users can change the button mapping on the PSS Operation Program. ① Fist point (1 point) - Referee pressed ‘fist’ button when the attack is a fist punch. - Valid point is expressed when at least two out of three referees presses the button. ② Technical Point - Body (1 additional point) - This button only works when valid point was made on Body Trunk. - Referee pressed ‘technical’ button when the attack is a technical kick. - Valid point is expressed when at least two out of three referees presses the button. ③ Head Point (3 points) - Valid point is expressed when at least two out of three referees presses the button. ④ Technical Head Point(4 points) - Referee must press the Head point button and Fist point button at the same time. - Or press the Head point button and Technical point button at the same time. ③ 3 Points③ 3 Points ② 2 Points ① 1 Point ② 2 Points ① 1 Point ④ 4 Points Press together 6-3. Manual Scoring Mode Referee’s Box Configuration 31
  • 32. III. PROGRAM & RULE SETTING 7. Referee’s Scoring Box Registration Register Button ① Turn on the Power of Referee’s Scoring Box. ② Press the Button on the Screen to register. ③ Press ‘Register Button on Referee’s Scoring Box before ④ progress bar runs out. ④ Progress Bar ⑤ If error occurs repeatedly, turn off the Scoring Box and try again from step ①. ⑥ If devices are successfully connected, you can see the MAC Address of the device and the Button changes from ‘Reg’ to ‘Off’ ⑦ If you press ‘Off’ button, you can turn-off the Scoring Box by software and the Button changes to ‘Reg’ again. ①Power Button ② ③ ④ ⑤ Figure II. Figure I. ⑦ ⑥ 32
  • 33. KPNP PSS User Guide IV. Competition Operation
  • 34. IV. COMPETITION OPERATION 1. Creating Games ① ② ③ ① Extend the Registration window by clicking ‘Correction’ button. ② Set the Game information and input Names and Teams of players. ③ Threshold levels are automatically applied by selected Division and Weight- category. ※ Tip If you want to ADD games without Names or From, just press ‘REGISTRATION’ button repeatedly, and games will be added automatically increasing Game No. In order to begin the Competition, you must apply a game onto the System. Simply ‘Double Click’ any game you added on the list. Then, the game will be set on the screen. If you want to change the current game, then ‘Double Click’ another game and it automatically applied to the system. This can be used when there was a mistake in any information (eg. Gender, Division or Weight category) during the game. 1-1. Player Registration 1-2. Applying Game to the System 34
  • 35. IV. COMPETITION OPERATION 2. Score Board Display Setting If you want to use National Flag on the Score Board Screen, DO NOT input ‘From’ when you enter the name of the Players. If you want to use Team Name instead of the National Flag on the Score Board Screen, input ‘From’ when you enter the name of the Players. 1-1. Using Natinoal Flags 1-2. Using Team Names 35
  • 36. IV. COMPETITION OPERATION 3. Protector Registration Reset Register LED Register Button Power Button Power LED① ② ③ To register Protectors to the system, follow the procedure below: ① Press ‘Reg’ Button to match the Protector to register. ② Progress bar runs about 10 seconds. ③ Press and hold ‘Register Button’ on the Protector for more than 3 seconds until ‘Beep’ sound is heard. ④ If the Protector is properly registered, the MAC address (16 digit code) registers and the box turns to Green. ⑤ Repeat ①~④ until you finish registering all protectors. ※ To ensure the protector is registered to the Right Place, compare the Number on the program, and the number on the Protector. ④ Compare the Number to ensure correct registration 36
  • 37. IV. COMPETITION OPERATION 4. Disconnect, Change Protectors For any reason, if you should disconnect and change the Protector, press ‘Off’ button. The Button will be changed go ‘Reg’ again. 37
  • 38. IV. COMPETITION OPERATION ① If you want to use designated Protectors on the court, you can check this button and register Device List. This option is used when you want to place the limited set of Body & Head Protectors on 1 court and use them repeatedly only changing Athletes. ① 5. Using Device List 1-1. Using Device List 38
  • 39. IV. COMPETITION OPERATION ① Displays the list of registered MAC Address of Chung Hogu (Body protector Blue). ② Input the 16 digit MAC Address of the device using keyboard or bar-code reader and click ADD button to register new protector. Maximum number of each devices are up to 6. Total 24 (6 Blue Body Protectors, 6 Red Body Protectors, 6 Blue Head Gears, 6 Red Head Gears) devices can be registered on 1 court. ① ② 1-2. Using Device List – Device Registration 39
  • 40. IV. COMPETITION OPERATION ① If you want to remove any of the registered devices, check the box on the device you want to delete, and then press “DELETE’ button above. ① 1-3. Using Device List – Deleting Device from the list 40
  • 41. KPNP PSS User Guide V. During the Game
  • 42. V. DURING THE GAME 1. Control Panel If everything is set and you want to begin the competition, close the Registration Window and press “ > “ button to open Operation Panel. OPEN / CLOSE Control Panel Start / Stop Chung Gamjeom ※ Keyboard Shortcut Fight within X sec Hong Gajeom Referee Battery Protector Battery Threshold Level Receiver Connection Checker TEST Mode (Equipment Test) Control Keys In Taekwondo Competition, what operators do is to follow order of Center Referee and manage the Time and Scores. In KPNP Scoring System, keys are mapped for most used functions as described on the left. Most of the operation can be done in one hand. Start/Stop : Shijak (Start the game), Gal-ryeo, Keuman(Stop) Chung Gamjeom: Give 1 Gamjoem to Chung Hong Gamjeom: Give 1 Gamjeom to Hong The rest of the operations such as cancelling Gamjeom must be done with Computer Mouse. 42
  • 43. V. DURING THE GAME 2. Score Board Display Component Registered E-Protector Threshold (Most recent one at the center) White: Body Protector Green: Head Protector Base Threshold Level (Power Value) V( ) – Body Protector H( ) – Head Protector GamjeomRegistered Corner Judge’s Button Press This stack builds the result of Corner Judge’s Button Press to give points. Fist Points, Technical Points are registered if the point was made by 1 second scoring window. Rest / Kyeshi Time Count Displays Rest or Kyeshi Time Fist Point (+1) All 3 corner Judges pressed right button Body-Technical Point (+1) Judge No. 1 missed button press Head-Technical Point (+1) All 3 corner Judges pressed button right Registered Corner Judge’s Button Press Explaination 43
  • 44. V. DURING THE GAME 3. TEST MODE In PSS Competition, Protectors are tested before beginning the game. KPNP supports PSS Test mode simulating real competition environment. When Test is done, all scores and records are initialized. Press “TEST” Button Press “RETURN” Button to go back to Operation mode In TEST Mode, scores are not reflected in the actual game. When scores appear after strikes, the EBP & EHP system is functioning normally. Hong’s Body Hit Power Level Chungs Body Hit Power Level 44
  • 45. V. DURING THE GAME 4. Starting the Game To begin the competition, press ‘SHI-JAK’ button with Mouse, or, press ↑ arrow on the KeyBoard. During the game, using Keyboard helps you to focus on Referee’s hand signal. - Button: Decrease + Button: Increase Start / Stop Chung Gamjeom + Hong Gajeom + ※ Keyboard Mapping (Shortcut) For other functions mapped on Keyboard, you should use Mouse to operate. 45
  • 46. V. DURING THE GAME 5. Changing Game Time during the game Sometimes, operator need to turn the time back to certain Minutes and Seconds. You can modify Game Time manually. ① Press <- button to exit Operation Panel and go to ‘REGISTRATION’ ② Check ‘Start Option’ ③ Change the ‘Time’ ④ Select the ‘Round’ ⑤ Then, press ‘APPLY’ button on the right. ※ CAUTION If you’ve finished the game and pressed ‘C.Win or H.Win’ and the game is over on the system, you cannot set the time back. You have to create the game again, register Protectors all over again and then use ‘Start Option’ to change the time setting. So, DO NOT FINISH THE GAME BEFORE THE CENTER REFEREE OFFICIALLY DECLARES THE END OF THE GAME. 46
  • 47. V. DURING THE GAME 6. Entering Golden Point Round If the 3rd Round Match finishes tie, the system automatically alerts if you want to enter into ‘Golden Point Round (4th Round)’. Press ‘Yes’, and the Rest Time begins and prepare for Golden Point Round. ※ CAUTION Even though the 3rd Round finishes by tie, the final result may not be tie in several cases: - Referee gives Gamjeom to a player when the round was finished. - A player protest with Video Replay and accepted to get more point. In those cases, operator must change the final result at the command of the Center Referee and finish the game without entering into Golden Point. The opposite situation might happen. So, it is critical to wait until the CENTER REFEREE DECLARES THE FINAL RESULT. 47
  • 48. V. DURING THE GAME 7. Golden Point Round Display In Golden Point Round, KPNP Scoring System displays assistive information for Referees and Operators. Also, the game automatically STOPs if one of the condition below is met: Those conditions are: ① A player scores point by Fist(1), Body(2) or Head(3) ② A player gets 1 point by opponent’s Gamjoem and scores point in ① ③ A player gets 2 points by consecutive Gamjeom of the opponent Additional information is displayed to help decide ‘Superiority’ in case of tie in compliance with WTF Competition Rule. ① H – Hit Registered Hit (under Threshold Level) during the Golden Point Round ② R – Round Winner Number of round won during 1 ~3 round ③ G – Gamjeom All gamjeom accumulated from Round 1 to Golden Point Round. ※ KPNP Strictly follows the WTF Competition Rules and reflect any changes. If the Golden Point Round ends up TIE, the system automatically displays final result as below: Since the Hit Count is also an important factor in deciding Winner in Golden Point Round, you can ADD or DELETE Hit Count record using ‘Hit Count’ button above. All operation should be done in command of Center Referee. You may uncheck O.T if you don’t want to show the final result below. 48
  • 49. V. DURING THE GAME 8. Reverse Screen Flip the Score board of Blue – Red location You can change the layout of the Score Board Screen on the extended display at your disposal. Changing Screen Layout does not affect any data. 49
  • 50. V. DURING THE GAME 9. Finishing Games Game finishes automatically when conditions are met. However, the Operator must finish the game by pressing C.Win (Blue wins) or H.Win (Red wins) button to declare Winner. Next, operator must press ‘END’ button to initialize the system. When C.Win (Blue wins) or H.Win (Red wins) button is pressed, you can choose Win Type. Choose the right ‘Win Type’ and press ‘OK’ button. 1. Win Type Selection 2. Final Screen 3. Initialize the System Press ‘END’ button to initialize the System. ① If ‘PSS OFF’ is CHECKED, all registered Equipment (Body & Head Protectors) are automatically TURN-OFF. ② If ‘PSS OFF’ is UNCHECKED, the system initializes and Equipment stay registered. This is used when Equipment stay registered in the court and players just change the protector for the next game. 50
  • 51. KPNP PSS User Guide VI. Error Handling
  • 52. VI. ERROR HANDLING 1. Error Messages KPNP PSS Software provides various Error Messages to handle errors. If any of the errors occur, the system stops and displays Error message on operator’s screen (below), and displays ‘PAUSE’ on extended Score Board Display. 1. USB Connection Error Receiver Connection Problem ① Receiver is not connected properly. => Check the Receiver Connection - Page 13 ② Receiver Driver is not installed properly. => Check driver installation - Page 14 If problems are solved, you must restart the program. 52 2. REFEREE X – ( Referee device Communication Error! ) Referee device is disconnected due to ① Battery Low ② Operator turned off the Referee’s box to change the device due to defection/malfunction => ① & ② Bring new device and register again. - Page 32 ③ Temporary Wireless communication error => If the Refree’s box is turned off, turn it on again and re-register. ※ When battery of all devices has no problem, but disconnection problem happens repeatedly, you musts change the Channel Setting. - Page 22 3. Please select a game to play first This error message pops up when you try to press ‘Control Panel’ without applying a game on the system. You must create or apply the game to open Control Panel. - Page 34
  • 53. VI. ERROR HANDLING 1. Error Messages - continued 4. Registration Timeout! Please check the (Body or Head) of (Chung or Hong) player. Registration of Protectors failed because ① Registration button was not pressed on time. => Reset the Transmitter and try again. - Page 7, 9, 11 ② Registration Button on protector (Body or Head) is broken. => Change the Equipment and register again. ③ Temporary wireless connection problem. => Reset the Transmitter and try again. - Page 7, 9, 11 ※ When battery of all equipment has no problem, but disconnection problem happens repeatedly, you musts change the Channel Setting. - Page 22 53 5. Some equipment are not registered! This happens when you try to start the game when there are unregistered device. Go to the ‘REGISTRATION’ panel again and register unregistered device. Ex) Ref.2 and Ref 3 are not registered. This also happens when you want to use only 1 referee’s box but the number of Referee’s box in the system is set to 3. In this case, you must restart the program and change the rule setting to disable Ref. 2 & 3. - Page 24, ⑤
  • 54. VI. ERROR HANDLING 2. Other Problems 1. Score Board Screen on the Extended Display returns to the main Screen. This happens when there’s problem with Display cable connection due to ① Physical disconnection of RGB/HDMI cable (unplugged, or cut my mistake) ② Temporary RGB/HDMI caused by RGB/HDMI port ③ Permanently broken RGB/HDMI cable For all cases above, you must close and restart the program to restore the Display Setting. Then, all PSS devices must be connected again. Before you restart the program, you must WRITE DOWN the current Time, Scores and number of Gamjeom on the paper to resume the game. For restoration of time, please refer to the Page 48, using Start Option. If you cannot find [X] button to close the program, press Alt+F4 on keyboard to close the program. 54 Operation Software Score Board 2. This version of Receiver is not support on this software. If you receive any message regarding the software / firmware version, please contact the seller or contact KPNP on the contact information below: Email: sales3@kpnp.kr Facebook: www.facebook.com/kpnppss
  • 55. KPNP PSS User Guide VII. Reference
  • 56. VII. REFERENCE Scoring by Corner Judges Mechanism Point Scored Point Not Scored 1 Point – Fist 3 Point – Head 0 sec 1 sec 1st Judge 2nd Judge EBP Power Detection 1st Judge 2nd Judge 0 sec 1 sec Point Scored Point Not Scored Technical Point 1st Judge 2nd Judge 1st Judge 2nd Judge 1 Second Scoring Window 1 Second Scoring Window Gives corner Judges maximum 2 Seconds (1.99 sec) to press the Technical Point button 1 Second Scoring Window Judge Box Vibration (Option) SCORING BOX 56
  • 57. VII. REFERENCE SCORING BOX Scoring by Corner Judges Mechanism 2 out of 3 judges pressed the 4 point technical head kick. Judge 1 – 3 points Judge 2 – 4 points 3 points is given. 2 out of 3 judges pressed the extra technical point button. 2 out of 3 judges pressed the fist point button. 3 out of 3 judges pressed the head point button. 57