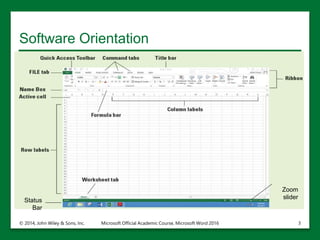
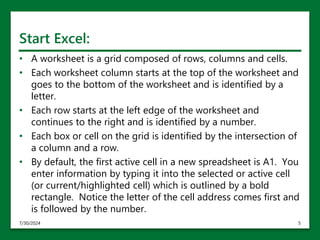
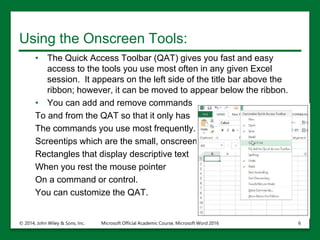
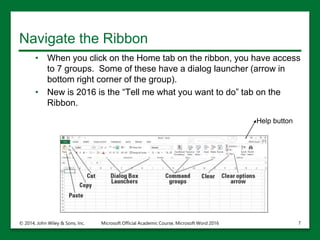
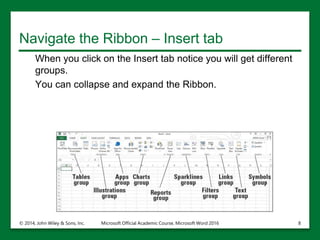
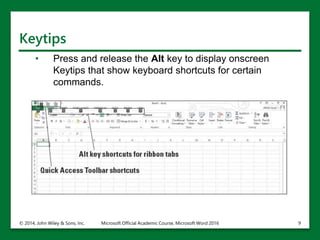
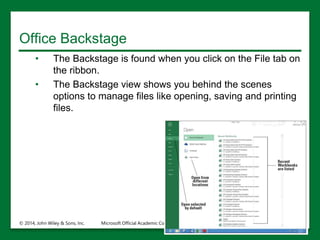
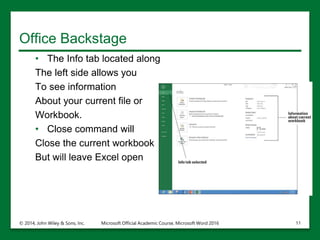
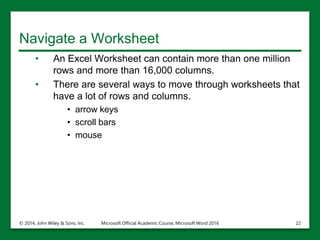
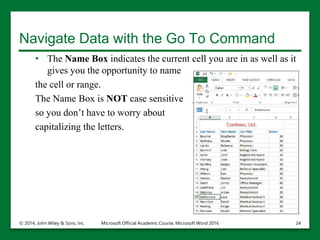
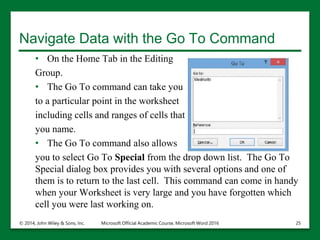
Overview
Lesson 1
© 2014, John Wiley & Sons, Inc. Microsoft Official Academic Course, Microsoft Word 2016 1
Microsoft Excel 2016
Software Orientation
• Microsoft Office Excel 2016 provides powerful tools to organize,
analyze, manage, and share information.
• The foundation of Excel and locations where you do your work
are cells, rows, and columns within a worksheet, and worksheets
as part of a workbook.
• The tools you use to help you with these locations are within a
broad band, called the ribbon, running across the top of the
window. The ribbon is organized into task-oriented command
tabs.
• Each tab is divided into task-specific command groups
appropriate to the work being performing. The tabs and groups,
introduced in Excel 2010, replace the menus and multiple tools
that were present in Excel 2007 and earlier versions.
© 2014, John Wiley & Sons, Inc. Microsoft Official Academic Course, Microsoft Word 2016 2
Software Orientation
© 2014, John Wiley & Sons, Inc. Microsoft Official Academic Course, Microsoft Word 2016 3
Status
Bar
Zoom
slider
Start Excel:
• Excel opens to a list of templates and in most cases you choose
Blank workbook or open a previous file.
• Think of a workbook as a physical book with many pages.
• The file name and the program name (Excel) appear in the title
bar at the top of the screen.
• The temporary title for your workbook is Book 1, book 2, etc.
until you assign your workbook a name.
• The new workbook has 1 worksheet by default and it appears at
the bottom of your worksheet above the status bar.
• You can easily add new worksheets by clicking on the + button
as needed.
© 2014, John Wiley & Sons, Inc. Microsoft Official Academic Course, Microsoft Word 2016 4
Start Excel:
• A worksheet is a grid composed of rows, columns and cells.
• Each worksheet column starts at the top of the worksheet and
goes to the bottom of the worksheet and is identified by a
letter.
• Each row starts at the left edge of the worksheet and
continues to the right and is identified by a number.
• Each box or cell on the grid is identified by the intersection of
a column and a row.
• By default, the first active cell in a new spreadsheet is A1. You
enter information by typing it into the selected or active cell
(or current/highlighted cell) which is outlined by a bold
rectangle. Notice the letter of the cell address comes first and
is followed by the number.
7/30/2024 5
Using the Onscreen Tools:
• The Quick Access Toolbar (QAT) gives you fast and easy
access to the tools you use most often in any given Excel
session. It appears on the left side of the title bar above the
ribbon; however, it can be moved to appear below the ribbon.
• You can add and remove commands
To and from the QAT so that it only has
The commands you use most frequently.
Screentips which are the small, onscreen
Rectangles that display descriptive text
When you rest the mouse pointer
On a command or control.
You can customize the QAT.
© 2014, John Wiley & Sons, Inc. Microsoft Official Academic Course, Microsoft Word 2016 6
Navigate the Ribbon
• When you click on the Home tab on the ribbon, you have access
to 7 groups. Some of these have a dialog launcher (arrow in
bottom right corner of the group).
• New is 2016 is the “Tell me what you want to do” tab on the
Ribbon.
© 2014, John Wiley & Sons, Inc. Microsoft Official Academic Course, Microsoft Word 2016 7
Help button
Navigate the Ribbon – Insert tab
When you click on the Insert tab notice you will get different
groups.
You can collapse and expand the Ribbon.
© 2014, John Wiley & Sons, Inc. Microsoft Official Academic Course, Microsoft Word 2016 8
Keytips
• Press and release the Alt key to display onscreen
Keytips that show keyboard shortcuts for certain
commands.
© 2014, John Wiley & Sons, Inc. Microsoft Official Academic Course, Microsoft Word 2016 9
Office Backstage
• The Backstage is found when you click on the File tab on
the ribbon.
• The Backstage view shows you behind the scenes
options to manage files like opening, saving and printing
files.
© 2014, John Wiley & Sons, Inc. Microsoft Official Academic Course, Microsoft Word 2016 10
Office Backstage
• The Info tab located along
The left side allows you
To see information
About your current file or
Workbook.
• Close command will
Close the current workbook
But will leave Excel open
© 2014, John Wiley & Sons, Inc. Microsoft Official Academic Course, Microsoft Word 2016 11
Change Excel’s View
• The View tab on the ribbon allows you to change the
appearance of the displayed spreadsheet.
• You also have several options located in the status bar.
• The default view in Excel is the Normal View
© 2014, John Wiley & Sons, Inc. Microsoft Official Academic Course, Microsoft Word 2016 12
Page Layout View
The Page Layout View allows you to see margins, horizontal and
vertical rulers, page breaks (where one page will end on a printed
copy), header and footer
Section.
In the Page Layout
View you can easily fine
tune pages before you
Print.
© 2014, John Wiley & Sons, Inc. Microsoft Official Academic Course, Microsoft Word 2016 13
Split the Window
• When a worksheet has a lot of data, you can only see a
small portion of the worksheet in Excel’s Normal and
Page Layout Views.
• The split command lets you overcome this obstacle by
viewing the worksheet in 2 panes or 4 quadrants.
• You can then use the scroll bars on the right and the
bottom of the window to display different sections of the
worksheet at the same time so that you can more easily
compare or contrast data or see what effect a change in
one part of the worksheet might have on a distant part of
the worksheet.
© 2014, John Wiley & Sons, Inc. Microsoft Official Academic Course, Microsoft Word 2016 14
Split the Window
• Go to the View tab and split is in the windows group.
• Click the split command again to remove the split.
© 2014, John Wiley & Sons, Inc. Microsoft Official Academic Course, Microsoft Word 2016 15
Open a New Window
• Splitting a window allows you to look at two sections of a
worksheet side by side. You can also view two sections of
a worksheet by using the New Window command.
• The New Window command is located on the View tab.
• Click New Window and a new window with a different
numbered title will appear. The : indicates that there are
two windows from the same workbook open.
• You have NOT opened a new Worksheet.
© 2014, John Wiley & Sons, Inc. Microsoft Official Academic Course, Microsoft Word 2016 16
Open a New Window
When you click on Switch
Windows, you will see a drop-
Down list of all open windows.
The book with the checkmark is
The active window.
Click the Close Window button
Located in the upper-right
Corner of the workbook window
To close the second book. If
You use the File, Close
Command you will close the
Entire workbook.
© 2014, John Wiley & Sons, Inc. Microsoft Official Academic Course, Microsoft Word 2016 17
Working with an Existing Workbook
• Most Excel Workbooks require frequent updating because of
data changes.
• Often files are created by 1 person but used by many.
• Descriptive file names allow you to locate and retrieve files
quickly.
• File names can be up to 255 characters long including file
extensions.
• The file extension for Excel 2016 is .xlsx
• You can also use File properties (found in the backstage view)
like tags to help you manage and find files.
7/30/2024 18
Open an Existing Workbook
• When you save an Excel 2016 file, the program
automatically adds the file extension .xlsx to the end of the
file’s name.
• To open a file you must also identify the location that
contains the file such as network, Skydrive, or folder.
• Use the File tab or Backstage view to save a document.
• Recently created/edited workbooks appear in the right
pane under the Recent Workbooks area.
© 2014, John Wiley & Sons, Inc. Microsoft Official Academic Course, Microsoft Word 2016 19
Open an Existing Workbook
• Note that the active cell does not default to A1 each time you open a
Workbook that you have been working on. The active cell will be
The cell you were on
When you saved your
Workbook. This allows
You to keep working in the
Same location when you
Return to the Workbook.
© 2014, John Wiley & Sons, Inc. Microsoft Official Academic Course, Microsoft Word 2016 20
Open a Workbook from Your SkyDrive
• In order to save and open files from SkyDrive, you must have
an account and we do not.
• SkyDrive is a Microsoft feature that allows you to work with files
in the Cloud – a location that is available from any computer in
the world as long as you have Internet connection.
• When Office 2016 is installed, you have the option of installing
SkyDrive or go to the Microsoft .com site and search for the
SkyDrive download and install it at a different time.
© 2014, John Wiley & Sons, Inc. Microsoft Official Academic Course, Microsoft Word 2016 21
Navigate a Worksheet
• An Excel Worksheet can contain more than one million
rows and more than 16,000 columns.
• There are several ways to move through worksheets that
have a lot of rows and columns.
• arrow keys
• scroll bars
• mouse
© 2014, John Wiley & Sons, Inc. Microsoft Official Academic Course, Microsoft Word 2016 22
Navigate a Worksheet
© 2014, John Wiley & Sons, Inc. Microsoft Official Academic Course, Microsoft Word 2016 23
Command What Command Does
Control + Home Moves cursor to the beginning of
the document
Control + End Moves cursor to the end of the
document
Name Box Type in address of cell you want
to go to and then press Enter
Control + down arrow Moves cursor to the last row of
data
Control + up arrow Moves cursor to the first row of
data
Scroll bars Both horizontal and vertical scroll
bars can help you navigate.
Navigate Data with the Go To Command
• The Name Box indicates the current cell you are in as well as it
gives you the opportunity to name
the cell or range.
The Name Box is NOT case sensitive
so you don’t have to worry about
capitalizing the letters.
© 2014, John Wiley & Sons, Inc. Microsoft Official Academic Course, Microsoft Word 2016 24
Navigate Data with the Go To Command
• On the Home Tab in the Editing
Group.
• The Go To command can take you
to a particular point in the worksheet
including cells and ranges of cells that
you name.
• The Go To command also allows
you to select Go To Special from the drop down list. The Go To
Special dialog box provides you with several options and one of
them is to return to the last cell. This command can come in handy
when your Worksheet is very large and you have forgotten which
cell you were last working on.
© 2014, John Wiley & Sons, Inc. Microsoft Official Academic Course, Microsoft Word 2016 25
Use the Help System
• The Help System in Excel is rich in information,
illustrations, and tips that can help you complete any task
as you create worksheets and workbooks.
• If you are not sure what an onscreen tool does, just point
to it. Once the mouse pointer rests on a tool, a box called
a ScreenTip appears. A basic ScreenTip displays the
tool’s name and shortcut key if one exists.
• A help button is also located just to the left of the Window
controls in the upper-right hand side of the Excel screen.
The icon or GUI is a question mark.
• F1 is the shortcut for help in
all of Microsoft
© 2014, John Wiley & Sons, Inc. Microsoft Official Academic Course, Microsoft Word 2016 26
Let’s practice what we have learned:
© 2014, John Wiley & Sons, Inc. Microsoft Official Academic Course, Microsoft Word 2016 27
Practice on your own:
© 2014, John Wiley & Sons, Inc. Microsoft Official Academic Course, Microsoft Word 2016 28
Sum it up…
• Discuss 3 things you learned today.
© 2014, John Wiley & Sons, Inc. Microsoft Official Academic Course, Microsoft Word 2016 29

Excel Lesson 1 ppt for guided notes.pptx

  • 1.
    Overview Lesson 1 © 2014,John Wiley & Sons, Inc. Microsoft Official Academic Course, Microsoft Word 2016 1 Microsoft Excel 2016
  • 2.
    Software Orientation • MicrosoftOffice Excel 2016 provides powerful tools to organize, analyze, manage, and share information. • The foundation of Excel and locations where you do your work are cells, rows, and columns within a worksheet, and worksheets as part of a workbook. • The tools you use to help you with these locations are within a broad band, called the ribbon, running across the top of the window. The ribbon is organized into task-oriented command tabs. • Each tab is divided into task-specific command groups appropriate to the work being performing. The tabs and groups, introduced in Excel 2010, replace the menus and multiple tools that were present in Excel 2007 and earlier versions. © 2014, John Wiley & Sons, Inc. Microsoft Official Academic Course, Microsoft Word 2016 2
  • 3.
    Software Orientation © 2014,John Wiley & Sons, Inc. Microsoft Official Academic Course, Microsoft Word 2016 3 Status Bar Zoom slider
  • 4.
    Start Excel: • Excelopens to a list of templates and in most cases you choose Blank workbook or open a previous file. • Think of a workbook as a physical book with many pages. • The file name and the program name (Excel) appear in the title bar at the top of the screen. • The temporary title for your workbook is Book 1, book 2, etc. until you assign your workbook a name. • The new workbook has 1 worksheet by default and it appears at the bottom of your worksheet above the status bar. • You can easily add new worksheets by clicking on the + button as needed. © 2014, John Wiley & Sons, Inc. Microsoft Official Academic Course, Microsoft Word 2016 4
  • 5.
    Start Excel: • Aworksheet is a grid composed of rows, columns and cells. • Each worksheet column starts at the top of the worksheet and goes to the bottom of the worksheet and is identified by a letter. • Each row starts at the left edge of the worksheet and continues to the right and is identified by a number. • Each box or cell on the grid is identified by the intersection of a column and a row. • By default, the first active cell in a new spreadsheet is A1. You enter information by typing it into the selected or active cell (or current/highlighted cell) which is outlined by a bold rectangle. Notice the letter of the cell address comes first and is followed by the number. 7/30/2024 5
  • 6.
    Using the OnscreenTools: • The Quick Access Toolbar (QAT) gives you fast and easy access to the tools you use most often in any given Excel session. It appears on the left side of the title bar above the ribbon; however, it can be moved to appear below the ribbon. • You can add and remove commands To and from the QAT so that it only has The commands you use most frequently. Screentips which are the small, onscreen Rectangles that display descriptive text When you rest the mouse pointer On a command or control. You can customize the QAT. © 2014, John Wiley & Sons, Inc. Microsoft Official Academic Course, Microsoft Word 2016 6
  • 7.
    Navigate the Ribbon •When you click on the Home tab on the ribbon, you have access to 7 groups. Some of these have a dialog launcher (arrow in bottom right corner of the group). • New is 2016 is the “Tell me what you want to do” tab on the Ribbon. © 2014, John Wiley & Sons, Inc. Microsoft Official Academic Course, Microsoft Word 2016 7 Help button
  • 8.
    Navigate the Ribbon– Insert tab When you click on the Insert tab notice you will get different groups. You can collapse and expand the Ribbon. © 2014, John Wiley & Sons, Inc. Microsoft Official Academic Course, Microsoft Word 2016 8
  • 9.
    Keytips • Press andrelease the Alt key to display onscreen Keytips that show keyboard shortcuts for certain commands. © 2014, John Wiley & Sons, Inc. Microsoft Official Academic Course, Microsoft Word 2016 9
  • 10.
    Office Backstage • TheBackstage is found when you click on the File tab on the ribbon. • The Backstage view shows you behind the scenes options to manage files like opening, saving and printing files. © 2014, John Wiley & Sons, Inc. Microsoft Official Academic Course, Microsoft Word 2016 10
  • 11.
    Office Backstage • TheInfo tab located along The left side allows you To see information About your current file or Workbook. • Close command will Close the current workbook But will leave Excel open © 2014, John Wiley & Sons, Inc. Microsoft Official Academic Course, Microsoft Word 2016 11
  • 12.
    Change Excel’s View •The View tab on the ribbon allows you to change the appearance of the displayed spreadsheet. • You also have several options located in the status bar. • The default view in Excel is the Normal View © 2014, John Wiley & Sons, Inc. Microsoft Official Academic Course, Microsoft Word 2016 12
  • 13.
    Page Layout View ThePage Layout View allows you to see margins, horizontal and vertical rulers, page breaks (where one page will end on a printed copy), header and footer Section. In the Page Layout View you can easily fine tune pages before you Print. © 2014, John Wiley & Sons, Inc. Microsoft Official Academic Course, Microsoft Word 2016 13
  • 14.
    Split the Window •When a worksheet has a lot of data, you can only see a small portion of the worksheet in Excel’s Normal and Page Layout Views. • The split command lets you overcome this obstacle by viewing the worksheet in 2 panes or 4 quadrants. • You can then use the scroll bars on the right and the bottom of the window to display different sections of the worksheet at the same time so that you can more easily compare or contrast data or see what effect a change in one part of the worksheet might have on a distant part of the worksheet. © 2014, John Wiley & Sons, Inc. Microsoft Official Academic Course, Microsoft Word 2016 14
  • 15.
    Split the Window •Go to the View tab and split is in the windows group. • Click the split command again to remove the split. © 2014, John Wiley & Sons, Inc. Microsoft Official Academic Course, Microsoft Word 2016 15
  • 16.
    Open a NewWindow • Splitting a window allows you to look at two sections of a worksheet side by side. You can also view two sections of a worksheet by using the New Window command. • The New Window command is located on the View tab. • Click New Window and a new window with a different numbered title will appear. The : indicates that there are two windows from the same workbook open. • You have NOT opened a new Worksheet. © 2014, John Wiley & Sons, Inc. Microsoft Official Academic Course, Microsoft Word 2016 16
  • 17.
    Open a NewWindow When you click on Switch Windows, you will see a drop- Down list of all open windows. The book with the checkmark is The active window. Click the Close Window button Located in the upper-right Corner of the workbook window To close the second book. If You use the File, Close Command you will close the Entire workbook. © 2014, John Wiley & Sons, Inc. Microsoft Official Academic Course, Microsoft Word 2016 17
  • 18.
    Working with anExisting Workbook • Most Excel Workbooks require frequent updating because of data changes. • Often files are created by 1 person but used by many. • Descriptive file names allow you to locate and retrieve files quickly. • File names can be up to 255 characters long including file extensions. • The file extension for Excel 2016 is .xlsx • You can also use File properties (found in the backstage view) like tags to help you manage and find files. 7/30/2024 18
  • 19.
    Open an ExistingWorkbook • When you save an Excel 2016 file, the program automatically adds the file extension .xlsx to the end of the file’s name. • To open a file you must also identify the location that contains the file such as network, Skydrive, or folder. • Use the File tab or Backstage view to save a document. • Recently created/edited workbooks appear in the right pane under the Recent Workbooks area. © 2014, John Wiley & Sons, Inc. Microsoft Official Academic Course, Microsoft Word 2016 19
  • 20.
    Open an ExistingWorkbook • Note that the active cell does not default to A1 each time you open a Workbook that you have been working on. The active cell will be The cell you were on When you saved your Workbook. This allows You to keep working in the Same location when you Return to the Workbook. © 2014, John Wiley & Sons, Inc. Microsoft Official Academic Course, Microsoft Word 2016 20
  • 21.
    Open a Workbookfrom Your SkyDrive • In order to save and open files from SkyDrive, you must have an account and we do not. • SkyDrive is a Microsoft feature that allows you to work with files in the Cloud – a location that is available from any computer in the world as long as you have Internet connection. • When Office 2016 is installed, you have the option of installing SkyDrive or go to the Microsoft .com site and search for the SkyDrive download and install it at a different time. © 2014, John Wiley & Sons, Inc. Microsoft Official Academic Course, Microsoft Word 2016 21
  • 22.
    Navigate a Worksheet •An Excel Worksheet can contain more than one million rows and more than 16,000 columns. • There are several ways to move through worksheets that have a lot of rows and columns. • arrow keys • scroll bars • mouse © 2014, John Wiley & Sons, Inc. Microsoft Official Academic Course, Microsoft Word 2016 22
  • 23.
    Navigate a Worksheet ©2014, John Wiley & Sons, Inc. Microsoft Official Academic Course, Microsoft Word 2016 23 Command What Command Does Control + Home Moves cursor to the beginning of the document Control + End Moves cursor to the end of the document Name Box Type in address of cell you want to go to and then press Enter Control + down arrow Moves cursor to the last row of data Control + up arrow Moves cursor to the first row of data Scroll bars Both horizontal and vertical scroll bars can help you navigate.
  • 24.
    Navigate Data withthe Go To Command • The Name Box indicates the current cell you are in as well as it gives you the opportunity to name the cell or range. The Name Box is NOT case sensitive so you don’t have to worry about capitalizing the letters. © 2014, John Wiley & Sons, Inc. Microsoft Official Academic Course, Microsoft Word 2016 24
  • 25.
    Navigate Data withthe Go To Command • On the Home Tab in the Editing Group. • The Go To command can take you to a particular point in the worksheet including cells and ranges of cells that you name. • The Go To command also allows you to select Go To Special from the drop down list. The Go To Special dialog box provides you with several options and one of them is to return to the last cell. This command can come in handy when your Worksheet is very large and you have forgotten which cell you were last working on. © 2014, John Wiley & Sons, Inc. Microsoft Official Academic Course, Microsoft Word 2016 25
  • 26.
    Use the HelpSystem • The Help System in Excel is rich in information, illustrations, and tips that can help you complete any task as you create worksheets and workbooks. • If you are not sure what an onscreen tool does, just point to it. Once the mouse pointer rests on a tool, a box called a ScreenTip appears. A basic ScreenTip displays the tool’s name and shortcut key if one exists. • A help button is also located just to the left of the Window controls in the upper-right hand side of the Excel screen. The icon or GUI is a question mark. • F1 is the shortcut for help in all of Microsoft © 2014, John Wiley & Sons, Inc. Microsoft Official Academic Course, Microsoft Word 2016 26
  • 27.
    Let’s practice whatwe have learned: © 2014, John Wiley & Sons, Inc. Microsoft Official Academic Course, Microsoft Word 2016 27
  • 28.
    Practice on yourown: © 2014, John Wiley & Sons, Inc. Microsoft Official Academic Course, Microsoft Word 2016 28
  • 29.
    Sum it up… •Discuss 3 things you learned today. © 2014, John Wiley & Sons, Inc. Microsoft Official Academic Course, Microsoft Word 2016 29

Editor's Notes

  • #5 Another Way: You can also use the Windows logo key or with a touch screen, swipe in from the right edge of your screen and tap the Start charm. Another Way: While in the Start window, you can also begin typing Excel and the icon appears.
  • #7 Take Note: Use ScreenTips to remind you of a command's function. Enhanced ScreenTips display in a larger rectangle that contains more descriptive text than a ScreenTip. Most Enhanced ScreenTips contain a link to a Help topic.
  • #12 Troubleshooting: Backstage defaults to different commands depending on what you're doing. When you are working in a blank workbook or with no workbooks opened, Backstage defaults to the Open command, which shows different options for opening files. If you have started typing in a document, Backsage defaults to Info.
  • #14 Another Way: You can also change the view among Normal, Page Layout, Page Break Preview, and Zoom by using the icons in the status bar at the bottom of the screen.
  • #16 Take Note: The Split command is especially useful when you need to compare various portions of a long worksheet.
  • #20 Another Way: To display the Open options in Backstage without using the FILE tab, press Ctrl+O. To display the Open dialog box, press Ctrl+F12. Take Note: Throughout this book, you see information that appears in brackets, such as [your e-mail address]. The information contained in the brackets is intended to be directions specific for you rather than something you actually type word for word. It instructs you to perform an action or substitute text. Do not type the actual text that appears within brackets.
  • #21 Take Note: By default, the Open dialog box lists only the files that were created in the program you are using—in this case, Excel. To see files created in other programs, you can select All Files in the Files of type box (next to the File name box) at the bottom of the Open dialog box.
  • #24 Take Note: When Scroll Lock is on, SCROLL LOCK is displayed on the left side of the Status bar. To use the arrow keys to move between cells, you must turn off Scroll Lock. Some keyboards come equipped with an onboard scroll lock key, whereas others do not. This is an option, not a necessity.