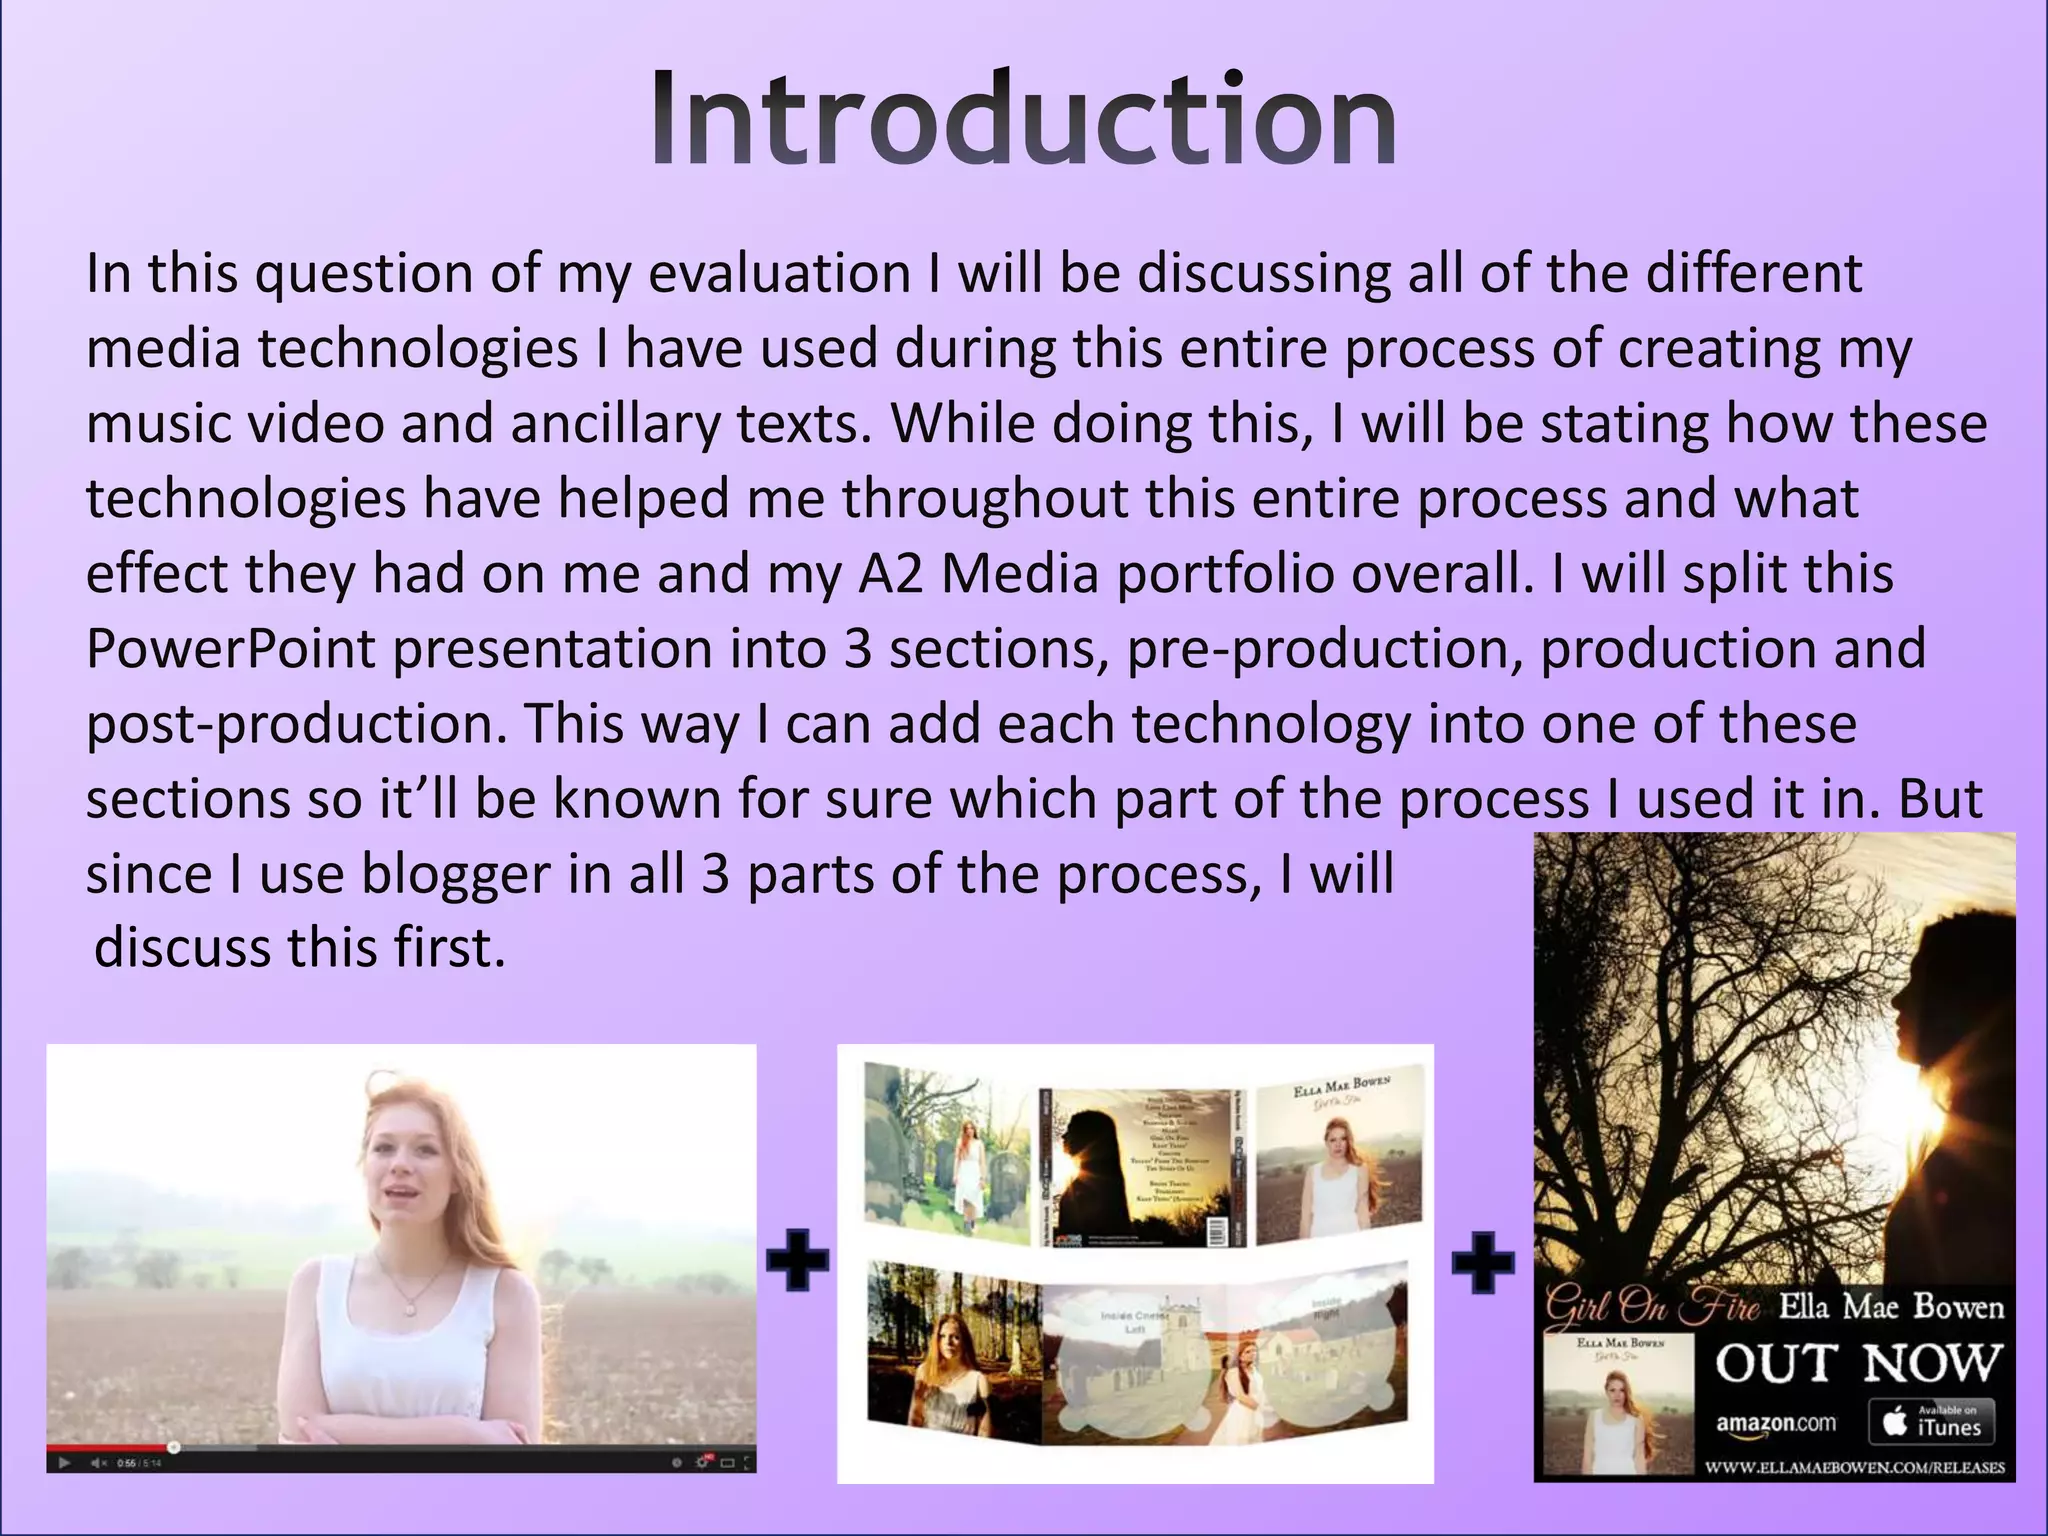
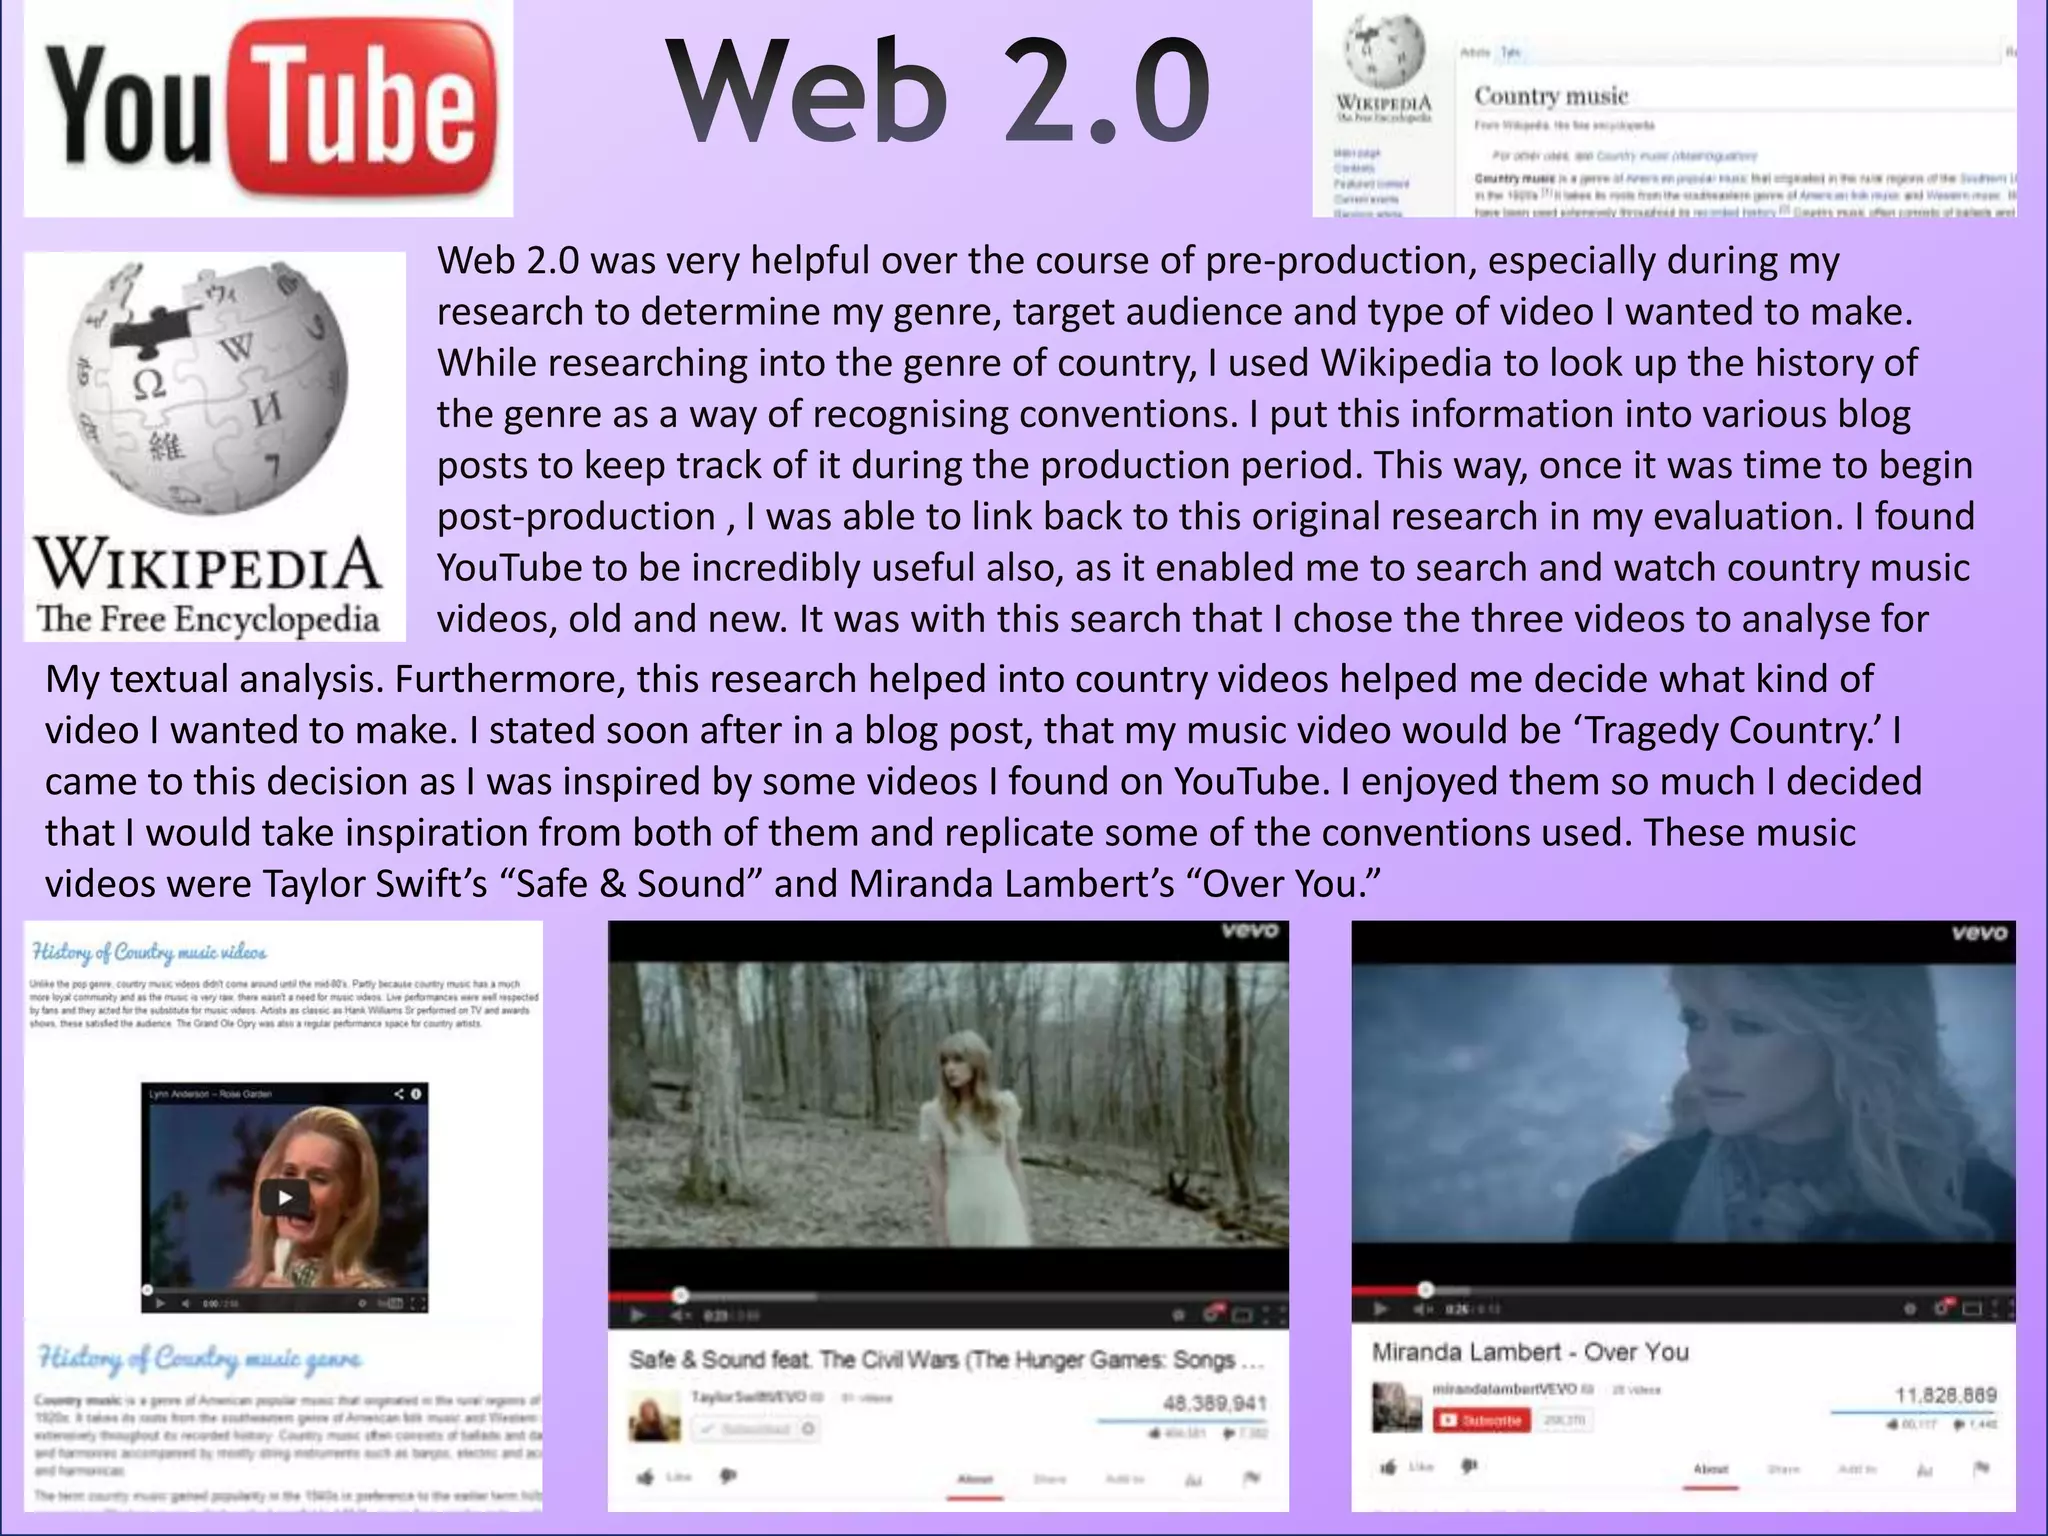
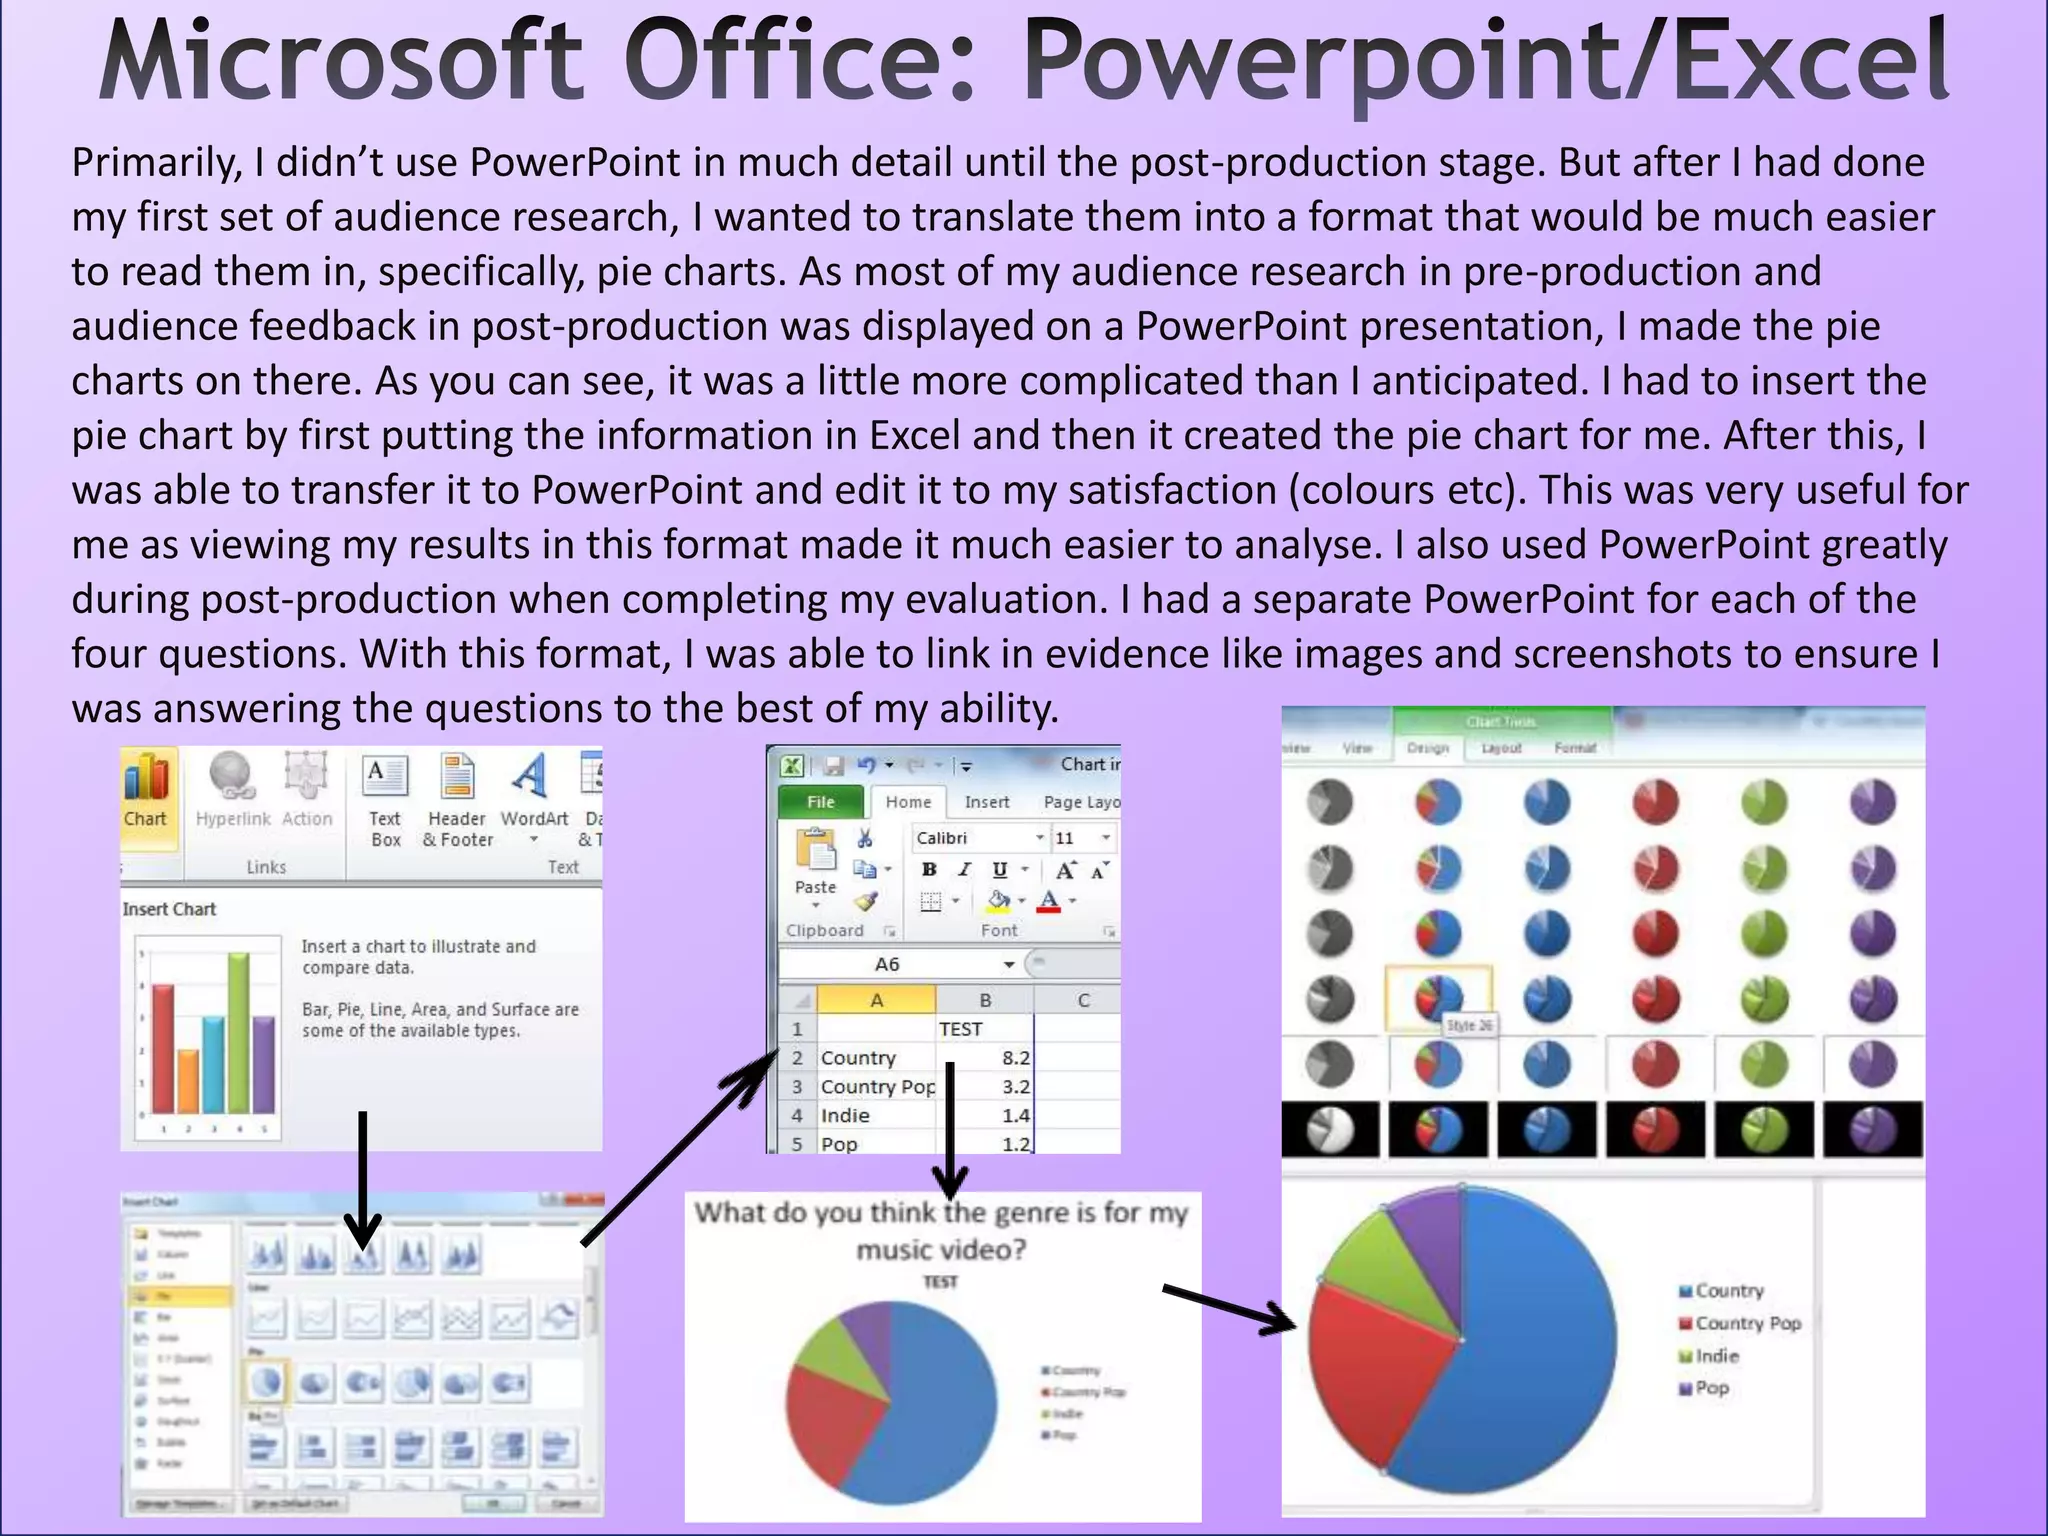
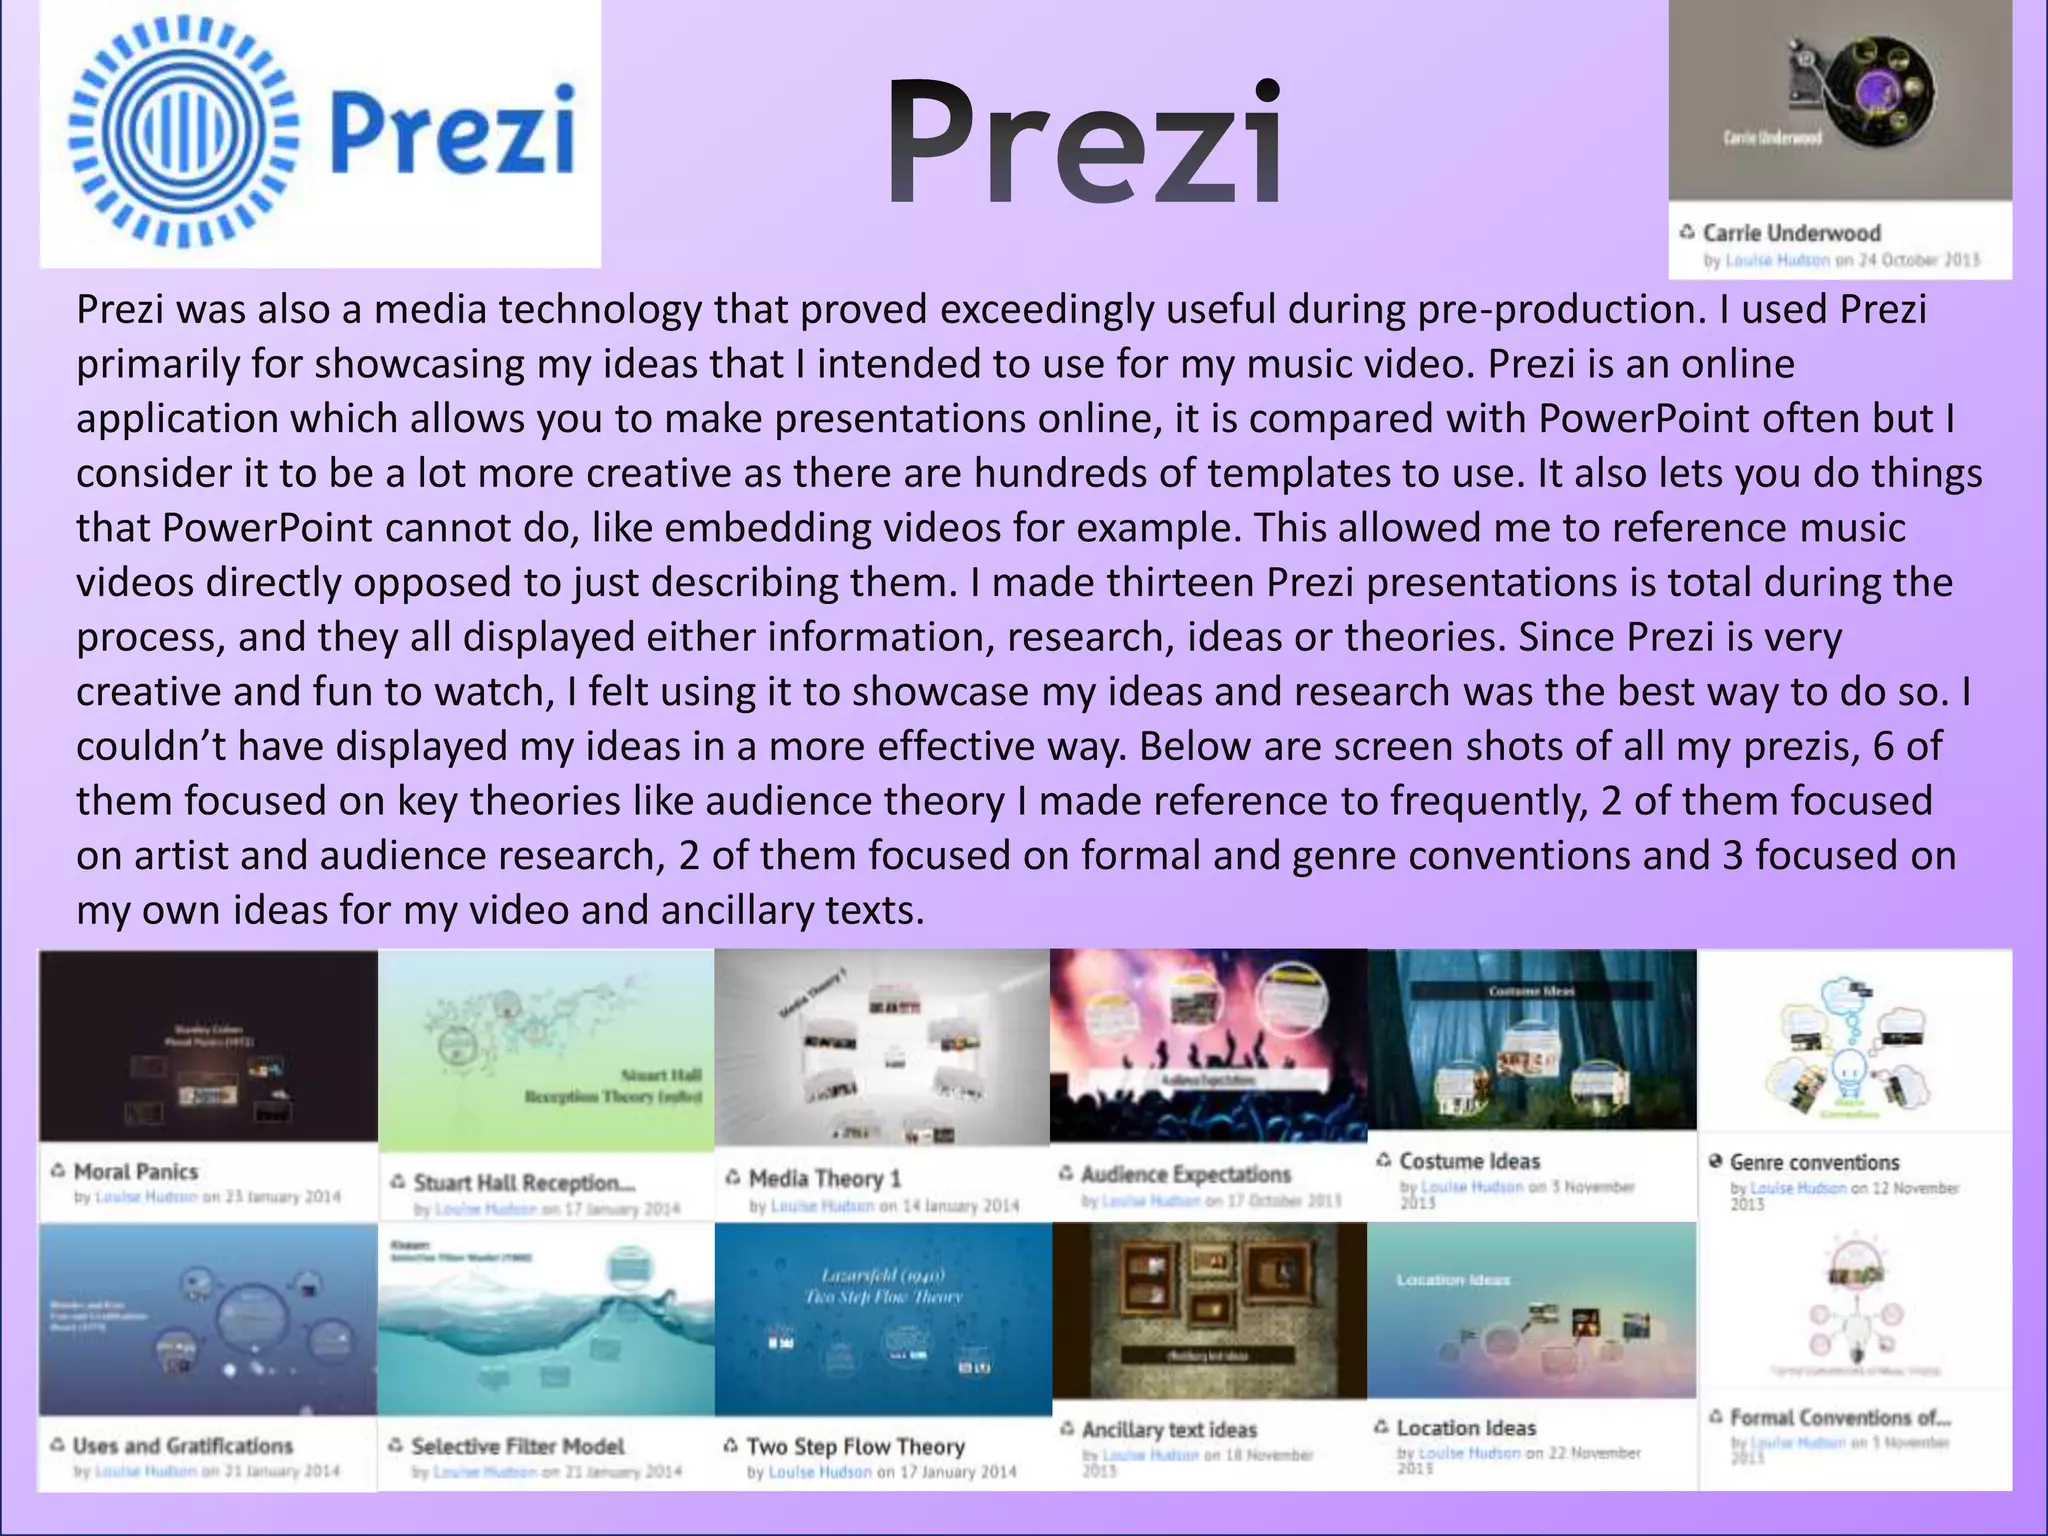
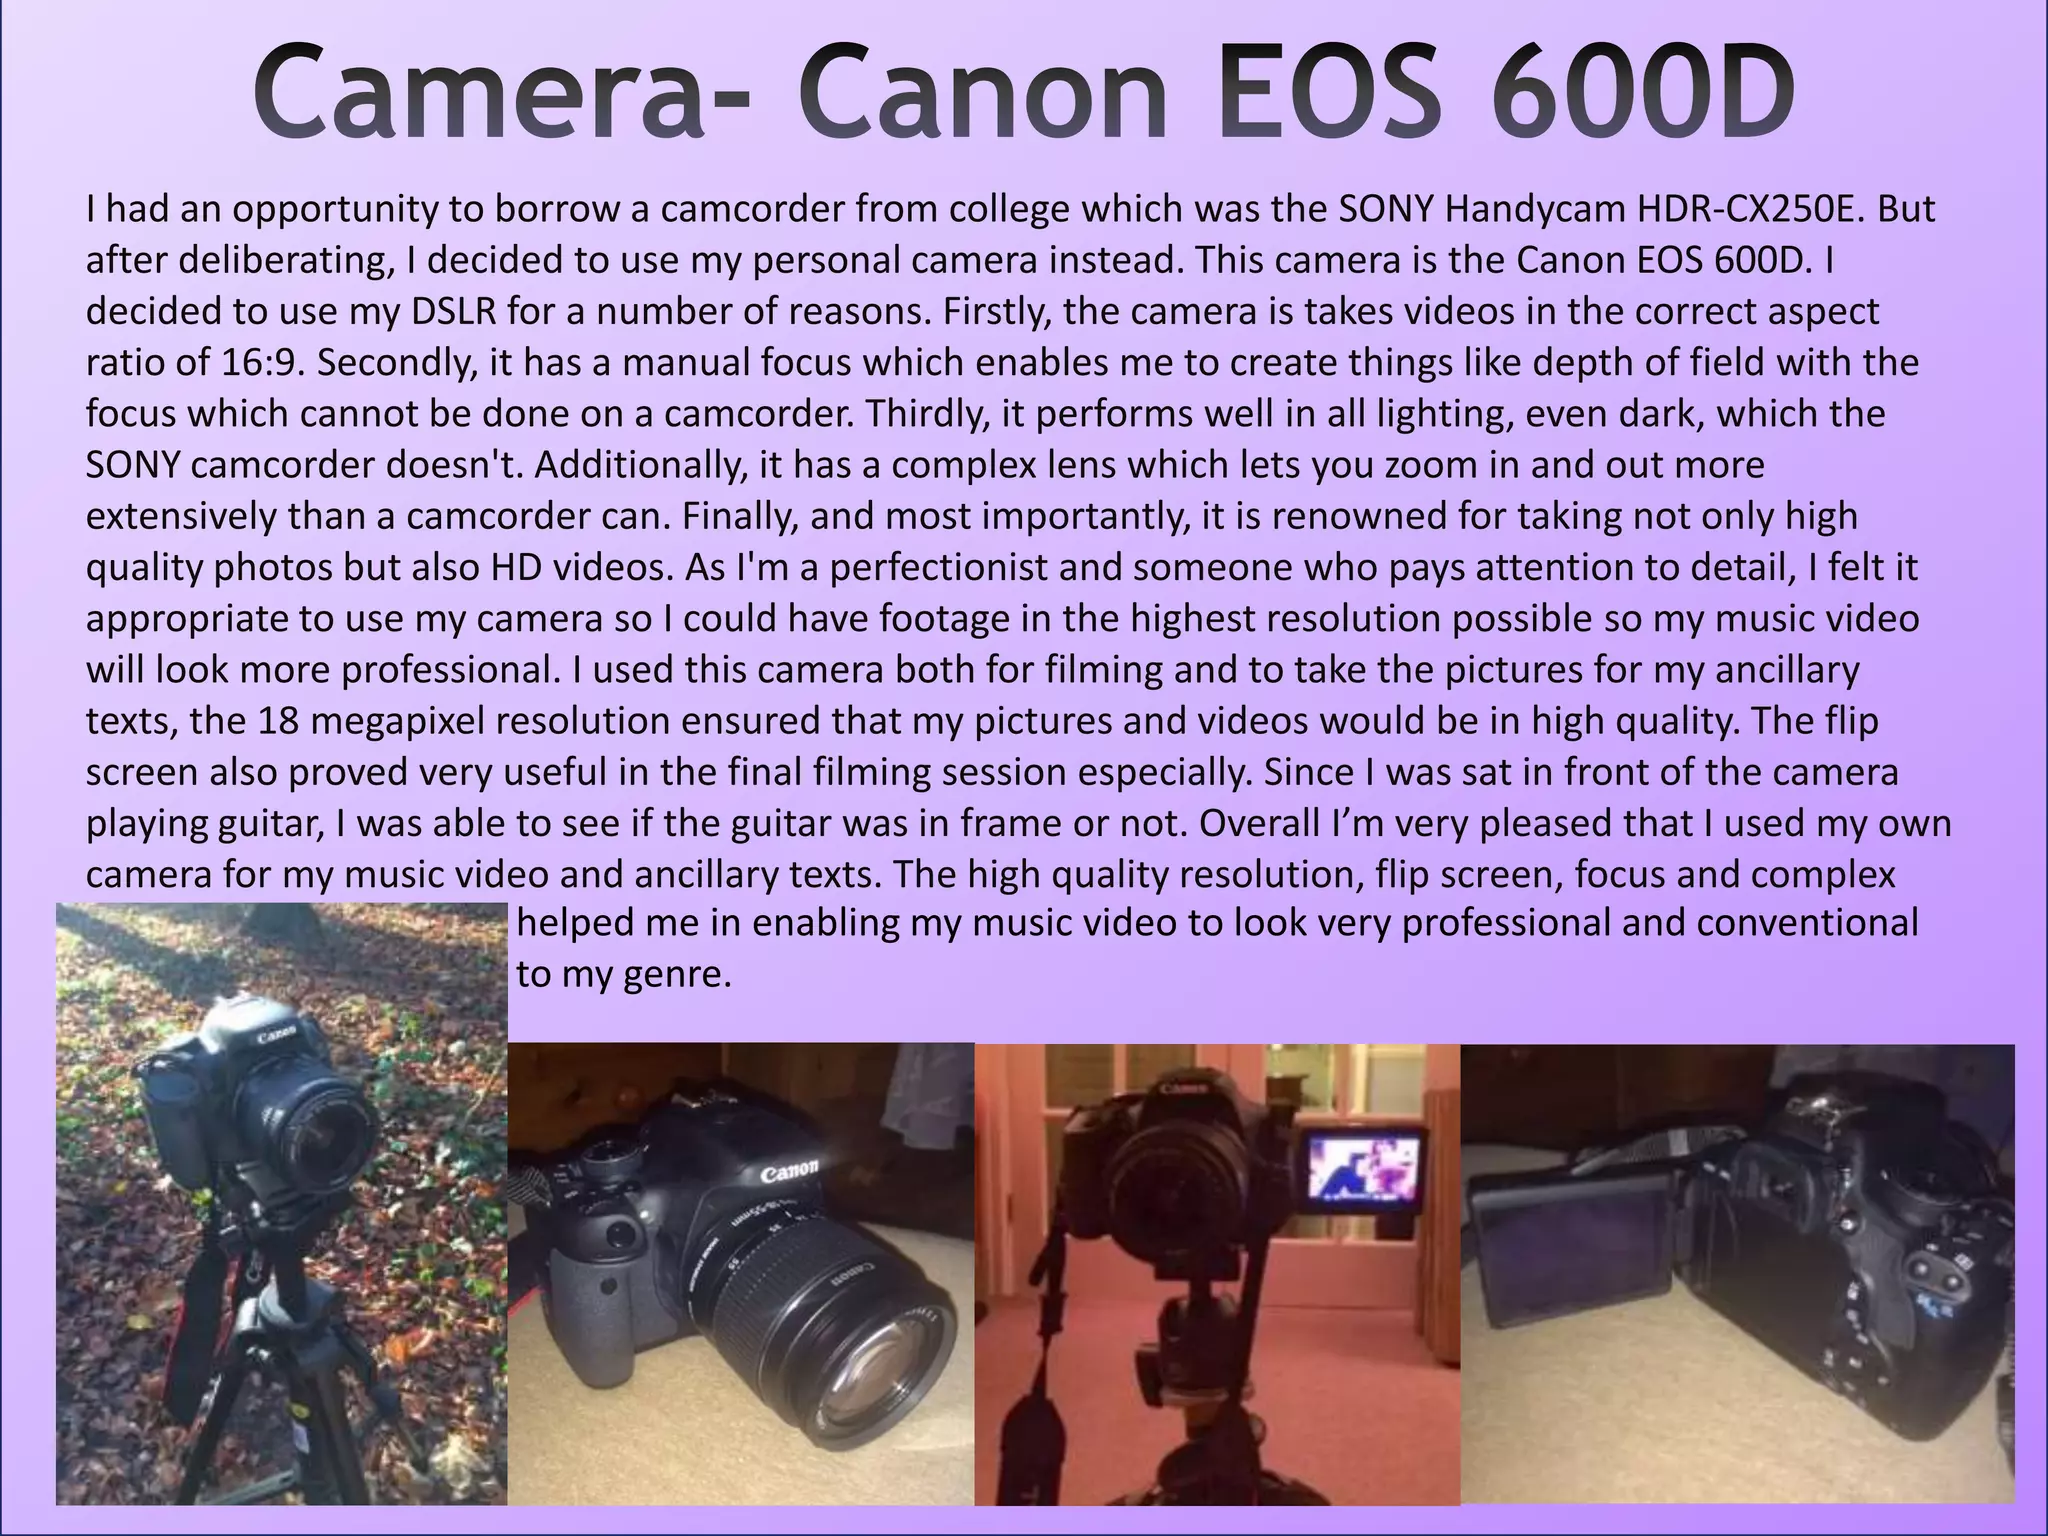
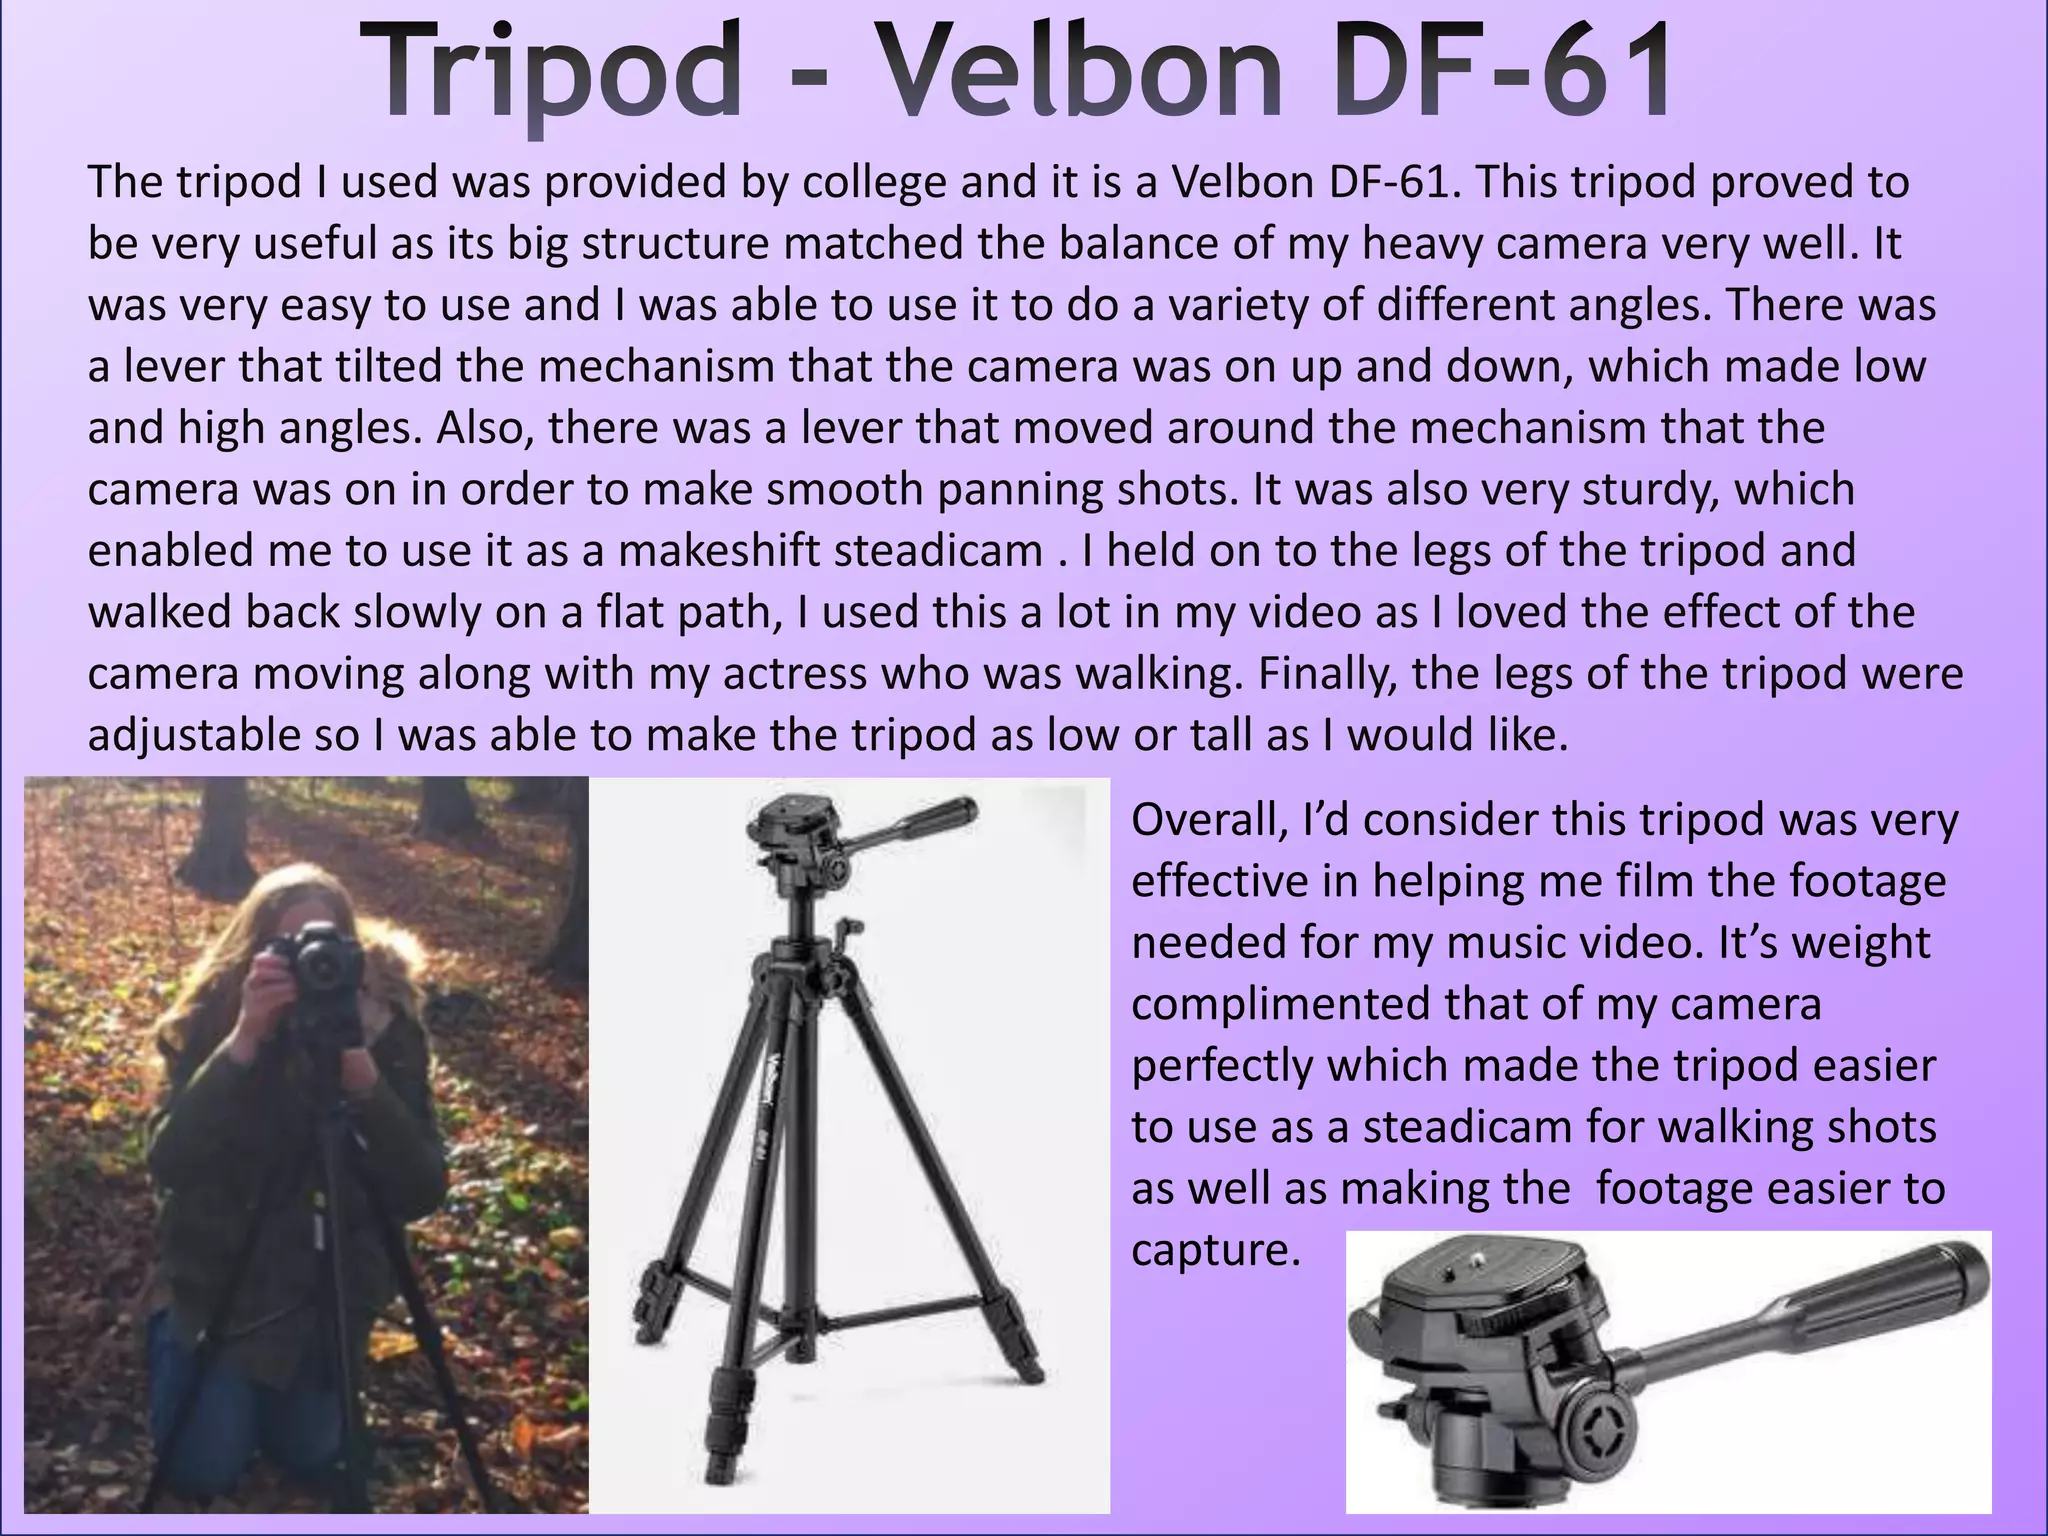
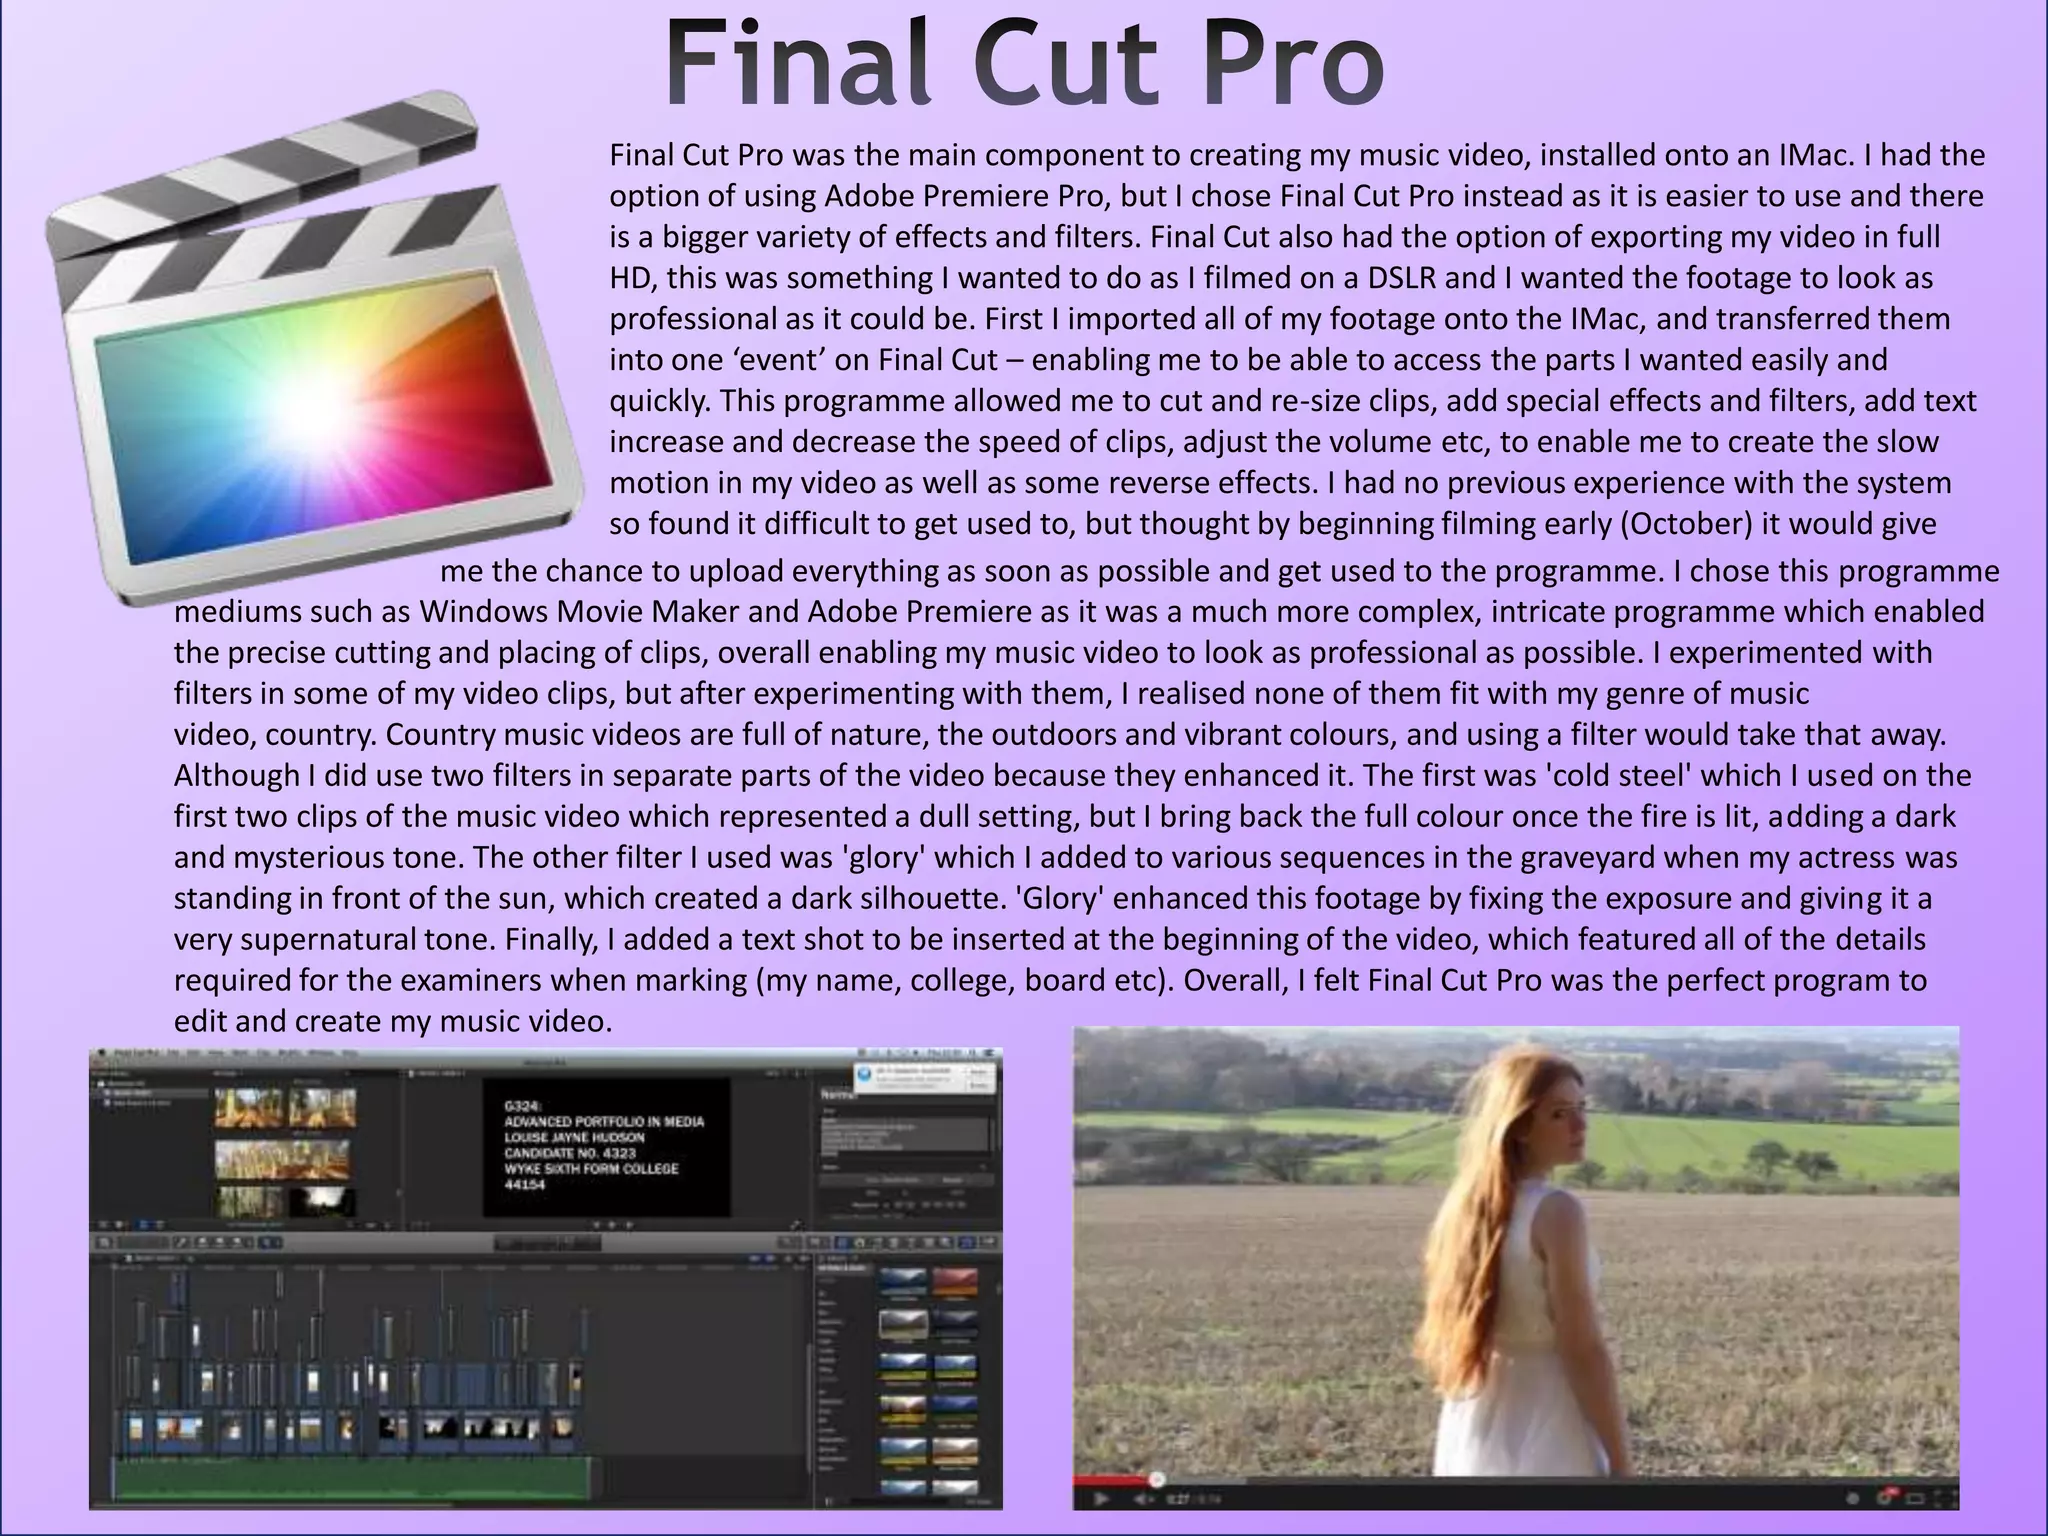
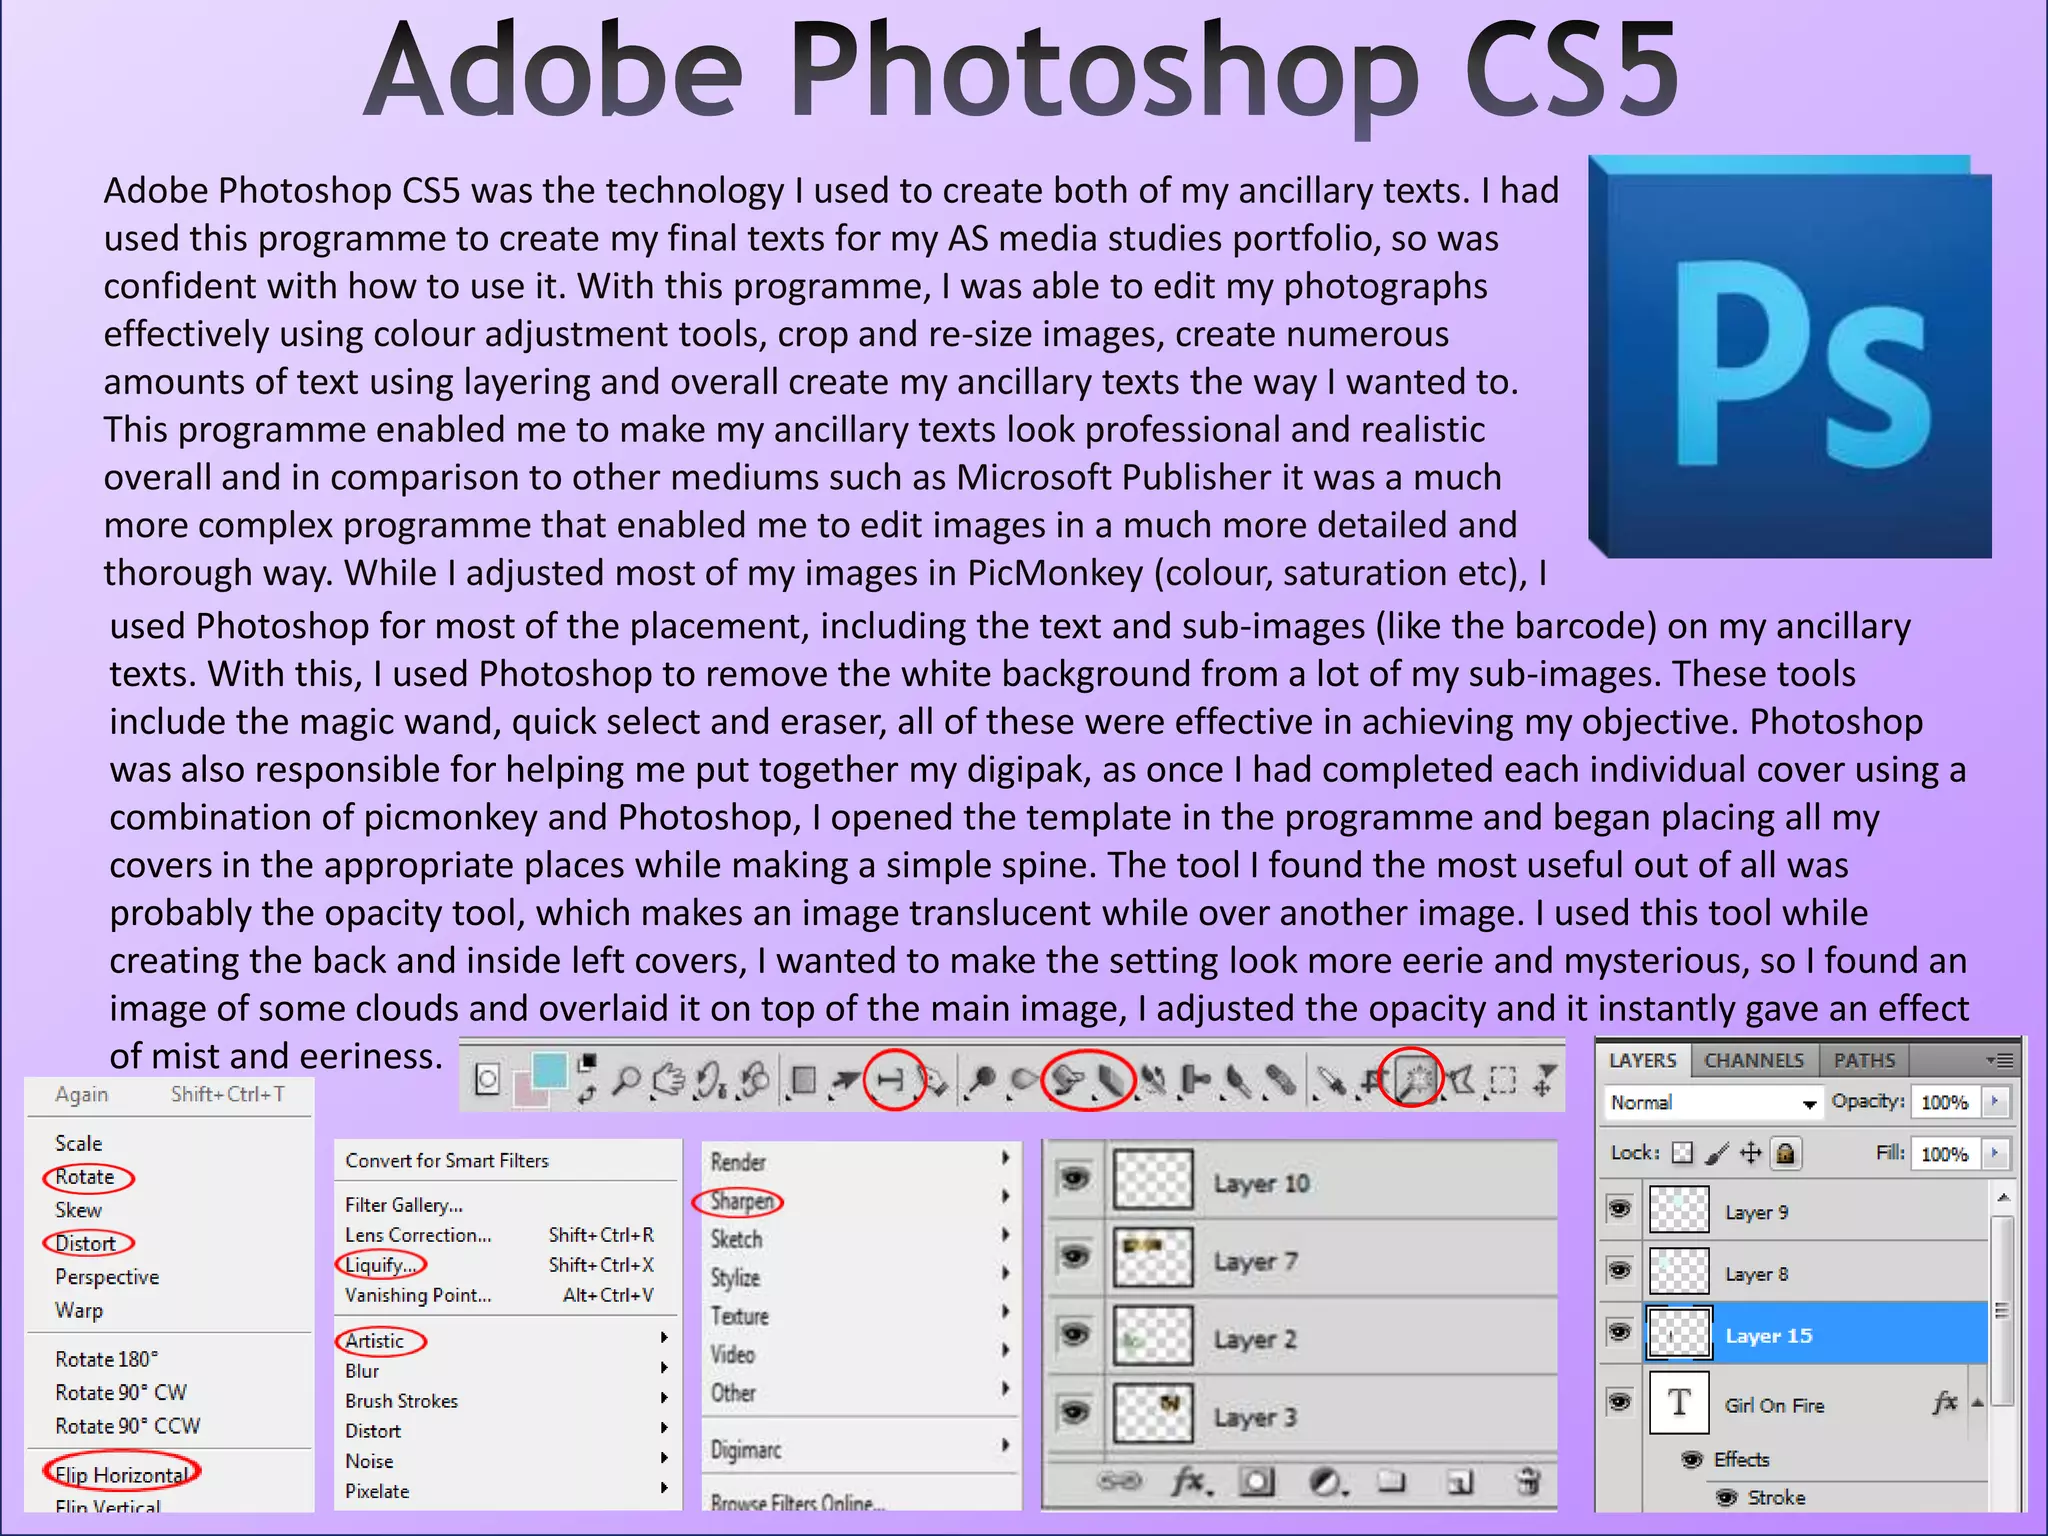
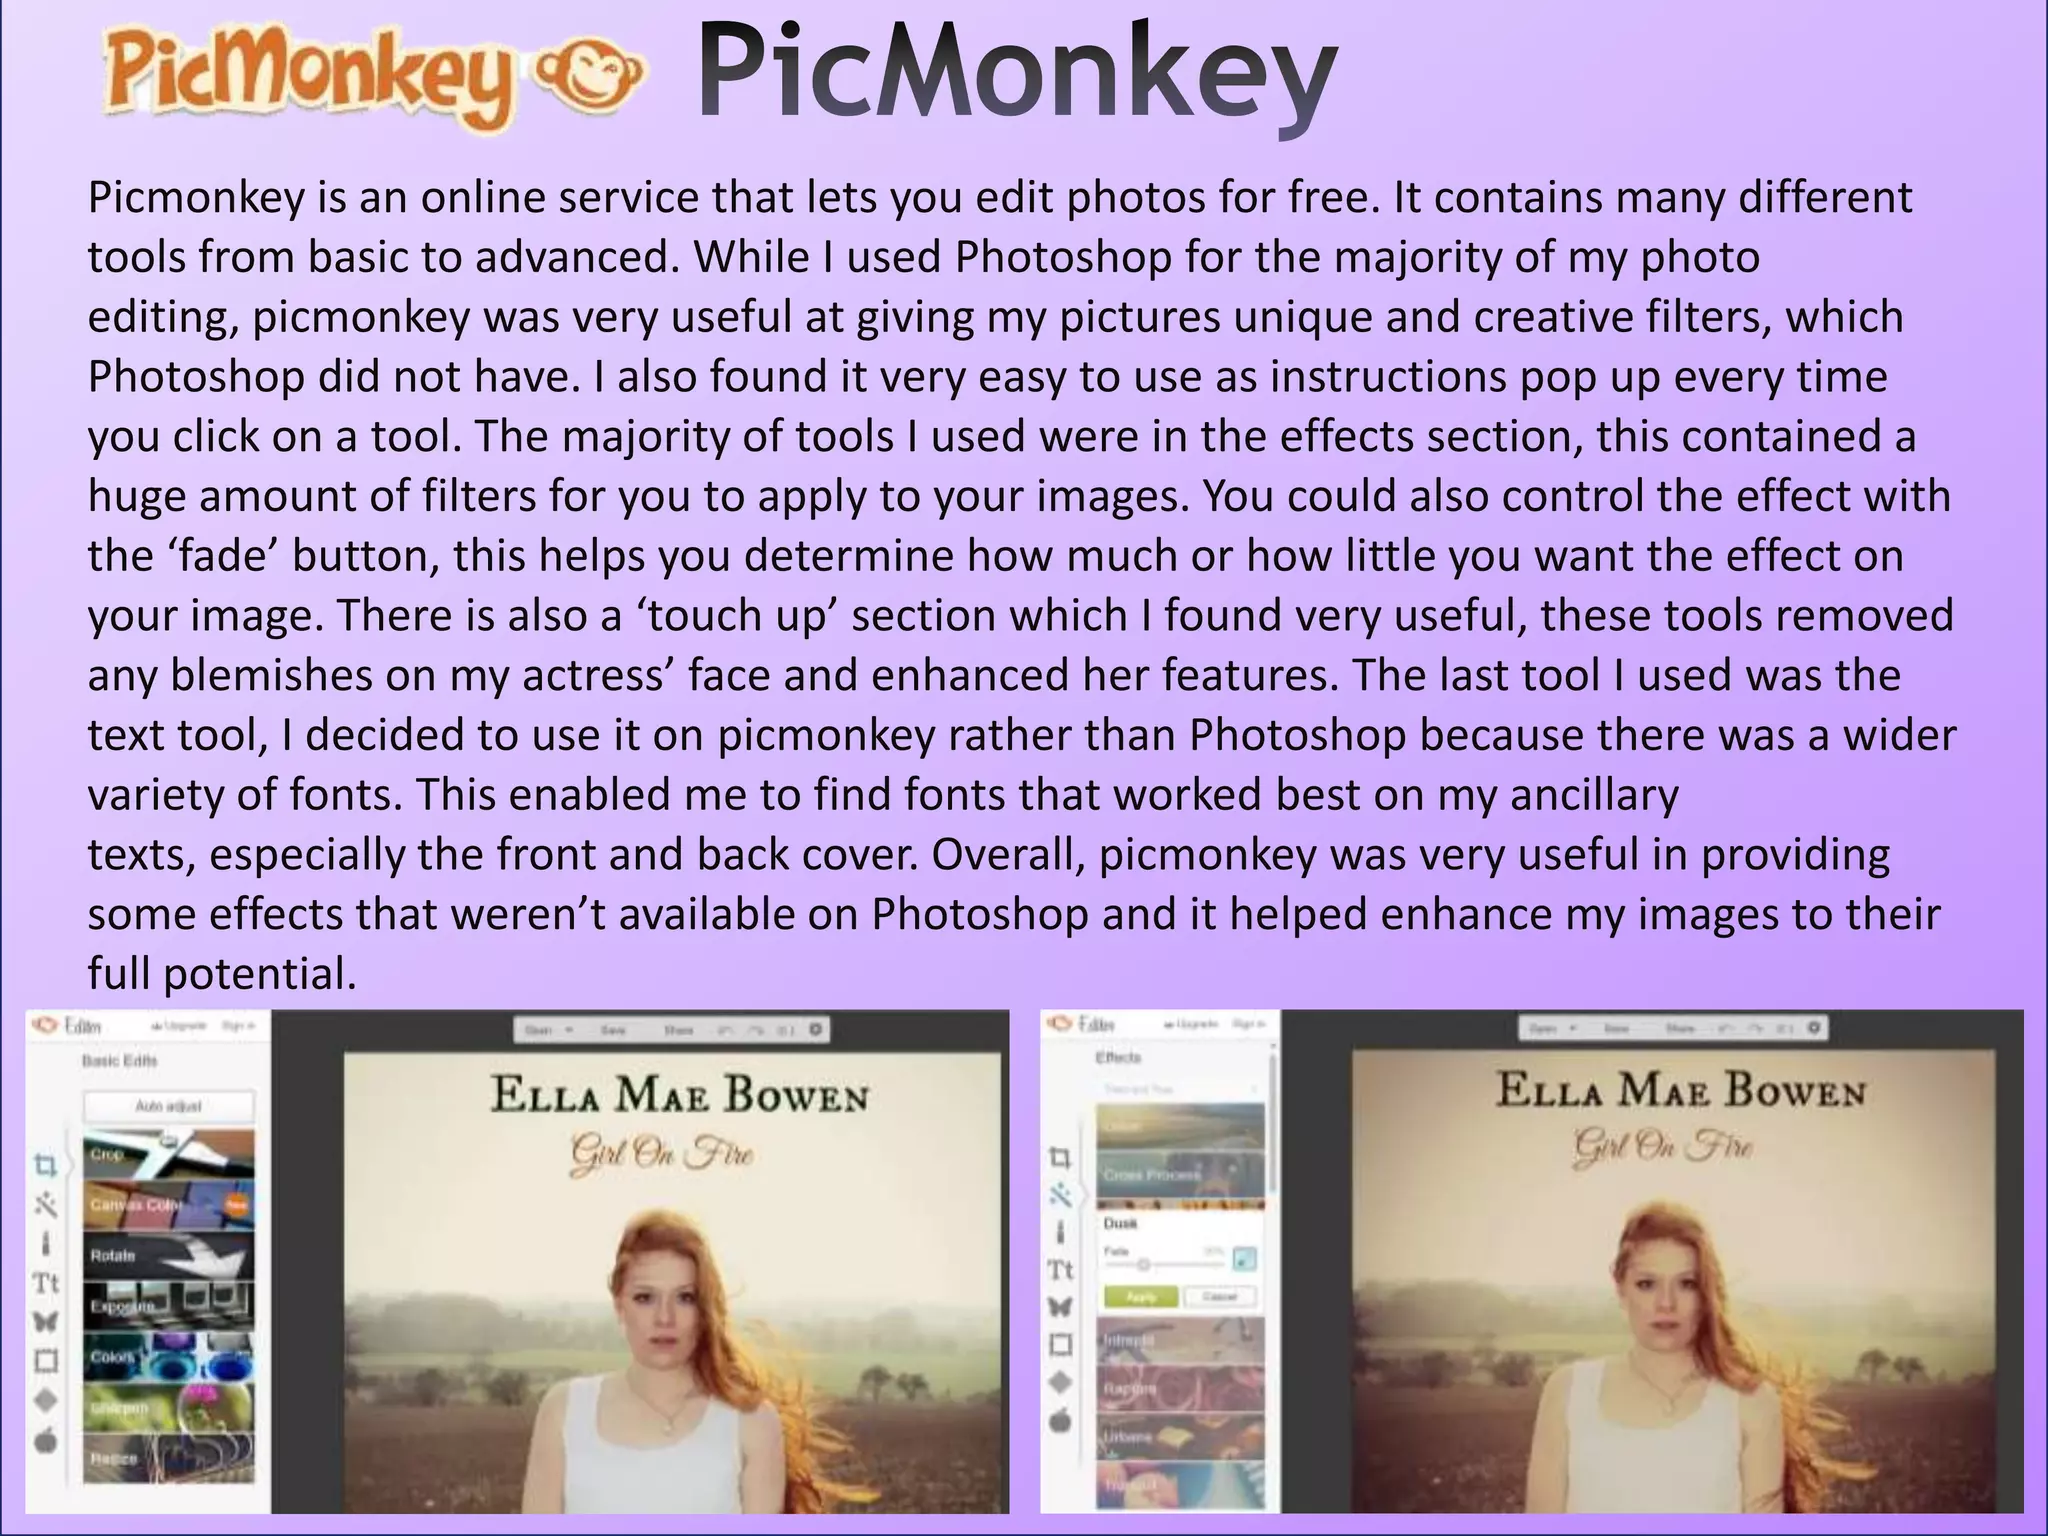
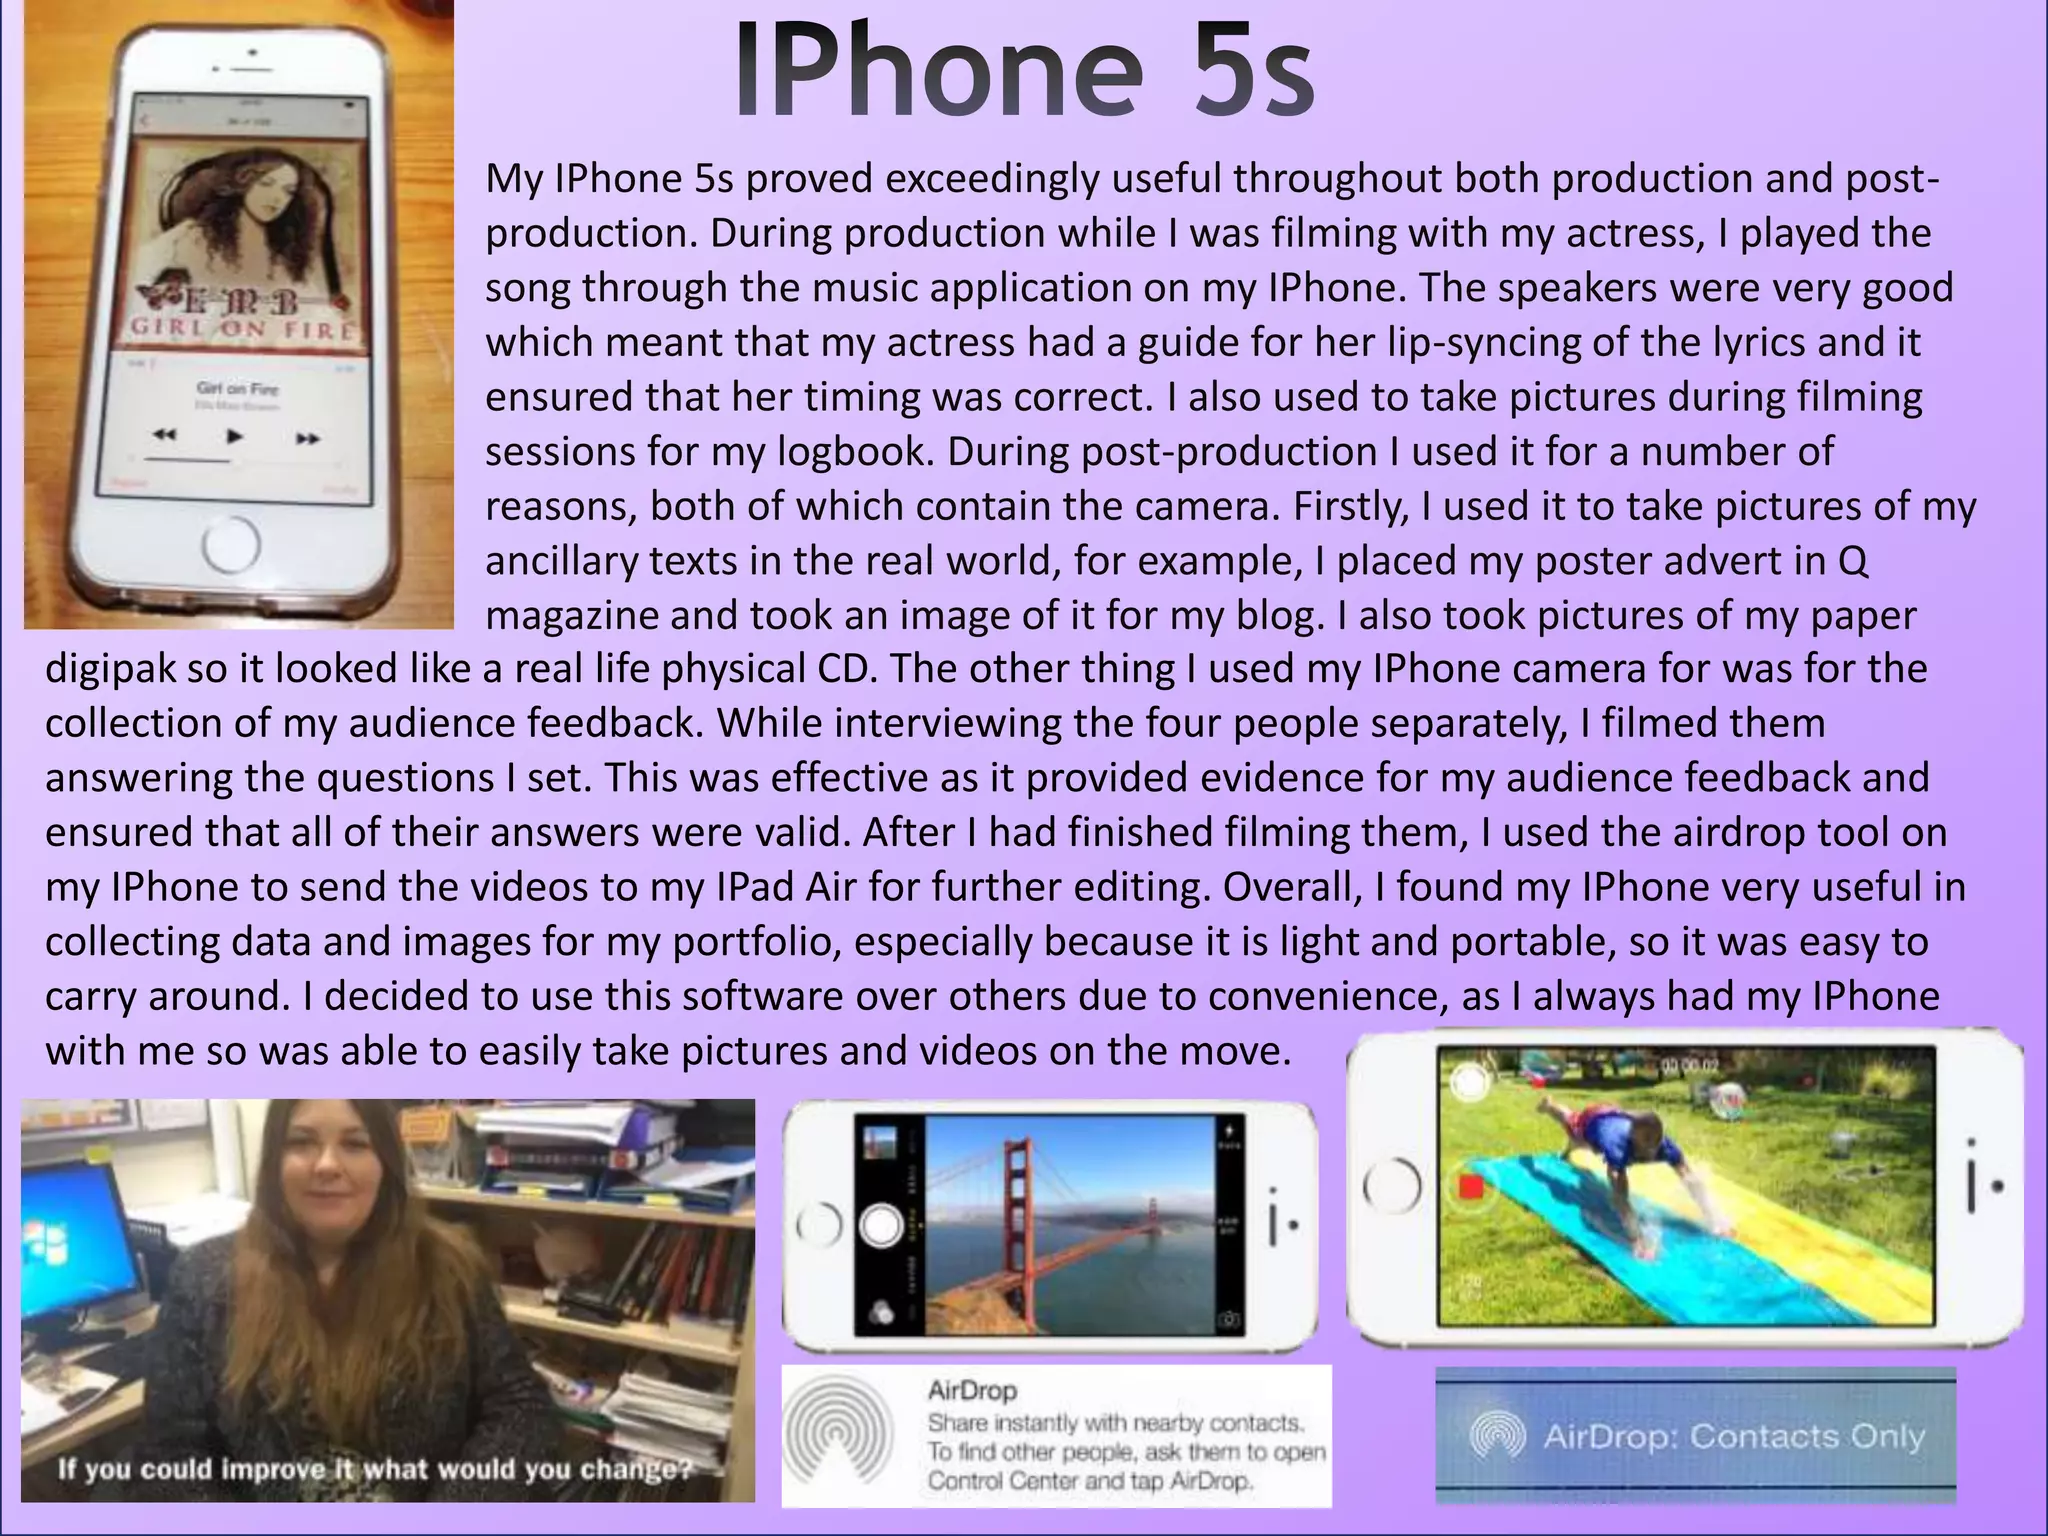
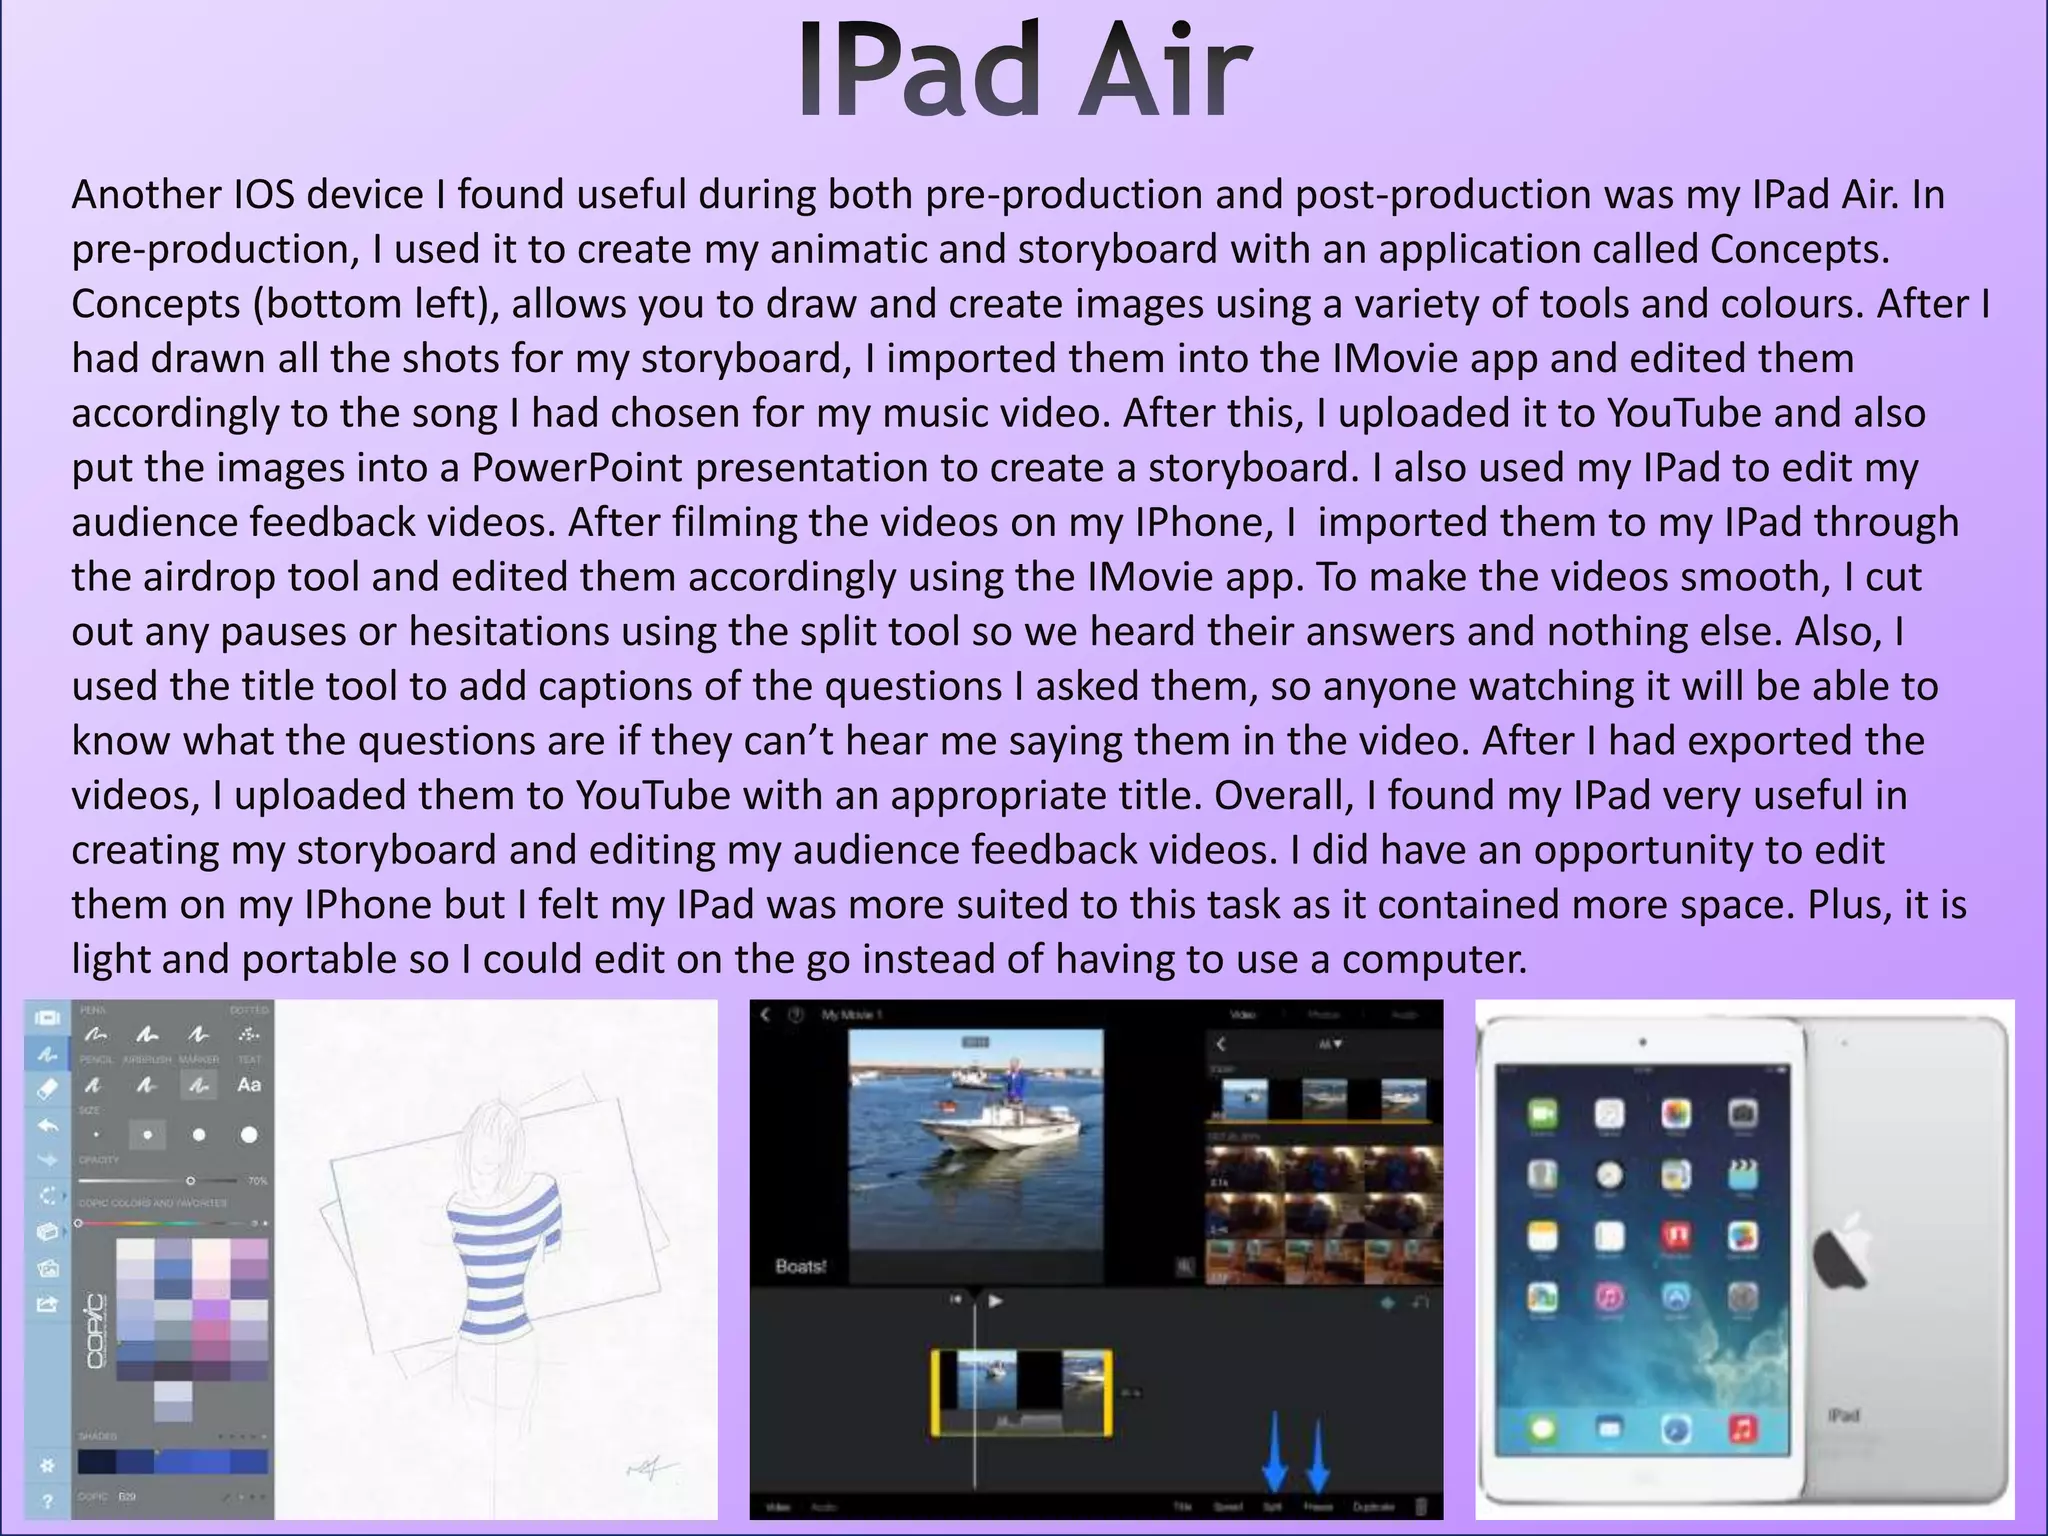
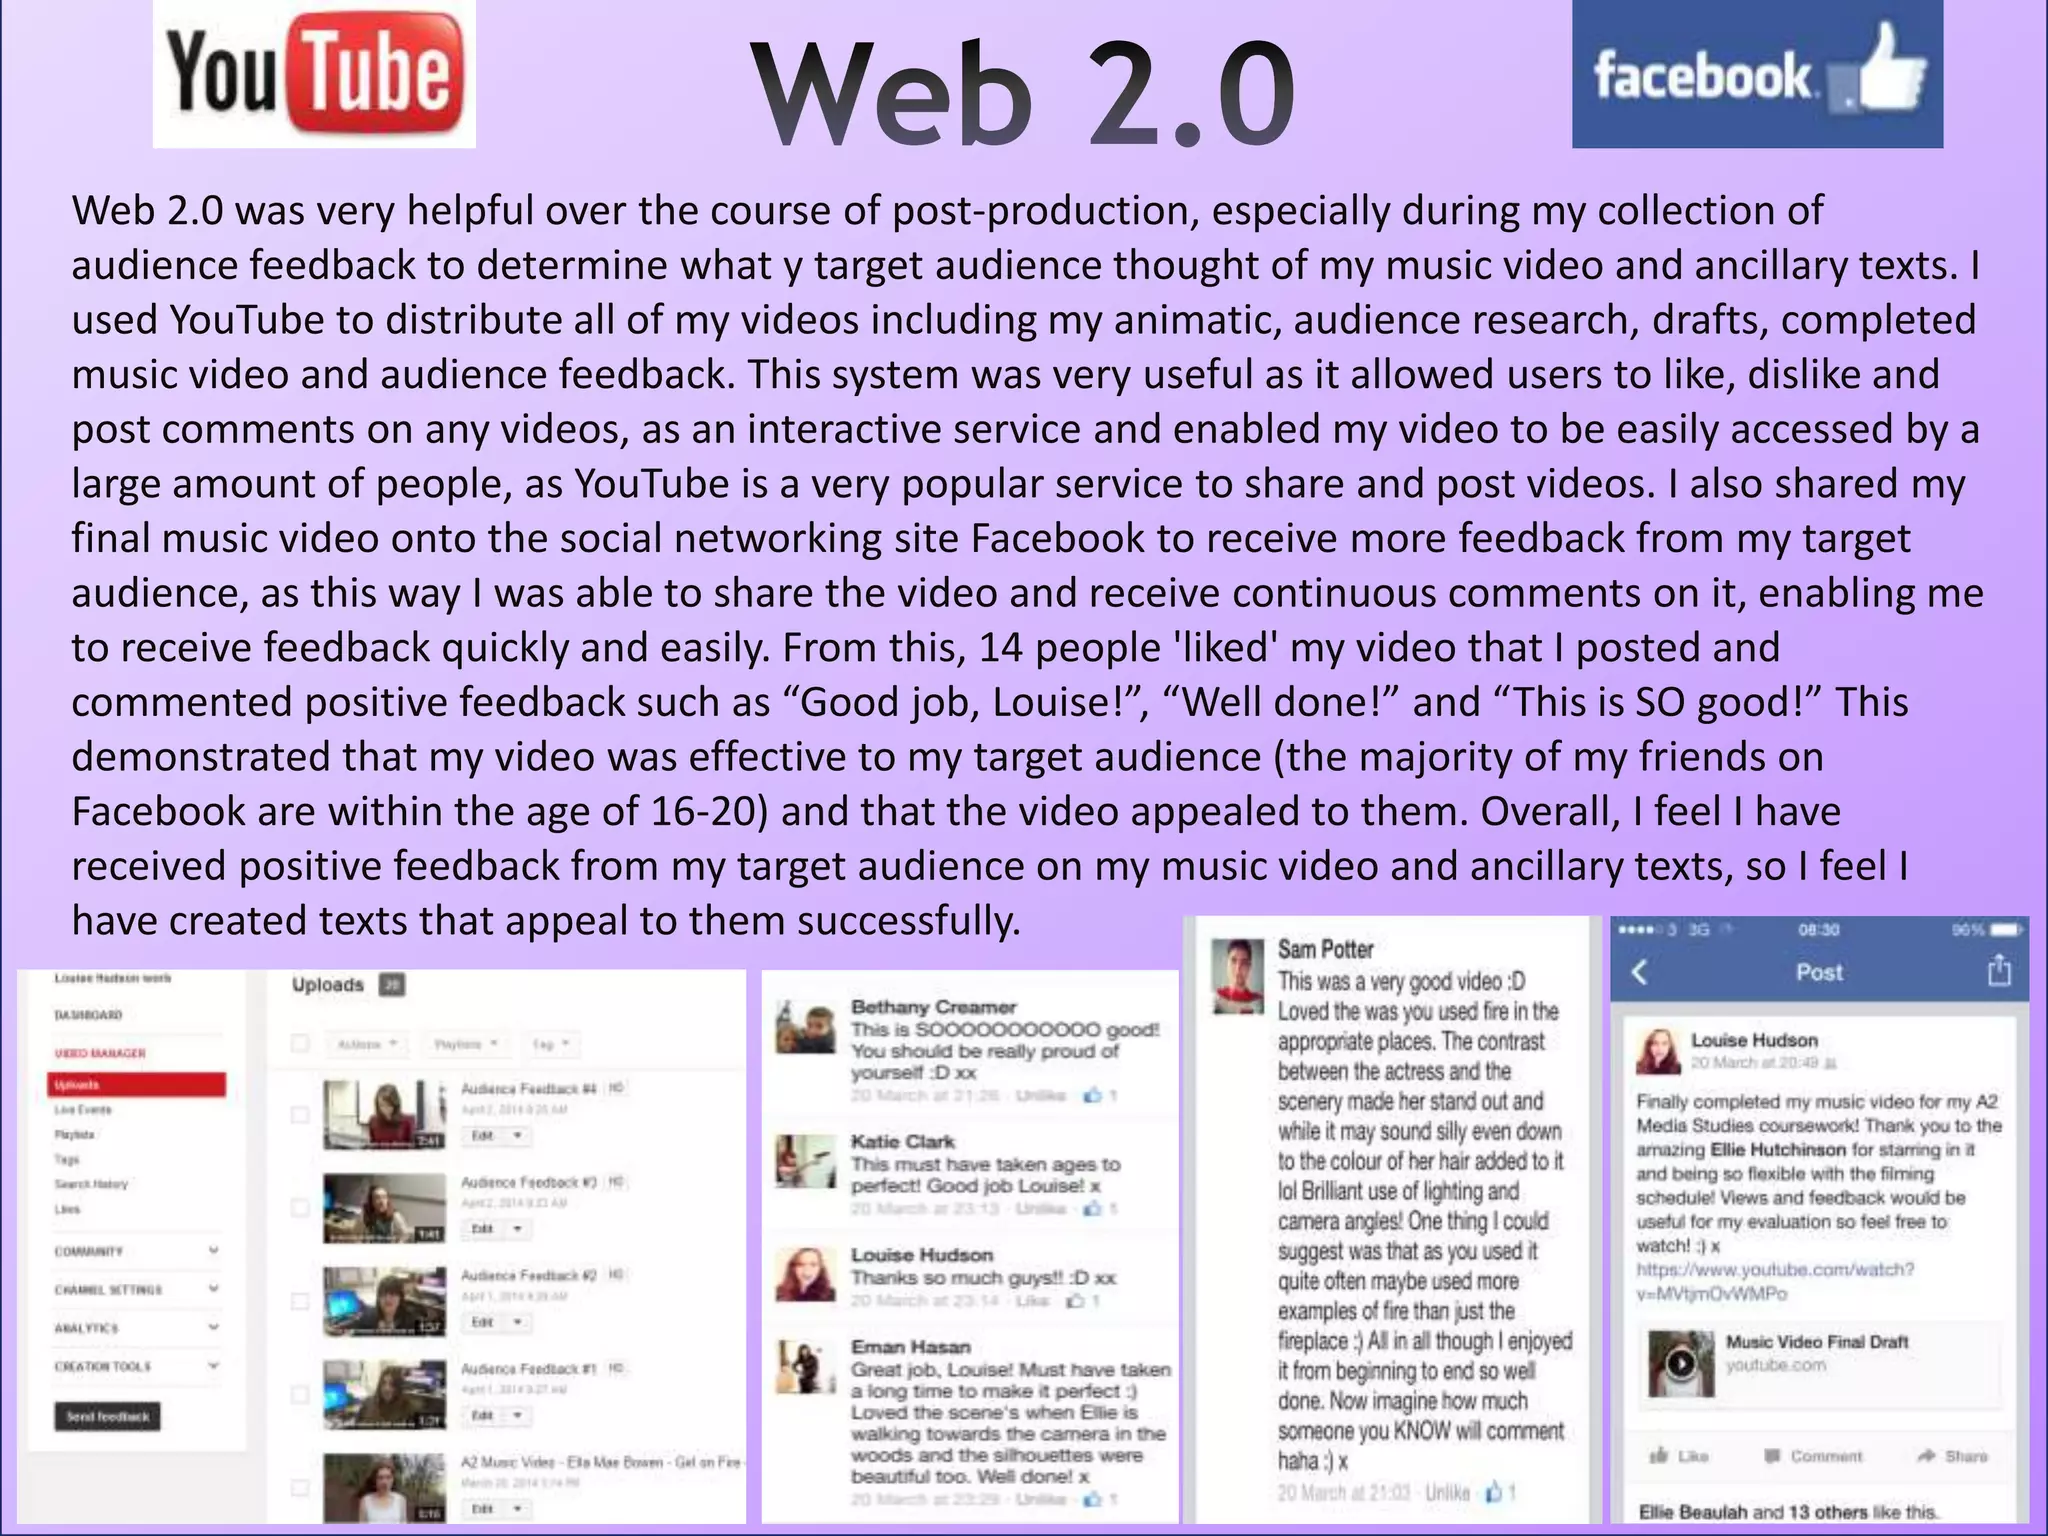
SlideShare a Scribd company logo
How did you use new media technologies in the
construction and research, planning and evaluation stages?
In this question of my evaluation I will be discussing all of the different
media technologies I have used during this entire process of creating my
music video and ancillary texts. While doing this, I will be stating how these
technologies have helped me throughout this entire process and what
effect they had on me and my A2 Media portfolio overall. I will split this
PowerPoint presentation into 3 sections, pre-production, production and
post-production. This way I can add each technology into one of these
sections so it’ll be known for sure which part of the process I used it in. But
since I use blogger in all 3 parts of the process, I will
discuss this first.
I’d already had some experience with blogger while doing my AS Media portfolio, so this time around, I was
very comfortable with using it. Its main use was to hold the entirety of my portfolio and publish all of my
development, planning and final pieces onto very quickly and easily. But it also allowed me to embed a lot of
content from other websites I used such as Prezi, Slideshare and YouTube. I liked doing this because it gave my
blog more variety, because I was displaying my research and planning in unique way. This looked much more
effective and readable than just posting the information in a plain text form. Blogger also proved useful during
the production period as I was able to keep a filming log/diary very easily by typing what I had done on a
particular day and then posting it immediately. This helped me keep track of my progress throughout the entire
process of making my video and ancillary texts. Blogger also enabled me to create a poll which I used during my
research period in pre-production. I added six questions with multiple choice answers, and I emailed my blog
link to my participants. The multiple choice options made it very easy for them to answer, so I managed to get
the results pretty quickly and easily as it showed the answers in percentages, this made them easy to analyse
later on. As for the post-production section of the process, I used blogger to keep track of my edits of my music
video, as well as how I was progressing with my ancillary texts. This didn’t only help my teachers see where I
was at in terms of progress, but it also helped me keep on track with
the tasks.
Web 2.0 was very helpful over the course of pre-production, especially during my
research to determine my genre, target audience and type of video I wanted to make.
While researching into the genre of country, I used Wikipedia to look up the history of
the genre as a way of recognising conventions. I put this information into various blog
posts to keep track of it during the production period. This way, once it was time to begin
post-production , I was able to link back to this original research in my evaluation. I found
YouTube to be incredibly useful also, as it enabled me to search and watch country music
videos, old and new. It was with this search that I chose the three videos to analyse for
My textual analysis. Furthermore, this research helped into country videos helped me decide what kind of
video I wanted to make. I stated soon after in a blog post, that my music video would be ‘Tragedy Country.’ I
came to this decision as I was inspired by some videos I found on YouTube. I enjoyed them so much I decided
that I would take inspiration from both of them and replicate some of the conventions used. These music
videos were Taylor Swift’s “Safe & Sound” and Miranda Lambert’s “Over You.”
Primarily, I didn’t use PowerPoint in much detail until the post-production stage. But after I had done
my first set of audience research, I wanted to translate them into a format that would be much easier
to read them in, specifically, pie charts. As most of my audience research in pre-production and
audience feedback in post-production was displayed on a PowerPoint presentation, I made the pie
charts on there. As you can see, it was a little more complicated than I anticipated. I had to insert the
pie chart by first putting the information in Excel and then it created the pie chart for me. After this, I
was able to transfer it to PowerPoint and edit it to my satisfaction (colours etc). This was very useful for
me as viewing my results in this format made it much easier to analyse. I also used PowerPoint greatly
during post-production when completing my evaluation. I had a separate PowerPoint for each of the
four questions. With this format, I was able to link in evidence like images and screenshots to ensure I
was answering the questions to the best of my ability.
Prezi was also a media technology that proved exceedingly useful during pre-production. I used Prezi
primarily for showcasing my ideas that I intended to use for my music video. Prezi is an online
application which allows you to make presentations online, it is compared with PowerPoint often but I
consider it to be a lot more creative as there are hundreds of templates to use. It also lets you do things
that PowerPoint cannot do, like embedding videos for example. This allowed me to reference music
videos directly opposed to just describing them. I made thirteen Prezi presentations is total during the
process, and they all displayed either information, research, ideas or theories. Since Prezi is very
creative and fun to watch, I felt using it to showcase my ideas and research was the best way to do so. I
couldn’t have displayed my ideas in a more effective way. Below are screen shots of all my prezis, 6 of
them focused on key theories like audience theory I made reference to frequently, 2 of them focused
on artist and audience research, 2 of them focused on formal and genre conventions and 3 focused on
my own ideas for my video and ancillary texts.
I had an opportunity to borrow a camcorder from college which was the SONY Handycam HDR-CX250E. But
after deliberating, I decided to use my personal camera instead. This camera is the Canon EOS 600D. I
decided to use my DSLR for a number of reasons. Firstly, the camera is takes videos in the correct aspect
ratio of 16:9. Secondly, it has a manual focus which enables me to create things like depth of field with the
focus which cannot be done on a camcorder. Thirdly, it performs well in all lighting, even dark, which the
SONY camcorder doesn't. Additionally, it has a complex lens which lets you zoom in and out more
extensively than a camcorder can. Finally, and most importantly, it is renowned for taking not only high
quality photos but also HD videos. As I'm a perfectionist and someone who pays attention to detail, I felt it
appropriate to use my camera so I could have footage in the highest resolution possible so my music video
will look more professional. I used this camera both for filming and to take the pictures for my ancillary
texts, the 18 megapixel resolution ensured that my pictures and videos would be in high quality. The flip
screen also proved very useful in the final filming session especially. Since I was sat in front of the camera
playing guitar, I was able to see if the guitar was in frame or not. Overall I’m very pleased that I used my own
camera for my music video and ancillary texts. The high quality resolution, flip screen, focus and complex
zoom helped me in enabling my music video to look very professional and conventional
to my genre.
The tripod I used was provided by college and it is a Velbon DF-61. This tripod proved to
be very useful as its big structure matched the balance of my heavy camera very well. It
was very easy to use and I was able to use it to do a variety of different angles. There was
a lever that tilted the mechanism that the camera was on up and down, which made low
and high angles. Also, there was a lever that moved around the mechanism that the
camera was on in order to make smooth panning shots. It was also very sturdy, which
enabled me to use it as a makeshift steadicam . I held on to the legs of the tripod and
walked back slowly on a flat path, I used this a lot in my video as I loved the effect of the
camera moving along with my actress who was walking. Finally, the legs of the tripod were
adjustable so I was able to make the tripod as low or tall as I would like.
Overall, I’d consider this tripod was very
effective in helping me film the footage
needed for my music video. It’s weight
complimented that of my camera
perfectly which made the tripod easier
to use as a steadicam for walking shots
as well as making the footage easier to
capture.
Final Cut Pro was the main component to creating my music video, installed onto an IMac. I had the
option of using Adobe Premiere Pro, but I chose Final Cut Pro instead as it is easier to use and there
is a bigger variety of effects and filters. Final Cut also had the option of exporting my video in full
HD, this was something I wanted to do as I filmed on a DSLR and I wanted the footage to look as
professional as it could be. First I imported all of my footage onto the IMac, and transferred them
into one ‘event’ on Final Cut – enabling me to be able to access the parts I wanted easily and
quickly. This programme allowed me to cut and re-size clips, add special effects and filters, add text
increase and decrease the speed of clips, adjust the volume etc, to enable me to create the slow
motion in my video as well as some reverse effects. I had no previous experience with the system
so found it difficult to get used to, but thought by beginning filming early (October) it would give
mediums such as Windows Movie Maker and Adobe Premiere as it was a much more complex, intricate programme which enabled
the precise cutting and placing of clips, overall enabling my music video to look as professional as possible. I experimented with
filters in some of my video clips, but after experimenting with them, I realised none of them fit with my genre of music
video, country. Country music videos are full of nature, the outdoors and vibrant colours, and using a filter would take that away.
Although I did use two filters in separate parts of the video because they enhanced it. The first was 'cold steel' which I used on the
first two clips of the music video which represented a dull setting, but I bring back the full colour once the fire is lit, adding a dark
and mysterious tone. The other filter I used was 'glory' which I added to various sequences in the graveyard when my actress was
standing in front of the sun, which created a dark silhouette. 'Glory' enhanced this footage by fixing the exposure and giving it a
very supernatural tone. Finally, I added a text shot to be inserted at the beginning of the video, which featured all of the details
required for the examiners when marking (my name, college, board etc). Overall, I felt Final Cut Pro was the perfect program to
edit and create my music video.
me the chance to upload everything as soon as possible and get used to the programme. I chose this programme
Adobe Photoshop CS5 was the technology I used to create both of my ancillary texts. I had
used this programme to create my final texts for my AS media studies portfolio, so was
confident with how to use it. With this programme, I was able to edit my photographs
effectively using colour adjustment tools, crop and re-size images, create numerous
amounts of text using layering and overall create my ancillary texts the way I wanted to.
This programme enabled me to make my ancillary texts look professional and realistic
overall and in comparison to other mediums such as Microsoft Publisher it was a much
more complex programme that enabled me to edit images in a much more detailed and
thorough way. While I adjusted most of my images in PicMonkey (colour, saturation etc), I
used Photoshop for most of the placement, including the text and sub-images (like the barcode) on my ancillary
texts. With this, I used Photoshop to remove the white background from a lot of my sub-images. These tools
include the magic wand, quick select and eraser, all of these were effective in achieving my objective. Photoshop
was also responsible for helping me put together my digipak, as once I had completed each individual cover using a
combination of picmonkey and Photoshop, I opened the template in the programme and began placing all my
covers in the appropriate places while making a simple spine. The tool I found the most useful out of all was
probably the opacity tool, which makes an image translucent while over another image. I used this tool while
creating the back and inside left covers, I wanted to make the setting look more eerie and mysterious, so I found an
image of some clouds and overlaid it on top of the main image, I adjusted the opacity and it instantly gave an effect
of mist and eeriness.
Picmonkey is an online service that lets you edit photos for free. It contains many different
tools from basic to advanced. While I used Photoshop for the majority of my photo
editing, picmonkey was very useful at giving my pictures unique and creative filters, which
Photoshop did not have. I also found it very easy to use as instructions pop up every time
you click on a tool. The majority of tools I used were in the effects section, this contained a
huge amount of filters for you to apply to your images. You could also control the effect with
the ‘fade’ button, this helps you determine how much or how little you want the effect on
your image. There is also a ‘touch up’ section which I found very useful, these tools removed
any blemishes on my actress’ face and enhanced her features. The last tool I used was the
text tool, I decided to use it on picmonkey rather than Photoshop because there was a wider
variety of fonts. This enabled me to find fonts that worked best on my ancillary
texts, especially the front and back cover. Overall, picmonkey was very useful in providing
some effects that weren’t available on Photoshop and it helped enhance my images to their
full potential.
Slideshare is an online service that allows you to upload PowerPoint presentations.
The service then transfers them into a digital format which you can link and embed
into various websites for viewing. I had used this technology while doing my AS
Media Portfolio, so I was very confident with using it once again for my A2 Portfolio. I used it primarily
for my evaluation as I felt it was a very professional yet unique way of presenting it on my blog.
Plus, once the PowerPoint it is uploaded, it is presented in a format where you click an arrow and it
goes to the next slide. I deemed this much more effective and advanced than just print-screening each
slide and posting them as pictures on my blog. Aside from my evaluation, I also used slideshare to
present the images I had taken during my filming sessions for my ancillary texts. Again, I considered
this more effective and viewable than just posting each picture individually. Finally, I used it to present
my completed storyboard as it felt more appropriate to do this slideshare is able compacts a lot of
information in a small space. This is much better and space-saving than just posting the 60+ pages of
storyboard in a row. Overall, slideshare was incredibly useful during post-production as it enabled me
to keep a lot of information compact rather than it taking up a lot of space while still looking
professional.
My IPhone 5s proved exceedingly useful throughout both production and post-
production. During production while I was filming with my actress, I played the
song through the music application on my IPhone. The speakers were very good
which meant that my actress had a guide for her lip-syncing of the lyrics and it
ensured that her timing was correct. I also used to take pictures during filming
sessions for my logbook. During post-production I used it for a number of
reasons, both of which contain the camera. Firstly, I used it to take pictures of my
ancillary texts in the real world, for example, I placed my poster advert in Q
magazine and took an image of it for my blog. I also took pictures of my paper
digipak so it looked like a real life physical CD. The other thing I used my IPhone camera for was for the
collection of my audience feedback. While interviewing the four people separately, I filmed them
answering the questions I set. This was effective as it provided evidence for my audience feedback and
ensured that all of their answers were valid. After I had finished filming them, I used the airdrop tool on
my IPhone to send the videos to my IPad Air for further editing. Overall, I found my IPhone very useful in
collecting data and images for my portfolio, especially because it is light and portable, so it was easy to
carry around. I decided to use this software over others due to convenience, as I always had my IPhone
with me so was able to easily take pictures and videos on the move.
Another IOS device I found useful during both pre-production and post-production was my IPad Air. In
pre-production, I used it to create my animatic and storyboard with an application called Concepts.
Concepts (bottom left), allows you to draw and create images using a variety of tools and colours. After I
had drawn all the shots for my storyboard, I imported them into the IMovie app and edited them
accordingly to the song I had chosen for my music video. After this, I uploaded it to YouTube and also
put the images into a PowerPoint presentation to create a storyboard. I also used my IPad to edit my
audience feedback videos. After filming the videos on my IPhone, I imported them to my IPad through
the airdrop tool and edited them accordingly using the IMovie app. To make the videos smooth, I cut
out any pauses or hesitations using the split tool so we heard their answers and nothing else. Also, I
used the title tool to add captions of the questions I asked them, so anyone watching it will be able to
know what the questions are if they can’t hear me saying them in the video. After I had exported the
videos, I uploaded them to YouTube with an appropriate title. Overall, I found my IPad very useful in
creating my storyboard and editing my audience feedback videos. I did have an opportunity to edit
them on my IPhone but I felt my IPad was more suited to this task as it contained more space. Plus, it is
light and portable so I could edit on the go instead of having to use a computer.
Web 2.0 was very helpful over the course of post-production, especially during my collection of
audience feedback to determine what y target audience thought of my music video and ancillary texts. I
used YouTube to distribute all of my videos including my animatic, audience research, drafts, completed
music video and audience feedback. This system was very useful as it allowed users to like, dislike and
post comments on any videos, as an interactive service and enabled my video to be easily accessed by a
large amount of people, as YouTube is a very popular service to share and post videos. I also shared my
final music video onto the social networking site Facebook to receive more feedback from my target
audience, as this way I was able to share the video and receive continuous comments on it, enabling me
to receive feedback quickly and easily. From this, 14 people 'liked' my video that I posted and
commented positive feedback such as “Good job, Louise!”, “Well done!” and “This is SO good!” This
demonstrated that my video was effective to my target audience (the majority of my friends on
Facebook are within the age of 16-20) and that the video appealed to them. Overall, I feel I have
received positive feedback from my target audience on my music video and ancillary texts, so I feel I
have created texts that appeal to them successfully.
Overall, I can say that the new technologies I have used in the
construction and research, planning and evaluation stages have all
contributed in a successful way to my final three
products, especially Photoshop and Final Cut Pro. These
technologies have thoroughly helped me throughout the process
and they have also kept me on schedule with my work. If I were to
go through this process again, I would without a doubt use these
technologies all over again.

More Related Content

What's hot

Evaluation Question 4
Evaluation Question 4Evaluation Question 4
Evaluation Question 4SophN
 
Question4
Question4Question4
Question4
f43g4n
 
Question 4
Question 4Question 4
Question 4
Bradley22
 
Looking back at your preliminary task, what
Looking back at your preliminary task, whatLooking back at your preliminary task, what
Looking back at your preliminary task, what
Louise_Davs
 
Question 4 Evaluation
Question 4 EvaluationQuestion 4 Evaluation
Question 4 Evaluation
benana0803
 
Question 4 media tech
Question 4 media techQuestion 4 media tech
Question 4 media tech
mrwalkerben
 
How did you use media technologies in the
How did you use media technologies in theHow did you use media technologies in the
How did you use media technologies in the
griffina1
 
Evaluation Question 4
Evaluation Question 4Evaluation Question 4
Evaluation Question 4
CVSmediastudies
 
Question 4
Question 4Question 4
Question 4
Alex Day
 
Evaluation question 4
Evaluation question 4Evaluation question 4
Evaluation question 4
chloegreig1998
 
AS Media evaluation question 6
 AS Media evaluation question 6 AS Media evaluation question 6
AS Media evaluation question 6
Beth Keohane
 
Evaluation Question 6
Evaluation Question 6Evaluation Question 6
Evaluation Question 6
Sam Benzie
 
Evaluation question 4
Evaluation question 4Evaluation question 4
Evaluation question 4Aimee Deegan
 
Evaluation question 2
Evaluation question 2Evaluation question 2
Evaluation question 2
Harrison Toward
 
Evaluation question 4
Evaluation question 4Evaluation question 4
Evaluation question 4
Sam Benzie
 
Evaluation 4
Evaluation 4Evaluation 4
Evaluation 4
harrietsmedia
 
Media Technologies
Media TechnologiesMedia Technologies
Media Technologies
mkaur22
 

What's hot (20)

Evaluation Question 4
Evaluation Question 4Evaluation Question 4
Evaluation Question 4
 
Question4
Question4Question4
Question4
 
Question 4
Question 4Question 4
Question 4
 
Looking back at your preliminary task, what
Looking back at your preliminary task, whatLooking back at your preliminary task, what
Looking back at your preliminary task, what
 
Question 4 Evaluation
Question 4 EvaluationQuestion 4 Evaluation
Question 4 Evaluation
 
Question 4 media tech
Question 4 media techQuestion 4 media tech
Question 4 media tech
 
How did you use media technologies in the
How did you use media technologies in theHow did you use media technologies in the
How did you use media technologies in the
 
Question 4
Question 4Question 4
Question 4
 
Evaluation question 3
Evaluation question 3Evaluation question 3
Evaluation question 3
 
Evaluation Question 4
Evaluation Question 4Evaluation Question 4
Evaluation Question 4
 
Question 4
Question 4Question 4
Question 4
 
Evaluation question 4
Evaluation question 4Evaluation question 4
Evaluation question 4
 
AS Media evaluation question 6
 AS Media evaluation question 6 AS Media evaluation question 6
AS Media evaluation question 6
 
Evaluation Question 6
Evaluation Question 6Evaluation Question 6
Evaluation Question 6
 
Evaluation question 4
Evaluation question 4Evaluation question 4
Evaluation question 4
 
Evaluation question 2
Evaluation question 2Evaluation question 2
Evaluation question 2
 
Evaluation question 4
Evaluation question 4Evaluation question 4
Evaluation question 4
 
Evaluation 4
Evaluation 4Evaluation 4
Evaluation 4
 
Question 4
Question 4Question 4
Question 4
 
Media Technologies
Media TechnologiesMedia Technologies
Media Technologies
 

Viewers also liked

Evaluation: Question 3
Evaluation: Question 3Evaluation: Question 3
Evaluation: Question 3LouiseJHudson
 
My final ancillary products
My final ancillary productsMy final ancillary products
My final ancillary products
harryiggledena2media
 
How did you use media technologies?
How did you use media technologies?How did you use media technologies?
How did you use media technologies?
mkaur22
 
Evaluation: Question 2
Evaluation: Question 2Evaluation: Question 2
Evaluation: Question 2LouiseJHudson
 
Evaluation: Question 1
Evaluation: Question 1Evaluation: Question 1
Evaluation: Question 1LouiseJHudson
 
Camera images
Camera imagesCamera images
Camera images
Rebecca Witty
 
Location 3
Location 3Location 3
Location 3
Rebecca Witty
 
Day 1 equipment
Day 1 equipmentDay 1 equipment
Day 1 equipment
Rebecca Witty
 
Day2 images
Day2 imagesDay2 images
Day2 images
Rebecca Witty
 
Location 1
Location 1Location 1
Location 1
Rebecca Witty
 
Day1 images
Day1 imagesDay1 images
Day1 images
Rebecca Witty
 
Memories Box Creation
Memories Box CreationMemories Box Creation
Memories Box Creation
Rebecca Witty
 
Day3 images
Day3 imagesDay3 images
Day3 images
Rebecca Witty
 
Day 4 Equipment
Day 4 Equipment Day 4 Equipment
Day 4 Equipment
Rebecca Witty
 
Hornsea Beach
Hornsea BeachHornsea Beach
Hornsea Beach
Rebecca Witty
 
Fav photoshoot pics
Fav photoshoot picsFav photoshoot pics
Fav photoshoot pics
Rebecca Witty
 
AAR Powerpoint
AAR PowerpointAAR Powerpoint
AAR Powerpoint
Rebecca Witty
 
Paramore conventions
Paramore conventionsParamore conventions
Paramore conventions
Rebecca Witty
 
Personal Albums
Personal Albums Personal Albums
Personal Albums
Rebecca Witty
 
From Under The Cork Tree Conventions
From Under The Cork Tree ConventionsFrom Under The Cork Tree Conventions
From Under The Cork Tree Conventions
Rebecca Witty
 

Viewers also liked (20)

Evaluation: Question 3
Evaluation: Question 3Evaluation: Question 3
Evaluation: Question 3
 
My final ancillary products
My final ancillary productsMy final ancillary products
My final ancillary products
 
How did you use media technologies?
How did you use media technologies?How did you use media technologies?
How did you use media technologies?
 
Evaluation: Question 2
Evaluation: Question 2Evaluation: Question 2
Evaluation: Question 2
 
Evaluation: Question 1
Evaluation: Question 1Evaluation: Question 1
Evaluation: Question 1
 
Camera images
Camera imagesCamera images
Camera images
 
Location 3
Location 3Location 3
Location 3
 
Day 1 equipment
Day 1 equipmentDay 1 equipment
Day 1 equipment
 
Day2 images
Day2 imagesDay2 images
Day2 images
 
Location 1
Location 1Location 1
Location 1
 
Day1 images
Day1 imagesDay1 images
Day1 images
 
Memories Box Creation
Memories Box CreationMemories Box Creation
Memories Box Creation
 
Day3 images
Day3 imagesDay3 images
Day3 images
 
Day 4 Equipment
Day 4 Equipment Day 4 Equipment
Day 4 Equipment
 
Hornsea Beach
Hornsea BeachHornsea Beach
Hornsea Beach
 
Fav photoshoot pics
Fav photoshoot picsFav photoshoot pics
Fav photoshoot pics
 
AAR Powerpoint
AAR PowerpointAAR Powerpoint
AAR Powerpoint
 
Paramore conventions
Paramore conventionsParamore conventions
Paramore conventions
 
Personal Albums
Personal Albums Personal Albums
Personal Albums
 
From Under The Cork Tree Conventions
From Under The Cork Tree ConventionsFrom Under The Cork Tree Conventions
From Under The Cork Tree Conventions
 

Similar to Evaluation: Question 4

How did you use media technologies in the construction and research (4)
How did you use media technologies in the construction and research (4)How did you use media technologies in the construction and research (4)
How did you use media technologies in the construction and research (4)
ramsz001
 
How did you use media technologies in the construction and research (4)
How did you use media technologies in the construction and research (4)How did you use media technologies in the construction and research (4)
How did you use media technologies in the construction and research (4)
ramsz001
 
4.how did you use new media technologies in the construction and research, pl...
4.how did you use new media technologies in the construction and research, pl...4.how did you use new media technologies in the construction and research, pl...
4.how did you use new media technologies in the construction and research, pl...
Vishal Dhariwal
 
A2 Media Question
A2 Media Question A2 Media Question
A2 Media Question
Louise_Davs
 
Question 4
Question 4   Question 4
Question 4
monasasani23
 
Digital media powerpoint
Digital media powerpointDigital media powerpoint
Digital media powerpointCaitlinhouse
 
Evaluation question 4
Evaluation question 4Evaluation question 4
Evaluation question 4
chrissiebishop
 
Media evaluation Q4 - Dilraj Singh
Media evaluation Q4 - Dilraj SinghMedia evaluation Q4 - Dilraj Singh
Media evaluation Q4 - Dilraj Singh
DilzLDN
 
FINAL Evaluation Question 4
FINAL Evaluation Question 4FINAL Evaluation Question 4
FINAL Evaluation Question 4SophN
 
Question 6
Question 6Question 6
Question 6
Sam Benzie
 
Evaluation Question 4
Evaluation Question 4Evaluation Question 4
Evaluation Question 4
jassy0121
 
A2 Media Evaluation
A2 Media EvaluationA2 Media Evaluation
A2 Media Evaluation
ccapricec
 
Question 4 Updated
Question 4 UpdatedQuestion 4 Updated
Question 4 Updated
kelly_alade
 
Evaluation-Question 4
Evaluation-Question 4Evaluation-Question 4
Evaluation-Question 4
kelly_alade
 
Evaluation question 4
Evaluation question 4Evaluation question 4
Evaluation question 4jessjsmith
 
Question 4 evaluation
Question 4   evaluationQuestion 4   evaluation
Question 4 evaluation
monasasani23
 
Evaluation question 4
Evaluation question 4Evaluation question 4
Evaluation question 4
joelle riley
 
Evaluation Question 4
Evaluation Question 4Evaluation Question 4
Evaluation Question 4
bethgilbert15
 
Evaluation question 4
Evaluation question 4Evaluation question 4
Evaluation question 4
joelle riley
 

Similar to Evaluation: Question 4 (20)

How did you use media technologies in the construction and research (4)
How did you use media technologies in the construction and research (4)How did you use media technologies in the construction and research (4)
How did you use media technologies in the construction and research (4)
 
How did you use media technologies in the construction and research (4)
How did you use media technologies in the construction and research (4)How did you use media technologies in the construction and research (4)
How did you use media technologies in the construction and research (4)
 
4.how did you use new media technologies in the construction and research, pl...
4.how did you use new media technologies in the construction and research, pl...4.how did you use new media technologies in the construction and research, pl...
4.how did you use new media technologies in the construction and research, pl...
 
A2 Media Question
A2 Media Question A2 Media Question
A2 Media Question
 
Question 4
Question 4   Question 4
Question 4
 
Digital media powerpoint
Digital media powerpointDigital media powerpoint
Digital media powerpoint
 
Evaluation question 4
Evaluation question 4Evaluation question 4
Evaluation question 4
 
Media evaluation Q4 - Dilraj Singh
Media evaluation Q4 - Dilraj SinghMedia evaluation Q4 - Dilraj Singh
Media evaluation Q4 - Dilraj Singh
 
FINAL Evaluation Question 4
FINAL Evaluation Question 4FINAL Evaluation Question 4
FINAL Evaluation Question 4
 
Question 6
Question 6Question 6
Question 6
 
Evaluation Question 4
Evaluation Question 4Evaluation Question 4
Evaluation Question 4
 
A2 Media Evaluation
A2 Media EvaluationA2 Media Evaluation
A2 Media Evaluation
 
Question 4 Updated
Question 4 UpdatedQuestion 4 Updated
Question 4 Updated
 
Evaluation-Question 4
Evaluation-Question 4Evaluation-Question 4
Evaluation-Question 4
 
Evaluation question 4
Evaluation question 4Evaluation question 4
Evaluation question 4
 
Question 4 evaluation
Question 4   evaluationQuestion 4   evaluation
Question 4 evaluation
 
Evaluation question 4
Evaluation question 4Evaluation question 4
Evaluation question 4
 
Evaluation Question 4
Evaluation Question 4Evaluation Question 4
Evaluation Question 4
 
Evaluation q4
Evaluation q4Evaluation q4
Evaluation q4
 
Evaluation question 4
Evaluation question 4Evaluation question 4
Evaluation question 4
 

More from LouiseJHudson

Ancillary photographs 3
Ancillary photographs 3Ancillary photographs 3
Ancillary photographs 3LouiseJHudson
 
Ancillary photographs 2
Ancillary photographs 2Ancillary photographs 2
Ancillary photographs 2
LouiseJHudson
 
Ancillary photographs 1
Ancillary photographs 1Ancillary photographs 1
Ancillary photographs 1
LouiseJHudson
 
Initial Ideas
Initial IdeasInitial Ideas
Initial Ideas
LouiseJHudson
 
Evaluation: Question 2
Evaluation: Question 2Evaluation: Question 2
Evaluation: Question 2LouiseJHudson
 
Step to step process of First draft
Step to step process of First draftStep to step process of First draft
Step to step process of First draftLouiseJHudson
 

More from LouiseJHudson (7)

Ancillary photographs 3
Ancillary photographs 3Ancillary photographs 3
Ancillary photographs 3
 
Ancillary photographs 2
Ancillary photographs 2Ancillary photographs 2
Ancillary photographs 2
 
Ancillary photographs 1
Ancillary photographs 1Ancillary photographs 1
Ancillary photographs 1
 
Initial Ideas
Initial IdeasInitial Ideas
Initial Ideas
 
Evaluation Q1
Evaluation Q1Evaluation Q1
Evaluation Q1
 
Evaluation: Question 2
Evaluation: Question 2Evaluation: Question 2
Evaluation: Question 2
 
Step to step process of First draft
Step to step process of First draftStep to step process of First draft
Step to step process of First draft
 

Recently uploaded

Instructions for Submissions thorugh G- Classroom.pptx
Instructions for Submissions thorugh G- Classroom.pptxInstructions for Submissions thorugh G- Classroom.pptx
Instructions for Submissions thorugh G- Classroom.pptx
Jheel Barad
 
How to Make a Field invisible in Odoo 17
How to Make a Field invisible in Odoo 17How to Make a Field invisible in Odoo 17
How to Make a Field invisible in Odoo 17
Celine George
 
Palestine last event orientationfvgnh .pptx
Palestine last event orientationfvgnh .pptxPalestine last event orientationfvgnh .pptx
Palestine last event orientationfvgnh .pptx
RaedMohamed3
 
678020731-Sumas-y-Restas-Para-Colorear.pdf
678020731-Sumas-y-Restas-Para-Colorear.pdf678020731-Sumas-y-Restas-Para-Colorear.pdf
678020731-Sumas-y-Restas-Para-Colorear.pdf
CarlosHernanMontoyab2
 
Operation Blue Star - Saka Neela Tara
Operation Blue Star   -  Saka Neela TaraOperation Blue Star   -  Saka Neela Tara
Operation Blue Star - Saka Neela Tara
Balvir Singh
 
"Protectable subject matters, Protection in biotechnology, Protection of othe...
"Protectable subject matters, Protection in biotechnology, Protection of othe..."Protectable subject matters, Protection in biotechnology, Protection of othe...
"Protectable subject matters, Protection in biotechnology, Protection of othe...
SACHIN R KONDAGURI
 
1.4 modern child centered education - mahatma gandhi-2.pptx
1.4 modern child centered education - mahatma gandhi-2.pptx1.4 modern child centered education - mahatma gandhi-2.pptx
1.4 modern child centered education - mahatma gandhi-2.pptx
JosvitaDsouza2
 
The approach at University of Liverpool.pptx
The approach at University of Liverpool.pptxThe approach at University of Liverpool.pptx
The approach at University of Liverpool.pptx
Jisc
 
Additional Benefits for Employee Website.pdf
Additional Benefits for Employee Website.pdfAdditional Benefits for Employee Website.pdf
Additional Benefits for Employee Website.pdf
joachimlavalley1
 
Guidance_and_Counselling.pdf B.Ed. 4th Semester
Guidance_and_Counselling.pdf B.Ed. 4th SemesterGuidance_and_Counselling.pdf B.Ed. 4th Semester
Guidance_and_Counselling.pdf B.Ed. 4th Semester
Atul Kumar Singh
 
Francesca Gottschalk - How can education support child empowerment.pptx
Francesca Gottschalk - How can education support child empowerment.pptxFrancesca Gottschalk - How can education support child empowerment.pptx
Francesca Gottschalk - How can education support child empowerment.pptx
EduSkills OECD
 
The Roman Empire A Historical Colossus.pdf
The Roman Empire A Historical Colossus.pdfThe Roman Empire A Historical Colossus.pdf
The Roman Empire A Historical Colossus.pdf
kaushalkr1407
 
Model Attribute Check Company Auto Property
Model Attribute  Check Company Auto PropertyModel Attribute  Check Company Auto Property
Model Attribute Check Company Auto Property
Celine George
 
A Strategic Approach: GenAI in Education
A Strategic Approach: GenAI in EducationA Strategic Approach: GenAI in Education
A Strategic Approach: GenAI in Education
Peter Windle
 
Lapbook sobre os Regimes Totalitários.pdf
Lapbook sobre os Regimes Totalitários.pdfLapbook sobre os Regimes Totalitários.pdf
Lapbook sobre os Regimes Totalitários.pdf
Jean Carlos Nunes Paixão
 
Unit 8 - Information and Communication Technology (Paper I).pdf
Unit 8 - Information and Communication Technology (Paper I).pdfUnit 8 - Information and Communication Technology (Paper I).pdf
Unit 8 - Information and Communication Technology (Paper I).pdf
Thiyagu K
 
How libraries can support authors with open access requirements for UKRI fund...
How libraries can support authors with open access requirements for UKRI fund...How libraries can support authors with open access requirements for UKRI fund...
How libraries can support authors with open access requirements for UKRI fund...
Jisc
 
The Accursed House by Émile Gaboriau.pptx
The Accursed House by Émile Gaboriau.pptxThe Accursed House by Émile Gaboriau.pptx
The Accursed House by Émile Gaboriau.pptx
DhatriParmar
 
Language Across the Curriculm LAC B.Ed.
Language Across the  Curriculm LAC B.Ed.Language Across the  Curriculm LAC B.Ed.
Language Across the Curriculm LAC B.Ed.
Atul Kumar Singh
 
Phrasal Verbs.XXXXXXXXXXXXXXXXXXXXXXXXXX
Phrasal Verbs.XXXXXXXXXXXXXXXXXXXXXXXXXXPhrasal Verbs.XXXXXXXXXXXXXXXXXXXXXXXXXX
Phrasal Verbs.XXXXXXXXXXXXXXXXXXXXXXXXXX
MIRIAMSALINAS13
 

Recently uploaded (20)

Instructions for Submissions thorugh G- Classroom.pptx
Instructions for Submissions thorugh G- Classroom.pptxInstructions for Submissions thorugh G- Classroom.pptx
Instructions for Submissions thorugh G- Classroom.pptx
 
How to Make a Field invisible in Odoo 17
How to Make a Field invisible in Odoo 17How to Make a Field invisible in Odoo 17
How to Make a Field invisible in Odoo 17
 
Palestine last event orientationfvgnh .pptx
Palestine last event orientationfvgnh .pptxPalestine last event orientationfvgnh .pptx
Palestine last event orientationfvgnh .pptx
 
678020731-Sumas-y-Restas-Para-Colorear.pdf
678020731-Sumas-y-Restas-Para-Colorear.pdf678020731-Sumas-y-Restas-Para-Colorear.pdf
678020731-Sumas-y-Restas-Para-Colorear.pdf
 
Operation Blue Star - Saka Neela Tara
Operation Blue Star   -  Saka Neela TaraOperation Blue Star   -  Saka Neela Tara
Operation Blue Star - Saka Neela Tara
 
"Protectable subject matters, Protection in biotechnology, Protection of othe...
"Protectable subject matters, Protection in biotechnology, Protection of othe..."Protectable subject matters, Protection in biotechnology, Protection of othe...
"Protectable subject matters, Protection in biotechnology, Protection of othe...
 
1.4 modern child centered education - mahatma gandhi-2.pptx
1.4 modern child centered education - mahatma gandhi-2.pptx1.4 modern child centered education - mahatma gandhi-2.pptx
1.4 modern child centered education - mahatma gandhi-2.pptx
 
The approach at University of Liverpool.pptx
The approach at University of Liverpool.pptxThe approach at University of Liverpool.pptx
The approach at University of Liverpool.pptx
 
Additional Benefits for Employee Website.pdf
Additional Benefits for Employee Website.pdfAdditional Benefits for Employee Website.pdf
Additional Benefits for Employee Website.pdf
 
Guidance_and_Counselling.pdf B.Ed. 4th Semester
Guidance_and_Counselling.pdf B.Ed. 4th SemesterGuidance_and_Counselling.pdf B.Ed. 4th Semester
Guidance_and_Counselling.pdf B.Ed. 4th Semester
 
Francesca Gottschalk - How can education support child empowerment.pptx
Francesca Gottschalk - How can education support child empowerment.pptxFrancesca Gottschalk - How can education support child empowerment.pptx
Francesca Gottschalk - How can education support child empowerment.pptx
 
The Roman Empire A Historical Colossus.pdf
The Roman Empire A Historical Colossus.pdfThe Roman Empire A Historical Colossus.pdf
The Roman Empire A Historical Colossus.pdf
 
Model Attribute Check Company Auto Property
Model Attribute  Check Company Auto PropertyModel Attribute  Check Company Auto Property
Model Attribute Check Company Auto Property
 
A Strategic Approach: GenAI in Education
A Strategic Approach: GenAI in EducationA Strategic Approach: GenAI in Education
A Strategic Approach: GenAI in Education
 
Lapbook sobre os Regimes Totalitários.pdf
Lapbook sobre os Regimes Totalitários.pdfLapbook sobre os Regimes Totalitários.pdf
Lapbook sobre os Regimes Totalitários.pdf
 
Unit 8 - Information and Communication Technology (Paper I).pdf
Unit 8 - Information and Communication Technology (Paper I).pdfUnit 8 - Information and Communication Technology (Paper I).pdf
Unit 8 - Information and Communication Technology (Paper I).pdf
 
How libraries can support authors with open access requirements for UKRI fund...
How libraries can support authors with open access requirements for UKRI fund...How libraries can support authors with open access requirements for UKRI fund...
How libraries can support authors with open access requirements for UKRI fund...
 
The Accursed House by Émile Gaboriau.pptx
The Accursed House by Émile Gaboriau.pptxThe Accursed House by Émile Gaboriau.pptx
The Accursed House by Émile Gaboriau.pptx
 
Language Across the Curriculm LAC B.Ed.
Language Across the  Curriculm LAC B.Ed.Language Across the  Curriculm LAC B.Ed.
Language Across the Curriculm LAC B.Ed.
 
Phrasal Verbs.XXXXXXXXXXXXXXXXXXXXXXXXXX
Phrasal Verbs.XXXXXXXXXXXXXXXXXXXXXXXXXXPhrasal Verbs.XXXXXXXXXXXXXXXXXXXXXXXXXX
Phrasal Verbs.XXXXXXXXXXXXXXXXXXXXXXXXXX
 

Evaluation: Question 4

  • 1. How did you use new media technologies in the construction and research, planning and evaluation stages?
  • 2. In this question of my evaluation I will be discussing all of the different media technologies I have used during this entire process of creating my music video and ancillary texts. While doing this, I will be stating how these technologies have helped me throughout this entire process and what effect they had on me and my A2 Media portfolio overall. I will split this PowerPoint presentation into 3 sections, pre-production, production and post-production. This way I can add each technology into one of these sections so it’ll be known for sure which part of the process I used it in. But since I use blogger in all 3 parts of the process, I will discuss this first.
  • 3. I’d already had some experience with blogger while doing my AS Media portfolio, so this time around, I was very comfortable with using it. Its main use was to hold the entirety of my portfolio and publish all of my development, planning and final pieces onto very quickly and easily. But it also allowed me to embed a lot of content from other websites I used such as Prezi, Slideshare and YouTube. I liked doing this because it gave my blog more variety, because I was displaying my research and planning in unique way. This looked much more effective and readable than just posting the information in a plain text form. Blogger also proved useful during the production period as I was able to keep a filming log/diary very easily by typing what I had done on a particular day and then posting it immediately. This helped me keep track of my progress throughout the entire process of making my video and ancillary texts. Blogger also enabled me to create a poll which I used during my research period in pre-production. I added six questions with multiple choice answers, and I emailed my blog link to my participants. The multiple choice options made it very easy for them to answer, so I managed to get the results pretty quickly and easily as it showed the answers in percentages, this made them easy to analyse later on. As for the post-production section of the process, I used blogger to keep track of my edits of my music video, as well as how I was progressing with my ancillary texts. This didn’t only help my teachers see where I was at in terms of progress, but it also helped me keep on track with the tasks.
  • 4.
  • 5. Web 2.0 was very helpful over the course of pre-production, especially during my research to determine my genre, target audience and type of video I wanted to make. While researching into the genre of country, I used Wikipedia to look up the history of the genre as a way of recognising conventions. I put this information into various blog posts to keep track of it during the production period. This way, once it was time to begin post-production , I was able to link back to this original research in my evaluation. I found YouTube to be incredibly useful also, as it enabled me to search and watch country music videos, old and new. It was with this search that I chose the three videos to analyse for My textual analysis. Furthermore, this research helped into country videos helped me decide what kind of video I wanted to make. I stated soon after in a blog post, that my music video would be ‘Tragedy Country.’ I came to this decision as I was inspired by some videos I found on YouTube. I enjoyed them so much I decided that I would take inspiration from both of them and replicate some of the conventions used. These music videos were Taylor Swift’s “Safe & Sound” and Miranda Lambert’s “Over You.”
  • 6. Primarily, I didn’t use PowerPoint in much detail until the post-production stage. But after I had done my first set of audience research, I wanted to translate them into a format that would be much easier to read them in, specifically, pie charts. As most of my audience research in pre-production and audience feedback in post-production was displayed on a PowerPoint presentation, I made the pie charts on there. As you can see, it was a little more complicated than I anticipated. I had to insert the pie chart by first putting the information in Excel and then it created the pie chart for me. After this, I was able to transfer it to PowerPoint and edit it to my satisfaction (colours etc). This was very useful for me as viewing my results in this format made it much easier to analyse. I also used PowerPoint greatly during post-production when completing my evaluation. I had a separate PowerPoint for each of the four questions. With this format, I was able to link in evidence like images and screenshots to ensure I was answering the questions to the best of my ability.
  • 7. Prezi was also a media technology that proved exceedingly useful during pre-production. I used Prezi primarily for showcasing my ideas that I intended to use for my music video. Prezi is an online application which allows you to make presentations online, it is compared with PowerPoint often but I consider it to be a lot more creative as there are hundreds of templates to use. It also lets you do things that PowerPoint cannot do, like embedding videos for example. This allowed me to reference music videos directly opposed to just describing them. I made thirteen Prezi presentations is total during the process, and they all displayed either information, research, ideas or theories. Since Prezi is very creative and fun to watch, I felt using it to showcase my ideas and research was the best way to do so. I couldn’t have displayed my ideas in a more effective way. Below are screen shots of all my prezis, 6 of them focused on key theories like audience theory I made reference to frequently, 2 of them focused on artist and audience research, 2 of them focused on formal and genre conventions and 3 focused on my own ideas for my video and ancillary texts.
  • 8.
  • 9. I had an opportunity to borrow a camcorder from college which was the SONY Handycam HDR-CX250E. But after deliberating, I decided to use my personal camera instead. This camera is the Canon EOS 600D. I decided to use my DSLR for a number of reasons. Firstly, the camera is takes videos in the correct aspect ratio of 16:9. Secondly, it has a manual focus which enables me to create things like depth of field with the focus which cannot be done on a camcorder. Thirdly, it performs well in all lighting, even dark, which the SONY camcorder doesn't. Additionally, it has a complex lens which lets you zoom in and out more extensively than a camcorder can. Finally, and most importantly, it is renowned for taking not only high quality photos but also HD videos. As I'm a perfectionist and someone who pays attention to detail, I felt it appropriate to use my camera so I could have footage in the highest resolution possible so my music video will look more professional. I used this camera both for filming and to take the pictures for my ancillary texts, the 18 megapixel resolution ensured that my pictures and videos would be in high quality. The flip screen also proved very useful in the final filming session especially. Since I was sat in front of the camera playing guitar, I was able to see if the guitar was in frame or not. Overall I’m very pleased that I used my own camera for my music video and ancillary texts. The high quality resolution, flip screen, focus and complex zoom helped me in enabling my music video to look very professional and conventional to my genre.
  • 10. The tripod I used was provided by college and it is a Velbon DF-61. This tripod proved to be very useful as its big structure matched the balance of my heavy camera very well. It was very easy to use and I was able to use it to do a variety of different angles. There was a lever that tilted the mechanism that the camera was on up and down, which made low and high angles. Also, there was a lever that moved around the mechanism that the camera was on in order to make smooth panning shots. It was also very sturdy, which enabled me to use it as a makeshift steadicam . I held on to the legs of the tripod and walked back slowly on a flat path, I used this a lot in my video as I loved the effect of the camera moving along with my actress who was walking. Finally, the legs of the tripod were adjustable so I was able to make the tripod as low or tall as I would like. Overall, I’d consider this tripod was very effective in helping me film the footage needed for my music video. It’s weight complimented that of my camera perfectly which made the tripod easier to use as a steadicam for walking shots as well as making the footage easier to capture.
  • 11.
  • 12. Final Cut Pro was the main component to creating my music video, installed onto an IMac. I had the option of using Adobe Premiere Pro, but I chose Final Cut Pro instead as it is easier to use and there is a bigger variety of effects and filters. Final Cut also had the option of exporting my video in full HD, this was something I wanted to do as I filmed on a DSLR and I wanted the footage to look as professional as it could be. First I imported all of my footage onto the IMac, and transferred them into one ‘event’ on Final Cut – enabling me to be able to access the parts I wanted easily and quickly. This programme allowed me to cut and re-size clips, add special effects and filters, add text increase and decrease the speed of clips, adjust the volume etc, to enable me to create the slow motion in my video as well as some reverse effects. I had no previous experience with the system so found it difficult to get used to, but thought by beginning filming early (October) it would give mediums such as Windows Movie Maker and Adobe Premiere as it was a much more complex, intricate programme which enabled the precise cutting and placing of clips, overall enabling my music video to look as professional as possible. I experimented with filters in some of my video clips, but after experimenting with them, I realised none of them fit with my genre of music video, country. Country music videos are full of nature, the outdoors and vibrant colours, and using a filter would take that away. Although I did use two filters in separate parts of the video because they enhanced it. The first was 'cold steel' which I used on the first two clips of the music video which represented a dull setting, but I bring back the full colour once the fire is lit, adding a dark and mysterious tone. The other filter I used was 'glory' which I added to various sequences in the graveyard when my actress was standing in front of the sun, which created a dark silhouette. 'Glory' enhanced this footage by fixing the exposure and giving it a very supernatural tone. Finally, I added a text shot to be inserted at the beginning of the video, which featured all of the details required for the examiners when marking (my name, college, board etc). Overall, I felt Final Cut Pro was the perfect program to edit and create my music video. me the chance to upload everything as soon as possible and get used to the programme. I chose this programme
  • 13. Adobe Photoshop CS5 was the technology I used to create both of my ancillary texts. I had used this programme to create my final texts for my AS media studies portfolio, so was confident with how to use it. With this programme, I was able to edit my photographs effectively using colour adjustment tools, crop and re-size images, create numerous amounts of text using layering and overall create my ancillary texts the way I wanted to. This programme enabled me to make my ancillary texts look professional and realistic overall and in comparison to other mediums such as Microsoft Publisher it was a much more complex programme that enabled me to edit images in a much more detailed and thorough way. While I adjusted most of my images in PicMonkey (colour, saturation etc), I used Photoshop for most of the placement, including the text and sub-images (like the barcode) on my ancillary texts. With this, I used Photoshop to remove the white background from a lot of my sub-images. These tools include the magic wand, quick select and eraser, all of these were effective in achieving my objective. Photoshop was also responsible for helping me put together my digipak, as once I had completed each individual cover using a combination of picmonkey and Photoshop, I opened the template in the programme and began placing all my covers in the appropriate places while making a simple spine. The tool I found the most useful out of all was probably the opacity tool, which makes an image translucent while over another image. I used this tool while creating the back and inside left covers, I wanted to make the setting look more eerie and mysterious, so I found an image of some clouds and overlaid it on top of the main image, I adjusted the opacity and it instantly gave an effect of mist and eeriness.
  • 14. Picmonkey is an online service that lets you edit photos for free. It contains many different tools from basic to advanced. While I used Photoshop for the majority of my photo editing, picmonkey was very useful at giving my pictures unique and creative filters, which Photoshop did not have. I also found it very easy to use as instructions pop up every time you click on a tool. The majority of tools I used were in the effects section, this contained a huge amount of filters for you to apply to your images. You could also control the effect with the ‘fade’ button, this helps you determine how much or how little you want the effect on your image. There is also a ‘touch up’ section which I found very useful, these tools removed any blemishes on my actress’ face and enhanced her features. The last tool I used was the text tool, I decided to use it on picmonkey rather than Photoshop because there was a wider variety of fonts. This enabled me to find fonts that worked best on my ancillary texts, especially the front and back cover. Overall, picmonkey was very useful in providing some effects that weren’t available on Photoshop and it helped enhance my images to their full potential.
  • 15. Slideshare is an online service that allows you to upload PowerPoint presentations. The service then transfers them into a digital format which you can link and embed into various websites for viewing. I had used this technology while doing my AS Media Portfolio, so I was very confident with using it once again for my A2 Portfolio. I used it primarily for my evaluation as I felt it was a very professional yet unique way of presenting it on my blog. Plus, once the PowerPoint it is uploaded, it is presented in a format where you click an arrow and it goes to the next slide. I deemed this much more effective and advanced than just print-screening each slide and posting them as pictures on my blog. Aside from my evaluation, I also used slideshare to present the images I had taken during my filming sessions for my ancillary texts. Again, I considered this more effective and viewable than just posting each picture individually. Finally, I used it to present my completed storyboard as it felt more appropriate to do this slideshare is able compacts a lot of information in a small space. This is much better and space-saving than just posting the 60+ pages of storyboard in a row. Overall, slideshare was incredibly useful during post-production as it enabled me to keep a lot of information compact rather than it taking up a lot of space while still looking professional.
  • 16. My IPhone 5s proved exceedingly useful throughout both production and post- production. During production while I was filming with my actress, I played the song through the music application on my IPhone. The speakers were very good which meant that my actress had a guide for her lip-syncing of the lyrics and it ensured that her timing was correct. I also used to take pictures during filming sessions for my logbook. During post-production I used it for a number of reasons, both of which contain the camera. Firstly, I used it to take pictures of my ancillary texts in the real world, for example, I placed my poster advert in Q magazine and took an image of it for my blog. I also took pictures of my paper digipak so it looked like a real life physical CD. The other thing I used my IPhone camera for was for the collection of my audience feedback. While interviewing the four people separately, I filmed them answering the questions I set. This was effective as it provided evidence for my audience feedback and ensured that all of their answers were valid. After I had finished filming them, I used the airdrop tool on my IPhone to send the videos to my IPad Air for further editing. Overall, I found my IPhone very useful in collecting data and images for my portfolio, especially because it is light and portable, so it was easy to carry around. I decided to use this software over others due to convenience, as I always had my IPhone with me so was able to easily take pictures and videos on the move.
  • 17. Another IOS device I found useful during both pre-production and post-production was my IPad Air. In pre-production, I used it to create my animatic and storyboard with an application called Concepts. Concepts (bottom left), allows you to draw and create images using a variety of tools and colours. After I had drawn all the shots for my storyboard, I imported them into the IMovie app and edited them accordingly to the song I had chosen for my music video. After this, I uploaded it to YouTube and also put the images into a PowerPoint presentation to create a storyboard. I also used my IPad to edit my audience feedback videos. After filming the videos on my IPhone, I imported them to my IPad through the airdrop tool and edited them accordingly using the IMovie app. To make the videos smooth, I cut out any pauses or hesitations using the split tool so we heard their answers and nothing else. Also, I used the title tool to add captions of the questions I asked them, so anyone watching it will be able to know what the questions are if they can’t hear me saying them in the video. After I had exported the videos, I uploaded them to YouTube with an appropriate title. Overall, I found my IPad very useful in creating my storyboard and editing my audience feedback videos. I did have an opportunity to edit them on my IPhone but I felt my IPad was more suited to this task as it contained more space. Plus, it is light and portable so I could edit on the go instead of having to use a computer.
  • 18. Web 2.0 was very helpful over the course of post-production, especially during my collection of audience feedback to determine what y target audience thought of my music video and ancillary texts. I used YouTube to distribute all of my videos including my animatic, audience research, drafts, completed music video and audience feedback. This system was very useful as it allowed users to like, dislike and post comments on any videos, as an interactive service and enabled my video to be easily accessed by a large amount of people, as YouTube is a very popular service to share and post videos. I also shared my final music video onto the social networking site Facebook to receive more feedback from my target audience, as this way I was able to share the video and receive continuous comments on it, enabling me to receive feedback quickly and easily. From this, 14 people 'liked' my video that I posted and commented positive feedback such as “Good job, Louise!”, “Well done!” and “This is SO good!” This demonstrated that my video was effective to my target audience (the majority of my friends on Facebook are within the age of 16-20) and that the video appealed to them. Overall, I feel I have received positive feedback from my target audience on my music video and ancillary texts, so I feel I have created texts that appeal to them successfully.
  • 19. Overall, I can say that the new technologies I have used in the construction and research, planning and evaluation stages have all contributed in a successful way to my final three products, especially Photoshop and Final Cut Pro. These technologies have thoroughly helped me throughout the process and they have also kept me on schedule with my work. If I were to go through this process again, I would without a doubt use these technologies all over again.