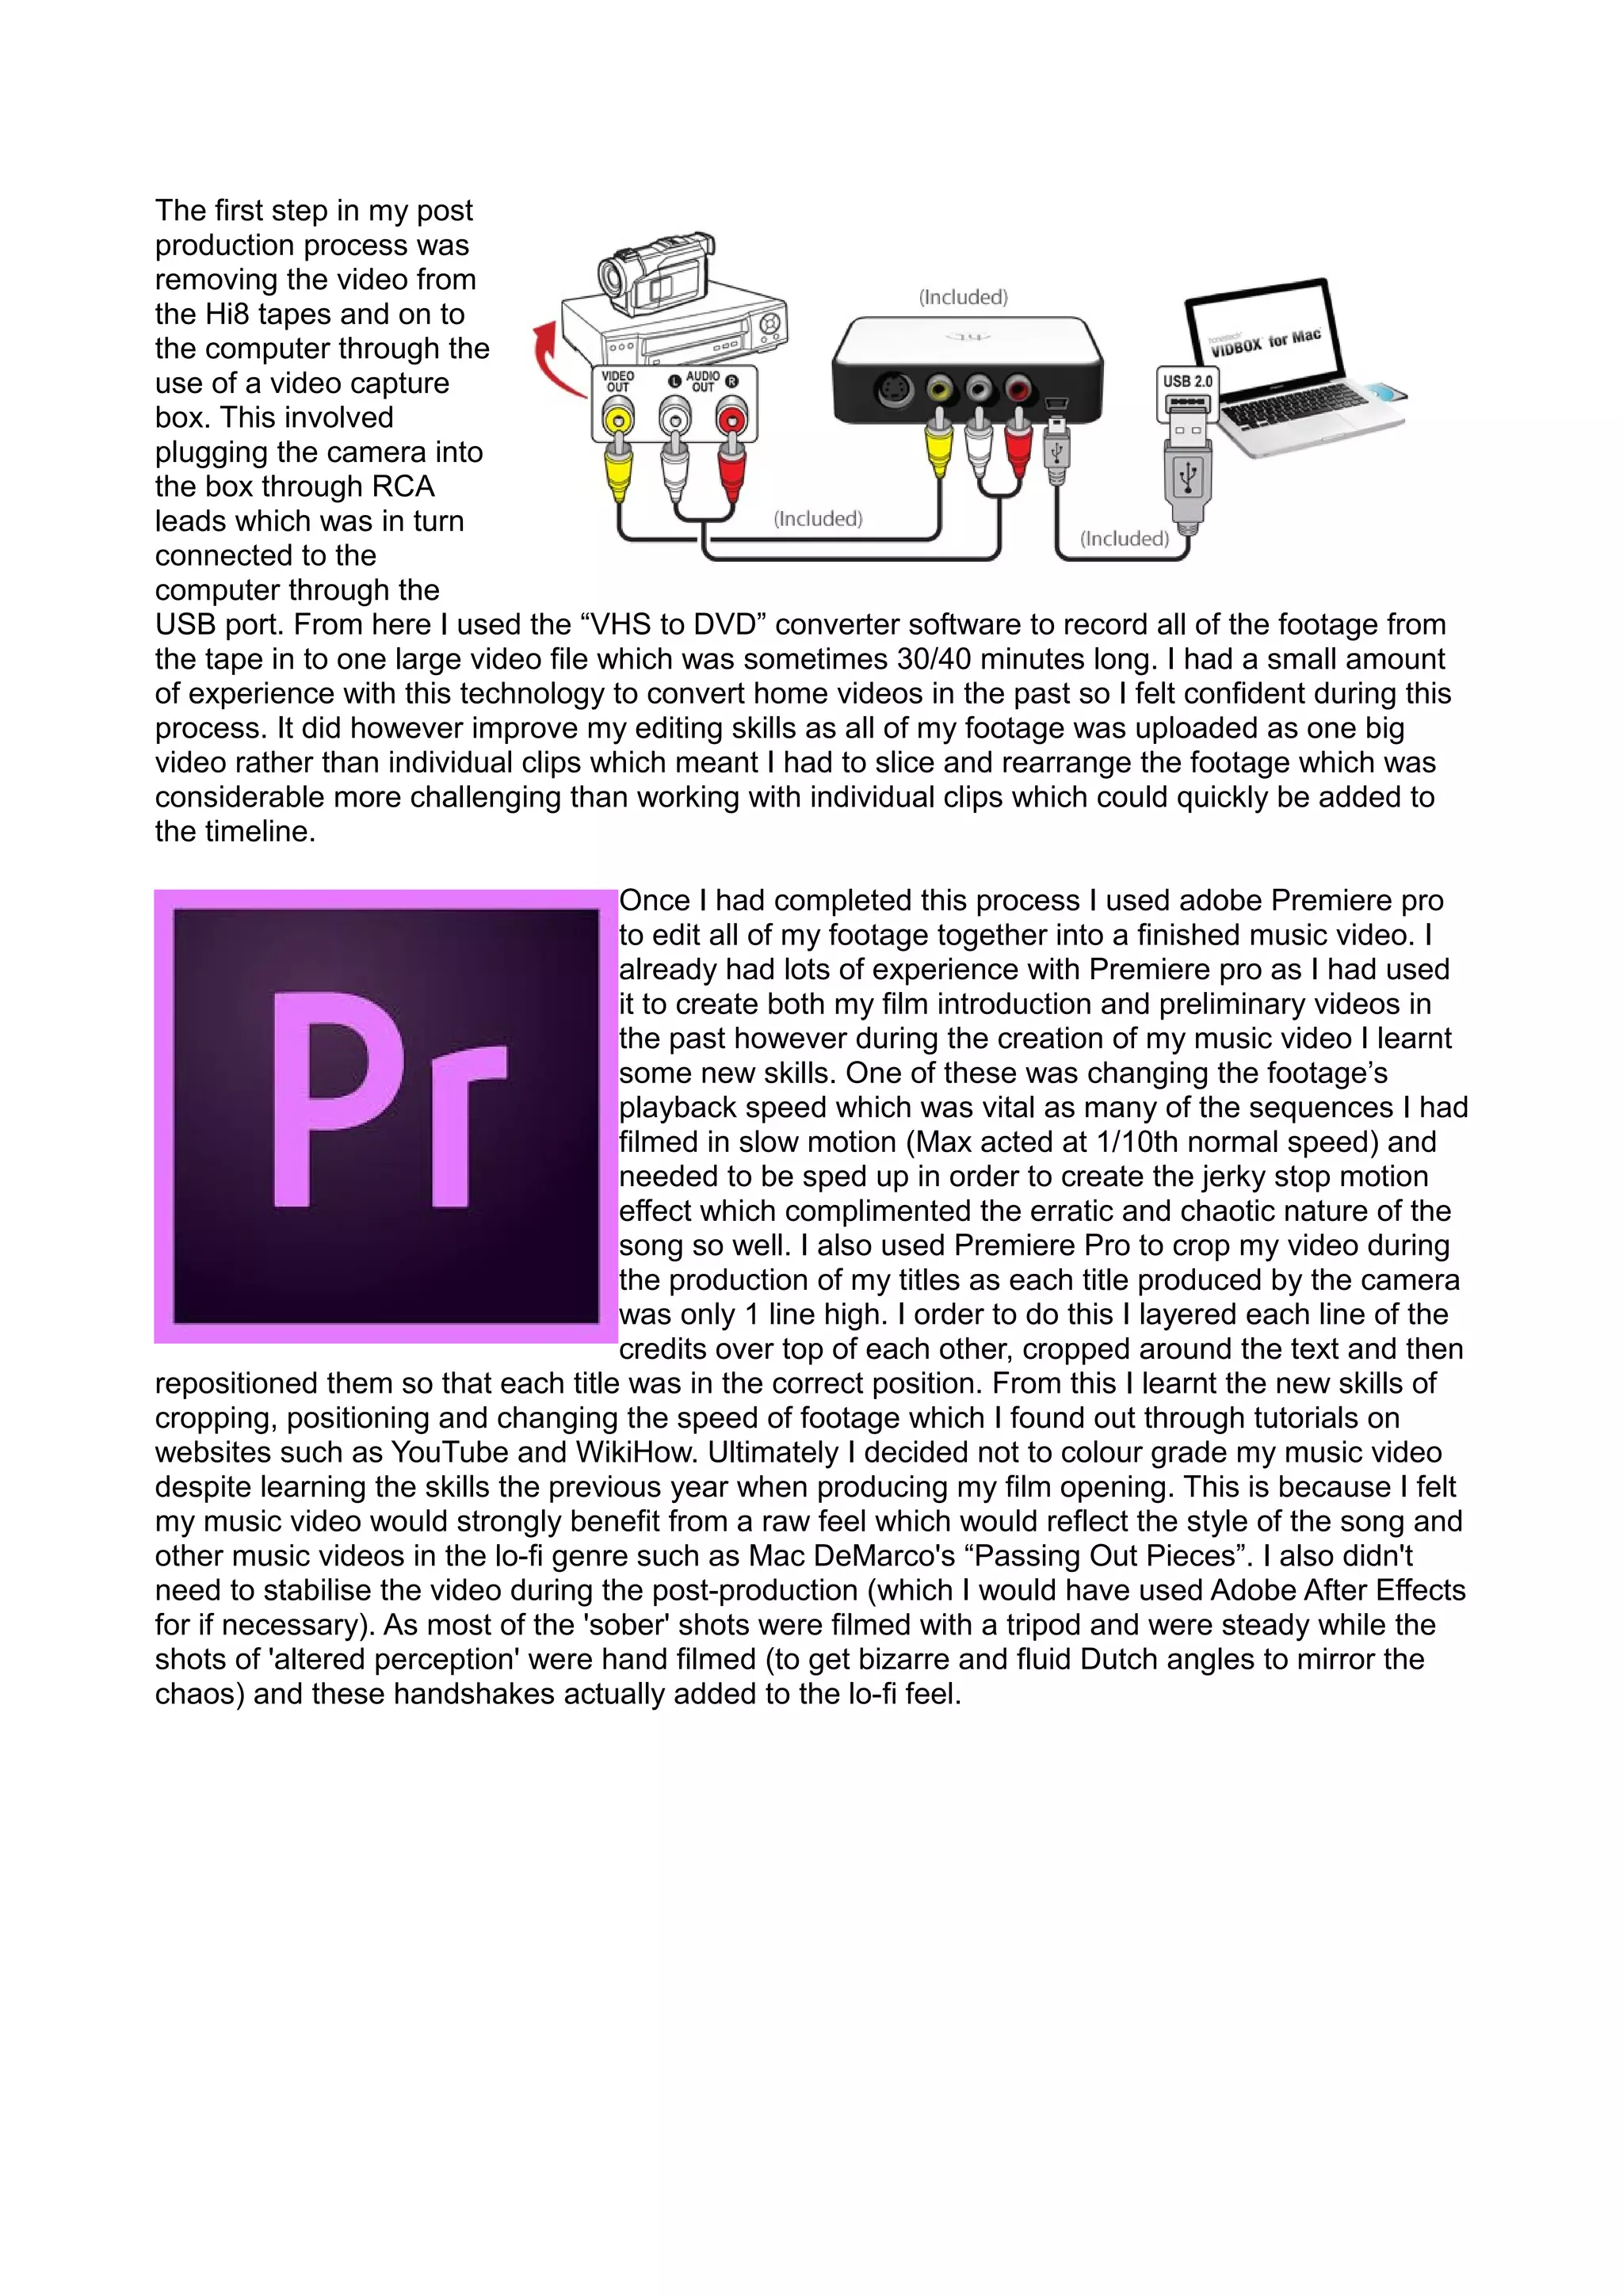
Question 4: How did you use new media technologies in the construction and
research, planning and evaluation stages?
For the planning and evaluation stages of
producing my music video I relied heavily on the
software Google Chrome which allowed me
access to the internet both at home and at
school. This software allowed me to explore
artists and genre conventions with the use of
google images to view digipaks and YouTube to
watch other popular music videos from the
psychedelic rock genre. Google also
allowed me to learn some new skills in
programs such as premiere pro like adding
titles through tutorials on sites such as
Wikihow. Through Google I also found
other sites such as SlideShare and Prezi
which allowed me to present my work
creatively using a variety of different
technologies. YouTube (as mentioned
earlier) was vital in exploring other music
videos from the same genre psychedelic
genre however I also used it to discover my
song in the first place. This is because it
gave me unlimited free access to an almost
countless number of albums and songs
which I could browse through by artist until I had something appropriate for the vague ideas I had
already considered. Two great example of videos I found on YouTube which greatly influenced my
production includes Mac DeMarco's “Passing out Pieces” (which helped influence my lo-fi camera
choice) and “The Cabinet of Dr. Caligari” which was recommended by a friend who showed me on
YouTube which ultimately had a large impact on the visual style of my sets and lighting.
The website blogger was vital during my production in order to
publish all of my progress in the form of blogs. From my previous
years production I already had the skills to post on to blogger, how to
change the visual style and how to use label in order to organise my
work which meant that this years use of blogger was fast and made
it an efficient choice. The 3 labels that I organised my work into
included my preliminary work, pre-production work and evaluation
work which gives my blog a clear sense of progress and time. I also
used it to add pictures to a lot of my writing such as my target
audience analysis where I used blogger to add photographs of my
target audience and graphs supporting my
hypothesise (found using google). In order to add
powerpoint presentations and long word documents
to my blog concisely I used Slide Share. This
allowed me to add documents through an embed
code which I added to the HTML of my blog which
would appear as a small window on screen which
the viewer could scroll through rather thank taking up
many pages and making the blog awkward to
navigate. I already had lots of experience adding
embed codes onto my blog via HTML codes through the skills gained in the production of my AS
film introduction for whisk boy so once again I feel this process was efficient and well rehearsed.
One element where I didn't feel entirely confident and well rehearsed was the use of Prezi which I
used both in my evaluation and preproduction stages in order to present my thoughts on the
effectiveness of my main text in combination with the ancillary and my genre research. This is
because I found Prezi slower and more
awkward than PowerPoint which led to a less
professional product however this could most
likely be solved in the future with more
practice which would be a useful investment
considering that (unlike Power Points) Prezi's
can be uploaded through an embed code.
During the production of my music video I used a large number of new media technologies which I
hadn’t had experience with before – this helped me develop my skills which will come in handy
during future productions. One example of this is my fisheye lens which I duct taped to the front of
my camera so that I could get a wide
enough angle to film in a space as small
as my bedroom. This had the added
effect of distorting my image which is
appropriate to the psychedelic genre but
also taught me the power that the lens
has on the image recorded and the
importance of selecting one appropriate
for the filming environment. The reason
that I had to duct tape my lens onto my
camera was because I filmed my music
video on a Sony Handycam which is of
consumer (rather than professional)
quality and hence has no option to change lenses. This lack in quality
was actually a positive though as it created a very lo-fi, poor quality
image which is appropriate for the genre of music that I am working with
and helped hide the fact that all of the backdrops were hand painted
through a large amount of noise and distortion. Using this new camera
was a challenge as I had previously only used DSLRs in school and I
found there was a number of drawbacks involved. Because it recorded
onto Hi8 tape it was a tedious process to check the footage immediately after filming which taught
me to put more thought into the framing and lighting of every shot to save time. This more careful
and planned approach was increased by the fact that my control over exposure and focus was
significantly less precise than when using a professional DSLR camera like I had previously in
class.
Another interesting use for the camera was the primitive in built editing software which would
originally have been used to edit home videos from raw
footage without ever exporting videos off the camera. This
had a feature allowing you to add a title to the video which
I then used to create my credits at the end of the video.
One problem of this however is that the titles could only be
1 line long however I overcame this problem using
Premiere Pro which I discuss in the post-production
section. Because I was filming inside my bedroom I was
forced to pay much more attention to artificial lighting
compared to my previous media products such as my film
beginning and preliminary tasks. In order to do this I
bought 2 colour changing LED light bulbs from B&Q prior
to filming which allowed me to have complete control of the
colour and brightness of 2 light sources. This ensured that
my music video had by far the most complex and planned lighting of any of my media products
produced previously and this taught me to pay much more attention to the framing and positioning
of objects and people on screen so that the action was both clearly but atmospherically lit towards
the camera.
The first step in my post
production process was
removing the video from
the Hi8 tapes and on to
the computer through the
use of a video capture
box. This involved
plugging the camera into
the box through RCA
leads which was in turn
connected to the
computer through the
USB port. From here I used the “VHS to DVD” converter software to record all of the footage from
the tape in to one large video file which was sometimes 30/40 minutes long. I had a small amount
of experience with this technology to convert home videos in the past so I felt confident during this
process. It did however improve my editing skills as all of my footage was uploaded as one big
video rather than individual clips which meant I had to slice and rearrange the footage which was
considerable more challenging than working with individual clips which could quickly be added to
the timeline.
Once I had completed this process I used adobe Premiere pro
to edit all of my footage together into a finished music video. I
already had lots of experience with Premiere pro as I had used
it to create both my film introduction and preliminary videos in
the past however during the creation of my music video I learnt
some new skills. One of these was changing the footage’s
playback speed which was vital as many of the sequences I had
filmed in slow motion (Max acted at 1/10th normal speed) and
needed to be sped up in order to create the jerky stop motion
effect which complimented the erratic and chaotic nature of the
song so well. I also used Premiere Pro to crop my video during
the production of my titles as each title produced by the camera
was only 1 line high. I order to do this I layered each line of the
credits over top of each other, cropped around the text and then
repositioned them so that each title was in the correct position. From this I learnt the new skills of
cropping, positioning and changing the speed of footage which I found out through tutorials on
websites such as YouTube and WikiHow. Ultimately I decided not to colour grade my music video
despite learning the skills the previous year when producing my film opening. This is because I felt
my music video would strongly benefit from a raw feel which would reflect the style of the song and
other music videos in the lo-fi genre such as Mac DeMarco's “Passing Out Pieces”. I also didn't
need to stabilise the video during the post-production (which I would have used Adobe After Effects
for if necessary). As most of the 'sober' shots were filmed with a tripod and were steady while the
shots of 'altered perception' were hand filmed (to get bizarre and fluid Dutch angles to mirror the
chaos) and these handshakes actually added to the lo-fi feel.

Question4

  • 1.
    Question 4: Howdid you use new media technologies in the construction and research, planning and evaluation stages? For the planning and evaluation stages of producing my music video I relied heavily on the software Google Chrome which allowed me access to the internet both at home and at school. This software allowed me to explore artists and genre conventions with the use of google images to view digipaks and YouTube to watch other popular music videos from the psychedelic rock genre. Google also allowed me to learn some new skills in programs such as premiere pro like adding titles through tutorials on sites such as Wikihow. Through Google I also found other sites such as SlideShare and Prezi which allowed me to present my work creatively using a variety of different technologies. YouTube (as mentioned earlier) was vital in exploring other music videos from the same genre psychedelic genre however I also used it to discover my song in the first place. This is because it gave me unlimited free access to an almost countless number of albums and songs which I could browse through by artist until I had something appropriate for the vague ideas I had already considered. Two great example of videos I found on YouTube which greatly influenced my production includes Mac DeMarco's “Passing out Pieces” (which helped influence my lo-fi camera choice) and “The Cabinet of Dr. Caligari” which was recommended by a friend who showed me on YouTube which ultimately had a large impact on the visual style of my sets and lighting. The website blogger was vital during my production in order to publish all of my progress in the form of blogs. From my previous years production I already had the skills to post on to blogger, how to change the visual style and how to use label in order to organise my work which meant that this years use of blogger was fast and made it an efficient choice. The 3 labels that I organised my work into included my preliminary work, pre-production work and evaluation work which gives my blog a clear sense of progress and time. I also used it to add pictures to a lot of my writing such as my target audience analysis where I used blogger to add photographs of my target audience and graphs supporting my hypothesise (found using google). In order to add powerpoint presentations and long word documents to my blog concisely I used Slide Share. This allowed me to add documents through an embed code which I added to the HTML of my blog which would appear as a small window on screen which the viewer could scroll through rather thank taking up many pages and making the blog awkward to navigate. I already had lots of experience adding embed codes onto my blog via HTML codes through the skills gained in the production of my AS film introduction for whisk boy so once again I feel this process was efficient and well rehearsed. One element where I didn't feel entirely confident and well rehearsed was the use of Prezi which I used both in my evaluation and preproduction stages in order to present my thoughts on the effectiveness of my main text in combination with the ancillary and my genre research. This is
  • 2.
    because I foundPrezi slower and more awkward than PowerPoint which led to a less professional product however this could most likely be solved in the future with more practice which would be a useful investment considering that (unlike Power Points) Prezi's can be uploaded through an embed code. During the production of my music video I used a large number of new media technologies which I hadn’t had experience with before – this helped me develop my skills which will come in handy during future productions. One example of this is my fisheye lens which I duct taped to the front of my camera so that I could get a wide enough angle to film in a space as small as my bedroom. This had the added effect of distorting my image which is appropriate to the psychedelic genre but also taught me the power that the lens has on the image recorded and the importance of selecting one appropriate for the filming environment. The reason that I had to duct tape my lens onto my camera was because I filmed my music video on a Sony Handycam which is of consumer (rather than professional) quality and hence has no option to change lenses. This lack in quality was actually a positive though as it created a very lo-fi, poor quality image which is appropriate for the genre of music that I am working with and helped hide the fact that all of the backdrops were hand painted through a large amount of noise and distortion. Using this new camera was a challenge as I had previously only used DSLRs in school and I found there was a number of drawbacks involved. Because it recorded onto Hi8 tape it was a tedious process to check the footage immediately after filming which taught me to put more thought into the framing and lighting of every shot to save time. This more careful and planned approach was increased by the fact that my control over exposure and focus was significantly less precise than when using a professional DSLR camera like I had previously in class. Another interesting use for the camera was the primitive in built editing software which would originally have been used to edit home videos from raw footage without ever exporting videos off the camera. This had a feature allowing you to add a title to the video which I then used to create my credits at the end of the video. One problem of this however is that the titles could only be 1 line long however I overcame this problem using Premiere Pro which I discuss in the post-production section. Because I was filming inside my bedroom I was forced to pay much more attention to artificial lighting compared to my previous media products such as my film beginning and preliminary tasks. In order to do this I bought 2 colour changing LED light bulbs from B&Q prior to filming which allowed me to have complete control of the colour and brightness of 2 light sources. This ensured that my music video had by far the most complex and planned lighting of any of my media products produced previously and this taught me to pay much more attention to the framing and positioning of objects and people on screen so that the action was both clearly but atmospherically lit towards the camera.
  • 3.
    The first stepin my post production process was removing the video from the Hi8 tapes and on to the computer through the use of a video capture box. This involved plugging the camera into the box through RCA leads which was in turn connected to the computer through the USB port. From here I used the “VHS to DVD” converter software to record all of the footage from the tape in to one large video file which was sometimes 30/40 minutes long. I had a small amount of experience with this technology to convert home videos in the past so I felt confident during this process. It did however improve my editing skills as all of my footage was uploaded as one big video rather than individual clips which meant I had to slice and rearrange the footage which was considerable more challenging than working with individual clips which could quickly be added to the timeline. Once I had completed this process I used adobe Premiere pro to edit all of my footage together into a finished music video. I already had lots of experience with Premiere pro as I had used it to create both my film introduction and preliminary videos in the past however during the creation of my music video I learnt some new skills. One of these was changing the footage’s playback speed which was vital as many of the sequences I had filmed in slow motion (Max acted at 1/10th normal speed) and needed to be sped up in order to create the jerky stop motion effect which complimented the erratic and chaotic nature of the song so well. I also used Premiere Pro to crop my video during the production of my titles as each title produced by the camera was only 1 line high. I order to do this I layered each line of the credits over top of each other, cropped around the text and then repositioned them so that each title was in the correct position. From this I learnt the new skills of cropping, positioning and changing the speed of footage which I found out through tutorials on websites such as YouTube and WikiHow. Ultimately I decided not to colour grade my music video despite learning the skills the previous year when producing my film opening. This is because I felt my music video would strongly benefit from a raw feel which would reflect the style of the song and other music videos in the lo-fi genre such as Mac DeMarco's “Passing Out Pieces”. I also didn't need to stabilise the video during the post-production (which I would have used Adobe After Effects for if necessary). As most of the 'sober' shots were filmed with a tripod and were steady while the shots of 'altered perception' were hand filmed (to get bizarre and fluid Dutch angles to mirror the chaos) and these handshakes actually added to the lo-fi feel.