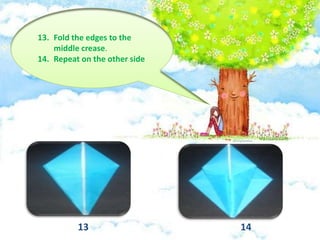
SOSIAL FUNCTION :
To tell how make the origami crane
MATERIAL :
A Square sheet of paper
1.
2. Unfold, and fold in half the other way.
Fold the paper in half, into a rectangle.
1. Unfold your rectangle. Turn the paper over and fold in half
into a triangle. You should see the back of your paper. Unfold
and repeat along the other diagonal.
2. Unfold your paper and turn it back over. You should see the
diagonal creases create”valley” and the perpendicular creases
create”mountains”
1
2
3. Bring the corners together. Allow the valley creases to meet in
the middle.
4. Align the square. By flattening
two opposite sides, you should
find yourself with a square that
is open on the bottom. Make
sure your square is rotated so
that the opening is on the
bottom, as shown in the
picture.
5. Bring the right corner of the top flap to the middle crease, so
that the lower right edge lines up with the crease.
6. Repeat this action on the left, so that the top looks like a kite
7. Fold down the top corner to
make the crease lie along the
horizontal line created in the
previous two steps.
8. Unfold. In doing so, you return
to having a square with an
opening facing down.
9. Take the bottom corner of the
square and start to fold it up
along the horizontal crease you
made in the previous two steps.
10. As you fold, note the four diagonal
creases on the inside that you made
earlier. You will need to reverse the two
creases on the upper flap. To reverse a
crease, fold it in the opposite direction
that it naturally folds.
11. Bring the outer edges to the middle
and flatten, so that you have a
diamond.
12. Turn your paper over, and
repeat the previous five steps.
13. Fold the edges to the
middle crease.
14. Repeat on the other side
13 14
15. Take the bottom tip of the top flap
and fold it up to the top corner. Turn
over and repeat on the other side.
16. Fold the right flap over to the left (in the same
manner as turning the page of a book). Turn
over and repeat on the back. Now the head and
tail are nestled in between what will become the
wings.
17. Fold the wings down so that they
are perpendicular to the body,
head and tail.
18. Fold the tip of the head down.
19. Pull the head and tail out so that they line up with the
outer edges of the body.
ORIGAMI CRANE IS COMPLETE
English SMA - Procedure Text (How to make origami crane)

English SMA - Procedure Text (How to make origami crane)

  • 4.
    SOSIAL FUNCTION : Totell how make the origami crane MATERIAL : A Square sheet of paper
  • 5.
    1. 2. Unfold, andfold in half the other way. Fold the paper in half, into a rectangle.
  • 6.
    1. Unfold yourrectangle. Turn the paper over and fold in half into a triangle. You should see the back of your paper. Unfold and repeat along the other diagonal. 2. Unfold your paper and turn it back over. You should see the diagonal creases create”valley” and the perpendicular creases create”mountains” 1 2
  • 7.
    3. Bring thecorners together. Allow the valley creases to meet in the middle. 4. Align the square. By flattening two opposite sides, you should find yourself with a square that is open on the bottom. Make sure your square is rotated so that the opening is on the bottom, as shown in the picture.
  • 8.
    5. Bring theright corner of the top flap to the middle crease, so that the lower right edge lines up with the crease. 6. Repeat this action on the left, so that the top looks like a kite
  • 9.
    7. Fold downthe top corner to make the crease lie along the horizontal line created in the previous two steps. 8. Unfold. In doing so, you return to having a square with an opening facing down.
  • 10.
    9. Take thebottom corner of the square and start to fold it up along the horizontal crease you made in the previous two steps. 10. As you fold, note the four diagonal creases on the inside that you made earlier. You will need to reverse the two creases on the upper flap. To reverse a crease, fold it in the opposite direction that it naturally folds.
  • 11.
    11. Bring theouter edges to the middle and flatten, so that you have a diamond. 12. Turn your paper over, and repeat the previous five steps.
  • 12.
    13. Fold theedges to the middle crease. 14. Repeat on the other side 13 14
  • 13.
    15. Take thebottom tip of the top flap and fold it up to the top corner. Turn over and repeat on the other side. 16. Fold the right flap over to the left (in the same manner as turning the page of a book). Turn over and repeat on the back. Now the head and tail are nestled in between what will become the wings.
  • 14.
    17. Fold thewings down so that they are perpendicular to the body, head and tail. 18. Fold the tip of the head down.
  • 15.
    19. Pull thehead and tail out so that they line up with the outer edges of the body.
  • 16.