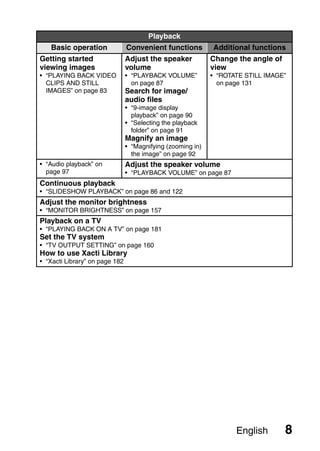
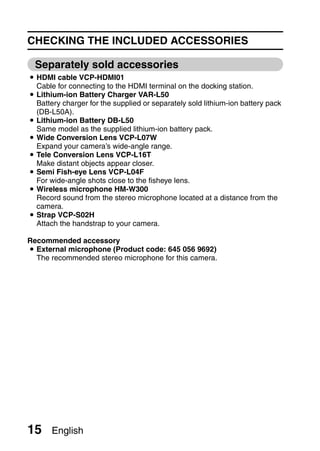
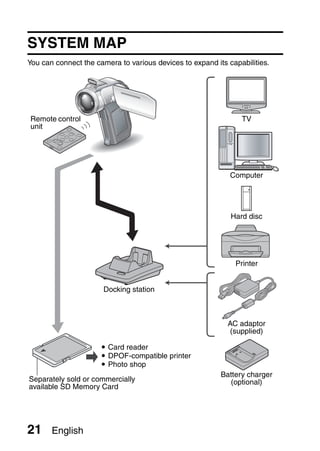
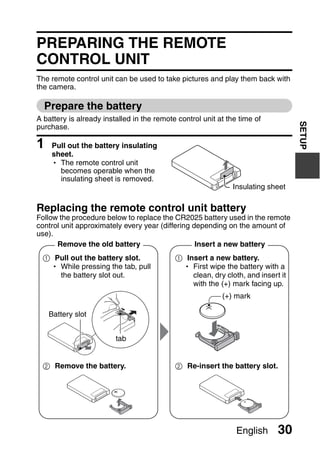
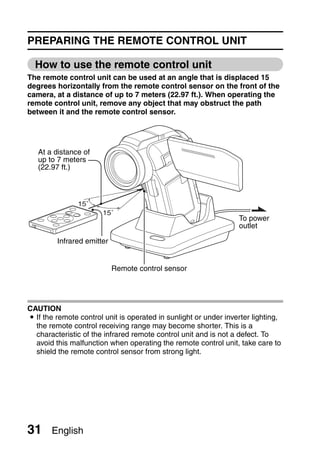
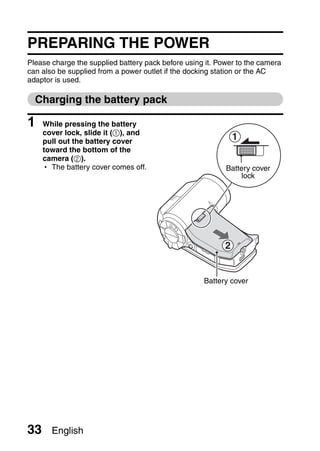
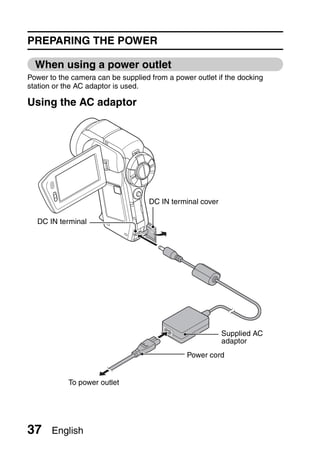
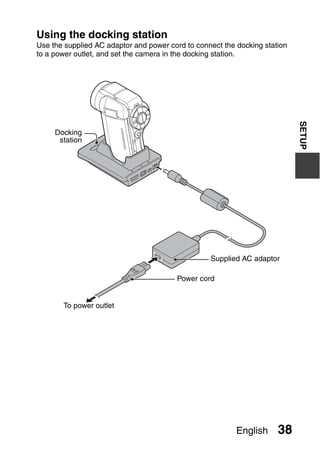
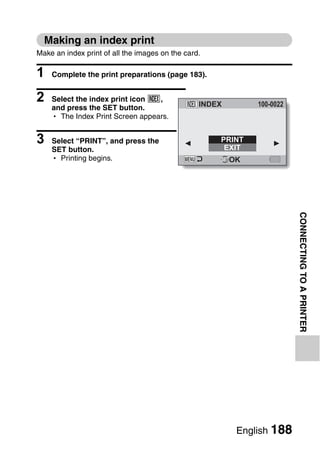
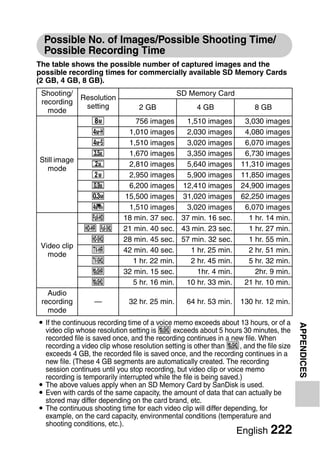
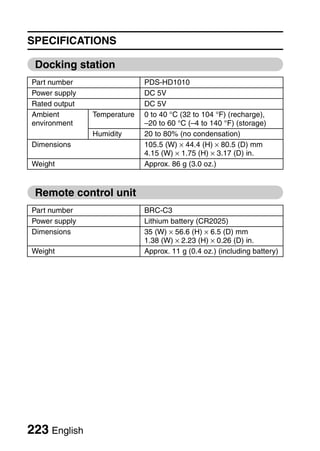
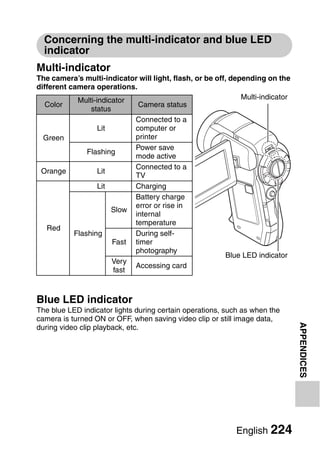
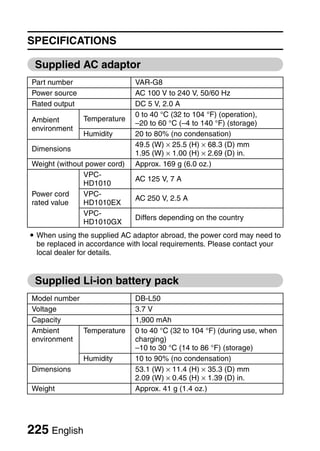
This instruction manual provides directions for safely operating three Digital Movie Camera models: VPC-HD1010EX, VPC-HD1010, and VPC-HD1010GX. It reviews important safety information and contains guides for setup, basic shooting and playback, and using the cameras advanced features through the Simple and Normal modes. Accessories like the docking station and remote control are also explained. The manual aims to help users fully utilize and enjoy their camera's digital video recording capabilities.


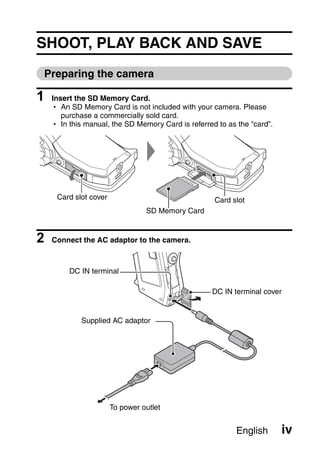
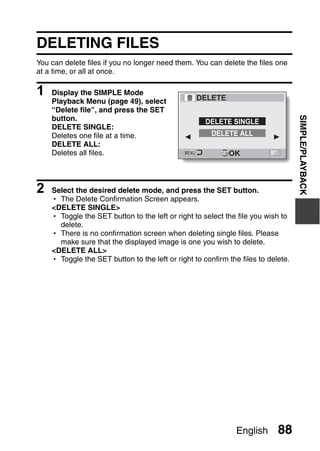
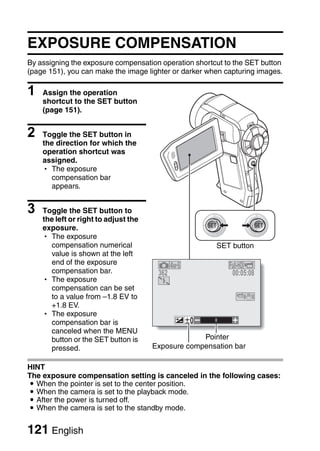
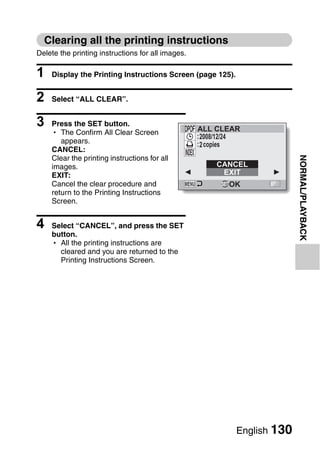
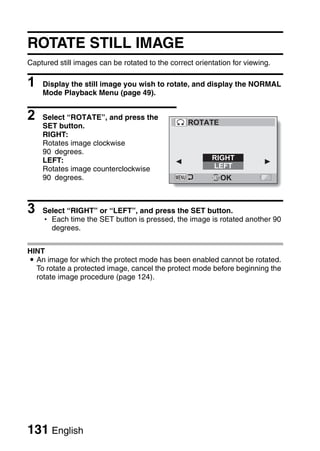
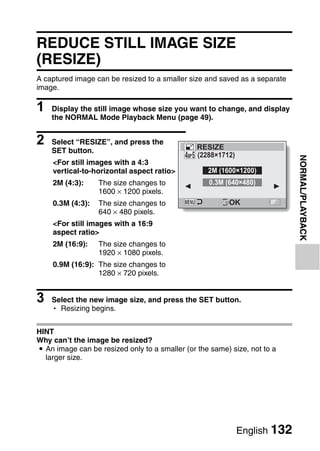
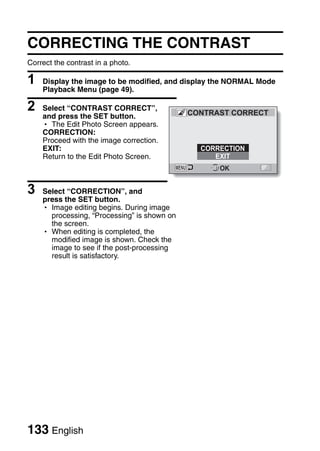
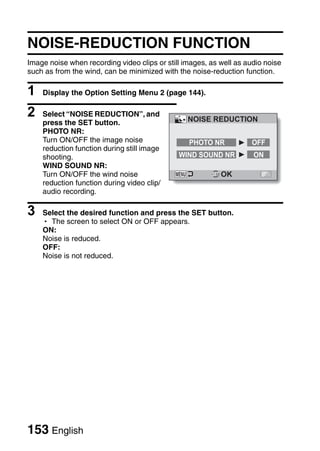
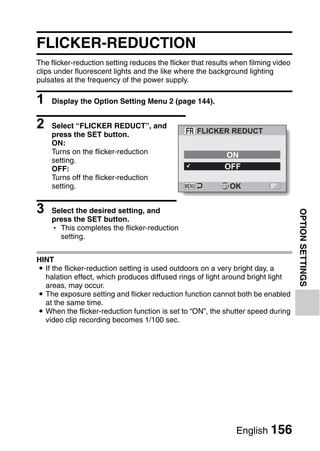
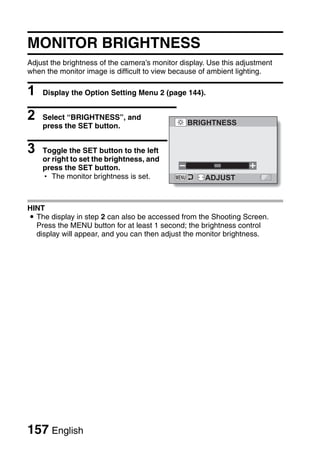
![SHOOT, PLAY BACK AND SAVE
Before capturing those important shots, be sure to first take a
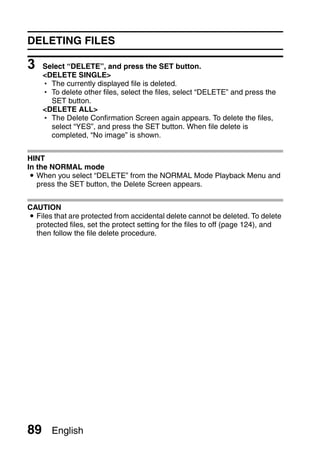
test shot to confirm that your camera is set up and ready to go
i Sanyo declines any claim for compensation for recorded contents etc. in case
of photographing or recording failure due to a chance camera or card flaw.
Shooting
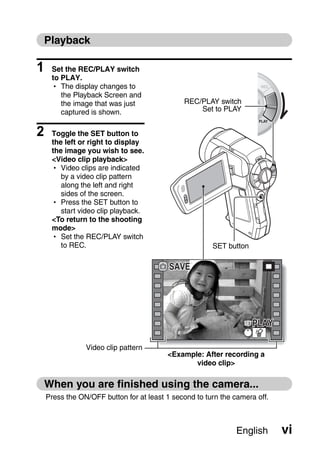
1 Set the REC/PLAY switch
to REC.
2 Press the ON/OFF button
REC/PLAY switch
Set to REC
for at least 1 second to turn
the camera on.
h If the screen to set the date
and time appears, press [ ] button
the MENU button 2 times [ ] button
to cancel it. ON/OFF button
For how to set the date
and time, see page 43.
3 Record. Monitor
To record a video clip:
h Press the [ ] button to
begin recording a video
clip.
h Press the [ ] button
again to end the recording.
To take a photo:
h Press the [ ] button.
h A still image is captured.
362 00:05:08
F1.8
1/14
v English](https://image.slidesharecdn.com/sanyovpchd1010-100209162153-phpapp01/85/Sanyo-Vpchd1010-title-chang-6-320.jpg)
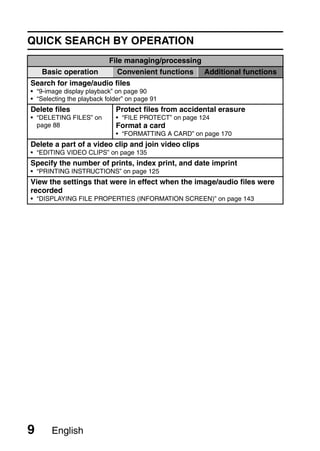
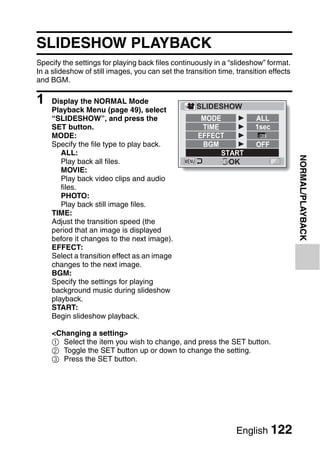
![SHOOT, PLAY BACK AND SAVE
Burn your recorded video clips onto a DVD
(Windows Vista)
Using the supplied CD-ROM (Sanyo Software Pack), you can store your
captured images on a DVD. Detailed information about the Sanyo
Software Pack can be found on page 4 in the Sanyo Software Pack
INSTRUCTION MANUAL.
Install application programs
1 Set the supplied CD-ROM in your computer’s DVD drive.
h The installation window opens.
2 Click on [Nero 8 Essentials].
h After clicking on an application program, follow the instructions shown
on the monitor to install the program.
3 In the installation window, click on [Finish] and remove the CD-ROM
from the computer’s DVD drive.
<About the Kodak online service>
h When the installation window closes, a dialog box to connect to the
website introducing Kodak’s online service appears. Check the [No
thanks!] option button, and then click on the [OK] button.
vii English](https://image.slidesharecdn.com/sanyovpchd1010-100209162153-phpapp01/85/Sanyo-Vpchd1010-title-chang-8-320.jpg)
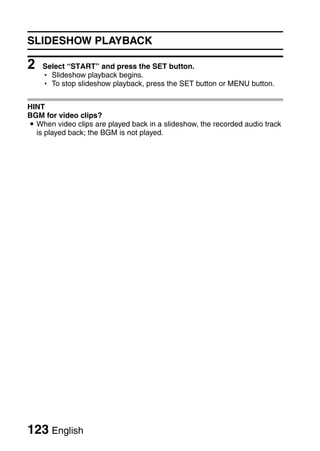
![Connect your camera to a computer
Connect your camera to a computer, and copy the desired files to the
computer.
1 Use the supplied dedicated USB interface cable to connect your
camera to the computer.
2 Turn on the camera.
h The USB Connection Screen appears on the camera’s monitor.
USB CONNECTION
COMPUTER
PRINTER
CANCEL
CANCEL OK
To power outlet
To USB terminal on
the docking station To USB connector
on the computer
Supplied dedicated USB Dedicated USB
interface cable interface cable
i Insert the plug with the [n]
mark facing up.
English viii](https://image.slidesharecdn.com/sanyovpchd1010-100209162153-phpapp01/85/Sanyo-Vpchd1010-title-chang-9-320.jpg)
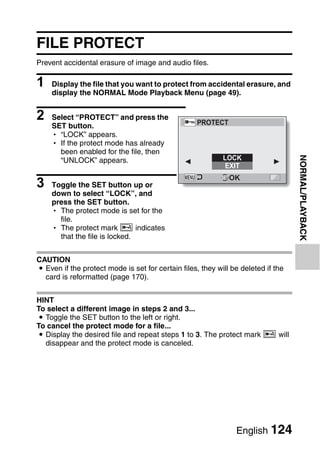
![SHOOT, PLAY BACK AND SAVE
3 Select “COMPUTER”, and press the SET button.
h The screen to select the computer connection mode appears.
4 Select “CARD READER”, and press the SET button.
h The message [Found New Hardware] appears in the task tray,
showing that the camera is recognized as a drive.
h The card is recognized (mounted) as a disk, and the [XACTI (E:)] icon
appears in the [My Computer] window.
* The drive name (E:) may be different on your computer.
5 Copy the files from the card to the computer’s hard disk.
h The data recorded with your camera are stored in the following folder.
You can specify the folder on the hard disk to which to copy the files.
XACTI (E:)DCIM****SANYO
(**** represents numbers [page 11 in the Sanyo Software Pack
INSTRUCTION MANUAL]).
* The drive name (E:) may be different on your computer.
ix English](https://image.slidesharecdn.com/sanyovpchd1010-100209162153-phpapp01/85/Sanyo-Vpchd1010-title-chang-10-320.jpg)
![Burn video clips onto a DVD (For Windows Vista
users)
Here’s how to write your recorded data onto a DVD in the mpeg2 format. For
information on other operations, please see the Help file for Nero Vision. To
access the Nero Vision Help file, click the [?] button on the Nero Vision start
screen.
1 Insert a blank DVD in your computer’s DVD drive.
2 Click the Start button, and point to [All Programs] → [Nero 8] and
click on [Nero Vision Essentials].
h Nero Vision starts up, and the start screen appears.
English x](https://image.slidesharecdn.com/sanyovpchd1010-100209162153-phpapp01/85/Sanyo-Vpchd1010-title-chang-11-320.jpg)
![SHOOT, PLAY BACK AND SAVE
3 Under the “What would you like to do?” heading, point to [Make
DVD] and click on [DVD-video].
h The Hints window opens, in which you can find an explanation of each
screen.
<To disable the Hints window >
h From the [Show hints when moving to page] menu in the Hints window
select [Disable].
4 Click the [Close] button.
h The screen to make a DVD-video opens.
<To return to the preceding step>
h Click the [Back] button.
xi English](https://image.slidesharecdn.com/sanyovpchd1010-100209162153-phpapp01/85/Sanyo-Vpchd1010-title-chang-12-320.jpg)
![5 Under the “What would you like to do?” heading, click [Add video
files].
h The window to select files to burn to DVD opens.
6 Click on a file to burn to DVD.
<To select multiple files>
h Click on the files while holding down the [Ctrl] key.
7 Click the [Open] button.
h The selected files are shown in the “Content” field.
English xii](https://image.slidesharecdn.com/sanyovpchd1010-100209162153-phpapp01/85/Sanyo-Vpchd1010-title-chang-13-320.jpg)
![SHOOT, PLAY BACK AND SAVE
<To check the contents of the selected files>
h When you double-click a file in the “Content” field, the window to play
the file appears. Click the [Next] button when you want to return to the
previous window.
<To deselect a file>
1 Right-click on the file in the “Content” field that you wish to deselect.
h A pulldown menu appears.
2 Click [Remove].
h The selected file is removed from the “Content” field.
8 Click the [Next] button.
h The window to edit the disk menu appears.
xiii English](https://image.slidesharecdn.com/sanyovpchd1010-100209162153-phpapp01/85/Sanyo-Vpchd1010-title-chang-14-320.jpg)
![9 Click on one of the designs under “Templates”, and then click the
[Next] button.
h A preview of the selected design is shown.
English xiv](https://image.slidesharecdn.com/sanyovpchd1010-100209162153-phpapp01/85/Sanyo-Vpchd1010-title-chang-15-320.jpg)
![SHOOT, PLAY BACK AND SAVE
10 Click the [Next] button.
h The window to configure the DVD burn setup opens.
xv English](https://image.slidesharecdn.com/sanyovpchd1010-100209162153-phpapp01/85/Sanyo-Vpchd1010-title-chang-16-320.jpg)
![11 Click the [Burn] button.
hDisk writing begins.
hThe process status is shown in the “Recording progress” field.
hWhen the burn process is completed, a screen asking if you would like
to save a log file of the burn process appears.
12 Click the [Yes] button.
h Enter a name for the log file.
13 Click the [Save] button.
h A screen for you to indicate the next operation appears.
English xvi](https://image.slidesharecdn.com/sanyovpchd1010-100209162153-phpapp01/85/Sanyo-Vpchd1010-title-chang-17-320.jpg)
![SHOOT, PLAY BACK AND SAVE
14 Click the [Finish] button.
h A screen asking if you would like to save the project appears.
15 Click the [Yes] button.
h Enter a name for the project file.
16 Click the [Save] button.
h Nero Vision Essentials ends.
xvii English](https://image.slidesharecdn.com/sanyovpchd1010-100209162153-phpapp01/85/Sanyo-Vpchd1010-title-chang-18-320.jpg)


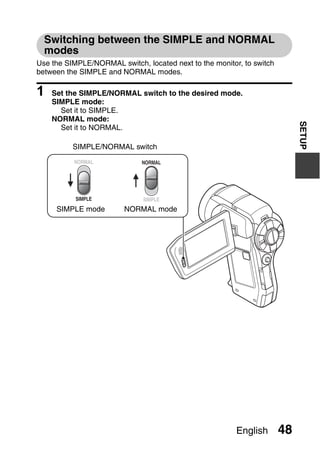
![SETUP
SETUP
PARTS NAMES
Camera
Front
Flash
i Extends when the flash button [?]
is pressed.
SETUP
Shoe cover
Flash unit
Strap holder
Flash button [?]
Lens
Battery cover lock
Remote control
Battery cover sensor
Monitor unit
Stereo
microphone
Mic/headphones teminal
cover [MIC/ ]
English 22](https://image.slidesharecdn.com/sanyovpchd1010-100209162153-phpapp01/85/Sanyo-Vpchd1010-title-chang-41-320.jpg)

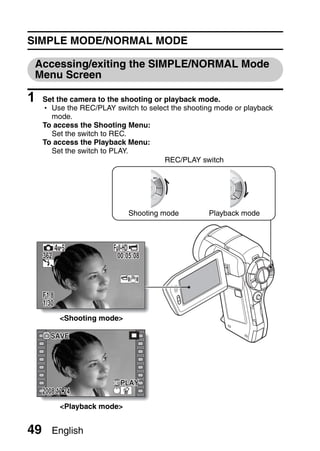
![Rear
Zoom switch
Speaker
Multi-indicator
Monitor PHOTO VIEW button
Blue LED indicator
REC/PLAY switch
SETUP
[ ] button
[ ] button
MENU button
SET button
Card slot cover
SIMPLE/NORMAL
switch DC IN terminal cover
ON/OFF button
Bottom
Docking station terminal
Tripod stand hole
English 24](https://image.slidesharecdn.com/sanyovpchd1010-100209162153-phpapp01/85/Sanyo-Vpchd1010-title-chang-43-320.jpg)

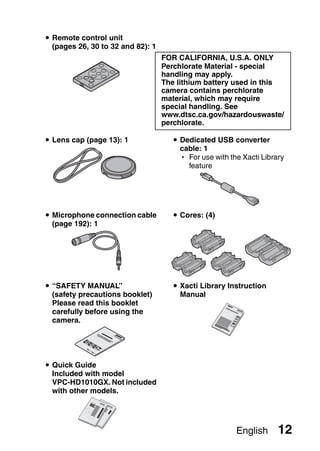
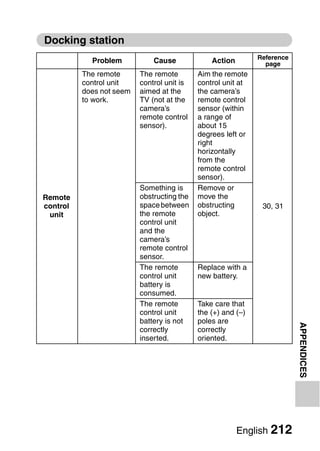
![Remote control unit
1 2
3 4
5 8
6 9
SETUP
;
7 A
<In the shooting mode> <In the playback mode>
1 [ ] button 1 [ ] button
2 [ ] button 2 [ ] button
3 Works the same as pushing 3 Works the same as pushing
zoom switch toward the zoom switch toward the
[W] ([P]) side [W] ([P]) side
4 Works the same as pushing 4 Works the same as pushing
zoom switch toward the zoom switch toward the
[T] ([]]) side [T] ([]]) side
5 SET button 5 SET button
6 Works the same as toggling 6 Works the same as toggling
SET button to the left SET button to the left
7 MENU button 7 MENU button
8 Works the same as toggling 8 Works the same as toggling
SET button up SET button up
9 Works the same as toggling 9 Works the same as toggling
SET button to the right SET button to the right
0 Works the same as toggling 0 Works the same as toggling
SET button down SET button down
A ON/OFF button A ON/OFF button
h Works only when the camera h Works only when the camera
is set in the docking station. is set in the docking station.
English 26](https://image.slidesharecdn.com/sanyovpchd1010-100209162153-phpapp01/85/Sanyo-Vpchd1010-title-chang-45-320.jpg)
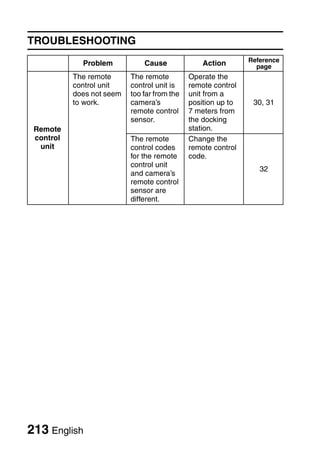
![Changing the remote control code
The remote control unit will also work with other Sanyo cameras that
can be operated by infrared remote control. When more than one
camera is present, it is recommended to change the remote control
code to ensure that only the intended camera operates when the remote
control unit is used. The remote control code is set to “RC CODE 1” at
the time of purchase.
<Changing the remote control code from “RC CODE 1” to “RC
CODE 2”>
SETUP
1 Aim the infrared emitter at the remote control sensor on the docking
station.
2 Simultaneously press the MENU button and the [ ] button for at
least 3 seconds.
3 Press a button on the remote control unit and check that the camera
is receiving correctly.
h The remote control codes are retained even if the batteries in the
remote control unit or camera are replaced.
h If the remote control codes for the remote control unit and the camera
and do not match, the remote control unit cannot be used to operate
the camera.
<Resetting the remote control code to “RC CODE 1”>
1 Aim the infrared emitter at the remote control sensor on the docking
station.
2 Simultaneously press the MENU button and the [ ] button for at
least 3 seconds.
English 32](https://image.slidesharecdn.com/sanyovpchd1010-100209162153-phpapp01/85/Sanyo-Vpchd1010-title-chang-51-320.jpg)


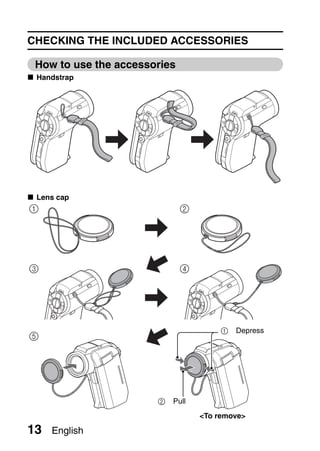
![TURNING THE CAMERA ON AND OFF
Turning on the camera when the power save
(sleep) mode is active
In order to preserve battery pack power, the power save (sleep) function
will automatically turn off the camera after 1 minute of no use during
shooting, or 5 minutes of no use during playback (factory-preset
setting).
i When the power save mode is active, you can restore the power by any of
the following methods:
h Move the REC/PLAY switch.
h Press the ON/OFF button.
h Press the [ ] or [ ] button.
h Press the SET or MENU button.
h Push the zoom switch.
h Move the SIMPLE/NORMAL switch.
h Press the PHOTO VIEW button.
* When the MENU button is used to turn on the camera, the screen to set
the operation sounds (page 148) appears.
i After the power save mode has been active for about 1 hour, the camera
will switch to the standby mode. In this case, you can restore the power by
pressing the ON/OFF button, or by closing and then opening the monitor
unit.
i When the AC adaptor is connected, the power save mode will become
active about 10 minutes after the camera is turned on (factory-preset
setting).
i The user can specify the time elapsed before the power save mode is
activated (page 165).
i When the camera is connected to a computer or printer, the power save
mode becomes active after about 12 hours.
Turning off the camera
1 Press the ON/OFF button for at least 1 second.
h The camera turns off.
41 English](https://image.slidesharecdn.com/sanyovpchd1010-100209162153-phpapp01/85/Sanyo-Vpchd1010-title-chang-60-320.jpg)
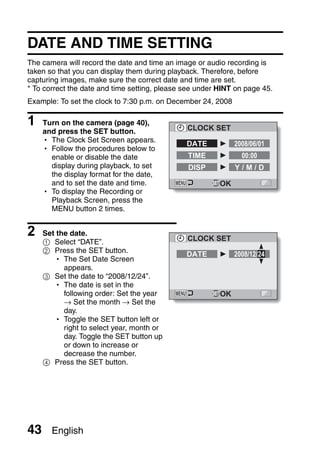
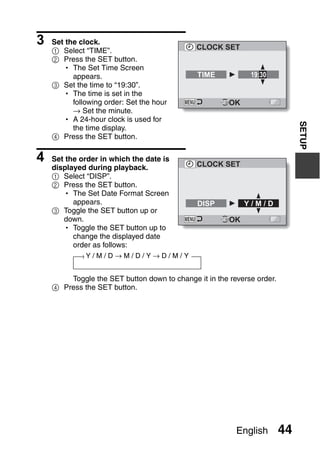
![DATE AND TIME SETTING
5 Press the MENU button.
h The date and time setting is completed.
h To display the Recording or Playback Screen, press the MENU button.
HINT
i Under normal conditions, while the battery pack is being replaced, an
internal battery will maintain the date and time settings. However, there is a
small chance the settings may be lost (the backup will last for about
7 days). It is recommended to check that the date and time settings are still
correct after replacing the battery pack and before shooting or recording of
any type (follow step 1).
To correct the date and time settings
1 Turn on the camera.
2 Display the Option Setting Menu [1] (page 144).
3 Select “CLOCK SET” and press the SET button.
h The screen to set the date and time appears.
h The current date and time settings are shown.
4 Select the line you wish to change, and make the correction.
45 English](https://image.slidesharecdn.com/sanyovpchd1010-100209162153-phpapp01/85/Sanyo-Vpchd1010-title-chang-64-320.jpg)
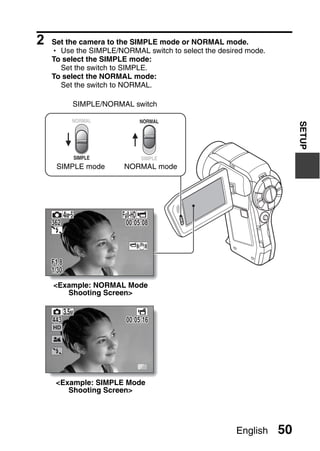
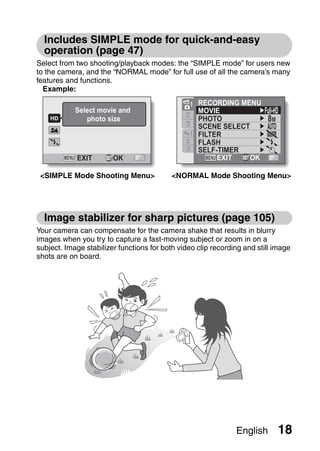
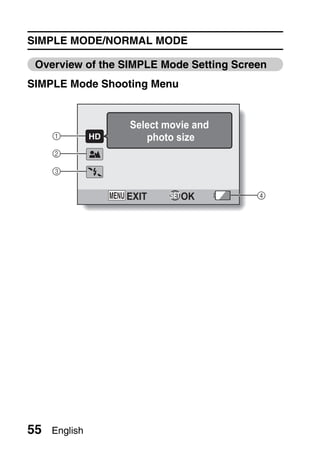
![To access the SIMPLE Mode Setting Menu Screen
4 Toggle the SET button up or down to select the item you wish to
change, and press the SET button.
h The Setting Screen for the selected item appears.
SETUP
Select an item to change
Description of selected item
Select movie and
photo size
EXIT OK
To keep in HDTV size
HDTV size
3.5M [16:9]
EXIT OK
<Setting Screen>
English 52](https://image.slidesharecdn.com/sanyovpchd1010-100209162153-phpapp01/85/Sanyo-Vpchd1010-title-chang-71-320.jpg)
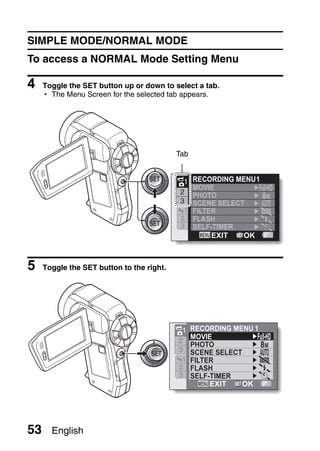
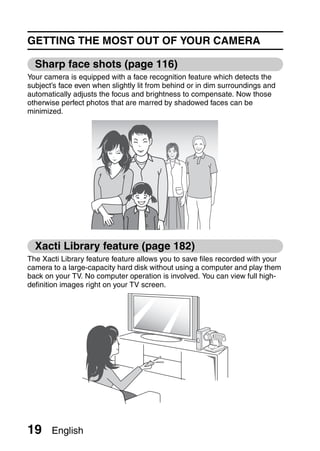
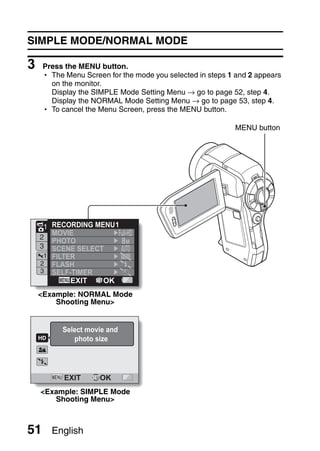
![6 Toggle the SET button up or down to select the item you wish to
change, and press the SET button.
h The Setting Screen for the selected item appears.
h To return to the Menu Screen, press the MENU button.
SETUP
Select an item to change
1 RECORDING MENU 1
MOVIE
2 PHOTO 8M
3 SCENE SELECT
1 FILTER
2 FLASH
3 SELF-TIMER
EXIT OK
Applicable mode
PHOTO
3264×2448
2288×1712
2288×1712
2496×1408 [16:9]
1920×1080 [16:9]
OK
<Setting Screen>
HINT
About the applicable mode indicator
i This indicator shows the shooting mode(s) for which the selected setting is
effective.
: This setting is effective during still image shooting.
: This setting is effective during video clip recording.
: This setting is effective during still image shooting and video clip
recording.
English 54](https://image.slidesharecdn.com/sanyovpchd1010-100209162153-phpapp01/85/Sanyo-Vpchd1010-title-chang-73-320.jpg)
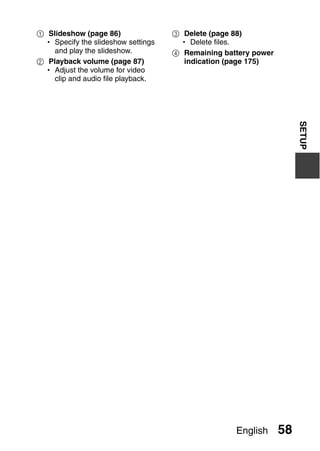

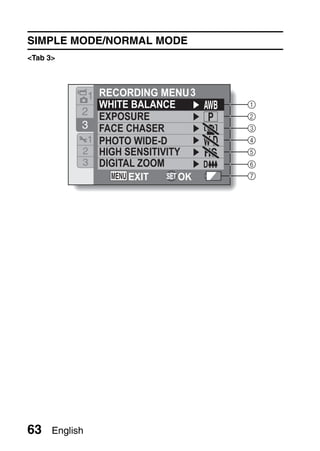
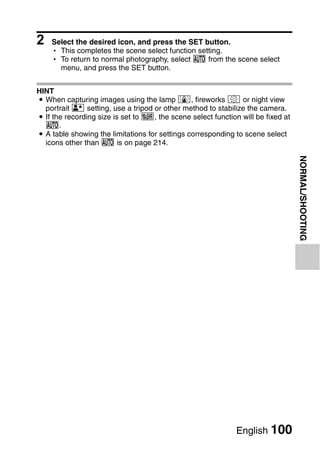
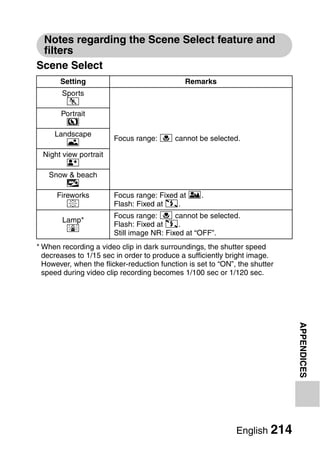
![1 Video clip settings (page 93) a: Sports mode
<HD mode> >: Portrait mode
!: Record at 1920 × 1080 +: Landscape mode
pixels, 60 fields/s.
/: Night view portrait mode
Y: Record at 1920 × 1080
k: Snow & beach mode
pixels, 30 fps.
+: Fireworks mode
": Record at 1280 × 720
pixels, 60 fps. Q: Lamp mode
&: Record at 1280 × 720 4 Filter (page 101)
pixels, 30 fps. &: No filter
%: Cosmetic filter
SETUP
<SD mode>
(: Record at 640 × 480 pixels, W: Monochrome filter
60 fps. ,: Sepia filter
): Record at 640 × 480 pixels, 5 Flash (page 102)
30 fps k: The camera will detect the
X: Record at 448 × 336 pixels, subject brightness and use
300 fps the flash only when
l: Record at 320 × 240 pixels, necessary.
30 fps. m: The flash will operate with
<: Make an audio recording. every image captured
regardless of the
2 Still image settings (page 94) conditions.
J: Image size is 3264 × 2448
l: The flash will not operate
pixels.
even in dark situations.
M: Image size is 2288 × 1712
n: The camera will detect the
pixels (low compression).
subject brightness and use
L: Image size is 2288 × 1712 the flash only when
pixels (normal required. At this time the
compression). flash will operate in a
*: Image size is 2496 × 1408 manner that reduces the
pixels (16:9 aspect ratio). red reflection (“red-eye”) in
+: Image size is 1920 × 1080 the subject’s eyes.
pixels (16:9 aspect ratio).
6 Self-timer (page 103)
G: Image size is 1600 × 1200 N: Self-timer is off.
pixels.
y: Shooting begins 2 seconds
,: Image size is 1280 × 720 after the [ ] or [ ]
pixels (16:9 aspect ratio). button is pressed.
[: Image size is 640 × 480 x: Shooting begins
pixels. 10 seconds after the [ ]
c: Image size is 2288 × 1712 or [ ] button is pressed.
pixels.
7 Remaining battery power
3 Scene select (page 99) (page 175)
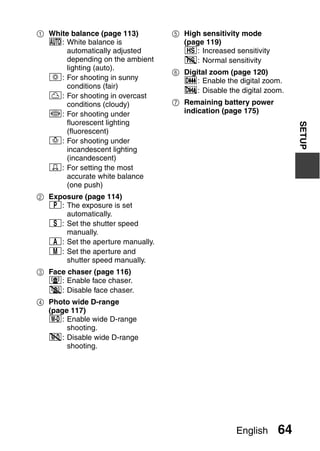
=: Full auto setting
English 60](https://image.slidesharecdn.com/sanyovpchd1010-100209162153-phpapp01/85/Sanyo-Vpchd1010-title-chang-79-320.jpg)
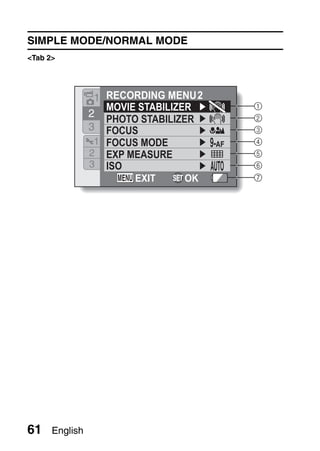
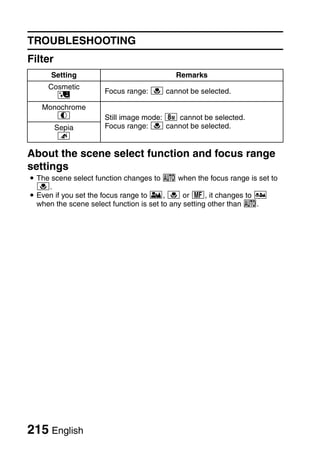
![1 Movie stabilizer (page 105) 5 Light-measuring mode
h Compensate for camera shake (page 110)
during video clip recording. X: Multi-section light
: Record with image measuring
stabilizer on. W: Center-weighted light
]: Record without image measuring
stabilizer. Y: Spot light-measuring
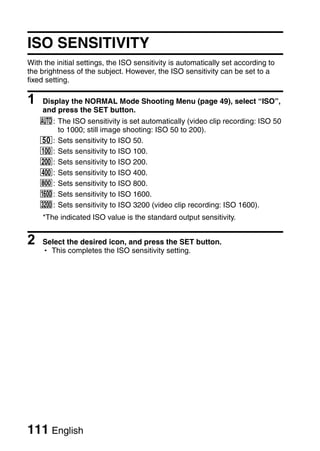
2 Photo stabilizer (page 105) 6 ISO sensitivity (page 111)
h Compensate for camera shake =: Sensitivity is set
during still image shooting. automatically (video clip
: Shoot with image stabilizer
SETUP
recording: ISO 50 to 1000;
on. still image shooting: ISO 50
]: Shoot without image to 200)
stabilizer. *: Sets sensitivity to ISO 50
3 Focus range (page 107) u: Sets sensitivity to ISO 100
h Select the focus range that v: Sets sensitivity to ISO 200
corresponds to the distance to w: Sets sensitivity to ISO 400
the subject. 6: Sets sensitivity to ISO 800
-: The camera automatically -: Sets sensitivity to ISO 1600
focuses on the subject
z: Sets sensitivity to ISO 3200
within a range of 10 cm
(video clip recording:
(3.94 in.) to infinity (total
ISO 1600)
range).
*: The camera automatically * The indicated ISO value is the
focuses on the subject with standard output sensitivity.
a range of 80 cm (31.50 in.) 7 Remaining battery power
to infinity (normal). (page 175)
-: The focus can be set
manually.
+: The camera focuses on the
subject within a range of
1 cm (0.39 in.) to 1.0 m
(3.28 ft.) (super macro).
4 Focus area (page 109)
B: 9-point range finder focus
C: Spot focus
English 62](https://image.slidesharecdn.com/sanyovpchd1010-100209162153-phpapp01/85/Sanyo-Vpchd1010-title-chang-81-320.jpg)
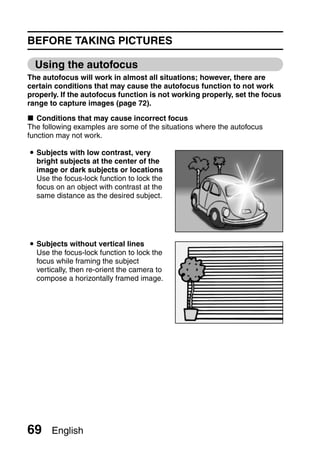
![The following examples are some of the situations where the autofocus
function may work, but not as desired.
i When both near and far objects are
present
Use the focus-lock function to lock the
focus on an object at the same distance
as the desired subject, then reposition
the camera to compose the picture.
SIMPLE/SHOOTING
i Fast-moving subjects
Use the focus-lock function to lock the
focus on an object at the same distance
as the desired subject, then reposition
the camera to compose the picture.
HINT
i Images captured in the still image shooting mode can be rotated when
they are played back (page 131).
i When the [ ] button is pressed halfway, the image in the monitor may
waver vertically. This is the result of internal image processing and is not a
malfunction. This wavering is not recorded and will not affect your images
in any way.
i When the optical zoom is used or when the autofocus is operating, the
image may appear to waver, but this is not a malfunction.
English 70](https://image.slidesharecdn.com/sanyovpchd1010-100209162153-phpapp01/85/Sanyo-Vpchd1010-title-chang-89-320.jpg)
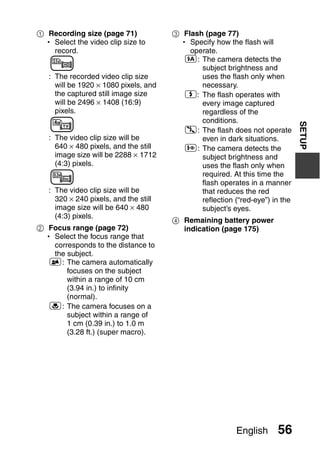
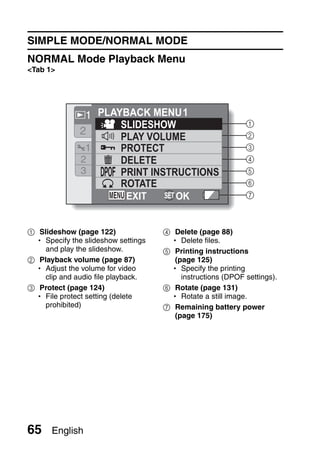
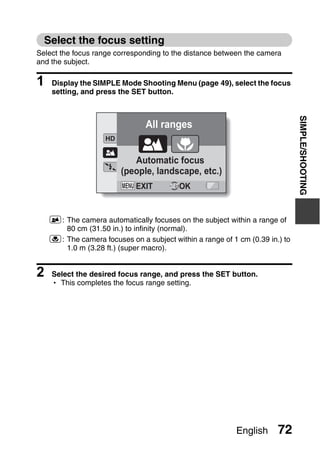
![BEFORE TAKING PICTURES
Select the recording size
The larger the image size (number of pixels), the better the image quality will
be, but the file size will also be larger. Select the image quality that is correct
for the intended purpose.
1 Display the SIMPLE Mode Shooting Menu (page 49), select the
recording size setting, and press the SET button.
To keep in HDTV size
HDTV size
3.5M [16:9]
EXIT SET OK
4: The recorded video clip size will be 1920 × 1080 pixels, and the
captured still image size will be 2496 × 1408 (16:9) pixels.
b: The video clip size will be 640 × 480 pixels, and the still image size
will be 2288 × 1712 (4:3) pixels.
6: The video clip size will be 320 × 240 pixels, and the still image size
will be 640 × 480 (4:3) pixels.
2 Select the desired video clip recording size, and press the SET
button.
h This completes the recording size setting.
71 English](https://image.slidesharecdn.com/sanyovpchd1010-100209162153-phpapp01/85/Sanyo-Vpchd1010-title-chang-90-320.jpg)
![VIDEO CLIP RECORDING
1 Turn on the camera
[ ] button
(page 40), and set it to the
shooting mode (page 46).
2 Press the [ ] button.
SIMPLE/SHOOTING
h Recording begins.
h It is not necessary to
keep the [ ] button
pressed while shooting.
h When the remaining
recording time available
for the currently recording
clip becomes little, a
countdown of the
remaining recording time
appears on the display.
3 End the recording.
h Press the [ ] button
again to stop recording. Recording time
Full-HD
REC 00:00:09
5
Available recording time
remaining
English 74](https://image.slidesharecdn.com/sanyovpchd1010-100209162153-phpapp01/85/Sanyo-Vpchd1010-title-chang-93-320.jpg)
![SHOOTING SINGLE SHOTS
Capture a still image (single-shot).
1 Turn on the camera (page 40), [ ] button
and set it to the shooting mode
(page 46).
2 Press the [ ] button.
1 Press the [ ] button
halfway.
h The autofocus operates,
and the image is focused
(focus lock).
2 Continue to gently press
the [ ] button all the
way.
h The shutter releases and
the image is captured.
h You can view the captured
image on the monitor by
keeping the [ ] button
depressed when you
capture the image.
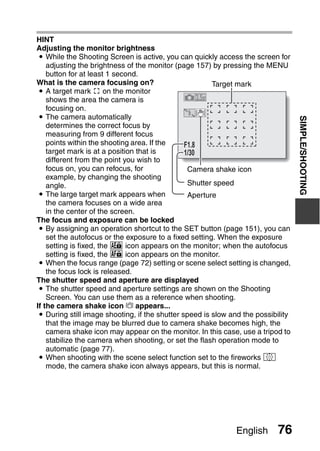
1 2
F1.8
1/30
Target mark
Shutter speed
Aperture
75 English](https://image.slidesharecdn.com/sanyovpchd1010-100209162153-phpapp01/85/Sanyo-Vpchd1010-title-chang-94-320.jpg)
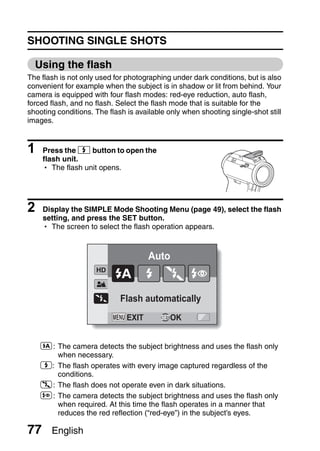
![3 Select the desired flash operation, and press the SET button.
h This completes the flash operation setting.
4 Press the [ ] button to take the picture.
CAUTION
Do not touch the flash unit when shooting
i The flash unit becomes very hot and may cause a burn. Avoid touching the
SIMPLE/SHOOTING
flash unit when shooting.
HINT
i The flash cannot be used during video clip recording.
i By assigning an operation shortcut to the SET button (page 151), you can
change the flash mode from the Shooting Screen (in the NORMAL mode).
English 78](https://image.slidesharecdn.com/sanyovpchd1010-100209162153-phpapp01/85/Sanyo-Vpchd1010-title-chang-97-320.jpg)
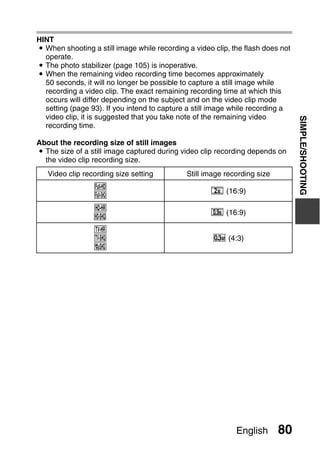
![SHOOT A STILL IMAGE WHILE
RECORDING A VIDEO CLIP
You can capture a still image (a single-shot) while recording a video clip.
1 Turn on the camera [ ] button
(page 40), and set it to the
shooting mode (page 46).
[ ] button
2 Press the [ ] button.
3 When you see a scene
you’d like to capture as a
still image. press the
[ ] button.
4 Press the [ ] button to
end the video clip
recording.
Full-HD
REC 00:00:09
79 English](https://image.slidesharecdn.com/sanyovpchd1010-100209162153-phpapp01/85/Sanyo-Vpchd1010-title-chang-98-320.jpg)
![MACRO-PHOTOGRAPHY (ZOOM)
Your camera has two zoom functions: optical zoom and digital zoom.
1 Point the camera lens at the Zoom switch
subject.
2 Push the zoom switch toward
[T/]] or [W/P] to compose
the desired image.
[T/]]: Zoom in on the subject.
[W/P]: Zoom out.
h When the zoom switch is
pushed, the zoom bar appears
on the monitor.
h When moving the optical
zoom, push the zoom switch
lightly to zoom slowly, and
press more strongly to zoom
quickly.
h When the optical zoom factor
is at maximum, zooming stops
temporarily. When the zoom
switch is pushed toward the Monitor
[T/]] side again, the mode
changes to the digital zoom Zoom bar
mode and zooming continues. Magnification
When both
optical and digital
zoom are enabled
Optical zoom
Digital zoom (yellow)
When optical
zoom only is
enabled
Pointer
3 Take the picture.
For video clip recording, see page 74.
For shooting single shots, see page 75.
For shooting sequential shots, see page 95.
81 English](https://image.slidesharecdn.com/sanyovpchd1010-100209162153-phpapp01/85/Sanyo-Vpchd1010-title-chang-100-320.jpg)

![To do this... Do this
Normal forward playback Press the SET button.
Stop playback During playback, toggle the SET button down.
During playback, press the SET button or
toggle the SET button up.
Pause
During accelerated playback, toggle the SET
button up.
To play back During forward After pausing playback, toggle the SET button
one image playback to the right.
SIMPLE/PLAYBACK
at a time
(single- During reverse After pausing playback, toggle the SET button
frame step) playback to the left.
During forward After pausing playback, press and hold the
Slow playback SET button to the right.
playback During reverse After pausing playback, press and hold the
playback SET button to the left.
During forward playback, toggle the SET
button to the right.
* The playback speed changes each time the
Forward
SET button is toggled to the right, as follows:
playback
Normal playback → 2× → 5× → 10× → 15×
Toggle the SET button to the left to resume
To normal playback speed.
accelerate
playback During forward playback, toggle the SET
button to the left.
* The playback speed changes each time the
Reverse
SET button is toggled to the left, as follows:
playback
15× ← 10× ← 5×
Toggle the SET button to the right to resume
normal playback speed.
Return to normal playback
Press the SET button.
speed
Louder: During playback, push the zoom
switch toward the [T] side.
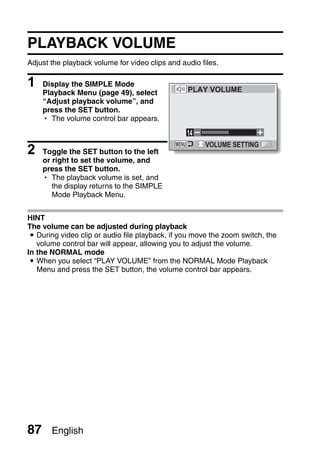
Adjusting the volume
Softer: During playback, push the zoom
switch toward the [W] side.
HINT
If the a appears on the playback Screen...
i The a icon appears when playing back a file that was saved in segments
(page 97). Although playback of these multiple files is continuous, there is
a slight pause at the point where the files are joined.
English 84](https://image.slidesharecdn.com/sanyovpchd1010-100209162153-phpapp01/85/Sanyo-Vpchd1010-title-chang-103-320.jpg)
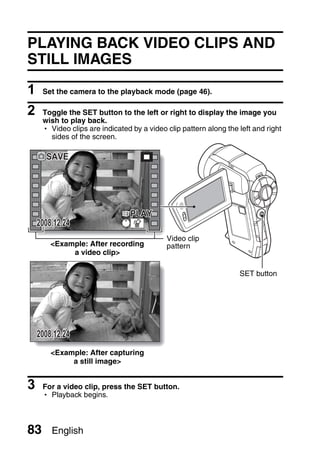
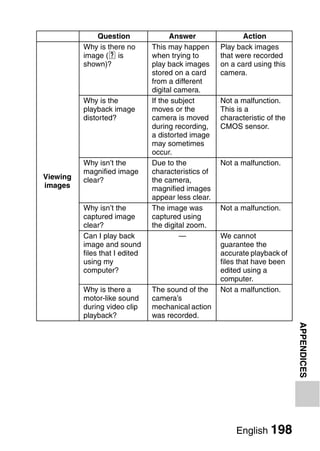
![PLAYING BACK VIDEO CLIPS AND STILL IMAGES
How to save one frame from a video clip as a
still image
1 Play back the video clip. Pause the playback at the point you wish to
“snap” a photo.
2 Press the [ ] button.
h The screen to select the aspect ratio of the still image appears. Select
the desired aspect ratio, and press the [ ] button. Note, however,
that if the video clip aspect ratio is 4:3, you cannot select 16:9.
HINT
The file for a video clip is very large
i Therefore, be aware that if the video clip is uploaded to a computer to be
played back, the computer may not be able to play back the video fast
enough, making it appear jerky. (The video will always be displayed
properly on the monitor or a television.)
i Depending on the card, shooting may end even before the possible
shooting time indicated.
Display the video clip playback point
i During video clip playback, press the MENU button for at least 1 second to
display a bar showing the current playback point in the video clip.
i Press the MENU button for about 1 second to cancel the bar.
CAUTION
During video clip playback, the sound of a motor is audible...
i During recording, the sound of the optical zoom movement or autofocus
movement was recorded. This is not a malfunction.
If no audio is heard...
i The audio is not played back when the video clip is played back in the
frame-by-frame, fast playback or reverse playback mode.
85 English](https://image.slidesharecdn.com/sanyovpchd1010-100209162153-phpapp01/85/Sanyo-Vpchd1010-title-chang-104-320.jpg)
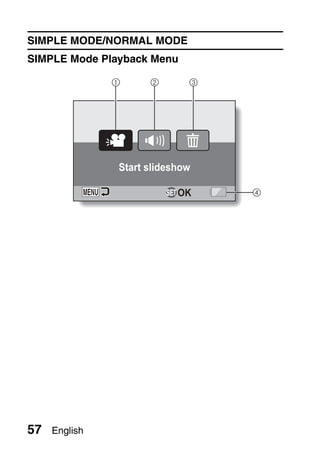
![PLAYBACK MODES
9-image display playback
1 Display the image you wish to Zoom switch
play back.
SIMPLE/PLAYBACK
2 Push the zoom switch toward
the [W/P] side.
h The 9-image display appears.
3 Select the image to play back.
h Toggle the SET button up,
down, left or right to move the
orange frame to the desired
image, and press the SET
button.
Instead of pressing the SET
button, you can push the
zoom switch toward the
[T/]] side to show the SET button
image full screen.
h If the zoom switch is pushed Video
toward the [W/P] side while clip Orange frame
the 9-image display is shown, Still image
the display changes to the
screen to select the playback 100
folder (page 91).
0001 0002 0003
0004 0005 0006
0007 0008 0009
Audio file Image number
Folder number
English 90](https://image.slidesharecdn.com/sanyovpchd1010-100209162153-phpapp01/85/Sanyo-Vpchd1010-title-chang-109-320.jpg)
![PLAYBACK MODES
Selecting the playback folder
If the card contains multiple folders, you can select from which folder you
would like to play back.
1 Display the Playback Screen.
2 Push the zoom switch toward the
[W/P] side 2 times.
h The screen to select the playback 100 101 102
folder appears.
h If the zoom switch is pushed toward
the [T/]] side, the camera 103 104 105
changes to the 9-image display
(page 90). FOLDER : 100SANYO
3 Toggle the SET button to the left or
right to move the orange frame to the
desired folder, and press the SET
button.
h The files in the selected folder are
displayed in the Playback Screen.
HINT
In the NORMAL mode
i When you select “SELECT FOLDER” from the NORMAL Mode Playback
Menu and press the SET button, the screen to select the playback folder
appears.
91 English](https://image.slidesharecdn.com/sanyovpchd1010-100209162153-phpapp01/85/Sanyo-Vpchd1010-title-chang-110-320.jpg)
![Magnifying (zooming in) the image
1 Display the image that you want to magnify.
h For a video clip, pause playback at the place you want to magnify.
2 Push the zoom switch toward the
SAVE 121%
[T/]] side.
h Magnification is enabled.
SIMPLE/PLAYBACK
h The image is magnified, and the
central portion of image is
displayed.
h Toggle the SET button to view
different parts of the magnified 100% MOVE
image.
To magnify:
Magnification increases each time the
zoom switch is pushed toward the
[T/]] side.
To return to normal size:
Magnification decreases each time the
zoom switch is pushed toward the
[W/P] side.
h Press the SET button to return to the
normal (100%) view.
HINT
The magnified portion of the image can be saved as a separate image
i Press the [ ] button. The magnified portion is saved as a new still
image.
English 92](https://image.slidesharecdn.com/sanyovpchd1010-100209162153-phpapp01/85/Sanyo-Vpchd1010-title-chang-111-320.jpg)
![CAUTION
When editing video clips...
i In order for video clips to be joined, they must have been photographed in
the same mode.
i Video clips that were photographed in different modes cannot be joined.
Restrictions when X is set
i When the camera is connected to a TV, the image is shown on the camera
monitor in the shooting mode, and on the TV in the playback mode.
i When the [ ] button is pressed, a video clip is recorded for about 10
seconds. Recording cannot be discontinued even if the [ ] button is
pressed again.
i The following recording functions are not available.
Capturing a still image during video clip recording
Zoom
NORMAL/SHOOTING
Image stabilizer
Scene select (fixed at =)
Manual exposure
Face chaser recording
High sensitivity mode recording
i If the AE lock setting is active, it is canceled when the X setting is set.
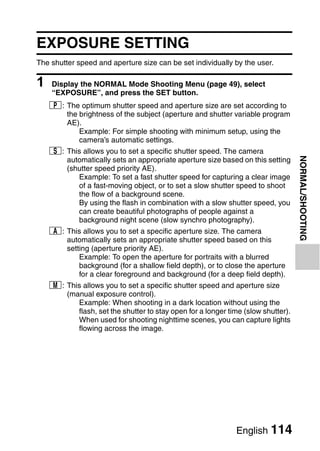
Still images
For still images, you can select either the 4:3 or 16:9 horizontal to vertical
aspect ratio. This menu is also used for shooting sequential shots.
1 Display the NORMAL Mode Shooting Menu (page 49), select
“PHOTO”, and press the SET button.
J: Image size is 3264 × 2448 pixels.
M: Image size is 2288 × 1712 pixels (low compression).
L: Image size is 2288 × 1712 pixels (normal compression).
*: Image size is 2496 × 1408 pixels (16:9 ratio).
+: Image size is 1920 × 1080 pixels (16:9 ratio).
G: Image size is 1600 × 1200 pixels.
,: Image size is 1280 × 720 pixels (16:9 ratio).
[: Image size is 640 × 480 pixels.
c: Image size is 2288 × 1712 pixels.
2 Select the desired recording size, and press the SET button.
h This completes the recording size setting.
English 94](https://image.slidesharecdn.com/sanyovpchd1010-100209162153-phpapp01/85/Sanyo-Vpchd1010-title-chang-113-320.jpg)
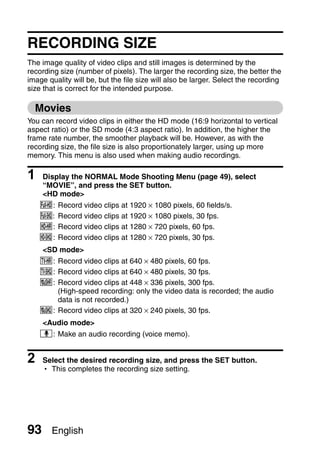
![RECORDING SIZE
Sequential shots
1 Display the NORMAL Mode Shooting Menu (page 49), select
“PHOTO”, and press the SET button.
2 Select c, and press the SET button.
3 Press the [ ] button.
h Shooting begins. Shooting continues as long as the [ ] button is
kept pressed.
HINT
i The maximum number of images in a sequential shots sequence is about
7.
About the focus when shooting sequential shots
i When sequential shots are captured, the autofocus operates when the
[ ] button is pressed halfway, fixing the focus.
Can the flash be used?
i The flash does not operate when shooting sequential shots.
95 English](https://image.slidesharecdn.com/sanyovpchd1010-100209162153-phpapp01/85/Sanyo-Vpchd1010-title-chang-114-320.jpg)
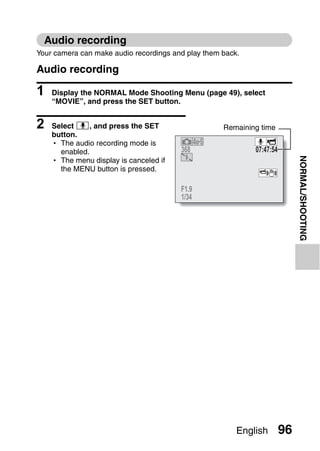
![RECORDING SIZE
3 Press the [ ] button.
h Audio recording begins. During Length of recording
recording, < appears in the
monitor. It is not necessary to
continue pressing the [ ] REC00:00:06
button while recording.
4 End the recording.
h Press the [ ] button again to stop recording.
HINT
You can capture a still image during an audio recording
i Press the [ ] button during audio recording to capture a [ still image.
About files saved in segments
i If the continuous recording time of a voice memo exceeds about 13 hours,
or of a video clip whose resolution setting is l exceeds about 5 hours
30 minutes, the recorded file is saved once, and the recording continues in
a new file. When recording a video clip whose resolution setting is other
than l, and the file size exceeds 4 GB, the recorded file is saved once,
and the recording continues in a new file. (These 4 GB segments are
automatically created. The recording session continues until you stop
recording, but video clip or voice memo recording is temporarily interrupted
while the file is being saved.)
Audio playback
1 Display the desired audio file.
00:00:00
PLAY
2008.12.24
97 English](https://image.slidesharecdn.com/sanyovpchd1010-100209162153-phpapp01/85/Sanyo-Vpchd1010-title-chang-116-320.jpg)
![2 Play back the recording.
To do this... Do this
Start
Press the SET button.
playback
Normal Press the SET button.
Pause
playback Toggle the SET button up.
Stop
Toggle the SET button down.
playback
During playback, toggle the SET button to
the right.
Fast Each time the SET button is toggled to the
forward right, the speed increases. If the SET
button is toggled to the left during fast
NORMAL/SHOOTING
forward, the speed decreases.
During playback, toggle the SET button to
Fast the left.
forward/ Fast Each time the SET button is toggled to the
fast reverse reverse left, the speed increases. If the SET button
is toggled to the right during fast reverse,
the speed decreases.
Pause Toggle the SET button up.
Return to
normal Press the SET button.
playback
During playback, push the zoom switch
Louder
Volume toward the [T/]] side.
adjustment During playback, push the zoom switch
Softer
toward the [W/P] side.
CAUTION
If no audio is heard...
i The audio is not played back when the audio recording is played back in
the fast playback or fast reverse mode.
English 98](https://image.slidesharecdn.com/sanyovpchd1010-100209162153-phpapp01/85/Sanyo-Vpchd1010-title-chang-117-320.jpg)
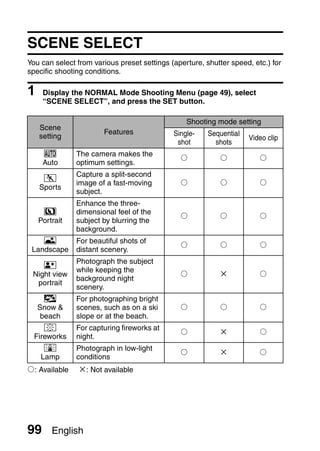
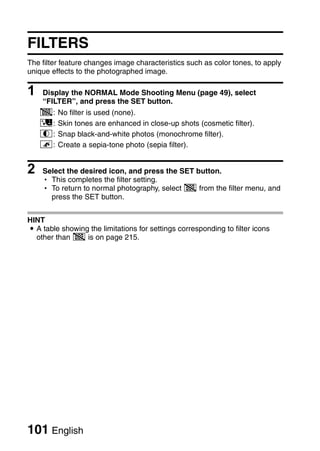
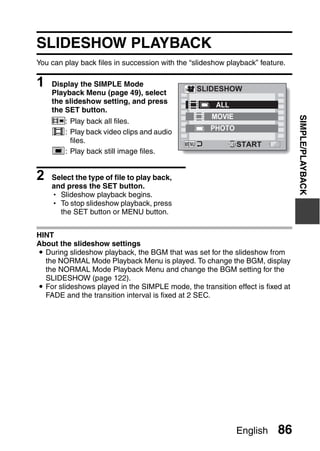
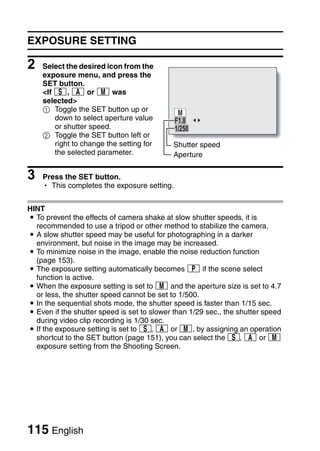
![FLASH OPERATION
1 Press the m button to open the
flash unit.
h The flash unit opens.
2 Display the NORMAL Mode Shooting Menu (page 49), select
“FLASH”, and press the SET button.
k: The camera detects the subject brightness and uses the flash only
NORMAL/SHOOTING
when necessary.
m: The flash operates with every image captured, regardless of the
subject brightness.
l: The flash does not operate even in dark surroundings.
n: The camera detects the subject brightness, and if it determines that
the flash is necessary, a pre-flash is emitted, after which the actual
flash is emitted as the image is captured. This has the effect of
minimizing the red reflection (“red-eye”) in the subject’s eyes.
3 Select the desired flash operation, and press the SET button.
h This completes the flash operation setting.
4 Press the [ ] button to capture the image.
HINT
i The flash works only when shooting single-shot still images.
English 102](https://image.slidesharecdn.com/sanyovpchd1010-100209162153-phpapp01/85/Sanyo-Vpchd1010-title-chang-121-320.jpg)
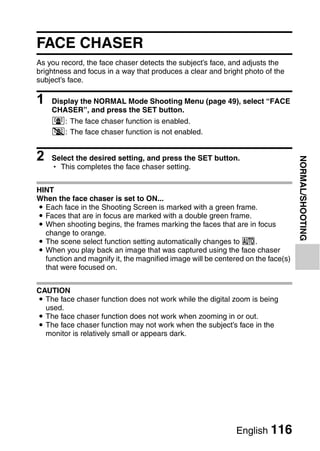
![SELF-TIMER
1 Display the NORMAL Mode Shooting Menu (page 49), select “SELF-
TIMER”, and press the SET button.
N: Turns off the self-timer function.
y: The image is captured about 2 seconds after the [ ] button or
[ ] button is pressed.
x: The image is captured about 10 seconds after the [ ] button or
[ ] button is pressed.
2 Select the desired icon, and press the SET button.
h This completes the self-timer setting.
3 Take the picture.
103 English](https://image.slidesharecdn.com/sanyovpchd1010-100209162153-phpapp01/85/Sanyo-Vpchd1010-title-chang-122-320.jpg)
![HINT
i By assigning an operation shortcut to the SET button (page 151), you can
set the self-timer from the Shooting Screen.
To pause or cancel the self-timer function...
i If the [ ] button or [ ] button is pressed again before the shutter is
released, the self-timer countdown temporarily stops. Press the [ ]
button or [ ] button one more time to restart the self-timer.
i To cancel self-timer photography, select the N icon from the self-timer
menu, and press the SET button.
i The self-timer is automatically reset to off N after the power save mode
is activated and the camera turned off.
When x is selected...
i When the [ ] button or [ ] button is
pressed, the multi-indicator will blink for
NORMAL/SHOOTING
about 10 seconds, and then the image
is captured. Also, 4 seconds before the
shutter releases, the indication shown in
the illustration appears on the monitor.
If you swivel the monitor unit
to its farthest position, the
image on the monitor will be
inverted.
English 104](https://image.slidesharecdn.com/sanyovpchd1010-100209162153-phpapp01/85/Sanyo-Vpchd1010-title-chang-123-320.jpg)
![MOTION COMPENSATION (IMAGE
STABILIZER)
Your camera can minimize a jittery picture by compensating for unintentional
hand motion.
Compensate for camera shake when recording
movies
1 Display the NORMAL Mode Shooting Menu (page 49), select “MOVIE
STABILIZER”, and press the SET button.
: Motion compensation is enabled.
]: Motion compensation is not enabled.
2 Select the desired setting, and press the SET button.
h This completes the movie stabilizer setting.
Compensate for camera shake when shooting
still images
1 Display the NORMAL Mode Shooting Menu (page 49), select
“PHOTO STABILIZER”, and press the SET button.
: Motion compensation is enabled.
]: Motion compensation is not enabled.
2 Select the desired setting, and press the SET button.
h This completes the photo stabilizer setting.
105 English](https://image.slidesharecdn.com/sanyovpchd1010-100209162153-phpapp01/85/Sanyo-Vpchd1010-title-chang-124-320.jpg)
![HINT
If the motion compensation does not seem to be working...
i Due to the mechanical characteristics of this function, it may not be
possible for the camera to compensate for violent motion.
i If the digital zoom (page 81) is being used, the large magnification factor
may make it difficult for the motion compensation function to work correctly.
Can’t set the “photo stabilizer” setting?
i The photo stabilizer is automatically turned off ] after any of the
following operations.
h Pressing the flash button [?] to open the flash unit.
h Setting the exposure to T, g or H (page 114).
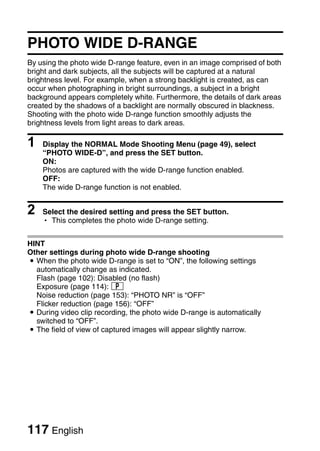
h Setting the photo wide D-range setting (page 117) to “ON”.
h Setting the still image NR (noise reduction) setting (page 153) to “ON”.
h Setting the flicker reduction setting (page 156) to “ON”.
NORMAL/SHOOTING
h Starting video clip recording.
h Setting the camera to the sequential shots mode (page 95).
When motion compensation is enabled,
i The following icons are shown on the monitor:
Full-HD
00:04:30 The movie stabilizer is active
The photo stabilizer is active
Both the movie stabilizer and the photo stabilizer
are active
Did the scene select setting change?
i When the motion compensation is set to , if the scene select setting is
/, + or Q, it will automatically change to =.
English 106](https://image.slidesharecdn.com/sanyovpchd1010-100209162153-phpapp01/85/Sanyo-Vpchd1010-title-chang-125-320.jpg)


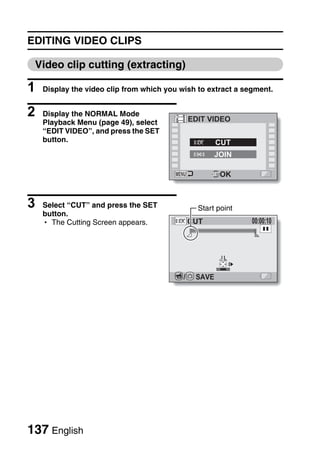
![EDITING VIDEO CLIPS
You can trim away unwanted portions from a video clip and save it as a new
video clip (video clip cutting [extracting]). You can also join video clips
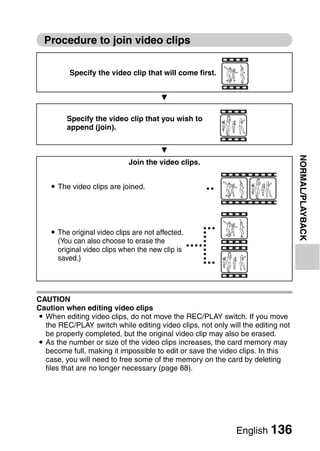
together and save them as one separate clip (“joining”).
Procedure to cut (extract) a portion of a video clip
Specify the frames 1 2
(1, 2) where the
video clip is to be
cut.
A B C
J
Extract the specified portion.
[Two ways to cut the
video clip]
i Trim away portions
A and C, and save
portion B.
i Delete portion B,
and join portions A
and C.
i The original
video clip is
not affected.
(You can also choose to erase the original video clip when the new clip is
saved.)
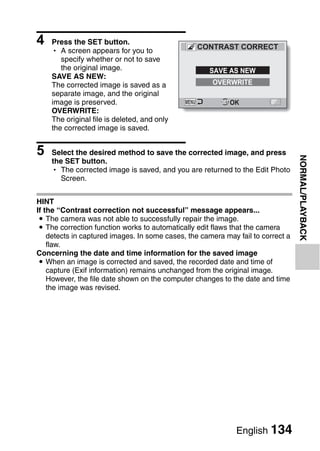
135 English](https://image.slidesharecdn.com/sanyovpchd1010-100209162153-phpapp01/85/Sanyo-Vpchd1010-title-chang-154-320.jpg)

![EDITING VIDEO CLIPS
6 Press the [ /O] button.
CUT
h A screen appears for you to
select either to save the edited SAVE AS NEW
video clip as a new (separate)
file, or to delete the original video OVERWRITE
clip and replace it with the edited REVIEW CLIP
video clip.
SAVE AS NEW: OK
The edited video clip will be
saved as a new file. The original
video clip remains unchanged.
OVERWRITE:
The original video clip will be
deleted. Only the edited video clip
will be saved.
REVIEW CLIP:
Play back the edited video clip
before saving it.
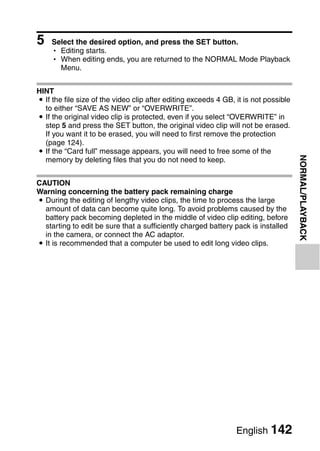
7 Select the desired option, and press the SET button.
h Editing starts.
h When editing ends, you are returned to the NORMAL Mode Playback
Menu.
HINT
i You will not be able to overwrite the file if the original file is protected.
i If the “Card full” message appears, you will need to free some of the
memory by deleting files that you do not need to keep.
CAUTION
Warning concerning the battery pack remaining charge
i During the editing of lengthy video clips, the time to process the large
amount of data can become quite long. To avoid problems caused by the
battery pack becoming depleted in the middle of video clip editing, before
starting to edit be sure that a sufficiently charged battery pack is installed
in the camera, or connect the AC adaptor.
i It is recommended that a computer be used to edit long video clips.
139 English](https://image.slidesharecdn.com/sanyovpchd1010-100209162153-phpapp01/85/Sanyo-Vpchd1010-title-chang-158-320.jpg)
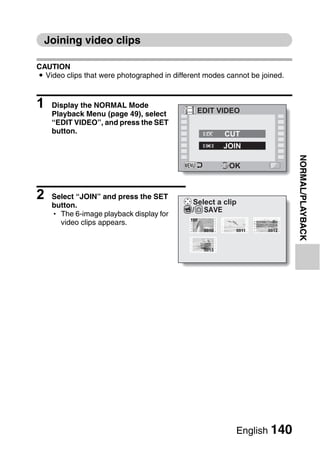
![EDITING VIDEO CLIPS
3 Move the orange frame to the
Select a clip 00:00:13
video clip you wish to join, and
press the SET button. / SAVE
100 1
h The specified video clip is
labeled with a number. 0001 0002 0003
h Up to 9 video clips can be
selected.
0004 0005 0006
h To cancel a selection and
remove the number label from a
video clip, select the video clip
and press the SET button.
4 Press the [ /O] button.
JOIN
h A screen appears for you to
select either to save the joined SAVE AS NEW
video clip as a new (separate)
file, or to delete the original video OVERWRITE
clips and replace them with the REVIEW CLIP
joined video clip.
SAVE AS NEW: OK
The joined video clip will be saved
as a new file. The original video
clips remain unchanged.
OVERWRITE:
The original video clips will be
deleted. Only the joined video clip
will be saved.
REVIEW CLIP:
Play back the joined video clip
before saving it.
141 English](https://image.slidesharecdn.com/sanyovpchd1010-100209162153-phpapp01/85/Sanyo-Vpchd1010-title-chang-160-320.jpg)

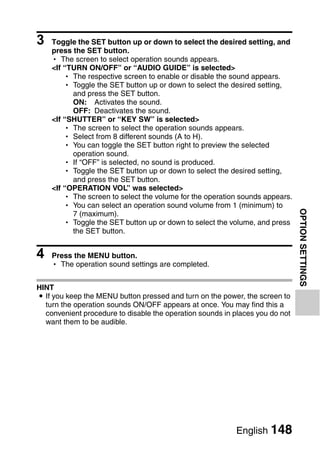
![OPERATION SOUNDS
Use this menu to set the confirming audio signals when the camera is turned
on/off or when the operation buttons ([ ] button, SET button, MENU
button, etc.) are pressed, to adjust the operation sound volume, and to
enable/disable the audio guide.
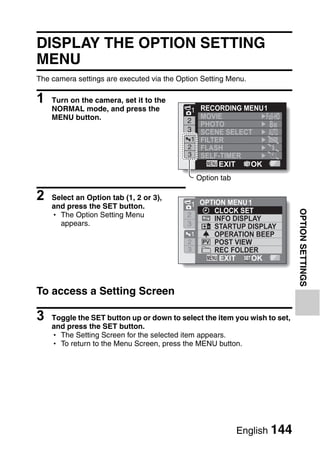
1 Display the Option Setting Menu 1 (page 144).
2 Select “OPERATION BEEP”, and
OPERATION BEEP
press the SET button.
TURN ON/OFF ON
h If “ALL OFF” is selected and the
SHUTTER D
SET button pressed, all the KEY SW A
operation sounds are muted. AUDIO GUIDE ON
h If the MENU button is pressed, OPERATION VOL 4
you are returned to the Option ALL OFF
Screen. OK
TURN ON/OFF:
Mute or enable the sound that is
produced when the power is turned
on or off.
SHUTTER:
Select the sound that is produced
when the [ ] button is pressed, or
when a photo is taken using the self-
timer.
KEY SW:
Select the sound that is produced
when the SET button, MENU button,
etc. are pressed.
AUDIO GUIDE:
Mute or enable the camera’s audio
help guide.
OPERATION VOL:
Adjust the volume of the operation
sounds.
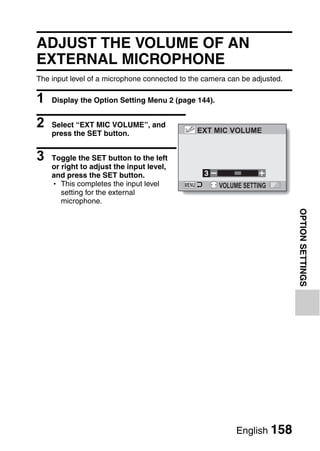
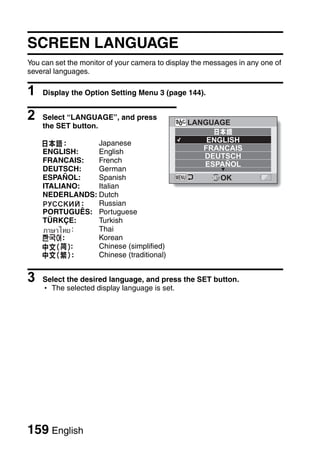
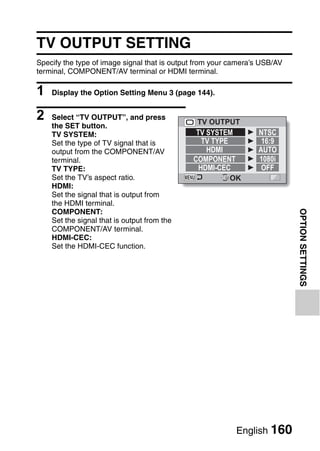
147 English](https://image.slidesharecdn.com/sanyovpchd1010-100209162153-phpapp01/85/Sanyo-Vpchd1010-title-chang-166-320.jpg)
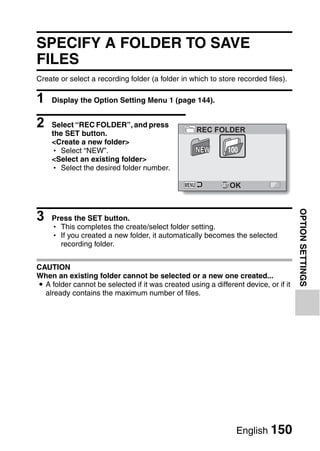
![POST-VIEW DISPLAY SETTING
Specify the duration that the captured image appears on the monitor (post-
view) after the [ ] button is pressed.
1 Display the Option Setting Menu 1 (page 144).
2 Select “POST VIEW”, and press
POST VIEW
the SET button.
1 sec:
1 sec
The post-view image is displayed
for 1 second. 2 sec
2 sec: OFF
The post-view image is displayed
for 2 seconds. OK
OFF:
The post-view image is not
displayed.
3 Select the desired setting, and press the SET button.
h This completes the post-view setting.
149 English](https://image.slidesharecdn.com/sanyovpchd1010-100209162153-phpapp01/85/Sanyo-Vpchd1010-title-chang-168-320.jpg)

![POWER SAVE FUNCTION
Your camera has a “power save” function whereby the power automatically
turns off after a specified period of inactivity. The power save function works
to conserve the battery pack power when the camera is not being used, or to
prevent the battery pack from dying if the camera has accidentally been left
on. You can specify the elapsed time (standby time) before the power save
function is activated.
1 Display the Option Setting Menu 3 (page 144).
2 Select “POWER SAVE”, and
POWER SAVE
press the SET button.
BATT:REC: BATT:REC 1 min
Set the standby time for the BATT:PLAY 5 min
shooting modes when the battery
AC:REC/PLAY 5 min
pack is used.
BATT:PLAY: BLUE LIGHT ON
Set the standby time for the OK
playback modes when the battery
pack is used.
AC:REC/PLAY:
Set the standby time for the
shooting and playback modes when
using an AC power source.
BLUE LIGHT:
Turn the ring-type blue LED
indicator encircling the [ ]/[ ]
buttons ON or OFF.
165 English](https://image.slidesharecdn.com/sanyovpchd1010-100209162153-phpapp01/85/Sanyo-Vpchd1010-title-chang-184-320.jpg)


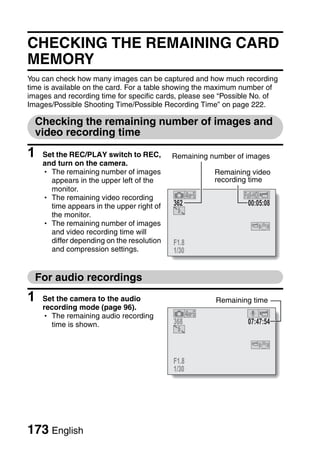
![CHECKING THE REMAINING
BATTERY PACK CHARGE
When using the battery pack, the remaining battery pack charge can be
checked on the monitor. Make sure to check this indicator before capturing an
image. For an indication of the possible length of time for battery pack
operation, see page 221.
1 Display the Shooting Menu or
Playback Menu (page 49). 1 RECORDING MENU 1
h The battery pack remaining MOVIE
2
charge indicator appears in the PHOTO 8M
3 SCENE SELECT
lower right corner of the monitor.
1 FILTER
h Due to the battery pack 2 FLASH
characteristics, when the 3 SELF-TIMER
ambient temperature is low, EXIT OK
may appear early for an
incorrect indication of the Battery pack remaining
remaining charge. charge indicator
Also, depending on the
conditions of use of the camera
or the ambient conditions
(temperature, etc.), the indicated
remaining charge may change.
Therefore, this indication can only
be used as a general
approximation of the remaining
charge.
Battery pack
remaining Battery remaining charge
charge indicator
No indication, or
Approx. full.
Power is low.
It will soon be impossible to capture or play
back images.
If this icon flashes when the [ ] button or
[ ] button is pressed, images cannot be
captured. Recharge the battery pack.
175 English](https://image.slidesharecdn.com/sanyovpchd1010-100209162153-phpapp01/85/Sanyo-Vpchd1010-title-chang-194-320.jpg)
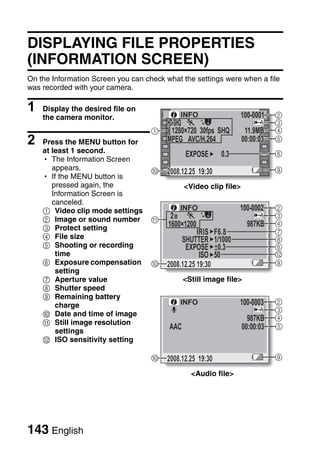
![HINT
i If any file is present, you can also check the remaining battery pack charge
on the Information Screen (page 143).
i Battery life may differ even among battery packs of the same type.
i Depending on the usage of the camera (such as the number of times the
flash is used, the use of the monitor, etc.) or the ambient temperature
(temperatures below 10 °C [50°F]) the number of images that can be
saved on a fully charged battery pack will vary greatly.
i It is recommended that you prepare an extra battery pack(s) when taking
pictures at a wedding or while traveling, for example, so you don’t miss
capturing images of important moments due to the battery pack power
running out. The same is recommended for taking photos in cold
environments. (In a ski area, for example, the battery pack can be kept
warm in your pocket until ready to use.)
OPTION SETTINGS
English 176](https://image.slidesharecdn.com/sanyovpchd1010-100209162153-phpapp01/85/Sanyo-Vpchd1010-title-chang-195-320.jpg)
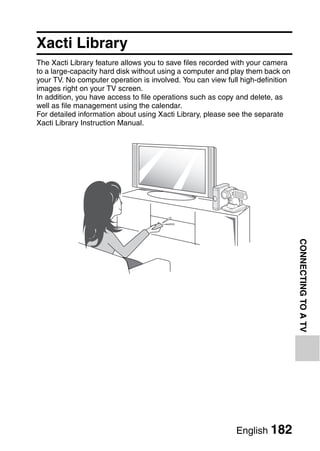
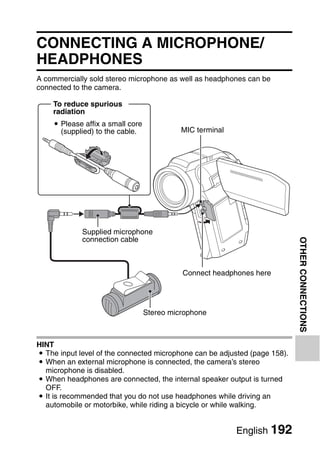
![OTHER DEVICES AND CONNECTIONS
CONNECTING TO A TV
CONNECTING TO A TV
CONNECTING TO A STANDARD
VIDEO INPUT TERMINAL
About image output: The image output destination differs depending on the
connection cable.
Connection Image output Recording mode Playback
cable destination Standby Recording mode
Camera monitor NTSC: n
m n
Dedicated S-AV PAL: m
interface cable NTSC: m
TV n m
PAL: n
Dedicated Camera monitor n m n
component
cable TV m n m
Camera monitor n m n
HDMI cable
TV m n m
m: Images are output n: Images are not output
Dedicated S-AV interface cable
Yellow plug:
To Video Input terminal
To AC adaptor
COMPONENT/AV terminal Set the input to
“VIDEO”.
i Insert the plug with the
[n] mark facing up. Not connected*
White plug: To Audio Input (L) terminal
Red plug: To Audio Input (R) terminal
* When connected, the images are not produced normally on the TV monitor.
177 English](https://image.slidesharecdn.com/sanyovpchd1010-100209162153-phpapp01/85/Sanyo-Vpchd1010-title-chang-196-320.jpg)
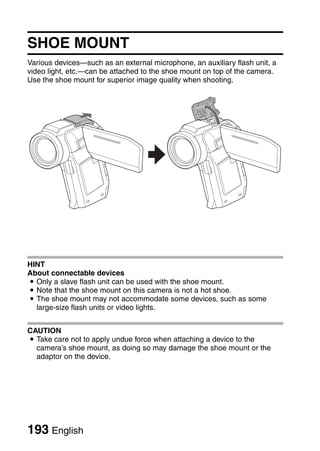
![ENJOY HIGHER IMAGE QUALITY
Connect to the S-VIDEO terminal
<When connecting to an S-VIDEO input terminal>
Dedicated S-AV
interface cable
Yellow plug:
Not connected*
To AC adaptor
COMPONENT/AV terminal
Set the input to
“VIDEO”.
CONNECTING TO A TV
i Insert the plug with the
[n] mark facing up. S-terminal
White plug: To Audio Input (L) terminal
Red plug: To Audio Input (R) terminal
* When connected, the images are not produced normally on the TV
monitor.
English 178](https://image.slidesharecdn.com/sanyovpchd1010-100209162153-phpapp01/85/Sanyo-Vpchd1010-title-chang-197-320.jpg)
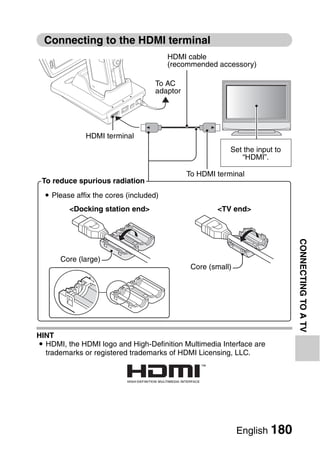
![ENJOY HIGHER IMAGE QUALITY
Connect to the 480p/720p/1080i terminal
If your TV has a 480p/720p/1080i input terminal, you can enjoy the high video
quality of component output from your camera.
Dedicated component cable
White plug:
To Audio Input (L) terminal
Red plug:
To Audio Input (R) terminal
To AC
adaptor
COMPONENT/AV terminal
Set the input to
i Insert the plug with the “VIDEO”.
[n] mark facing up.
To 480p/720p/1080i
input terminal
NOTE
If your TV does not have 480p/720p/1080i video input capability
i The images will not appear on the TV.
Camera Menu Screen and TV Menu Screen
i The Menu Screen appears only on the TV monitor, so please operate the
camera while looking at the TV monitor.
Insert and pull out the cable carefully
i When connecting the cables, make sure that the cable plugs are correctly
oriented and that they match the shapes of the terminal sockets on the
devices. Push the plugs in straight when connecting them. If undue force is
used to connect a cable, it may permanently damage the connector pins in
the terminal socket.
i Do not use excessive force when connecting and disconnecting cables.
179 English](https://image.slidesharecdn.com/sanyovpchd1010-100209162153-phpapp01/85/Sanyo-Vpchd1010-title-chang-198-320.jpg)
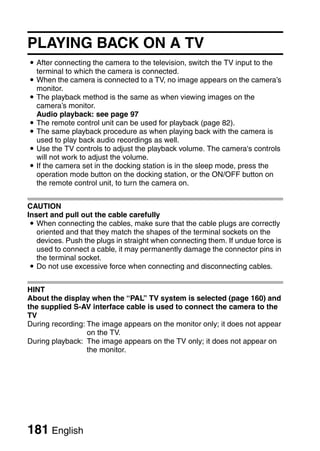
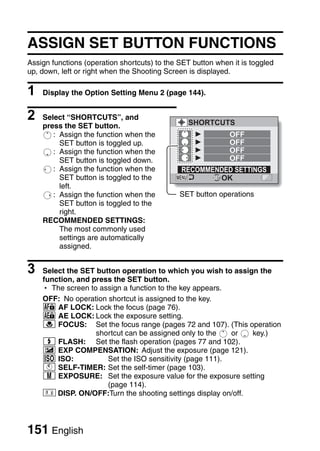
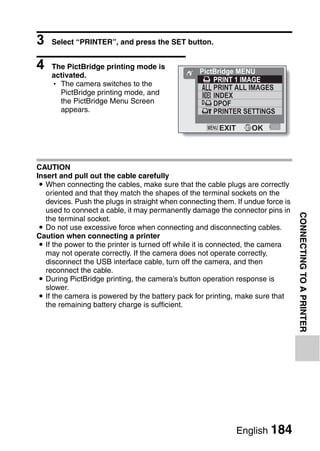
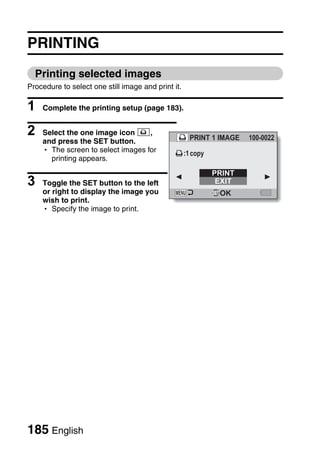
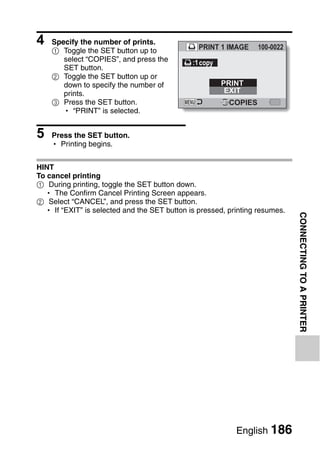
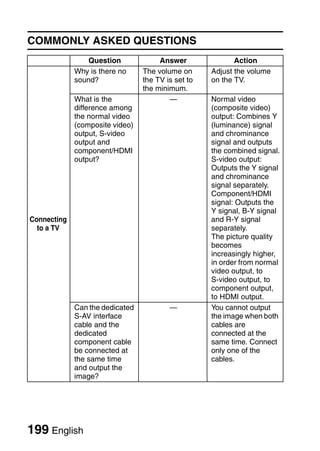
![CONNECTING TO A PRINTER
CONNECTING TO A PRINTER
PictBridge MODE
Your camera supports the PictBridge function. By connecting the camera
directly to a PictBridge-enabled printer, the camera’s monitor can be used to
select images and initiate printing (PictBridge printing).
1 Install the card in the camera, open the monitor unit to turn on the
camera, and turn on the printer.
2 Use the supplied docking station to connect the camera to the
printer.
To AC adaptor
USB terminal
USB CONNECTION
To USB connector
COMPUTER
PRINTER Dedicated USB interface cable
CANCEL i Insert the plug with the [n] mark facing
up.
CANCEL OK
183 English](https://image.slidesharecdn.com/sanyovpchd1010-100209162153-phpapp01/85/Sanyo-Vpchd1010-title-chang-202-320.jpg)

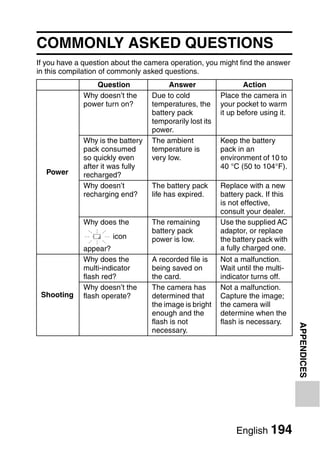
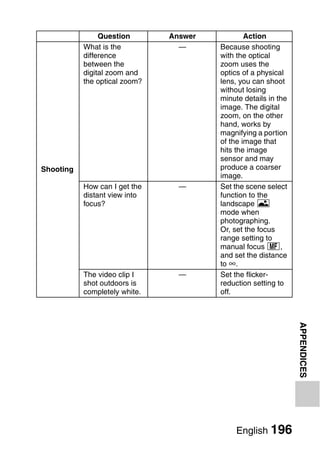
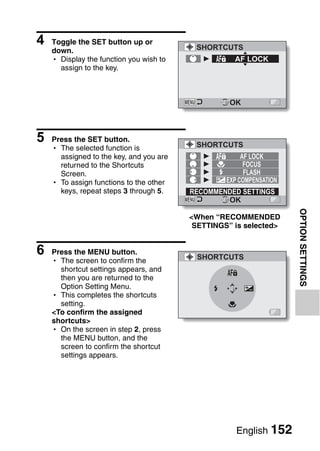
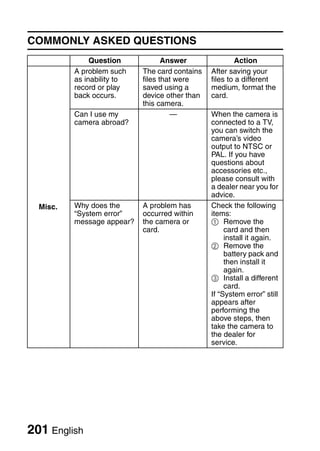
![COMMONLY ASKED QUESTIONS
Question Answer Action
When used in Condition due to Not a malfunction.
cold weather, why the monitor Spots that appear in
does the image characteristics. the monitor only
seem to leave appear in the
traces as it monitor and will not
moves? be recorded with the
Monitor Why does the images.
displayed image
contain some red,
blue and green
dots, or why are
black spots
visible?
Why is the image The subject was When capturing an
too bright? too bright. image, devise a way
to compensate for a
bright subject, for
example, by
changing the
shooting angle.
Why is the image The focus is not Hold the camera
out of focus? locked properly. correctly and slowly
Viewing press the [ ]
images button halfway to
lock the focus. Then
press the [ ]
button all the way to
capture the image.
Why is a part of The image was When capturing an
the image captured at close image at close
missing? range. range, compose the
image using the
monitor.
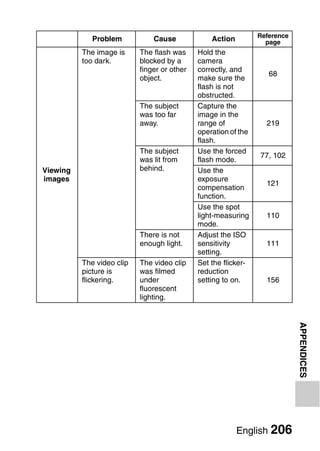
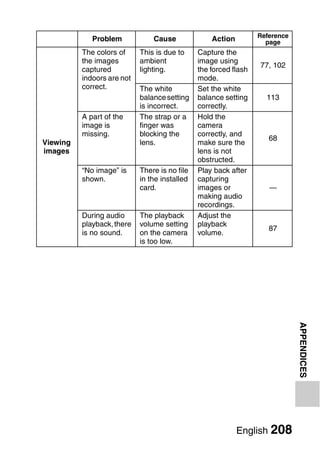
197 English](https://image.slidesharecdn.com/sanyovpchd1010-100209162153-phpapp01/85/Sanyo-Vpchd1010-title-chang-216-320.jpg)
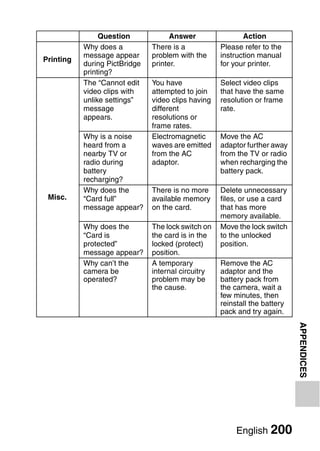
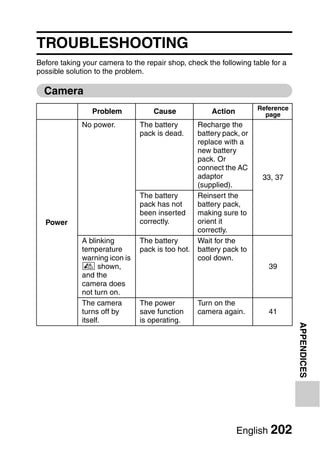
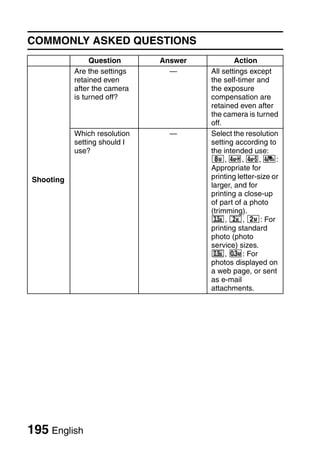
![TROUBLESHOOTING
Reference
Problem Cause Action page
An image is The power is If the power
not captured not turned on. save function
when the was activated,
[ ] button or turn on the
[ ] button is camera before
pressed. shooting. 41
If the camera
was turned off,
press the ON/
OFF button to
Shooting turn it on.
The maximum Install a new
27
number of card.
images that Delete the
can be images that are
captured or the not necessary.
maximum
video clip 88
recording time
has been
reached.
203 English](https://image.slidesharecdn.com/sanyovpchd1010-100209162153-phpapp01/85/Sanyo-Vpchd1010-title-chang-222-320.jpg)
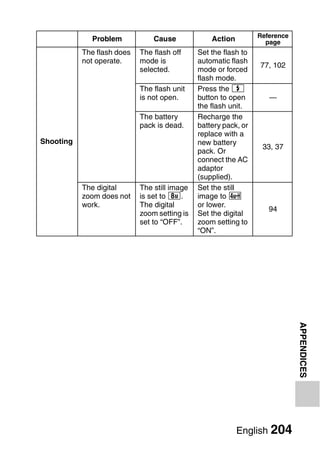
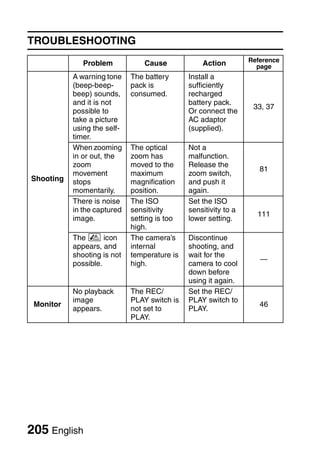
![TROUBLESHOOTING
Reference
Problem Cause Action page
The image is The forced Select a
too bright. flash mode is different flash 77, 102
selected. mode.
The subject Use the
was too bright. exposure
121
compensation
function.
The ISO Set the ISO
sensitivity sensitivity to
111
setting is =.
incorrect.
The image is The subject is Capture the
not in focus. too close to the image with the
camera. subject within
The focus the
setting is not photographable
72, 109
Viewing correct. range.
images Select the
correct focus
setting for your
needs.
The camera Hold the
moved when camera
the [ ] correctly and
button was slowly press
pressed. the [ ]
(camera button halfway
68, 75
shake) to lock the
The focus is focus. Then
not locked press the [ ]
properly. button all the
way to capture
the image.
The lens is Clean the lens.
—
dirty.
207 English](https://image.slidesharecdn.com/sanyovpchd1010-100209162153-phpapp01/85/Sanyo-Vpchd1010-title-chang-226-320.jpg)
![Reference
Problem Cause Action page
The camera is The AC Check that the
set in the adaptor is not power cord of
docking station connected to the AC adaptor 29
but the the docking is connected
installed station. correctly.
battery is not The camera is When inserting
being not correctly the camera in
recharged. connected to the docking
the docking station, push
station. down on it to
make sure that 29, 35
the connection
between the
Charging camera and the
docking station
is secure.
The camera is Turn the
turned on. camera off.
Alternatively,
press the
docking
station’s 224
operation
mode button
[ ] to light
the multi-
indicator red.
The “No card” No card is Turn off the
message inserted. power and 27
appears. insert a card.
The “Image is You have Set the protect
APPENDICES
Misc. protected” attempted to setting for the
message delete a file file to UNLOCK.
appears and that is 124
the file cannot protected from
be deleted. accidental
erasure.
English 210](https://image.slidesharecdn.com/sanyovpchd1010-100209162153-phpapp01/85/Sanyo-Vpchd1010-title-chang-229-320.jpg)
![SPECIFICATIONS
Minimum subject 9 lux (1/30 sec in the scene select AUTO mode)
illumination 3 lux (1/15 sec in the HIGH SENSITIVITY or lamp
mode)
Image stabilizer Movie: Electronic
Still image: Multi-calculation electronic
Monitor 2.7" (6.9 cm) low-temperature polysilicon TFT color
wide liquid crystal (transmissive), approx.
230,000 pixels
Flash working GN = 6.2
range Approx. 20 cm (7.87 in.) to 6.0 m (19.69 ft.)
(Wide)
Approx. 1.0 m (3.28 ft.) to 5.0 m (16.40 ft.) (Tele)
Flash modes Auto-flash, forced flash, flash off, red-eye reduction
Focus TTL-type AF (still image shooting mode: 9-point
range finder/spot focus; video clip recording mode:
Continuous focus), manual focus (22 steps)
Self-timer Approx. 2-second delay, 10-second delay
Ambient Temperature 0 to 40 °C (32 to 104°F) (operation),
environment –20 to 60 °C (–4 to 140°F) (storage)
Humidity 30 to 90% (operating, no
condensation)
10 to 90% (storage, no
condensation)
Power supply Battery pack Li-ion battery pack (DB-L50) ×1
(supplied)
AC adaptor VAR-G8
(supplied)
Power consumption 4.2 W (When using the Li-ion
battery during recording)
Dimensions (excluding protrusions) 90 (W) × 112.6 (H) × 54.5 (D) mm
3.54 (W) × 4.43 (H) × 2.15 (D) in.
(Maximum dimensions)
Volumetric capacity: Approx. 272 cc
Weight Approx. 268 g (9.5 oz.) (camera
only [without battery pack and
card])
219 English](https://image.slidesharecdn.com/sanyovpchd1010-100209162153-phpapp01/85/Sanyo-Vpchd1010-title-chang-238-320.jpg)
![Camera connectors
[COMPONENT/ Regrouped jack
AV] (480p/ Audio 265 mVrms (–9 dBs), 12 kΩ or less, stereo
1080i/720p output
output) terminal*
Video 1.0 Vp-p, 75 Ω unbalanced, sync negative,
output composite video
NTSC color TV system/PAL color TV system
(switchable from the Option Screen)
S-video Y signal: 1.0 Vp-p, 75 Ω, unbalanced, sync
output negative
C signal: 0.286 Vp-p, 75 Ω, unbalanced
NTSC color TV system/PAL color TV system
(switchable from the Option Setting Menu)
For 480p/1080i/720p video output
Y signal: 1.0 Vp-p/75 Ω unbalanced, tri-level sync
Pb and Pr signals: 0.7 Vp-p/75 Ω unbalanced
[HDMI] terminal* Video output
Total number of scan lines (effective number of scan
lines): 750p (720p)/1125i (1080i)/525p (480p)
Audio output: L-PCM 48 kHz sampling
[USB] terminal* USB 2.0 High-speed
[MIC] ø2.5 mm stereo mini jack (converts to a ø3.5 mm
(microphone stereo mini jack by the supplied microphone connection
input) terminal cable), 2 kΩ.
Sensitivity: less than –42 dB (plug-in power type
microphone)
Headphone jack ø3.5 mm mini-jack (stereo headphone jack, impedance
16 Ω to 32 Ω)
Audio 310 mVrms (–8 dBs), 47 kΩ, stereo
output
DC IN (external DC 5 V (for exclusive use with the supplied AC adaptor
APPENDICES
DC power input) [VAR-G8])
terminal
* Via the docking station
English 220](https://image.slidesharecdn.com/sanyovpchd1010-100209162153-phpapp01/85/Sanyo-Vpchd1010-title-chang-239-320.jpg)
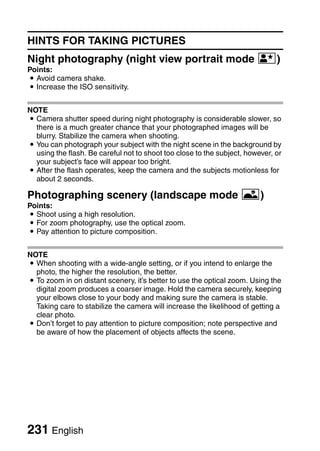
![HINTS FOR TAKING PICTURES
Taking great pictures in difficult surroundings is easier than you might think.
By keeping a few points in mind and choosing the correct settings, you can
create photos that you’ll be proud to display and share.
If images are blurred even when the autofocus is
used
Your camera employs an autofocus function. When you snap a picture using
the autofocus, the camera automatically adjusts the settings so that the
image will be in focus. If you are getting blurred images even when using the
autofocus, one or more of the following might be the reason.
k How the autofocus works
The autofocus is activated when the [ ] button is gently pressed halfway.
Press the [ ] button slightly, and the target mark will appear on the monitor
to indicate that the autofocus has been activated. Next, continue to gently
press the [ ] button all the way to snap the picture. This two-step method is
the way to ensure that your photos are perfectly focused.
k Reasons for unfocused images
1 The [ ] button was pressed all the way in one step.
2 After the image was focused, the subject moved.
h Even if camera focuses the subject once, if the distance between the
camera and the subject is changed, the subject may become out of
focus.
3 The focus setting is not set for the correct distance.
h If you shoot a close-up subject with the camera set to the normal focus
mode, or if you shoot a subject at normal distance with the camera set
to the super macro (close-up) mode (pages 72 and 107), the image will
not be in focus.
k Preventing blurred images
APPENDICES
1 Confirm that the camera is set to the correct focus mode for your subject.
2 Hold the camera correctly, and press the [ ] button halfway.
3 Wait for the target mark to appear in the monitor, and holding the camera
steady, gently continue to press the [ ] button all the way down.
Following these steps for a gentle but firm pressing of the [ ] button will
ensure that you get beautifully focused photos.
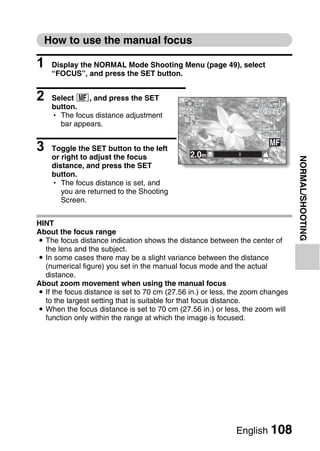
English 228](https://image.slidesharecdn.com/sanyovpchd1010-100209162153-phpapp01/85/Sanyo-Vpchd1010-title-chang-247-320.jpg)
![HINTS FOR TAKING PICTURES
Photographing a moving subject
Situation: You would like to snap an action shot of a moving child or pet. The
autofocus is activated, but because the subject is moving, the image may be
blurred. In particular, when the distance between the camera and the subject
is changing, it is difficult to lock the focus on the subject. Here are some hints
for successfully capturing images of moving subjects.
k Reasons for unfocused images
When the [ ] button is gently pressed halfway, the camera’s autofocus
works by determining the distance between the camera and the subject.
Once the subject is in focus, if it then moves before the picture is snapped,
the image may be out of focus. This often happens when you once lock the
focus on a subject and then wait for the right moment to snap the picture.
And, conversely, a blurred image may result if you press the [ ] button all
the way in one step in an attempt to quickly capture an action scene, thus
failing to activate the autofocus in time.
k Preventing blurred images (How to use the manual focus [page 108])
In addition to the autofocus, a manual focus mode is also incorporated in your
camera. In the autofocus mode, the distance between the camera and the
subject is automatically determined when you press the [ ] button halfway.
In contrast to this, with the manual focus mode, you manually set the focus by
specifying the correct distance between the camera and the subject before
taking the picture.
k How to photograph a moving subject
1 Set the camera’s focus mode to the manual focus. Set the focus distance
to the correct distance between the camera and the subject.
2 When the subject is at the set focus distance, gently press the [ ]
button all the way down.
<Advantage of using the manual focus>
i Images can be quickly captured without waiting for the autofocus to
activate.
i Because you are presetting the focus distance, the focus can be more
accurate.
<Using the manual focus effectively>
i When photographing a moving subject, press the [ ] button just before
the subject reaches the focus distance, and the shutter will be released
when the subject is at the correct distance.
i Use manual focus to avoid incorrectly focused images when there is an
object between the camera and the subject you wish to focus on.
229 English](https://image.slidesharecdn.com/sanyovpchd1010-100209162153-phpapp01/85/Sanyo-Vpchd1010-title-chang-248-320.jpg)
![Shooting portraits (portrait mode >)
Points:
i Choose a background that doesn’t detract from your subject.
i Move in close to your subject.
i Pay attention to lighting and how it affects your subject.
NOTE
i If the background is distracting, it will not show your subject to his best
advantage. Move in closer to your subject or zoom in so that the
background does not compete with the subject.
i In portrait photography your subject is clearly the central figure, so try
techniques that allow the subject to stand out.
i If light is coming from behind your subject (backlit), his face will appear
dark. You can get a better picture by using the flash, for example, or
changing the exposure compensation setting.
Photographing moving subjects (sports mode a)
Points:
i Match the camera’s movement with that of the subject.
i Set the zoom to the Wide end (wide-angle).
i Don’t be too hesitant to press the [ ] button, or you’ll miss the action.
NOTE
i Tips to not missing those great action shots: Make sure you’re holding the
camera correctly. Keep the subject in the lens at all times, moving the
camera with him while waiting for the right shot. Move your whole body–not
just your arms–with the camera while shooting.
i Blurred images are more likely when the zoom is set to the Tele end than
the Wide end. Set the zoom as close as possible to the Wide end.
i Learn to press the [ ] button quickly yet smoothly the instant your photo
chance occurs.
APPENDICES
English 230](https://image.slidesharecdn.com/sanyovpchd1010-100209162153-phpapp01/85/Sanyo-Vpchd1010-title-chang-249-320.jpg)