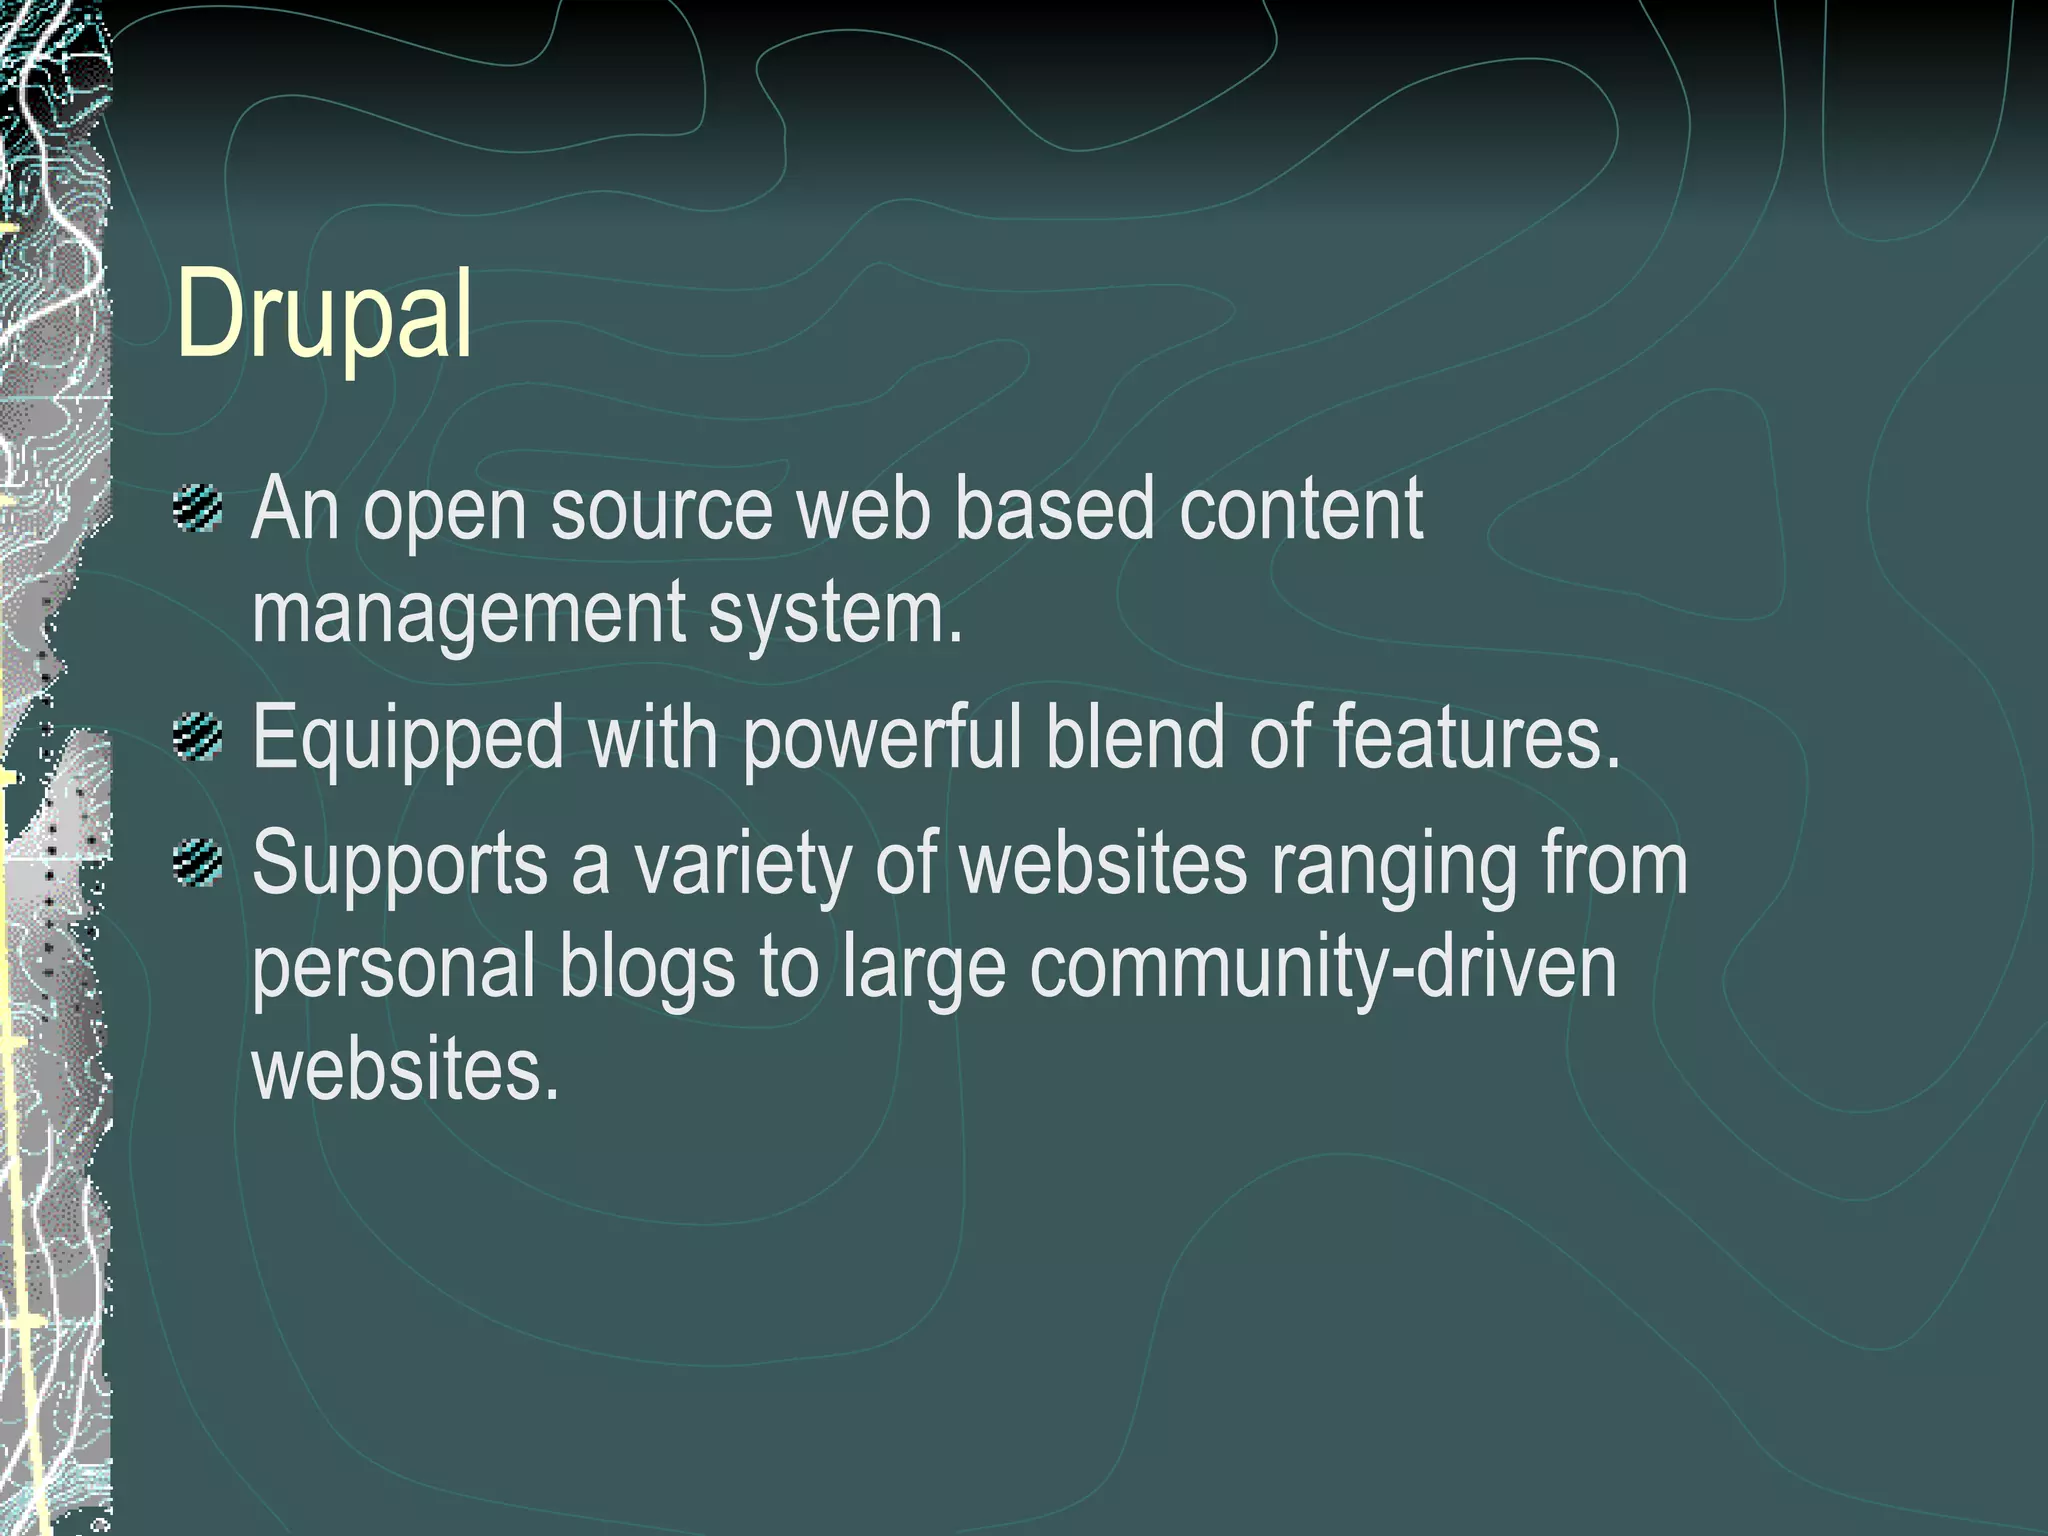
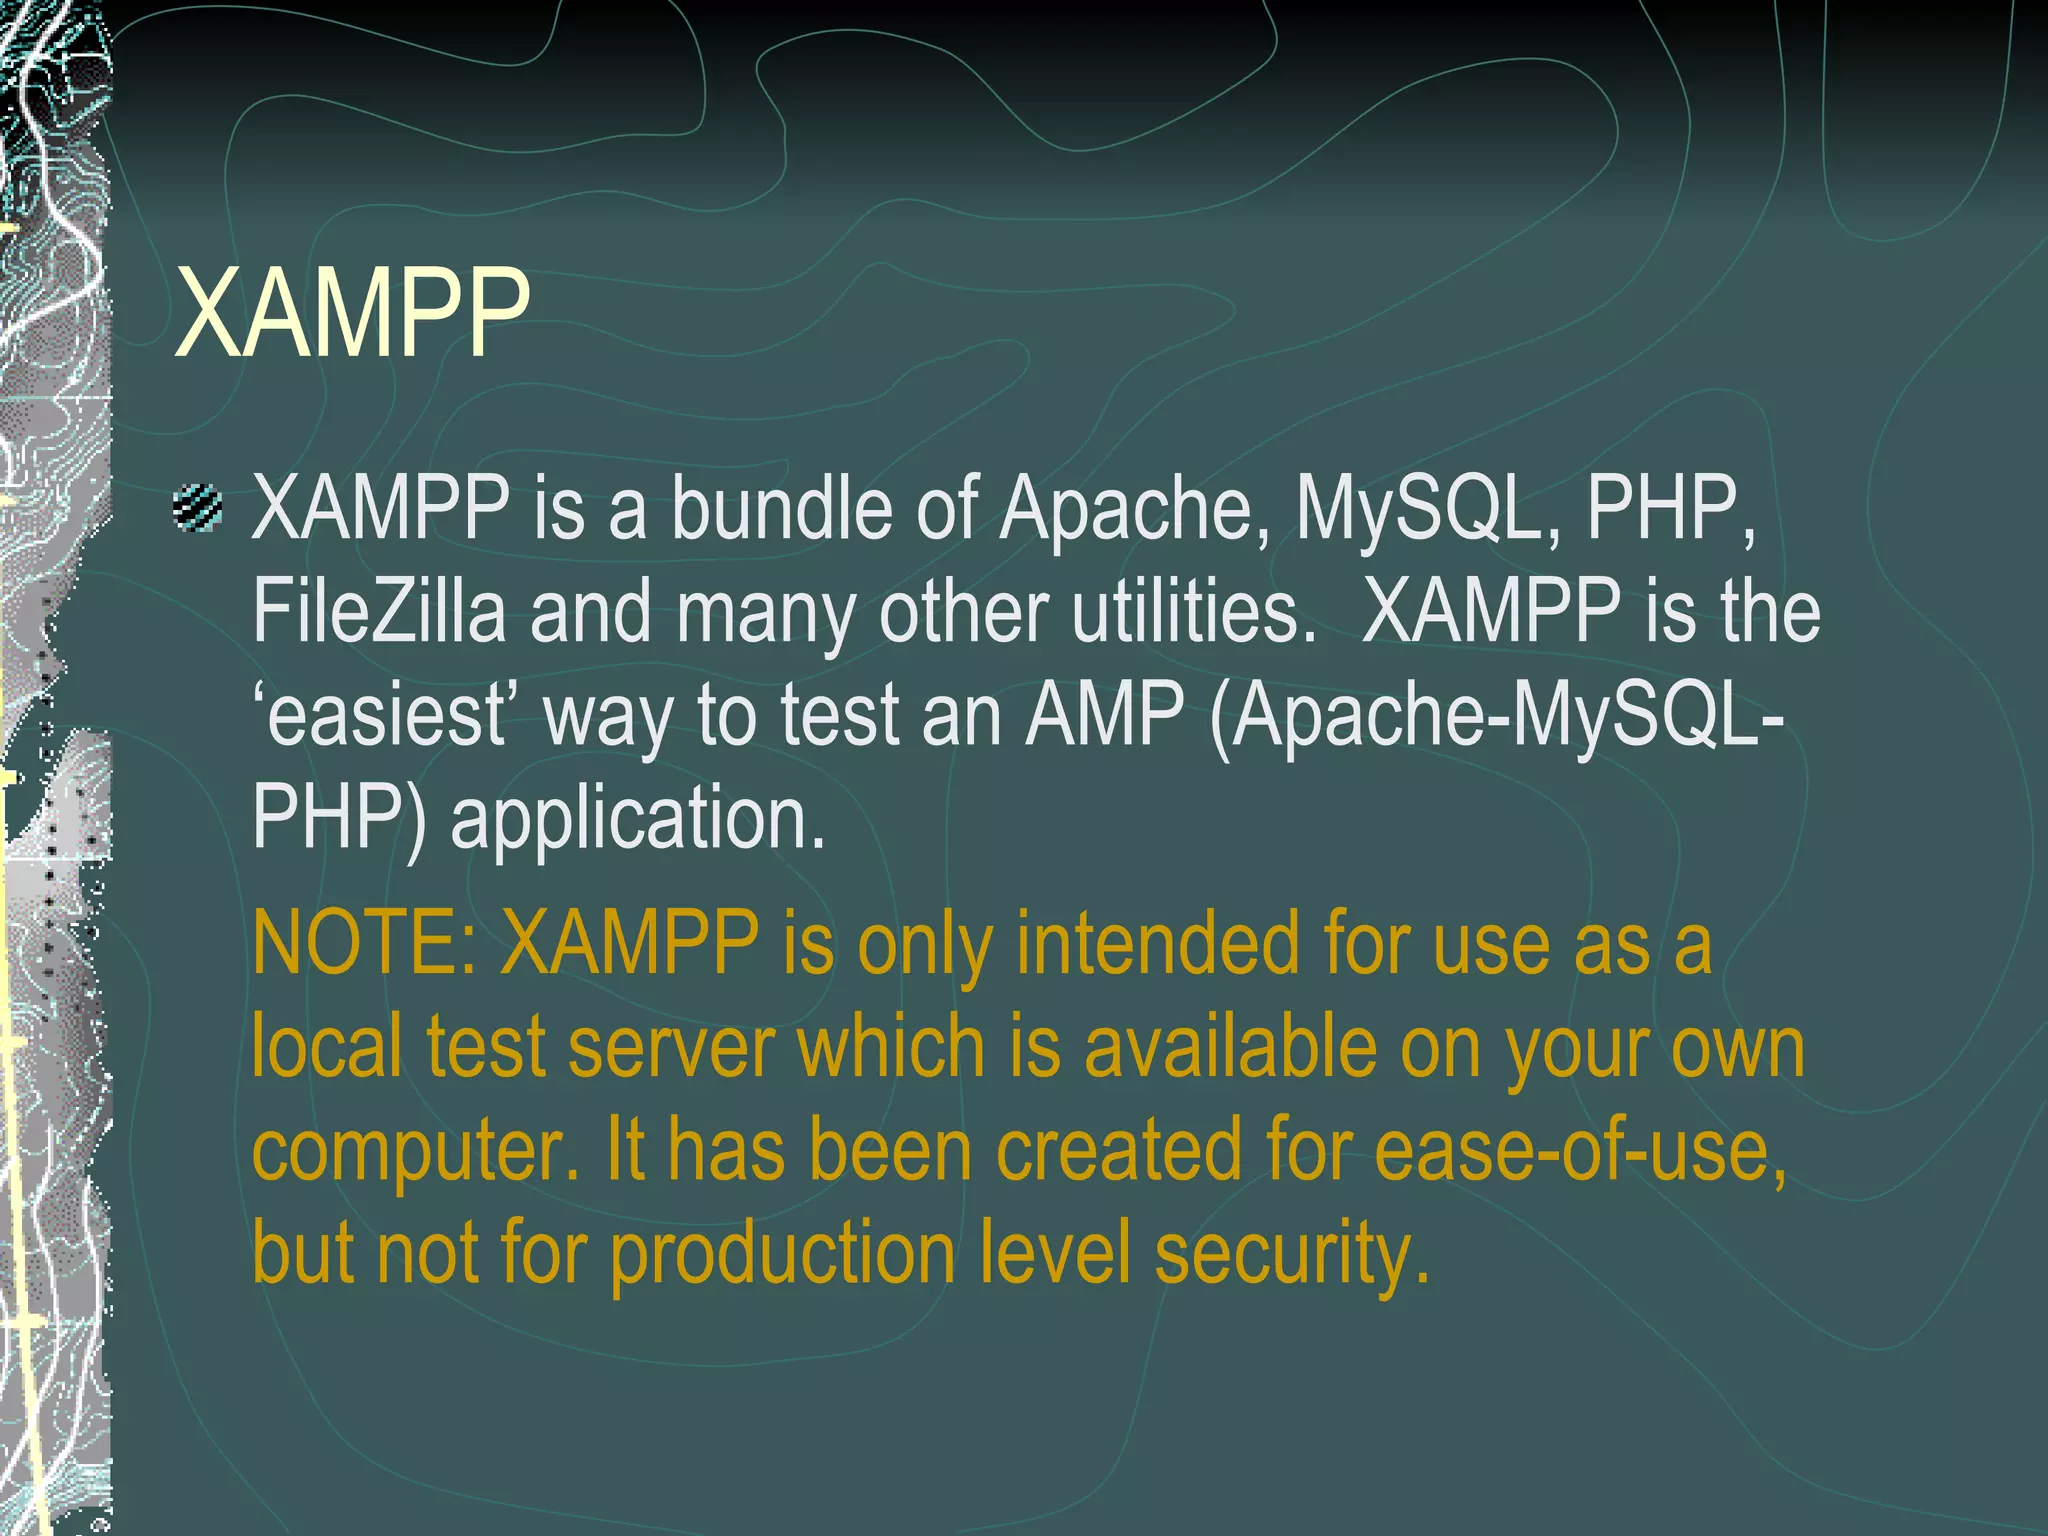
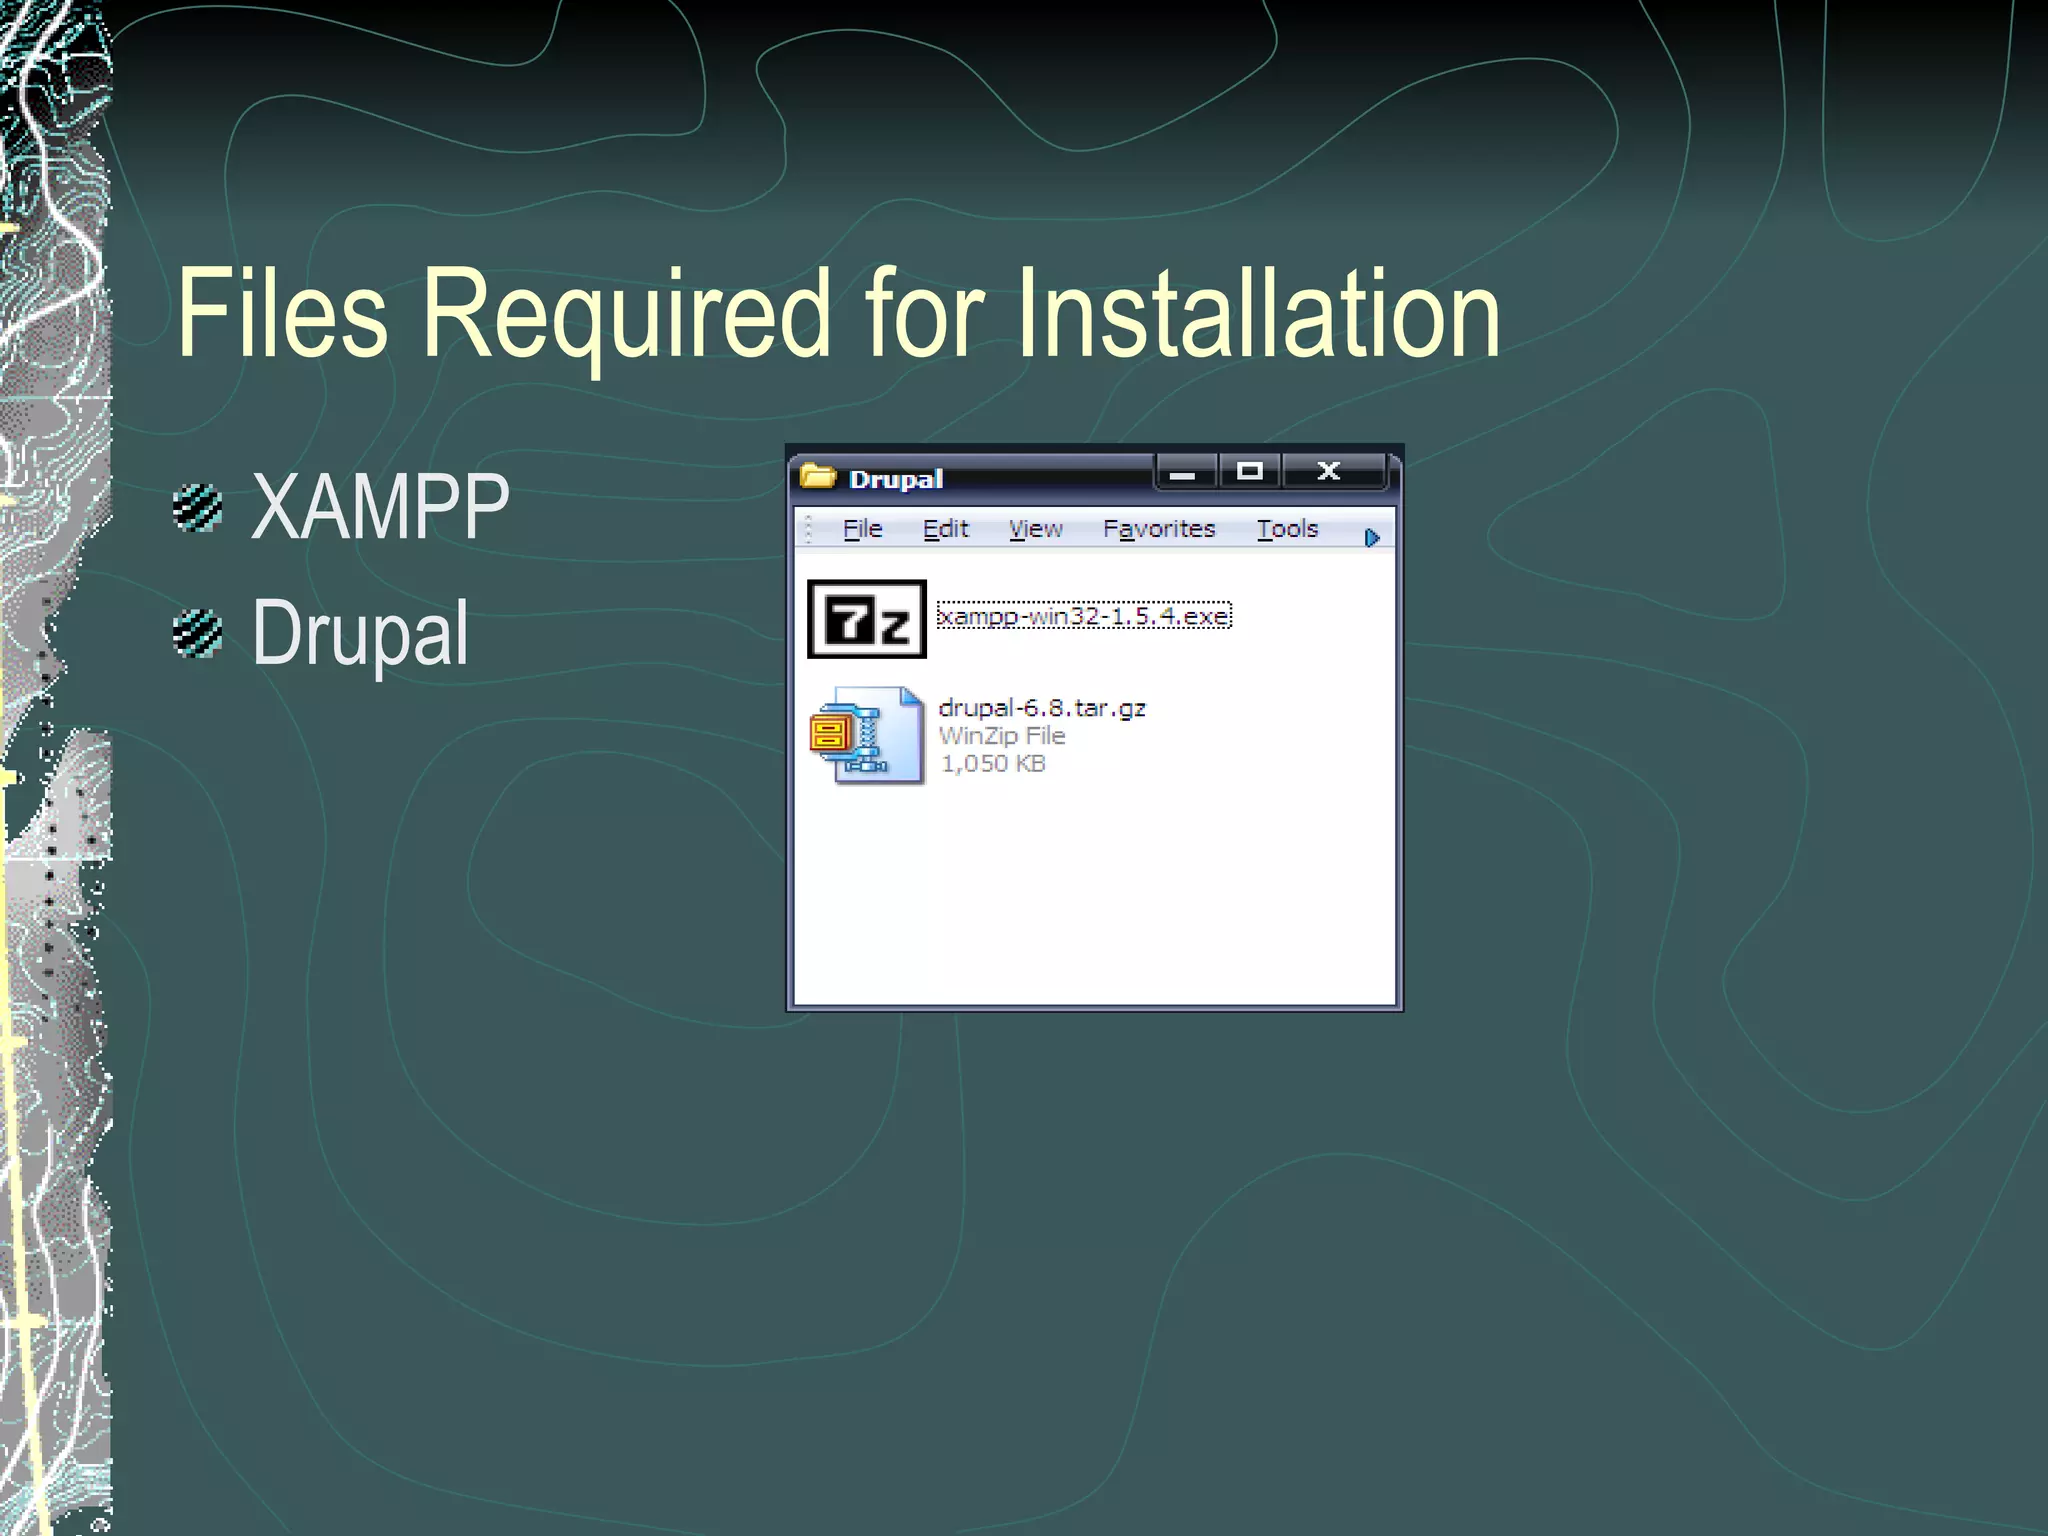
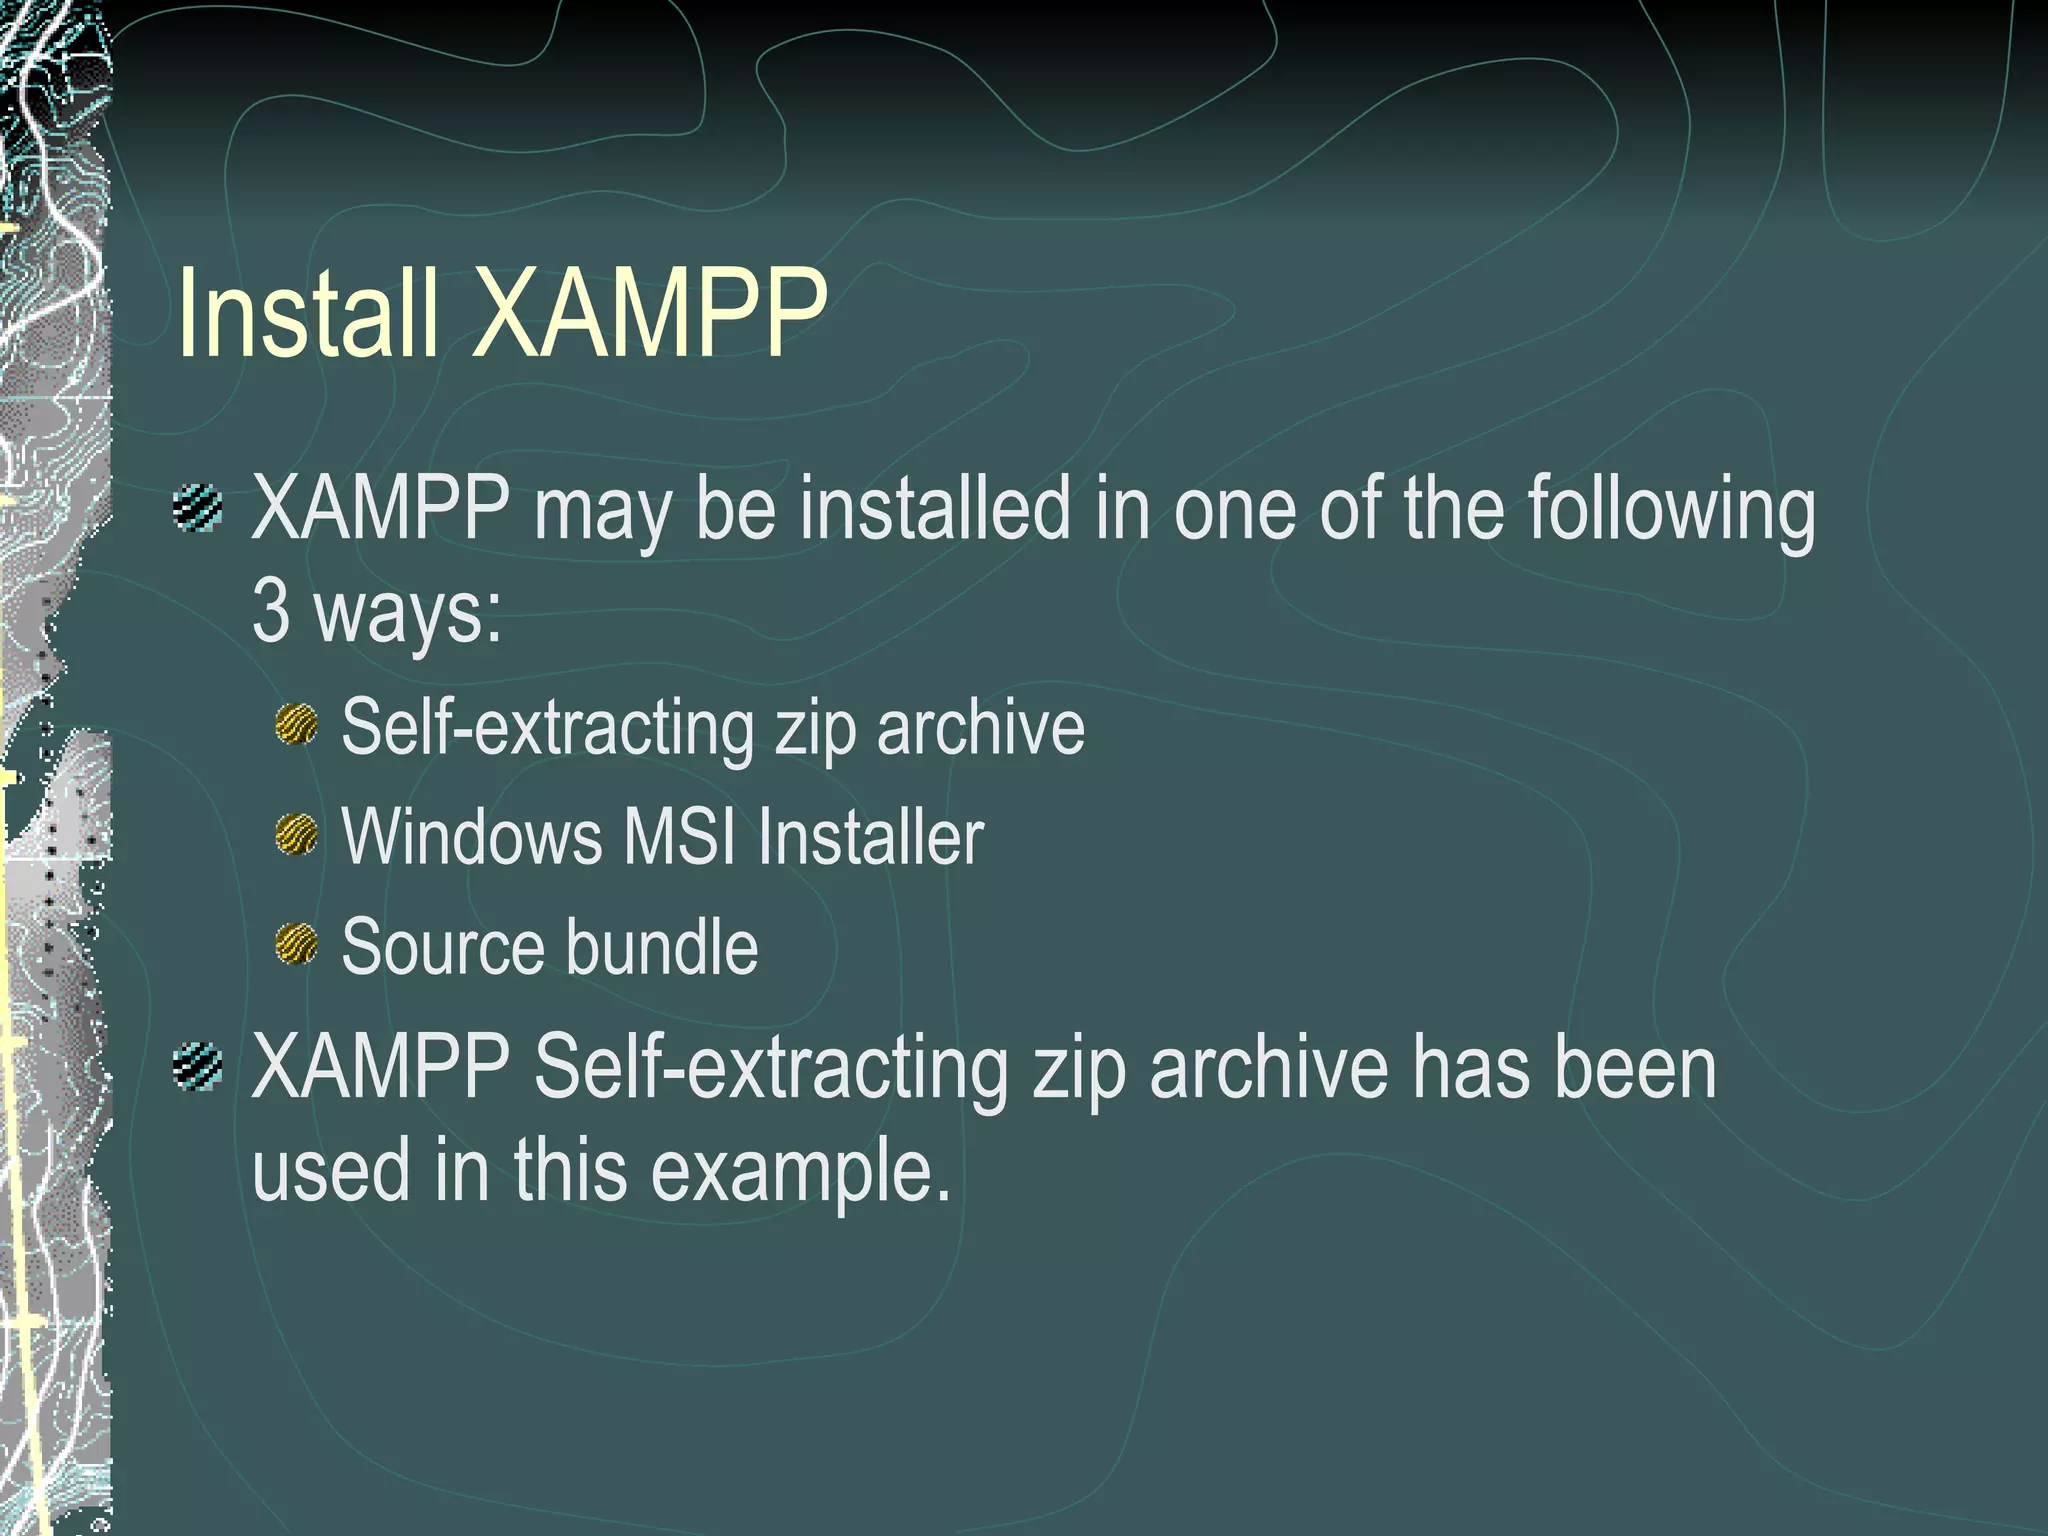
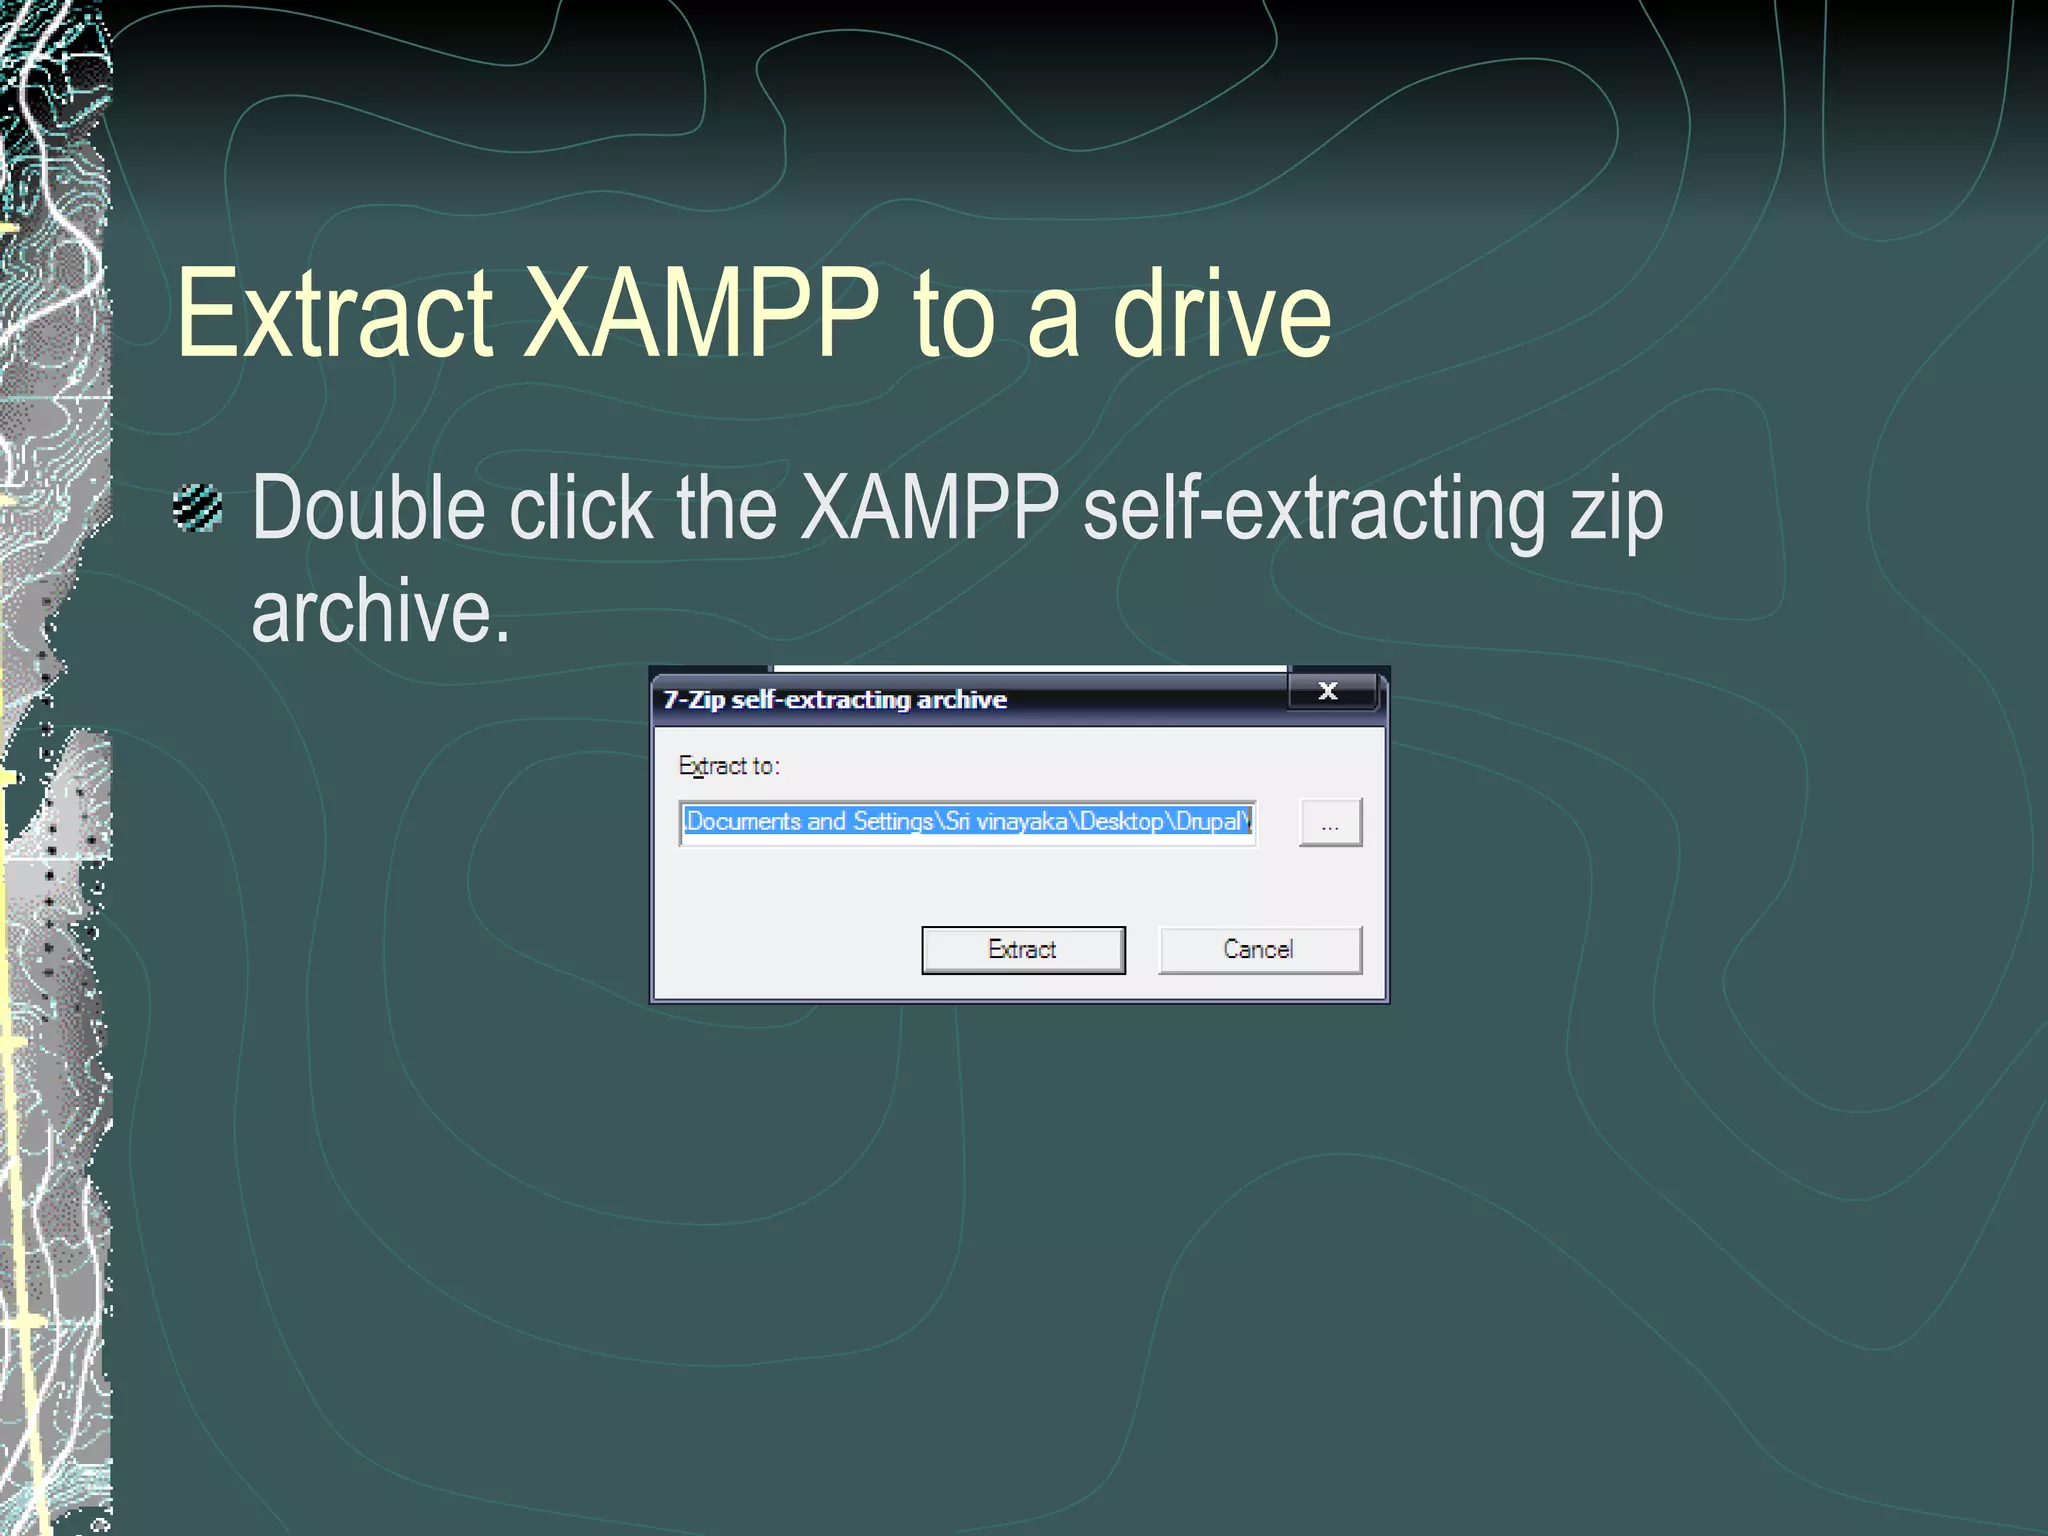
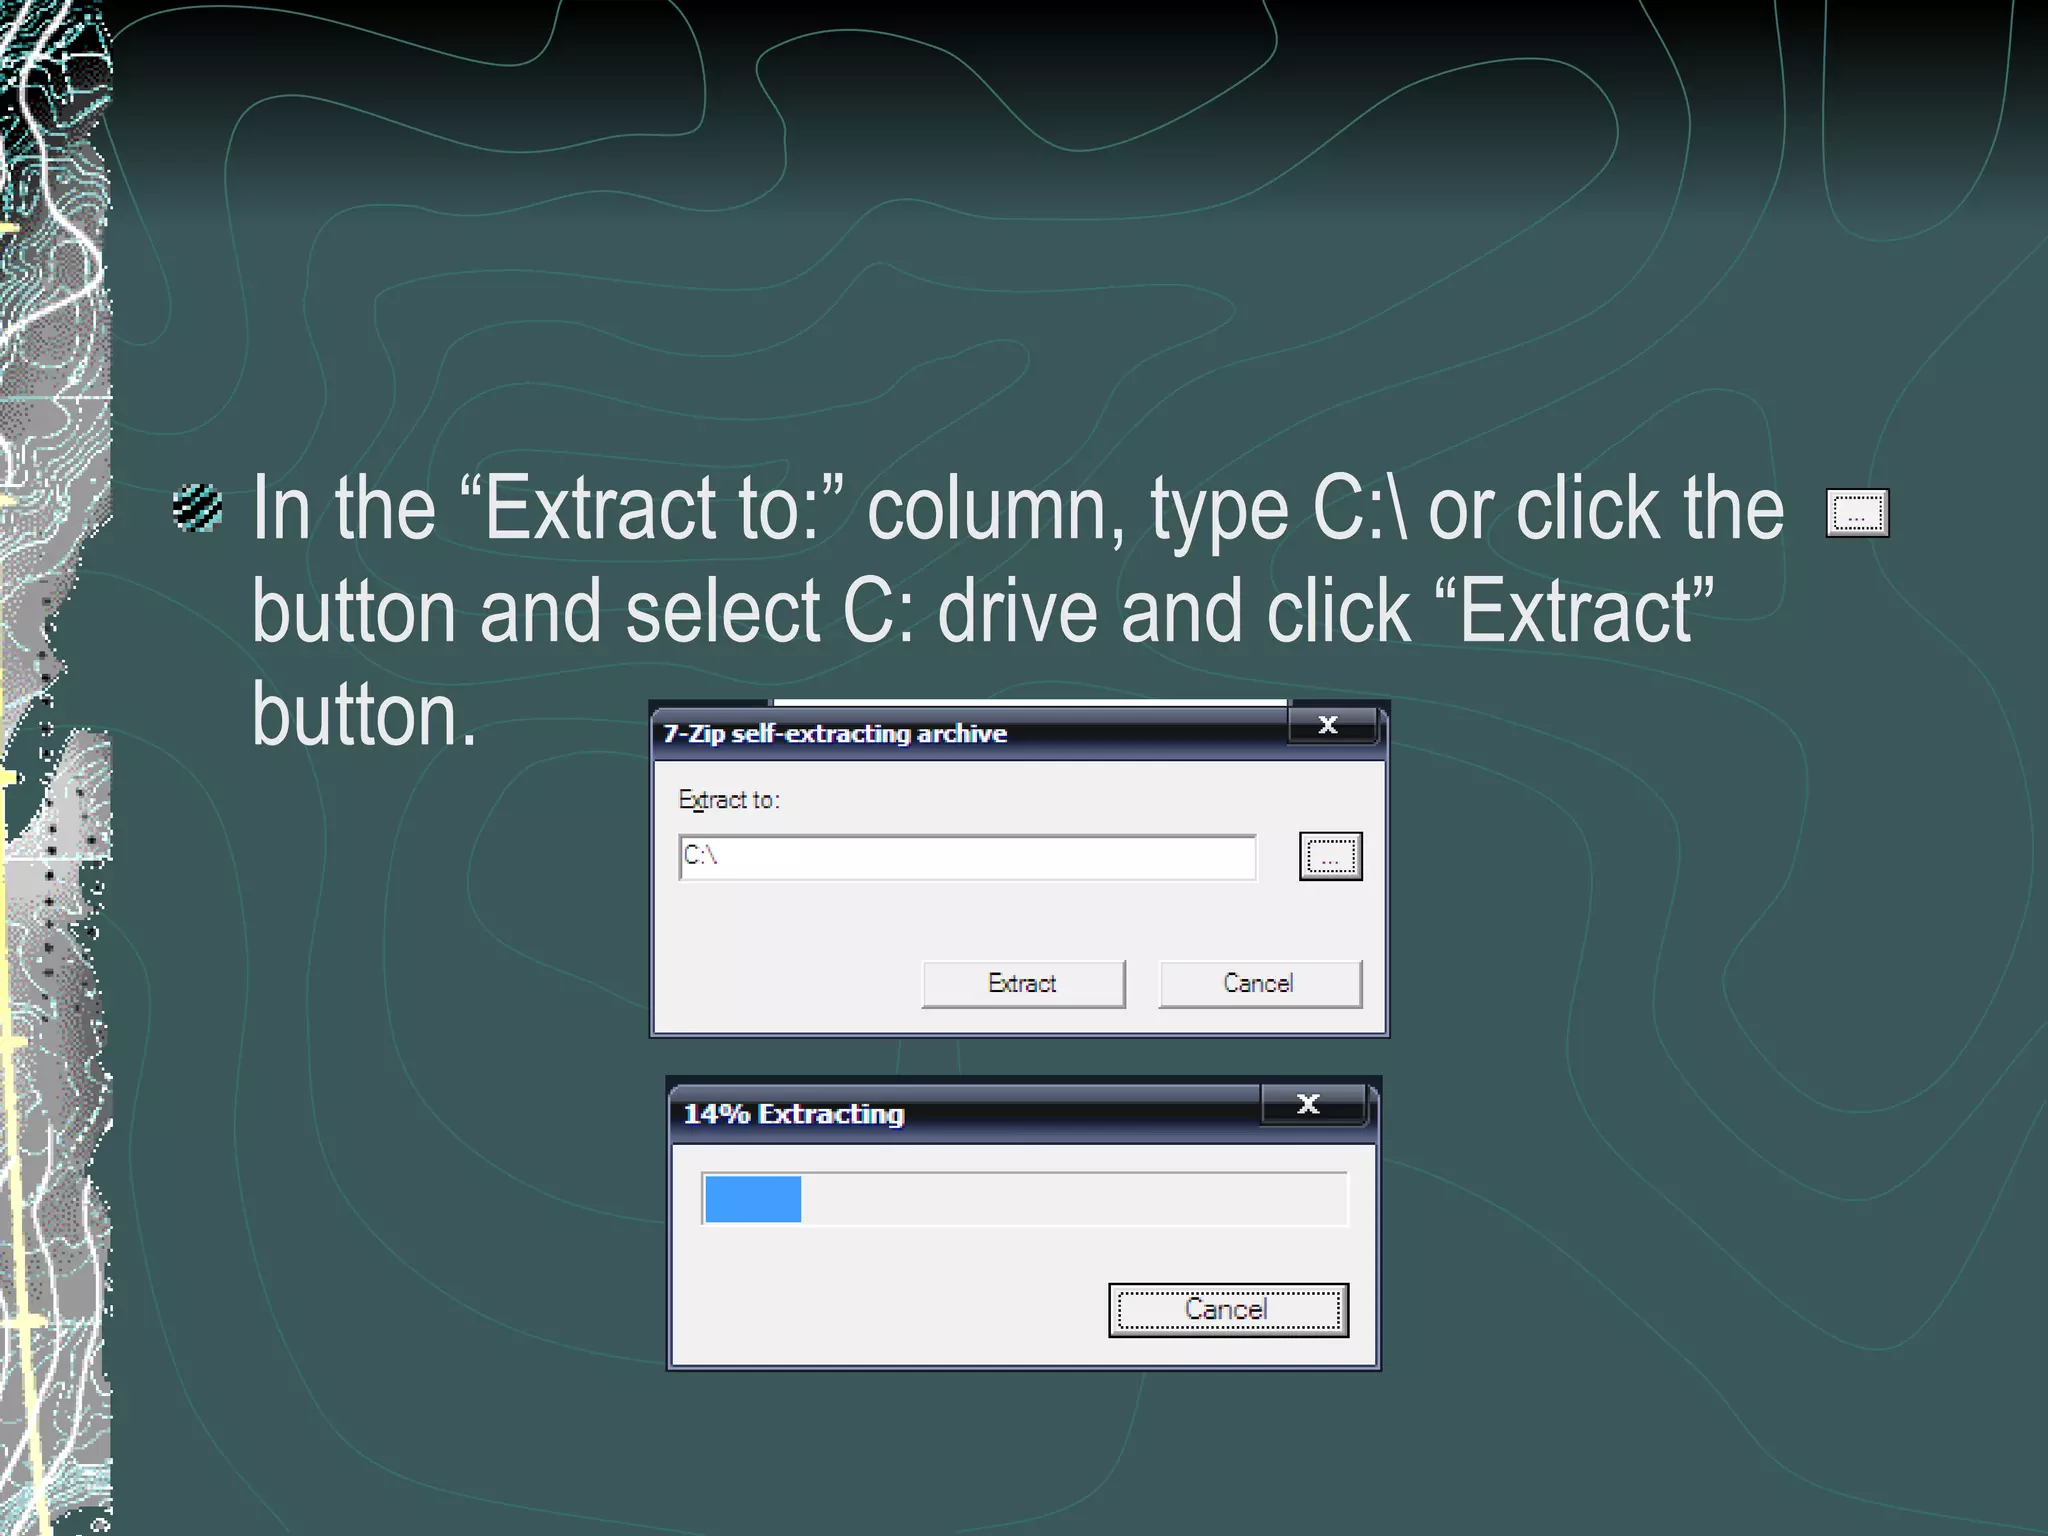
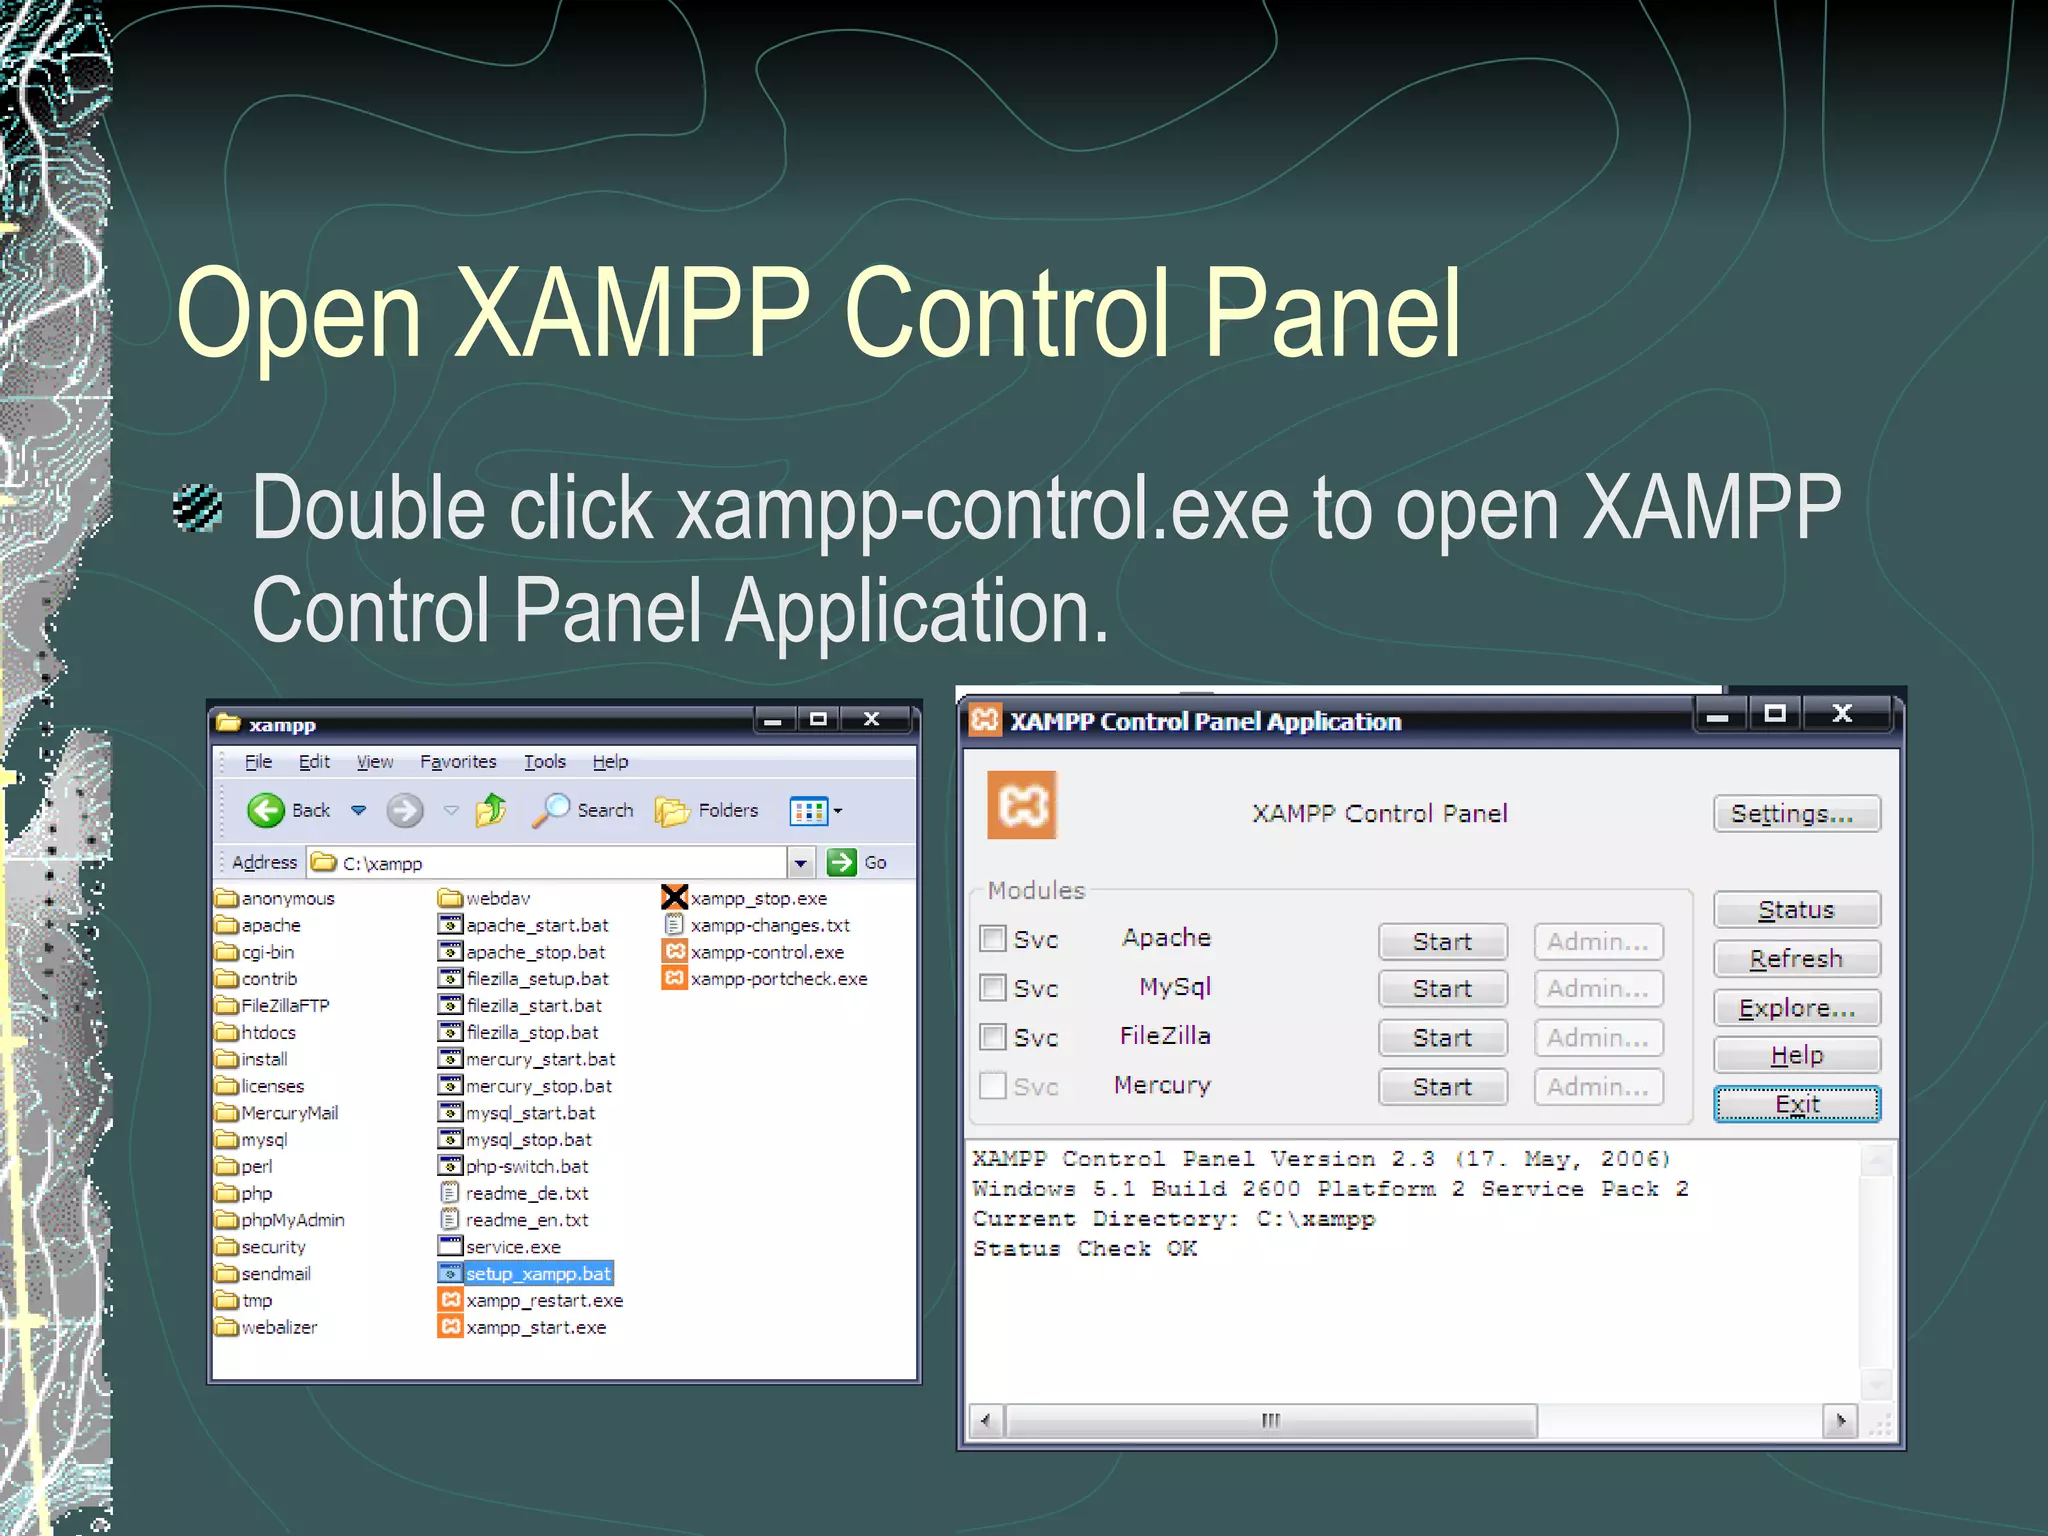
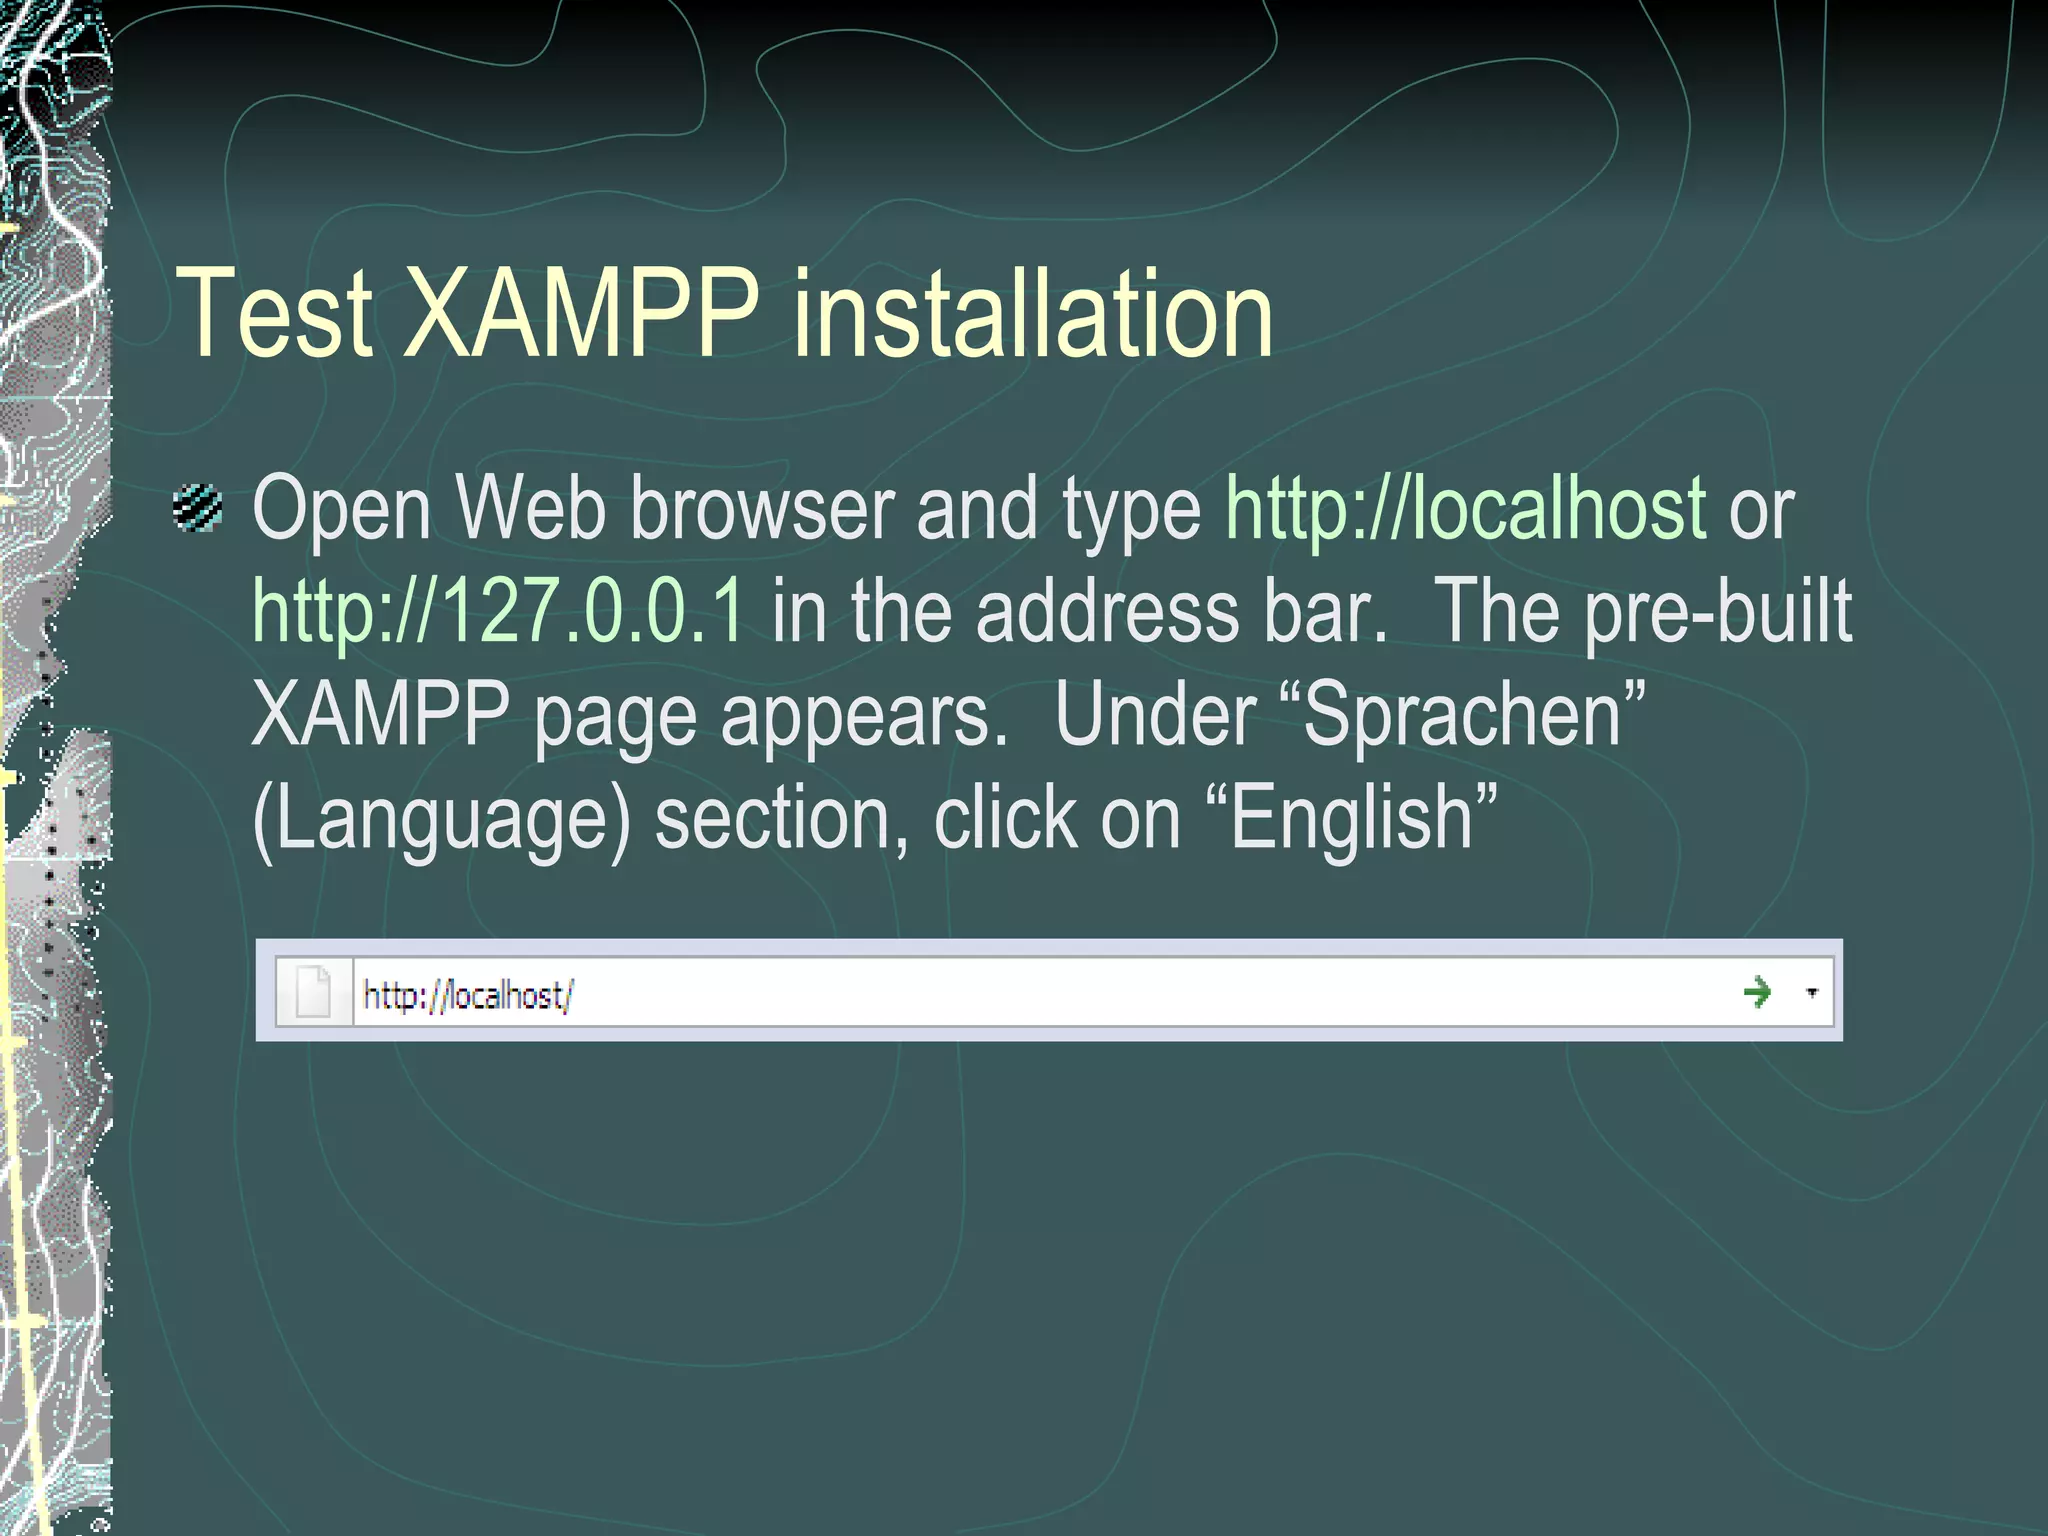
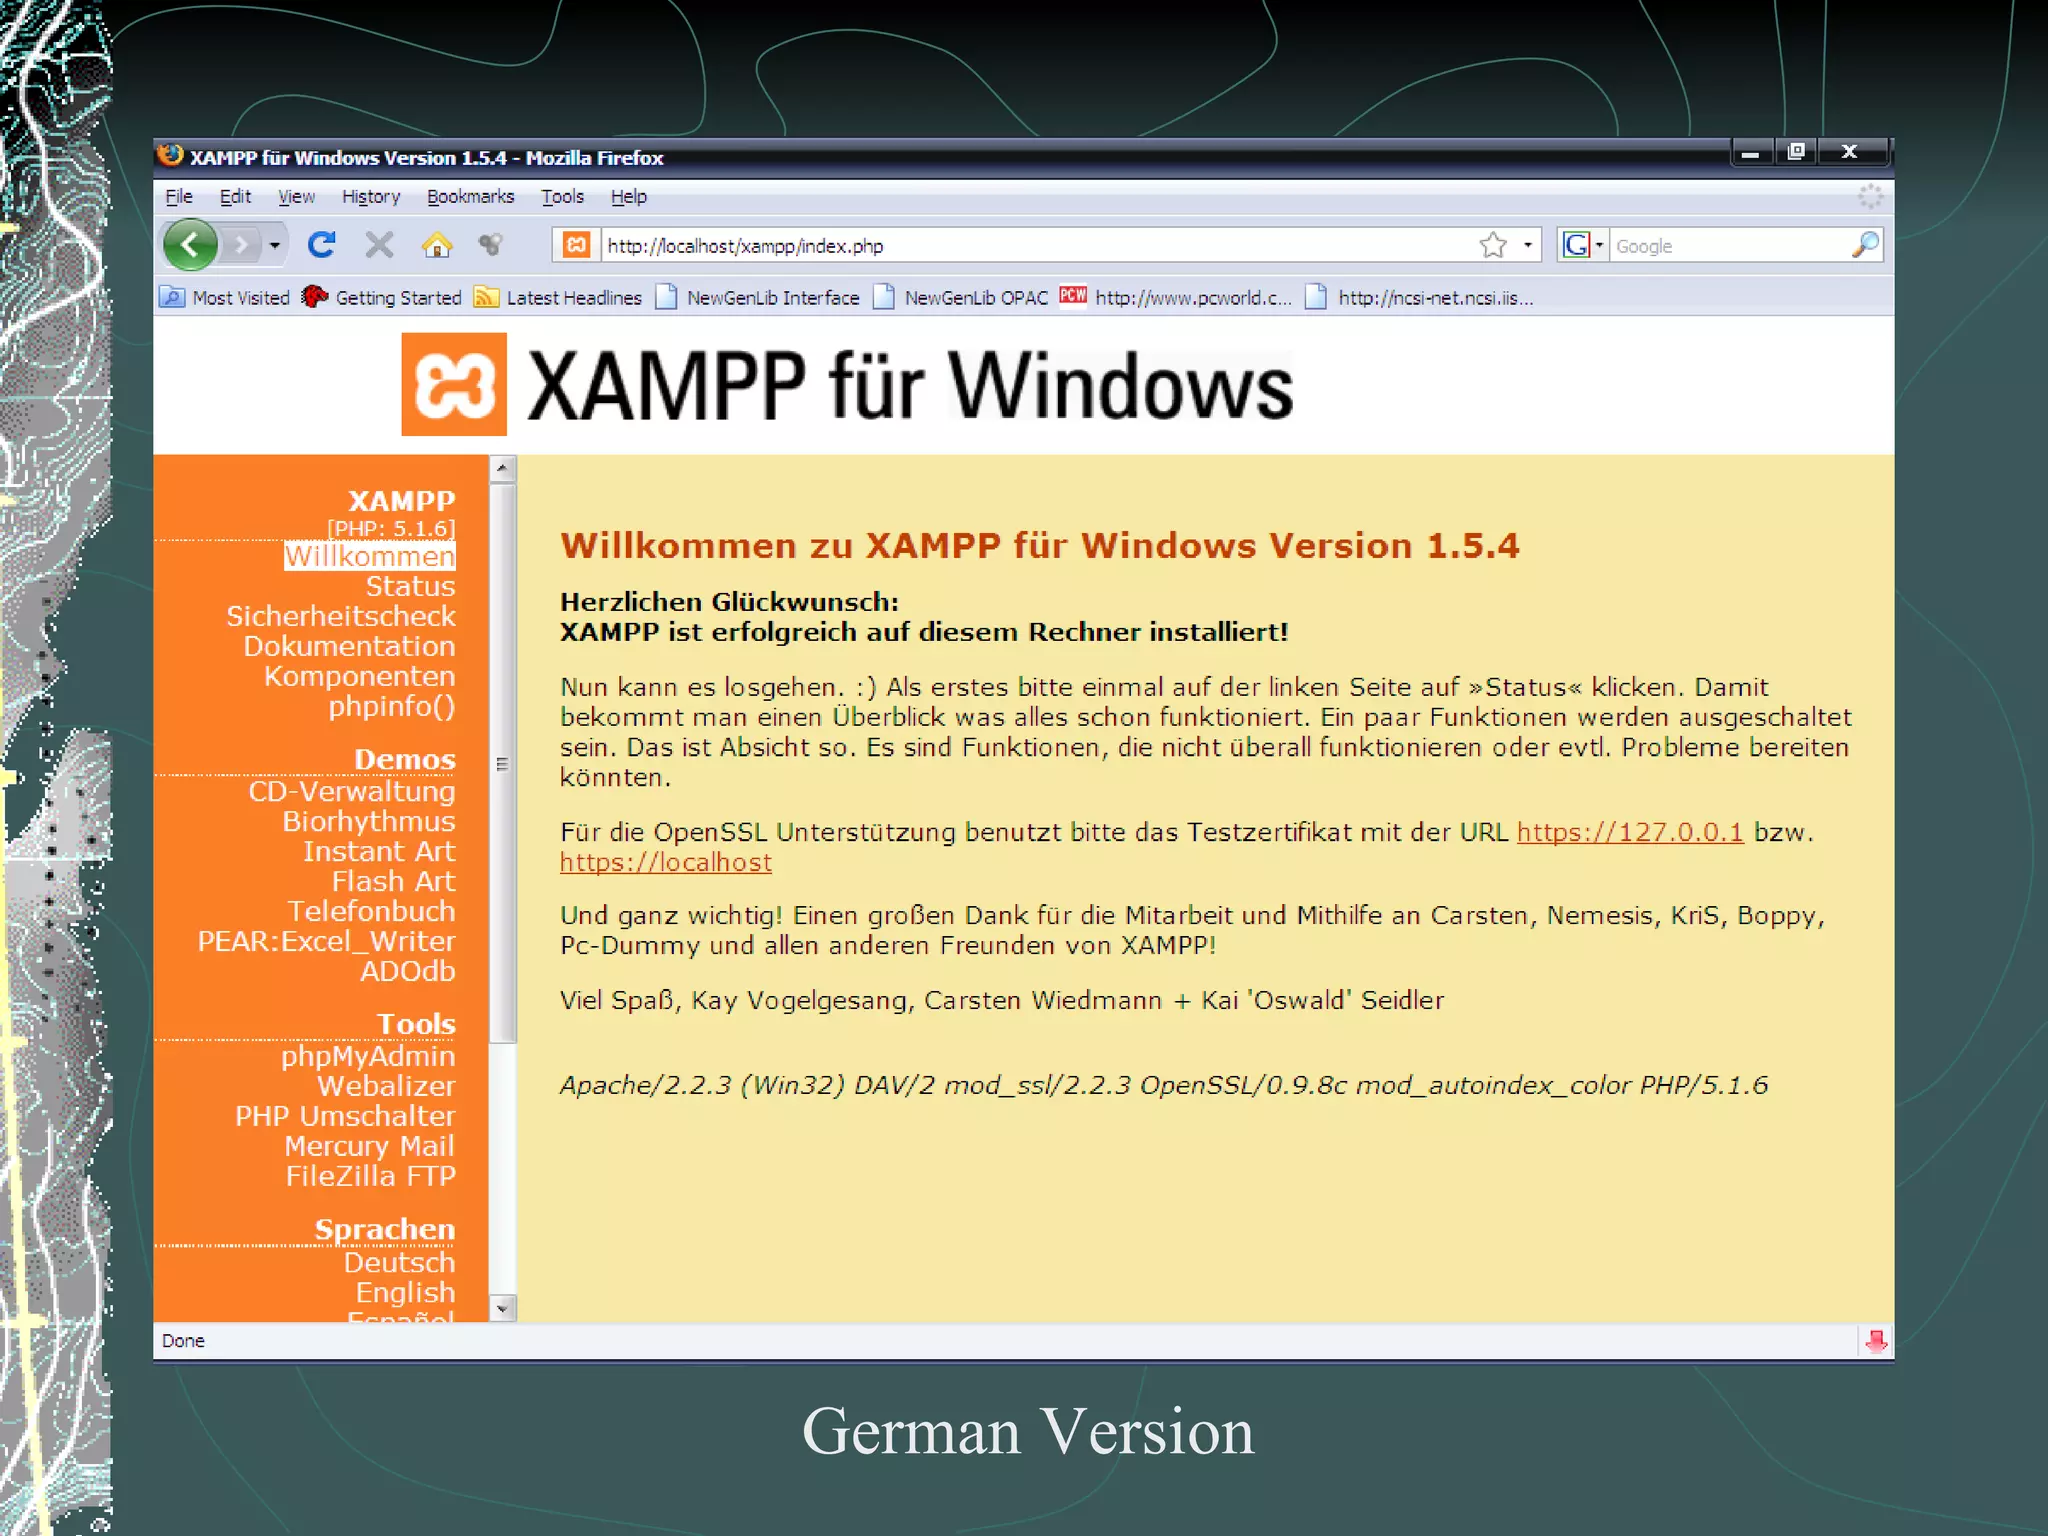
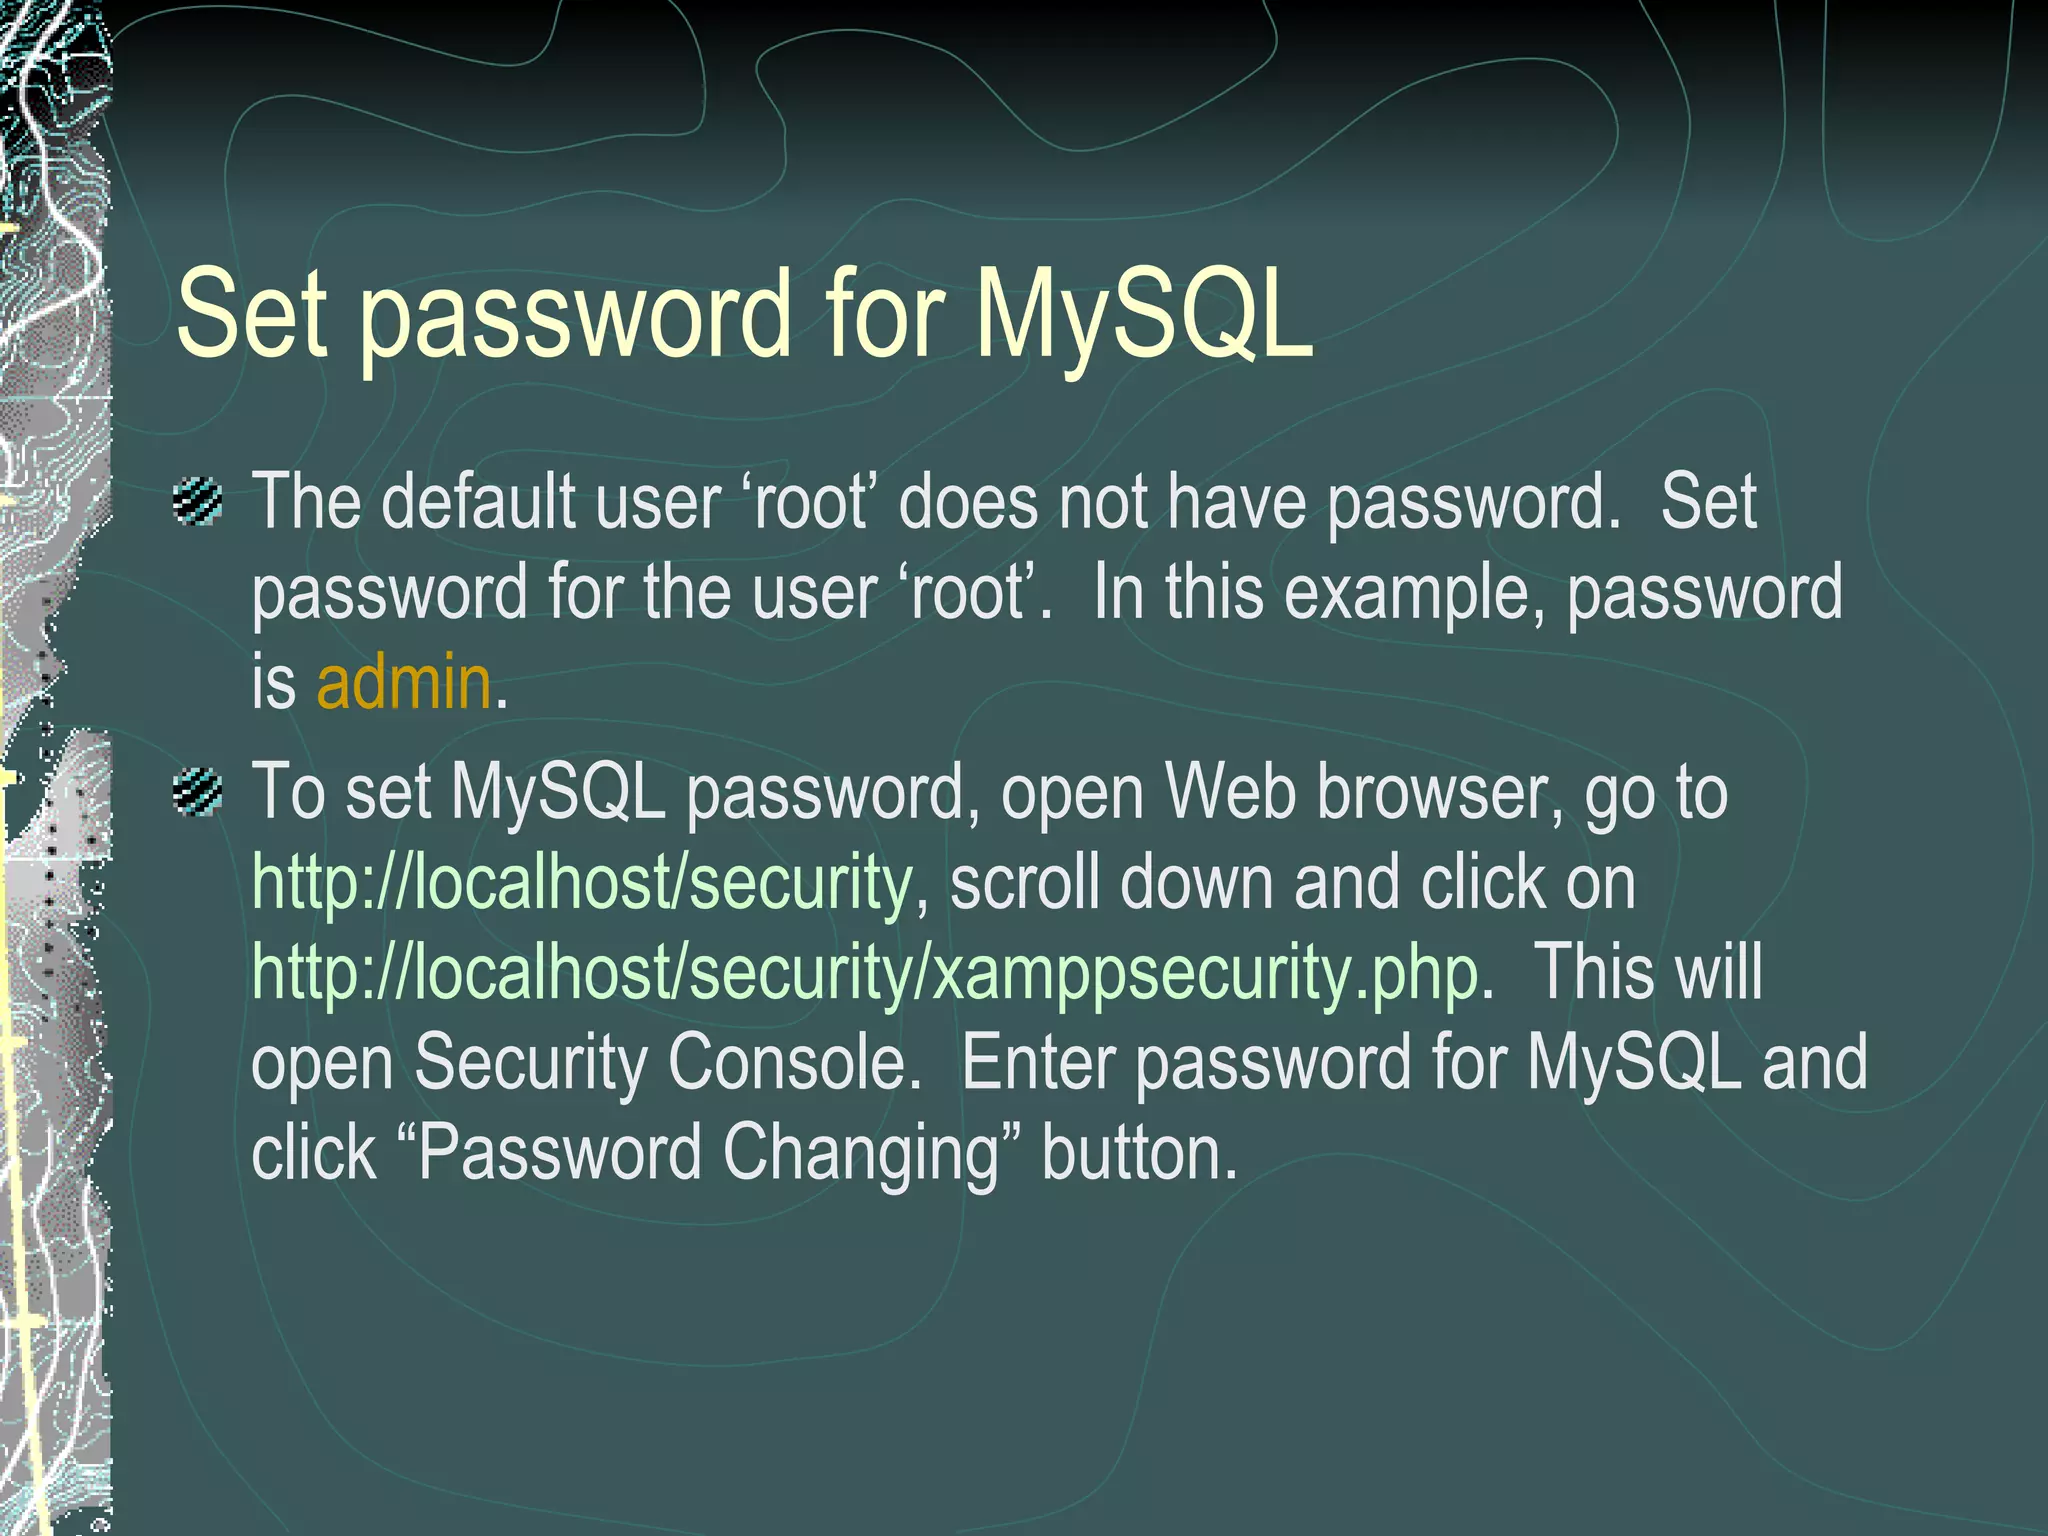
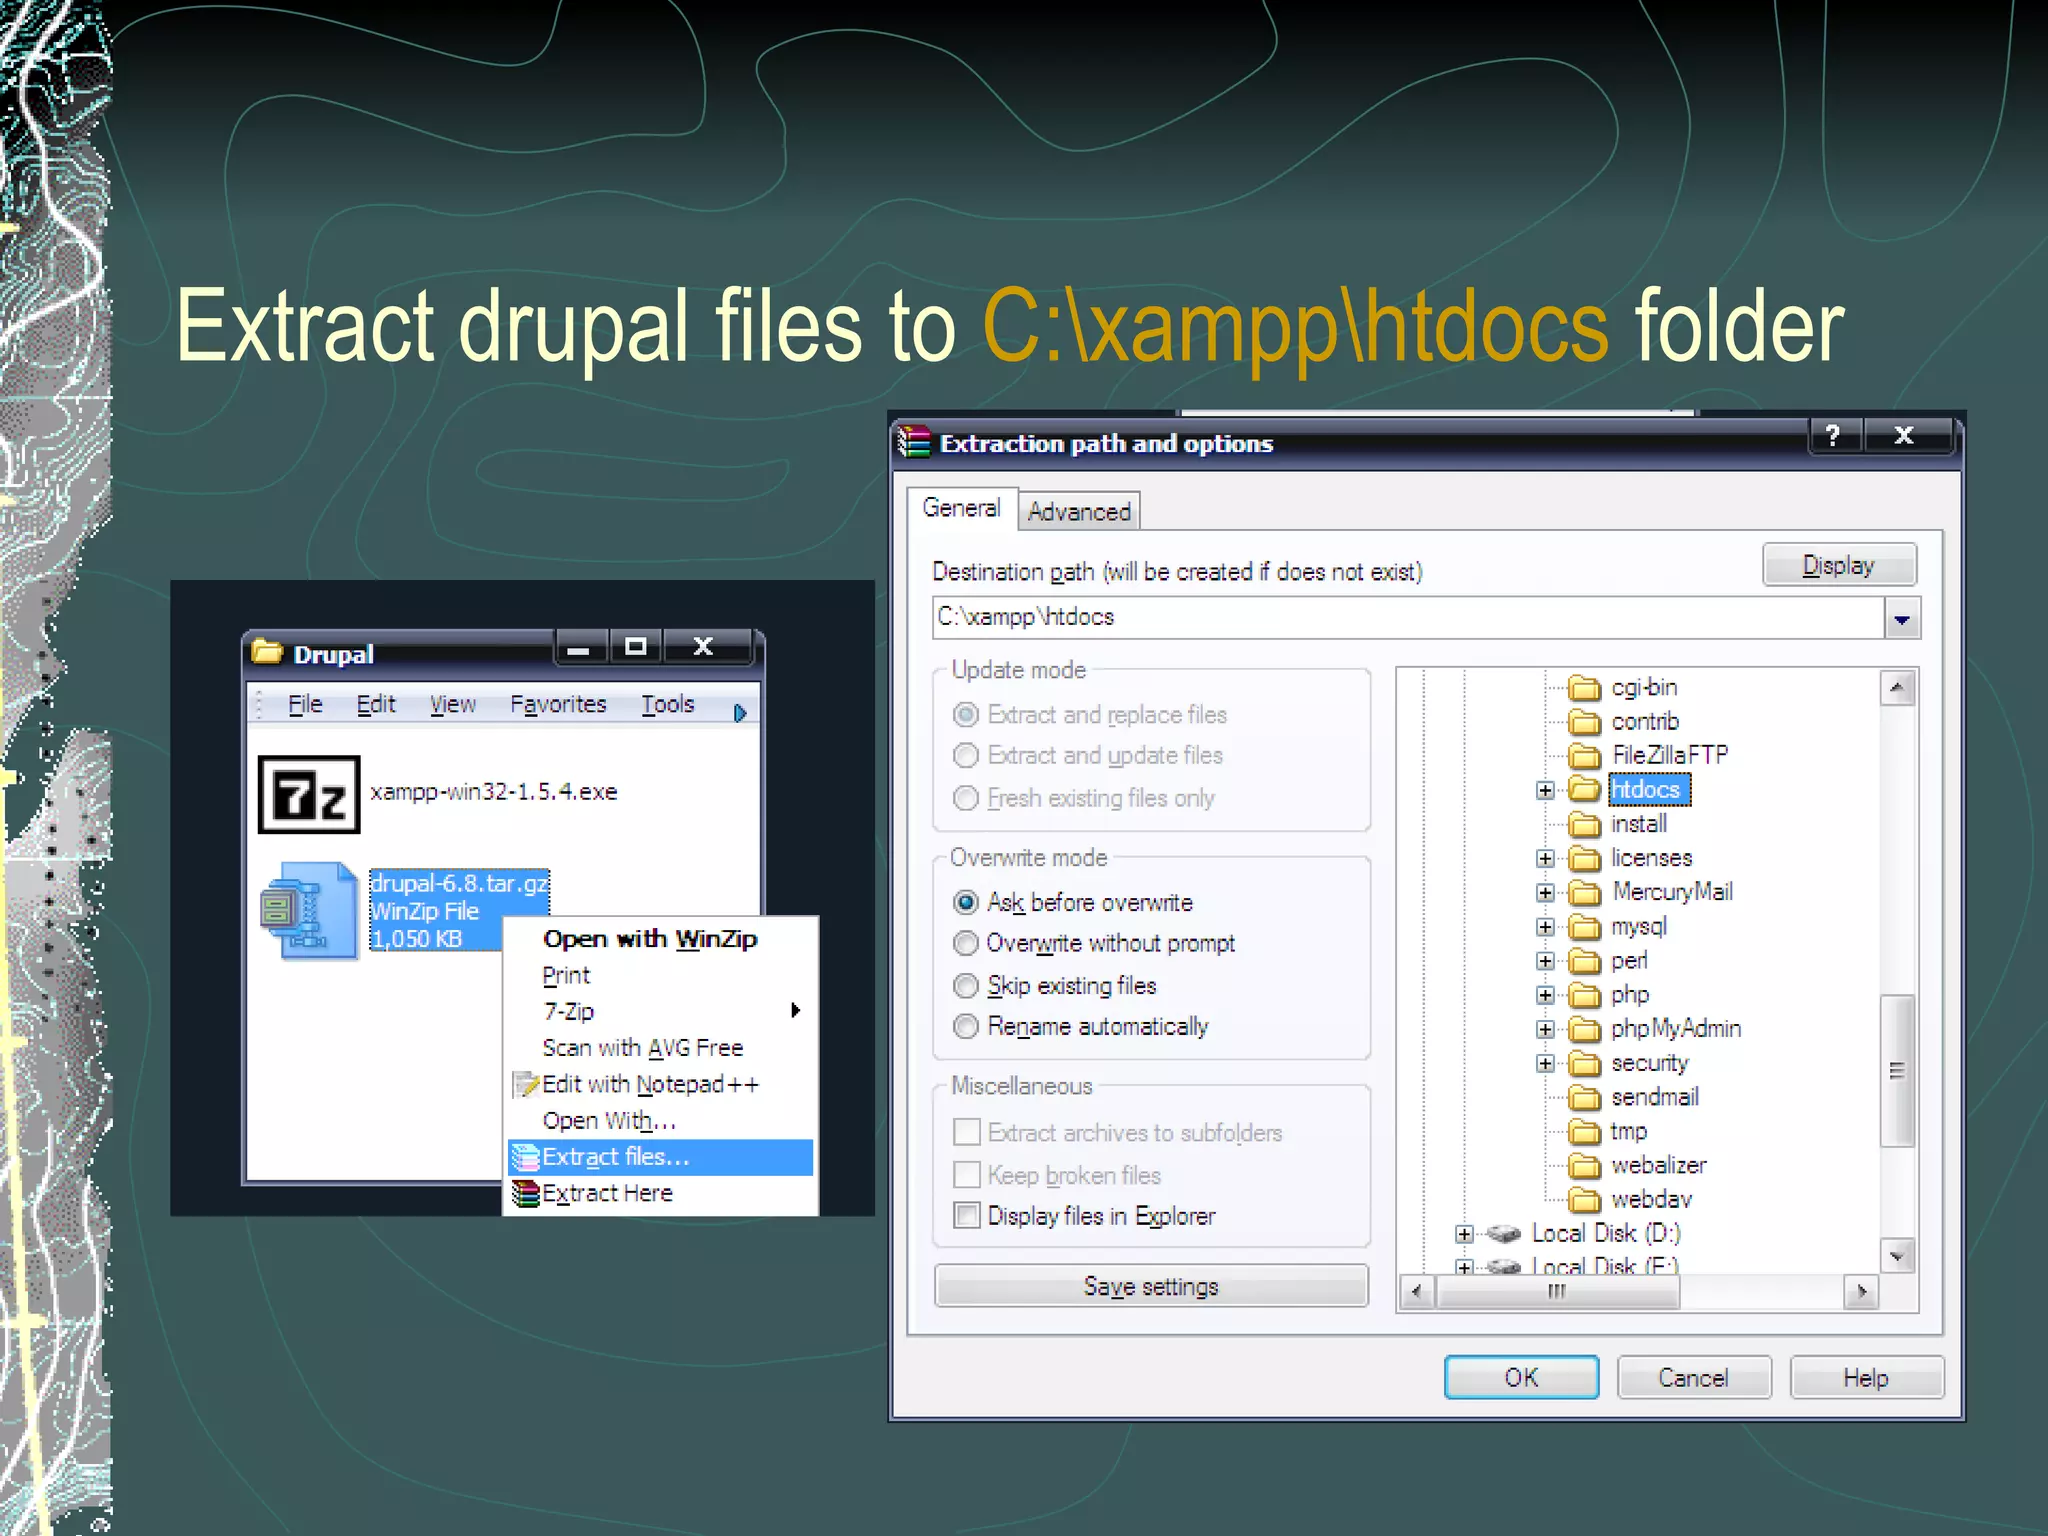
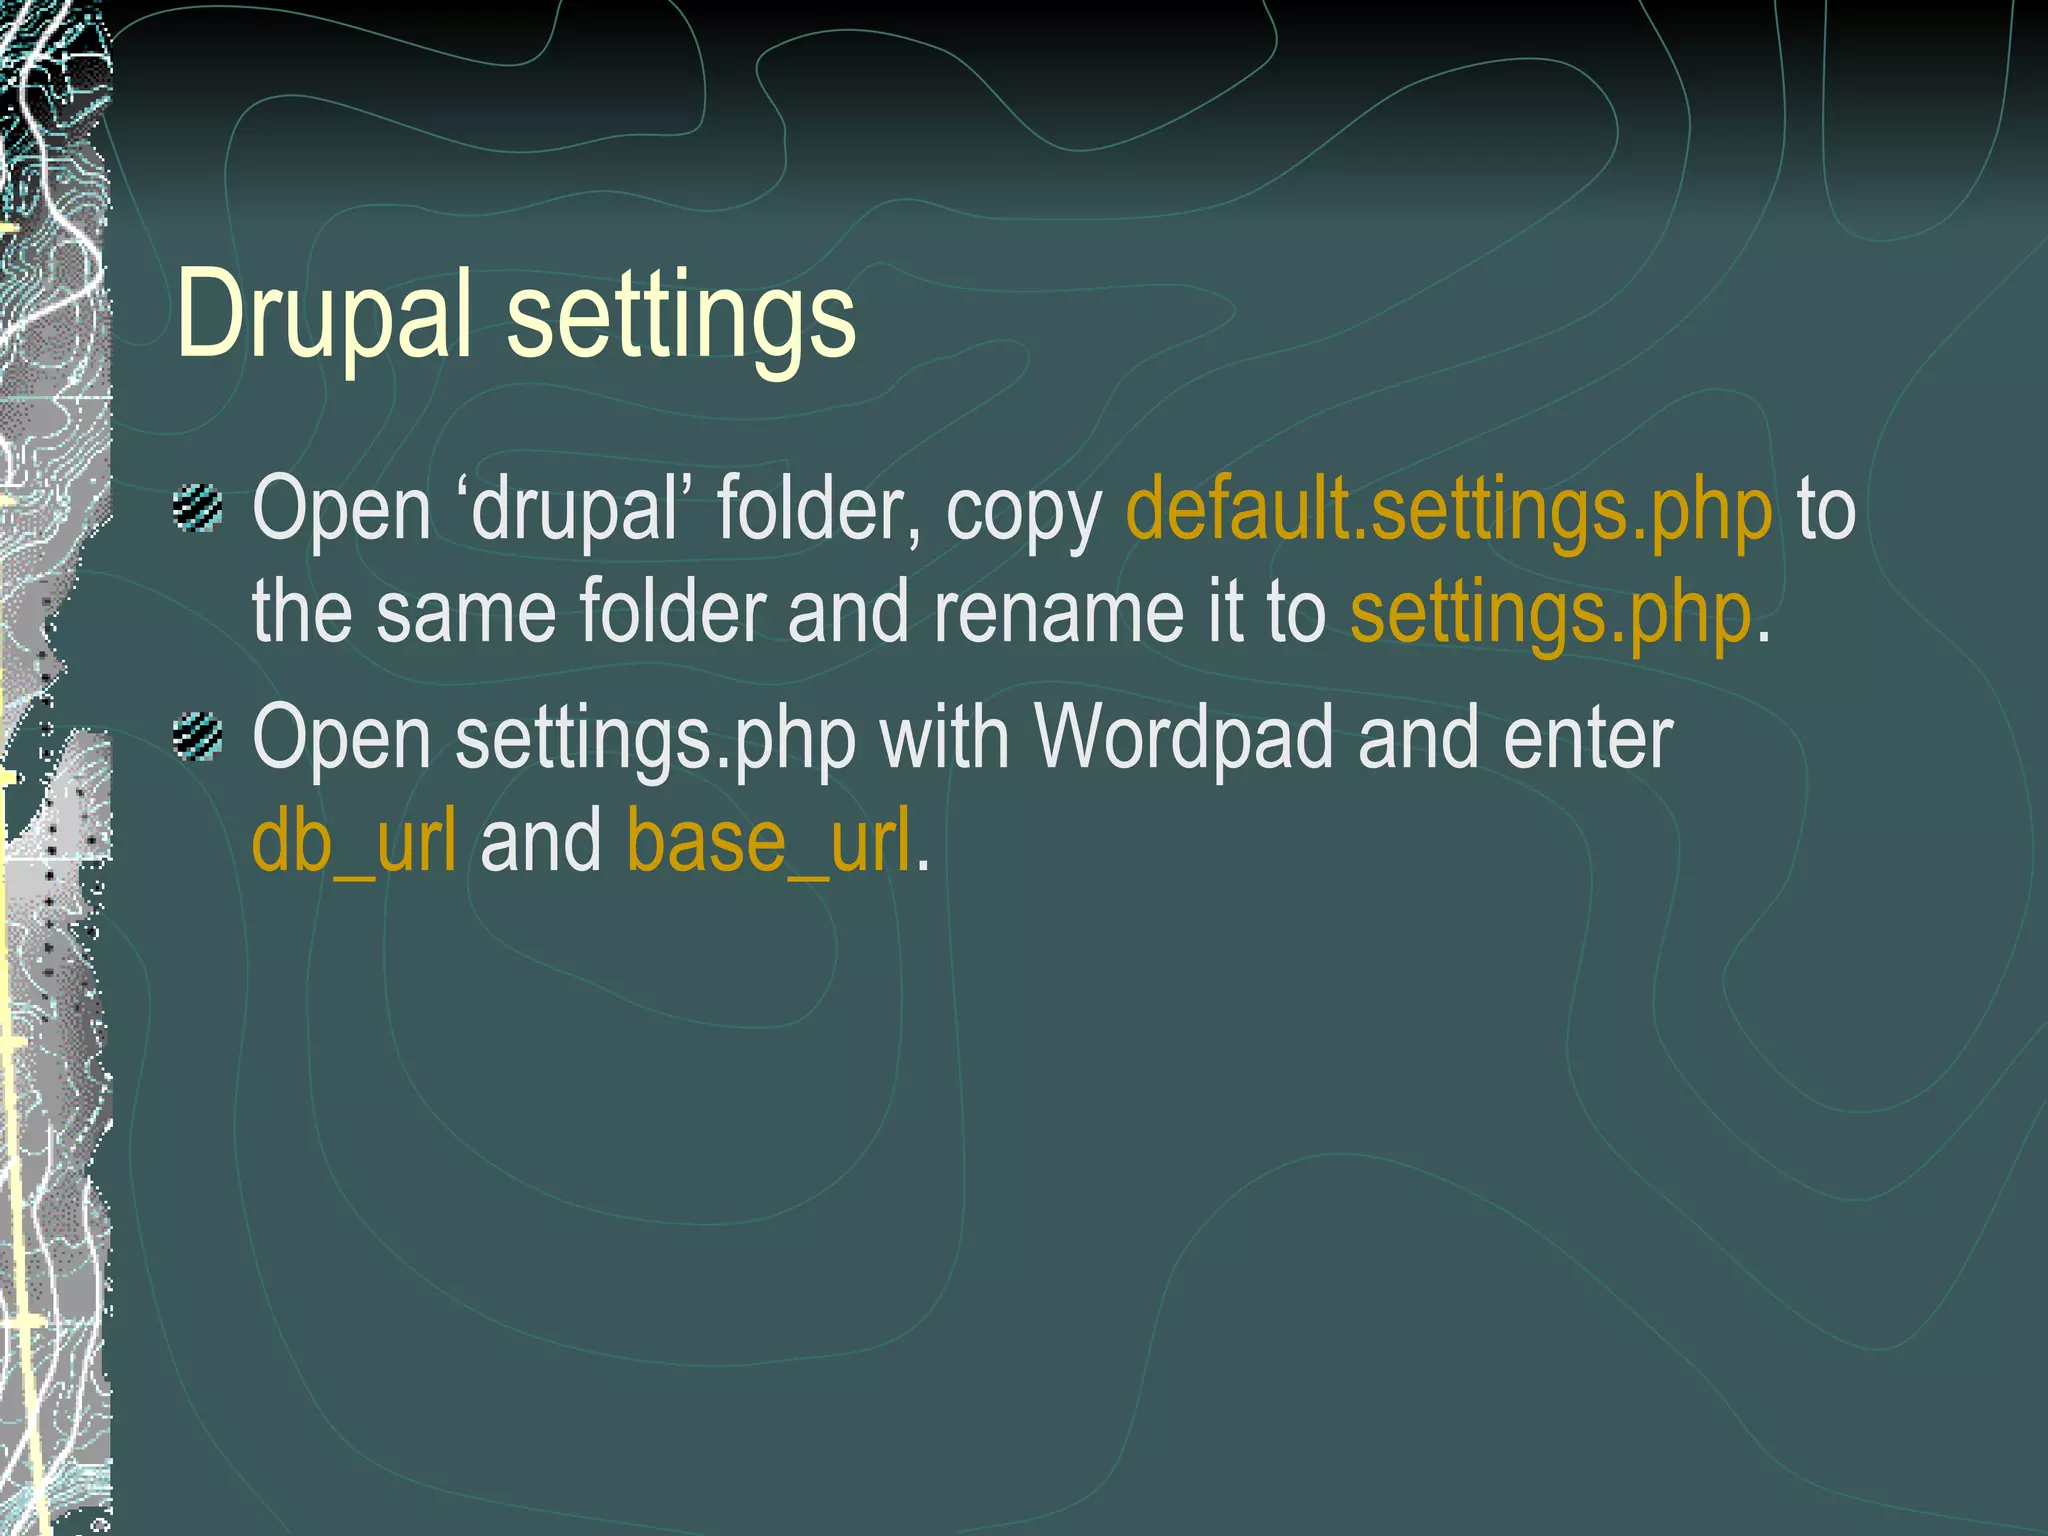
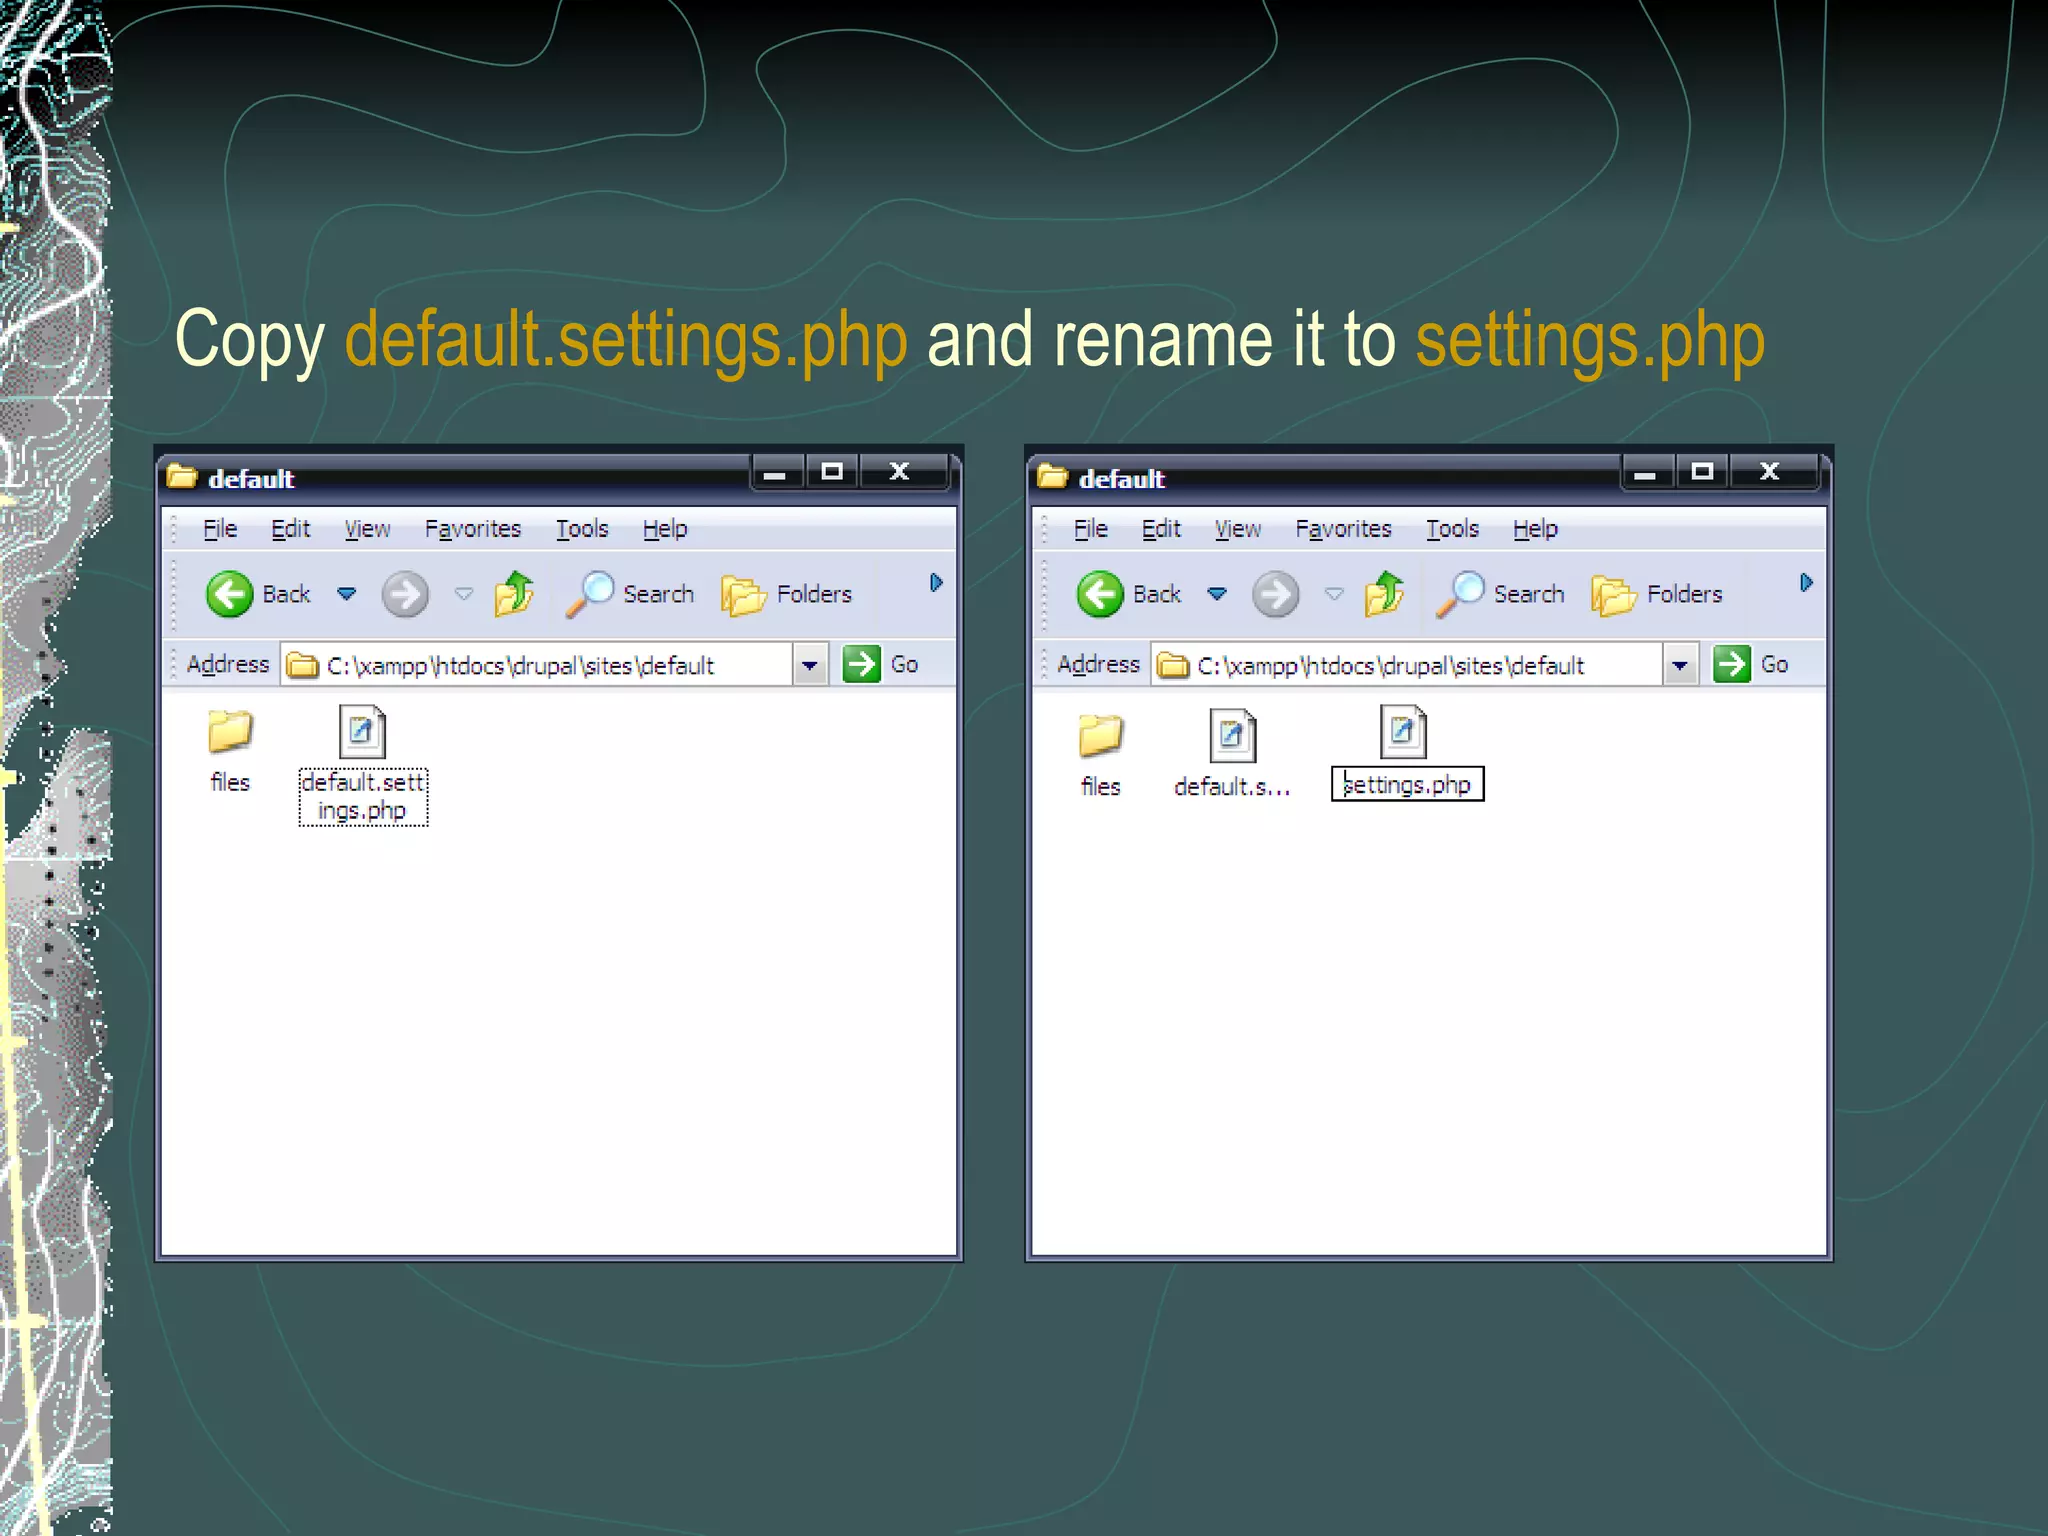
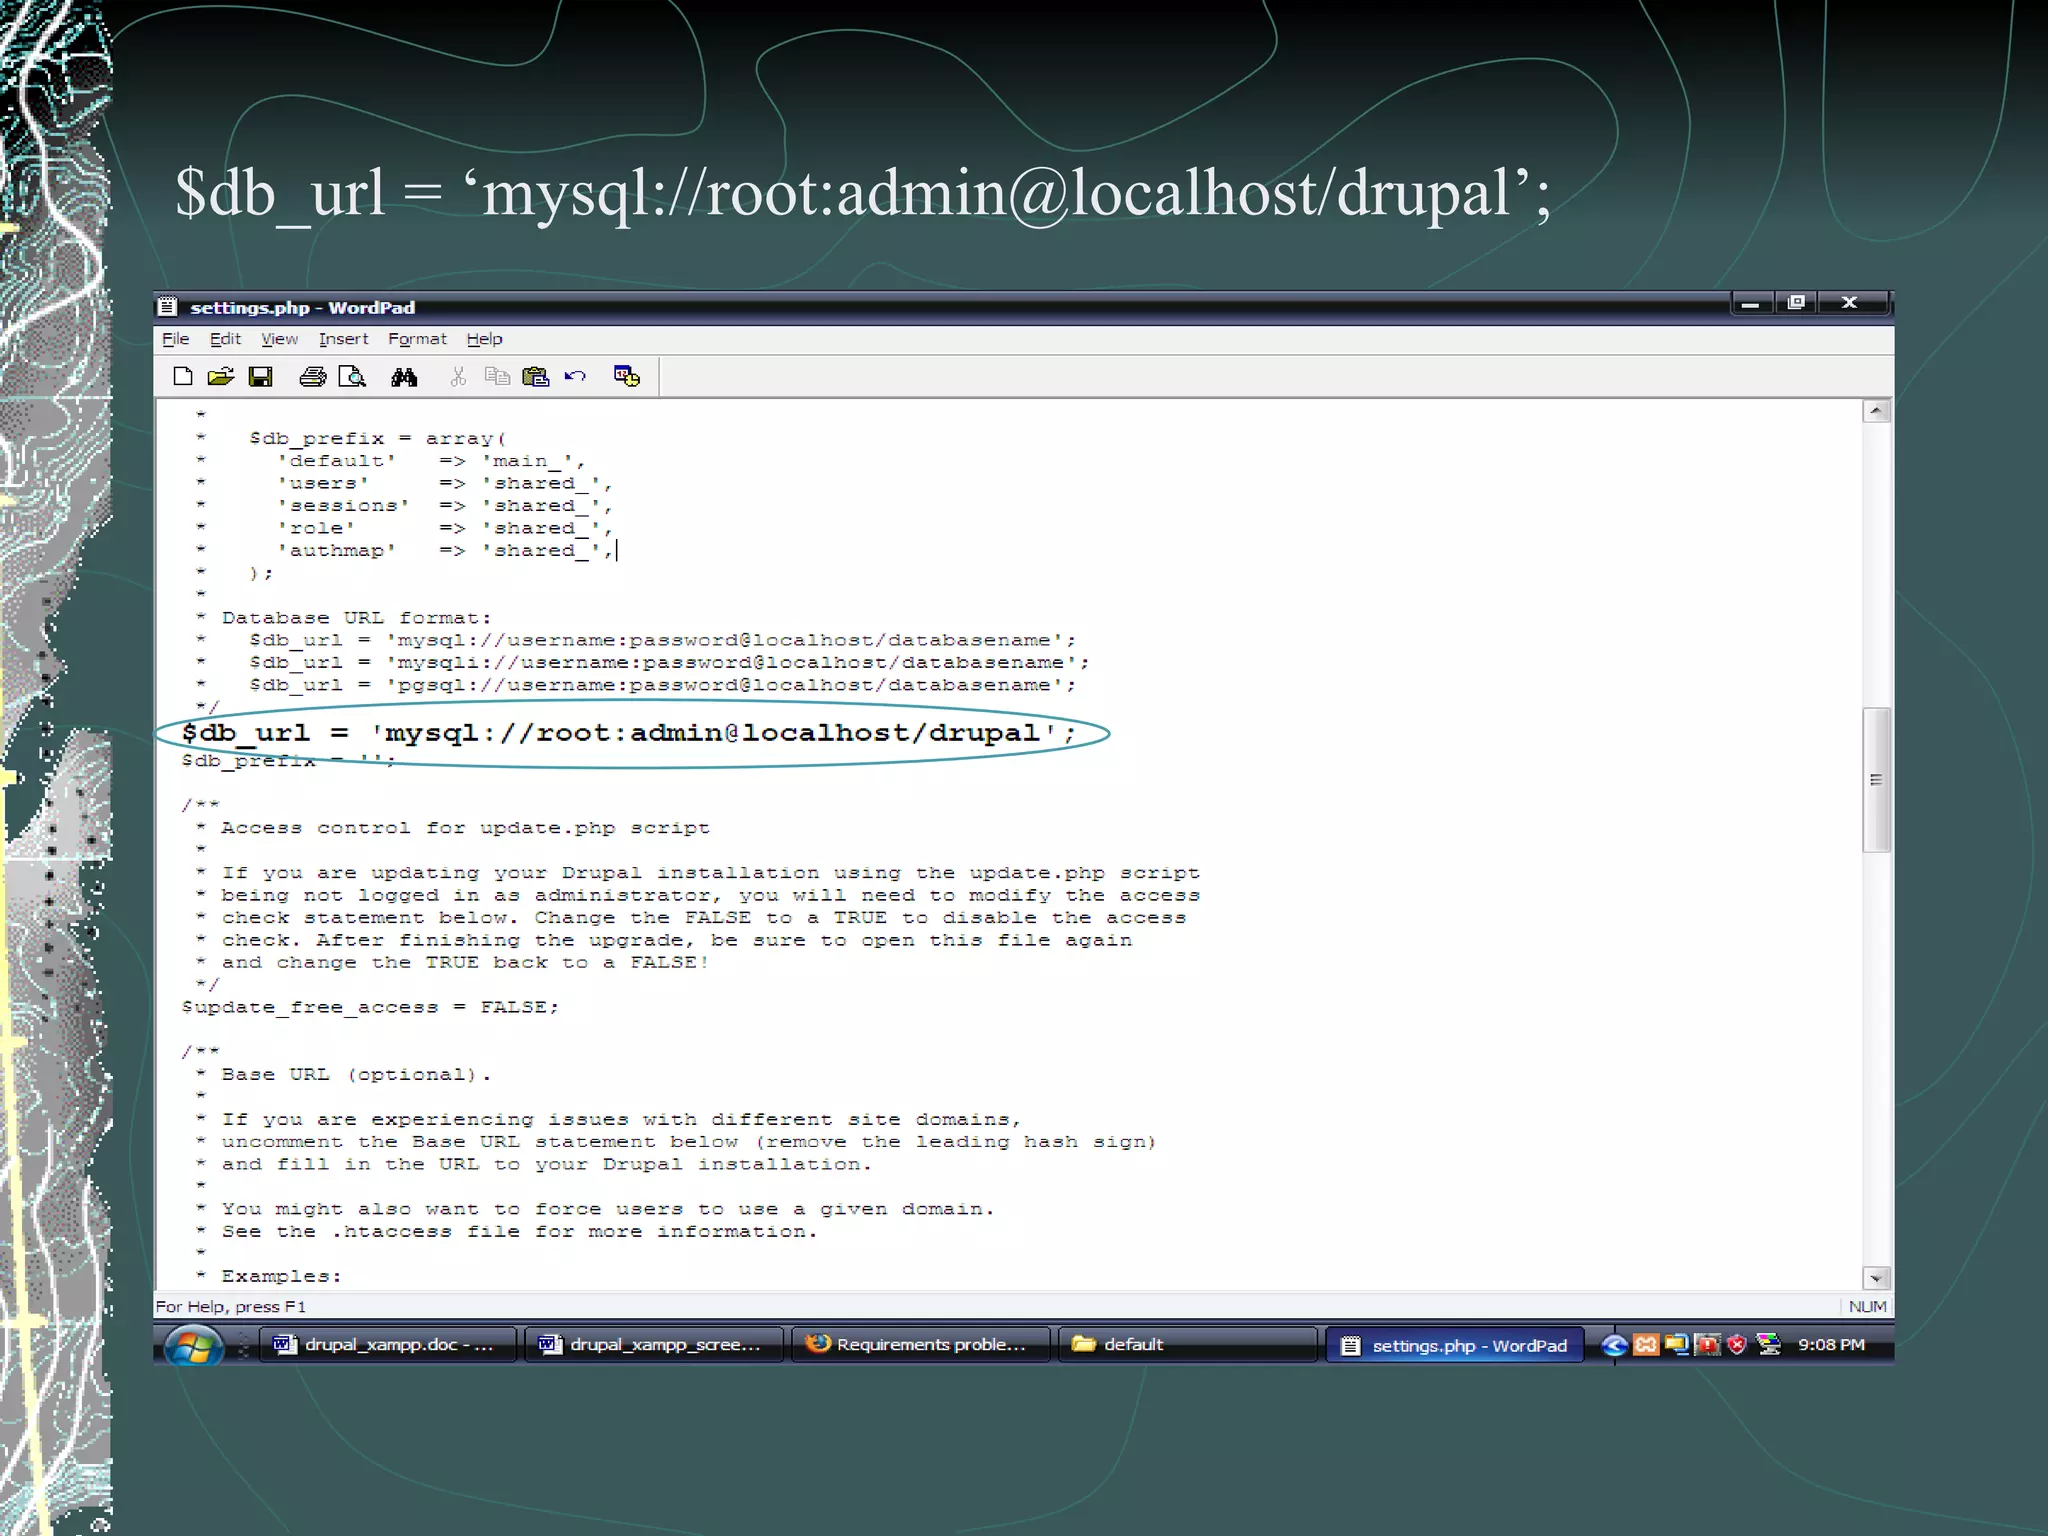
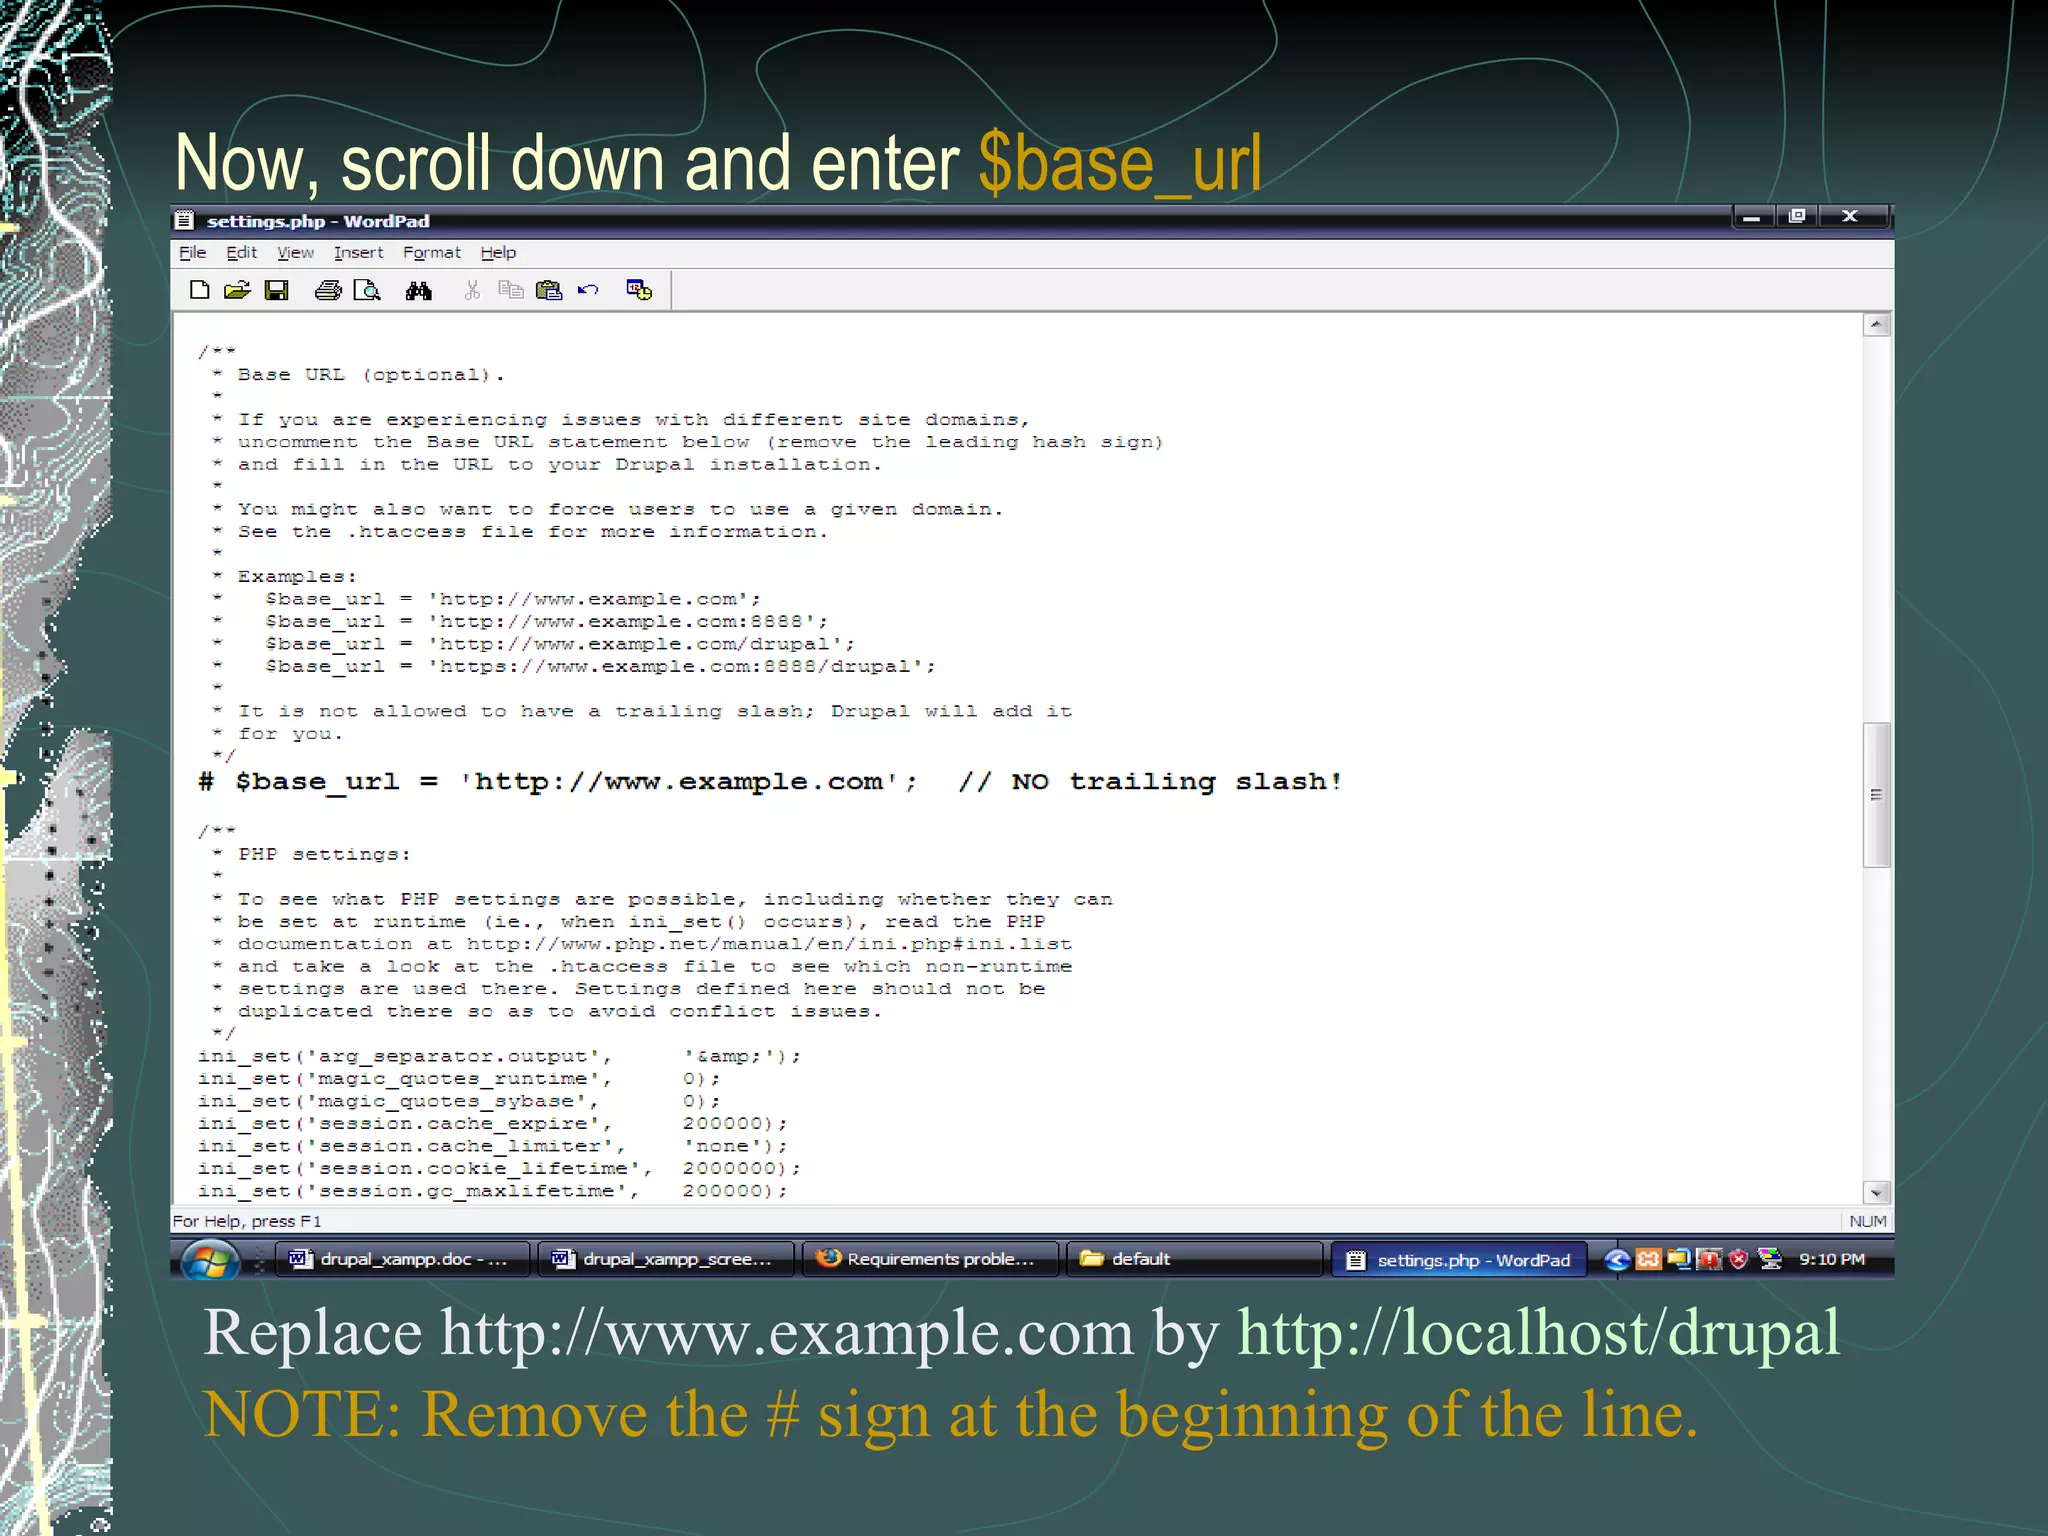
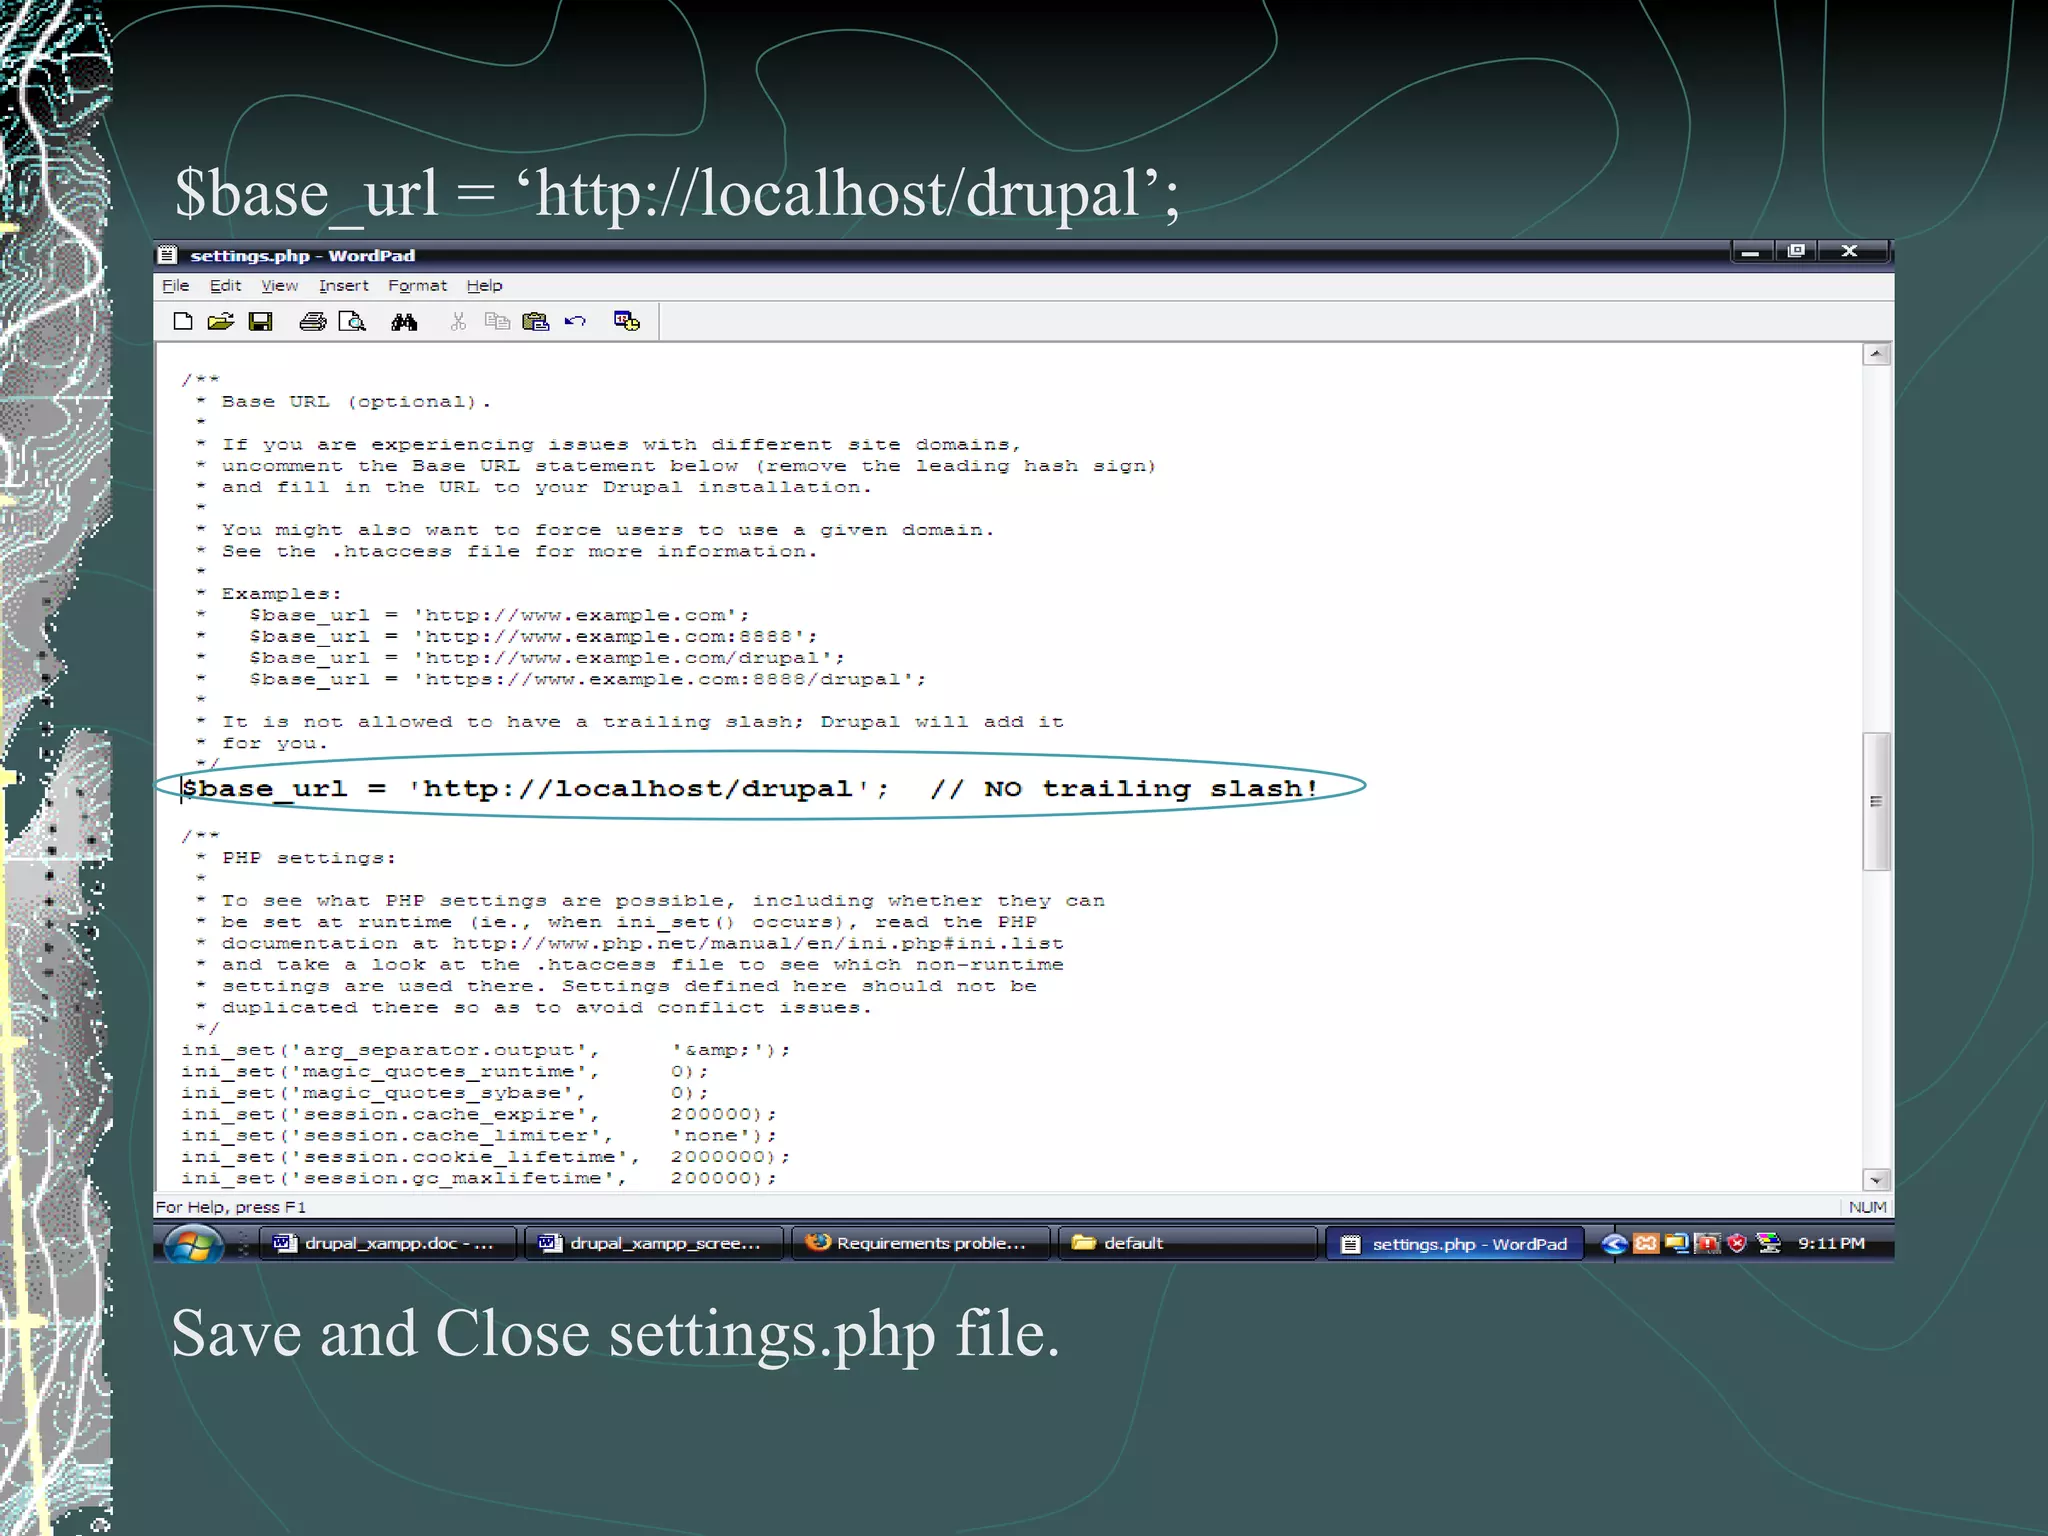
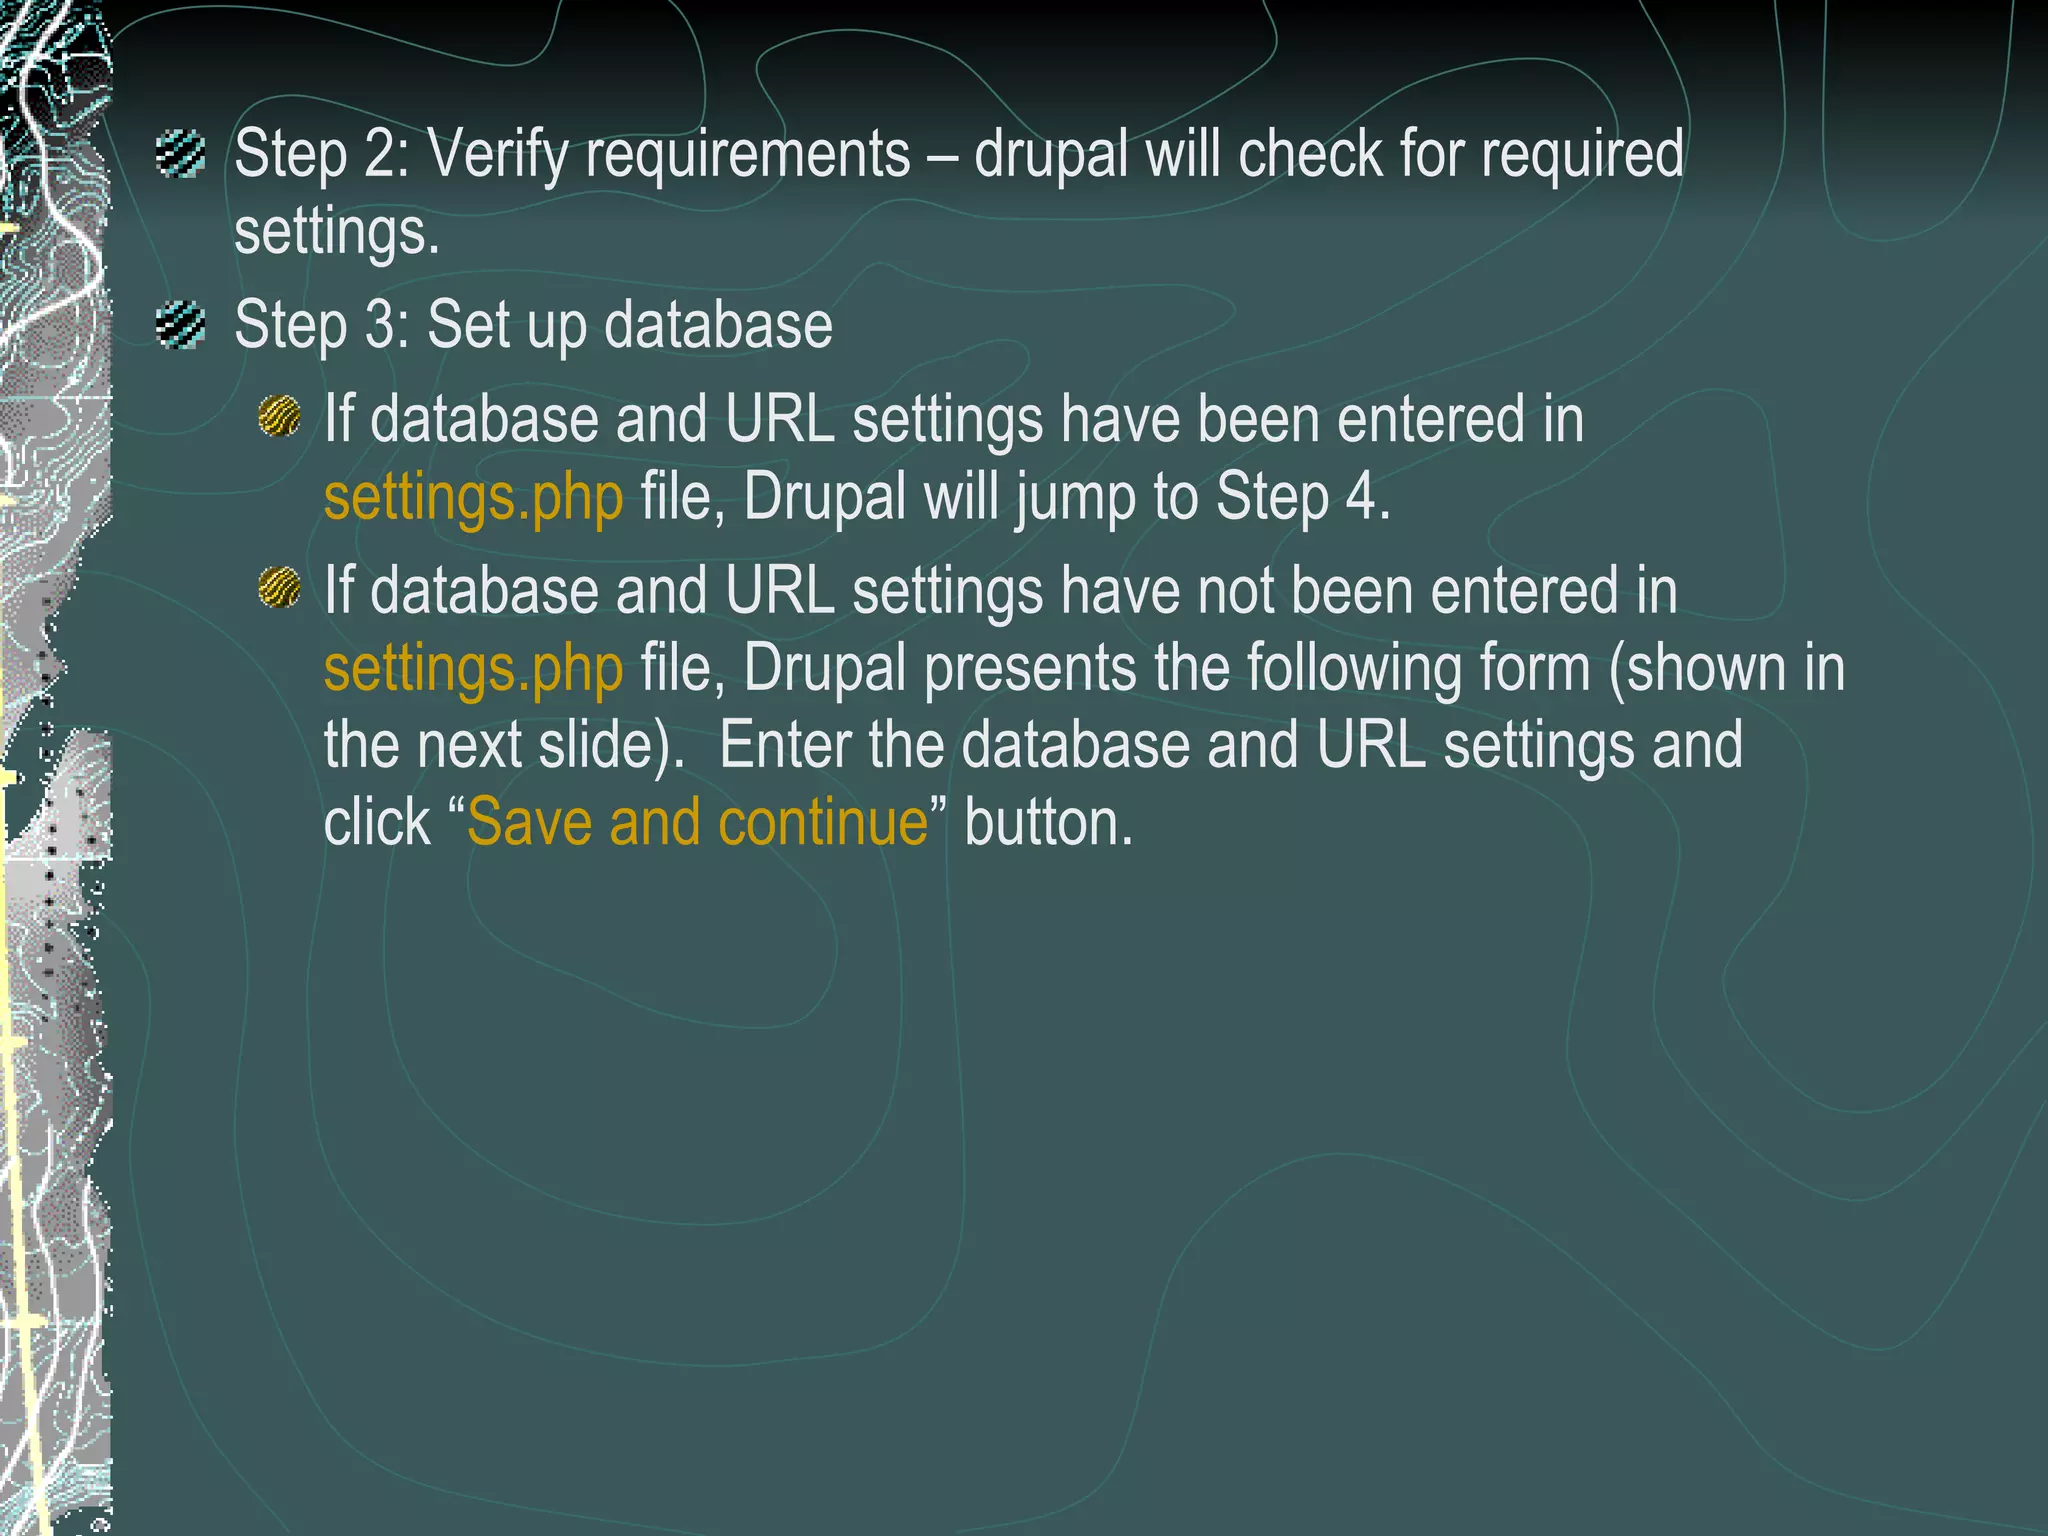
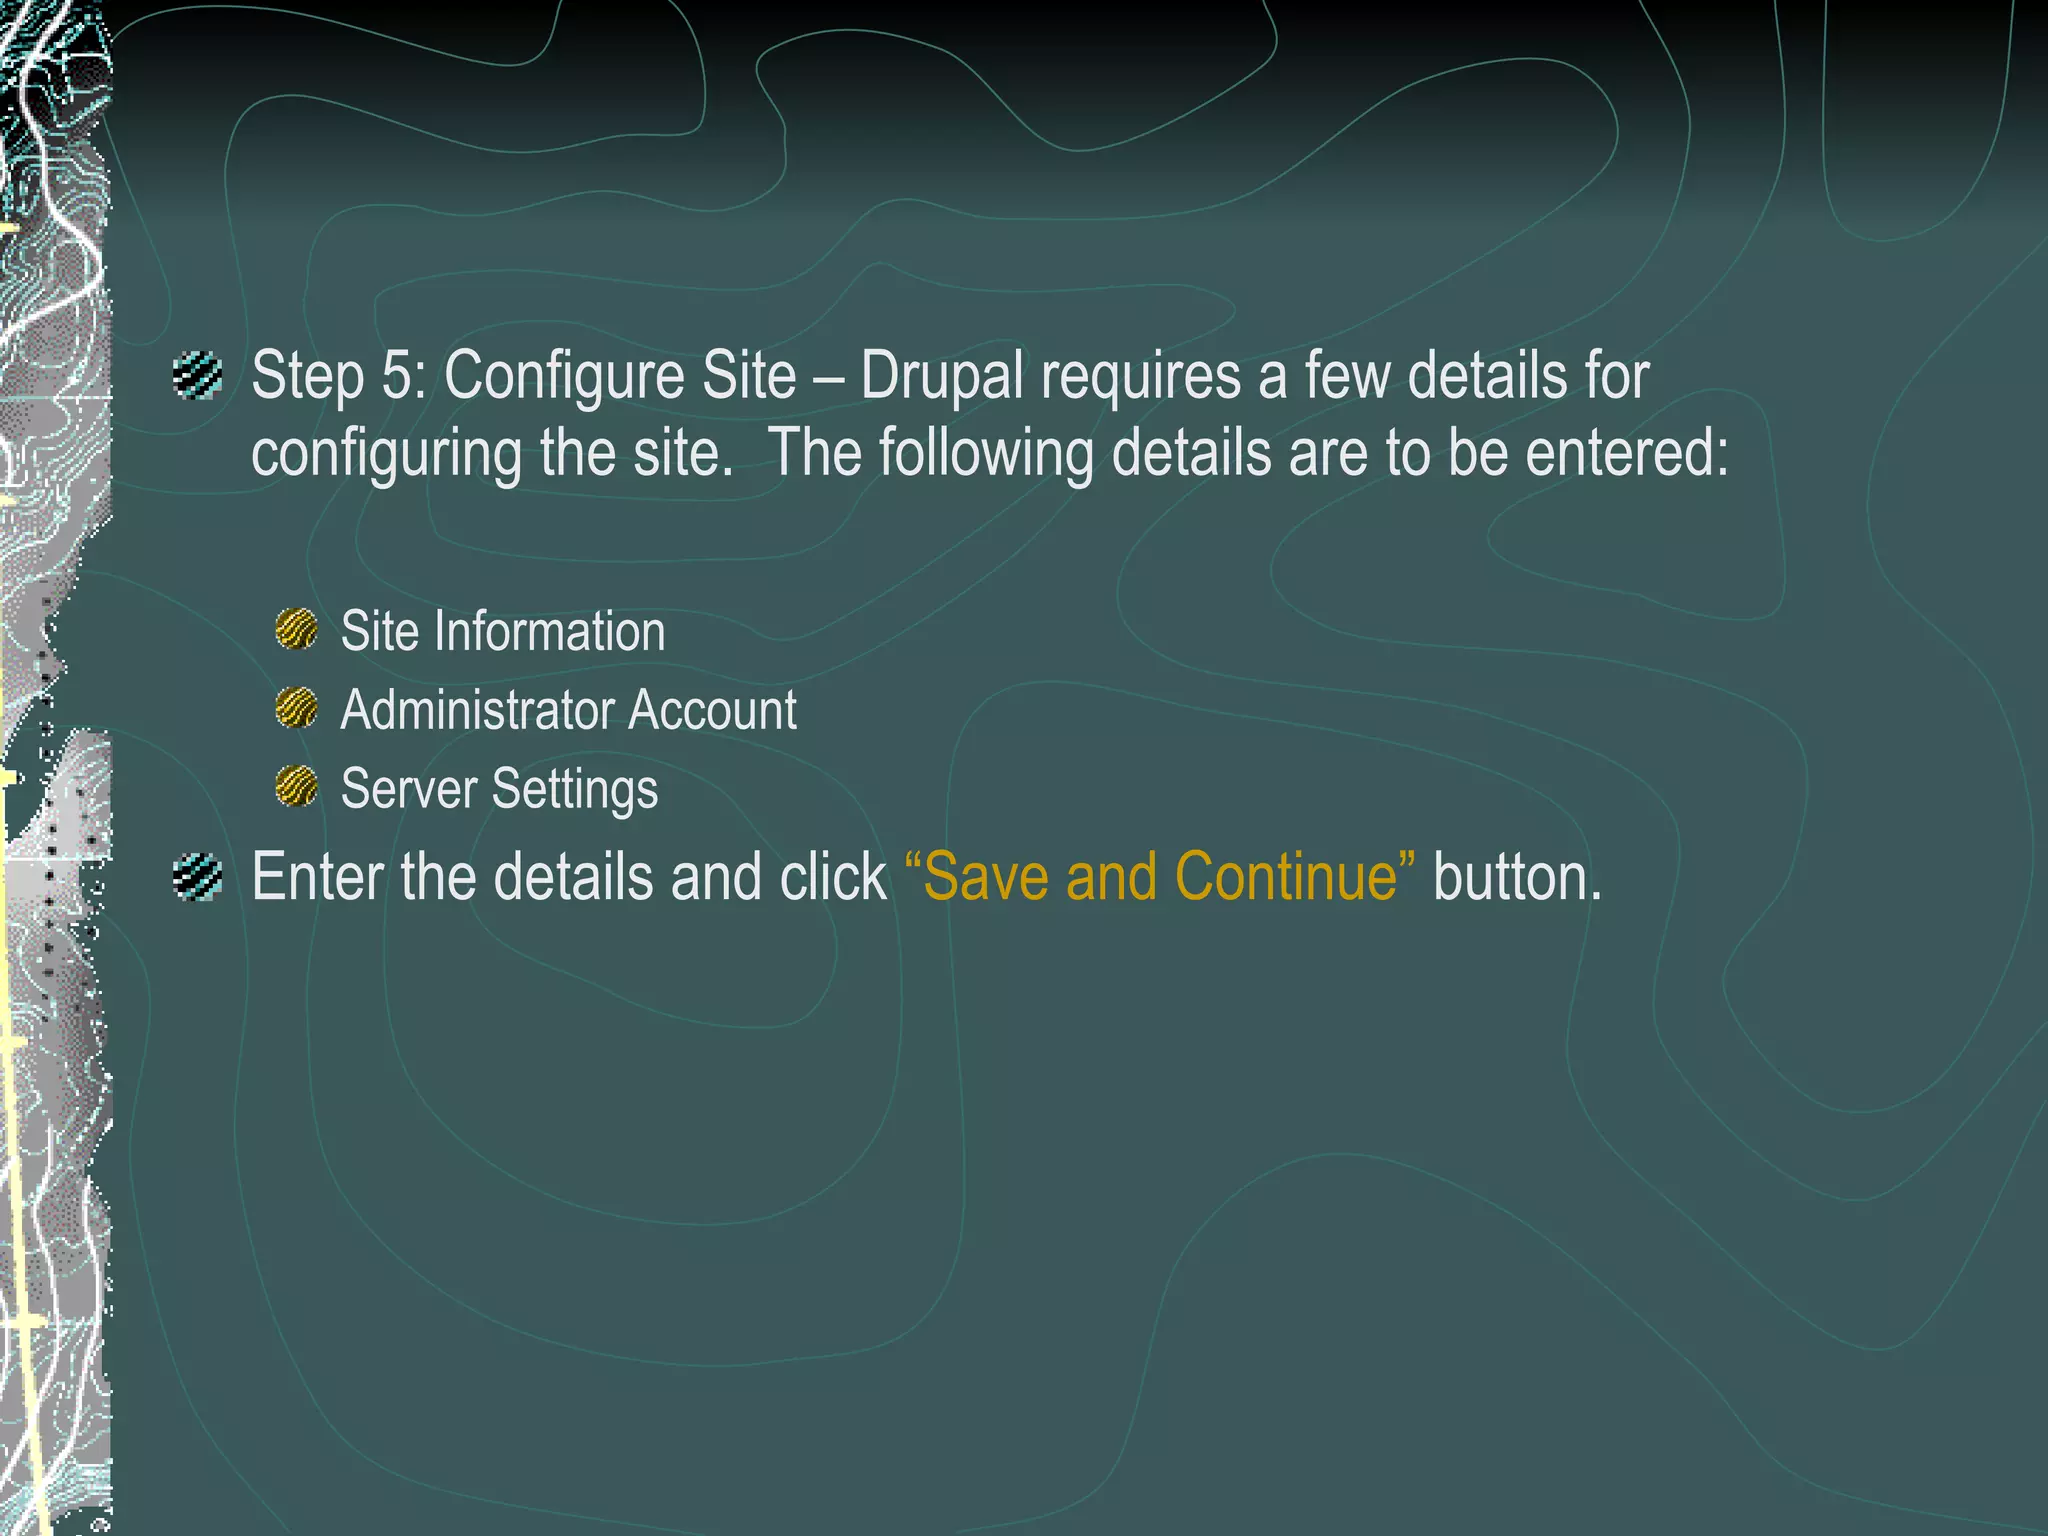
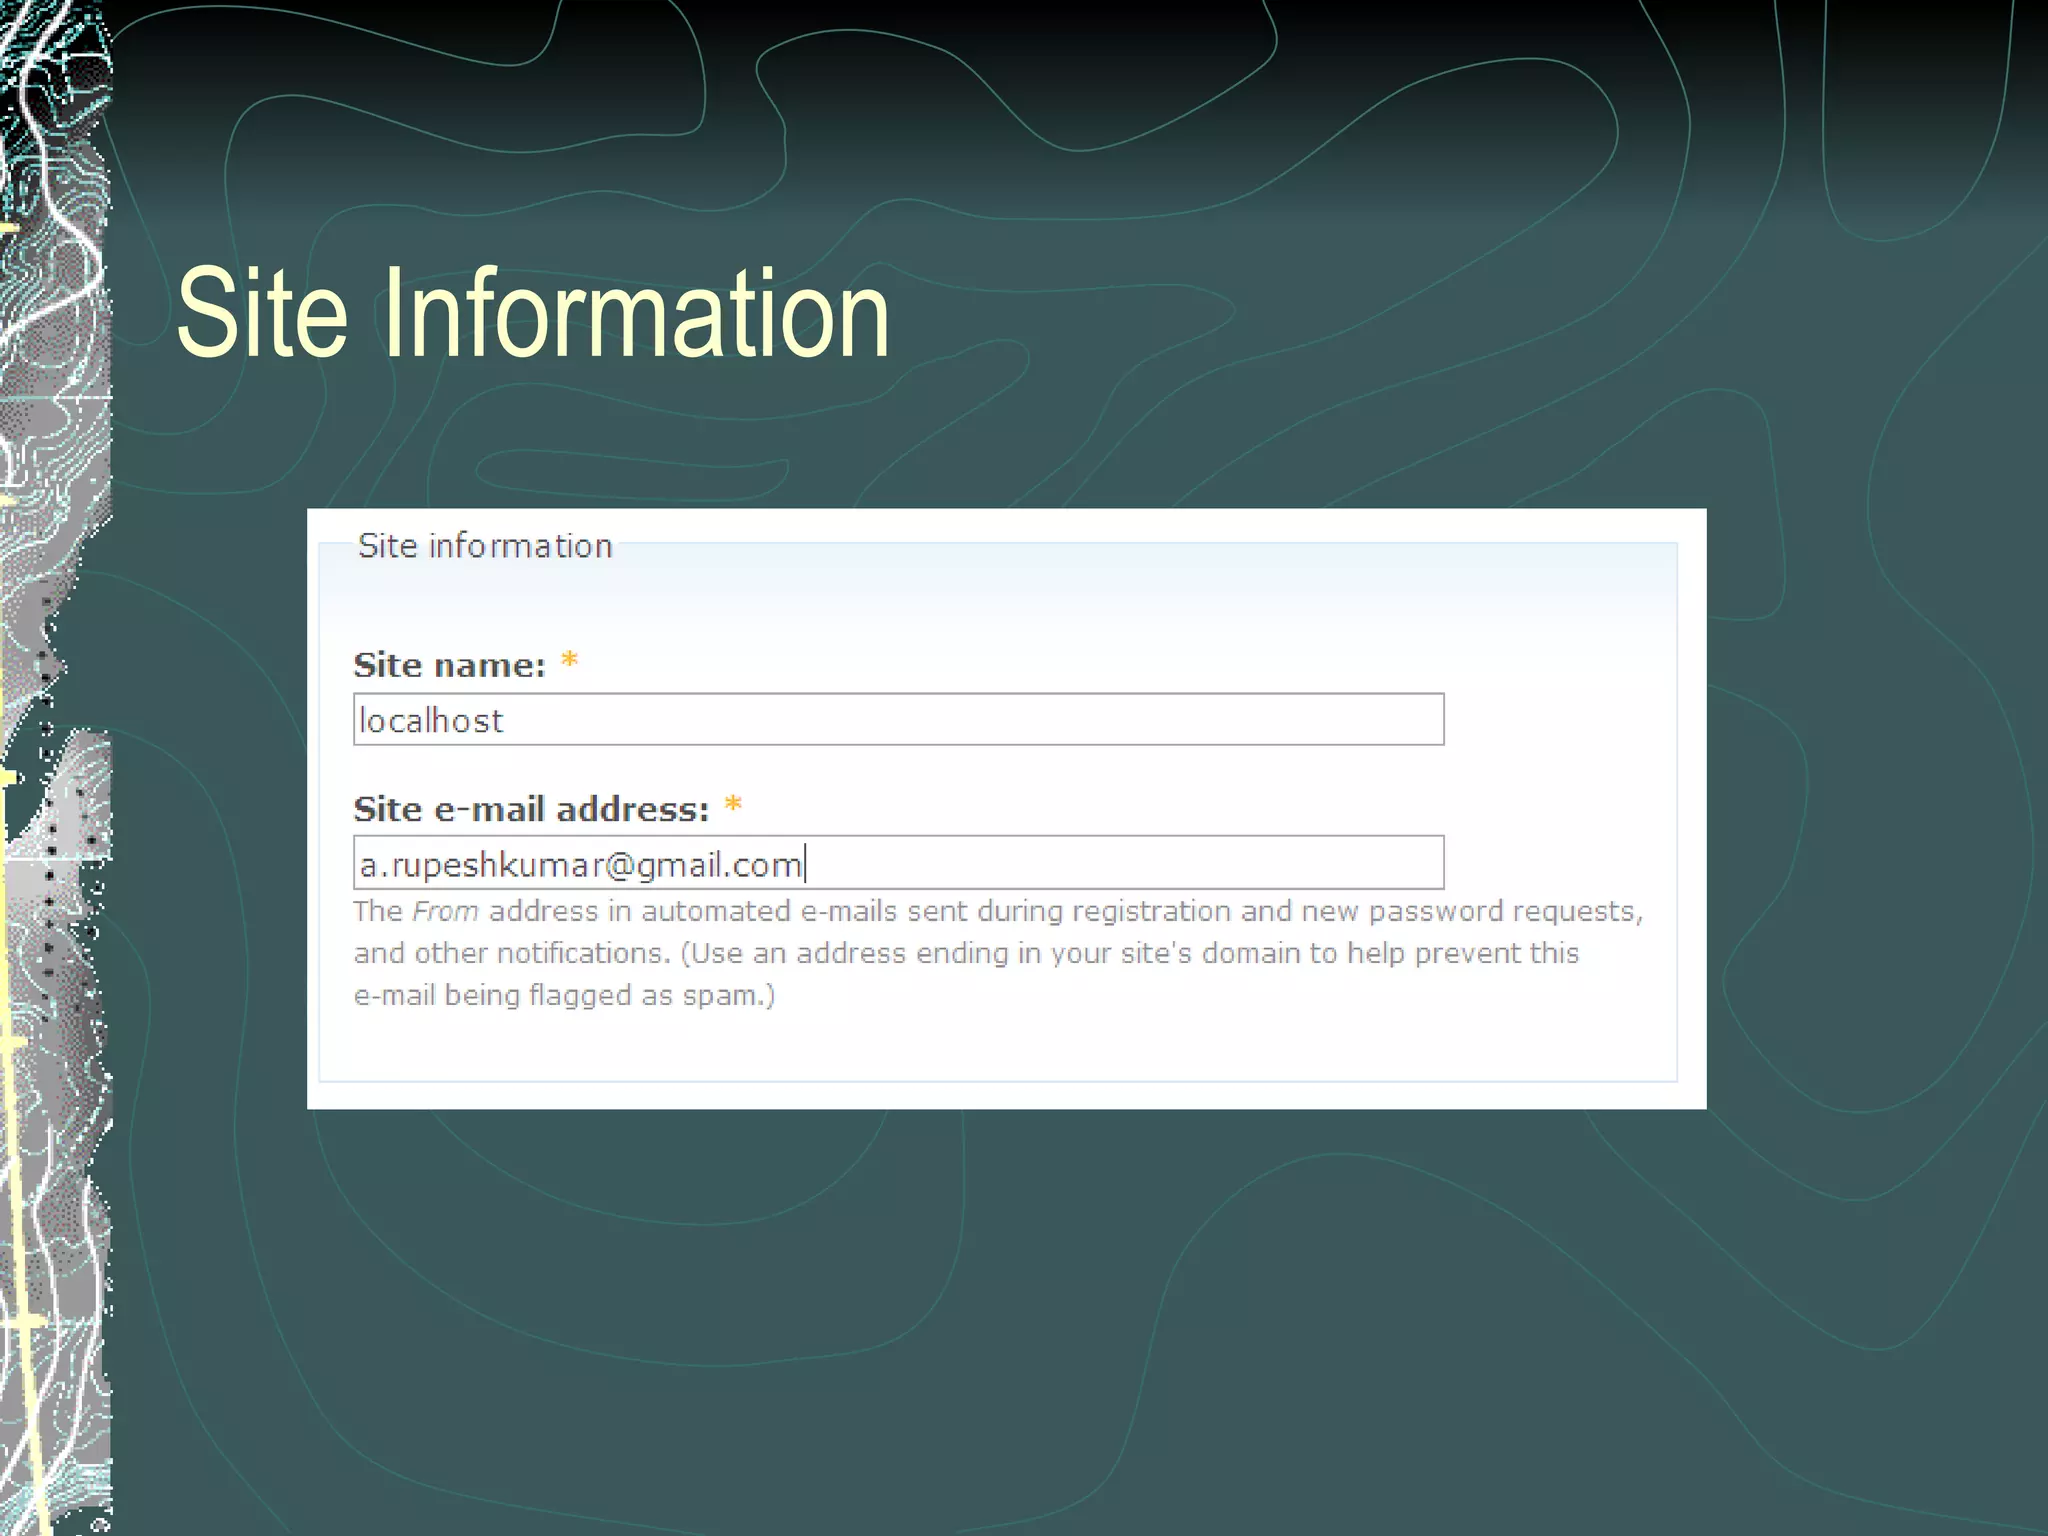
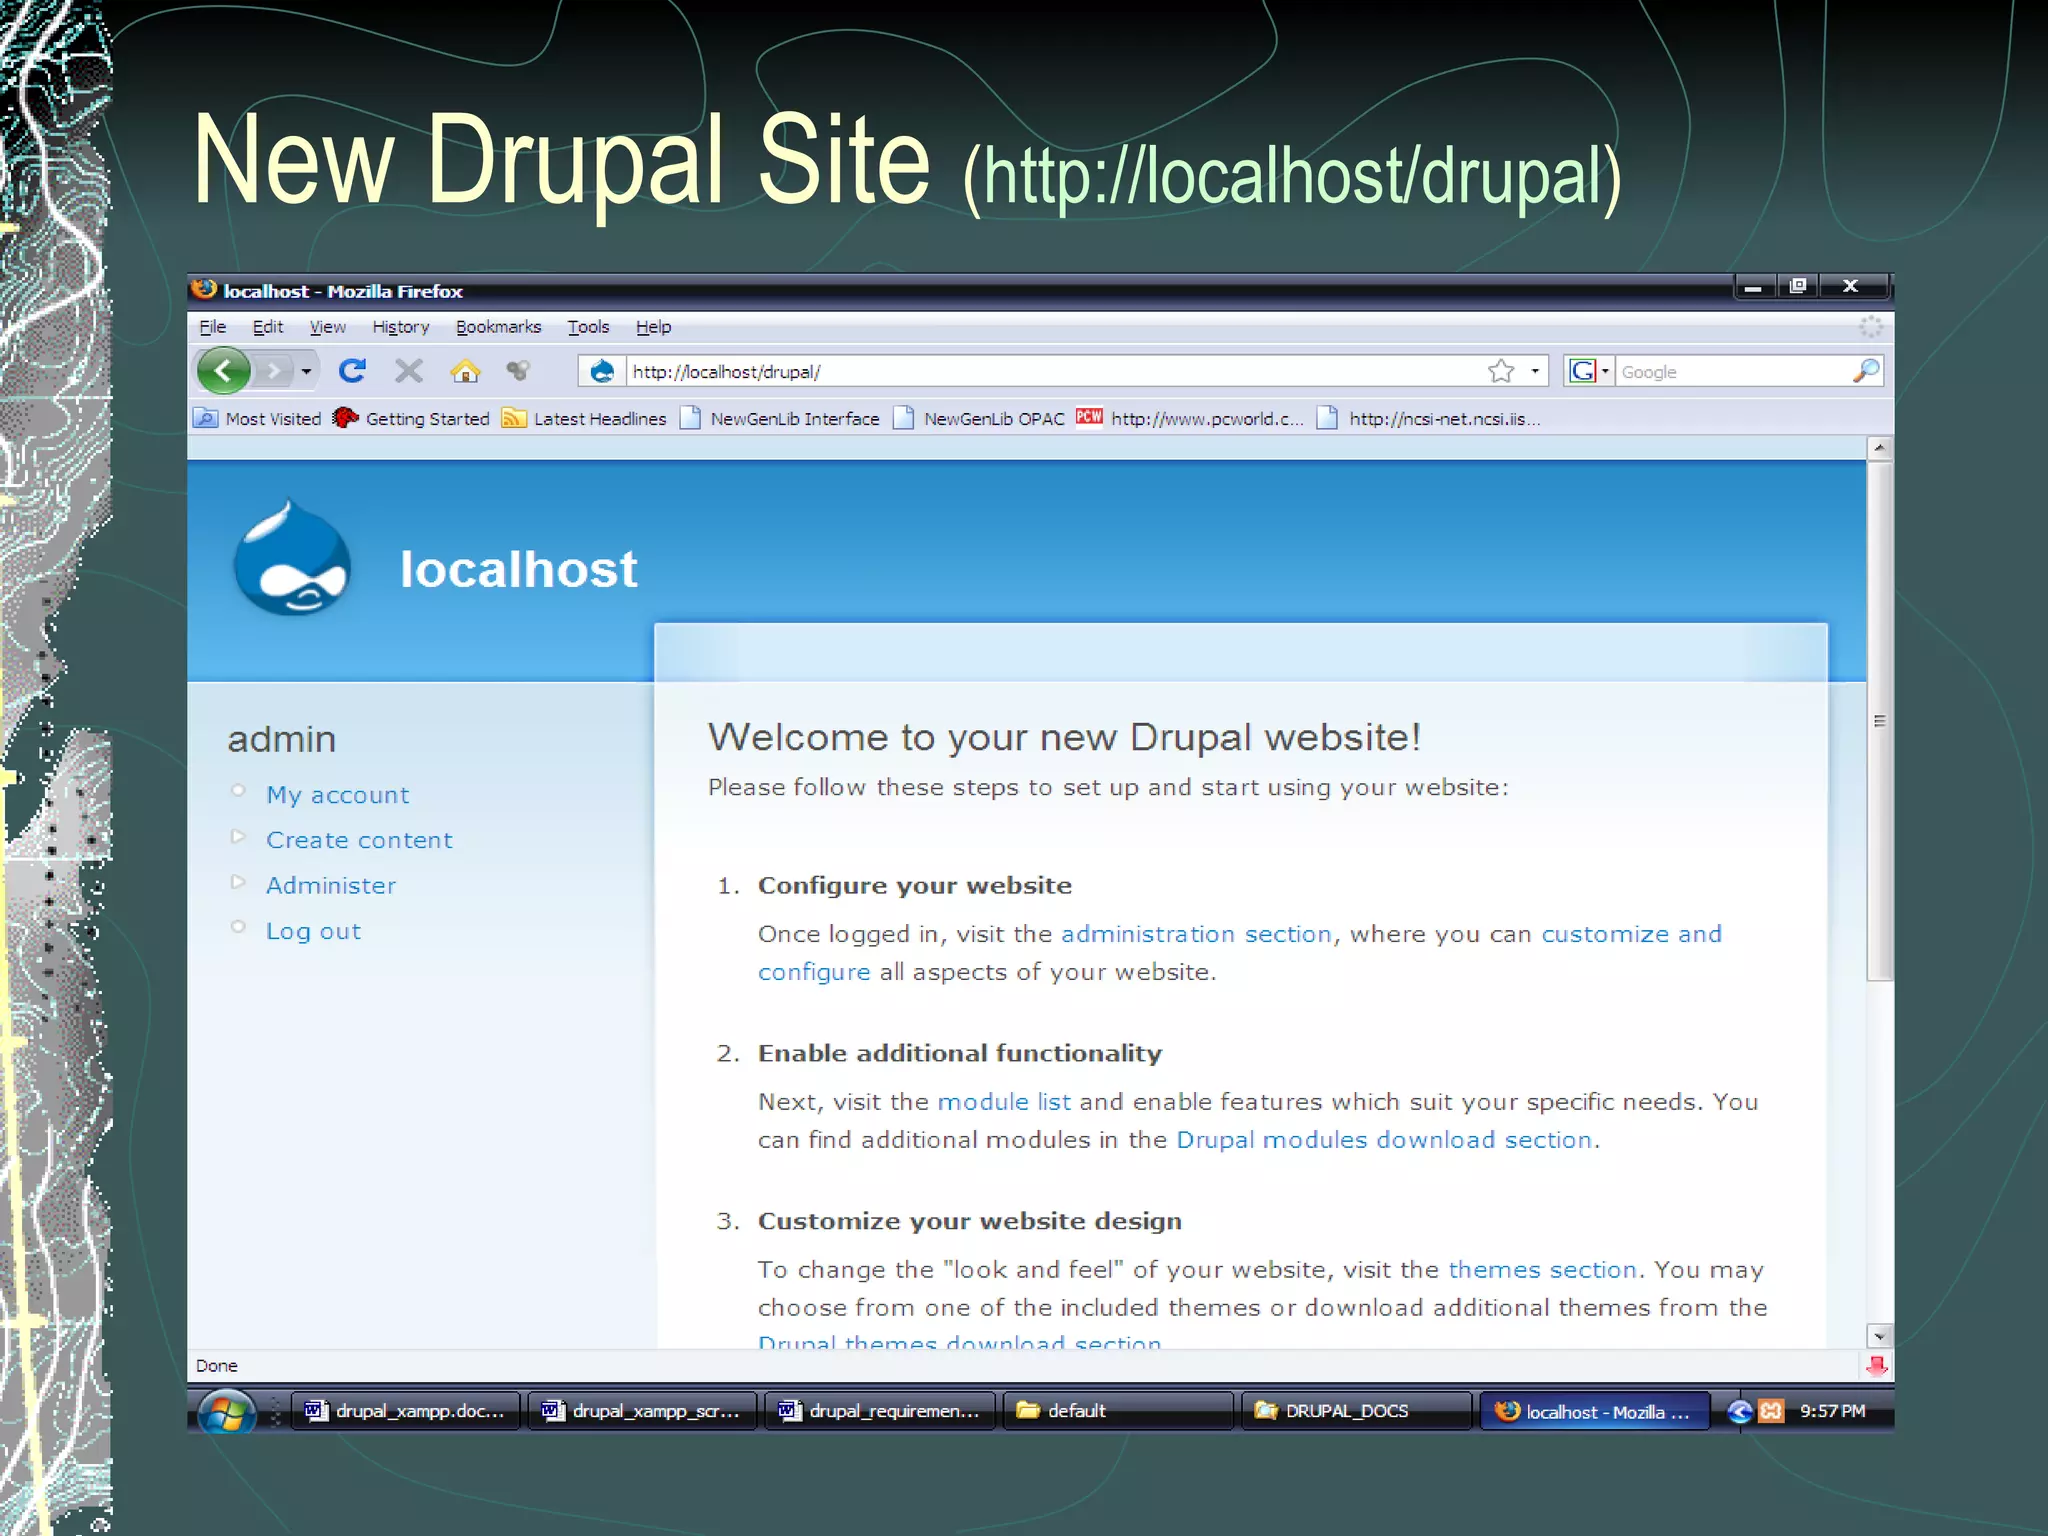
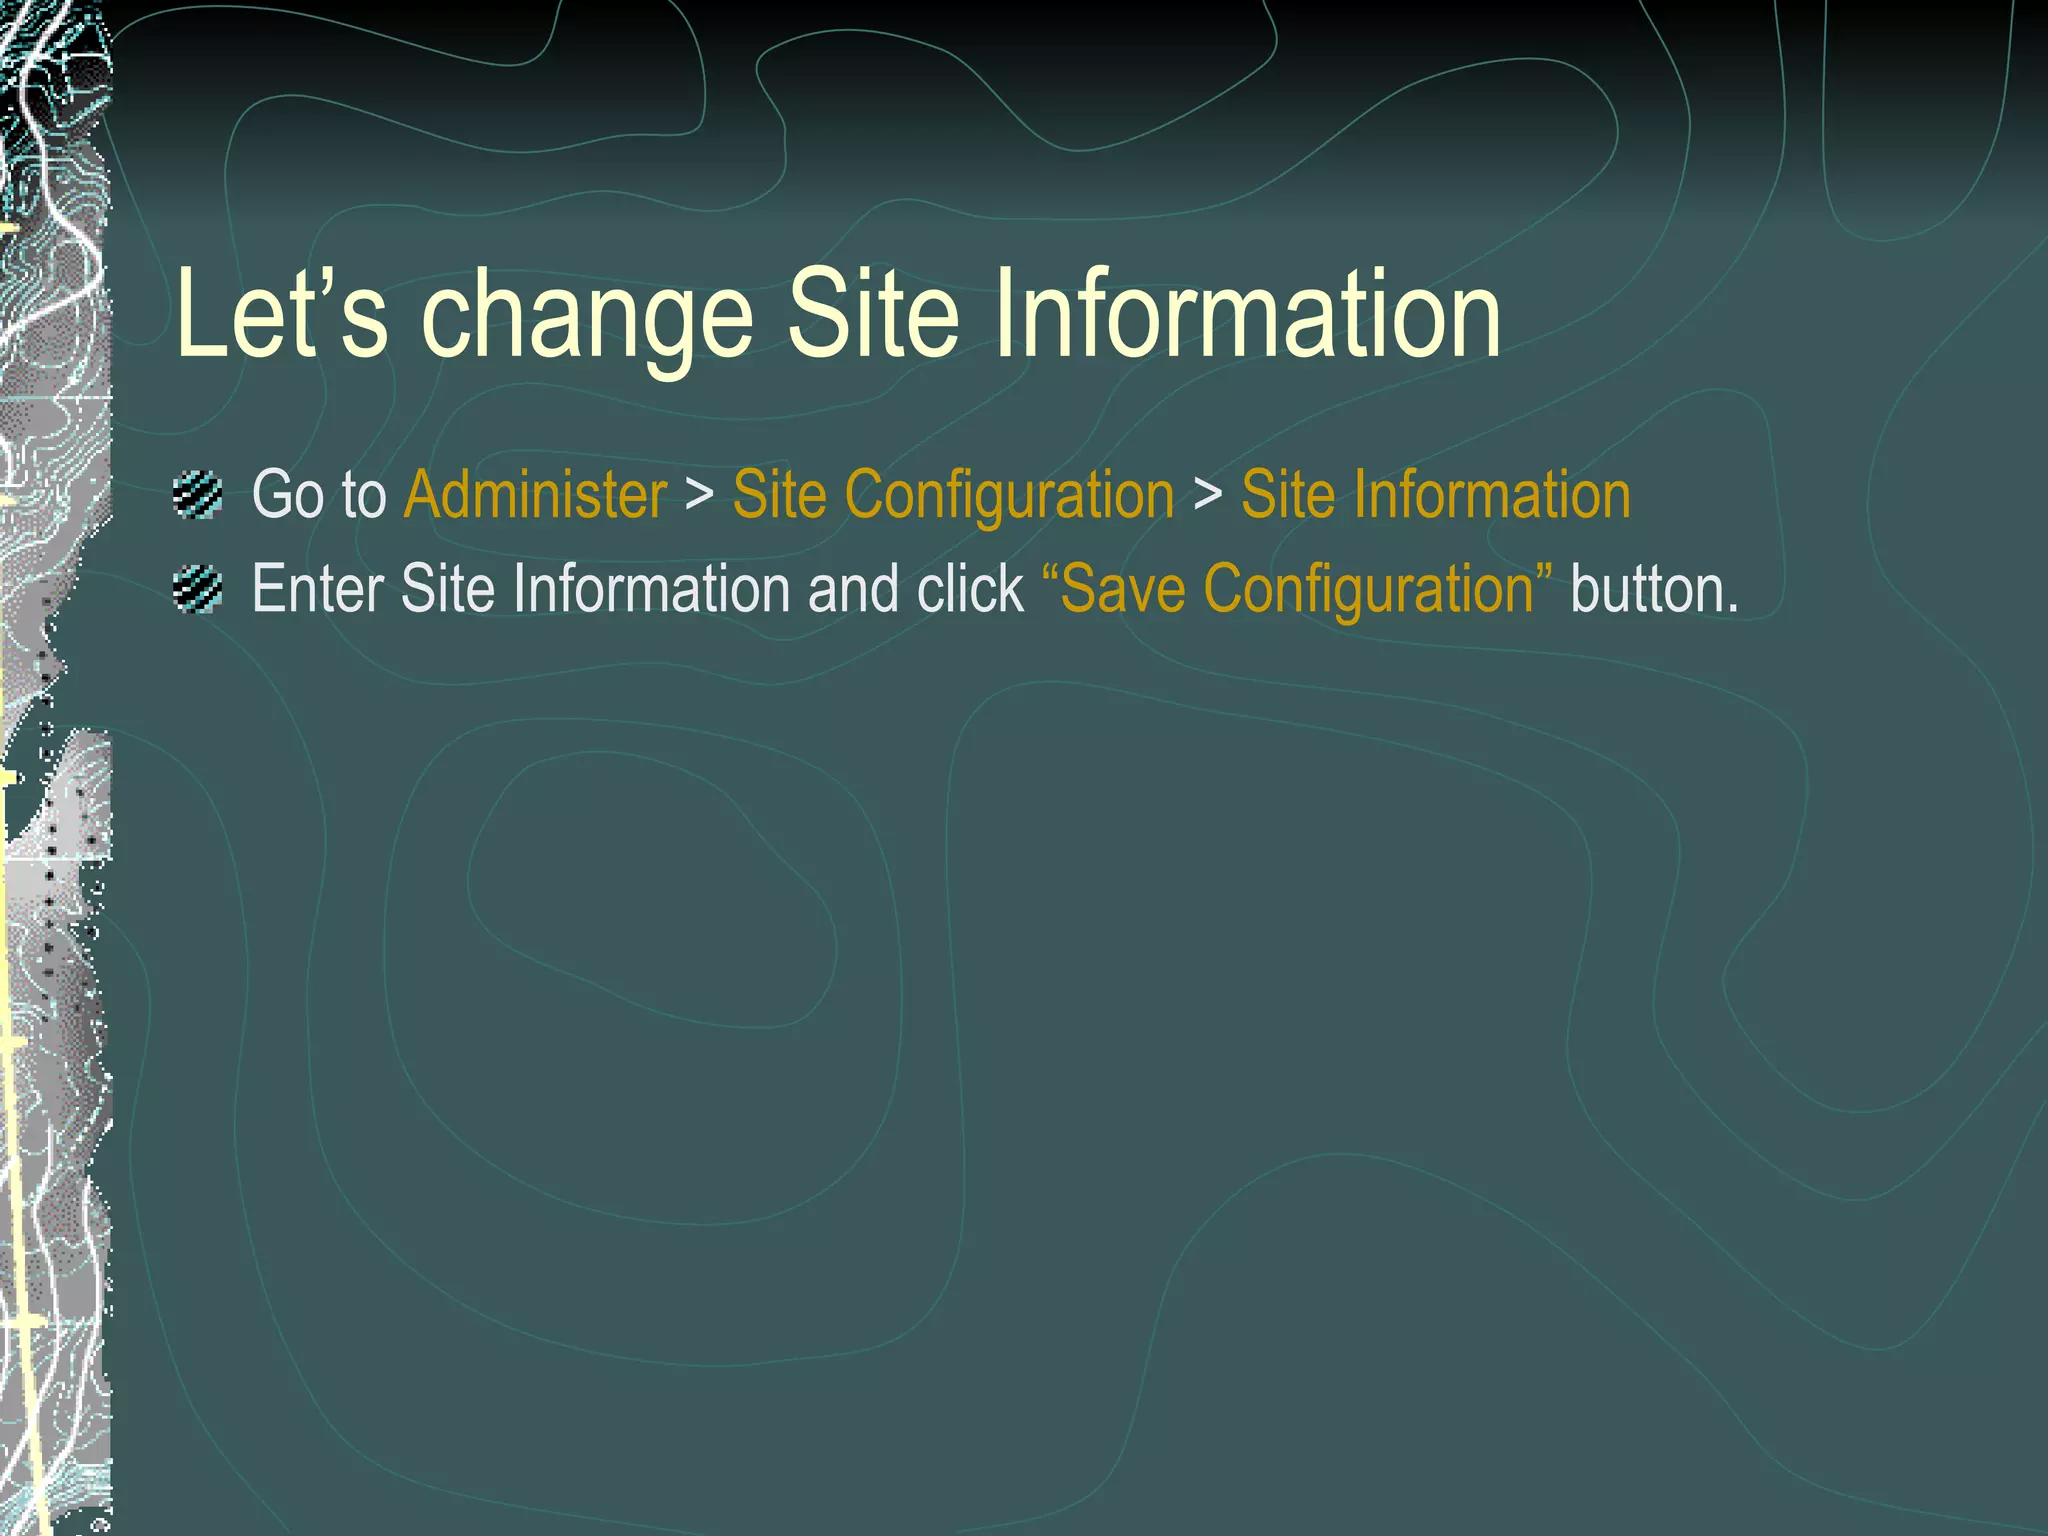
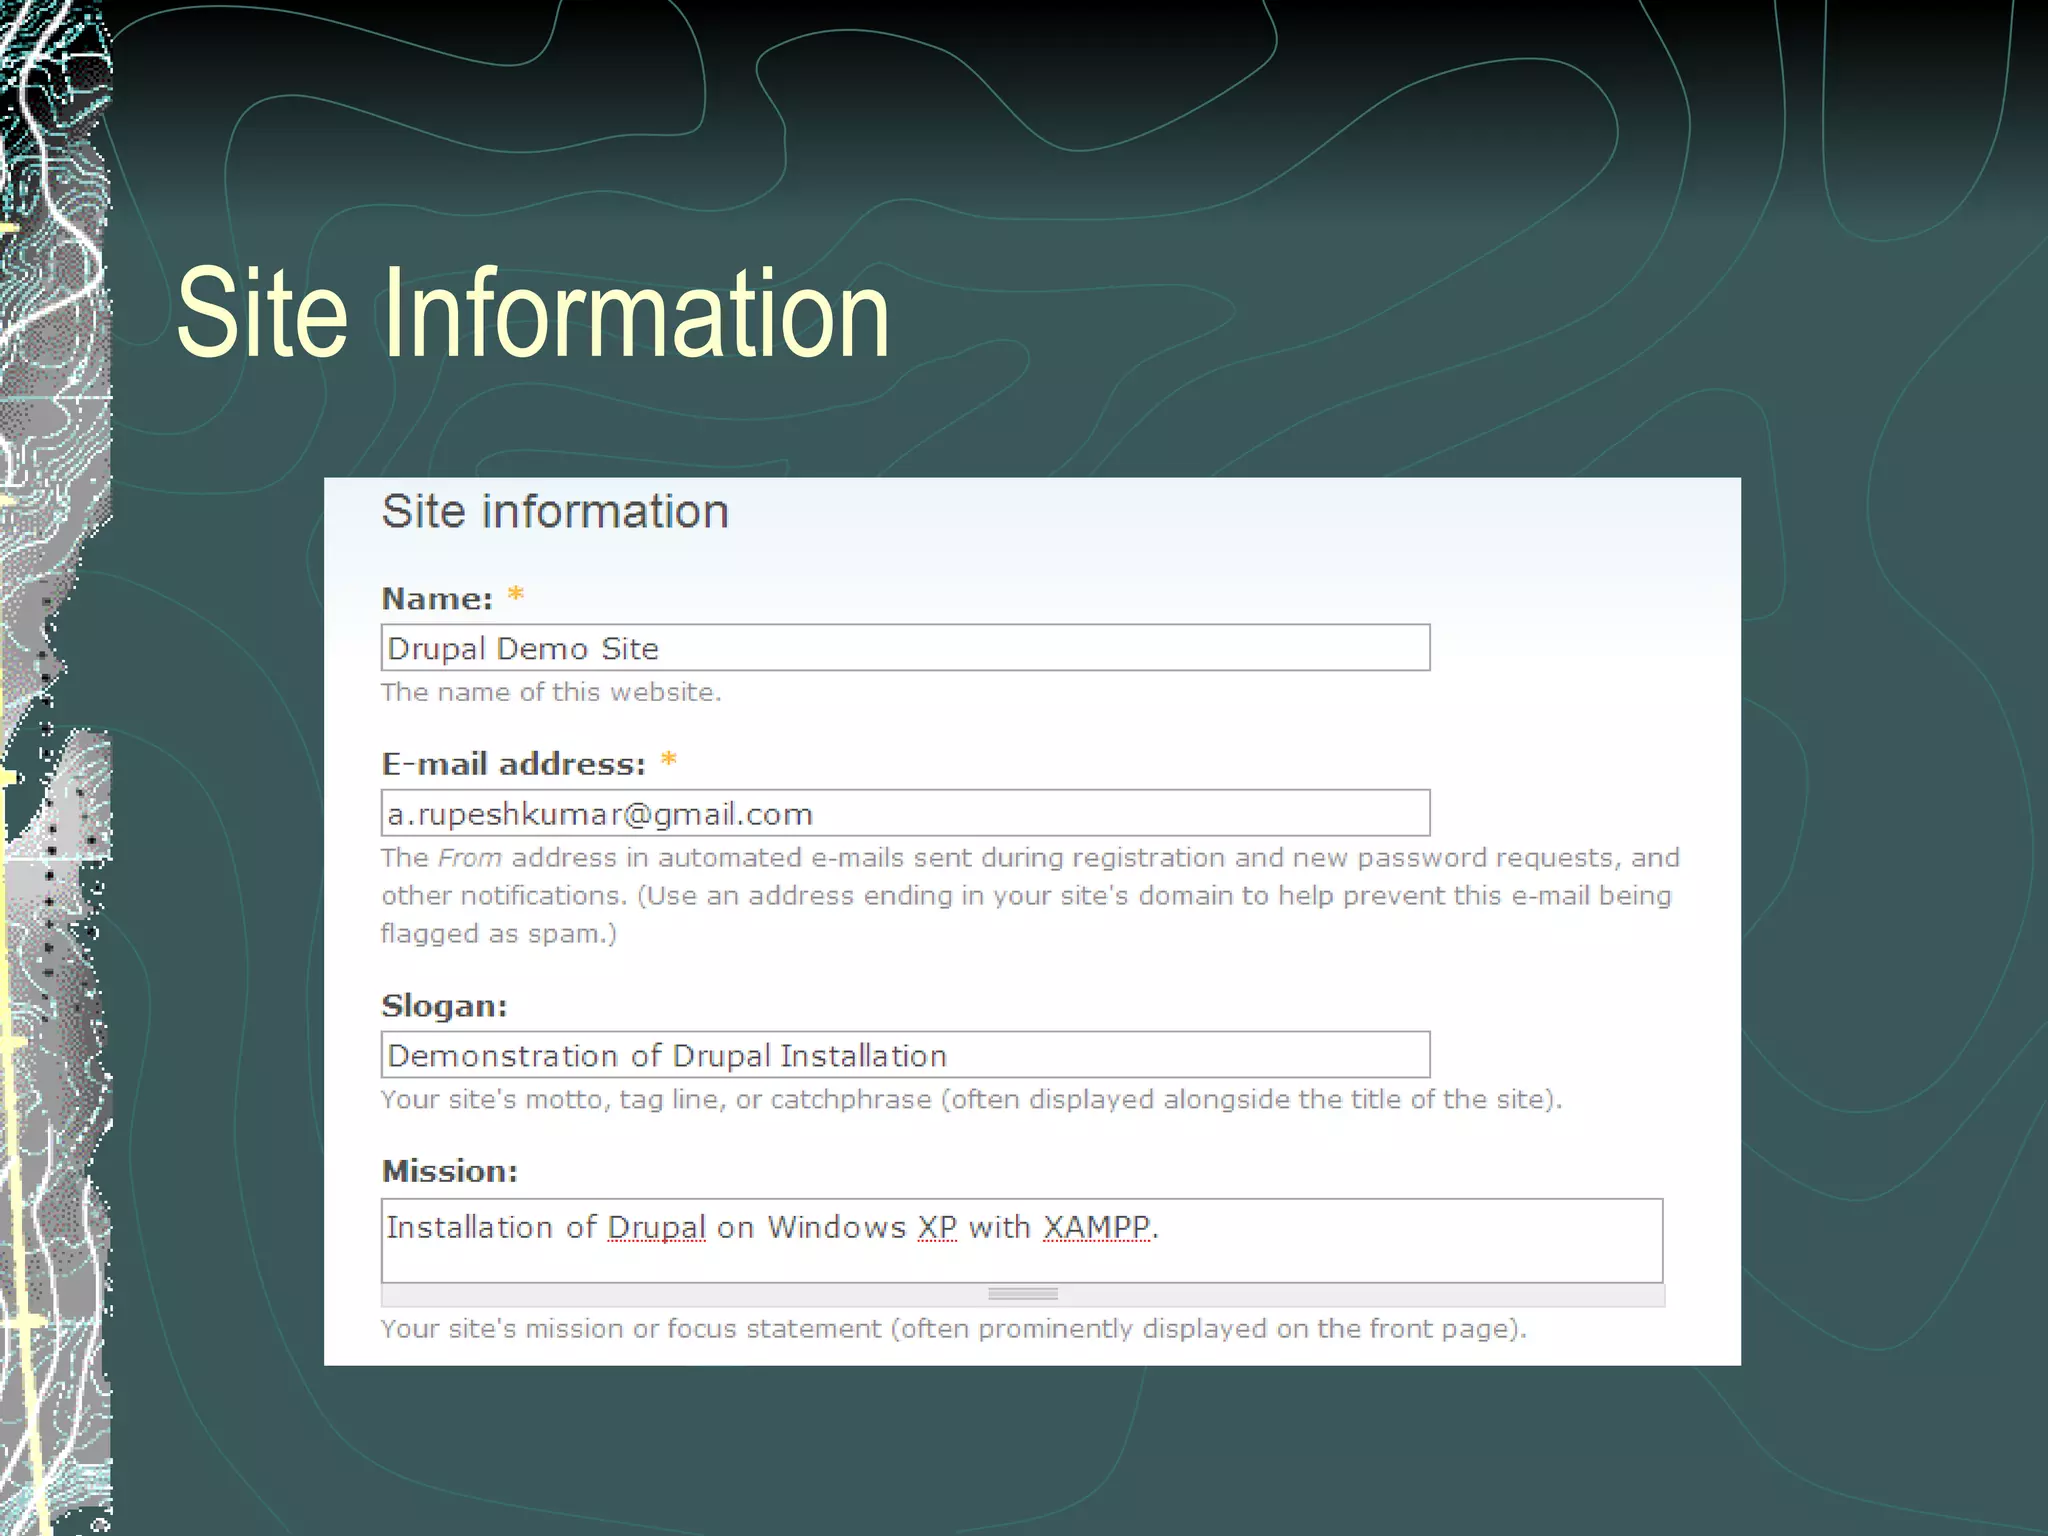
Installation of Drupal with XAMPP on Windows XP Rupesh Kumar A [email_address]
Drupal An open source web based content management system. Equipped with powerful blend of features. Supports a variety of websites ranging from personal blogs to large community-driven websites.
XAMPP XAMPP is a bundle of Apache, MySQL, PHP, FileZilla and many other utilities.  XAMPP is the ‘easiest’ way to test an AMP (Apache-MySQL-PHP) application. NOTE: XAMPP is only intended for use as a local test server which is available on your own computer. It has been created for ease-of-use, but not for production level security.
Files Required for Installation XAMPP Drupal
Download Locations XAMPP –  www.apachefriends.org/en/xampp-windows.html   Drupal –  http://www.drupal.org
Steps in Installation Extract XAMPP files. Setup XAMPP. Run XAMPP Services (Apache and MySQL). Create drupal database in MySQL. Set password for MySQL. Extract Drupal files. Enter database and server settings. Install Drupal Site and configure.
Install XAMPP XAMPP may be installed in one of the following 3 ways: Self-extracting zip archive Windows MSI Installer Source bundle XAMPP Self-extracting zip archive has been used in this example.
Extract XAMPP to a drive Double click the XAMPP self-extracting zip archive.
In the “Extract to:” column, type C:\ or click the  button and select C: drive and click “Extract” button.
Open the Extracted Folder C:\xampp Run setup_xampp.bat to setup XAMPP.
Open XAMPP Control Panel Double click xampp-control.exe to open XAMPP Control Panel Application.
Start Apache and MySQL Services Click “Start” button next to Apache and MySQL.
Test XAMPP installation Open Web browser and type  http://localhost  or  http://127.0.0.1  in the address bar.  The pre-built XAMPP page appears.  Under “Sprachen” (Language) section, click on “English”
German Version
English Version
Create ‘drupal’ database On XAMPP Page, click ‘PhpMyAdmin’ and create a new database ‘drupal’ with character set utf8 (unicode)
Click phpMyAdmin
Database name: drupal MySQL charset: UTF-8 Unicode Click “Create” button
New database ‘drupal’ created Close phpMyAdmin.
Set password for MySQL The default user ‘root’ does not have password.  Set password for the user ‘root’.  In this example, password is  admin . To set MySQL password, open Web browser, go to  http://localhost/security , scroll down and click on  http://localhost/security/xamppsecurity.php .  This will open Security Console.  Enter password for MySQL and click “Password Changing” button.
Password changed.  Restart MySQL.
Restart MySQL in XAMPP Control Panel Click “Stop” and “Start” button next to MySql.
Extract drupal files to  C:\xampp\htdocs  folder
Rename extracted folder to ‘drupal’ for simplicity
Drupal settings Open ‘drupal’ folder, copy  default.settings.php  to the same folder and rename it to  settings.php . Open settings.php with Wordpad and enter  db_url  and  base_url .
Copy  default.settings.php  and rename it to  settings.php
Open settings.php and enter  $db_url  and  $base_url Replace username by  root , password by  admin  & databasename  by  drupal
$db_url = ‘mysql://root:admin@localhost/drupal’;
Now, scroll down and enter  $base_url   Replace http://www.example.com by  http://localhost/drupal   NOTE: Remove the # sign at the beginning of the line.
$base_url = ‘http://localhost/drupal’; Save and Close settings.php file.
NOTE The settings shown in previously were entered directly in  settings.php  file.  Alternatively, the same settings can be entered using the web form interface presented by Drupal.
Install ‘Drupal’ site Open Web browser and enter  http://localhost/drupal  in the address bar Step 1: Choose language.  Click ‘Install Drupal in English’
Step 2: Verify requirements – drupal will check for required settings. Step 3: Set up database  If database and URL settings have been entered in  settings.php  file, Drupal will jump to Step 4. If database and URL settings have not been entered in  settings.php  file, Drupal presents the following form (shown in the next slide).  Enter the database and URL settings and click “ Save and continue ” button.
Enter  database name ,  database username ,  database password
Click  Advanced Options , enter Database Host, Database Port (enter only if other than standard port) and Table prefix (if multiple applications are sharing same database).  Click  Save and continue .
Step 4: Install Site – drupal will install the site.
Step 5: Configure Site – Drupal requires a few details for configuring the site.  The following details are to be entered: Site Information Administrator Account Server Settings Enter the details and click  “Save and Continue”  button.
Site Information
Administrator Account
Server Settings
Drupal Installation Complete! Drupal notifies about successful installation.  Click on  your new site  to view your site The mail server configuration warning may be ignored,  as this is a local installation.
New Drupal Site  ( http:// localhost / drupal )
Let’s change Site Information Go to  Administer  >  Site Configuration  >  Site Information Enter Site Information and click  “Save Configuration”  button.
Site Information
NOTES Please enter necessary parameters in settings.php before running drupal installation script. The settings.php should be writable, i.e., should not have ‘read only’ attribute.  This is automatically taken care of by Windows when default.settings.php is copied as settings.php.  In case the file is still read-only, right click on settings.php, go to Properties and uncheck the read-only attribute and click OK. Drupal will set back this file to read-only after installation. Set root password to MySQL. Remember Drupal Administrator Account password.  It is needed for logging in to Drupal every time.
Thanks To Drupal Team XAMPP Team Please send comments & suggestions to  [email_address]

Drupalxamppxp2 1231342958532404 1

  • 1.
    Installation of Drupalwith XAMPP on Windows XP Rupesh Kumar A [email_address]
  • 2.
    Drupal An opensource web based content management system. Equipped with powerful blend of features. Supports a variety of websites ranging from personal blogs to large community-driven websites.
  • 3.
    XAMPP XAMPP isa bundle of Apache, MySQL, PHP, FileZilla and many other utilities. XAMPP is the ‘easiest’ way to test an AMP (Apache-MySQL-PHP) application. NOTE: XAMPP is only intended for use as a local test server which is available on your own computer. It has been created for ease-of-use, but not for production level security.
  • 4.
    Files Required forInstallation XAMPP Drupal
  • 5.
    Download Locations XAMPP– www.apachefriends.org/en/xampp-windows.html Drupal – http://www.drupal.org
  • 6.
    Steps in InstallationExtract XAMPP files. Setup XAMPP. Run XAMPP Services (Apache and MySQL). Create drupal database in MySQL. Set password for MySQL. Extract Drupal files. Enter database and server settings. Install Drupal Site and configure.
  • 7.
    Install XAMPP XAMPPmay be installed in one of the following 3 ways: Self-extracting zip archive Windows MSI Installer Source bundle XAMPP Self-extracting zip archive has been used in this example.
  • 8.
    Extract XAMPP toa drive Double click the XAMPP self-extracting zip archive.
  • 9.
    In the “Extractto:” column, type C:\ or click the button and select C: drive and click “Extract” button.
  • 10.
    Open the ExtractedFolder C:\xampp Run setup_xampp.bat to setup XAMPP.
  • 11.
    Open XAMPP ControlPanel Double click xampp-control.exe to open XAMPP Control Panel Application.
  • 12.
    Start Apache andMySQL Services Click “Start” button next to Apache and MySQL.
  • 13.
    Test XAMPP installationOpen Web browser and type http://localhost or http://127.0.0.1 in the address bar. The pre-built XAMPP page appears. Under “Sprachen” (Language) section, click on “English”
  • 14.
  • 15.
  • 16.
    Create ‘drupal’ databaseOn XAMPP Page, click ‘PhpMyAdmin’ and create a new database ‘drupal’ with character set utf8 (unicode)
  • 17.
  • 18.
    Database name: drupalMySQL charset: UTF-8 Unicode Click “Create” button
  • 19.
    New database ‘drupal’created Close phpMyAdmin.
  • 20.
    Set password forMySQL The default user ‘root’ does not have password. Set password for the user ‘root’. In this example, password is admin . To set MySQL password, open Web browser, go to http://localhost/security , scroll down and click on http://localhost/security/xamppsecurity.php . This will open Security Console. Enter password for MySQL and click “Password Changing” button.
  • 21.
    Password changed. Restart MySQL.
  • 22.
    Restart MySQL inXAMPP Control Panel Click “Stop” and “Start” button next to MySql.
  • 23.
    Extract drupal filesto C:\xampp\htdocs folder
  • 24.
    Rename extracted folderto ‘drupal’ for simplicity
  • 25.
    Drupal settings Open‘drupal’ folder, copy default.settings.php to the same folder and rename it to settings.php . Open settings.php with Wordpad and enter db_url and base_url .
  • 26.
    Copy default.settings.php and rename it to settings.php
  • 27.
    Open settings.php andenter $db_url and $base_url Replace username by root , password by admin & databasename by drupal
  • 28.
  • 29.
    Now, scroll downand enter $base_url Replace http://www.example.com by http://localhost/drupal NOTE: Remove the # sign at the beginning of the line.
  • 30.
    $base_url = ‘http://localhost/drupal’;Save and Close settings.php file.
  • 31.
    NOTE The settingsshown in previously were entered directly in settings.php file. Alternatively, the same settings can be entered using the web form interface presented by Drupal.
  • 32.
    Install ‘Drupal’ siteOpen Web browser and enter http://localhost/drupal in the address bar Step 1: Choose language. Click ‘Install Drupal in English’
  • 33.
    Step 2: Verifyrequirements – drupal will check for required settings. Step 3: Set up database If database and URL settings have been entered in settings.php file, Drupal will jump to Step 4. If database and URL settings have not been entered in settings.php file, Drupal presents the following form (shown in the next slide). Enter the database and URL settings and click “ Save and continue ” button.
  • 34.
    Enter databasename , database username , database password
  • 35.
    Click AdvancedOptions , enter Database Host, Database Port (enter only if other than standard port) and Table prefix (if multiple applications are sharing same database). Click Save and continue .
  • 36.
    Step 4: InstallSite – drupal will install the site.
  • 37.
    Step 5: ConfigureSite – Drupal requires a few details for configuring the site. The following details are to be entered: Site Information Administrator Account Server Settings Enter the details and click “Save and Continue” button.
  • 38.
  • 39.
  • 40.
  • 41.
    Drupal Installation Complete!Drupal notifies about successful installation. Click on your new site to view your site The mail server configuration warning may be ignored, as this is a local installation.
  • 42.
    New Drupal Site ( http:// localhost / drupal )
  • 43.
    Let’s change SiteInformation Go to Administer > Site Configuration > Site Information Enter Site Information and click “Save Configuration” button.
  • 44.
  • 45.
    NOTES Please enternecessary parameters in settings.php before running drupal installation script. The settings.php should be writable, i.e., should not have ‘read only’ attribute. This is automatically taken care of by Windows when default.settings.php is copied as settings.php. In case the file is still read-only, right click on settings.php, go to Properties and uncheck the read-only attribute and click OK. Drupal will set back this file to read-only after installation. Set root password to MySQL. Remember Drupal Administrator Account password. It is needed for logging in to Drupal every time.
  • 46.
    Thanks To DrupalTeam XAMPP Team Please send comments & suggestions to [email_address]