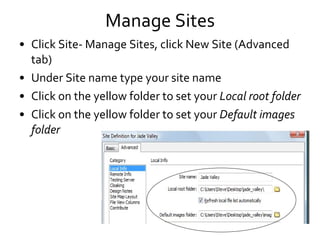
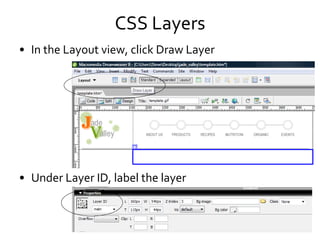
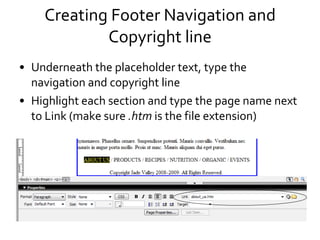
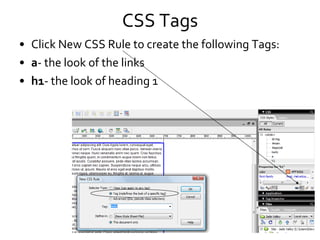
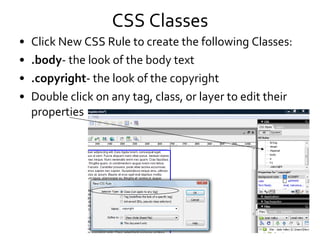
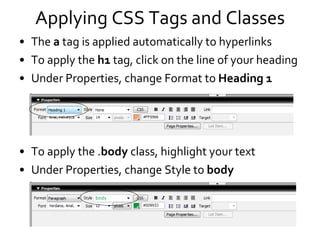
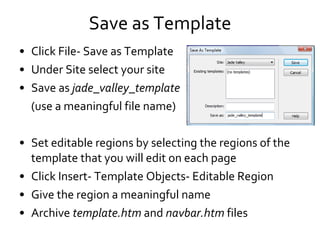
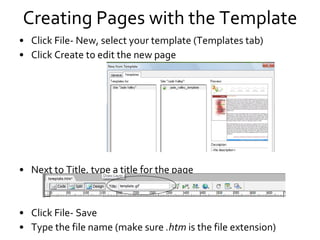
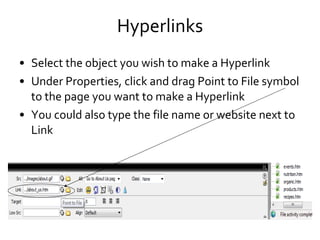
Notes
Manage Sites Click Site- Manage Sites, click New Site (Advanced tab) Under Site name type your site name Click on the yellow folder to set your  Local root folder Click on the yellow folder to set your  Default images folder
Using Exported files from Fireworks Open  template.htm Delete the navbar section (keep this section selected) Click Insert- Image Objects- Fireworks HTML Click Browse to select  navbar.htm Click File- Save Click F12 to preview in web browser
CSS Layers In the Layout view, click Draw Layer Under Layer ID, label the layer
Inserting Placeholder Text Click inside the layer where you will insert the text Click Insert- Technocurve- Lorem Ipsum Text Select how many paragraphs you need This generator will give you text to work with so you can set up the template for the entire site
Creating Footer Navigation and Copyright line Underneath the placeholder text, type the navigation and copyright line Highlight each section and type the page name next to Link (make sure  .htm  is the file extension)
CSS Tags Click New CSS Rule to create the following Tags: a - the look of the links h1 - the look of heading 1
CSS Classes Click New CSS Rule to create the following Classes:  .body - the look of the body text .copyright - the look of the copyright Double click on any tag, class, or layer to edit their properties
Applying CSS Tags and Classes The  a  tag is applied automatically to hyperlinks To apply the  h1  tag, click on the line of your heading Under Properties, change Format to  Heading 1 To apply the . body  class, highlight your text  Under Properties, change Style to  body
Save as Template Click File- Save as Template Under Site select your site Save as  jade_valley_template (use a meaningful file name) Set editable regions by selecting the regions of the template that you will edit on each page Click Insert- Template Objects- Editable Region Give the region a meaningful name Archive  template.htm  and  navbar.htm  files
Creating Pages with the Template Click File- New, select your template (Templates tab)  Click Create to edit the new page Next to Title, type a title for the page Click File- Save Type the file name (make sure  .htm  is the file extension)
Hyperlinks Select the object you wish to make a Hyperlink Under Properties, click and drag Point to File symbol to the page you want to make a Hyperlink You could also type the file name or website next to Link

Dreamweaver Notes

  • 1.
  • 2.
    Manage Sites ClickSite- Manage Sites, click New Site (Advanced tab) Under Site name type your site name Click on the yellow folder to set your Local root folder Click on the yellow folder to set your Default images folder
  • 3.
    Using Exported filesfrom Fireworks Open template.htm Delete the navbar section (keep this section selected) Click Insert- Image Objects- Fireworks HTML Click Browse to select navbar.htm Click File- Save Click F12 to preview in web browser
  • 4.
    CSS Layers Inthe Layout view, click Draw Layer Under Layer ID, label the layer
  • 5.
    Inserting Placeholder TextClick inside the layer where you will insert the text Click Insert- Technocurve- Lorem Ipsum Text Select how many paragraphs you need This generator will give you text to work with so you can set up the template for the entire site
  • 6.
    Creating Footer Navigationand Copyright line Underneath the placeholder text, type the navigation and copyright line Highlight each section and type the page name next to Link (make sure .htm is the file extension)
  • 7.
    CSS Tags ClickNew CSS Rule to create the following Tags: a - the look of the links h1 - the look of heading 1
  • 8.
    CSS Classes ClickNew CSS Rule to create the following Classes: .body - the look of the body text .copyright - the look of the copyright Double click on any tag, class, or layer to edit their properties
  • 9.
    Applying CSS Tagsand Classes The a tag is applied automatically to hyperlinks To apply the h1 tag, click on the line of your heading Under Properties, change Format to Heading 1 To apply the . body class, highlight your text Under Properties, change Style to body
  • 10.
    Save as TemplateClick File- Save as Template Under Site select your site Save as jade_valley_template (use a meaningful file name) Set editable regions by selecting the regions of the template that you will edit on each page Click Insert- Template Objects- Editable Region Give the region a meaningful name Archive template.htm and navbar.htm files
  • 11.
    Creating Pages withthe Template Click File- New, select your template (Templates tab) Click Create to edit the new page Next to Title, type a title for the page Click File- Save Type the file name (make sure .htm is the file extension)
  • 12.
    Hyperlinks Select theobject you wish to make a Hyperlink Under Properties, click and drag Point to File symbol to the page you want to make a Hyperlink You could also type the file name or website next to Link