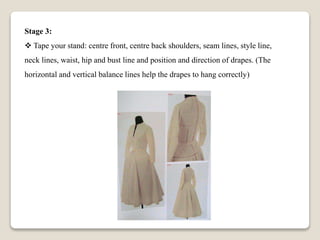
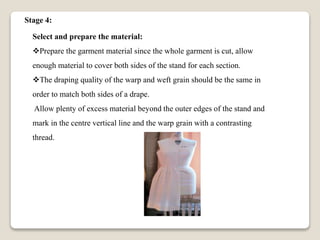
Definition
Draping is the manipulation of fabric on a three dimensional form by a designer
to obtain perfect fit and harmony between the fabrics and design of the garment and the
silhouette (outline or shape) of the individual. There are three common terms used to
describe this technique-draping, toile and modeling. A fourth term is sometimes used
namely moulage.
STEPS IN DRAPING
Stage 1:
Drape the uncut length of dress fabric over the stand.
Observe its natural characteristics, i.e. the ways it falls, its handle, texture and
weight etc.
Do not cut into the fabric, but pin to hold where necessary.
Stage 2:
Substitute dress fabrics; To model the entire garments in the actual fabric is
ideal, but unfortunately it makes experimentation expensive. For this reason, use
a fabric with similar properties which has been left over from a previous
collection.
Alternatively, the non-draped parts of the garment can be modelled in muslin
with just the draped sections made in the actual fabric. When draped designs for
checks or stripes, mark in the position of the lines on the muslin to get the effect
of the fabric and to match the lines along the seams.
Stage 3:
 Tape your stand: centre front, centre back shoulders, seam lines, style line,
neck lines, waist, hip and bust line and position and direction of drapes. (The
horizontal and vertical balance lines help the drapes to hang correctly)
Select and prepare the material:
Prepare the garment material since the whole garment is cut, allow
enough material to cover both sides of the stand for each section.
The draping quality of the warp and weft grain should be the same in
order to match both sides of a drape.
Allow plenty of excess material beyond the outer edges of the stand and
mark in the centre vertical line and the warp grain with a contrasting
thread.
Stage 4:
Stage 5:
Place and pin material onto the stand in the following way:
 A full toile is required, but need to model one side only, except for asymmetric
designs where both sides must be modeled.
 Line up the vertical central thread with the centre front line of the stand, and pin.
To avoid injury to the fabric, use very fine pins, e.g. silk pins, and keep pinning to a
minimum.
 Mould the fabric around the stand as desired, allowing the excess fabric to fall
freely into the area.
Where required the fullness of the drape to be placed. Use drapes in place of darts.
The drapes can be continuing along the out edges of the stand and be allowed to
fall forwards or backwards into a cascade of drapery or be caught up into a seam line
etc.
Stage 6:
All the details should be indicated with pins rather than chalk and pins should follow
the direction of any darts, tucks, seams etc.,
Stage 7:
Remove from stand.
Stage 8:
Press: Do not press over pins as they will leave an impression in the fabric.
Stage 9:
 True all lines of check details. The rough design now needs to be trued in order to
establish the correct grain line and to ensure that the armhole, underarm sears and
shoulder are the same length. Both sides although perhaps not the same shape on the
left and right side if the design is asymmetric.
When a symmetric full toile is modeled, the left and right side will not be exactly
the same. Therefore, choose the better side and fold that side over on
the centre line on the double to transfer shape and details. Transfer all markings with
thread.
Stage 10:
Check seam allowances.
Stage 11:
Make up and press
Stage 12:
Places on stand are model and check for any discrepancies.
Draping

Draping

  • 2.
    Definition Draping is themanipulation of fabric on a three dimensional form by a designer to obtain perfect fit and harmony between the fabrics and design of the garment and the silhouette (outline or shape) of the individual. There are three common terms used to describe this technique-draping, toile and modeling. A fourth term is sometimes used namely moulage.
  • 3.
    STEPS IN DRAPING Stage1: Drape the uncut length of dress fabric over the stand. Observe its natural characteristics, i.e. the ways it falls, its handle, texture and weight etc. Do not cut into the fabric, but pin to hold where necessary. Stage 2: Substitute dress fabrics; To model the entire garments in the actual fabric is ideal, but unfortunately it makes experimentation expensive. For this reason, use a fabric with similar properties which has been left over from a previous collection. Alternatively, the non-draped parts of the garment can be modelled in muslin with just the draped sections made in the actual fabric. When draped designs for checks or stripes, mark in the position of the lines on the muslin to get the effect of the fabric and to match the lines along the seams.
  • 4.
    Stage 3:  Tapeyour stand: centre front, centre back shoulders, seam lines, style line, neck lines, waist, hip and bust line and position and direction of drapes. (The horizontal and vertical balance lines help the drapes to hang correctly)
  • 5.
    Select and preparethe material: Prepare the garment material since the whole garment is cut, allow enough material to cover both sides of the stand for each section. The draping quality of the warp and weft grain should be the same in order to match both sides of a drape. Allow plenty of excess material beyond the outer edges of the stand and mark in the centre vertical line and the warp grain with a contrasting thread. Stage 4:
  • 6.
    Stage 5: Place andpin material onto the stand in the following way:  A full toile is required, but need to model one side only, except for asymmetric designs where both sides must be modeled.  Line up the vertical central thread with the centre front line of the stand, and pin. To avoid injury to the fabric, use very fine pins, e.g. silk pins, and keep pinning to a minimum.  Mould the fabric around the stand as desired, allowing the excess fabric to fall freely into the area. Where required the fullness of the drape to be placed. Use drapes in place of darts. The drapes can be continuing along the out edges of the stand and be allowed to fall forwards or backwards into a cascade of drapery or be caught up into a seam line etc.
  • 7.
    Stage 6: All thedetails should be indicated with pins rather than chalk and pins should follow the direction of any darts, tucks, seams etc., Stage 7: Remove from stand. Stage 8: Press: Do not press over pins as they will leave an impression in the fabric.
  • 8.
    Stage 9:  Trueall lines of check details. The rough design now needs to be trued in order to establish the correct grain line and to ensure that the armhole, underarm sears and shoulder are the same length. Both sides although perhaps not the same shape on the left and right side if the design is asymmetric. When a symmetric full toile is modeled, the left and right side will not be exactly the same. Therefore, choose the better side and fold that side over on the centre line on the double to transfer shape and details. Transfer all markings with thread.
  • 9.
    Stage 10: Check seamallowances. Stage 11: Make up and press Stage 12: Places on stand are model and check for any discrepancies.