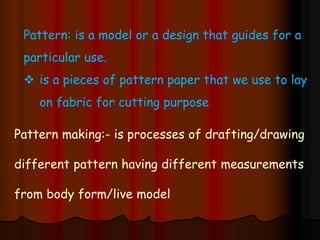
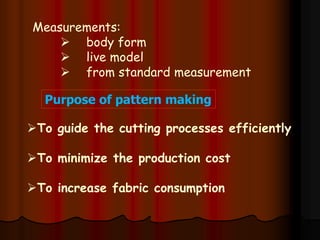
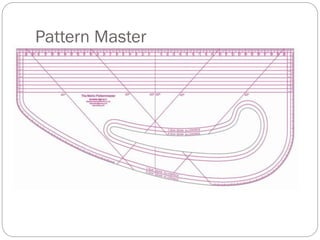
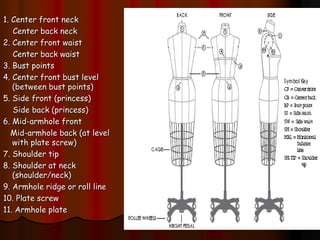
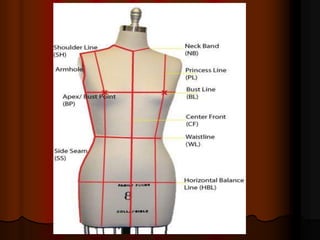
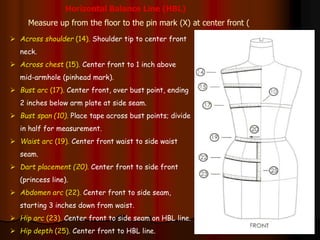
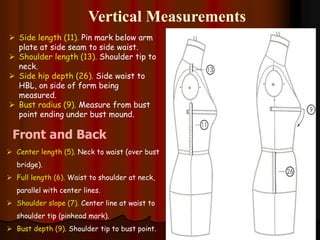
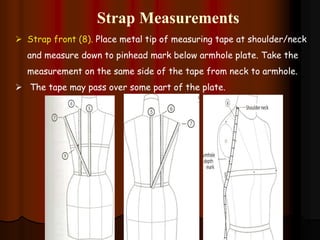
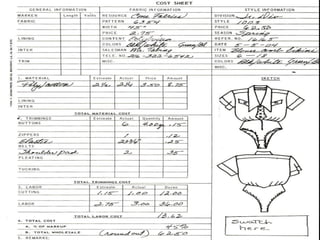
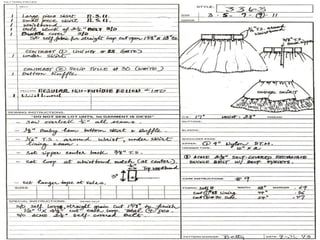
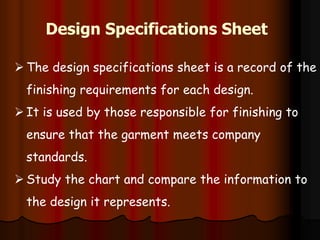
The document provides information about pattern making for men's clothing. It discusses what pattern making is, the purpose of pattern making, and common pattern making tools. It also describes different pattern making methods like direct drafting, flat pattern, and draping. Measurement is a key part of pattern making to accurately create patterns for garments. The document outlines important body measurement landmarks and techniques for properly measuring the body or a form. It also discusses other important pattern making documents like cost sheets, pattern charts, design specification sheets, and technical packs which provide production details for patterns and garments. Accurate measurement and documentation are essential for successful pattern making.
This session seeks to enlighten the learner on what pattern is, its improtance and and ways of obtaining them. it also help you to identify the tools and materials needed for pattern making
This presentation was made to have an elaborate sense of fabric spreading. Different types of fabric spreading and the pros and cons of different fabric spreading is illustrated into the presentation.
DART MANIPULATION ALLOWS ONE TO MOVE DART FROM ITS ORIGINAL POSITION TO A NEW POSITION IN THE SLOPER.
THIS SLIDE TEACHES STEP BY STEP WITH ILLUSTRATIONS HOW TO MOVE DARTS USING BOTH THE SLASH AND SPREAD METHOD AND PIVOT METHOD.
A Merchandiser plays very important role in the apparel industry.
The objective of the merchandising management team is to get the correct balance between the expectations of the customer and the objectives of the company’s financial strategy.
Sampling department is known as the heart of an apparel industry. Company profit or loss depends on this department. Therefore the responsibility of this department is very high.
Careful study & understanding of Tech Pack/files will reduce errors in production, reduce issues with communication, and ultimately can save lots of money and frustration.
By applying their knowledge about fabric and clothing construction, the supplier will study the T/F and find the best way to manufacture the item while taking things like price and buyer’s requirements into consideration.
Learning diary / theoretical material of 2D Apparel CAD and Grading. Contains important terminologies for the subject, primarily terms revolving around pattern making, pattern grading, measurements, CAD, marker making, spreading and cutting of apparel. A go-to theory book to quickly understand grade concepts, extremely helpful for concerned students.
Welcome to TechSoup New Member Orientation and Q&A (May 2024).pdfTechSoup
In this webinar you will learn how your organization can access TechSoup's wide variety of product discount and donation programs. From hardware to software, we'll give you a tour of the tools available to help your nonprofit with productivity, collaboration, financial management, donor tracking, security, and more.
Acetabularia Information For Class 9 .docxvaibhavrinwa19
Acetabularia acetabulum is a single-celled green alga that in its vegetative state is morphologically differentiated into a basal rhizoid and an axially elongated stalk, which bears whorls of branching hairs. The single diploid nucleus resides in the rhizoid.
Palestine last event orientationfvgnh .pptxRaedMohamed3
An EFL lesson about the current events in Palestine. It is intended to be for intermediate students who wish to increase their listening skills through a short lesson in power point.
Introduction to AI for Nonprofits with Tapp NetworkTechSoup
Dive into the world of AI! Experts Jon Hill and Tareq Monaur will guide you through AI's role in enhancing nonprofit websites and basic marketing strategies, making it easy to understand and apply.
The Roman Empire A Historical Colossus.pdfkaushalkr1407
The Roman Empire, a vast and enduring power, stands as one of history's most remarkable civilizations, leaving an indelible imprint on the world. It emerged from the Roman Republic, transitioning into an imperial powerhouse under the leadership of Augustus Caesar in 27 BCE. This transformation marked the beginning of an era defined by unprecedented territorial expansion, architectural marvels, and profound cultural influence.
The empire's roots lie in the city of Rome, founded, according to legend, by Romulus in 753 BCE. Over centuries, Rome evolved from a small settlement to a formidable republic, characterized by a complex political system with elected officials and checks on power. However, internal strife, class conflicts, and military ambitions paved the way for the end of the Republic. Julius Caesar’s dictatorship and subsequent assassination in 44 BCE created a power vacuum, leading to a civil war. Octavian, later Augustus, emerged victorious, heralding the Roman Empire’s birth.
Under Augustus, the empire experienced the Pax Romana, a 200-year period of relative peace and stability. Augustus reformed the military, established efficient administrative systems, and initiated grand construction projects. The empire's borders expanded, encompassing territories from Britain to Egypt and from Spain to the Euphrates. Roman legions, renowned for their discipline and engineering prowess, secured and maintained these vast territories, building roads, fortifications, and cities that facilitated control and integration.
The Roman Empire’s society was hierarchical, with a rigid class system. At the top were the patricians, wealthy elites who held significant political power. Below them were the plebeians, free citizens with limited political influence, and the vast numbers of slaves who formed the backbone of the economy. The family unit was central, governed by the paterfamilias, the male head who held absolute authority.
Culturally, the Romans were eclectic, absorbing and adapting elements from the civilizations they encountered, particularly the Greeks. Roman art, literature, and philosophy reflected this synthesis, creating a rich cultural tapestry. Latin, the Roman language, became the lingua franca of the Western world, influencing numerous modern languages.
Roman architecture and engineering achievements were monumental. They perfected the arch, vault, and dome, constructing enduring structures like the Colosseum, Pantheon, and aqueducts. These engineering marvels not only showcased Roman ingenuity but also served practical purposes, from public entertainment to water supply.
4. Pattern: is a model or a design that guides for a
particular use.
is a pieces of pattern paper that we use to lay
on fabric for cutting purpose
Pattern making:- is processes of drafting/drawing
different pattern having different measurements
from body form/live model
5. Purpose of pattern making
To guide the cutting processes efficiently
To minimize the production cost
To increase fabric consumption
Measurements:
body form
live model
from standard measurement
6. Pattern is developed from the block that includes all the
information needed for cutting and production of the
garment including seam allowance.
Things to be included on a pattern are:-
Grain line
Centre Front or Centre Back
Style number or code number of the pattern set
may be evolved e.g. AB 01 here AB
7. identify type of the garment and 01 identify the piece
number of complete set. If there are 5 pattern pieces in a
garment, the pieces will be numbered as AB 01, AB 02, AB
03, AB 04 and AB 05.
Pattern piece e.g. skirt front, skirt back, side front etc.
Size as 32, 34, 36, or S, M, L etc.
Cutting information - It should be clearly mentioned as to
how many pieces are to be cut e.g. Cut 1, Cut 2, Cut on fold
Notches - Marks that are needed to help assemble garment
sections correctly.
8. Directional Fabrics - For fabrics which have
designs in one direction such as floral print,
stripes, plaid, velvet, fur etc. A symbol "cut
one way" or is indicated on the pattern.
Date - Indicated as a reference point.
Seam Allowances.
9.
10.
11. Pattern Making toolsName of Tool Image Description of Use
Set Square
This is used to draw perpendicular lines that
need to be squared out.
Shears
The Shears is used to cut pattern and fabric,
though the Pattern Maker has 2 separate shears
for both of them
French Curve
Transparent curve is especially valuable for
shaping edges of curved collars, armscyes and
necklines. Additional types of these curves are
also valuable to have at the patternmaking table.
Notcher
The notch tool has a cutting blade that slips into
the pattern's edge leaving an 1/8- to 1/4-inch cut-
out. As the patterns are traced the notch cut-outs
are marked on the fab-ric. The cutter slashes the
fabric at these locations. The seamstress
assembles and stitches the garment parts
following the slashes
12. Tracing wheel
This instrument saves hours of needless labor of
thread marking. It is used to transfer lines or
symbols from one pattern to another or from the
final pattern to the muslin or fabric.
Hip curves
It proves useful at the dress designer's table when
establishing curves of reveres, or when adding
flares to gored skirt sections. It also is used for
the side seams and the inseams of trousers and
the like.
Measuring Tape
The Pattern Makers companion. It is a soft
instrument to measure distances.
Awl
The awl is used to mark the darts and note the
main points of a size on a gradation plan.
Transparent Ruler
It is divided into one eighth inch squares. As so
many measurements in pattern making are based
upon eighths of an inch, this ruler comes into use
conveniently. It is also valuable when
establishing seam allowances on final Patterns.
14. Basic pattern set. A five-piece pattern set, consisting of
front and back bodice and skirt and a long sleeve,
which represents the dimensions of a specific form or
figure. It is developed without design features. It is
always traced for patternmaking when using the slash
and spread technique described in
16. Direct Drafting Method
Direct drafting method or Pattern drafting is a system of
pattern cutting that uses a combination of ease allowance
and body measurement taken from body measurement of
the customer or dress form measurement to create
patterns for the chosen design.
It is a method of pattern construction based on the
systematic draft of measurements taken directly from
the human form.
17. Flat patternmaking A system of patternmaking that is
dependent on previously developed patterns.
Flat Pattern Method is a method where in body or dress
form measurements are taken for developed a pattern.
Following a logical stepwise procedure, the measurements
are then converted into a pattern.
In other words this system depends on accurate
measurements to complete the paper pattern.
There are limitless designs, which can be achieved for
workable garments.
Flat Pattern Method
18. Flat pattern making should be done in conjunction with a
dress form so that as the design evolves, proportion and
balance in the garment can be checked side by side.
It is important to transfer the pattern on to a muslin (toile
pronounced as 'twall') to test the fit, on a dress form or a
human figure.
Flat pattern cutting is now widely used because of its
accuracy of sizing and the speed with which complicated
designs are made.
19. It is a system of creating patterns by manipulating a basic
block.
The basic block contains a movement ease allowance which
allows the body to perform a variety of normal body
functions that require movement of various body parts.
Creating a fashion pattern by using the flat pattern making
method is reasonably logical and easy to understand, the
flat pattern making method brings consistency of both size
and fit of mass-produced garment and is also the fastest
and most efficient pattern design method.
20. Draping
Draping method is the oldest pattern making
method and is generally regarded as a creative
approach.
In this method a piece of two-dimensional fabric
is draped directly on a dress form or figure and
made to fit on the dress form to achieve the
desired look or shape.
21. The fabric may conform to the basic shape of the
form or arranged artistically in folds for a
specific design.
This muslin pattern is then transferred on the
paper, corrections are made, if any, and then the
same are converted into a final pattern
22.
23. Different Type of Sample
Development Sample: Which sample make by available fabric
& accessories and send to buyer to collect order from the
buyer that is called development sample.
Fit sample: Medium or large size have to send buyer for
checking fits of dummy that is called fit sample
Pr-production sample (PP Sample): which sample make by
actual fabric & accessories and send to buyer for final
approval to start production.
24. Size set sample: send to local buying house all size sample
made by according to order, style & color& get them
approved from buying house
Counter sample: To reserved with pattern for future order
from buyer that is called counter sample
Shipment sample: according to the buyer requirement like
accessories, ploy bag, tag etc. is been made and kept ready
to ship the before dispatched.
25. LANDMARK TERMS
To measure accurately, you must know where the landmarks
are and identify them point to point for specific locations.
The following landmarks identify the parts of the form that
are referred to when measuring from one landmark to
another. Numbers refer to both the front and back
wherever indicated.
Personal fit. The instruction applies to models that will be
measured for drafting the basic patterns.
26. 1. Center front neck
Center back neck
2. Center front waist
Center back waist
3. Bust points
4. Center front bust level
(between bust points)
5. Side front (princess)
Side back (princess)
6. Mid-armhole front
Mid-armhole back (at level
with plate screw)
7. Shoulder tip
8. Shoulder at neck
(shoulder/neck)
9. Armhole ridge or roll line
10. Plate screw
11. Armhole plate
27.
28. Q1. What is the necessity of sending sample to
the customer?
Q2. Do you think pattern developing is
important for fitness and quality of the
design?? How???
30. Importance of measurement
A professional patternmaker must have a full-scale model
for fitting patterns and garments.
Measurements must be taken from a body form or live
model carefully, keeping in mind that any mistakes will be
transferred onto the patterns and will cause fit problems.
In order to construct garments that fit well, body
measurements must be taken with precision. we can
draft original patterns based on these measurements
which can be used as the basis of a variety of styles.
31. PREPARATION FOR MEASURING
For taking the measurements, use a good quality measuring
tape which is sturdy and will not stretch.
The metal end of the tape should be used for vertical
measurements and the other end for horizontal and
circumference measurements.
The measurements should be taken over a smooth fitting
foundation garment and never over bulky garments.
Before taking measurements, tie a cord or string
around the waist.
Next, take ¼” wide tape and cast it around your armhole
32. This will make it easier to measure width of shoulders,
arms depth etc.
Stand erect with the arms hanging straight at the
sides while measurements are being made by some one
else.
Take snug measurements rather that tight or loose ones.
Hold the tape parallel to the floor for horizontal
measurements, and perpendicular to the floor for
vertical measurements.
As the measurements are taken, record them in a note
book.
33. Q. What happen if we didn’t measure horizontal
measurements parallel to the floor, and the
vertical measurement perpendicular to the floor?
35. Taking Measurement methods
Bust (1). Across bust points and back.
Waist (2). Around waist.
Abdomen (3). Three inches below waist.
Hip (4). Measure widest area with tape
parallel with floor. Pin to mark hip level
at center front (referred to as X-point).
Circumference Measurements
36. Horizontal Balance Line (HBL)
Measure up from the floor to the pin mark (X) at center front (
Across shoulder (14). Shoulder tip to center front
neck.
Across chest (15). Center front to 1 inch above
mid-armhole (pinhead mark).
Bust arc (17). Center front, over bust point, ending
2 inches below arm plate at side seam.
Bust span (10). Place tape across bust points; divide
in half for measurement.
Waist arc (19). Center front waist to side waist
seam.
Dart placement (20). Center front to side front
(princess line).
Abdomen arc (22). Center front to side seam,
starting 3 inches down from waist.
Hip arc (23). Center front to side seam on HBL line.
Hip depth (25). Center front to HBL line.
37. Back neck (12). Center back neck to shoulder at
neck. Reference measurement.
Across shoulder (14). Shoulder tip to center back
neck.
Across back (16). Center back to 1 inch above the
mid-armhole at ridge of pinhead.
Back arc (18). Center back to bottom of arm plate.
Waist arc (19). Center back waist to side waist
seam.
Dart placement (20). Center back waist to side back
(princess line).
Abdomen arc (22). Center back to side seam,
starting 3 inches down from waist.
Hip arc (23). Center back to side seam on HBL line.
Hip depth (25). Center back waist to HBL line.
38. Vertical Measurements
Side length (11). Pin mark below arm
plate at side seam to side waist.
Shoulder length (13). Shoulder tip to
neck.
Side hip depth (26). Side waist to
HBL, on side of form being
measured.
Bust radius (9). Measure from bust
point ending under bust mound.
Front and Back
Center length (5). Neck to waist (over bust
bridge).
Full length (6). Waist to shoulder at neck,
parallel with center lines.
Shoulder slope (7). Center line at waist to
shoulder tip (pinhead mark).
Bust depth (9). Shoulder tip to bust point.
39. Strap Measurements
Strap front (8). Place metal tip of measuring tape at shoulder/neck
and measure down to pinhead mark below armhole plate. Take the
measurement on the same side of the tape from neck to armhole.
The tape may pass over some part of the plate.
40. Cost Sheet
A cost sheet is a complete record of each design and is
used to cost the garment and establish the wholesale
price.
The top part of the form (items 1 and 2) is completed in
the design room.
It should include the names and telephone numbers of the
salesperson and the fabric and trim companies, as well as
fabric swatches, a sketch, and special pattern information
or instructions.
41. The original copy is for the manufacturer or
production person, who completes the lower part
(items 3 and 4) and marks yardage.
This provides the manufacturer with information
required for production. A duplicate kept in the
design room for quick reference makes for fewer
interruptions in the design department.
42.
43. Pattern Chart
The pattern chart is a complete record of all
pattern pieces within the pattern set.
It also includes swatches and special pattern
information.
Each pattern shape is identified by name and
number of pieces to be cut.
44. A color code is used to distinguish linings and
interlinings from other pattern pieces.
When completed, the chart is placed in front
of the production pattern and given to the
production manager.
Some charts require sewing guides, as shown.
45.
46. Design Specifications Sheet
The design specifications sheet is a record of the
finishing requirements for each design.
It is used by those responsible for finishing to
ensure that the garment meets company
standards.
Study the chart and compare the information to
the design it represents.
47.
48. Tech Pack
A “Tech Pack” is a set of design or style sheets
which contain all the necessary specifications to
construct a garment or a sewn product for
prototype or production purposes.
The “Tech Pack” provides the manufacturer with a
detailed “road map” on how to make your sewn
prototype, sales samples, or production, and
information for labels and hangtags.
49. Every detail from the style number, season, thread
color, embroidery placement, and vendor information is
clearly identified in a tech pack.
Many may contain specs and garment measurements,
layouts for artwork, full color or black and white flat
sketches
50. Tech Pack includes…
Cover page (company name ,Style number, Season
information)
Detailed Photograph of the sample.
A flat sketch
BOM(Fabric details (body and trim),Detail of accessories
and trims)
Label Specification: Size label, wash care label , Main
label and tags
52. Benefits of creating a Tech Pack
A tech pack will tell you everything you need to
know to construct the pieces and if followed
correctly you will have the desired product.
To stay organized and focused.
To help with patternmaking, grading, calculating
profits and costing.
To insure the accuracy of the final product.
53. 1. What happen if we didn’t measure the measurement
properly?
2. What use of land mark placement on body form?
3. What the difference between cost sheet, design spec
sheet, tech pack?
4. Either any similarity between tech pack and design spec
sheet?
5. Which one includes tech pack or design spec sheet?
Summary questions????