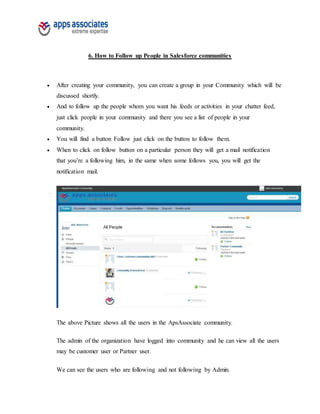
SlideShare a Scribd company logo
A
Document
On
Salesforce Communities
Contents
 Introduction to Communities
 Why Did We Create the Communities?
 What are the Types of communities?
 What are The Key Features of Salesforce Communities?
 How to Create Salesforce Communities?
 How To Follow up People in Salesforce communities
 How to Create Private Groups?
 How to Create Global Actions in Salesforce And adding them to Chatter Feeds
 Writing Triggers in Chatter Feeds.
 Adding Apex Classes to Salesforce Communities
 Customizing the Community Controller.
1. Introduction to Salesforce Communities
 Salesforce released many new Features in Summer 13 Version.
 One of the new features is Salesforce Communities. Communities are branded spaces for
your employees, customers, and partners to connect.
 You can customize and create Communities to meet your business need, then transition
seamlessly between them.
 Now any company can create private social communities to connect with customers,
partners, suppliers and distributors in entirely new ways.
 Salesforce Communities is the only community platform that combines the power of
social networking with business processes for breakthrough collaboration and
productivity.
Salesforce Communities offers:
 Social collaboration for employees, customers, and partners.
 Deep integration with sales, service, and marketing business processes.
 Custom branding and application development.
 Multi-community access.
 Trusted security and scalability.
What makes Salesforce Communities different?
 Unlike other community’s products, Salesforce Communities offers social collaboration
in the context of business processes and workflows -- all wrapped in your own pixel-
perfect branding.
 Salesforce Communities is 100% cloud-based and backed by the trusted reputation of
salesforce.com.
What can I do with Salesforce Communities?
Connect with Customers:
 Salesforce Communities will help social enterprises combine knowledge-driven, peer-
assisted and agent-assisted customer service communities into a single unified experience
giving customers better and faster service, every time.
 Companies will also be able to create a variety of marketing communities around events,
campaigns or even spin up focus groups on the fly.
Connect with Partners:
 Companies along with their partners, suppliers and distributors, can create custom
communities to drive more sales through seamless deal registration, access to proven
sales tools and collaboration with the right experts.
Connect with Any Community:
 Deploy communities to support any business process - from franchises sharing best
practices, to high-end retailers delivering custom shopping experiences, to universities
looking to connect students with alumni.
What if I am an existing Portals customer?
 Once Salesforce Communities is generally available existing Portals customers can
enable the community functionality to their service and partner portal licenses at no
additional cost.
 There is no data migration or changes in sharing rules.
How much will Salesforce Communities cost?
 Pricing of Salesforce Communities will be announced at general availability.
2. Why did we create Salesforce Communities?
What is Salesforce Communities?
 Salesforce Communities is an online platform that enables rich collaboration between
employees, customers, partners, suppliers and distributors.
 Organizations can create fully-branded public or private communities that connect
members directly with each other – and with relevant content, data and business
processes.
 Salesforce Communities is the only community platform that combines the power of
social with mobile participation, trusted security, and direct connection to business
processes.
Why did we create Salesforce Communities?
 Today’s customer expects to interact with their favorite vendors, share experiences with
other customers, and find the information they need from any mobile device.
 To meet these expectations, companies need to deepen customer relationships,
understand rapidly-changing customer needs, and connect customers directly to their
business processes.
 Communities were built to address all of these needs. Communities go beyond portals by
adding social collaboration, extensive branding, customization, and mobile access while
retaining both enterprise security and tight integration with business processes
3. What types of communities does Salesforce support?
Salesforce provides two general types of communities that can be used for a broad variety of
purposes, from customer service to marketing or engagement of resellers, suppliers and partners.
 Customer Communities.
 Partner Communities.
3.1 Customer Communities
 Customer Communities deliver rich collaboration, mobile access and consistent branding
for even the largest groups.
 For example, a service community enables customers to answer questions for other
customers, quickly find the information they need, or work with service reps to resolve
issues – decreasing time to resolution while increasing engagement and loyalty.
3.2 Partner Communities
 Partner Communities provide even greater ties to business process along with the added
power of role-based security to segment the data that’s been shared with different
members.
 For example, partner communities enable companies to manage reseller relationships by
keeping some lead and funding information private, but enabling collaborative selling
between partners, leading to more engaged partners and increased deal flow.
4. What are the key features of Salesforce Communities?
No other community’s platform offers the same combination of capabilities along with deep
integration into business process. Key Communities features include:
 Business Process Integration: members can create and collaborate on support cases,
sales opportunities or campaigns from within the community
 Social Collaboration: members can interact, collaborate on goals and form groups to
support their interests
 Branding/Customization: companies can design their community to match their brand
and website look and feel. Content and navigation structure is highly customizable.
 Mobility: members can access the community from any device, anywhere
 Social Intelligence: relevant content and resources are suggested to each member based
on their interests and behavior
 Security & scalability: leveraging the trusted Salesforce platform, all data and member
information is always safe -- no matter how many members you have.
5. How to Create Salesforce Communities?
 Creating Salesforce Communities is Very Easy, All u need is to do Point and Click
Functionality.
 To create communities first you need to enable communities.
 Here are Navigation steps for Creating your First Community.
 Go to setup, and then on left side of the app menu click on customize – Communities-
Settings.
Fig 1: Creating Communities
Note: Once you enable the Communities the Look and Feel of your organization changes
completely, you will find the new global header once you enable it .However you can still
customize that using your profile settings.
 After enabling it you will be asking for create a domain.
 If your Organization already has a domain, then it uses its domain, or else you need to
create a new domain.
Note: Check whether the domain is valid or not.
Fig 2: Select the Domain.
 After choosing the domain you can create your new Communities.
 Click on new Communities, then you will be prompt for asking to create new
communities, here the figure where it looks likes this
 For creating the communities you need to provide the Name of the Community and
Description, though description is not a mandatory, URL is your community end point
you can have any specific name after slash.
 When press Create Your First Community Gets Created, and you will find a new global
Header Shown Below.
 After you create your Community, you will get a prompt box, where you will ask for
adding members to your community, Branding, login page, adding tabs and
Customization of emails.
Manage community
 Manage community membership by adding profiles and permission sets during the setup
process. Using profiles and permission Sets, you can:
 Easily grant or remove access for groups of users. Once you add a profile or permission
set, all users assigned to that profile Or permission set become members of the
community.
 Enforce a membership policy. New users added to a profile or permission set that is
already associated with a community automatically gain access.
 Permission sets allow added flexibility for adding members.
 You can grant community access to a subset of users from the same profile, without
needing to clone the profile.
 Standard, Chatter, and portal profiles can be added to communities; Chatter customers,
from private groups with customers, can’t be added to communities even if they’re
assigned permission sets that are associated with communities.
 Note: Profiles and permission sets associated with communities can’t be deleted from
Salesforce. You must remove
 The profiles or permission sets from the communities first.
 Click Customize >Communities >Manage Communities, then click Edit next to the
community name.
 Click Members.
 To add profiles:
 To filter profiles, select a profile type from the drop-down menu. To search for a specific
profile, enter a search term
 And click Find.
 Search returns profiles for the selected filter.
 Select the user profiles you want to allow access to your community. Press CTRL to
select multiple profiles.
 Click Add. To remove a profile, select it and click Remove.
 If you remove a profile from a community, users with that profile lose access to the
community, unless the users are Assigned permission sets or other profiles that are still
part of the community. Their posts and comments still appear.
 To add permission sets:
 To search for a specific permission set, enter a search term and click Find.
 Select the permission sets you want to allow access to your community. Press CTRL to
select multiple permission sets.
 Click Add.
 If you remove a permission set from a community, users with that permission set lose
access to the community, unless the users are associated with profiles or other permission
sets that are still part of the community. Their posts and Comments still appear even after
they lose access.
 Click Save.
 If the community is published and welcome emails are enabled, users with the profiles or
permission sets you added receive a welcome email. The welcome email includes a
username and a change password link if it is sent to an external
 User who hasn’t logged in to a portal or community yet.
 When the community is published, welcome emails are sent and the community is
discoverable by members. When community is in Preview status, only members with the
login URL can view the community. If a community is Offline, Only users with the
“Create and Manage Communities “permission can access it through the Community
menu, regardless of membership.
Adding Tabs to Your Community
 After you identify the features you want your community members to see, you can
expose those features by choosing the Corresponding tabs during setup.
 Remember that profiles control access to tabs, so some tabs you choose may be hidden
for profiles associated with the community.
 In that case, you’ll need to manually expose the tabs in the profile so that those users can
see the tabs in the community.
 Keep in mind that the tabs you enable should be required for the type of activity you’re
performing in this community, whether it be sharing accounts and opportunities with
your partners or sharing cases and solutions with customers who need support.
 You don’t want to clutter your community with tabs that users don’t really need.
 Note: Chatter Free users in your community won’t see any tabs except the Chatter tab.
 Click Customize >Communities >Manage Communities, then click Edit next to the
community name.
 Click Tabs.
 Select the tabs to include in your community from the Available Tabs list. Press CTRL to
select multiple tabs.
 Click Add to add the tab. To remove a tab, select it in the Selected Tabs list and click
Remove.
 Click up or Down to change the order that the tabs display.
 The tab at the top of the list is the landing tab for the community. When users access the
community, it will be the first tab they see.
 Note: If any user doesn’t have access to the landing tab and Chatter is disabled, we show
them the Home tab. If Chatter is enabled, we show the Chatter tab.
 Click Save.
Branding Your Community
 Customize the look and feel of your community by adding your company logo, colors,
and copyright.
 This ensures that your community matches your company’s branding and is instantly
recognizable to your community members.
 Click Customize >Communities >Manage Communities, then click Edit next to the
community name.
 Click Branding.
 Use the lookups to choose a header and footer for the community.
 The files you’re choosing for header and footer must have been previously uploaded to
the Documents tab and must be publicly available.
 The header can be .html, .gif, .jpg, or .png. The footer must be an .html file. The
maximum file sizefor .html file is 100 KB combined. The maximum file size for .gif,
.jpg, or .png files is 20 KB.
 So, if you have a header.html file that is 70 KB and you want to use an .html file for the
footer as well, it can only be 30 KB.
 The header you choose replaces the Salesforce logo below the global header. The footer
you choose replaces the standardSalesforce copyright and privacy footer.
 Click Select Color Scheme to select from predefined color schemes or click the text box
next to the page section fields to select a color from the color picker.
 Note that the colors selected impact your community login page as well.
 Color Choice Where it Appears Top of the page, under the black global header. If an
HTML file is selected in the Header field, it overrides this color choice.
 Top of the login page. HeaderBackground Page Background color for all pages in your
community, including the login page.
 Color Choice Where it Appears
 Primary Tab that is selected. Top borders of lists and tables.Button on the login
page.Secondary Tertiary Backgroundcolor for section headers on edits and detail pages.
 Click
Customizing Communities Login
 Customize the look and feel of your community login page, from the logo and footer to
login options for external users.
 The colors used on the login page are inherited from the community branding color
scheme.
 You can customize this other Elements of the page.
 Click Customize >Communities >Manage Communities, then click Edit next to the
community name.
 Click Login Page.
 Upload a logo for the community login page header.
 The file can be .gif, .jpg, or .png. The maximum file size is 100 KB. Images larger than
250 pixels wide or 125 pixels higharen’t accepted. Uploading a logo automatically
creates a Communities Shared Document Folder on the Documents tab and saves the
logo there. Once created, you can’t delete the folder.
 The header logo displays at the top left of the login page.
 Enter custom text for the community login page footer, up to a maximum of 120
characters.
 The footer displays at the bottom of the login page.
 Choose the login options to make available to external users on the community login
page.
 External users are users with Community, Customer Portal, or partner portal licenses.
 Click Save.
 Your selected login options will be visible to all users on the login page. However,
they’re valid only for external users. Internal users who try to use these options will get a
login error. They must use the link that directs employees to Log in here and login with
their Salesforce username and password.
Customizing Communities Email
 You can customize email sender information, Chatter email branding, and templates in
your community emails.
 You can perform customizations in either the user interface or the Network object in
Salesforce APIs.
 Click Customize >Communities >Manage Communities, then click Edit next to the
community name.
 Click Emails.
 Enter custom values for the email sender’s name and address to replace the default
values.
 Note: If you change the sender’s email address, we send a verification email to the new
address. The change is Pending and we continue to use the existing address while we
await verification. The requested address doesn’t take effect until you click the
confirmation link in the email, which is valid for 72 hours. If verification is already
pending for a new email address and you specify a different new address, we retain the
latest value and use that for verification.
 Customize what displays in the footer of community Chatter emails.
 Important: Both a logo and email footer text are required. Keep in mind that:
o All Chatter emails display the Chatter logo and salesforce.com information by
default unless you replace them with your organization’s own logo and
information.
o If you previously customized the logo or footer text and want to restore the
default values, use the API to set these fields to null.
o Choose a logo to replace the default Chatter logo.
 The logo must be an existing document in the Documents tab and must be marked
Externally Available Image. Images with a maximum size of 150 x 50 pixels on a
transparent background work best.
o Enter custom text to replace the default footer text, up to a maximum of 1,000
characters. The default text includes salesforce.com's name and physical address.
We strongly recommend including your organization’s physical address to
comply with applicable anti-spam laws.
o Click Preview before saving to make sure your changes display properly in a
sample Chatter email. If your web browser blocks popup windows, you won’t be
able to view the preview window.
 Select Send welcome email to send email to users when they’re added to the community.
Welcome emails are sent when:
o A community changes from Preview status to Published status. Emails are not
sent when a community is in Preview or Offline status.
o An administrator adds a new profile or permission set to a Published community.
o A user is assigned a profile or permission set that is part of a Published
community.
 Note: If a profile or permission set is part of multiple communities, users with that profile
or permission set receive a welcome email from each community.
 Use the default email templates or use the lookups to select different templates for
welcome emails to new community Members, forgotten password emails, and
notification emails about reset passwords. If your organization uses email templates to
submit case comments, you can select a template (none is provided by default).You can
customize any default template.
 Click Save.
Publishing the Communities
 Publishing a community makes it visible to members.
 If you want to customize it further after publishing, you can do so while the community is
published or take the community offline.
 Keep in mind that once you publish, everything in the community is visible to members.
 Be sure to finish all major customizations while in Preview status.
 Note: If welcome emails are enabled, an email with a link to the community is sent to
each member when the Community is published.
 For any members from outside the company who don’t have a password or use single
sign-on, the welcome email includes a link to set their password and security question.
 An external user with access to multiple communities within one organization uses the
same login credentials for all communities.
 Go to the Community settings page:
o Click Customize >Communities >Manage Communities.
o Click Customize next to the community name.
 Click Publish.
 Your community is online.
Navigation to Communities
 You can easily switch between working in your internal organization and collaborating
with customers or partners in communities.
 When your organization turns on Communities, you see a new global header unless your
administrator has Chosen to hide it.
 The menu on the left side lets you switch between communities and your internal
organization.
 To access communities from within your organization, click next to Organization Name
(Appsorg Internal) in the drop-down and select the community you want to switch to.
 To return to your internal organization, click next to Community Name in the drop-down
and select your organization name.
 Internal users who aren’t members of any community just see the company name.
External users see the drop-down menu only if they belong to more than one community.
 You can work in more than one community at a time if you open each one in a different
browser tab.
 Switching between your internal organization and your communities doesn’t have to
disrupt your work-flow.
 We automatically return you to the page where you were last working, so you can pick up
right where you left off.
6. How to Follow up People in Salesforce communities
 After creating your community, you can create a group in your Community which will be
discussed shortly.
 And to follow up the people whom you want his feeds or activities in your chatter feed,
just click people in your community and there you see a list of people in your
community.
 You will find a button Follow just click on the button to follow them.
 When to click on follow button on a particular person they will get a mail notification
that you’re a following him, in the same when some follows you, you will get the
notification mail.
The above Picture shows all the users in the ApsAssociate community.
The admin of the organization have logged into community and he can view all the users
may be customer user or Partner user.
We can see the users who are following and not following by Admin.
7. How to Create Private Groups?
 You can create groups in your communities; you may create your public or private
groups depending on your requirement.
 When you create a public group any one can see the feeds and can download the files, or
create feeds.
 When you create a private group, only to group members can have access to see the data,
others can’t see the data, and they can send the request to your group for a membership in
your group.
When you click on create you’ll be asking for enter your group name, description, Automatic
Archiving (It makes the group disable if there are no posts for 90 days).
 After Clicking on save your group gets created, then now you need to add the members to
your group, it’s very easy to add the members into the group,
 Here the picture which shows how to add the members to your group.
 Click on Add/Remove members in your group, you’ll see it to right corner in the group.
 After clicking on add members in your group, you will see a window like this
We can select the group members among the above list of users in community.
The above picture shows a community group with name as IDC Group Technical along
with its logo.
We can control flow of emails by clicking on Email Weekly digest.
The above picture shows how we can control email alerts. We can choose when to send an
email from community to user.
8. How to Create Global Actions in Salesforce and adding them to chatter Feeds
Global Actions: To customize the current tasks and to assign the new tasks without writing the
code we can use Global Actions
Steps in creating Global Actions:
1) After you logged into the system at the left side corner you will see create option
below that Global Actions option is present. Click that to create global actions.
After clicking on that you can directed to global actions page.
Click on new action, after that choose Target Object and enter action name and label name.
Adding Global Actions in Chatter feed
Configure chatter action page in Salesforce by drag and drop required fields in action layout
After configuring Chatter action page layout in Salesforce, go to chatter page and create a record
from chatter.
We can create a record from chatter by clicking what I follow which is at the left side of the
chatter page.
Choose action by clicking on the more, fill the required details of the action and click create,
then new record will create.
This process is explained in the diagram shown below.
From above drop down list of different actions we have selected salesforcexpreview and the
same is shown in below picture.
The picture above represents a global action in salesforce community which was created in
custom way by using Global actions process.
The above picture shows by inserting all the values into the fields and click on create we can
create an Account record as we selected account object while creating global action so we can
create account record here.
9. Writing Triggers in Chatter Feeds
We can write triggers to the chatter by writing code in Apex language. Sample coding is given
below.
The below trigger is written on feedItem object which used to create a task when the chatter
body starts with #activity.
trigger MyActivityTaskCreating1 on FeedItem (after insert)
{
for (feedItem f:trigger.new)
{
if(f.body.startsWith('#Activity'))
{
task t=new task(subject=f.body.replace('#Activity',''),status='inProgress');
t.subject=f.Body.replace('#Activity','');
t.status='inProgress';
insert t;
}
}
}
Documentation on salesforce communities

More Related Content

What's hot

Salesforce Steelbrick CPQ Overview
Salesforce Steelbrick CPQ OverviewSalesforce Steelbrick CPQ Overview
Salesforce Steelbrick CPQ Overview
Harshala Shewale ☁
 
How Salesforce Uses the Marketing Cloud
How Salesforce Uses the Marketing CloudHow Salesforce Uses the Marketing Cloud
How Salesforce Uses the Marketing Cloud
Salesforce Marketing Cloud
 
Salesforce CPQ
Salesforce CPQSalesforce CPQ
Salesforce CPQ
Jade Global
 
Salesforce Intro
Salesforce IntroSalesforce Intro
Salesforce Intro
Rich Helton
 
Salesforce online training || Salesforce Integration | salesforce lightning
Salesforce online training || Salesforce Integration | salesforce lightningSalesforce online training || Salesforce Integration | salesforce lightning
Salesforce online training || Salesforce Integration | salesforce lightningsuresh
 
Salesforce CPQ by yuvaraj
Salesforce CPQ by yuvarajSalesforce CPQ by yuvaraj
Salesforce CPQ by yuvaraj
Yuvaraj P
 
Session 1: INTRODUCTION TO SALESFORCE
Session 1: INTRODUCTION TO SALESFORCESession 1: INTRODUCTION TO SALESFORCE
Session 1: INTRODUCTION TO SALESFORCE
SmritiSharan1
 
Case Study: Salesforce CPQ (Configure Price Quote) for Software as a Service ...
Case Study: Salesforce CPQ (Configure Price Quote) for Software as a Service ...Case Study: Salesforce CPQ (Configure Price Quote) for Software as a Service ...
Case Study: Salesforce CPQ (Configure Price Quote) for Software as a Service ...
Jade Global
 
What Is Salesforce? | Salesforce Training - What Does Salesforce Do? | Salesf...
What Is Salesforce? | Salesforce Training - What Does Salesforce Do? | Salesf...What Is Salesforce? | Salesforce Training - What Does Salesforce Do? | Salesf...
What Is Salesforce? | Salesforce Training - What Does Salesforce Do? | Salesf...
Edureka!
 
Salesforce Training For Beginners | Salesforce Tutorial | Salesforce Training...
Salesforce Training For Beginners | Salesforce Tutorial | Salesforce Training...Salesforce Training For Beginners | Salesforce Tutorial | Salesforce Training...
Salesforce Training For Beginners | Salesforce Tutorial | Salesforce Training...
Edureka!
 
Salesforce admin training 1
Salesforce admin training 1Salesforce admin training 1
Salesforce admin training 1
HungPham381
 
Salesforce CPQ updated 1.pptx
Salesforce CPQ updated 1.pptxSalesforce CPQ updated 1.pptx
Salesforce CPQ updated 1.pptx
ssuser1eba67
 
Salesforce Presentation
Salesforce PresentationSalesforce Presentation
Salesforce Presentation
Chetna Purohit
 
Salesforce for Marketing Overview Deck
Salesforce for Marketing Overview DeckSalesforce for Marketing Overview Deck
Salesforce for Marketing Overview Deck
Sylvia Wong ☁
 
Using Personas for Salesforce Accessibility and Security
Using Personas for Salesforce Accessibility and SecurityUsing Personas for Salesforce Accessibility and Security
Using Personas for Salesforce Accessibility and Security
Salesforce Admins
 
Salesforce
SalesforceSalesforce
Salesforce
BharatSirvi8
 
Salesforce Service Cloud
Salesforce Service CloudSalesforce Service Cloud
Salesforce Service Cloud
sharad soni
 
Salesforce Deck Template
Salesforce Deck TemplateSalesforce Deck Template
Salesforce Deck Template
Phil Weinmeister
 
Salesforce Marketing Cloud Training | Salesforce Training For Beginners - Mar...
Salesforce Marketing Cloud Training | Salesforce Training For Beginners - Mar...Salesforce Marketing Cloud Training | Salesforce Training For Beginners - Mar...
Salesforce Marketing Cloud Training | Salesforce Training For Beginners - Mar...
Edureka!
 
Salesforce Sales Cloud: Best Practices to Win More Deals
Salesforce Sales Cloud: Best Practices to Win More DealsSalesforce Sales Cloud: Best Practices to Win More Deals
Salesforce Sales Cloud: Best Practices to Win More Deals
Cloud Analogy
 

What's hot (20)

Salesforce Steelbrick CPQ Overview
Salesforce Steelbrick CPQ OverviewSalesforce Steelbrick CPQ Overview
Salesforce Steelbrick CPQ Overview
 
How Salesforce Uses the Marketing Cloud
How Salesforce Uses the Marketing CloudHow Salesforce Uses the Marketing Cloud
How Salesforce Uses the Marketing Cloud
 
Salesforce CPQ
Salesforce CPQSalesforce CPQ
Salesforce CPQ
 
Salesforce Intro
Salesforce IntroSalesforce Intro
Salesforce Intro
 
Salesforce online training || Salesforce Integration | salesforce lightning
Salesforce online training || Salesforce Integration | salesforce lightningSalesforce online training || Salesforce Integration | salesforce lightning
Salesforce online training || Salesforce Integration | salesforce lightning
 
Salesforce CPQ by yuvaraj
Salesforce CPQ by yuvarajSalesforce CPQ by yuvaraj
Salesforce CPQ by yuvaraj
 
Session 1: INTRODUCTION TO SALESFORCE
Session 1: INTRODUCTION TO SALESFORCESession 1: INTRODUCTION TO SALESFORCE
Session 1: INTRODUCTION TO SALESFORCE
 
Case Study: Salesforce CPQ (Configure Price Quote) for Software as a Service ...
Case Study: Salesforce CPQ (Configure Price Quote) for Software as a Service ...Case Study: Salesforce CPQ (Configure Price Quote) for Software as a Service ...
Case Study: Salesforce CPQ (Configure Price Quote) for Software as a Service ...
 
What Is Salesforce? | Salesforce Training - What Does Salesforce Do? | Salesf...
What Is Salesforce? | Salesforce Training - What Does Salesforce Do? | Salesf...What Is Salesforce? | Salesforce Training - What Does Salesforce Do? | Salesf...
What Is Salesforce? | Salesforce Training - What Does Salesforce Do? | Salesf...
 
Salesforce Training For Beginners | Salesforce Tutorial | Salesforce Training...
Salesforce Training For Beginners | Salesforce Tutorial | Salesforce Training...Salesforce Training For Beginners | Salesforce Tutorial | Salesforce Training...
Salesforce Training For Beginners | Salesforce Tutorial | Salesforce Training...
 
Salesforce admin training 1
Salesforce admin training 1Salesforce admin training 1
Salesforce admin training 1
 
Salesforce CPQ updated 1.pptx
Salesforce CPQ updated 1.pptxSalesforce CPQ updated 1.pptx
Salesforce CPQ updated 1.pptx
 
Salesforce Presentation
Salesforce PresentationSalesforce Presentation
Salesforce Presentation
 
Salesforce for Marketing Overview Deck
Salesforce for Marketing Overview DeckSalesforce for Marketing Overview Deck
Salesforce for Marketing Overview Deck
 
Using Personas for Salesforce Accessibility and Security
Using Personas for Salesforce Accessibility and SecurityUsing Personas for Salesforce Accessibility and Security
Using Personas for Salesforce Accessibility and Security
 
Salesforce
SalesforceSalesforce
Salesforce
 
Salesforce Service Cloud
Salesforce Service CloudSalesforce Service Cloud
Salesforce Service Cloud
 
Salesforce Deck Template
Salesforce Deck TemplateSalesforce Deck Template
Salesforce Deck Template
 
Salesforce Marketing Cloud Training | Salesforce Training For Beginners - Mar...
Salesforce Marketing Cloud Training | Salesforce Training For Beginners - Mar...Salesforce Marketing Cloud Training | Salesforce Training For Beginners - Mar...
Salesforce Marketing Cloud Training | Salesforce Training For Beginners - Mar...
 
Salesforce Sales Cloud: Best Practices to Win More Deals
Salesforce Sales Cloud: Best Practices to Win More DealsSalesforce Sales Cloud: Best Practices to Win More Deals
Salesforce Sales Cloud: Best Practices to Win More Deals
 

Similar to Documentation on salesforce communities

Introduction to Salesforce Communities [Milan Nonprofit]
Introduction to Salesforce Communities [Milan Nonprofit]Introduction to Salesforce Communities [Milan Nonprofit]
Introduction to Salesforce Communities [Milan Nonprofit]
Nertin Hoxha
 
How do i create communities in salesforce
How do i create communities in salesforce How do i create communities in salesforce
How do i create communities in salesforce
Ajay chinna
 
Socialcast Feature Deck
Socialcast Feature DeckSocialcast Feature Deck
Socialcast Feature Deck
Socialcast
 
Employee Community
Employee CommunityEmployee Community
Employee Community
Cloud Analogy
 
Emerging Solutions: Salesforce Communities
Emerging Solutions: Salesforce CommunitiesEmerging Solutions: Salesforce Communities
Emerging Solutions: Salesforce Communities
Idealist Consulting
 
Salesforce communities
Salesforce communitiesSalesforce communities
Salesforce communities
Kavita Badgujar
 
Highlights of Spring '14 webinar
Highlights of Spring '14 webinarHighlights of Spring '14 webinar
Highlights of Spring '14 webinar
Salesforce.org
 
Experience Clould Discussion Part 1.pptx
Experience Clould Discussion Part 1.pptxExperience Clould Discussion Part 1.pptx
Experience Clould Discussion Part 1.pptx
satheeshkumarpalanis2
 
The New Sales Navigator: Admin Training Guide
The New Sales Navigator: Admin Training GuideThe New Sales Navigator: Admin Training Guide
The New Sales Navigator: Admin Training Guide
LinkedIn Sales Solutions
 
Social crm concept
Social crm   conceptSocial crm   concept
Social crm concept전행 이
 
FunLearn Season 1 - Talk 1 - salesforce lightning communities
FunLearn Season 1 - Talk 1 - salesforce lightning communitiesFunLearn Season 1 - Talk 1 - salesforce lightning communities
FunLearn Season 1 - Talk 1 - salesforce lightning communities
Sikha Baid ☁
 
Using Social Media As Tools Instead Of Venues
Using Social Media As Tools Instead Of VenuesUsing Social Media As Tools Instead Of Venues
Using Social Media As Tools Instead Of Venues
Morry Patoka, Chief Accelerator at CTC Consulting
 
Enterprise 2.0
Enterprise 2.0Enterprise 2.0
Enterprise 2.0Magan Le
 
Start Generating Leads: 5 Ways a Community Gets You Customers
Start Generating Leads: 5 Ways a Community Gets You CustomersStart Generating Leads: 5 Ways a Community Gets You Customers
Start Generating Leads: 5 Ways a Community Gets You CustomersHelprace
 
Axxis solutions salesforce communities workshop
Axxis solutions salesforce communities workshopAxxis solutions salesforce communities workshop
Axxis solutions salesforce communities workshopAndres Campo
 
Collaboration Space
Collaboration SpaceCollaboration Space
Collaboration SpaceJamie Sawyer
 
Best Social Networking Platform To Grow Your Business.pdf
Best Social Networking Platform To Grow Your Business.pdfBest Social Networking Platform To Grow Your Business.pdf
Best Social Networking Platform To Grow Your Business.pdf
7searchppc
 
Anypoint access management
Anypoint access management Anypoint access management
Anypoint access management
Shanky Gupta
 

Similar to Documentation on salesforce communities (20)

Introduction to Salesforce Communities [Milan Nonprofit]
Introduction to Salesforce Communities [Milan Nonprofit]Introduction to Salesforce Communities [Milan Nonprofit]
Introduction to Salesforce Communities [Milan Nonprofit]
 
How do i create communities in salesforce
How do i create communities in salesforce How do i create communities in salesforce
How do i create communities in salesforce
 
Socialcast Feature Deck
Socialcast Feature DeckSocialcast Feature Deck
Socialcast Feature Deck
 
Employee Community
Employee CommunityEmployee Community
Employee Community
 
Emerging Solutions: Salesforce Communities
Emerging Solutions: Salesforce CommunitiesEmerging Solutions: Salesforce Communities
Emerging Solutions: Salesforce Communities
 
Salesforce communities
Salesforce communitiesSalesforce communities
Salesforce communities
 
Highlights of Spring '14 webinar
Highlights of Spring '14 webinarHighlights of Spring '14 webinar
Highlights of Spring '14 webinar
 
Experience Clould Discussion Part 1.pptx
Experience Clould Discussion Part 1.pptxExperience Clould Discussion Part 1.pptx
Experience Clould Discussion Part 1.pptx
 
The New Sales Navigator: Admin Training Guide
The New Sales Navigator: Admin Training GuideThe New Sales Navigator: Admin Training Guide
The New Sales Navigator: Admin Training Guide
 
Social crm concept
Social crm   conceptSocial crm   concept
Social crm concept
 
SOCIAL CRM
SOCIAL CRMSOCIAL CRM
SOCIAL CRM
 
FunLearn Season 1 - Talk 1 - salesforce lightning communities
FunLearn Season 1 - Talk 1 - salesforce lightning communitiesFunLearn Season 1 - Talk 1 - salesforce lightning communities
FunLearn Season 1 - Talk 1 - salesforce lightning communities
 
Whitepaper association benefits
Whitepaper association benefitsWhitepaper association benefits
Whitepaper association benefits
 
Using Social Media As Tools Instead Of Venues
Using Social Media As Tools Instead Of VenuesUsing Social Media As Tools Instead Of Venues
Using Social Media As Tools Instead Of Venues
 
Enterprise 2.0
Enterprise 2.0Enterprise 2.0
Enterprise 2.0
 
Start Generating Leads: 5 Ways a Community Gets You Customers
Start Generating Leads: 5 Ways a Community Gets You CustomersStart Generating Leads: 5 Ways a Community Gets You Customers
Start Generating Leads: 5 Ways a Community Gets You Customers
 
Axxis solutions salesforce communities workshop
Axxis solutions salesforce communities workshopAxxis solutions salesforce communities workshop
Axxis solutions salesforce communities workshop
 
Collaboration Space
Collaboration SpaceCollaboration Space
Collaboration Space
 
Best Social Networking Platform To Grow Your Business.pdf
Best Social Networking Platform To Grow Your Business.pdfBest Social Networking Platform To Grow Your Business.pdf
Best Social Networking Platform To Grow Your Business.pdf
 
Anypoint access management
Anypoint access management Anypoint access management
Anypoint access management
 

Recently uploaded

aaaaaaaaaaaaaaaaaaaaaaaaaaaaaaaaaaaaaaaaa
aaaaaaaaaaaaaaaaaaaaaaaaaaaaaaaaaaaaaaaaaaaaaaaaaaaaaaaaaaaaaaaaaaaaaaaaaaaaaaaaaa
aaaaaaaaaaaaaaaaaaaaaaaaaaaaaaaaaaaaaaaaa
siemaillard
 
CLASS 11 CBSE B.St Project AIDS TO TRADE - INSURANCE
CLASS 11 CBSE B.St Project AIDS TO TRADE - INSURANCECLASS 11 CBSE B.St Project AIDS TO TRADE - INSURANCE
CLASS 11 CBSE B.St Project AIDS TO TRADE - INSURANCE
BhavyaRajput3
 
How to Create Map Views in the Odoo 17 ERP
How to Create Map Views in the Odoo 17 ERPHow to Create Map Views in the Odoo 17 ERP
How to Create Map Views in the Odoo 17 ERP
Celine George
 
Unit 2- Research Aptitude (UGC NET Paper I).pdf
Unit 2- Research Aptitude (UGC NET Paper I).pdfUnit 2- Research Aptitude (UGC NET Paper I).pdf
Unit 2- Research Aptitude (UGC NET Paper I).pdf
Thiyagu K
 
How to Make a Field invisible in Odoo 17
How to Make a Field invisible in Odoo 17How to Make a Field invisible in Odoo 17
How to Make a Field invisible in Odoo 17
Celine George
 
2024.06.01 Introducing a competency framework for languag learning materials ...
2024.06.01 Introducing a competency framework for languag learning materials ...2024.06.01 Introducing a competency framework for languag learning materials ...
2024.06.01 Introducing a competency framework for languag learning materials ...
Sandy Millin
 
Palestine last event orientationfvgnh .pptx
Palestine last event orientationfvgnh .pptxPalestine last event orientationfvgnh .pptx
Palestine last event orientationfvgnh .pptx
RaedMohamed3
 
Synthetic Fiber Construction in lab .pptx
Synthetic Fiber Construction in lab .pptxSynthetic Fiber Construction in lab .pptx
Synthetic Fiber Construction in lab .pptx
Pavel ( NSTU)
 
How libraries can support authors with open access requirements for UKRI fund...
How libraries can support authors with open access requirements for UKRI fund...How libraries can support authors with open access requirements for UKRI fund...
How libraries can support authors with open access requirements for UKRI fund...
Jisc
 
Instructions for Submissions thorugh G- Classroom.pptx
Instructions for Submissions thorugh G- Classroom.pptxInstructions for Submissions thorugh G- Classroom.pptx
Instructions for Submissions thorugh G- Classroom.pptx
Jheel Barad
 
Phrasal Verbs.XXXXXXXXXXXXXXXXXXXXXXXXXX
Phrasal Verbs.XXXXXXXXXXXXXXXXXXXXXXXXXXPhrasal Verbs.XXXXXXXXXXXXXXXXXXXXXXXXXX
Phrasal Verbs.XXXXXXXXXXXXXXXXXXXXXXXXXX
MIRIAMSALINAS13
 
Unit 8 - Information and Communication Technology (Paper I).pdf
Unit 8 - Information and Communication Technology (Paper I).pdfUnit 8 - Information and Communication Technology (Paper I).pdf
Unit 8 - Information and Communication Technology (Paper I).pdf
Thiyagu K
 
Thesis Statement for students diagnonsed withADHD.ppt
Thesis Statement for students diagnonsed withADHD.pptThesis Statement for students diagnonsed withADHD.ppt
Thesis Statement for students diagnonsed withADHD.ppt
EverAndrsGuerraGuerr
 
aaaaaaaaaaaaaaaaaaaaaaaaaaaaaaaaaaaaaaaaaaaaaaaaaaaaaaa
aaaaaaaaaaaaaaaaaaaaaaaaaaaaaaaaaaaaaaaaaaaaaaaaaaaaaaaaaaaaaaaaaaaaaaaaaaaaaaaaaaaaaaaaaaaaaaaaaaaaaaaaaaaaaa
aaaaaaaaaaaaaaaaaaaaaaaaaaaaaaaaaaaaaaaaaaaaaaaaaaaaaaa
siemaillard
 
Operation Blue Star - Saka Neela Tara
Operation Blue Star   -  Saka Neela TaraOperation Blue Star   -  Saka Neela Tara
Operation Blue Star - Saka Neela Tara
Balvir Singh
 
Basic phrases for greeting and assisting costumers
Basic phrases for greeting and assisting costumersBasic phrases for greeting and assisting costumers
Basic phrases for greeting and assisting costumers
PedroFerreira53928
 
The Art Pastor's Guide to Sabbath | Steve Thomason
The Art Pastor's Guide to Sabbath | Steve ThomasonThe Art Pastor's Guide to Sabbath | Steve Thomason
The Art Pastor's Guide to Sabbath | Steve Thomason
Steve Thomason
 
TESDA TM1 REVIEWER FOR NATIONAL ASSESSMENT WRITTEN AND ORAL QUESTIONS WITH A...
TESDA TM1 REVIEWER  FOR NATIONAL ASSESSMENT WRITTEN AND ORAL QUESTIONS WITH A...TESDA TM1 REVIEWER  FOR NATIONAL ASSESSMENT WRITTEN AND ORAL QUESTIONS WITH A...
TESDA TM1 REVIEWER FOR NATIONAL ASSESSMENT WRITTEN AND ORAL QUESTIONS WITH A...
EugeneSaldivar
 
Model Attribute Check Company Auto Property
Model Attribute  Check Company Auto PropertyModel Attribute  Check Company Auto Property
Model Attribute Check Company Auto Property
Celine George
 
Sha'Carri Richardson Presentation 202345
Sha'Carri Richardson Presentation 202345Sha'Carri Richardson Presentation 202345
Sha'Carri Richardson Presentation 202345
beazzy04
 

Recently uploaded (20)

aaaaaaaaaaaaaaaaaaaaaaaaaaaaaaaaaaaaaaaaa
aaaaaaaaaaaaaaaaaaaaaaaaaaaaaaaaaaaaaaaaaaaaaaaaaaaaaaaaaaaaaaaaaaaaaaaaaaaaaaaaaa
aaaaaaaaaaaaaaaaaaaaaaaaaaaaaaaaaaaaaaaaa
 
CLASS 11 CBSE B.St Project AIDS TO TRADE - INSURANCE
CLASS 11 CBSE B.St Project AIDS TO TRADE - INSURANCECLASS 11 CBSE B.St Project AIDS TO TRADE - INSURANCE
CLASS 11 CBSE B.St Project AIDS TO TRADE - INSURANCE
 
How to Create Map Views in the Odoo 17 ERP
How to Create Map Views in the Odoo 17 ERPHow to Create Map Views in the Odoo 17 ERP
How to Create Map Views in the Odoo 17 ERP
 
Unit 2- Research Aptitude (UGC NET Paper I).pdf
Unit 2- Research Aptitude (UGC NET Paper I).pdfUnit 2- Research Aptitude (UGC NET Paper I).pdf
Unit 2- Research Aptitude (UGC NET Paper I).pdf
 
How to Make a Field invisible in Odoo 17
How to Make a Field invisible in Odoo 17How to Make a Field invisible in Odoo 17
How to Make a Field invisible in Odoo 17
 
2024.06.01 Introducing a competency framework for languag learning materials ...
2024.06.01 Introducing a competency framework for languag learning materials ...2024.06.01 Introducing a competency framework for languag learning materials ...
2024.06.01 Introducing a competency framework for languag learning materials ...
 
Palestine last event orientationfvgnh .pptx
Palestine last event orientationfvgnh .pptxPalestine last event orientationfvgnh .pptx
Palestine last event orientationfvgnh .pptx
 
Synthetic Fiber Construction in lab .pptx
Synthetic Fiber Construction in lab .pptxSynthetic Fiber Construction in lab .pptx
Synthetic Fiber Construction in lab .pptx
 
How libraries can support authors with open access requirements for UKRI fund...
How libraries can support authors with open access requirements for UKRI fund...How libraries can support authors with open access requirements for UKRI fund...
How libraries can support authors with open access requirements for UKRI fund...
 
Instructions for Submissions thorugh G- Classroom.pptx
Instructions for Submissions thorugh G- Classroom.pptxInstructions for Submissions thorugh G- Classroom.pptx
Instructions for Submissions thorugh G- Classroom.pptx
 
Phrasal Verbs.XXXXXXXXXXXXXXXXXXXXXXXXXX
Phrasal Verbs.XXXXXXXXXXXXXXXXXXXXXXXXXXPhrasal Verbs.XXXXXXXXXXXXXXXXXXXXXXXXXX
Phrasal Verbs.XXXXXXXXXXXXXXXXXXXXXXXXXX
 
Unit 8 - Information and Communication Technology (Paper I).pdf
Unit 8 - Information and Communication Technology (Paper I).pdfUnit 8 - Information and Communication Technology (Paper I).pdf
Unit 8 - Information and Communication Technology (Paper I).pdf
 
Thesis Statement for students diagnonsed withADHD.ppt
Thesis Statement for students diagnonsed withADHD.pptThesis Statement for students diagnonsed withADHD.ppt
Thesis Statement for students diagnonsed withADHD.ppt
 
aaaaaaaaaaaaaaaaaaaaaaaaaaaaaaaaaaaaaaaaaaaaaaaaaaaaaaa
aaaaaaaaaaaaaaaaaaaaaaaaaaaaaaaaaaaaaaaaaaaaaaaaaaaaaaaaaaaaaaaaaaaaaaaaaaaaaaaaaaaaaaaaaaaaaaaaaaaaaaaaaaaaaa
aaaaaaaaaaaaaaaaaaaaaaaaaaaaaaaaaaaaaaaaaaaaaaaaaaaaaaa
 
Operation Blue Star - Saka Neela Tara
Operation Blue Star   -  Saka Neela TaraOperation Blue Star   -  Saka Neela Tara
Operation Blue Star - Saka Neela Tara
 
Basic phrases for greeting and assisting costumers
Basic phrases for greeting and assisting costumersBasic phrases for greeting and assisting costumers
Basic phrases for greeting and assisting costumers
 
The Art Pastor's Guide to Sabbath | Steve Thomason
The Art Pastor's Guide to Sabbath | Steve ThomasonThe Art Pastor's Guide to Sabbath | Steve Thomason
The Art Pastor's Guide to Sabbath | Steve Thomason
 
TESDA TM1 REVIEWER FOR NATIONAL ASSESSMENT WRITTEN AND ORAL QUESTIONS WITH A...
TESDA TM1 REVIEWER  FOR NATIONAL ASSESSMENT WRITTEN AND ORAL QUESTIONS WITH A...TESDA TM1 REVIEWER  FOR NATIONAL ASSESSMENT WRITTEN AND ORAL QUESTIONS WITH A...
TESDA TM1 REVIEWER FOR NATIONAL ASSESSMENT WRITTEN AND ORAL QUESTIONS WITH A...
 
Model Attribute Check Company Auto Property
Model Attribute  Check Company Auto PropertyModel Attribute  Check Company Auto Property
Model Attribute Check Company Auto Property
 
Sha'Carri Richardson Presentation 202345
Sha'Carri Richardson Presentation 202345Sha'Carri Richardson Presentation 202345
Sha'Carri Richardson Presentation 202345
 

Documentation on salesforce communities

  • 2. Contents  Introduction to Communities  Why Did We Create the Communities?  What are the Types of communities?  What are The Key Features of Salesforce Communities?  How to Create Salesforce Communities?  How To Follow up People in Salesforce communities  How to Create Private Groups?  How to Create Global Actions in Salesforce And adding them to Chatter Feeds  Writing Triggers in Chatter Feeds.  Adding Apex Classes to Salesforce Communities  Customizing the Community Controller.
  • 3. 1. Introduction to Salesforce Communities  Salesforce released many new Features in Summer 13 Version.  One of the new features is Salesforce Communities. Communities are branded spaces for your employees, customers, and partners to connect.  You can customize and create Communities to meet your business need, then transition seamlessly between them.  Now any company can create private social communities to connect with customers, partners, suppliers and distributors in entirely new ways.  Salesforce Communities is the only community platform that combines the power of social networking with business processes for breakthrough collaboration and productivity. Salesforce Communities offers:  Social collaboration for employees, customers, and partners.  Deep integration with sales, service, and marketing business processes.  Custom branding and application development.  Multi-community access.  Trusted security and scalability.
  • 4. What makes Salesforce Communities different?  Unlike other community’s products, Salesforce Communities offers social collaboration in the context of business processes and workflows -- all wrapped in your own pixel- perfect branding.  Salesforce Communities is 100% cloud-based and backed by the trusted reputation of salesforce.com. What can I do with Salesforce Communities? Connect with Customers:  Salesforce Communities will help social enterprises combine knowledge-driven, peer- assisted and agent-assisted customer service communities into a single unified experience giving customers better and faster service, every time.  Companies will also be able to create a variety of marketing communities around events, campaigns or even spin up focus groups on the fly. Connect with Partners:  Companies along with their partners, suppliers and distributors, can create custom communities to drive more sales through seamless deal registration, access to proven sales tools and collaboration with the right experts.
  • 5. Connect with Any Community:  Deploy communities to support any business process - from franchises sharing best practices, to high-end retailers delivering custom shopping experiences, to universities looking to connect students with alumni. What if I am an existing Portals customer?  Once Salesforce Communities is generally available existing Portals customers can enable the community functionality to their service and partner portal licenses at no additional cost.  There is no data migration or changes in sharing rules. How much will Salesforce Communities cost?  Pricing of Salesforce Communities will be announced at general availability.
  • 6. 2. Why did we create Salesforce Communities? What is Salesforce Communities?  Salesforce Communities is an online platform that enables rich collaboration between employees, customers, partners, suppliers and distributors.  Organizations can create fully-branded public or private communities that connect members directly with each other – and with relevant content, data and business processes.  Salesforce Communities is the only community platform that combines the power of social with mobile participation, trusted security, and direct connection to business processes. Why did we create Salesforce Communities?  Today’s customer expects to interact with their favorite vendors, share experiences with other customers, and find the information they need from any mobile device.  To meet these expectations, companies need to deepen customer relationships, understand rapidly-changing customer needs, and connect customers directly to their business processes.  Communities were built to address all of these needs. Communities go beyond portals by adding social collaboration, extensive branding, customization, and mobile access while retaining both enterprise security and tight integration with business processes
  • 7. 3. What types of communities does Salesforce support? Salesforce provides two general types of communities that can be used for a broad variety of purposes, from customer service to marketing or engagement of resellers, suppliers and partners.  Customer Communities.  Partner Communities. 3.1 Customer Communities  Customer Communities deliver rich collaboration, mobile access and consistent branding for even the largest groups.  For example, a service community enables customers to answer questions for other customers, quickly find the information they need, or work with service reps to resolve issues – decreasing time to resolution while increasing engagement and loyalty. 3.2 Partner Communities  Partner Communities provide even greater ties to business process along with the added power of role-based security to segment the data that’s been shared with different members.
  • 8.  For example, partner communities enable companies to manage reseller relationships by keeping some lead and funding information private, but enabling collaborative selling between partners, leading to more engaged partners and increased deal flow. 4. What are the key features of Salesforce Communities? No other community’s platform offers the same combination of capabilities along with deep integration into business process. Key Communities features include:  Business Process Integration: members can create and collaborate on support cases, sales opportunities or campaigns from within the community  Social Collaboration: members can interact, collaborate on goals and form groups to support their interests  Branding/Customization: companies can design their community to match their brand and website look and feel. Content and navigation structure is highly customizable.  Mobility: members can access the community from any device, anywhere  Social Intelligence: relevant content and resources are suggested to each member based on their interests and behavior
  • 9.  Security & scalability: leveraging the trusted Salesforce platform, all data and member information is always safe -- no matter how many members you have. 5. How to Create Salesforce Communities?  Creating Salesforce Communities is Very Easy, All u need is to do Point and Click Functionality.  To create communities first you need to enable communities.  Here are Navigation steps for Creating your First Community.  Go to setup, and then on left side of the app menu click on customize – Communities- Settings. Fig 1: Creating Communities
  • 10. Note: Once you enable the Communities the Look and Feel of your organization changes completely, you will find the new global header once you enable it .However you can still customize that using your profile settings.  After enabling it you will be asking for create a domain.  If your Organization already has a domain, then it uses its domain, or else you need to create a new domain. Note: Check whether the domain is valid or not. Fig 2: Select the Domain.  After choosing the domain you can create your new Communities.
  • 11.  Click on new Communities, then you will be prompt for asking to create new communities, here the figure where it looks likes this  For creating the communities you need to provide the Name of the Community and Description, though description is not a mandatory, URL is your community end point you can have any specific name after slash.  When press Create Your First Community Gets Created, and you will find a new global Header Shown Below.  After you create your Community, you will get a prompt box, where you will ask for adding members to your community, Branding, login page, adding tabs and Customization of emails.
  • 12. Manage community  Manage community membership by adding profiles and permission sets during the setup process. Using profiles and permission Sets, you can:  Easily grant or remove access for groups of users. Once you add a profile or permission set, all users assigned to that profile Or permission set become members of the community.  Enforce a membership policy. New users added to a profile or permission set that is already associated with a community automatically gain access.  Permission sets allow added flexibility for adding members.
  • 13.  You can grant community access to a subset of users from the same profile, without needing to clone the profile.  Standard, Chatter, and portal profiles can be added to communities; Chatter customers, from private groups with customers, can’t be added to communities even if they’re assigned permission sets that are associated with communities.  Note: Profiles and permission sets associated with communities can’t be deleted from Salesforce. You must remove  The profiles or permission sets from the communities first.  Click Customize >Communities >Manage Communities, then click Edit next to the community name.  Click Members.  To add profiles:  To filter profiles, select a profile type from the drop-down menu. To search for a specific profile, enter a search term  And click Find.  Search returns profiles for the selected filter.  Select the user profiles you want to allow access to your community. Press CTRL to select multiple profiles.  Click Add. To remove a profile, select it and click Remove.  If you remove a profile from a community, users with that profile lose access to the community, unless the users are Assigned permission sets or other profiles that are still part of the community. Their posts and comments still appear.  To add permission sets:  To search for a specific permission set, enter a search term and click Find.  Select the permission sets you want to allow access to your community. Press CTRL to select multiple permission sets.  Click Add.  If you remove a permission set from a community, users with that permission set lose access to the community, unless the users are associated with profiles or other permission sets that are still part of the community. Their posts and Comments still appear even after they lose access.
  • 14.  Click Save.  If the community is published and welcome emails are enabled, users with the profiles or permission sets you added receive a welcome email. The welcome email includes a username and a change password link if it is sent to an external  User who hasn’t logged in to a portal or community yet.  When the community is published, welcome emails are sent and the community is discoverable by members. When community is in Preview status, only members with the login URL can view the community. If a community is Offline, Only users with the “Create and Manage Communities “permission can access it through the Community menu, regardless of membership.
  • 15. Adding Tabs to Your Community  After you identify the features you want your community members to see, you can expose those features by choosing the Corresponding tabs during setup.  Remember that profiles control access to tabs, so some tabs you choose may be hidden for profiles associated with the community.  In that case, you’ll need to manually expose the tabs in the profile so that those users can see the tabs in the community.  Keep in mind that the tabs you enable should be required for the type of activity you’re performing in this community, whether it be sharing accounts and opportunities with your partners or sharing cases and solutions with customers who need support.  You don’t want to clutter your community with tabs that users don’t really need.  Note: Chatter Free users in your community won’t see any tabs except the Chatter tab.  Click Customize >Communities >Manage Communities, then click Edit next to the community name.  Click Tabs.  Select the tabs to include in your community from the Available Tabs list. Press CTRL to select multiple tabs.  Click Add to add the tab. To remove a tab, select it in the Selected Tabs list and click Remove.  Click up or Down to change the order that the tabs display.  The tab at the top of the list is the landing tab for the community. When users access the community, it will be the first tab they see.  Note: If any user doesn’t have access to the landing tab and Chatter is disabled, we show them the Home tab. If Chatter is enabled, we show the Chatter tab.  Click Save.
  • 16. Branding Your Community  Customize the look and feel of your community by adding your company logo, colors, and copyright.
  • 17.  This ensures that your community matches your company’s branding and is instantly recognizable to your community members.  Click Customize >Communities >Manage Communities, then click Edit next to the community name.  Click Branding.  Use the lookups to choose a header and footer for the community.  The files you’re choosing for header and footer must have been previously uploaded to the Documents tab and must be publicly available.  The header can be .html, .gif, .jpg, or .png. The footer must be an .html file. The maximum file sizefor .html file is 100 KB combined. The maximum file size for .gif, .jpg, or .png files is 20 KB.  So, if you have a header.html file that is 70 KB and you want to use an .html file for the footer as well, it can only be 30 KB.  The header you choose replaces the Salesforce logo below the global header. The footer you choose replaces the standardSalesforce copyright and privacy footer.  Click Select Color Scheme to select from predefined color schemes or click the text box next to the page section fields to select a color from the color picker.  Note that the colors selected impact your community login page as well.  Color Choice Where it Appears Top of the page, under the black global header. If an HTML file is selected in the Header field, it overrides this color choice.  Top of the login page. HeaderBackground Page Background color for all pages in your community, including the login page.  Color Choice Where it Appears  Primary Tab that is selected. Top borders of lists and tables.Button on the login page.Secondary Tertiary Backgroundcolor for section headers on edits and detail pages.  Click
  • 18.
  • 19. Customizing Communities Login  Customize the look and feel of your community login page, from the logo and footer to login options for external users.  The colors used on the login page are inherited from the community branding color scheme.  You can customize this other Elements of the page.  Click Customize >Communities >Manage Communities, then click Edit next to the community name.  Click Login Page.  Upload a logo for the community login page header.  The file can be .gif, .jpg, or .png. The maximum file size is 100 KB. Images larger than 250 pixels wide or 125 pixels higharen’t accepted. Uploading a logo automatically creates a Communities Shared Document Folder on the Documents tab and saves the logo there. Once created, you can’t delete the folder.  The header logo displays at the top left of the login page.  Enter custom text for the community login page footer, up to a maximum of 120 characters.  The footer displays at the bottom of the login page.  Choose the login options to make available to external users on the community login page.  External users are users with Community, Customer Portal, or partner portal licenses.  Click Save.  Your selected login options will be visible to all users on the login page. However, they’re valid only for external users. Internal users who try to use these options will get a login error. They must use the link that directs employees to Log in here and login with their Salesforce username and password.
  • 20.
  • 21. Customizing Communities Email  You can customize email sender information, Chatter email branding, and templates in your community emails.  You can perform customizations in either the user interface or the Network object in Salesforce APIs.  Click Customize >Communities >Manage Communities, then click Edit next to the community name.  Click Emails.  Enter custom values for the email sender’s name and address to replace the default values.  Note: If you change the sender’s email address, we send a verification email to the new address. The change is Pending and we continue to use the existing address while we await verification. The requested address doesn’t take effect until you click the confirmation link in the email, which is valid for 72 hours. If verification is already pending for a new email address and you specify a different new address, we retain the latest value and use that for verification.  Customize what displays in the footer of community Chatter emails.  Important: Both a logo and email footer text are required. Keep in mind that: o All Chatter emails display the Chatter logo and salesforce.com information by default unless you replace them with your organization’s own logo and information. o If you previously customized the logo or footer text and want to restore the default values, use the API to set these fields to null. o Choose a logo to replace the default Chatter logo.
  • 22.  The logo must be an existing document in the Documents tab and must be marked Externally Available Image. Images with a maximum size of 150 x 50 pixels on a transparent background work best. o Enter custom text to replace the default footer text, up to a maximum of 1,000 characters. The default text includes salesforce.com's name and physical address. We strongly recommend including your organization’s physical address to comply with applicable anti-spam laws. o Click Preview before saving to make sure your changes display properly in a sample Chatter email. If your web browser blocks popup windows, you won’t be able to view the preview window.  Select Send welcome email to send email to users when they’re added to the community. Welcome emails are sent when: o A community changes from Preview status to Published status. Emails are not sent when a community is in Preview or Offline status. o An administrator adds a new profile or permission set to a Published community. o A user is assigned a profile or permission set that is part of a Published community.  Note: If a profile or permission set is part of multiple communities, users with that profile or permission set receive a welcome email from each community.  Use the default email templates or use the lookups to select different templates for welcome emails to new community Members, forgotten password emails, and notification emails about reset passwords. If your organization uses email templates to submit case comments, you can select a template (none is provided by default).You can customize any default template.  Click Save.
  • 23.
  • 24. Publishing the Communities  Publishing a community makes it visible to members.  If you want to customize it further after publishing, you can do so while the community is published or take the community offline.  Keep in mind that once you publish, everything in the community is visible to members.  Be sure to finish all major customizations while in Preview status.  Note: If welcome emails are enabled, an email with a link to the community is sent to each member when the Community is published.  For any members from outside the company who don’t have a password or use single sign-on, the welcome email includes a link to set their password and security question.
  • 25.  An external user with access to multiple communities within one organization uses the same login credentials for all communities.  Go to the Community settings page: o Click Customize >Communities >Manage Communities. o Click Customize next to the community name.  Click Publish.  Your community is online.
  • 26. Navigation to Communities  You can easily switch between working in your internal organization and collaborating with customers or partners in communities.  When your organization turns on Communities, you see a new global header unless your administrator has Chosen to hide it.  The menu on the left side lets you switch between communities and your internal organization.  To access communities from within your organization, click next to Organization Name (Appsorg Internal) in the drop-down and select the community you want to switch to.  To return to your internal organization, click next to Community Name in the drop-down and select your organization name.  Internal users who aren’t members of any community just see the company name. External users see the drop-down menu only if they belong to more than one community.  You can work in more than one community at a time if you open each one in a different browser tab.  Switching between your internal organization and your communities doesn’t have to disrupt your work-flow.  We automatically return you to the page where you were last working, so you can pick up right where you left off.
  • 27. 6. How to Follow up People in Salesforce communities  After creating your community, you can create a group in your Community which will be discussed shortly.  And to follow up the people whom you want his feeds or activities in your chatter feed, just click people in your community and there you see a list of people in your community.  You will find a button Follow just click on the button to follow them.  When to click on follow button on a particular person they will get a mail notification that you’re a following him, in the same when some follows you, you will get the notification mail. The above Picture shows all the users in the ApsAssociate community. The admin of the organization have logged into community and he can view all the users may be customer user or Partner user. We can see the users who are following and not following by Admin.
  • 28. 7. How to Create Private Groups?  You can create groups in your communities; you may create your public or private groups depending on your requirement.  When you create a public group any one can see the feeds and can download the files, or create feeds.  When you create a private group, only to group members can have access to see the data, others can’t see the data, and they can send the request to your group for a membership in your group.
  • 29. When you click on create you’ll be asking for enter your group name, description, Automatic Archiving (It makes the group disable if there are no posts for 90 days).  After Clicking on save your group gets created, then now you need to add the members to your group, it’s very easy to add the members into the group,  Here the picture which shows how to add the members to your group.
  • 30.  Click on Add/Remove members in your group, you’ll see it to right corner in the group.  After clicking on add members in your group, you will see a window like this We can select the group members among the above list of users in community.
  • 31. The above picture shows a community group with name as IDC Group Technical along with its logo. We can control flow of emails by clicking on Email Weekly digest. The above picture shows how we can control email alerts. We can choose when to send an email from community to user.
  • 32. 8. How to Create Global Actions in Salesforce and adding them to chatter Feeds Global Actions: To customize the current tasks and to assign the new tasks without writing the code we can use Global Actions Steps in creating Global Actions: 1) After you logged into the system at the left side corner you will see create option below that Global Actions option is present. Click that to create global actions. After clicking on that you can directed to global actions page. Click on new action, after that choose Target Object and enter action name and label name.
  • 33. Adding Global Actions in Chatter feed Configure chatter action page in Salesforce by drag and drop required fields in action layout
  • 34. After configuring Chatter action page layout in Salesforce, go to chatter page and create a record from chatter. We can create a record from chatter by clicking what I follow which is at the left side of the chatter page. Choose action by clicking on the more, fill the required details of the action and click create, then new record will create. This process is explained in the diagram shown below. From above drop down list of different actions we have selected salesforcexpreview and the same is shown in below picture.
  • 35. The picture above represents a global action in salesforce community which was created in custom way by using Global actions process. The above picture shows by inserting all the values into the fields and click on create we can create an Account record as we selected account object while creating global action so we can create account record here.
  • 36. 9. Writing Triggers in Chatter Feeds We can write triggers to the chatter by writing code in Apex language. Sample coding is given below. The below trigger is written on feedItem object which used to create a task when the chatter body starts with #activity. trigger MyActivityTaskCreating1 on FeedItem (after insert) { for (feedItem f:trigger.new) { if(f.body.startsWith('#Activity')) { task t=new task(subject=f.body.replace('#Activity',''),status='inProgress'); t.subject=f.Body.replace('#Activity',''); t.status='inProgress'; insert t; } } }