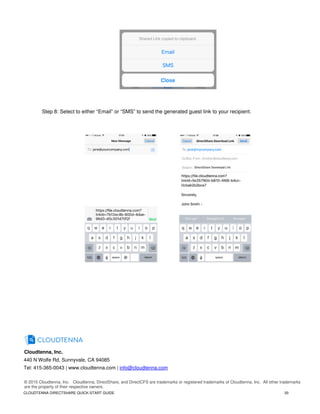
DirectShare
Direct Collaboration File Sharing
Technical Installation Solution Guide
Quick-Start Setup Guide
CLOUDTENNA DIRECTSHARE QUICK-START GUIDE 2
Document Revision
Date Revision Description (co-authors)
01/12/2016 1.0 Initial Release (Christian Petrou, Mitch Crane)
THIS SOLUTION GUIDE IS FOR INFORMATIONAL PURPOSES ONLY, AND MAY CONTAIN
TYPOGRAPHICAL ERRORS AND TECHNICAL INACCURACIES. THE CONTENT IS PROVIDED AS IS,
WITHOUT EXPRESS OR IMPLIED WARRANTIES OF ANY KIND.
Cloudtenna © 2016: All rights reserved. Reproduction of this material in any manner whatsoever without the
express written permission of Cloudtenna is strictly prohibited.
CLOUDTENNA DIRECTSHARE QUICK-START GUIDE 3
Getting Started
This guide will help you deploy a Cloudtenna DirectShare virtual appliance (VA) using VMware ESXi.
Assumptions
• It is assumed that the reader has a working knowledge of VMware vSphere system administration,
Microsoft® Windows® desktop and server administration, SAN network design, basic Ubuntu Linux
commands and basic SAN storage operations.
• This is not a complete “how to” guide. Step by step setup is covered in part, examples of screen shots
and settings should be sufficient for the reader to apply the right changes to implement the steps outlined
in this guide.
Limitations and Other Considerations
External File Sharing and Collaboration can be setup in multiple different fashions. This solution guide will
address a specific scenario and how to build around it.
For information on how to setup a NON-PRODUCTION Windows Server 2012R2 demo environment in
conjunction with a DirectShare virtual appliance, download the “How to setup a Fresh Windows Server
for a DirectShare EasyDemo” at https://channel.ctna.co/downloads/ .
CLOUDTENNA DIRECTSHARE QUICK-START GUIDE 4
DirectShare Virtual Appliance Sizing
Optimal performance of the DirectShare VA (Virtual Appliance) is dependent on several factors. Sizing of
the VA is determined by number of concurrent users accessing files at max load.
Production sizing of compute resources should be determined by monitoring of the VA during initial usage
and onboarding of users. Although system administrators are accustomed to this best practice, more
frequent checks of resource utilization are recommended, as each environment has different success criteria
and usage, activity varies throughout different times of day, days of week, and seasonal demands on the
network may vary.
A deescalating resource monitoring check is recommended similar to this example:
Day 1+: Once every few until all users are on boarded and have successfully connected at least once.
Day 2: Twice daily.
Day 3 - 7: Once daily.
Day 8+: Notifications configured to alert administrators at 80% of vCPU and/or RAM reached.
Minimum VA resources:
• 1 vCPU, 2 GB RAM, 40 GB local volume (few users with limited file transfer requests).
• < 25 concurrent file transfers
Medium VA resources:
• 2 vCPU, 4 GB RAM, 40 GB local volume (light file transfers evenly throughout the day).
• < 75 concurrent file transfers
Large VA resources:
• 4 vCPU, 8 GB RAM, 40 GB local volume (increased file transfers at different peak times of day).
• < 150 concurrent file transfers
Maximum VA sizing:
• 8 vCPU, 16 GB RAM, 40 GB local volume (heavy concurrent file transfers all day long).
• <= 300 concurrent file transfers
The above-recommended resource allocations are for a single DirectShare VA. Local volume size
of 40 GB may be increased to accommodate longer audit log retention requirements, but not
required for performance. For deployments requiring greater than 300 concurrent file connections, please
call +1 (415) 365-0043 to speak with a Cloudtenna DirectShare Sales Engineer.
CLOUDTENNA DIRECTSHARE QUICK-START GUIDE 5
Pre-install Preparation Checklist
The following information is required to configure a DirectShare VA and enable DirectCFS external
access features to a SMB configured file server.
Public Network Information
1. An external public static IP will be needed for the DirectShare VA.
2. Designate a FQDN for the DirectShare VA. (Ex: directshare.company.com )
3. Purchase an SSL certificate (nginx-style) for the FQDN in step 2.
4. Open and forward public port (443 recommended) to DirectShare VA port 2980.
5. Your company alias. (Users will need this alias when using the Web and Mobile Apps).
6. Visit www.cloudtenna.com/trial and register for a 30-Day Trial Account to receive your Cloudtenna
Admin username & password.
ESXi Information
1. ESXi server IP address which you will install the DirectShare VA on.
2. ESXi username & password for the above referenced server.
Internal Networking Information
1. Internal static IP to be assigned to the DirectShare VA.
2. Internal network gateway and netmask.
3. Internal DNS server(s) IP.
4. Internal domain suffix.
AD/LDAP Information
1. AD/LDAP hostname the DirectShare VA will forward authentication requests to (Ex:
ldap.example.com).
2. AD/LDAP port in use (default port is 389).
3. AD/LDAP Bind DN (Ex: CN=Users,DC=example,DC=com).
4. AD/LDAP user domain (Ex: user_domain, example.local, example.com).
SMB / CIFS Information
1. SMB/CIFS hostname or internal IP address (Ex: ldap.example.com).
2. SMB/CIFS shared folder(s), share name(s).
3. SMB/CIFS binding user name (a new service user is recommended for security best practices).
4. SMB/CIFS binding user password.
Download Ubuntu 14.04.3 LTS Server 64-bit & Putty
DirectShare runs on Ubuntu 14.04.3 LTS Server 64-bit and is the operating system used to create the
VA. Download Ubuntu before beginning the install process to save time. Accessing the VA via SSH is
another time saver and secure method of connecting to the VA. Using a generally available SSH client
application will be needed. Putty is recommended and referenced in this guide.
http://www.ubuntu.com/download/server
http://www.putty.org/
CLOUDTENNA DIRECTSHARE QUICK-START GUIDE 6
The following section has been formatted in a spreadsheet type format that can be used as a working
document during the install process.
DirectShare Setup Information Cheat Sheet
Public Network Information
Publicly accessible IP address. Cloudtenna will supply a Cloudtenna admin account.
Appliance FQDN directshare.company.com
Public Port 2980
Company Alias Company, Inc
Cloudtenna Admin Username admin@company.com
Cloudtenna Admin Password cloudtenna_password
ESXi Information
Remote into ESXi to configure and setup Cloudtenna virtual appliance (VMware vSphere)
ESXi server ip 10.26.1.16
ESXi username esxi_user
ESXi password esxi_password
Internal Networking Information
Location of virtual appliance and network information
Internal static IP 192.168.11.104
Internal gateway 192.168.11.1
Internal netmask 255.255.255.0
Internal dns server(s) 192.168.11.7 192.168.11.8
Internal domain suffix ct-dev.local
AD/LDAP Information
Location of AD/LDAP authentication server
AD/LDAP hostname ldap.example.com
AD/LDAP port 389
AD/LDAP Bind DN CN=Users,DC=example,DC=com
AD/LDAP user domain user_domain
Fileshare Information
Location, name, and credentials of the SMB file server you wish to broadcast
SMB/CIFS hostname or ip fileserver.example.com
SMB/CIFS Share Name CompanyShared
SMB/CIFS binding user name smb_user
SMB/CIFS binding user password smb_password
CLOUDTENNA DIRECTSHARE QUICK-START GUIDE 7
Post VM Creation & Ubuntu Installation
Ubuntu Configuration (Static IP & Routing Table)
Once the VA is created in ESXi and the Ubuntu Server installation is completed, a few steps remain to
ensure everything is ready for DirectCFS. This guide assumes the reader has basic knowledge of Linux
commands and network security best practices.
• Redirect port 443 (or your designated high port) to port 2980
• Update the Ubuntu Server
• Install wget
• Configure then confirm the network interface is correct and up.
From the Ubuntu console, run the following commands:
sudo -i
apt-get update
apt-get install wget -y
nano /etc/network/interfaces
auto lo eth0
iface lo inet loopback
iface eth0 inet static
address 192.168.11.104 (enter your IP here)
netmask 255.255.255.0 (enter your netmask here)
gateway 192.168.11.1 (enter gateway IP here)
dns-nameserver 8.8.8.8 (enter your DNS IPs here)
ifdown eth0
ifup eth0
ifconfig
Confirm the static IP with ifconfig.
CLOUDTENNA DIRECTSHARE QUICK-START GUIDE 8
Download & Install the Cloudtenna Deb Package
Cloudtenna simplifies the DirectShare installation and auto configures all the services required for
DirectCFS enablement all by running a few commands.
From the Ubuntu console, run the following commands as root (or sudo –i):
wget http://ctna.co/deb
dpkg -i deb
apt-get install -f -y
service cloudtenna stop
service cloudtenna start
Confirm ports 8001 and 2980 are listening.
ss -nlp | grep 8001
ss -nlp | grep 2980
Confirm the DirectShare Appliance is accessible via browser on port 8001 (Ex: https://192.168.11.104:8001).
Replace the IP address with the internal static IP assigned to the VA. Using your Windows Server
Domain Controller confirm the VA is reachable via a browser in that subnet. If the VA is not
accessible from the Domain Controller selected for authentication, additional network routing may be
required for your unique environment. Contact your network administrator for assistance in this area.
CLOUDTENNA DIRECTSHARE QUICK-START GUIDE 9
Configuring the DirectShare VA (GUI)
Log into the appliance using your Company Admin credentials obtained via registration email from
Cloudtenna. Company Admin user name is the email address used when registering for a DirectShare trial.
You can obtain a Cloudtenna Company Admin account by visiting www.cloudtenna.com/trial.
Network Settings
Select the “Network” option from the left menu.
• Connection – Enter the FQDN previously determined for DirectShare in the “Host” field (Ex:
directshare.company.com) and the external port number (recommended port 443, or whichever high
port desired).
Click the “UPDATE AND RESTART SERVICE” button under the Host / Port fields to save the settings.
CLOUDTENNA DIRECTSHARE QUICK-START GUIDE 10
• Encryption – Click the “Choose File” button under the ‘SSL Certificate’ heading, then select your
certificate obtained from your SSL Certificate Issuer or Domain Registrar (Ex: GoDaddy, ENOM,
Symantec, etc).
• Repeat the process for ‘SSL Key’, then click the “TEST” button, lastly click the “UPDATE AND
RESTART SERVICE” under the “TEST” button to save the settings.
Refreshing the Network page after a few minutes to allow the network services to restart,
confirmation Health Checks will be displayed for the connection between the appliance, the
Cloudtenna API servers, confirming successful encryption of your network traffic.
Add Shares (AKA - User Mapped Drives)
Select the “Shares” option from the left menu.
Enter information for a network Share to be made available to authenticated users.
• Drive name (Ex: CompanyShare) – This will be the name shown in the Web and Mobile Apps.
• Drive type (Ex: Shared Directory) – This is the default and most common drive type.
o Advanced Option 1: (Ex: Existing Users Directory) may be selected for networks that have
User Roaming Profiles and Folder Redirection correctly configured.
CLOUDTENNA DIRECTSHARE QUICK-START GUIDE 11
o Advanced Option 2: (Ex: DirectShare Briefcase) may be selected for use with DirectShare
Sync Desktop Client. DirectShare Sync allows for automated individual user folder creation
on a network share, with each folder assigned to a single user and completely isolated from
roaming profiles. Users access the folder via DirectShare Apps as well as the DirectShare
Sync Client running on their Windows or Mac desktop.
• UNC Path (Ex: 192.168.11.104CompanyShare) – This will be your Windows internal static IP and
Share name.
• Bind username (Ex: company.localctadmin) – Use the domain name and designated Bind user you
created earlier in this guide.
• Click the “TEST” button to confirm the settings are correct. Then click “UPDATE AND RESTART”
under the “TEST” button to save the settings.
Users – AD/LDAP Authentication
Select the “Users” option from the left menu.
Enter information for any ADLDAP user that will
authenticate using their Windows credentials.
• Host (Ex: 192.168.11.200) – Use the internal IP
for the chosen Windows Domain Controller.
• Port (Ex: 389).
• Bind DN (Ex: CN=Users,DC=company,DC=local).
• Username (Ex: company.localctadmin) – Use the
domain name and any AD user to authenticate
users; alternatively you may use the Bind user
created earlier in this guide.
When authenticating with a user in an OU not in the default CN users, use the following format, (Ex:
OU=Internal-users,DC=company,DC=local). Ensure correct capitalization is used in the Bind DN.
• Click the “PERFORM TEST LOGIN”, then click “UPDATE AND RESTART” to save the settings.
CLOUDTENNA DIRECTSHARE QUICK-START GUIDE 12
Refresh the page to load heath checks after a few minutes, allowing the services to finish the
restart.
• Select “Status” from the left menu to view the global status and health checks.
Shared Links & Guest Access
Configure Shared Link Rules
Admin rules need to be added to the Cloudtenna Web Admin Interface to enable or disable sharing from
within a path or share. Log into the Web Admin Interface at https://admin.cloudtenna.com using the
Company Admin email credentials also used when accessing the DirectShare virtual appliance.
Select the “Shared Links” option from the left menu.
CLOUDTENNA DIRECTSHARE QUICK-START GUIDE 13
The rule with the deepest applicable base path will be used when a shared link is created; all other
rules will be ignored.
• Click the “+ PATH” option in the top right portion of the Shared Links table.
• Select the Drive Name using the dropdown (Shares added on the DirectShare appliance will
automatically show up in the Web Admin Interface).
• Type in the name of a folder in the Base Path field in order to enable links for this directory. (Ex: To
enable shared links for a folder “Marketing” located in the “Public” share / user mapped drive; Select
“Public” from the Drive Name dropdown, then type “/Marketing” for the Base Path).
• Select the Maximum number of downloads per link (Ex: No limit, 0 Disable sharing, or 100).
• Select the time a link will be active using the Expire link after dropdown (Ex: 24 hours to 180 days).
• Choose the Password requirement (Ex: No password required, or at least 8 characters).
• Click the “Add Rule” button to save the settings.
• Repeat the steps above for each additional rule needed to enable all the Shares added on the
DirectShare appliance approved for shared links.
Configure Guest Access - Collaborators
While not all internal users may have been granted permissions to files and folders, there are instances
where temporary access is needed. External guests may need access to collaborate in a folder as well. The
Guest Access Rules enable or disable guest access within a drive / folder / user mapped drive. A “DENY”
rule will prevent invitations from being sent and existing guests from accessing files and folders within the
specific base path. Guest access rules take effect immediately.
CLOUDTENNA DIRECTSHARE QUICK-START GUIDE 14
• Click the “+ PATH” option in the top right portion of the Guest Access table.
• Select the Drive Name using the dropdown.
• Type in the name of a folder in the Base Path field in order to enable guests to collaborate in this
directory.
• Select the Access type from the dropdown (Ex: DENY or ALLOW).
• Click the “Add Rule” button to save the settings.
• Repeat the steps above for each additional rule needed to ALLOW or DENY Guest Access to all the
Shares added on the DirectShare appliance.
By default, for any Base Path not associated to a specified rule, access is set to DENY. You can
DENY a path within an ALLOWed path.
Accessing files and Generating Shared Links
DirectShare Web App
To create guest links and share files or to collaborate in a folder with external guests, you can access shares
from any modern browser by visiting https://app.cloudtenna.com .
Log into the DirectShare Web App using your Windows Domain credentials. Your internal domain name is
not required when entering in a user name.
Step 1: Visit https://app.cloudtenna.com
Step 2: Type in your company name in the search field, select your company name from the dropdown. Then
click the “CONTINUE” button.
CLOUDTENNA DIRECTSHARE QUICK-START GUIDE 15
Step 3: Enter in your domain user name and password. Then click the “SIGN IN” button.
Beneath the “SIGN IN” button, the option to “Switch company?” is available should a user need
access to a different company shares and an active account in that company.
The home screen will display the mapped drives enabled for remote access, where permissions have been
assigned for the logged in user to browse.
Step 4: Click a listed mapped drive to view its contents.
CLOUDTENNA DIRECTSHARE QUICK-START GUIDE 16
Step 5: Click the icon to the right of the file or folder to expand the context menu.
Step 6: Select the “Share” option from the dropdown to generate a Shared Link.
If a folder was selected, you will be prompted to enter the email address of the individual with
whom you wish to grant guest access to the entire folder. An email will automatically be sent to
that individual with details on accessing the folder via the web.
Step 7: Select “Password Protection” if desired from the light box pop up. Type in a password as needed,
then click the “CREATE SHARED LINK” button.
Step 8: Copy the generated shared link and send to your recipient via email, chat, message, etc., then click
the “OK” button.
CLOUDTENNA DIRECTSHARE QUICK-START GUIDE 17
DirectShare Mobile App
DirectShare lets users take access to mapped drives anywhere they go using either iPhone, iPad or Android
apps. Apps are available free from the Apple AppStore and Google Play Store.
Apple iOS (iPhone / iPad) app Download Google Android app Download
To create guest links, share files or to collaborate in a folder with external guests on the go, you can access
shares from a mobile device. For the purposes of this guide, the Apple iOS app for iPhone / iPad is used to
demonstrate the mobile app function.
Step 1: Download and install the Cloudtenna app from the AppStore app on your phone.
Step 2: Launch the mobile app and type in your company name in the search field, select your company
name from the dropdown. Then click the blue arrow in the field.
Step 3: Enter in your domain user name and password. Then click the “Sign In” button.
CLOUDTENNA DIRECTSHARE QUICK-START GUIDE 18
Beneath the “SIGN IN” button, the option to “Switch company?” is available should a user need
access to a different company shares and an active account in that company.
The home screen will display the mapped drives that are enabled for remote access, where permissions
have been assigned for the logged in user to browse.
Step 4: Click a listed mapped drive to view its contents.
CLOUDTENNA DIRECTSHARE QUICK-START GUIDE 19
Step 5: Swipe left on a file or folder name to expand its context menu.
Step 6: Select the “Share” option from the menu to generate a Shared Link.
If a folder was selected, you will be prompted to enter the email address of the individual with whom
you wish to grant guest access to the entire folder. An email will automatically be sent to that
individual with details on accessing the folder via the web.
Step 7: Select “Password Protection” if desired. Type in a password as needed, then click the “Create Link”
button.
CLOUDTENNA DIRECTSHARE QUICK-START GUIDE 20
Step 8: Select to either “Email” or “SMS” to send the generated guest link to your recipient.
Cloudtenna, Inc.
440 N Wolfe Rd, Sunnyvale, CA 94085
Tel: 415-365-0043 | www.cloudtenna.com | info@cloudtenna.com
© 2015 Cloudtenna, Inc. Cloudtenna, DirectShare, and DirectCFS are trademarks or registered trademarks of Cloudtenna, Inc. All other trademarks
are the property of their respective owners.

DirectShare Quick Start Setup Guide

  • 1.
    DirectShare Direct Collaboration FileSharing Technical Installation Solution Guide Quick-Start Setup Guide
  • 2.
    CLOUDTENNA DIRECTSHARE QUICK-STARTGUIDE 2 Document Revision Date Revision Description (co-authors) 01/12/2016 1.0 Initial Release (Christian Petrou, Mitch Crane) THIS SOLUTION GUIDE IS FOR INFORMATIONAL PURPOSES ONLY, AND MAY CONTAIN TYPOGRAPHICAL ERRORS AND TECHNICAL INACCURACIES. THE CONTENT IS PROVIDED AS IS, WITHOUT EXPRESS OR IMPLIED WARRANTIES OF ANY KIND. Cloudtenna © 2016: All rights reserved. Reproduction of this material in any manner whatsoever without the express written permission of Cloudtenna is strictly prohibited.
  • 3.
    CLOUDTENNA DIRECTSHARE QUICK-STARTGUIDE 3 Getting Started This guide will help you deploy a Cloudtenna DirectShare virtual appliance (VA) using VMware ESXi. Assumptions • It is assumed that the reader has a working knowledge of VMware vSphere system administration, Microsoft® Windows® desktop and server administration, SAN network design, basic Ubuntu Linux commands and basic SAN storage operations. • This is not a complete “how to” guide. Step by step setup is covered in part, examples of screen shots and settings should be sufficient for the reader to apply the right changes to implement the steps outlined in this guide. Limitations and Other Considerations External File Sharing and Collaboration can be setup in multiple different fashions. This solution guide will address a specific scenario and how to build around it. For information on how to setup a NON-PRODUCTION Windows Server 2012R2 demo environment in conjunction with a DirectShare virtual appliance, download the “How to setup a Fresh Windows Server for a DirectShare EasyDemo” at https://channel.ctna.co/downloads/ .
  • 4.
    CLOUDTENNA DIRECTSHARE QUICK-STARTGUIDE 4 DirectShare Virtual Appliance Sizing Optimal performance of the DirectShare VA (Virtual Appliance) is dependent on several factors. Sizing of the VA is determined by number of concurrent users accessing files at max load. Production sizing of compute resources should be determined by monitoring of the VA during initial usage and onboarding of users. Although system administrators are accustomed to this best practice, more frequent checks of resource utilization are recommended, as each environment has different success criteria and usage, activity varies throughout different times of day, days of week, and seasonal demands on the network may vary. A deescalating resource monitoring check is recommended similar to this example: Day 1+: Once every few until all users are on boarded and have successfully connected at least once. Day 2: Twice daily. Day 3 - 7: Once daily. Day 8+: Notifications configured to alert administrators at 80% of vCPU and/or RAM reached. Minimum VA resources: • 1 vCPU, 2 GB RAM, 40 GB local volume (few users with limited file transfer requests). • < 25 concurrent file transfers Medium VA resources: • 2 vCPU, 4 GB RAM, 40 GB local volume (light file transfers evenly throughout the day). • < 75 concurrent file transfers Large VA resources: • 4 vCPU, 8 GB RAM, 40 GB local volume (increased file transfers at different peak times of day). • < 150 concurrent file transfers Maximum VA sizing: • 8 vCPU, 16 GB RAM, 40 GB local volume (heavy concurrent file transfers all day long). • <= 300 concurrent file transfers The above-recommended resource allocations are for a single DirectShare VA. Local volume size of 40 GB may be increased to accommodate longer audit log retention requirements, but not required for performance. For deployments requiring greater than 300 concurrent file connections, please call +1 (415) 365-0043 to speak with a Cloudtenna DirectShare Sales Engineer.
  • 5.
    CLOUDTENNA DIRECTSHARE QUICK-STARTGUIDE 5 Pre-install Preparation Checklist The following information is required to configure a DirectShare VA and enable DirectCFS external access features to a SMB configured file server. Public Network Information 1. An external public static IP will be needed for the DirectShare VA. 2. Designate a FQDN for the DirectShare VA. (Ex: directshare.company.com ) 3. Purchase an SSL certificate (nginx-style) for the FQDN in step 2. 4. Open and forward public port (443 recommended) to DirectShare VA port 2980. 5. Your company alias. (Users will need this alias when using the Web and Mobile Apps). 6. Visit www.cloudtenna.com/trial and register for a 30-Day Trial Account to receive your Cloudtenna Admin username & password. ESXi Information 1. ESXi server IP address which you will install the DirectShare VA on. 2. ESXi username & password for the above referenced server. Internal Networking Information 1. Internal static IP to be assigned to the DirectShare VA. 2. Internal network gateway and netmask. 3. Internal DNS server(s) IP. 4. Internal domain suffix. AD/LDAP Information 1. AD/LDAP hostname the DirectShare VA will forward authentication requests to (Ex: ldap.example.com). 2. AD/LDAP port in use (default port is 389). 3. AD/LDAP Bind DN (Ex: CN=Users,DC=example,DC=com). 4. AD/LDAP user domain (Ex: user_domain, example.local, example.com). SMB / CIFS Information 1. SMB/CIFS hostname or internal IP address (Ex: ldap.example.com). 2. SMB/CIFS shared folder(s), share name(s). 3. SMB/CIFS binding user name (a new service user is recommended for security best practices). 4. SMB/CIFS binding user password. Download Ubuntu 14.04.3 LTS Server 64-bit & Putty DirectShare runs on Ubuntu 14.04.3 LTS Server 64-bit and is the operating system used to create the VA. Download Ubuntu before beginning the install process to save time. Accessing the VA via SSH is another time saver and secure method of connecting to the VA. Using a generally available SSH client application will be needed. Putty is recommended and referenced in this guide. http://www.ubuntu.com/download/server http://www.putty.org/
  • 6.
    CLOUDTENNA DIRECTSHARE QUICK-STARTGUIDE 6 The following section has been formatted in a spreadsheet type format that can be used as a working document during the install process. DirectShare Setup Information Cheat Sheet Public Network Information Publicly accessible IP address. Cloudtenna will supply a Cloudtenna admin account. Appliance FQDN directshare.company.com Public Port 2980 Company Alias Company, Inc Cloudtenna Admin Username admin@company.com Cloudtenna Admin Password cloudtenna_password ESXi Information Remote into ESXi to configure and setup Cloudtenna virtual appliance (VMware vSphere) ESXi server ip 10.26.1.16 ESXi username esxi_user ESXi password esxi_password Internal Networking Information Location of virtual appliance and network information Internal static IP 192.168.11.104 Internal gateway 192.168.11.1 Internal netmask 255.255.255.0 Internal dns server(s) 192.168.11.7 192.168.11.8 Internal domain suffix ct-dev.local AD/LDAP Information Location of AD/LDAP authentication server AD/LDAP hostname ldap.example.com AD/LDAP port 389 AD/LDAP Bind DN CN=Users,DC=example,DC=com AD/LDAP user domain user_domain Fileshare Information Location, name, and credentials of the SMB file server you wish to broadcast SMB/CIFS hostname or ip fileserver.example.com SMB/CIFS Share Name CompanyShared SMB/CIFS binding user name smb_user SMB/CIFS binding user password smb_password
  • 7.
    CLOUDTENNA DIRECTSHARE QUICK-STARTGUIDE 7 Post VM Creation & Ubuntu Installation Ubuntu Configuration (Static IP & Routing Table) Once the VA is created in ESXi and the Ubuntu Server installation is completed, a few steps remain to ensure everything is ready for DirectCFS. This guide assumes the reader has basic knowledge of Linux commands and network security best practices. • Redirect port 443 (or your designated high port) to port 2980 • Update the Ubuntu Server • Install wget • Configure then confirm the network interface is correct and up. From the Ubuntu console, run the following commands: sudo -i apt-get update apt-get install wget -y nano /etc/network/interfaces auto lo eth0 iface lo inet loopback iface eth0 inet static address 192.168.11.104 (enter your IP here) netmask 255.255.255.0 (enter your netmask here) gateway 192.168.11.1 (enter gateway IP here) dns-nameserver 8.8.8.8 (enter your DNS IPs here) ifdown eth0 ifup eth0 ifconfig Confirm the static IP with ifconfig.
  • 8.
    CLOUDTENNA DIRECTSHARE QUICK-STARTGUIDE 8 Download & Install the Cloudtenna Deb Package Cloudtenna simplifies the DirectShare installation and auto configures all the services required for DirectCFS enablement all by running a few commands. From the Ubuntu console, run the following commands as root (or sudo –i): wget http://ctna.co/deb dpkg -i deb apt-get install -f -y service cloudtenna stop service cloudtenna start Confirm ports 8001 and 2980 are listening. ss -nlp | grep 8001 ss -nlp | grep 2980 Confirm the DirectShare Appliance is accessible via browser on port 8001 (Ex: https://192.168.11.104:8001). Replace the IP address with the internal static IP assigned to the VA. Using your Windows Server Domain Controller confirm the VA is reachable via a browser in that subnet. If the VA is not accessible from the Domain Controller selected for authentication, additional network routing may be required for your unique environment. Contact your network administrator for assistance in this area.
  • 9.
    CLOUDTENNA DIRECTSHARE QUICK-STARTGUIDE 9 Configuring the DirectShare VA (GUI) Log into the appliance using your Company Admin credentials obtained via registration email from Cloudtenna. Company Admin user name is the email address used when registering for a DirectShare trial. You can obtain a Cloudtenna Company Admin account by visiting www.cloudtenna.com/trial. Network Settings Select the “Network” option from the left menu. • Connection – Enter the FQDN previously determined for DirectShare in the “Host” field (Ex: directshare.company.com) and the external port number (recommended port 443, or whichever high port desired). Click the “UPDATE AND RESTART SERVICE” button under the Host / Port fields to save the settings.
  • 10.
    CLOUDTENNA DIRECTSHARE QUICK-STARTGUIDE 10 • Encryption – Click the “Choose File” button under the ‘SSL Certificate’ heading, then select your certificate obtained from your SSL Certificate Issuer or Domain Registrar (Ex: GoDaddy, ENOM, Symantec, etc). • Repeat the process for ‘SSL Key’, then click the “TEST” button, lastly click the “UPDATE AND RESTART SERVICE” under the “TEST” button to save the settings. Refreshing the Network page after a few minutes to allow the network services to restart, confirmation Health Checks will be displayed for the connection between the appliance, the Cloudtenna API servers, confirming successful encryption of your network traffic. Add Shares (AKA - User Mapped Drives) Select the “Shares” option from the left menu. Enter information for a network Share to be made available to authenticated users. • Drive name (Ex: CompanyShare) – This will be the name shown in the Web and Mobile Apps. • Drive type (Ex: Shared Directory) – This is the default and most common drive type. o Advanced Option 1: (Ex: Existing Users Directory) may be selected for networks that have User Roaming Profiles and Folder Redirection correctly configured.
  • 11.
    CLOUDTENNA DIRECTSHARE QUICK-STARTGUIDE 11 o Advanced Option 2: (Ex: DirectShare Briefcase) may be selected for use with DirectShare Sync Desktop Client. DirectShare Sync allows for automated individual user folder creation on a network share, with each folder assigned to a single user and completely isolated from roaming profiles. Users access the folder via DirectShare Apps as well as the DirectShare Sync Client running on their Windows or Mac desktop. • UNC Path (Ex: 192.168.11.104CompanyShare) – This will be your Windows internal static IP and Share name. • Bind username (Ex: company.localctadmin) – Use the domain name and designated Bind user you created earlier in this guide. • Click the “TEST” button to confirm the settings are correct. Then click “UPDATE AND RESTART” under the “TEST” button to save the settings. Users – AD/LDAP Authentication Select the “Users” option from the left menu. Enter information for any ADLDAP user that will authenticate using their Windows credentials. • Host (Ex: 192.168.11.200) – Use the internal IP for the chosen Windows Domain Controller. • Port (Ex: 389). • Bind DN (Ex: CN=Users,DC=company,DC=local). • Username (Ex: company.localctadmin) – Use the domain name and any AD user to authenticate users; alternatively you may use the Bind user created earlier in this guide. When authenticating with a user in an OU not in the default CN users, use the following format, (Ex: OU=Internal-users,DC=company,DC=local). Ensure correct capitalization is used in the Bind DN. • Click the “PERFORM TEST LOGIN”, then click “UPDATE AND RESTART” to save the settings.
  • 12.
    CLOUDTENNA DIRECTSHARE QUICK-STARTGUIDE 12 Refresh the page to load heath checks after a few minutes, allowing the services to finish the restart. • Select “Status” from the left menu to view the global status and health checks. Shared Links & Guest Access Configure Shared Link Rules Admin rules need to be added to the Cloudtenna Web Admin Interface to enable or disable sharing from within a path or share. Log into the Web Admin Interface at https://admin.cloudtenna.com using the Company Admin email credentials also used when accessing the DirectShare virtual appliance. Select the “Shared Links” option from the left menu.
  • 13.
    CLOUDTENNA DIRECTSHARE QUICK-STARTGUIDE 13 The rule with the deepest applicable base path will be used when a shared link is created; all other rules will be ignored. • Click the “+ PATH” option in the top right portion of the Shared Links table. • Select the Drive Name using the dropdown (Shares added on the DirectShare appliance will automatically show up in the Web Admin Interface). • Type in the name of a folder in the Base Path field in order to enable links for this directory. (Ex: To enable shared links for a folder “Marketing” located in the “Public” share / user mapped drive; Select “Public” from the Drive Name dropdown, then type “/Marketing” for the Base Path). • Select the Maximum number of downloads per link (Ex: No limit, 0 Disable sharing, or 100). • Select the time a link will be active using the Expire link after dropdown (Ex: 24 hours to 180 days). • Choose the Password requirement (Ex: No password required, or at least 8 characters). • Click the “Add Rule” button to save the settings. • Repeat the steps above for each additional rule needed to enable all the Shares added on the DirectShare appliance approved for shared links. Configure Guest Access - Collaborators While not all internal users may have been granted permissions to files and folders, there are instances where temporary access is needed. External guests may need access to collaborate in a folder as well. The Guest Access Rules enable or disable guest access within a drive / folder / user mapped drive. A “DENY” rule will prevent invitations from being sent and existing guests from accessing files and folders within the specific base path. Guest access rules take effect immediately.
  • 14.
    CLOUDTENNA DIRECTSHARE QUICK-STARTGUIDE 14 • Click the “+ PATH” option in the top right portion of the Guest Access table. • Select the Drive Name using the dropdown. • Type in the name of a folder in the Base Path field in order to enable guests to collaborate in this directory. • Select the Access type from the dropdown (Ex: DENY or ALLOW). • Click the “Add Rule” button to save the settings. • Repeat the steps above for each additional rule needed to ALLOW or DENY Guest Access to all the Shares added on the DirectShare appliance. By default, for any Base Path not associated to a specified rule, access is set to DENY. You can DENY a path within an ALLOWed path. Accessing files and Generating Shared Links DirectShare Web App To create guest links and share files or to collaborate in a folder with external guests, you can access shares from any modern browser by visiting https://app.cloudtenna.com . Log into the DirectShare Web App using your Windows Domain credentials. Your internal domain name is not required when entering in a user name. Step 1: Visit https://app.cloudtenna.com Step 2: Type in your company name in the search field, select your company name from the dropdown. Then click the “CONTINUE” button.
  • 15.
    CLOUDTENNA DIRECTSHARE QUICK-STARTGUIDE 15 Step 3: Enter in your domain user name and password. Then click the “SIGN IN” button. Beneath the “SIGN IN” button, the option to “Switch company?” is available should a user need access to a different company shares and an active account in that company. The home screen will display the mapped drives enabled for remote access, where permissions have been assigned for the logged in user to browse. Step 4: Click a listed mapped drive to view its contents.
  • 16.
    CLOUDTENNA DIRECTSHARE QUICK-STARTGUIDE 16 Step 5: Click the icon to the right of the file or folder to expand the context menu. Step 6: Select the “Share” option from the dropdown to generate a Shared Link. If a folder was selected, you will be prompted to enter the email address of the individual with whom you wish to grant guest access to the entire folder. An email will automatically be sent to that individual with details on accessing the folder via the web. Step 7: Select “Password Protection” if desired from the light box pop up. Type in a password as needed, then click the “CREATE SHARED LINK” button. Step 8: Copy the generated shared link and send to your recipient via email, chat, message, etc., then click the “OK” button.
  • 17.
    CLOUDTENNA DIRECTSHARE QUICK-STARTGUIDE 17 DirectShare Mobile App DirectShare lets users take access to mapped drives anywhere they go using either iPhone, iPad or Android apps. Apps are available free from the Apple AppStore and Google Play Store. Apple iOS (iPhone / iPad) app Download Google Android app Download To create guest links, share files or to collaborate in a folder with external guests on the go, you can access shares from a mobile device. For the purposes of this guide, the Apple iOS app for iPhone / iPad is used to demonstrate the mobile app function. Step 1: Download and install the Cloudtenna app from the AppStore app on your phone. Step 2: Launch the mobile app and type in your company name in the search field, select your company name from the dropdown. Then click the blue arrow in the field. Step 3: Enter in your domain user name and password. Then click the “Sign In” button.
  • 18.
    CLOUDTENNA DIRECTSHARE QUICK-STARTGUIDE 18 Beneath the “SIGN IN” button, the option to “Switch company?” is available should a user need access to a different company shares and an active account in that company. The home screen will display the mapped drives that are enabled for remote access, where permissions have been assigned for the logged in user to browse. Step 4: Click a listed mapped drive to view its contents.
  • 19.
    CLOUDTENNA DIRECTSHARE QUICK-STARTGUIDE 19 Step 5: Swipe left on a file or folder name to expand its context menu. Step 6: Select the “Share” option from the menu to generate a Shared Link. If a folder was selected, you will be prompted to enter the email address of the individual with whom you wish to grant guest access to the entire folder. An email will automatically be sent to that individual with details on accessing the folder via the web. Step 7: Select “Password Protection” if desired. Type in a password as needed, then click the “Create Link” button.
  • 20.
    CLOUDTENNA DIRECTSHARE QUICK-STARTGUIDE 20 Step 8: Select to either “Email” or “SMS” to send the generated guest link to your recipient. Cloudtenna, Inc. 440 N Wolfe Rd, Sunnyvale, CA 94085 Tel: 415-365-0043 | www.cloudtenna.com | info@cloudtenna.com © 2015 Cloudtenna, Inc. Cloudtenna, DirectShare, and DirectCFS are trademarks or registered trademarks of Cloudtenna, Inc. All other trademarks are the property of their respective owners.