DIGITAL SMILE DESIGNING
Guided by:
Dr.S.R.Godbole
Presented by:
Apurva Deshmukh
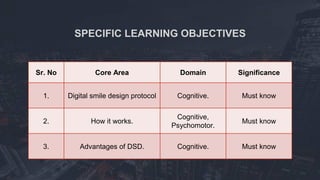
SPECIFIC LEARNING OBJECTIVES
Sr. No Core Area Domain Significance
1. Digital smile design protocol Cognitive. Must know
2. How it works.
Cognitive,
Psychomotor.
Must know
3. Advantages of DSD. Cognitive. Must know
CONTENTS
• Introduction.
• DSD workflow
• Advantages of DSD
• Other similar softwares.
• Summary
• References.
INTRODUCTION
To obtain consistent esthetic outcomes, the design of dental restorations
should be defined. The importance of gathering diagnostic data from
questionnaires and checklists cannot be overlooked; however, much of this
information may be lost if it is not transferred adequately to the design of the
restorations.

The diagnostic data must guide the subsequent treatment phases,
integrating all of the patient’s needs, desires, and functional and biologic issues
into an esthetic treatment design.
One of dentistry’s most challenging dilemmas relates to
whether or not we can actually meet or exceed patients’
expectations for treatment in the esthetic zone.
The Digital Smile Design (DSD) is a multi-use diagnosis
tool that is very useful for dento-gingival alterations and can
strengthen the diagnostic vision, improve communication, and
enhance predictability throughout treatment.
It was introduced by an American technician turned dentist,
Dr Christian Coachman in 2004.
DSD works in presentation softwares such as Keynote or Microsoft
PowerPoint.
It allows for careful analysis of the patient’s facial and dental
characteristics along with any critical factors that may have been overlooked
during clinical, photographic, or diagnostic cast based evaluation procedures.
The drawing of reference lines and shapes on intra- and extra-oral
photographs in a predetermined sequence widens the diagnostic visualization
and helps the restorative team evaluate the limitations of a given case,
including asymmetries, disharmonies, and violations of esthetic principles.
DSD WORKFLOW
A. STEP I: Photography
a. Three basic photographic views are necessary: Full face with a wide smile and the teeth
apart, full face at rest, and retracted view of the full maxillary arch with teeth apart.
b. A short video is recommended in which the patient is prompted by the clinician to explain
his or her treatment concerns and expectations.
Simultaneously, the video captures all possible dental and smile positions, including 45-
degree and profile views.
c. The photographs and videos are downloaded and inserted into the slide presentation. The
DSD work flow then proceeds further.
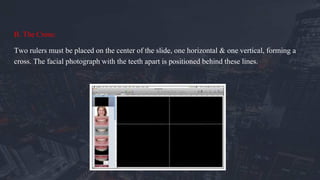
B. The Cross:
Two rulers must be placed on the center of the slide, one horizontal & one vertical, forming a
cross. The facial photograph with the teeth apart is positioned behind these lines.
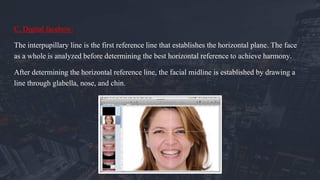
C. Digital facebow:
The interpupillary line is the first reference line that establishes the horizontal plane. The face
as a whole is analyzed before determining the best horizontal reference to achieve harmony.
After determining the horizontal reference line, the facial midline is established by drawing a
line through glabella, nose, and chin.
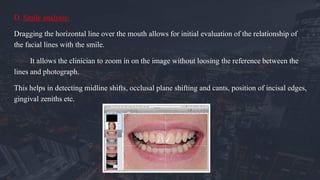
D. Smile analysis:
Dragging the horizontal line over the mouth allows for initial evaluation of the relationship of
the facial lines with the smile.
It allows the clinician to zoom in on the image without loosing the reference between the
lines and photograph.
This helps in detecting midline shifts, occlusal plane shifting and cants, position of incisal edges,
gingival zeniths etc.
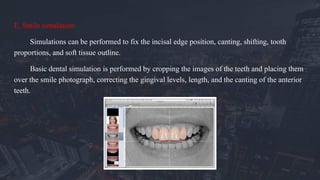
E. Smile simulation:
Simulations can be performed to fix the incisal edge position, canting, shifting, tooth
proportions, and soft tissue outline.
Basic dental simulation is performed by cropping the images of the teeth and placing them
over the smile photograph, correcting the gingival levels, length, and the canting of the anterior
teeth.
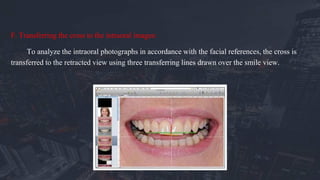
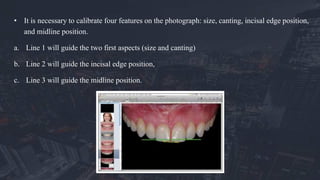
F. Transferring the cross to the intraoral images:
To analyze the intraoral photographs in accordance with the facial references, the cross is
transferred to the retracted view using three transferring lines drawn over the smile view.
• It is necessary to calibrate four features on the photograph: size, canting, incisal edge position,
and midline position.
a. Line 1 will guide the two first aspects (size and canting)
b. Line 2 will guide the incisal edge position,
c. Line 3 will guide the midline position.
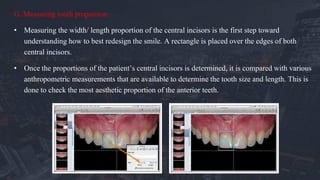
G. Measuring tooth proportion:
• Measuring the width/ length proportion of the central incisors is the first step toward
understanding how to best redesign the smile. A rectangle is placed over the edges of both
central incisors.
• Once the proportions of the patient’s central incisors is determined, it is compared with various
anthropometric measurements that are available to determine the tooth size and length. This is
done to check the most aesthetic proportion of the anterior teeth.
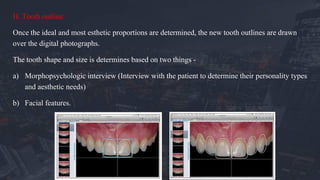
H. Tooth outline:
Once the ideal and most esthetic proportions are determined, the new tooth outlines are drawn
over the digital photographs.
The tooth shape and size is determines based on two things -
a) Morphopsychologic interview (Interview with the patient to determine their personality types
and aesthetic needs)
b) Facial features.
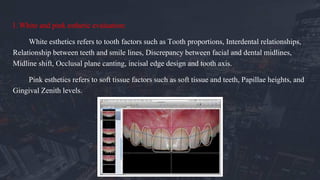
I. White and pink esthetic evaluation:
White esthetics refers to tooth factors such as Tooth proportions, Interdental relationships,
Relationship between teeth and smile lines, Discrepancy between facial and dental midlines,
Midline shift, Occlusal plane canting, incisal edge design and tooth axis.
Pink esthetics refers to soft tissue factors such as soft tissue and teeth, Papillae heights, and
Gingival Zenith levels.
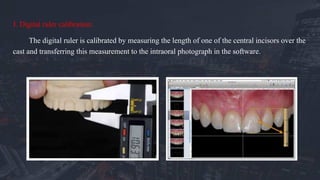
J. Digital ruler calibration:
The digital ruler is calibrated by measuring the length of one of the central incisors over the
cast and transferring this measurement to the intraoral photograph in the software.
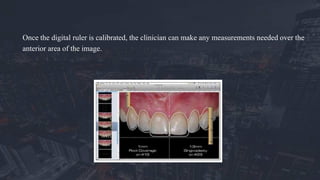
Once the digital ruler is calibrated, the clinician can make any measurements needed over the
anterior area of the image.
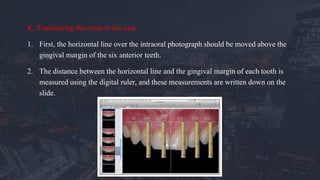
K. Transferring the cross to the cast:
1. First, the horizontal line over the intraoral photograph should be moved above the
gingival margin of the six anterior teeth.
2. The distance between the horizontal line and the gingival margin of each tooth is
measured using the digital ruler, and these measurements are written down on the
slide.
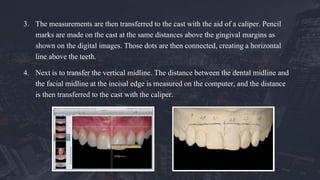
3. The measurements are then transferred to the cast with the aid of a caliper. Pencil
marks are made on the cast at the same distances above the gingival margins as
shown on the digital images. Those dots are then connected, creating a horizontal
line above the teeth.
4. Next is to transfer the vertical midline. The distance between the dental midline and
the facial midline at the incisal edge is measured on the computer, and the distance
is then transferred to the cast with the caliper.
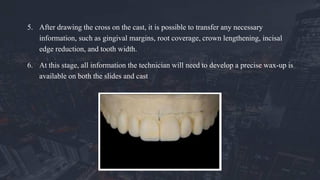
5. After drawing the cross on the cast, it is possible to transfer any necessary
information, such as gingival margins, root coverage, crown lengthening, incisal
edge reduction, and tooth width.
6. At this stage, all information the technician will need to develop a precise wax-up is
available on both the slides and cast
The guided diagnostic wax-up will be an important reference for any surgical,
orthodontic, and restorative procedures. Several guides can be produced over this wax-
up to control the procedures, such as surgical stents, orthodontic guides, implant guides,
crown lengthening guides, and tooth preparation guides.
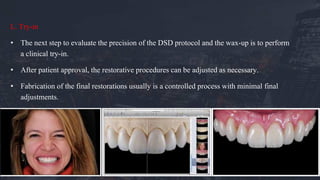
L. Try-in
• The next step to evaluate the precision of the DSD protocol and the wax-up is to perform
a clinical try-in.
• After patient approval, the restorative procedures can be adjusted as necessary.
• Fabrication of the final restorations usually is a controlled process with minimal final
adjustments.
The DSD protocol offers advantages in the following areas:
• Esthetic diagnosis
• Communication
• Feedback
• Patient management
ESTHETIC DIAGNOSIS
When the dentist first evaluates a new patient with esthetic concerns,
many critical factors may be overlooked.
A digital photography and digital analysis protocol enables the dentist to
visualize and analyze issues that he or she may not notice clinically.
Drawing of reference lines and shapes over extra- and intraoral digital
photographs can easily be performed using the presentation software.
COMMUNICATION
Traditionally, smile design has been instituted by the dental technician. The technician
performs the restorative wax-up, creates the tooth shapes and dental arrangements, and
follows the instructions and guidelines provided by the dentist.
However, if insufficient information is given to the dental technician, it leads to reduced
utilization of his or her skills to maximum potential. As a result, the final restoration is less
likely to fully satisfy the patient’s desires.
When the dentist develops a personal rapport with the patient, she/he has better ability
to communicate the patient’s personal preferences to the technician, elevating the excellence
of the restoration from acceptable to exceptional.
• Successful restorative treatment involves controlling the four dimensions of treatment:
a. Esthetics,
b. function,
c. Structure,
d. biology.
• In relation to esthetics, there are four main issues that must be controlled to improve
predictability and meet patient expectations:
a. the horizontal reference plane,
b. facial midline,
c. smile design (tooth shape and arrangement),
d. Color.
The primary goal of the DSD protocol is to facilitate the process of precisely
transferring this information from the face and the mouth, to the cast, and to the final
restoration.
With this valuable information in hand, the dental technician efficiently fabricates a three-
dimensional wax-up, focusing on developing anatomical features within the parameters
provided, including the planes of reference, facial and dental midlines, recommended
incisal edge position, lip dynamics, basic tooth arrangement, and incisal plane.
This information is transferred to the try-in phase through a provisional restoration.
FEEDBACK
• The DSD allows for precise evaluation of the results obtained in every treatment
phase.
• The sequence of treatment is organized on the slides with photographs, videos,
notes, graphics, and drawings.
• At any time, team members can access the slide presentation to track and analyze
the treatment provided.
• With the digital ruler, drawings, and reference lines, easy comparisons can
be made between pre- and post- treatment photographs.
• The dental technician also gains feedback related to tooth shape,
arrangement, and color to facilitate any necessary refinements.
• This constant double-checking ensures the excellence of the final result
and provides a great learning tool for the entire interdisciplinary team.
PATIENT MANAGEMENT
• It can used as a tool to motivate the patient, an educational tool to help
explain issues related to treatment, and an evaluative tool by comparing
before and after photographs.
• Further, the library of slides from past treatments can be used to
demonstrate treatment possibilities during patient consultation.
• The treatment planning presentation is much more effective because DSD
allows patients to visualize the multiple factors responsible for their orofacial
issues.
• The problems presented in each case can be put up in list form directly over the
patient’s own photographs.
• In addition, DSD aids in patient acceptance by helping them visualize and
understand both past and future treatments.
OTHER SIMILAR SMILE DESIGNING
SOFTWARES
Some other popular softwares are:
1. Smile designer Pro.
2. SNAP – Cosmetic simulation Software.
3. Visagismile design software.
4. G design software.
5. Smart smile design software.
6. Smylist Aesthetic design software.
The Digital Smile Design is a multi-use tool that can assist the restorative team
throughout treatment, improving the dental team’s understanding of the esthetic issues and
increasing patient acceptance of the final result. The digital photographs widens the dental
team’s diagnostic vision and helps to evaluate the limitations, risk factors, and esthetic
principles of a given case. These critical data leads to improved results in all phases of
treatment.
SUMMARY
1. Coachman C, Van Dooren E, Gürel G, Landsberg CJ, Calamita MA, Bichacho N. Smile design: From
digital treatment planning to clinical reality. In: Cohen M (ed). Interdisciplinary Treatment Planning.
Vol 2: Comprehensive Case Studies. Chicago: Quintessence, 2012:119–174
2. Coachman, C & Calamita, Marcelo. (2012). Digital Smile Design: A Tool for Treatment Planning and
Communication in Esthetic Dentistry. QDT 2012 Quintessence. 35. 1-9
3. Thumati P. Evaluation of function and esthetics for creating a beautiful smile in dental practice using
digital smile designing. J Interdiscip Dentistry 2014;4:144-7.
4. Zanardi PR, Laia Rocha Zanardi R, Chaib Stegun R, Sesma N, Costa B, Cruz Laganá D. The Use of the
Digital Smile Design Concept as an Auxiliary Tool in Aesthetic Rehabilitation: A Case Report. The
Open Dentistry Journal. 2016;10:28-34.
REFERENCES
Digital Smile Designing