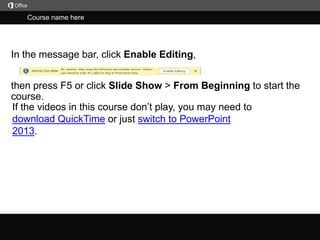
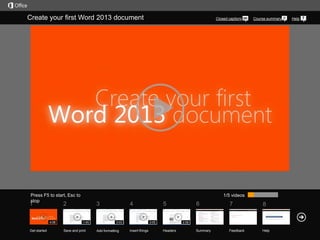
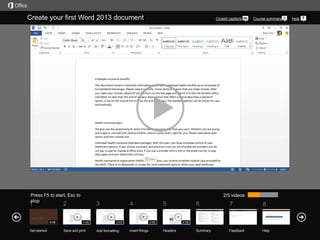
Course name here

In the message bar, click Enable Editing,

then press F5 or click Slide Show > From Beginning to start the
course.
If the videos in this course don’t play, you may need to
download QuickTime or just switch to PowerPoint
2013.

j
Create your first Word 2013 document

Press F5 to start, Esc to
stop

1

Get started

Course summary

1/5 videos

2

4:06

Closed captions

3
1:45

Save and print

4
3:03

Add formatting

5
3:05

Insert things

6

7

8

Summary

Feedback

Help

2:58

Headers

Help
Create your first Word 2013 document

Press F5 to start, Esc to
stop

1

Get started

Course summary

2/5 videos

2

4:06

Closed captions

3
1:45

Save and print

4
3:03

Add formatting

5
3:05

Insert things

6

7

8

Summary

Feedback

Help

2:58

Headers

Help
Create your first Word 2013 document

Press F5 to start, Esc to
stop

1

Get started

Course summary

3/5 videos

2

4:06

Closed captions

3
1:45

Save and print

4
3:03

Add formatting

5
3:05

Insert things

6

7

8

Summary

Feedback

Help

2:58

Headers

Help
Create your first Word 2013 document

Press F5 to start, Esc to
stop

1

Get started

Course summary

4/5 videos

2

4:06

Closed captions

3
1:45

Save and print

4
3:03

Add formatting

5
3:05

Insert things

6

7

8

Summary

Feedback

Help

2:58

Headers

Help
Create your first Word 2013 document

Press F5 to start, Esc to
stop

1

Get started

Course summary

5/5 videos

2

4:06

Closed captions

3
1:45

Save and print

4
3:03

Add formatting

5
3:05

Insert things

6

7

8

Summary

Feedback

Help

2:58

Headers

Help
Course
Help summary—Create your first Word 2013 document

Start using Word

Course summary

Add headers, footers,
margins, and more

Your first step in creating a document in Word
2013 is to choose whether to start from a blank
document or to let a template do much of the
work for you.

You can add a lot to your document using the
commands and options on two tabs – the Home
tab and Insert tab. But what about the others?
Let’s look at what you can do on the Design,
Page Layout, View, and Header and Footer
Tools tabs.

Save your document
Click File > Save, pick or browse to a folder, type
a name for your presentation in the File name
box, and click Save. And save your work as you
go - hit Ctrl+S often. To print, click the File tab
and then click Print.

See also
• More training courses
• Basic tasks in Word 2013
• What's new in Word 2013

Add some formatting
In general, the best and easiest way to format
text is to use a Style. Styles are easy because
you can apply a number of formatting options
with one click.

Insert some things
On the Insert tab, you can add pictures, shapes,
SmartArt graphics, tables, and more to take your
document to the next level.

Press F5 to start, Esc to stop

1

2
4:06

Get started

3
1:45

Save and print

5

4
3:03

Add formatting

3:05

Insert things

6

7

8

Summary

Feedback

Help

2:58

Headers
Rating
Help and comments

Course summary

Thank you for viewing this course!
Please tell us what you think
Check out more
courses

Press F5 to start, Esc to stop

1

2
4:06

Get started

3
1:45

Save and print

5

4
3:03

Add formatting

3:05

Insert things

6

7

8

Summary

Feedback

Help

2:58

Headers
Help

Course summary

Using PowerPoint’s video controls

Stopping a course

Going places

If you download a course and the videos don’t play
get the PowerPoint Viewer.
upgrade to PowerPoint 2013

the QuickTime player

Press F5 to start, Esc to stop

1

2
4:06

Get started

3
1:45

Save and print

5

4
3:03

Add formatting

3:05

Insert things

6

7

8

Summary

Feedback

Help

2:58

Headers

Word 2013

  • 1.
    Course name here Inthe message bar, click Enable Editing, then press F5 or click Slide Show > From Beginning to start the course. If the videos in this course don’t play, you may need to download QuickTime or just switch to PowerPoint 2013. j
  • 2.
    Create your firstWord 2013 document Press F5 to start, Esc to stop 1 Get started Course summary 1/5 videos 2 4:06 Closed captions 3 1:45 Save and print 4 3:03 Add formatting 5 3:05 Insert things 6 7 8 Summary Feedback Help 2:58 Headers Help
  • 3.
    Create your firstWord 2013 document Press F5 to start, Esc to stop 1 Get started Course summary 2/5 videos 2 4:06 Closed captions 3 1:45 Save and print 4 3:03 Add formatting 5 3:05 Insert things 6 7 8 Summary Feedback Help 2:58 Headers Help
  • 4.
    Create your firstWord 2013 document Press F5 to start, Esc to stop 1 Get started Course summary 3/5 videos 2 4:06 Closed captions 3 1:45 Save and print 4 3:03 Add formatting 5 3:05 Insert things 6 7 8 Summary Feedback Help 2:58 Headers Help
  • 5.
    Create your firstWord 2013 document Press F5 to start, Esc to stop 1 Get started Course summary 4/5 videos 2 4:06 Closed captions 3 1:45 Save and print 4 3:03 Add formatting 5 3:05 Insert things 6 7 8 Summary Feedback Help 2:58 Headers Help
  • 6.
    Create your firstWord 2013 document Press F5 to start, Esc to stop 1 Get started Course summary 5/5 videos 2 4:06 Closed captions 3 1:45 Save and print 4 3:03 Add formatting 5 3:05 Insert things 6 7 8 Summary Feedback Help 2:58 Headers Help
  • 7.
    Course Help summary—Create yourfirst Word 2013 document Start using Word Course summary Add headers, footers, margins, and more Your first step in creating a document in Word 2013 is to choose whether to start from a blank document or to let a template do much of the work for you. You can add a lot to your document using the commands and options on two tabs – the Home tab and Insert tab. But what about the others? Let’s look at what you can do on the Design, Page Layout, View, and Header and Footer Tools tabs. Save your document Click File > Save, pick or browse to a folder, type a name for your presentation in the File name box, and click Save. And save your work as you go - hit Ctrl+S often. To print, click the File tab and then click Print. See also • More training courses • Basic tasks in Word 2013 • What's new in Word 2013 Add some formatting In general, the best and easiest way to format text is to use a Style. Styles are easy because you can apply a number of formatting options with one click. Insert some things On the Insert tab, you can add pictures, shapes, SmartArt graphics, tables, and more to take your document to the next level. Press F5 to start, Esc to stop 1 2 4:06 Get started 3 1:45 Save and print 5 4 3:03 Add formatting 3:05 Insert things 6 7 8 Summary Feedback Help 2:58 Headers
  • 8.
    Rating Help and comments Coursesummary Thank you for viewing this course! Please tell us what you think Check out more courses Press F5 to start, Esc to stop 1 2 4:06 Get started 3 1:45 Save and print 5 4 3:03 Add formatting 3:05 Insert things 6 7 8 Summary Feedback Help 2:58 Headers
  • 9.
    Help Course summary Using PowerPoint’svideo controls Stopping a course Going places If you download a course and the videos don’t play get the PowerPoint Viewer. upgrade to PowerPoint 2013 the QuickTime player Press F5 to start, Esc to stop 1 2 4:06 Get started 3 1:45 Save and print 5 4 3:03 Add formatting 3:05 Insert things 6 7 8 Summary Feedback Help 2:58 Headers