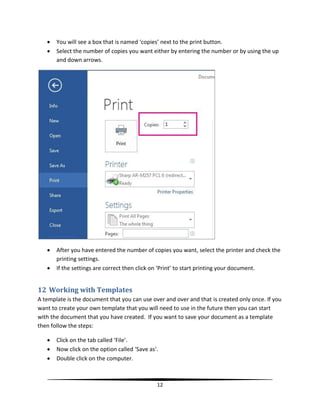
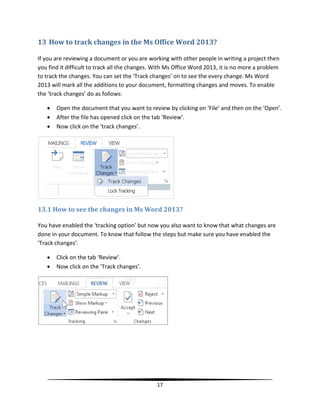
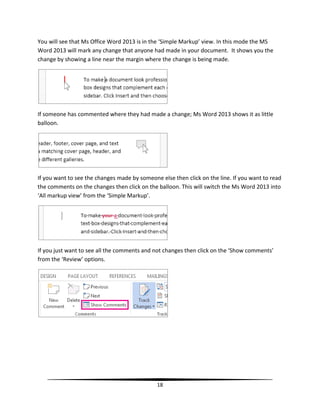
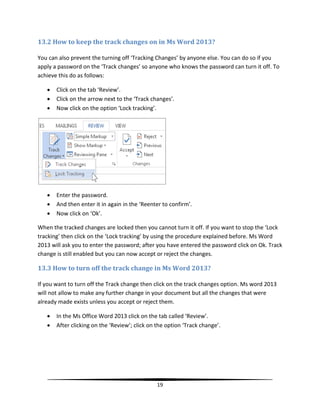
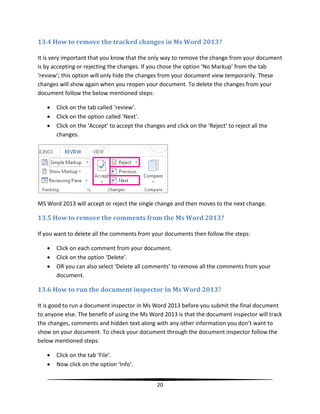
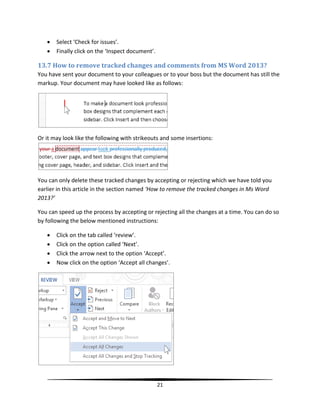
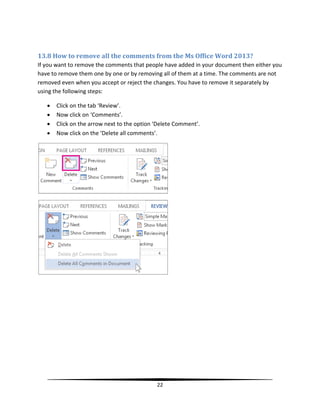
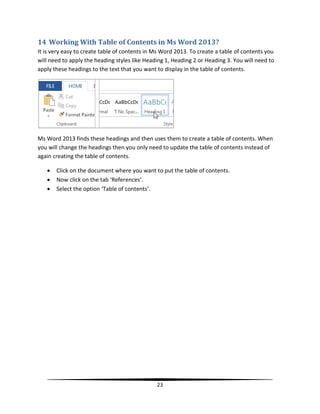
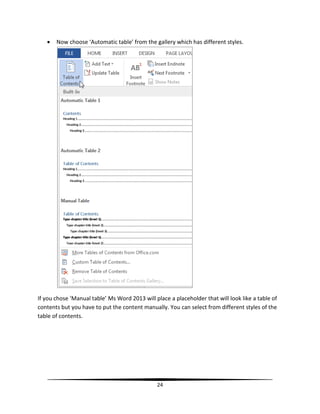
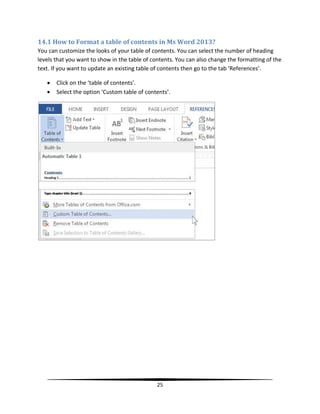
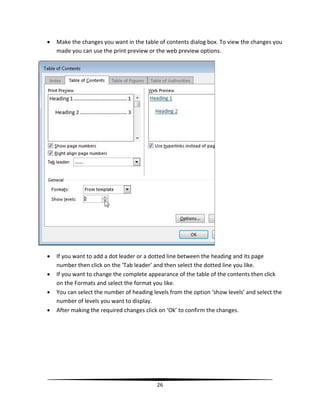
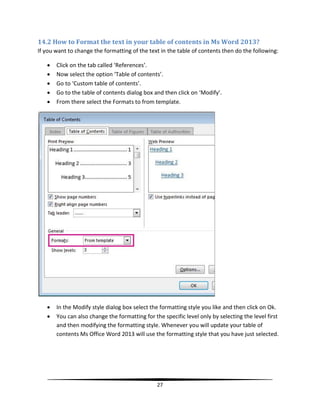
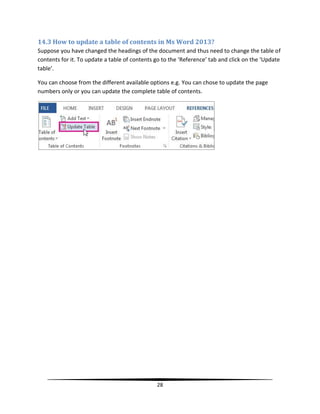
This tutorial provides instructions on how to use various features of Microsoft Word 2013, including opening documents from earlier versions of Word, creating new documents, checking document mode, converting document mode, choosing templates, opening documents, saving documents, reading documents, printing documents, working with templates, tracking changes, working with tables of contents, and more. The tutorial is intended as a learning resource for collaborating professionals, report writers, and managers to help them get started with MS Word 2013 and learn about its advanced features.
its very usefull to all the student , wwhich has stdy to all about ....plz go throught ppt and stdy all the ms office ....i am very glad to admiission in my collage ....
Introduction to Microsoft Office:
Youtube Video Link:
English Video: https://youtu.be/shaXOcxm8Wk
Hindi Video: https://youtu.be/diFbLWssxTs
MICROSOFT OFFICE 2007 Microsoft Office is a collection of computer programs made by Microsoft A package of softwares Word – text editor Excel – spreadsheet PowerPoint – presentations Outlook – e-mail Access – database Publisher – brochures, calendars, postcards, etc. Visio – professional diagrams
It is of vital importance to have knowledge of how these programs work.
Basic training on computer and internet for all age group. Now learn computer and internet on your own and surprise your loved ones! :)
Let’s Just Go For It! Wish you an Awesome Learning Experience.
Subscribe to our YouTube channel:
https://www.youtube.com/c/TimesRide?sub_confirmation=1
Visit our Official Website: https://timesride.com/
Follow us:
Facebook: https://www.facebook.com/timesride
Twitter: https://twitter.com/TimesRide
LinkedIn: https://www.linkedin.com/in/timesride
Instagram: https://www.instagram.com/timesride.connect
Pinterest: https://in.pinterest.com/timesrideconnect
Scribd: https://www.scribd.com/user/529709683/Times-Ride
Thank You
#AwesomeLearningExperience
#SmartQuickTips&Tricks #LeaningVideos #TimesRide #Keep Learning to Keep Winning!
computer definition,software and hardware, difference between hardware and software,major areas of applications,ms-word, word count,thesaurus in ms word,inserting objects in word, advanced in ms word
For the past 23 years Microsoft's Office software is ubiquitous through business and education. It has seen a wide range of changes throughout it's history and this presentation summarises the main highlights. To learn more about Microsoft Office visit the UK's number 1 provider of Office training and consultancy at http://www.microsofttraining.net
Presentation On Microsoft office, How to use Microsoft Office,Microsoft word, Microsoft Exel ,Microsoft Powerpoint, Difference Between Office 2007 and 2010
10 must know introductory photoshop skills for beginner photographerNazmul Hasan Jingar
Hay guys, In this tutorial you'll get 10 must know introductory Photoshop skills for beginner photographer.
Photoshop is very often the tool of choice for photo retouching and it is a multi-use program that can help a lot to develop our creative work.
However, it is easy for beginners to start making certain errors or time-consuming methodology through using the tools incorrectly.
Thanks.
For any kind of photo eiditing you can hire me at: https://goo.gl/c9cQpg
Adobe photoshop every tool explained! -Prabhaharan429PRABHAHARAN429
Adobe Photoshop Explained (tools & Uses)
-Prabhaharan429
Follow me on Google+ https://plus.google.com/u/0/+PrabhaharanE429/posts
Follow me on Facebook
https://www.facebook.com/PRABHAHARAN429
The new release of Excel enables business users to do self-service Business Intelligence directly in the client, which now becomes a complete and powerful self-service BI tool - Basically users have all they need in one familiar environment in order to do data modeling, exploration and visualization of the data. New capabilities and features delivered for end users in Excel 2013; - ability to analyze data ranging from a few rows to hundred of millions of rows with extreme analytical performance - opportunity to speed up analysis in Excel by easily cleaning up and shaping your data with Flash Fill and Quick Explore - mash-up and analyze data from virtually any source quickly and create compelling analytical apps with PowerPivot - provide stunning data visualization to discover new insights with interactive and familiar data exploration, visualization and presentation experience with Power View
SEE THE FULL, FREE EXCEL 2013 TRAINING COURSE AT WWW.PIVOTEXCEL.COM
This presentation introduces you to basic Excel function syntax and usage, and runs through some basic mathematical functions.
Contents:
***Standard Function Syntax***
Elements of an Excel Function
Inputting Function Arguments
AutoComplete for Functions
***Basic Numerical Functions***
Using Sum(), Max(), Min(), Average() and Count()
Functions Update Automatically as Arguments Change.
Using Comma and Colon to Reference Cells & Ranges.
Using Cell References, Values, Formulas or other Functions as Arguments.
Inserting a Formula into Many Cells at Once with CTRL+ Enter.
***The AutoSum & Quick Analysis Feature***
The Autosum Tool
The Quick Analysis Feature
***Function Library & Insert Function Tool***
Using the ‘Insert Function’ Tool.
***Editing & Deleting Functions***
Editing & Deleting Functions with Mouse & Keyboard
Editing a Function with the Insert Function Tool
Module 3 - Word Processing
This module enables candidates to demonstrate the ability to use a word processing application to accomplish everyday tasks associated with creating, formatting and finishing small-sized word processing documents such as letters and other everyday documents.
Candidates will be able to duplicate and move text within and between documents. They gain competence in using some of the features associated with word processing applications such as creating standard tables, using pictures and images within a document, and using mail merge tools.
On completion of this module each candidate will be able to:
• Work with documents and save them in different file formats
• Choose built-in options such as the Help function to enhance productivity
• Create and edit small-sized word processing documents that will be ready to share and distribute
• Apply different formats to documents to enhance them before distribution and recognise good practice in choosing the appropriate formatting options
• Insert tables, images and drawn objects into documents
• Prepare documents for mail merge operations
• Adjust document page settings and check and correct spelling before finally printing documents
In this latest installment of the O365 Productivity Tips series, Tom Duff (@duffbert) and Christian Buckley (@buckleyplanet) return with another head-to-head battle of the Microsoft Office and Office 365 productivity hints and tips, recorded June 20th, 2019 with viewers voting on each round. You can watch the video recording at https://youtu.be/0ZMD0RScBaQ
Follow us on Twitter for future webinars and sessions where we'll share more great tips, and be sure to follow the CollabTalk YouTube channel at https://youtube.com/c/collabtalk
In this ppt we will give you Introduction about Microsoft Word and mini short notes to recall during your exams. We will discuss all topics of Microsoft word in more details in our upcoming slides.
--------------------
*Easy to learn and grab the point by PPT/Shorts
*Let us start our journey to upgrade our skills
*If you like this video... Like||Share||Comment
*Any Suggestions are welcome
----------------------
With Regards from,
Learn with Sri
Essential it skills that will get you hired as an it professionalMirza Rihad Ali Sunny
We are all aware of the fact that IT knowledge is mandatory these days for getting even the mediocre of jobs. Most of the posts these days are getting computerised, automated. There are specific IT skills we ought to learn. These skills are essential in the job sectors of our lives. We all have that one friend who has a vast knowledge of computers and IT. And then we also have a few friends who don’t have any computer skills at all. If you know any such person, this article could change his/her life. This article intends to solve some of those problems as we dig deep into the realm of IT. We are going to discuss what the essential IT skills are, how we can gain them with ease.
JMeter webinar - integration with InfluxDB and GrafanaRTTS
Watch this recorded webinar about real-time monitoring of application performance. See how to integrate Apache JMeter, the open-source leader in performance testing, with InfluxDB, the open-source time-series database, and Grafana, the open-source analytics and visualization application.
In this webinar, we will review the benefits of leveraging InfluxDB and Grafana when executing load tests and demonstrate how these tools are used to visualize performance metrics.
Length: 30 minutes
Session Overview
-------------------------------------------
During this webinar, we will cover the following topics while demonstrating the integrations of JMeter, InfluxDB and Grafana:
- What out-of-the-box solutions are available for real-time monitoring JMeter tests?
- What are the benefits of integrating InfluxDB and Grafana into the load testing stack?
- Which features are provided by Grafana?
- Demonstration of InfluxDB and Grafana using a practice web application
To view the webinar recording, go to:
https://www.rttsweb.com/jmeter-integration-webinar
Transcript: Selling digital books in 2024: Insights from industry leaders - T...BookNet Canada
The publishing industry has been selling digital audiobooks and ebooks for over a decade and has found its groove. What’s changed? What has stayed the same? Where do we go from here? Join a group of leading sales peers from across the industry for a conversation about the lessons learned since the popularization of digital books, best practices, digital book supply chain management, and more.
Link to video recording: https://bnctechforum.ca/sessions/selling-digital-books-in-2024-insights-from-industry-leaders/
Presented by BookNet Canada on May 28, 2024, with support from the Department of Canadian Heritage.
GDG Cloud Southlake #33: Boule & Rebala: Effective AppSec in SDLC using Deplo...James Anderson
Effective Application Security in Software Delivery lifecycle using Deployment Firewall and DBOM
The modern software delivery process (or the CI/CD process) includes many tools, distributed teams, open-source code, and cloud platforms. Constant focus on speed to release software to market, along with the traditional slow and manual security checks has caused gaps in continuous security as an important piece in the software supply chain. Today organizations feel more susceptible to external and internal cyber threats due to the vast attack surface in their applications supply chain and the lack of end-to-end governance and risk management.
The software team must secure its software delivery process to avoid vulnerability and security breaches. This needs to be achieved with existing tool chains and without extensive rework of the delivery processes. This talk will present strategies and techniques for providing visibility into the true risk of the existing vulnerabilities, preventing the introduction of security issues in the software, resolving vulnerabilities in production environments quickly, and capturing the deployment bill of materials (DBOM).
Speakers:
Bob Boule
Robert Boule is a technology enthusiast with PASSION for technology and making things work along with a knack for helping others understand how things work. He comes with around 20 years of solution engineering experience in application security, software continuous delivery, and SaaS platforms. He is known for his dynamic presentations in CI/CD and application security integrated in software delivery lifecycle.
Gopinath Rebala
Gopinath Rebala is the CTO of OpsMx, where he has overall responsibility for the machine learning and data processing architectures for Secure Software Delivery. Gopi also has a strong connection with our customers, leading design and architecture for strategic implementations. Gopi is a frequent speaker and well-known leader in continuous delivery and integrating security into software delivery.
Software Delivery At the Speed of AI: Inflectra Invests In AI-Powered QualityInflectra
In this insightful webinar, Inflectra explores how artificial intelligence (AI) is transforming software development and testing. Discover how AI-powered tools are revolutionizing every stage of the software development lifecycle (SDLC), from design and prototyping to testing, deployment, and monitoring.
Learn about:
• The Future of Testing: How AI is shifting testing towards verification, analysis, and higher-level skills, while reducing repetitive tasks.
• Test Automation: How AI-powered test case generation, optimization, and self-healing tests are making testing more efficient and effective.
• Visual Testing: Explore the emerging capabilities of AI in visual testing and how it's set to revolutionize UI verification.
• Inflectra's AI Solutions: See demonstrations of Inflectra's cutting-edge AI tools like the ChatGPT plugin and Azure Open AI platform, designed to streamline your testing process.
Whether you're a developer, tester, or QA professional, this webinar will give you valuable insights into how AI is shaping the future of software delivery.
DevOps and Testing slides at DASA ConnectKari Kakkonen
My and Rik Marselis slides at 30.5.2024 DASA Connect conference. We discuss about what is testing, then what is agile testing and finally what is Testing in DevOps. Finally we had lovely workshop with the participants trying to find out different ways to think about quality and testing in different parts of the DevOps infinity loop.
Dev Dives: Train smarter, not harder – active learning and UiPath LLMs for do...UiPathCommunity
💥 Speed, accuracy, and scaling – discover the superpowers of GenAI in action with UiPath Document Understanding and Communications Mining™:
See how to accelerate model training and optimize model performance with active learning
Learn about the latest enhancements to out-of-the-box document processing – with little to no training required
Get an exclusive demo of the new family of UiPath LLMs – GenAI models specialized for processing different types of documents and messages
This is a hands-on session specifically designed for automation developers and AI enthusiasts seeking to enhance their knowledge in leveraging the latest intelligent document processing capabilities offered by UiPath.
Speakers:
👨🏫 Andras Palfi, Senior Product Manager, UiPath
👩🏫 Lenka Dulovicova, Product Program Manager, UiPath
Encryption in Microsoft 365 - ExpertsLive Netherlands 2024Albert Hoitingh
In this session I delve into the encryption technology used in Microsoft 365 and Microsoft Purview. Including the concepts of Customer Key and Double Key Encryption.
The Art of the Pitch: WordPress Relationships and SalesLaura Byrne
Clients don’t know what they don’t know. What web solutions are right for them? How does WordPress come into the picture? How do you make sure you understand scope and timeline? What do you do if sometime changes?
All these questions and more will be explored as we talk about matching clients’ needs with what your agency offers without pulling teeth or pulling your hair out. Practical tips, and strategies for successful relationship building that leads to closing the deal.
GraphRAG is All You need? LLM & Knowledge GraphGuy Korland
Guy Korland, CEO and Co-founder of FalkorDB, will review two articles on the integration of language models with knowledge graphs.
1. Unifying Large Language Models and Knowledge Graphs: A Roadmap.
https://arxiv.org/abs/2306.08302
2. Microsoft Research's GraphRAG paper and a review paper on various uses of knowledge graphs:
https://www.microsoft.com/en-us/research/blog/graphrag-unlocking-llm-discovery-on-narrative-private-data/
Neuro-symbolic is not enough, we need neuro-*semantic*Frank van Harmelen
Neuro-symbolic (NeSy) AI is on the rise. However, simply machine learning on just any symbolic structure is not sufficient to really harvest the gains of NeSy. These will only be gained when the symbolic structures have an actual semantics. I give an operational definition of semantics as “predictable inference”.
All of this illustrated with link prediction over knowledge graphs, but the argument is general.
2. 1 Table of Contents
2 What is Microsoft Word 2013? ............................................................................................................. 3
3 How to use Ms Office Word 2013 to open Documents from earlier versions of Ms Office Word? ..... 3
4 How to create a new Document in the Ms Word 2013? ...................................................................... 3
5 How to check the mode of your document using MS Word 2013?...................................................... 4
6 How to convert your document to MS Word 2013 mode? .................................................................. 4
7 How to choose a template in Ms Word 2013? ..................................................................................... 4
8 How to Open a Document in Ms Word 2013? ...................................................................................... 5
9 How to save a document in Ms Word 2013?........................................................................................ 6
9.1 How to save your document in other formats in Ms Office Word 2013? .................................... 7
9.2 How to quickly save your work in Ms Office Word 2013? ............................................................ 7
10 How to read documents in Ms Office Word 2013? .......................................................................... 8
11 How to print a document in Ms Word 2013? ................................................................................... 9
11.1 How to print preview your document in Ms Office Word 2013? ................................................. 9
11.2 How to print selected pages from your document in Ms Word 2013? ...................................... 10
11.3 How to print multiple copies of a document in Ms Word 2013? ............................................... 11
12 Working with Templates ................................................................................................................. 12
12.1 How to change the default location of the templates in the Ms Word 2013? ........................... 14
12.2 How to see your templates in Ms Word 2013? .......................................................................... 14
12.3 How to edit your template in Ms Word 2013? ........................................................................... 14
12.4 How to use your template to create a new document in Ms Word 2013? ................................ 15
12.5 How to Use your templates from earlier versions of Word in Ms Word 2013? ......................... 15
12.6 Where are your custom templates stored in previous versions of Ms Office Word 2013? ....... 15
12.7 How to use the Fix it Tool in Ms Word 2013? ............................................................................. 16
13 How to track changes in the Ms Office Word 2013? ...................................................................... 17
13.1 How to see the changes in Ms Word 2013? ............................................................................... 17
13.2 How to keep the track changes on in Ms Word 2013? ............................................................... 19
13.3 How to turn off the track change in Ms Word 2013? ................................................................. 19
13.4 How to remove the tracked changes in Ms Word 2013? ........................................................... 20
13.5 How to remove the comments from the Ms Word 2013? ......................................................... 20
13.6 How to run the document inspector in Ms Word 2013? ............................................................ 20
1
3. 13.7 How to remove tracked changes and comments from MS Word 2013? ................................... 21
13.8 How to remove all the comments from the Ms Office Word 2013? .......................................... 22
14 Working With Table of Contents in Ms Word 2013? ...................................................................... 23
14.1 How to Format a table of contents in Ms Word 2013? .............................................................. 25
14.2 How to Format the text in your table of contents in Ms Word 2013? ....................................... 27
14.3 How to update a table of contents in Ms Word 2013? .............................................................. 28
14.4 How to add a heading in Ms Word 2013? .................................................................................. 29
2
4. 2 What is Microsoft Word 2013?
Microsoft Word or commonly known as Ms Word is a word processor which is the main feature
in the Microsoft office. It had used the doc format as a de facto standard until Ms Word 2007.
Office 2010 introduced the new XML based format which is called Docx. Ms Word is available
for both Mac and Windows operating systems. Microsoft has launched many versions of Ms
Word, 2013 is the latest. In this article we will show you how you can easily learn Ms Word
2013.
3 How to use Ms Office Word 2013 to open Documents from earlier
versions of Ms Office Word?
Do not worry about opening the earlier versions of Ms office word files after you have
downloaded the new and latest version of the Ms Office Word i.e. Ms Word 2013. You can
open all the files from the earlier versions of the Ms office Word. However when you will open
a file that was created using the earlier version of the Ms Word; you will see the ‘Compatibility
Mode’ in the Title bar.
When you will be using the documents with the compatibility mode in the header, you will not
be able to use the new features of the Ms Word 2013. This is because those features were not
available in the earlier versions thus you cannot use them in the file that is created in the earlier
version of Ms Word.
4 How to create a new Document in the Ms Word 2013?
Click on the Ms office Word 2013 from the start menu and then open a new document. This
new document will be in one of the following modes:
Ms Word 2013
Ms Word 2010 Compatibility Mode
Ms Word 2007 Compatibility Mode
Ms Word 97-2003 Compatibility Mode
3
5. 5 How to check the mode of your document using MS Word 2013?
If you want to check the mode of your document in the Ms Word 2013 you can check the title
bar of your document. However if you see ‘compatibility mode’ there but you want more
details then follow the below mentioned steps:
Click on File and then click for info.
Click on the ‘Inspect Document’ and then further click on the ‘Check for issues’.
Now click on ‘Check compatibility’ and then select versions to show.
This will show you the mode name which your current document is using.
6 How to convert your document to MS Word 2013 mode?
You may want to convert your document to 2013 mode so that you can avail the full features of
the new version of the new Ms Word. You can do so by using the following steps:
Click on the tab ‘File’.
Click on the ‘Info’ and then select the option ‘convert’. This will convert your document to 2013
mode without saving the copy.
You can also click on ‘Save As’ and then select the place for the file. Before saving enter the new
name for the document and uncheck the box that says ‘Maintain compatibility with earlier
versions of word’. This will create a copy of your document with 2013 mode.
7 How to choose a template in Ms Word 2013?
When you create a new document in MS Word 2013; it asks you to choose a template or a
blank document. You can choose a template to do the most of your work. After choosing a
template the next steps are same to the creating a blank document.
Choosing a template to create your new document makes the work easier for you. MS Word
2013 templates are ready with different themes and styles and you do not have to add them
separately. When you choose a template all you have to do is to add content in it.
4
6. Whenever you will open the Ms Word 2013 it will ask you to choose a template or a blank
document. You can click on the category to view the templates in it and if you do not like the
existing templates you can search for templates on the internet. Click on the template to view
the large review and see how the template will look.
8 How to Open a Document in Ms Word 2013?
You will see the list of your recently used documents on the left side of Ms Office Windows;
whenever you open the Ms Office Word 2013. If the document you want is not in the list then
go through the following steps to open it.
Click on ‘Open other documents’ which will be below the list of your recent documents.
5
7. OR
Open the Ms Word 2013.
Click on File and then click on ‘Open’.
Now select the place where your file is stored and click on it to open the document.
If you have created the document in earlier versions of MS Word 2013 then you will see the
‘compatibility mode’ at the top of the Ms Office Word.
9 How to save a document in Ms Word 2013?
After you have written a document for the first time you will need to save so that you use it
later on. To save the documents follow the steps:
Click on the tab called ‘File’.
Now click on the option ‘Save’.
It will ask you to enter the file name and the place where you want to save the file.
If you want to save the document on your machine then choose a folder under ‘My
computer’. If you want to save the document online then choose a place under ‘Places’
or you can also add your own location.
After selecting the name and location click on ‘Save’.
6
8. 9.1 How to save your document in other formats in Ms Office Word 2013?
MS Word 2013 saves all your documents automatically in the ‘.docx’ format. If you want to save
your document in any other format then, do as follows:
Click on the tab that is named ‘File’.
Now click on the option ‘Save as’.
Select the format you want from the list of the file type.
After selecting the format click on ‘Save’.
9.2 How to quickly save your work in Ms Office Word 2013?
To save your documents quickly while you are still working on your document; click on the
button ‘Save’ from the Quick Access toolbar.
OR you can also quickly save the document by using the short keys ‘CTRL + S’.
7
9. 10 How to read documents in Ms Office Word 2013?
To concentrate on reading the document and not on toolbars you can open the document in
the ‘Read mode’. When you are using the read mode it will hide the most of the MS Word 2013
buttons so you can easily read the document without any distraction.
To open the document you want to read in the MS Word 2013 follow the below mentioned
steps:
Click on the tab ‘File’.
Click on the option ‘Open’.
Click on the file name you want open.
Now click on ‘open’.
Go to the tab ‘View’.
Click on the ‘Read mode’.
To go to the different pages of the document you can either click on the arrows that are on the
left and right side of the document. Or you can also press the ‘Page up’ and ‘Page down’ keys of
your keyboard to move from one page to another. If you are using the touch device then you
can swipe left or right to go to the different pages in the document.
You can also set the column width to view the wider or narrower columns while reading a
document in the Ms Office Word 2013. You can set the column width by using the following
steps:
Click on the tab ‘View’.
Click on the ‘options’.
Now further click on the ‘Column and width’ and set your desired reading style.
There are many documents which only open in the ‘read mode’ only. This is because these
documents may be protected to allow read only.
8
10. 11 How to print a document in Ms Word 2013?
To print a document in Ms Word 2013 follow the below mentioned steps:
Click on the tab ‘File’.
Then click on the option ‘Print’ and perform the following tasks:
Enter the number of copies you want in the copies box.
Select the required printer under the box named ‘Printer’.
Check the settings under the settings tab and if you want to change the default the
setting then click on it and change it.
When you have performed all of the above actions then click on ‘Print’.
11.1 How to print preview your document in Ms Office Word 2013?
Before printing your final product you might want to see how your document will look after it is
printed.
To print preview your document click on the File tab.
Now click on the ‘Print’.
On the right side you will see your document.
To see the different pages from your document click on the arrow that will at the
bottom of the preview.
You can use the zoom slider to adjust the text size of the previewed document.
9
11. Choose the number of copies of your document to print the document.
Now click on the button ‘Print’.
Click on the Arrow above the menu options to go back to your document.
Sometimes you may have some issues while printing or previewing your documents then you
will need to update your printer drivers.
11.2 How to print selected pages from your document in Ms Word 2013?
If you want to print only selected pages from your document or if you want to print the tracked
changes and comments then follow the below mentioned steps:
Click on the tab called ‘File’.
Now click on the option ‘Print’ from the list of available options.
Now click on ‘Settings’.
Under the settings options click on the arrow next to the ‘Print all pages’ to see the
different options.
10
12. 11.3 How to print multiple copies of a document in Ms Word 2013?
If you want to print the multiple copies of the same document then do as stated below:
Click on the tab called ‘File’.
Now click on the option ‘Print’.
11
13. You will see a box that is named ‘copies’ next to the print button.
Select the number of copies you want either by entering the number or by using the up
and down arrows.
After you have entered the number of copies you want, select the printer and check the
printing settings.
If the settings are correct then click on ‘Print’ to start printing your document.
12 Working with Templates
A template is the document that you can use over and over and that is created only once. If you
want to create your own template that you will need to use in the future then you can start
with the document that you have created. If you want to save your document as a template
then follow the steps:
Click on the tab called ‘File’.
Now click on the option called ‘Save as’.
Double click on the computer.
12
14. Enter the name for your template in the box called ‘File name’.
In the field ‘Save as type’ select the option ‘Word Template’. But if your document
contains ‘macros’; then choose the option that is named ‘Word Macro Enabled
template’.
Click on Save.
13
15. 12.1 How to change the default location of the templates in the Ms Word 2013?
If you want to change the location where the Ms Word stores your templates then:
Click on the tab ‘File’.
Go to ‘Options’.
Click on ‘Save’.
Enter the folder where you want to store your template in the box called ‘Default
personal template location’.
Ms Office Word 2013 will store all the new templates in the folder that you have mentioned
above.
12.2 How to see your templates in Ms Word 2013?
If you want to view all your templates in Ms Word 2013 then click on the tab ‘File’.
Click on ‘New’ and then select the option ‘Personal’
Ms Word 2013 will show you all your templates in the folder.
12.3 How to edit your template in Ms Word 2013?
If you want to update your template then open the template make changes and store it. You
can do so by following the below mentioned steps:
Click on the tab ‘File’.
Now go to the option ‘Open’.
Double click on the computer and browse the folder ‘Custom Office templates’.
Select your template and then click on ‘Open’.
Change the template and after you have done with the changes save the template like
you did before.
14
16. 12.4 How to use your template to create a new document in Ms Word 2013?
If you want to create a new document using your own template then click on the tab ‘File’.
Go to the option ‘New’.
Click on the option ‘Personal’.
Select your template.
Click on Ok.
12.5 How to Use your templates from earlier versions of Word in Ms Word
2013?
If you have made templates using the earlier versions of the Ms Word 2013 then you do not
have to worry you can still use them in the new version of Ms Office Word. But for using those
templates in Ms Word 2013 you will need to move them to default folder where Ms Word
stores its templates i.e. ‘Custom office templates’. If you want to move the templates quickly
and easily then we will suggest you to use the ‘Fix it’ tool.
12.6 Where are your custom templates stored in previous versions of Ms
Office Word 2013?
Your earlier custom templates are stored but the Ms Office Word 2013 will not display it by
default. When you will open the Ms Word 2013 you will only see the Ms Office templates not
yours. If you want to see your templates under the ‘Personal’ tab with the Ms Office Word
2013; follow the instructions:
15
17. 12.7 How to use the Fix it Tool in Ms Word 2013?
You can use the Fix it tool to import all your custom templates to Ms Word 2013.It will fix all
the Office 2013 programs and you do not need to provide the location every time. It will import
all the templates to the Ms Office 2013 Default folder for templates that is ‘Custom Office
Templates’. If you want to import the templates to a new location then you will need to use the
‘I’ll fix it myself’ section.
To use the ‘I’ll fix it myself’ go to start and click on Run.
Now type ‘%appdata%MicrosoftTemplates’ and press enter.
Copy the address.
Now click on File > Options and then on Save.
Now paste the copied address in the ‘Default personal templates location’.
16
18. 13 How to track changes in the Ms Office Word 2013?
If you are reviewing a document or you are working with other people in writing a project then
you find it difficult to track all the changes. With Ms Office Word 2013, it is no more a problem
to track the changes. You can set the ‘Track changes’ on to see the every change. Ms Word
2013 will mark all the additions to your document, formatting changes and moves. To enable
the ‘track changes’ do as follows:
Open the document that you want to review by clicking on ‘File’ and then on the ‘Open’.
After the file has opened click on the tab ‘Review’.
Now click on the ‘track changes’.
13.1 How to see the changes in Ms Word 2013?
You have enabled the ‘tracking option’ but now you also want to know that what changes are
done in your document. To know that follow the steps but make sure you have enabled the
‘Track changes’.
Click on the tab ‘Review’.
Now click on the ‘Track changes’.
17
19. You will see that Ms Office Word 2013 is in the ‘Simple Markup’ view. In this mode the MS
Word 2013 will mark any change that anyone had made in your document. It shows you the
change by showing a line near the margin where the change is being made.
If someone has commented where they had made a change; Ms Word 2013 shows it as little
balloon.
If you want to see the changes made by someone else then click on the line. If you want to read
the comments on the changes then click on the balloon. This will switch the Ms Word 2013 into
‘All markup view’ from the ‘Simple Markup’.
If you just want to see all the comments and not changes then click on the ‘Show comments’
from the ‘Review’ options.
18
20. 13.2 How to keep the track changes on in Ms Word 2013?
You can also prevent the turning off ‘Tracking Changes’ by anyone else. You can do so if you
apply a password on the ‘Track changes’ so anyone who knows the password can turn it off. To
achieve this do as follows:
Click on the tab ‘Review’.
Click on the arrow next to the ‘Track changes’.
Now click on the option ‘Lock tracking’.
Enter the password.
And then enter it in again in the ‘Reenter to confirm’.
Now click on ‘Ok’.
When the tracked changes are locked then you cannot turn it off. If you want to stop the ‘Lock
tracking’ then click on the ‘Lock tracking’ by using the procedure explained before. Ms Word
2013 will ask you to enter the password; after you have entered the password click on Ok. Track
change is still enabled but you can now accept or reject the changes.
13.3 How to turn off the track change in Ms Word 2013?
If you want to turn off the Track change then click on the track changes option. Ms word 2013
will not allow to make any further change in your document but all the changes that were
already made exists unless you accept or reject them.
In the Ms Office Word 2013 click on the tab called ‘Review’.
After clicking on the ‘Review’; click on the option ‘Track change’.
19
21. 13.4 How to remove the tracked changes in Ms Word 2013?
It is very important that you know that the only way to remove the change from your document
is by accepting or rejecting the changes. If you chose the option ‘No Markup’ from the tab
‘review’; this option will only hide the changes from your document view temporarily. These
changes will show again when you reopen your document. To delete the changes from your
document follow the below mentioned steps:
Click on the tab called ‘review’.
Click on the option called ‘Next’.
Click on the ‘Accept’ to accept the changes and click on the ‘Reject’ to reject all the
changes.
MS Word 2013 will accept or reject the single change and then moves to the next change.
13.5 How to remove the comments from the Ms Word 2013?
If you want to delete all the comments from your documents then follow the steps:
Click on each comment from your document.
Click on the option ‘Delete’.
OR you can also select ‘Delete all comments’ to remove all the comments from your
document.
13.6 How to run the document inspector in Ms Word 2013?
It is good to run a document inspector in Ms Word 2013 before you submit the final document
to anyone else. The benefit of using the Ms Word 2013 is that the document inspector will track
the changes, comments and hidden text along with any other information you don’t want to
show on your document. To check your document through the document inspector follow the
below mentioned steps:
Click on the tab ‘File’.
Now click on the option ‘Info’.
20
22. Select ‘Check for issues’.
Finally click on the ‘Inspect document’.
13.7 How to remove tracked changes and comments from MS Word 2013?
You have sent your document to your colleagues or to your boss but the document has still the
markup. Your document may have looked like as follows:
Or it may look like the following with strikeouts and some insertions:
You can only delete these tracked changes by accepting or rejecting which we have told you
earlier in this article in the section named ‘How to remove the tracked changes in Ms Word
2013?’
You can speed up the process by accepting or rejecting all the changes at a time. You can do so
by following the below mentioned instructions:
Click on the tab called ‘review’.
Click on the option called ‘Next’.
Click the arrow next to the option ‘Accept’.
Now click on the option ‘Accept all changes’.
21
23. 13.8 How to remove all the comments from the Ms Office Word 2013?
If you want to remove the comments that people have added in your document then either you
have to remove them one by one or by removing all of them at a time. The comments are not
removed even when you accept or reject the changes. You have to remove it separately by
using the following steps:
Click on the tab ‘Review’.
Now click on ‘Comments’.
Click on the arrow next to the option ‘Delete Comment’.
Now click on the ‘Delete all comments’.
22
24. 14 Working With Table of Contents in Ms Word 2013?
It is very easy to create table of contents in Ms Word 2013. To create a table of contents you
will need to apply the heading styles like Heading 1, Heading 2 or Heading 3. You will need to
apply these headings to the text that you want to display in the table of contents.
Ms Word 2013 finds these headings and then uses them to create a table of contents. When
you will change the headings then you only need to update the table of contents instead of
again creating the table of contents.
Click on the document where you want to put the table of contents.
Now click on the tab ‘References’.
Select the option ‘Table of contents’.
23
25. Now choose ‘Automatic table’ from the gallery which has different styles.
If you chose ‘Manual table’ Ms Word 2013 will place a placeholder that will look like a table of
contents but you have to put the content manually. You can select from different styles of the
table of contents.
24
26. 14.1 How to Format a table of contents in Ms Word 2013?
You can customize the looks of your table of contents. You can select the number of heading
levels that you want to show in the table of contents. You can also change the formatting of the
text. If you want to update an existing table of contents then go to the tab ‘References’.
Click on the ‘table of contents’.
Select the option ‘Custom table of contents’.
25
27. Make the changes you want in the table of contents dialog box. To view the changes you
made you can use the print preview or the web preview options.
If you want to add a dot leader or a dotted line between the heading and its page
number then click on the ‘Tab leader’ and then select the dotted line you like.
If you want to change the complete appearance of the table of the contents then click
on the Formats and select the format you like.
You can select the number of heading levels from the option ‘show levels’ and select the
number of levels you want to display.
After making the required changes click on ‘Ok’ to confirm the changes.
26
28. 14.2 How to Format the text in your table of contents in Ms Word 2013?
If you want to change the formatting of the text in the table of contents then do the following:
Click on the tab called ‘References’.
Now select the option ‘Table of contents’.
Go to ‘Custom table of contents’.
Go to the table of contents dialog box and then click on ‘Modify’.
From there select the Formats to from template.
In the Modify style dialog box select the formatting style you like and then click on Ok.
You can also change the formatting for the specific level only by selecting the level first
and then modifying the formatting style. Whenever you will update your table of
contents Ms Office Word 2013 will use the formatting style that you have just selected.
27
29. 14.3 How to update a table of contents in Ms Word 2013?
Suppose you have changed the headings of the document and thus need to change the table of
contents for it. To update a table of contents go to the ‘Reference’ tab and click on the ‘Update
table’.
You can choose from the different available options e.g. You can chose to update the page
numbers only or you can update the complete table of contents.
28
30. 14.4 How to add a heading in Ms Word 2013?
You can add the headings in your document by selecting the heading styles and applying it to
your text.
Enter the text that you want to make the heading.
Select that text and then click on tab ‘Home’.
From there you will see different heading styles move your pointer over different
heading styles.
When you point the mouse over a style you will see that your text style changes.
Select the style that you like from the list of different styles in the gallery.
If you don’t like the style from the available list then click on the arrow to show you the
more styles from its gallery.
A heading makes your text different from the rest of the document and it catches your reader’s
attention. Besides this the headings will help the Ms Office Word 2013 in quick and automatic
creation of the tables of content. You can also reorganize your document easily and change the
formatting style of the heading without changing the formatting of the each and every text.
29