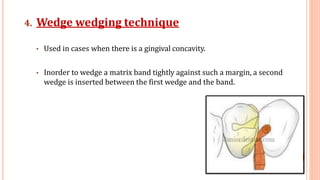
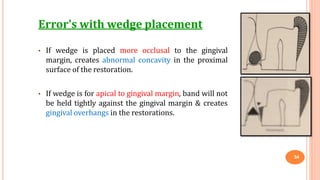
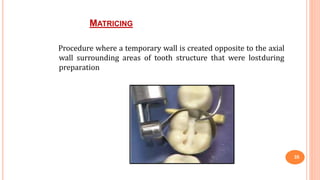
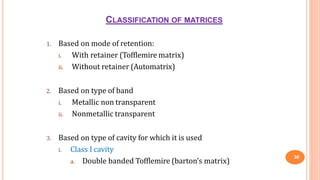
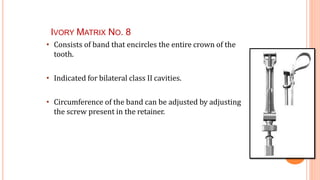
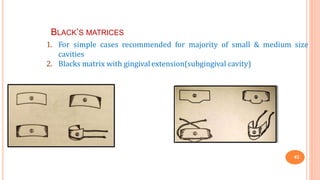
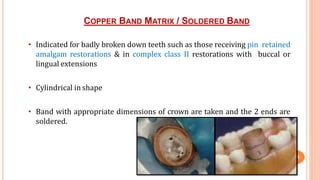
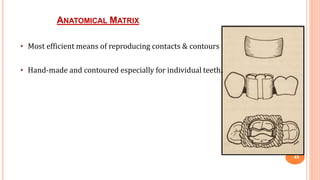
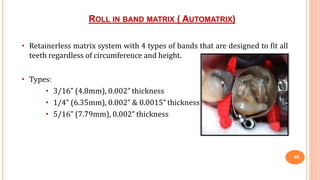
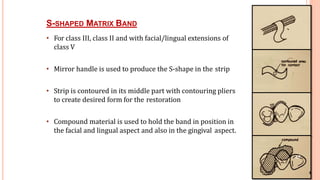
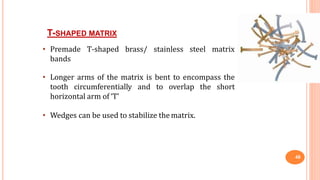
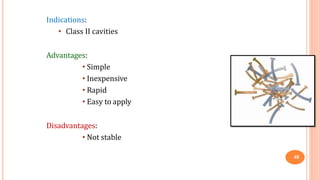
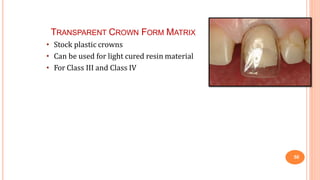
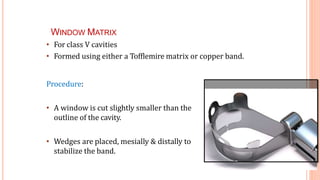
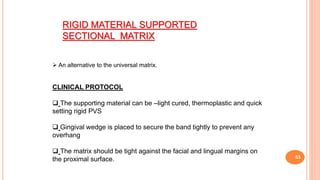
1
Department of Conservative Dentistry & Endodontic
Under guidance of:
Dr. SUMIT SHARMA
Dr. RISHI MANAN
Dr. NIKHIL PURI
Dr. SAI GANAPATHY
Dr. VINISHA PANDEY
Dr. NEETU BANSAL
Submitted by:
Anil Kumar
B.D.S. Final Year
Batch: 2013-17
Contacts and Contours
CONTENTS…
2
1. Introduction
2. Contacts
3. Contours
4. Proximal ContactArea
5. Embrasures
6. MarginalRidges
7. Procedures for formulation of proper contacts andcontours:
8. Tooth movement
9. Matricing
10. Classification
11. Conclusion
12. References
• Presence of proper contacts & contour is important to maintain stability &
occlusal harmony.
• A thorough knowledge of the contacts & contours of various teeth is
mandatory for understanding:
• Predisposing factors of proximal caries like faulty interrelationships.
• Significance of marginal ridges, embrasuresfor re-establishing the
form and function of restored teeth.
• Periodontal aspect & health of the tooth to be restored.
3
Introduction
BENEFITS OF AN IDEAL CONTACT & CONTOUR
1. Conserves the health of peridontium
2. Prevents food impaction
3. Makes area self cleansable
4. Improves longevity of proximal restorations
5. Maintains normal mesiodistal relationship of the teeth in the dental
arch
6
Food we consume moves in 3 different
directions:
1. Occlusal surfaces
2. Contact & Gingival embrasures
3. Facial & Lingual sulcus
5
• Any decay occurring on the proximal surface is
mainly due to faulty interrelationship between
Contact Areas
Marginal Ridges
Embrasures
Gingiva.
6
TIME OF ERUPTION: ONLY
CONTACT POINT ARE PRESENT
• Proximal Contact Point Proximal Contact Area
7
PROXIMAL CONTACT AREA
• Area of proximal height of contour of the mesial or distal surface of a
tooth that touches the adjacent tooth in the same arch
• According to their general shape:
3 Types:
1. Tapering teeth
2. Square type
3. Ovoid type
8
CONTOURS
9
Convexities on the facial & Lingual surfaces of tooth that
affords protection & stimulation of the supporting tissues during
mastication.
Functions of contour:
1. Deflecting food away from gingival margin
2. Maintenance of periodontal tissues
3. Maintain contact with adjacent tooth
HEIGHT OF CONTOUR
10
• Area of greatest circumference on the facial and lingual surface of the
teeth.
• Protects the gingival tissue by preventing food impaction.
ANTERIOR POSTERIOR
Cervical 3rd on facial
& lingual surface
Gingival 3rd on facial
surface
Middle 3rd on lingual
surface
TYPES OF CONTOUR
11
OVERCONTOUR
• Deflects food away from gingiva
• Understimulation of supportingtissues
• Plaque accumulation
UNDERCONTOUR
• Irritation to softtissues
ADEQUATECONTOUR
• Stimulation of supportingtissues
• Healthy peridontium
EMBRASURES
(SPILLWAYS)
12
V-shaped spaces between the teeth that
originate at the proximal contact areas
between adjacent teeth.
Curvature formed by two adjacent teeth in an
arch form a spillway space that is called an
embrasure.
Serves 2 purposes:
 Provides a passage for food during mastication
 Prevents food from being forced into the contact area
18
• Named for the direction towards which they radicate:
facial, lingual, incisal/occlusal, gingival
Facial/Buccal
Incisal/Occlusal
Lingual/Palatal
Gingival
13
• Embrassure is reduced: Additional stress is created in teeth &
supporting structures.
• Embrassures is large: Less protection to supporting structures
29
MARGINAL RIDGES
15
• Rounded borders of enamel that forms the mesial
& distal margins of occlusal surfaces of molars &
premolars and the mesial and distal margins of
lingual surfaces of incisors and canine.
Functions:
Helps in prevention of food impaction proximally
Mastication
Protection of peridontium
16
Marginal ridges of adjacent posterior teeth should be at the same height to
have a proper contact and embrasure forms.
MARGINAL RIDGES WITH NORMAL OCCLUSAL
17
MARGINAL RIDGES WITH EXAGGERATED OCCLUSAL
EMBRASURES CAUSES DRIFTING OF TOOTH WHICH LEADS
TO WEDGING OF FOOD
18
ADJACENT MARGINAL RIDGES ARE NOT COMPATIBLE IN
HEIGHT - DRIVES THE DEBRIS INTERPROXIMALLY
19
MARGINAL RIDGES WITH NO TRIANGULAR FOSSA, THE
VERTICAL FORCES WILL IMPACT FOOD INTERPROXIMALLY
20
THIN MARGINAL RIDGES WILL BE SUSCEPTIBLE TO
FRACTURE OR DEFORMATION
21
MARGINAL RIDGES WITH NO OCCLUSAL EMBRASURES, THE 2
ADJACENT MARGINAL RIDGES WILL ACT LIKE A PAIR OF TWEEZERS
GRASPING THE FOOD SUBSTANCE PASSING OVER IT.
22
PROCEDURES OF PROPER CONTACTS & CONTOURS
23
Tooth movement
Matricing
TOOTH MOVEMENT
• Act of separating the involved teeth from each other, bringing them
closer to each other or changing their spatial position in one or more
dimensions.
24
TOOTH
MOVEMENT
25
Rapid / Immediate Slow / Delayed
RAPID/ IMMEDIATE MOVEMENT
26
• Mechanical type of separation
• Creates either proximal separation at the point of separator’s introduction
and/or improves closeness of proximal surface of opposite side.
• Separation shouldn’t exceed the thickness of the involved tooth’s
periodontal ligament thickness. ie: 0.2 – 0.5 mm
METHODS
27
Wedge method
• By insertion of a pointed wedge shaped device between the teeth
• The more the wedge moves facially or lingualy, greater is the separation.
Elliots separator
• Indicated for short duration separation
• Useful in examining proximal surfaces in final polishing of restored
contacts.
28
Wood/ Plastic Wedges
• Used in both tooth separation for preparation and restoration
• Triangular shaped wedges (wood/synthetic resin)
• Base of triangle will be in contact with
interdental papillae.
• Apex must coincide with the gingival start of the
contact area. 29
Types:
Wooden
Plastic
Elastic
Transparent
Medicated wedges
Shape:
Triangular
Round
Trapezoidal
30
41
Wedging techniques
in the gingival
1. Single wedge technique
• Single wedge is placed
embrasure
2. Piggyback wedging
• A second wedge is placed on top of the first
wedge to wedge adequately the matrix against
the margin
• Indicated for patients whose interproximal
tissue level has receded.
31
3. Double wedging technique
• Here, 2 wedges, one from the facial embrasure and the other from the
lingual embrasure are used.
• Used when proximal box is wide faciolingually.
32
4. Wedge wedging technique
• Used in cases when there is a gingival concavity.
• Inorder to wedge a matrix band tightly against such a margin, a second
wedge is inserted between the first wedge and the band.
33
Error’s with wedge placement
• If wedge is placed more occlusal to the gingival
margin, creates abnormal concavity in the proximal
surface of the restoration.
• If wedge is for apical to gingival margin, band will not
be held tightly against the gingival margin & creates
gingival overhangs in the restorations.
34
MATRICING
35
Procedure where a temporary wall is created opposite to the axial
wall surrounding areas of tooth structure that were lostduring
preparation
CLASSIFICATION OF MATRICES
36
1. Based on mode of retention:
i. With retainer (Tofflemire matrix)
ii. Without retainer (Automatrix)
2. Based on type of band
i. Metallic non transparent
ii. Nonmetallic transparent
3. Based on type of cavity for which it is used
i. Class I cavity
a. Double banded Tofflemire (barton’s matrix)
ii. Class II cavity
37
a. Single banded Tofflemire
b. Ivory matrix No. 1
c. Ivory matrix No. 8
d. Copper band matrix
e. Automatrix
iii. Class III cavity
a. Mylar strip
b. S-shaped
matrix
band
iv. Class IV cavity
crown form
a. Mylar strip
b. Transparent
matrix
c. Modified S-shaped
v. Class V
a. Window matrix
b. Cervical matrix
UNIVERSAL MATRIX (TOFFLEMIRE MATRIX)
38
• Designed by BR. Tofflemire
• Ideally indicated when 3 surface of posterior
tooth are prepared(i.e. mesial, occlusal,
distal)
• Commonly used for class II restorations
• 2 types:
• Straight
• Contra-angled
39
MATRIX BANDS
40
1. Uncontoured bands
• Available in 2 thickness : 0.05 mm & 0.038 mm
• Burnishing the thinner band is more difficult and less likely to
retain contours
2. Precontoured bands
• Needs little or no adjustment
• Expensive
• Difference in cost justified by lesser chair time.
76
IVORY MATRIX NO.1
proximal surfaces so it is indicated in• Band encircles the posterior
unilateral class II cavities.
• Band is attached to the retainer via a wedge shaped projection.
41
IVORY MATRIX NO. 8
42
• Consists of band that encircles the entire crown of the
tooth.
• Indicated for bilateral class II cavities.
• Circumference of the band can be adjusted by adjusting
the screw present in the retainer.
BLACK’S MATRICES
43
1. For simple cases recommended for majority of small & medium size
cavities
2. Blacks matrix with gingival extension(subgingival cavity)
COPPER BAND MATRIX / SOLDERED BAND
44
• Indicated for badly broken down teeth such as those receiving pin retained
amalgam restorations & in complex class II restorations with buccal or
lingual extensions
• Cylindrical in shape
• Band with appropriate dimensions of crown are taken and the 2 ends are
soldered.
ANATOMICAL MATRIX
45
• Most efficient means of reproducing contacts & contours
• Hand-made and contoured especially for individual teeth.
ROLL IN BAND MATRIX ( AUTOMATRIX)
46
• Retainerless matrix system with 4 types of bands that are designed to fit all
teeth regardless of circumference and height.
• Types:
• 3/16” (4.8mm), 0.002” thickness
• 1/4” (6.35mm), 0.002” & 0.0015” thickness
• 5/16” (7.79mm), 0.002” thickness
8
S-SHAPED MATRIX BAND
• For class III, class II and with facial/lingual extensions of
class V
• Mirror handle is used to produce the S-shape in the strip
• Strip is contoured in its middle part with contouring pliers
to create desired form for the restoration
• Compound material is used to hold the band in position in
the facial and lingual aspect and also in the gingival aspect.
6
47
T-SHAPED MATRIX
T-shaped brass/ stainless steel matrix• Premade
bands
• Longer arms of the matrix is bent to encompass the
tooth circumferentially and to overlap the short
horizontal arm of ‘T’
• Wedges can be used to stabilize the matrix.
48
Indications:
• Class II cavities
Advantages:
• Simple
• Inexpensive
• Rapid
• Easy to apply
Disadvantages:
• Not stable
49
TRANSPARENT CROWN FORM MATRIX
50
• Stock plastic crowns
• Can be used for light cured resin material
• For Class III and Class IV
• INDICATIONS:
51
• Large bilateral/unilateral class IV cavity
• Oblique fractures of anterior teeth
• Advantages:
• Easy to use
• Good contours can be established
• Disadvantages:
• Time consuming
• Expensive
WINDOW MATRIX
52
• For class V cavities
• Formed using either a Tofflemire matrix or copper band.
Procedure:
• A window is cut slightly smaller than the
outline of the cavity.
• Wedges are placed, mesially & distally to
stabilize the band.
53
RIGID MATERIAL SUPPORTED
SECTIONAL MATRIX
 An alternative to the universal matrix.
CLINICAL PROTOCOL
 The supporting material can be –light cured, thermoplastic and quick
setting rigid PVS
 Gingival wedge is placed to secure the band tightly to prevent any
overhang
 The matrix should be tight against the facial and lingual margins on
the proximal surface.
54
 Shape of the stainless steel after trimming
The strip is contoured
 Burnishing the strip to produce occlusogingival contact and contour
Contoured strip is positioned and wedged
Rigid material supported sectional matrix completed
Application
BARTON MATRIX
55
 Matrix application for class I amalgam restoration
The Tofflemire matrix retainer is used to secure a matrix band
to the tooth.
Because this type of matrix band does not adapt to the lingual or
facial groove area of the tooth , an additional step may be
necessary to provide a matrix that is rigid.
 A piece of matrix material is cut to fit between the lingual surface
of the tooth and the band already in place.
A wedge is inserted between the Tofflemire and the cut piece of
matric band.
56
Application
57
A quick setting polyvinyl siloxane (PVS) may be used between the
sectional matrix and the Tofflemire matrix band, to prevent lingual
displacement of the sectional matrix during condensation of
amalgam

 Alternatively , green stick compound is used.
The end of wedge is covered with softened compound and
inserted between the Tofflemire band and the cut piece of
matrix material.
REFERENCES:
58
1. Operative Dentistry – MA Marzouk
2. Art & science of operative Dentistry – Sturdevants (5th edition)
3. Art & Science of Operative Dentistry – Sturdevants (South Asian Edition)
4. Textbook Of Operative Dentistry – Vimal K Sikri
5. Dental Anatomy, Physiology & Occlusion – Wheeler’s (9th Edition)
CONCLUSION
59
• Proper restoration of the anatomical landmarks is important for
enhancing the longevity of restorations as well as to maintain the occlusal
health and harmony.
• Matricing is a vital step during the placement of different restorations.
• Selection of the matrix should be based on its ease of use and efficiency to
provide the optimum contacts and contours..
• The dentist should select the right method according to the needs of
individual case.
57

Contacts and contours

  • 1.
    1 Department of ConservativeDentistry & Endodontic Under guidance of: Dr. SUMIT SHARMA Dr. RISHI MANAN Dr. NIKHIL PURI Dr. SAI GANAPATHY Dr. VINISHA PANDEY Dr. NEETU BANSAL Submitted by: Anil Kumar B.D.S. Final Year Batch: 2013-17 Contacts and Contours
  • 2.
    CONTENTS… 2 1. Introduction 2. Contacts 3.Contours 4. Proximal ContactArea 5. Embrasures 6. MarginalRidges 7. Procedures for formulation of proper contacts andcontours: 8. Tooth movement 9. Matricing 10. Classification 11. Conclusion 12. References
  • 3.
    • Presence ofproper contacts & contour is important to maintain stability & occlusal harmony. • A thorough knowledge of the contacts & contours of various teeth is mandatory for understanding: • Predisposing factors of proximal caries like faulty interrelationships. • Significance of marginal ridges, embrasuresfor re-establishing the form and function of restored teeth. • Periodontal aspect & health of the tooth to be restored. 3 Introduction
  • 4.
    BENEFITS OF ANIDEAL CONTACT & CONTOUR 1. Conserves the health of peridontium 2. Prevents food impaction 3. Makes area self cleansable 4. Improves longevity of proximal restorations 5. Maintains normal mesiodistal relationship of the teeth in the dental arch 6
  • 5.
    Food we consumemoves in 3 different directions: 1. Occlusal surfaces 2. Contact & Gingival embrasures 3. Facial & Lingual sulcus 5
  • 6.
    • Any decayoccurring on the proximal surface is mainly due to faulty interrelationship between Contact Areas Marginal Ridges Embrasures Gingiva. 6
  • 7.
    TIME OF ERUPTION:ONLY CONTACT POINT ARE PRESENT • Proximal Contact Point Proximal Contact Area 7
  • 8.
    PROXIMAL CONTACT AREA •Area of proximal height of contour of the mesial or distal surface of a tooth that touches the adjacent tooth in the same arch • According to their general shape: 3 Types: 1. Tapering teeth 2. Square type 3. Ovoid type 8
  • 9.
    CONTOURS 9 Convexities on thefacial & Lingual surfaces of tooth that affords protection & stimulation of the supporting tissues during mastication. Functions of contour: 1. Deflecting food away from gingival margin 2. Maintenance of periodontal tissues 3. Maintain contact with adjacent tooth
  • 10.
    HEIGHT OF CONTOUR 10 •Area of greatest circumference on the facial and lingual surface of the teeth. • Protects the gingival tissue by preventing food impaction. ANTERIOR POSTERIOR Cervical 3rd on facial & lingual surface Gingival 3rd on facial surface Middle 3rd on lingual surface
  • 11.
    TYPES OF CONTOUR 11 OVERCONTOUR •Deflects food away from gingiva • Understimulation of supportingtissues • Plaque accumulation UNDERCONTOUR • Irritation to softtissues ADEQUATECONTOUR • Stimulation of supportingtissues • Healthy peridontium
  • 12.
    EMBRASURES (SPILLWAYS) 12 V-shaped spaces betweenthe teeth that originate at the proximal contact areas between adjacent teeth. Curvature formed by two adjacent teeth in an arch form a spillway space that is called an embrasure. Serves 2 purposes:  Provides a passage for food during mastication  Prevents food from being forced into the contact area
  • 13.
    18 • Named forthe direction towards which they radicate: facial, lingual, incisal/occlusal, gingival Facial/Buccal Incisal/Occlusal Lingual/Palatal Gingival 13
  • 14.
    • Embrassure isreduced: Additional stress is created in teeth & supporting structures. • Embrassures is large: Less protection to supporting structures 29
  • 15.
    MARGINAL RIDGES 15 • Roundedborders of enamel that forms the mesial & distal margins of occlusal surfaces of molars & premolars and the mesial and distal margins of lingual surfaces of incisors and canine.
  • 16.
    Functions: Helps in preventionof food impaction proximally Mastication Protection of peridontium 16 Marginal ridges of adjacent posterior teeth should be at the same height to have a proper contact and embrasure forms.
  • 17.
    MARGINAL RIDGES WITHNORMAL OCCLUSAL 17
  • 18.
    MARGINAL RIDGES WITHEXAGGERATED OCCLUSAL EMBRASURES CAUSES DRIFTING OF TOOTH WHICH LEADS TO WEDGING OF FOOD 18
  • 19.
    ADJACENT MARGINAL RIDGESARE NOT COMPATIBLE IN HEIGHT - DRIVES THE DEBRIS INTERPROXIMALLY 19
  • 20.
    MARGINAL RIDGES WITHNO TRIANGULAR FOSSA, THE VERTICAL FORCES WILL IMPACT FOOD INTERPROXIMALLY 20
  • 21.
    THIN MARGINAL RIDGESWILL BE SUSCEPTIBLE TO FRACTURE OR DEFORMATION 21
  • 22.
    MARGINAL RIDGES WITHNO OCCLUSAL EMBRASURES, THE 2 ADJACENT MARGINAL RIDGES WILL ACT LIKE A PAIR OF TWEEZERS GRASPING THE FOOD SUBSTANCE PASSING OVER IT. 22
  • 23.
    PROCEDURES OF PROPERCONTACTS & CONTOURS 23 Tooth movement Matricing
  • 24.
    TOOTH MOVEMENT • Actof separating the involved teeth from each other, bringing them closer to each other or changing their spatial position in one or more dimensions. 24
  • 25.
  • 26.
    RAPID/ IMMEDIATE MOVEMENT 26 •Mechanical type of separation • Creates either proximal separation at the point of separator’s introduction and/or improves closeness of proximal surface of opposite side. • Separation shouldn’t exceed the thickness of the involved tooth’s periodontal ligament thickness. ie: 0.2 – 0.5 mm
  • 27.
    METHODS 27 Wedge method • Byinsertion of a pointed wedge shaped device between the teeth • The more the wedge moves facially or lingualy, greater is the separation.
  • 28.
    Elliots separator • Indicatedfor short duration separation • Useful in examining proximal surfaces in final polishing of restored contacts. 28
  • 29.
    Wood/ Plastic Wedges •Used in both tooth separation for preparation and restoration • Triangular shaped wedges (wood/synthetic resin) • Base of triangle will be in contact with interdental papillae. • Apex must coincide with the gingival start of the contact area. 29
  • 30.
  • 31.
    41 Wedging techniques in thegingival 1. Single wedge technique • Single wedge is placed embrasure 2. Piggyback wedging • A second wedge is placed on top of the first wedge to wedge adequately the matrix against the margin • Indicated for patients whose interproximal tissue level has receded. 31
  • 32.
    3. Double wedgingtechnique • Here, 2 wedges, one from the facial embrasure and the other from the lingual embrasure are used. • Used when proximal box is wide faciolingually. 32
  • 33.
    4. Wedge wedgingtechnique • Used in cases when there is a gingival concavity. • Inorder to wedge a matrix band tightly against such a margin, a second wedge is inserted between the first wedge and the band. 33
  • 34.
    Error’s with wedgeplacement • If wedge is placed more occlusal to the gingival margin, creates abnormal concavity in the proximal surface of the restoration. • If wedge is for apical to gingival margin, band will not be held tightly against the gingival margin & creates gingival overhangs in the restorations. 34
  • 35.
    MATRICING 35 Procedure where atemporary wall is created opposite to the axial wall surrounding areas of tooth structure that were lostduring preparation
  • 36.
    CLASSIFICATION OF MATRICES 36 1.Based on mode of retention: i. With retainer (Tofflemire matrix) ii. Without retainer (Automatrix) 2. Based on type of band i. Metallic non transparent ii. Nonmetallic transparent 3. Based on type of cavity for which it is used i. Class I cavity a. Double banded Tofflemire (barton’s matrix)
  • 37.
    ii. Class IIcavity 37 a. Single banded Tofflemire b. Ivory matrix No. 1 c. Ivory matrix No. 8 d. Copper band matrix e. Automatrix iii. Class III cavity a. Mylar strip b. S-shaped matrix band iv. Class IV cavity crown form a. Mylar strip b. Transparent matrix c. Modified S-shaped v. Class V a. Window matrix b. Cervical matrix
  • 38.
    UNIVERSAL MATRIX (TOFFLEMIREMATRIX) 38 • Designed by BR. Tofflemire • Ideally indicated when 3 surface of posterior tooth are prepared(i.e. mesial, occlusal, distal) • Commonly used for class II restorations • 2 types: • Straight • Contra-angled
  • 39.
  • 40.
    MATRIX BANDS 40 1. Uncontouredbands • Available in 2 thickness : 0.05 mm & 0.038 mm • Burnishing the thinner band is more difficult and less likely to retain contours 2. Precontoured bands • Needs little or no adjustment • Expensive • Difference in cost justified by lesser chair time.
  • 41.
    76 IVORY MATRIX NO.1 proximalsurfaces so it is indicated in• Band encircles the posterior unilateral class II cavities. • Band is attached to the retainer via a wedge shaped projection. 41
  • 42.
    IVORY MATRIX NO.8 42 • Consists of band that encircles the entire crown of the tooth. • Indicated for bilateral class II cavities. • Circumference of the band can be adjusted by adjusting the screw present in the retainer.
  • 43.
    BLACK’S MATRICES 43 1. Forsimple cases recommended for majority of small & medium size cavities 2. Blacks matrix with gingival extension(subgingival cavity)
  • 44.
    COPPER BAND MATRIX/ SOLDERED BAND 44 • Indicated for badly broken down teeth such as those receiving pin retained amalgam restorations & in complex class II restorations with buccal or lingual extensions • Cylindrical in shape • Band with appropriate dimensions of crown are taken and the 2 ends are soldered.
  • 45.
    ANATOMICAL MATRIX 45 • Mostefficient means of reproducing contacts & contours • Hand-made and contoured especially for individual teeth.
  • 46.
    ROLL IN BANDMATRIX ( AUTOMATRIX) 46 • Retainerless matrix system with 4 types of bands that are designed to fit all teeth regardless of circumference and height. • Types: • 3/16” (4.8mm), 0.002” thickness • 1/4” (6.35mm), 0.002” & 0.0015” thickness • 5/16” (7.79mm), 0.002” thickness
  • 47.
    8 S-SHAPED MATRIX BAND •For class III, class II and with facial/lingual extensions of class V • Mirror handle is used to produce the S-shape in the strip • Strip is contoured in its middle part with contouring pliers to create desired form for the restoration • Compound material is used to hold the band in position in the facial and lingual aspect and also in the gingival aspect. 6 47
  • 48.
    T-SHAPED MATRIX T-shaped brass/stainless steel matrix• Premade bands • Longer arms of the matrix is bent to encompass the tooth circumferentially and to overlap the short horizontal arm of ‘T’ • Wedges can be used to stabilize the matrix. 48
  • 49.
    Indications: • Class IIcavities Advantages: • Simple • Inexpensive • Rapid • Easy to apply Disadvantages: • Not stable 49
  • 50.
    TRANSPARENT CROWN FORMMATRIX 50 • Stock plastic crowns • Can be used for light cured resin material • For Class III and Class IV
  • 51.
    • INDICATIONS: 51 • Largebilateral/unilateral class IV cavity • Oblique fractures of anterior teeth • Advantages: • Easy to use • Good contours can be established • Disadvantages: • Time consuming • Expensive
  • 52.
    WINDOW MATRIX 52 • Forclass V cavities • Formed using either a Tofflemire matrix or copper band. Procedure: • A window is cut slightly smaller than the outline of the cavity. • Wedges are placed, mesially & distally to stabilize the band.
  • 53.
    53 RIGID MATERIAL SUPPORTED SECTIONALMATRIX  An alternative to the universal matrix. CLINICAL PROTOCOL  The supporting material can be –light cured, thermoplastic and quick setting rigid PVS  Gingival wedge is placed to secure the band tightly to prevent any overhang  The matrix should be tight against the facial and lingual margins on the proximal surface.
  • 54.
    54  Shape ofthe stainless steel after trimming The strip is contoured  Burnishing the strip to produce occlusogingival contact and contour Contoured strip is positioned and wedged Rigid material supported sectional matrix completed Application
  • 55.
    BARTON MATRIX 55  Matrixapplication for class I amalgam restoration The Tofflemire matrix retainer is used to secure a matrix band to the tooth. Because this type of matrix band does not adapt to the lingual or facial groove area of the tooth , an additional step may be necessary to provide a matrix that is rigid.  A piece of matrix material is cut to fit between the lingual surface of the tooth and the band already in place. A wedge is inserted between the Tofflemire and the cut piece of matric band.
  • 56.
  • 57.
    57 A quick settingpolyvinyl siloxane (PVS) may be used between the sectional matrix and the Tofflemire matrix band, to prevent lingual displacement of the sectional matrix during condensation of amalgam   Alternatively , green stick compound is used. The end of wedge is covered with softened compound and inserted between the Tofflemire band and the cut piece of matrix material.
  • 58.
    REFERENCES: 58 1. Operative Dentistry– MA Marzouk 2. Art & science of operative Dentistry – Sturdevants (5th edition) 3. Art & Science of Operative Dentistry – Sturdevants (South Asian Edition) 4. Textbook Of Operative Dentistry – Vimal K Sikri 5. Dental Anatomy, Physiology & Occlusion – Wheeler’s (9th Edition)
  • 59.
    CONCLUSION 59 • Proper restorationof the anatomical landmarks is important for enhancing the longevity of restorations as well as to maintain the occlusal health and harmony. • Matricing is a vital step during the placement of different restorations. • Selection of the matrix should be based on its ease of use and efficiency to provide the optimum contacts and contours.. • The dentist should select the right method according to the needs of individual case.
  • 60.