
Recommended
Recommended
More Related Content
What's hot
What's hot (20)
Similar to CNC plotter controlled using Android application
Similar to CNC plotter controlled using Android application (20)
Recently uploaded
Recently uploaded (20)
CNC plotter controlled using Android application
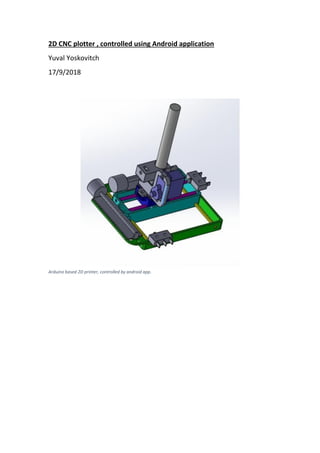
- 1. 2D CNC plotter , controlled using Android application Yuval Yoskovitch 17/9/2018 Arduino based 2D printer, controlled by android app.
- 2. We used two scrap CD ROMs, took them apart to get their linear stepper motors. Those motors used for the XY axis movement. A servo motor is used for z axis to move the pen up and down. The whole structure is operating with L293D shield, connected to the Arduino. The shield outputs 1A for each channel. It is strong enough to drive all 3 motors together using a 12V 2A supply. The Arduino's memory contains a CNC reader program, that translates serial data from a specific program to motors movement according to its coordinates. We've built a program that reads a G-code file and sends the data to the Arduino. We have some applications and features such as image processing of a captured photos, a data base for saving built-in sketches and sharing captured photos. All about it will be explained later. Those applications are based android platform that controls the whole machine.
- 3. Here are some photos of the prototype, soldering wires to the motor so I can control them from the Arduino:
- 4. First version of the machine was abandoned later for smaller, more accurate one
- 6. We decided to make things smaller, elegant and precise. Therefore, we neglected out first prototype and printed all the parts below with a professional 3D machine. Final product Some parts had to be printed
- 8. Android application and user interface I created an android application, based on Java. The application is used to control the machine and to create the sketch. A short explanation about the technologies I have used: The camera activity: I created an image processing algorithm that converts the camera photo into sketch. The algorithm (shortly) : RGB->grayscale conversion, convolutional filtering, negative conversion (repmat(255) - A), grayscale->white and black ( using threshold). I tested the algorithm using Matlab, and implemented the algorithm using OpenCV library in Java (which gives us the option to use image processing directly on the screen of the phone) The algorithm was made as short (less computations) as possible so we can use it “live” when taking the image (3X3 filter) . After taking the image, we re-process the original image again (6 X 6 Filter), to get better results. I give the user the ability to process to image only after taking the photos (saves battery). I give the user the ability to upload the image to my Node.js server so anyone can see it in the future. The algorithm was first tested on Matlab, and then implemented in Java Application Main Activity
- 9. We can disable the processing procedure The drawing activity: I give the user the ability to draw the sketch on the screen. The activity was implemented using the Canvas class (and also some OpenCV for the processing). I give the user the ability to upload the image to my Node.js server so anyone can see it in the future. The image is being processed “live” Drawing Activity
- 10. The “image from server/database” activity: I have created a Node.js server from scratch. I created a database of photos and G-codes on my server, so anyone can easily watch them and sketch them using my machine. The user also has the option to upload sketches when taking a photo or drawing on the screen. The G-codes are stored on the server. The G-code tells the machine how it should move its engines I have created a Node.js server from scratch (7 Javascript files) to help us control the connection with the Android application, and also to store the images. Imaged being selected from the server.
- 11. The Gcode simulation activity: The last G-code that was created is sent to the phone from my Node.js server. I created an algorithm that figures the G-code and simulates the last images sketch. The user can see exactly how my machine will create the sketch. This activity lets us watch a simulation of the sketch. We can see exactly how the picture is printed step by step. We create a child thread that reads the G-code file from the server. Then it figures all the pixels from the code, including when the pen is lifted or being put down. The child thread informs the UI Thread every certain amount of time to draw a new line on the screen. Of course, implementing this procedure on the Main Thread is impossible since using delays on the UI thread will cause the entire Android operation system not to respond to any user interface until the simulation ends.
- 12. How we create the G-code The G-code is the code that tells the Arduino exactly how to operate in order to draw the sketch on paper. I created from scratch an algorithm ,using Matlab, that takes the “white and black” image and figures how the Arduino engines should move. The algorithm is very basic: First we make a list of all the black pixels. Each iteration we look for the closest black pixel,and figure if the pen should be lifted or not. Then write it to the G-code file, and the black pixel is painted white (until the entire image is white). The Matlab code was compiled to EXE file, uploaded to my Node.js server. We run the EXE file using my Node.js script (The android application sends command to the server after the processing of the image is finished). The user can watch the progress of the G-code generation on his phone application (using a progress bar). In order to create this progress bar the Matlab program (on my server) must communicate with the android device all the time. The Matlab EXE file takes an image and creates a G-code. The G-code is a code that tells the Arduino device how to operate. Implementing a progress bar requires successive communication with the server
- 13. How the G-code is sent to the Arduino device After the G-code is finished being written, the file needs to be sent to the Arduino device. We created a Java program, using Java Processing Library. This program read the G-code file line by line and sends it to the Arduino device using serial communication. A program, written with Java Processing, helps to create serial communication with Arduino. The technologies I have used in this project: Java and Android Studio Matlab Node.js Java OpenCV (image processing) library Java Processing Libaray Arduino IDE Thanks for Dan Sosking for helping with the hardware design