The document defines various ceramics and clay art terms including pottery, hand building, slip, coil building, pinch pots, and glazing. It also outlines the basic steps and equipment needed for building with clay slabs, pinch pots, and coils.
• Ceramics -any artwork produced using clay.
• Pottery – Thrown clay, clay pots produced using a pottery wheel.
• Hand building – any process which involves using your hands to
produce art work in clay.
• Slip – watery clay used as a joining aid.
• Coloured slip- slip with a base metal colour powder which can add
colour.
• Coil – worm like clay, built together to make a shape.
• Pinch pot – hand built shape using hands.
• Leather hard- clay that is able to support its own weight, good for
carving.
• Relied Tile – clay tile with layers built on and craved out.
• Kiln – the clay oven to harden clay, takes around 8 hours!
• Green clay- Unfired clay
• Bisc – fired clay
• Glaze- a glossy surface paint used to decorate the fired clay.
• Incise – to cut into the surface of the clay .
• Carve – to remove excess clay using a carving tool.
• Cheese wire- a piece of wire or cord used to cut soft clay.
• Kidney- a plastic, wood or metal former used to smooth the surface of
clay.
• Rolling guides- wood slats used when rolling clay to give an even
thickness.
• Banding wheel – a raised surface which can be turned when hand
building.
Kate Malone Peter Anton Jae Kim Yong Melanie West
Anna Collette Hunt Laura Zindel Kate Malone
Sue Dunne
2.
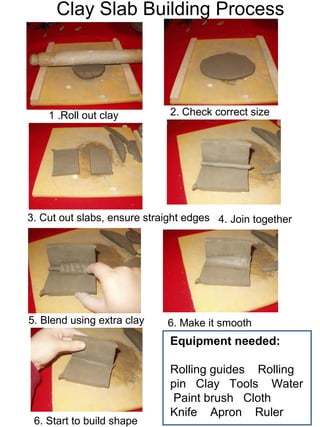
Clay Slab BuildingProcess
Equipment needed:
Rolling guides Rolling
pin Clay Tools Water
Paint brush Cloth
Knife Apron Ruler
1 .Roll out clay 2. Check correct size
3. Cut out slabs, ensure straight edges 4. Join together
5. Blend using extra clay 6. Make it smooth
6. Start to build shape
3.
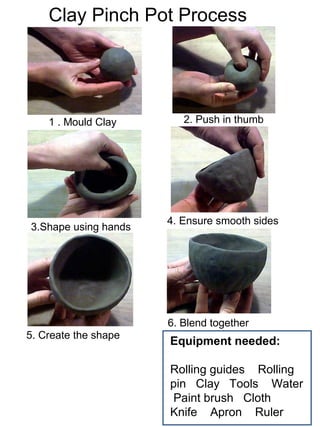
Clay Pinch PotProcess
Equipment needed:
Rolling guides Rolling
pin Clay Tools Water
Paint brush Cloth
Knife Apron Ruler
1 . Mould Clay 2. Push in thumb
3.Shape using hands
4. Ensure smooth sides
5. Create the shape
6. Blend together
4.
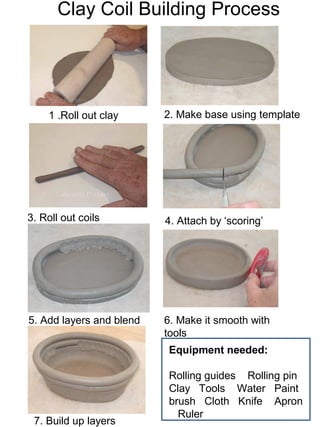
Clay Coil BuildingProcess
Equipment needed:
Rolling guides Rolling pin
Clay Tools Water Paint
brush Cloth Knife Apron
Ruler
1 .Roll out clay 2. Make base using template
3. Roll out coils 4. Attach by ‘scoring’
5. Add layers and blend 6. Make it smooth with
tools
7. Build up layers