SlideShare a Scribd company logo
1 of 25
Download to read offline
SUBMITTED TO
AJAY LAMBA SIR
SUBMITTED BY
VISHAL SINGH
00320903613
MAE 7TH SEMESTER
COMPUTER AIDED DESIGN
LABORATORY
ETAT-451
INDEX
S . N o . E x p e r i m e n t
P a g e
N o .
R e m a r k s
1 . To study the basic features of CATIA. 1
2 . To prepare the given sketch 1 using CATIA v5. 5
3 . To prepare the given sketch 2 using CATIA v5. 7
4 . To prepare the given part 1 using CATIA v5. 9
5 . To prepare the given part 2 using CATIA v5. 1 1
6 . To prepare the given part 3 using CATIA v5 1 3
7 . To prepare the given part 4 using CATIA v5. 1 5
8 . To prepare a knuckle joint assembly using CATIA v5. 1 7
V i s h a l S i n g h ( 0 0 3 2 0 9 0 3 6 1 3 ) | 1
1 . I N T R O D U C T I O N
AIM
To study the basic features of CATIA.
THEORY
CATIA (Computer Aided Three-dimensional Interactive Application) is a multi-platform
CAD/CAM/CAE. It is written in the C++ programming language. CATIA supports multiple
stages of product development (CAx), from conceptualization, design (CAD), manufacturing
(CAM), and engineering (CAE). CATIA can be customized via application programming
interfaces (API). CATIA V5 can be adapted via the Visual Basic and C++ programming
languages, an API called CAA2 or CAA V5 (Component Application Architecture) that is a
component object model (COM)-like interface.
Features of CATIA Design Software
 Optimal Sharing
Catia users will get access to a unique, collaborative 3 dimensional environments that
can be access by an unlimited number of people online. This allows people from across
the globe to collaborate in a virtual environment. It has been designed to not only allow
for online cooperation, but also makes offline sharing and designing easy to integrate
as well.
 Simplified Product Development
Creating a new product can be a long and complex process. It encompasses multiple
design phases including the initial design, overall development, and manufacturing.
Catia decreases the complexity and length of the entire project because it integrates
various stages of the development process so that they can be controlled and modified
on a single platform.
 Seamless Transitioning
Every version of the Catia design software is designed to allow for seamless integration
with previous versions. This makes upgrading a simple process and can be completed
without losing any of the information that has already been stored.
CATIA Modules
CATIA consists of several modules and each module is specialized in specific design field
V i s h a l S i n g h ( 0 0 3 2 0 9 0 3 6 1 3 ) | 2
 Sketcher
This module is responsible for the implementation of two-dimensional shapes, in
preparation for a three-dimensional command on it.
 Part Design
This module is responsible for converting two-dimensional graphics to three-
dimensional objects which is most famous in Catia and is closely linked with sketcher
module.
 Assembly
This module is responsible for assembling the parts previously produced in Part Design
 Stress Analysis
This module is responsible for testing parts designed to withstand the loads expected
occurrence on it, and shows how the mechanical parts are affected by the colours.
 Drafting
This module is responsible, for converting what is seen on the screen to standard
engineering drawings can be traded in the workshop for manufacturing or save them
for documentation.
 Surface and Wireframe
With this module surfaces can be drawing with zero size and weight and has its uses
in the aerospace, automotive, ships and mold Design.
 Simulation
This module is responsible for obtaining a similar movement of the natural movement,
which is expected to occur during the actual operation of the machine or mechanical
establishment whatever.
Modules of CATIA v5
V i s h a l S i n g h ( 0 0 3 2 0 9 0 3 6 1 3 ) | 3
Other modules include Sheet Metals, Mold Design, Welding etc. in mechanical design field.
Similar modules are available for different operations in infrastructure, machining, ergonomics
etc.
Toolbars
A set of tools that helps you create and constrain 2D geometries. Features (pads, pockets,
shafts, etc...) may then be created solids or modifications to solids using these 2D profiles.
The Sketcher workbench contains the following standard workbench specific toolbars.
 Profile toolbar
The commands located in this toolbar allows to create simple geometries (rectangle,
circle, line, etc...) and more complex geometries (profile, spline, etc...).
 Operation toolbar
Once a profile has been created, it can be modified using commands such as trim,
mirror, chamfer, and other commands located in the Operation toolbar.
 Constraint toolbar
Profiles may be constrained with dimensional (distances, angles, etc...) or geometrical
(tangent, parallel, etc...) constraints using the commands located in the Constraint
toolbar.
 Sketch tools toolbar
The commands in this toolbar allows to work in different modes which make sketching
easier.
 User Selection Filter toolbar
Allows to activate different selection filters.
 Visualization toolbar
V i s h a l S i n g h ( 0 0 3 2 0 9 0 3 6 1 3 ) | 4
Allows to, among other things to cut the part by the sketch plane and choose lighting
effects and other factors that influence how the part is visualized.
 Tools toolbar
Allows to, among others other things, to analyse a sketch for problems, and create a
datum.
RESULT
The basic features of CATIA V5 had been studied successfully.
V i s h a l S i n g h ( 0 0 3 2 0 9 0 3 6 1 3 ) | 5
2 . S K E T C H I N G
AIM
To prepare the given sketch using CATIA v5.
PROCEDURE
 Select the XY plane (the plane the profile will be sketched on).
 Enter the Sketcher Work Bench.
 Sketch the profile of the part without considering the dimensions.
 Constrain the profile to match the dimensions as given.
 Exit the Sketcher Work Bench, return to the Part Design Work Bench
 Capture the image of the sketch so obtained.
RESULT
Thus the given sketch has been successfully modelled using CATIA v5.
V i s h a l S i n g h ( 0 0 3 2 0 9 0 3 6 1 3 ) | 6
Figure of the sketch obtained in CATIA v5
V i s h a l S i n g h ( 0 0 3 2 0 9 0 3 6 1 3 ) | 7
3 . S K E T C H I N G
AIM
To prepare the given sketch using CATIA v5.
PROCEDURE
 Select the XY plane (the plane the profile will be sketched on).
 Enter the Sketcher Work Bench.
 Sketch the profile of the part without considering the dimensions.
 Constrain the profile to match the dimensions as given.
 Exit the Sketcher Work Bench, return to the Part Design Work Bench
 Capture the image of the sketch so obtained.
RESULT
Thus the given sketch has been successfully modelled using CATIA v5.
V i s h a l S i n g h ( 0 0 3 2 0 9 0 3 6 1 3 ) | 8
Figure of the sketch obtained in CATIA v5
V i s h a l S i n g h ( 0 0 3 2 0 9 0 3 6 1 3 ) | 9
4 . P A R T D E S I G N
AIM
To prepare the given part using CATIA v5.
PROCEDURE
 Select the XY plane (the plane the profile will be sketched on).
 Enter the Sketcher Work Bench.
 Sketch the profile of the part without considering the dimensions.
 Constrain the profile to match the dimensions as given.
 Exit the Sketcher Work Bench, return to the Part Design Work Bench.
 Click Pad and give the thickness for the part.
 Similarly select another plane or define a new plane using plane tool that is offset with
XY, YZ, ZX plane.
 Enter Sketcher to define the sketch and give the required padding.
 Make similar sketches followed by pocket command to cut the slots.
 Capture the image of the part so obtained.
RESULT
Thus the given part has been successfully modelled using CATIA v5.
V i s h a l S i n g h ( 0 0 3 2 0 9 0 3 6 1 3 ) | 10
Renderingofthepartobtained
AH BG
D
E
C
F
B
G
A
H
3
3
2
2
4
4
1
1
This drawing is our property; it can't be reproduced or communicated without our written agreement.
SCALE
1:1
WEIGHT (kg) DRAWING NUMBER SHEET
SIZE
CHECKED BY:
XXX
DATE:
XXX
DESIGNED BY:
Vishal
DATE:
A _
B _
C _
D _
E _
F _
G _
H _
I _
Part10.11
A3
1/1
GB Pant Engineering College
07-11-2016
Exercise - 1
Front view
Scale: 1:1
12
12
24
44
16
12
Top view
Scale: 1:1
1010
62
Left view
Scale: 1:1
88
25
R
25
10
32
88
Isometric view
Scale: 1:1
V i s h a l S i n g h ( 0 0 3 2 0 9 0 3 6 1 3 ) | 11
5 . P A R T D E S I G N
AIM
To prepare the given part using CATIA v5.
PROCEDURE
 Select the XY plane (or the plane on which the profile will be sketched on).
 Enter the Sketcher Work Bench.
 Sketch the profile of the part without considering the dimensions.
 Constrain the profile to match the dimensions as given.
 Exit the Sketcher Work Bench, return to the Part Design Work Bench.
 Click Pad and give the thickness for the part.
 Similarly select another plane or define a new plane using plane tool that is offset with
XY, YZ, ZX plane.
 Enter Sketcher to define the sketch and give the required padding.
 Make similar sketches followed by pocket command to cut the slots.
 Finally use stiffener command to attach the bodies.
 Capture the image of the part so obtained.
RESULT
Thus the given part has been successfully modelled using CATIA v5.
V i s h a l S i n g h ( 0 0 3 2 0 9 0 3 6 1 3 ) | 12
Renderingofthepartobtained
AH BG
D
E
C
F
B
G
A
H
3
3
2
2
4
4
1
1
This drawing is our property; it can't be reproduced or communicated without our written agreement.
SCALE
1:1
WEIGHT (kg)
0.13
DRAWING NUMBER
Part 1
SHEET
1/1
SIZE
A3 GB Pant Engineering College
CHECKED BY:
DATE:
DESIGNED BY:
Vishal
DATE:
A _
B _
C _
D _
E _
F _
G _
H _
I _
EXERCISE - 2
07-11-2016
Front view
Scale: 1:1
10
14
30
Top View
Scale: 1:1
30R
24
36
5
Right View
Scale: 1:1
Isometric view
Scale: 1:1
V i s h a l S i n g h ( 0 0 3 2 0 9 0 3 6 1 3 ) | 13
6 . P A R T D E S I G N
AIM
To prepare the given part using CATIA v5.
PROCEDURE
 Select the XY plane (the plane the profile will be sketched on).
 Enter the Sketcher Work Bench.
 Sketch the profile of the part without considering the dimensions.
 Constrain the profile to match the dimensions as given.
 Exit the Sketcher Work Bench, return to the Part Design Work Bench.
 Click Pad and give the thickness for the part.
 Similarly select another plane or define a new plane using plane tool that is offset with
XY, YZ, ZX plane.
 Enter Sketcher to define the sketch and give the required padding.
 Make similar sketches followed by pocket command to cut the slots.
 Use stiffener tool for the bigger cylindrical part.
 Add the base pad and the edge pad followed by slot at the edge.
 Capture the image of the part so obtained.
RESULT
Thus the given part has been successfully modelled using CATIA v5.
V i s h a l S i n g h ( 0 0 3 2 0 9 0 3 6 1 3 ) | 14
Renderingofthepartobtained
AH BG
D
E
C
F
B
G
A
H
3
3
2
2
4
4
1
1
This drawing is our property; it can't be reproduced or communicated without our written agreement.
SCALE
1:1
WEIGHT (kg) DRAWING NUMBER SHEET
SIZE
CHECKED BY:
DATE:
DESIGNED BY:
Vishal
DATE:
A _
B _
C _
D _
E _
F _
G _
H _
I _
Part10.20
A3
1/1
GB Pant Engineering College
07-11-2016
Exercise - 3
15R
30
16
4
4
2
1212
42
Top view
Scale: 1:1
15
65
15
Left viewFront view
Scale: 1:1
45
15
R
12
Isometric view
Scale: 1:1
V i s h a l S i n g h ( 0 0 3 2 0 9 0 3 6 1 3 ) | 15
7 . P A R T D E S I G N
AIM
To prepare the given part using CATIA v5.
PROCEDURE
 Select the XY plane (the plane the profile will be sketched on).
 Enter the Sketcher Work Bench.
 Sketch the profile of the part without considering the dimensions.
 Constrain the profile to match the dimensions as given.
 Exit the Sketcher Work Bench, return to the Part Design Work Bench.
 Click Pad and give the thickness for the part.
 Similarly select another plane or define a new plane using plane tool that is offset with
XY, YZ, ZX plane.
 Enter Sketcher to define the sketch and give the required padding.
 Make similar sketches followed by pocket command to cut the slots and add pads.
 Use stiffener tool for the to connect the pads part.
 Capture the image of the part so obtained.
RESULT
Thus the given part has been successfully modelled using CATIA v5.
V i s h a l S i n g h ( 0 0 3 2 0 9 0 3 6 1 3 ) | 16
Renderingofthepartobtained
AH BG
D
E
C
F
B
G
A
H
3
3
2
2
4
4
1
1
This drawing is our property; it can't be reproduced or communicated without our written agreement.
SCALE
1:1
WEIGHT (kg) DRAWING NUMBER SHEET
SIZE
CHECKED BY:
DATE:
DESIGNED BY:
Vishal
DATE:
A _
B _
C _
D _
E _
F _
G _
H _
I _
Part10.26
A3
1/1
GB Pant Engineering College
07-11-2016
Exercise - 4
Top View
Scale: 1:1
25
R
40
R
60140
140
1010
10
2.5
Side view
Scale: 1:1
60
10
1010
Front view
Scale: 1:1
Isometric view
Scale: 1:2
V i s h a l S i n g h ( 0 0 3 2 0 9 0 3 6 1 3 ) | 17
8 . P A R T A S S E M B L Y
AIM
To prepare a knuckle joint assembly using CATIA v5.
PROCEDURE
 Draw the sketches and add required sketch based feature to obtain the part.
 Similarly draw other parts as different part design files.
 Open the CATIA assembly design and add the part design files to it.
 Add suitable constraints between the parts to have the assembly.
 Capture the rendering of the assembly so obtained.
RESULT
Thus the given assembly has been successfully modelled using CATIA v5.
V i s h a l S i n g h ( 0 0 3 2 0 9 0 3 6 1 3 ) | 18
RenderingoftheKnuckleJointassemblyobtained
Catia File

More Related Content

What's hot

Catia sketcher workbench
Catia  sketcher workbenchCatia  sketcher workbench
Catia sketcher workbenchJayesh Sarode
 
Catia v5 ppt md asif 7th sem
Catia v5 ppt md asif 7th semCatia v5 ppt md asif 7th sem
Catia v5 ppt md asif 7th semMDMustafaHusain
 
Solidworks ppt 2015
Solidworks ppt 2015Solidworks ppt 2015
Solidworks ppt 2015lalit yadav
 
CATIA V5 Tips and Tricks
CATIA V5 Tips and TricksCATIA V5 Tips and Tricks
CATIA V5 Tips and TricksEmmett Ross
 
NX training Report
NX training ReportNX training Report
NX training ReportSTAY CURIOUS
 
Anurag Arpan (PPT on AutoCAD )
Anurag Arpan (PPT on AutoCAD )Anurag Arpan (PPT on AutoCAD )
Anurag Arpan (PPT on AutoCAD )Anurag Arpan
 
Introduction of creo software
Introduction of creo softwareIntroduction of creo software
Introduction of creo softwareAmar raj
 
Introduction to CATIA
Introduction to CATIAIntroduction to CATIA
Introduction to CATIARahul Kumar
 
Solidworks
SolidworksSolidworks
SolidworksMoe Oee
 
CATIA Drafting
CATIA DraftingCATIA Drafting
CATIA DraftingCad Cam
 
CATIA V5 Interview Questions & Answers
CATIA V5 Interview Questions & AnswersCATIA V5 Interview Questions & Answers
CATIA V5 Interview Questions & AnswersCMS Computer
 
AutoCAD Presentation 2021 (Internship Project)
AutoCAD Presentation 2021 (Internship Project)AutoCAD Presentation 2021 (Internship Project)
AutoCAD Presentation 2021 (Internship Project)Kumar Gaurav
 

What's hot (20)

Catia v5 lecture notes
Catia v5 lecture notesCatia v5 lecture notes
Catia v5 lecture notes
 
Catia sketcher workbench
Catia  sketcher workbenchCatia  sketcher workbench
Catia sketcher workbench
 
Catia v5 ppt md asif 7th sem
Catia v5 ppt md asif 7th semCatia v5 ppt md asif 7th sem
Catia v5 ppt md asif 7th sem
 
NX_CAD
NX_CADNX_CAD
NX_CAD
 
Solidworks ppt 2015
Solidworks ppt 2015Solidworks ppt 2015
Solidworks ppt 2015
 
Introduction to nx
Introduction to nxIntroduction to nx
Introduction to nx
 
Catia5v
Catia5vCatia5v
Catia5v
 
Nx basics 2014
Nx basics 2014 Nx basics 2014
Nx basics 2014
 
CATIA V5 Tips and Tricks
CATIA V5 Tips and TricksCATIA V5 Tips and Tricks
CATIA V5 Tips and Tricks
 
NX training Report
NX training ReportNX training Report
NX training Report
 
Creo Demo
Creo DemoCreo Demo
Creo Demo
 
Anurag Arpan (PPT on AutoCAD )
Anurag Arpan (PPT on AutoCAD )Anurag Arpan (PPT on AutoCAD )
Anurag Arpan (PPT on AutoCAD )
 
Introduction of creo software
Introduction of creo softwareIntroduction of creo software
Introduction of creo software
 
CATIA V5 Lectures.ppt
CATIA V5 Lectures.pptCATIA V5 Lectures.ppt
CATIA V5 Lectures.ppt
 
Introduction to CATIA
Introduction to CATIAIntroduction to CATIA
Introduction to CATIA
 
Solidworks
SolidworksSolidworks
Solidworks
 
CATIA Drafting
CATIA DraftingCATIA Drafting
CATIA Drafting
 
CATIA V5 Interview Questions & Answers
CATIA V5 Interview Questions & AnswersCATIA V5 Interview Questions & Answers
CATIA V5 Interview Questions & Answers
 
Solid works ppt
Solid works pptSolid works ppt
Solid works ppt
 
AutoCAD Presentation 2021 (Internship Project)
AutoCAD Presentation 2021 (Internship Project)AutoCAD Presentation 2021 (Internship Project)
AutoCAD Presentation 2021 (Internship Project)
 

Similar to Catia File

CAD/CAM - Wood picnic table (CATIA)
CAD/CAM - Wood picnic table (CATIA)CAD/CAM - Wood picnic table (CATIA)
CAD/CAM - Wood picnic table (CATIA)Sisubalan Selvan
 
Catia productenhancementoverview v5-6r2013
Catia productenhancementoverview v5-6r2013Catia productenhancementoverview v5-6r2013
Catia productenhancementoverview v5-6r2013Jimmy Chang
 
Frequently Asked questions
Frequently Asked questions Frequently Asked questions
Frequently Asked questions butest
 
Autocad civil project file
Autocad civil project fileAutocad civil project file
Autocad civil project filenaveen899
 
LabReport-Autodesk Inventor 2008-MasterCam X4
LabReport-Autodesk Inventor 2008-MasterCam X4LabReport-Autodesk Inventor 2008-MasterCam X4
LabReport-Autodesk Inventor 2008-MasterCam X4Kienho Chan
 
AUTOCAD Report
AUTOCAD ReportAUTOCAD Report
AUTOCAD ReportAMIT RAJ
 
Catia productenhancementoverview v5-6r2012
Catia productenhancementoverview v5-6r2012Catia productenhancementoverview v5-6r2012
Catia productenhancementoverview v5-6r2012Jimmy Chang
 
DLP_Observation-1.docx
DLP_Observation-1.docxDLP_Observation-1.docx
DLP_Observation-1.docxWyztyDelle2
 
AutoCAD 2D training report
AutoCAD 2D training reportAutoCAD 2D training report
AutoCAD 2D training reportSTAY CURIOUS
 
Design of machine element by using AutoLISP programming in AutoCAD.
Design of machine element by using AutoLISP programming in AutoCAD.Design of machine element by using AutoLISP programming in AutoCAD.
Design of machine element by using AutoLISP programming in AutoCAD.Chaitanya Yadure
 
Utilizing Layers in AutoCAD Prototype Package
Utilizing Layers in AutoCAD Prototype PackageUtilizing Layers in AutoCAD Prototype Package
Utilizing Layers in AutoCAD Prototype PackageBrian Mitchell
 
IRJET- Modelling and Analysis of Two Wheeler Suspension System
IRJET- Modelling and Analysis of Two Wheeler Suspension SystemIRJET- Modelling and Analysis of Two Wheeler Suspension System
IRJET- Modelling and Analysis of Two Wheeler Suspension SystemIRJET Journal
 
catia presentation.pptx
catia presentation.pptxcatia presentation.pptx
catia presentation.pptxAnkitRaj562761
 
Civil 3 d 2011 tutorials
Civil 3 d 2011 tutorialsCivil 3 d 2011 tutorials
Civil 3 d 2011 tutorialsocramr0111
 

Similar to Catia File (20)

CAD/CAM - Wood picnic table (CATIA)
CAD/CAM - Wood picnic table (CATIA)CAD/CAM - Wood picnic table (CATIA)
CAD/CAM - Wood picnic table (CATIA)
 
Catia productenhancementoverview v5-6r2013
Catia productenhancementoverview v5-6r2013Catia productenhancementoverview v5-6r2013
Catia productenhancementoverview v5-6r2013
 
Frequently Asked questions
Frequently Asked questions Frequently Asked questions
Frequently Asked questions
 
Autocad civil project file
Autocad civil project fileAutocad civil project file
Autocad civil project file
 
LabReport-Autodesk Inventor 2008-MasterCam X4
LabReport-Autodesk Inventor 2008-MasterCam X4LabReport-Autodesk Inventor 2008-MasterCam X4
LabReport-Autodesk Inventor 2008-MasterCam X4
 
CAD/CAM/CIM ( Lecture 2 model construction and product design)
CAD/CAM/CIM ( Lecture 2 model construction and product design)CAD/CAM/CIM ( Lecture 2 model construction and product design)
CAD/CAM/CIM ( Lecture 2 model construction and product design)
 
AUTOCAD Report
AUTOCAD ReportAUTOCAD Report
AUTOCAD Report
 
Catia productenhancementoverview v5-6r2012
Catia productenhancementoverview v5-6r2012Catia productenhancementoverview v5-6r2012
Catia productenhancementoverview v5-6r2012
 
Solidworks software
Solidworks softwareSolidworks software
Solidworks software
 
DLP_Observation-1.docx
DLP_Observation-1.docxDLP_Observation-1.docx
DLP_Observation-1.docx
 
AutoCAD 2D training report
AutoCAD 2D training reportAutoCAD 2D training report
AutoCAD 2D training report
 
Autocad Presentation
Autocad PresentationAutocad Presentation
Autocad Presentation
 
AutoCAD Tutorial AB.pptx
AutoCAD Tutorial AB.pptxAutoCAD Tutorial AB.pptx
AutoCAD Tutorial AB.pptx
 
Design of machine element by using AutoLISP programming in AutoCAD.
Design of machine element by using AutoLISP programming in AutoCAD.Design of machine element by using AutoLISP programming in AutoCAD.
Design of machine element by using AutoLISP programming in AutoCAD.
 
Utilizing Layers in AutoCAD Prototype Package
Utilizing Layers in AutoCAD Prototype PackageUtilizing Layers in AutoCAD Prototype Package
Utilizing Layers in AutoCAD Prototype Package
 
_CATIA
_CATIA_CATIA
_CATIA
 
IRJET- Modelling and Analysis of Two Wheeler Suspension System
IRJET- Modelling and Analysis of Two Wheeler Suspension SystemIRJET- Modelling and Analysis of Two Wheeler Suspension System
IRJET- Modelling and Analysis of Two Wheeler Suspension System
 
catia presentation.pptx
catia presentation.pptxcatia presentation.pptx
catia presentation.pptx
 
Civil 3 d 2011 tutorials
Civil 3 d 2011 tutorialsCivil 3 d 2011 tutorials
Civil 3 d 2011 tutorials
 
Computer graphics
Computer graphicsComputer graphics
Computer graphics
 

More from Vishal Singh

Engineering System Modelling and Simulation Lab
Engineering System Modelling and Simulation LabEngineering System Modelling and Simulation Lab
Engineering System Modelling and Simulation LabVishal Singh
 
Application of Trigonometry
Application of TrigonometryApplication of Trigonometry
Application of TrigonometryVishal Singh
 
Railway Training Report
Railway Training ReportRailway Training Report
Railway Training ReportVishal Singh
 
Numerical analysis
Numerical analysisNumerical analysis
Numerical analysisVishal Singh
 
Physics nanophotonics
Physics nanophotonicsPhysics nanophotonics
Physics nanophotonicsVishal Singh
 
Environmental project
Environmental projectEnvironmental project
Environmental projectVishal Singh
 

More from Vishal Singh (10)

Engineering System Modelling and Simulation Lab
Engineering System Modelling and Simulation LabEngineering System Modelling and Simulation Lab
Engineering System Modelling and Simulation Lab
 
Application of Trigonometry
Application of TrigonometryApplication of Trigonometry
Application of Trigonometry
 
NTPC Report
NTPC ReportNTPC Report
NTPC Report
 
Pneumatic System
Pneumatic SystemPneumatic System
Pneumatic System
 
Railway Training Report
Railway Training ReportRailway Training Report
Railway Training Report
 
Numerical analysis
Numerical analysisNumerical analysis
Numerical analysis
 
Physics nanophotonics
Physics nanophotonicsPhysics nanophotonics
Physics nanophotonics
 
Environmental project
Environmental projectEnvironmental project
Environmental project
 
Segway Robotics
Segway Robotics Segway Robotics
Segway Robotics
 
Motion Class 9
Motion Class 9 Motion Class 9
Motion Class 9
 

Recently uploaded

3D Printing And Designing Final Report.pdf
3D Printing And Designing Final Report.pdf3D Printing And Designing Final Report.pdf
3D Printing And Designing Final Report.pdfSwaraliBorhade
 
How to Be Famous in your Field just visit our Site
How to Be Famous in your Field just visit our SiteHow to Be Famous in your Field just visit our Site
How to Be Famous in your Field just visit our Sitegalleryaagency
 
PORTAFOLIO 2024_ ANASTASIYA KUDINOVA
PORTAFOLIO   2024_  ANASTASIYA  KUDINOVAPORTAFOLIO   2024_  ANASTASIYA  KUDINOVA
PORTAFOLIO 2024_ ANASTASIYA KUDINOVAAnastasiya Kudinova
 
call girls in Harsh Vihar (DELHI) 🔝 >༒9953330565🔝 genuine Escort Service 🔝✔️✔️
call girls in Harsh Vihar (DELHI) 🔝 >༒9953330565🔝 genuine Escort Service 🔝✔️✔️call girls in Harsh Vihar (DELHI) 🔝 >༒9953330565🔝 genuine Escort Service 🔝✔️✔️
call girls in Harsh Vihar (DELHI) 🔝 >༒9953330565🔝 genuine Escort Service 🔝✔️✔️9953056974 Low Rate Call Girls In Saket, Delhi NCR
 
NATA 2024 SYLLABUS, full syllabus explained in detail
NATA 2024 SYLLABUS, full syllabus explained in detailNATA 2024 SYLLABUS, full syllabus explained in detail
NATA 2024 SYLLABUS, full syllabus explained in detailDesigntroIntroducing
 
306MTAMount UCLA University Bachelor's Diploma in Social Media
306MTAMount UCLA University Bachelor's Diploma in Social Media306MTAMount UCLA University Bachelor's Diploma in Social Media
306MTAMount UCLA University Bachelor's Diploma in Social MediaD SSS
 
VIP Call Girls Service Mehdipatnam Hyderabad Call +91-8250192130
VIP Call Girls Service Mehdipatnam Hyderabad Call +91-8250192130VIP Call Girls Service Mehdipatnam Hyderabad Call +91-8250192130
VIP Call Girls Service Mehdipatnam Hyderabad Call +91-8250192130Suhani Kapoor
 
PORTFOLIO DE ARQUITECTURA CRISTOBAL HERAUD 2024
PORTFOLIO DE ARQUITECTURA CRISTOBAL HERAUD 2024PORTFOLIO DE ARQUITECTURA CRISTOBAL HERAUD 2024
PORTFOLIO DE ARQUITECTURA CRISTOBAL HERAUD 2024CristobalHeraud
 
Design Portfolio - 2024 - William Vickery
Design Portfolio - 2024 - William VickeryDesign Portfolio - 2024 - William Vickery
Design Portfolio - 2024 - William VickeryWilliamVickery6
 
VIP Kolkata Call Girl Gariahat 👉 8250192130 Available With Room
VIP Kolkata Call Girl Gariahat 👉 8250192130  Available With RoomVIP Kolkata Call Girl Gariahat 👉 8250192130  Available With Room
VIP Kolkata Call Girl Gariahat 👉 8250192130 Available With Roomdivyansh0kumar0
 
Call Girls Aslali 7397865700 Ridhima Hire Me Full Night
Call Girls Aslali 7397865700 Ridhima Hire Me Full NightCall Girls Aslali 7397865700 Ridhima Hire Me Full Night
Call Girls Aslali 7397865700 Ridhima Hire Me Full Nightssuser7cb4ff
 
Abu Dhabi Call Girls O58993O4O2 Call Girls in Abu Dhabi`
Abu Dhabi Call Girls O58993O4O2 Call Girls in Abu Dhabi`Abu Dhabi Call Girls O58993O4O2 Call Girls in Abu Dhabi`
Abu Dhabi Call Girls O58993O4O2 Call Girls in Abu Dhabi`dajasot375
 
Kala jadu for love marriage | Real amil baba | Famous amil baba | kala jadu n...
Kala jadu for love marriage | Real amil baba | Famous amil baba | kala jadu n...Kala jadu for love marriage | Real amil baba | Famous amil baba | kala jadu n...
Kala jadu for love marriage | Real amil baba | Famous amil baba | kala jadu n...babafaisel
 
Call Girls Meghani Nagar 7397865700 Independent Call Girls
Call Girls Meghani Nagar 7397865700  Independent Call GirlsCall Girls Meghani Nagar 7397865700  Independent Call Girls
Call Girls Meghani Nagar 7397865700 Independent Call Girlsssuser7cb4ff
 
办理学位证(SFU证书)西蒙菲莎大学毕业证成绩单原版一比一
办理学位证(SFU证书)西蒙菲莎大学毕业证成绩单原版一比一办理学位证(SFU证书)西蒙菲莎大学毕业证成绩单原版一比一
办理学位证(SFU证书)西蒙菲莎大学毕业证成绩单原版一比一F dds
 
VIP Call Girls Service Kukatpally Hyderabad Call +91-8250192130
VIP Call Girls Service Kukatpally Hyderabad Call +91-8250192130VIP Call Girls Service Kukatpally Hyderabad Call +91-8250192130
VIP Call Girls Service Kukatpally Hyderabad Call +91-8250192130Suhani Kapoor
 
Revit Understanding Reference Planes and Reference lines in Revit for Family ...
Revit Understanding Reference Planes and Reference lines in Revit for Family ...Revit Understanding Reference Planes and Reference lines in Revit for Family ...
Revit Understanding Reference Planes and Reference lines in Revit for Family ...Narsimha murthy
 
办理学位证(TheAuckland证书)新西兰奥克兰大学毕业证成绩单原版一比一
办理学位证(TheAuckland证书)新西兰奥克兰大学毕业证成绩单原版一比一办理学位证(TheAuckland证书)新西兰奥克兰大学毕业证成绩单原版一比一
办理学位证(TheAuckland证书)新西兰奥克兰大学毕业证成绩单原版一比一Fi L
 

Recently uploaded (20)

3D Printing And Designing Final Report.pdf
3D Printing And Designing Final Report.pdf3D Printing And Designing Final Report.pdf
3D Printing And Designing Final Report.pdf
 
How to Be Famous in your Field just visit our Site
How to Be Famous in your Field just visit our SiteHow to Be Famous in your Field just visit our Site
How to Be Famous in your Field just visit our Site
 
PORTAFOLIO 2024_ ANASTASIYA KUDINOVA
PORTAFOLIO   2024_  ANASTASIYA  KUDINOVAPORTAFOLIO   2024_  ANASTASIYA  KUDINOVA
PORTAFOLIO 2024_ ANASTASIYA KUDINOVA
 
call girls in Harsh Vihar (DELHI) 🔝 >༒9953330565🔝 genuine Escort Service 🔝✔️✔️
call girls in Harsh Vihar (DELHI) 🔝 >༒9953330565🔝 genuine Escort Service 🔝✔️✔️call girls in Harsh Vihar (DELHI) 🔝 >༒9953330565🔝 genuine Escort Service 🔝✔️✔️
call girls in Harsh Vihar (DELHI) 🔝 >༒9953330565🔝 genuine Escort Service 🔝✔️✔️
 
Cheap Rate Call girls Kalkaji 9205541914 shot 1500 night
Cheap Rate Call girls Kalkaji 9205541914 shot 1500 nightCheap Rate Call girls Kalkaji 9205541914 shot 1500 night
Cheap Rate Call girls Kalkaji 9205541914 shot 1500 night
 
NATA 2024 SYLLABUS, full syllabus explained in detail
NATA 2024 SYLLABUS, full syllabus explained in detailNATA 2024 SYLLABUS, full syllabus explained in detail
NATA 2024 SYLLABUS, full syllabus explained in detail
 
306MTAMount UCLA University Bachelor's Diploma in Social Media
306MTAMount UCLA University Bachelor's Diploma in Social Media306MTAMount UCLA University Bachelor's Diploma in Social Media
306MTAMount UCLA University Bachelor's Diploma in Social Media
 
Call Girls Service Mukherjee Nagar @9999965857 Delhi 🫦 No Advance VVIP 🍎 SER...
Call Girls Service Mukherjee Nagar @9999965857 Delhi 🫦 No Advance  VVIP 🍎 SER...Call Girls Service Mukherjee Nagar @9999965857 Delhi 🫦 No Advance  VVIP 🍎 SER...
Call Girls Service Mukherjee Nagar @9999965857 Delhi 🫦 No Advance VVIP 🍎 SER...
 
VIP Call Girls Service Mehdipatnam Hyderabad Call +91-8250192130
VIP Call Girls Service Mehdipatnam Hyderabad Call +91-8250192130VIP Call Girls Service Mehdipatnam Hyderabad Call +91-8250192130
VIP Call Girls Service Mehdipatnam Hyderabad Call +91-8250192130
 
PORTFOLIO DE ARQUITECTURA CRISTOBAL HERAUD 2024
PORTFOLIO DE ARQUITECTURA CRISTOBAL HERAUD 2024PORTFOLIO DE ARQUITECTURA CRISTOBAL HERAUD 2024
PORTFOLIO DE ARQUITECTURA CRISTOBAL HERAUD 2024
 
Design Portfolio - 2024 - William Vickery
Design Portfolio - 2024 - William VickeryDesign Portfolio - 2024 - William Vickery
Design Portfolio - 2024 - William Vickery
 
VIP Kolkata Call Girl Gariahat 👉 8250192130 Available With Room
VIP Kolkata Call Girl Gariahat 👉 8250192130  Available With RoomVIP Kolkata Call Girl Gariahat 👉 8250192130  Available With Room
VIP Kolkata Call Girl Gariahat 👉 8250192130 Available With Room
 
Call Girls Aslali 7397865700 Ridhima Hire Me Full Night
Call Girls Aslali 7397865700 Ridhima Hire Me Full NightCall Girls Aslali 7397865700 Ridhima Hire Me Full Night
Call Girls Aslali 7397865700 Ridhima Hire Me Full Night
 
Abu Dhabi Call Girls O58993O4O2 Call Girls in Abu Dhabi`
Abu Dhabi Call Girls O58993O4O2 Call Girls in Abu Dhabi`Abu Dhabi Call Girls O58993O4O2 Call Girls in Abu Dhabi`
Abu Dhabi Call Girls O58993O4O2 Call Girls in Abu Dhabi`
 
Kala jadu for love marriage | Real amil baba | Famous amil baba | kala jadu n...
Kala jadu for love marriage | Real amil baba | Famous amil baba | kala jadu n...Kala jadu for love marriage | Real amil baba | Famous amil baba | kala jadu n...
Kala jadu for love marriage | Real amil baba | Famous amil baba | kala jadu n...
 
Call Girls Meghani Nagar 7397865700 Independent Call Girls
Call Girls Meghani Nagar 7397865700  Independent Call GirlsCall Girls Meghani Nagar 7397865700  Independent Call Girls
Call Girls Meghani Nagar 7397865700 Independent Call Girls
 
办理学位证(SFU证书)西蒙菲莎大学毕业证成绩单原版一比一
办理学位证(SFU证书)西蒙菲莎大学毕业证成绩单原版一比一办理学位证(SFU证书)西蒙菲莎大学毕业证成绩单原版一比一
办理学位证(SFU证书)西蒙菲莎大学毕业证成绩单原版一比一
 
VIP Call Girls Service Kukatpally Hyderabad Call +91-8250192130
VIP Call Girls Service Kukatpally Hyderabad Call +91-8250192130VIP Call Girls Service Kukatpally Hyderabad Call +91-8250192130
VIP Call Girls Service Kukatpally Hyderabad Call +91-8250192130
 
Revit Understanding Reference Planes and Reference lines in Revit for Family ...
Revit Understanding Reference Planes and Reference lines in Revit for Family ...Revit Understanding Reference Planes and Reference lines in Revit for Family ...
Revit Understanding Reference Planes and Reference lines in Revit for Family ...
 
办理学位证(TheAuckland证书)新西兰奥克兰大学毕业证成绩单原版一比一
办理学位证(TheAuckland证书)新西兰奥克兰大学毕业证成绩单原版一比一办理学位证(TheAuckland证书)新西兰奥克兰大学毕业证成绩单原版一比一
办理学位证(TheAuckland证书)新西兰奥克兰大学毕业证成绩单原版一比一
 

Catia File

  • 1. SUBMITTED TO AJAY LAMBA SIR SUBMITTED BY VISHAL SINGH 00320903613 MAE 7TH SEMESTER COMPUTER AIDED DESIGN LABORATORY ETAT-451
  • 2. INDEX S . N o . E x p e r i m e n t P a g e N o . R e m a r k s 1 . To study the basic features of CATIA. 1 2 . To prepare the given sketch 1 using CATIA v5. 5 3 . To prepare the given sketch 2 using CATIA v5. 7 4 . To prepare the given part 1 using CATIA v5. 9 5 . To prepare the given part 2 using CATIA v5. 1 1 6 . To prepare the given part 3 using CATIA v5 1 3 7 . To prepare the given part 4 using CATIA v5. 1 5 8 . To prepare a knuckle joint assembly using CATIA v5. 1 7
  • 3. V i s h a l S i n g h ( 0 0 3 2 0 9 0 3 6 1 3 ) | 1 1 . I N T R O D U C T I O N AIM To study the basic features of CATIA. THEORY CATIA (Computer Aided Three-dimensional Interactive Application) is a multi-platform CAD/CAM/CAE. It is written in the C++ programming language. CATIA supports multiple stages of product development (CAx), from conceptualization, design (CAD), manufacturing (CAM), and engineering (CAE). CATIA can be customized via application programming interfaces (API). CATIA V5 can be adapted via the Visual Basic and C++ programming languages, an API called CAA2 or CAA V5 (Component Application Architecture) that is a component object model (COM)-like interface. Features of CATIA Design Software  Optimal Sharing Catia users will get access to a unique, collaborative 3 dimensional environments that can be access by an unlimited number of people online. This allows people from across the globe to collaborate in a virtual environment. It has been designed to not only allow for online cooperation, but also makes offline sharing and designing easy to integrate as well.  Simplified Product Development Creating a new product can be a long and complex process. It encompasses multiple design phases including the initial design, overall development, and manufacturing. Catia decreases the complexity and length of the entire project because it integrates various stages of the development process so that they can be controlled and modified on a single platform.  Seamless Transitioning Every version of the Catia design software is designed to allow for seamless integration with previous versions. This makes upgrading a simple process and can be completed without losing any of the information that has already been stored. CATIA Modules CATIA consists of several modules and each module is specialized in specific design field
  • 4. V i s h a l S i n g h ( 0 0 3 2 0 9 0 3 6 1 3 ) | 2  Sketcher This module is responsible for the implementation of two-dimensional shapes, in preparation for a three-dimensional command on it.  Part Design This module is responsible for converting two-dimensional graphics to three- dimensional objects which is most famous in Catia and is closely linked with sketcher module.  Assembly This module is responsible for assembling the parts previously produced in Part Design  Stress Analysis This module is responsible for testing parts designed to withstand the loads expected occurrence on it, and shows how the mechanical parts are affected by the colours.  Drafting This module is responsible, for converting what is seen on the screen to standard engineering drawings can be traded in the workshop for manufacturing or save them for documentation.  Surface and Wireframe With this module surfaces can be drawing with zero size and weight and has its uses in the aerospace, automotive, ships and mold Design.  Simulation This module is responsible for obtaining a similar movement of the natural movement, which is expected to occur during the actual operation of the machine or mechanical establishment whatever. Modules of CATIA v5
  • 5. V i s h a l S i n g h ( 0 0 3 2 0 9 0 3 6 1 3 ) | 3 Other modules include Sheet Metals, Mold Design, Welding etc. in mechanical design field. Similar modules are available for different operations in infrastructure, machining, ergonomics etc. Toolbars A set of tools that helps you create and constrain 2D geometries. Features (pads, pockets, shafts, etc...) may then be created solids or modifications to solids using these 2D profiles. The Sketcher workbench contains the following standard workbench specific toolbars.  Profile toolbar The commands located in this toolbar allows to create simple geometries (rectangle, circle, line, etc...) and more complex geometries (profile, spline, etc...).  Operation toolbar Once a profile has been created, it can be modified using commands such as trim, mirror, chamfer, and other commands located in the Operation toolbar.  Constraint toolbar Profiles may be constrained with dimensional (distances, angles, etc...) or geometrical (tangent, parallel, etc...) constraints using the commands located in the Constraint toolbar.  Sketch tools toolbar The commands in this toolbar allows to work in different modes which make sketching easier.  User Selection Filter toolbar Allows to activate different selection filters.  Visualization toolbar
  • 6. V i s h a l S i n g h ( 0 0 3 2 0 9 0 3 6 1 3 ) | 4 Allows to, among other things to cut the part by the sketch plane and choose lighting effects and other factors that influence how the part is visualized.  Tools toolbar Allows to, among others other things, to analyse a sketch for problems, and create a datum. RESULT The basic features of CATIA V5 had been studied successfully.
  • 7. V i s h a l S i n g h ( 0 0 3 2 0 9 0 3 6 1 3 ) | 5 2 . S K E T C H I N G AIM To prepare the given sketch using CATIA v5. PROCEDURE  Select the XY plane (the plane the profile will be sketched on).  Enter the Sketcher Work Bench.  Sketch the profile of the part without considering the dimensions.  Constrain the profile to match the dimensions as given.  Exit the Sketcher Work Bench, return to the Part Design Work Bench  Capture the image of the sketch so obtained. RESULT Thus the given sketch has been successfully modelled using CATIA v5.
  • 8. V i s h a l S i n g h ( 0 0 3 2 0 9 0 3 6 1 3 ) | 6 Figure of the sketch obtained in CATIA v5
  • 9. V i s h a l S i n g h ( 0 0 3 2 0 9 0 3 6 1 3 ) | 7 3 . S K E T C H I N G AIM To prepare the given sketch using CATIA v5. PROCEDURE  Select the XY plane (the plane the profile will be sketched on).  Enter the Sketcher Work Bench.  Sketch the profile of the part without considering the dimensions.  Constrain the profile to match the dimensions as given.  Exit the Sketcher Work Bench, return to the Part Design Work Bench  Capture the image of the sketch so obtained. RESULT Thus the given sketch has been successfully modelled using CATIA v5.
  • 10. V i s h a l S i n g h ( 0 0 3 2 0 9 0 3 6 1 3 ) | 8 Figure of the sketch obtained in CATIA v5
  • 11. V i s h a l S i n g h ( 0 0 3 2 0 9 0 3 6 1 3 ) | 9 4 . P A R T D E S I G N AIM To prepare the given part using CATIA v5. PROCEDURE  Select the XY plane (the plane the profile will be sketched on).  Enter the Sketcher Work Bench.  Sketch the profile of the part without considering the dimensions.  Constrain the profile to match the dimensions as given.  Exit the Sketcher Work Bench, return to the Part Design Work Bench.  Click Pad and give the thickness for the part.  Similarly select another plane or define a new plane using plane tool that is offset with XY, YZ, ZX plane.  Enter Sketcher to define the sketch and give the required padding.  Make similar sketches followed by pocket command to cut the slots.  Capture the image of the part so obtained. RESULT Thus the given part has been successfully modelled using CATIA v5.
  • 12. V i s h a l S i n g h ( 0 0 3 2 0 9 0 3 6 1 3 ) | 10 Renderingofthepartobtained
  • 13. AH BG D E C F B G A H 3 3 2 2 4 4 1 1 This drawing is our property; it can't be reproduced or communicated without our written agreement. SCALE 1:1 WEIGHT (kg) DRAWING NUMBER SHEET SIZE CHECKED BY: XXX DATE: XXX DESIGNED BY: Vishal DATE: A _ B _ C _ D _ E _ F _ G _ H _ I _ Part10.11 A3 1/1 GB Pant Engineering College 07-11-2016 Exercise - 1 Front view Scale: 1:1 12 12 24 44 16 12 Top view Scale: 1:1 1010 62 Left view Scale: 1:1 88 25 R 25 10 32 88 Isometric view Scale: 1:1
  • 14. V i s h a l S i n g h ( 0 0 3 2 0 9 0 3 6 1 3 ) | 11 5 . P A R T D E S I G N AIM To prepare the given part using CATIA v5. PROCEDURE  Select the XY plane (or the plane on which the profile will be sketched on).  Enter the Sketcher Work Bench.  Sketch the profile of the part without considering the dimensions.  Constrain the profile to match the dimensions as given.  Exit the Sketcher Work Bench, return to the Part Design Work Bench.  Click Pad and give the thickness for the part.  Similarly select another plane or define a new plane using plane tool that is offset with XY, YZ, ZX plane.  Enter Sketcher to define the sketch and give the required padding.  Make similar sketches followed by pocket command to cut the slots.  Finally use stiffener command to attach the bodies.  Capture the image of the part so obtained. RESULT Thus the given part has been successfully modelled using CATIA v5.
  • 15. V i s h a l S i n g h ( 0 0 3 2 0 9 0 3 6 1 3 ) | 12 Renderingofthepartobtained
  • 16. AH BG D E C F B G A H 3 3 2 2 4 4 1 1 This drawing is our property; it can't be reproduced or communicated without our written agreement. SCALE 1:1 WEIGHT (kg) 0.13 DRAWING NUMBER Part 1 SHEET 1/1 SIZE A3 GB Pant Engineering College CHECKED BY: DATE: DESIGNED BY: Vishal DATE: A _ B _ C _ D _ E _ F _ G _ H _ I _ EXERCISE - 2 07-11-2016 Front view Scale: 1:1 10 14 30 Top View Scale: 1:1 30R 24 36 5 Right View Scale: 1:1 Isometric view Scale: 1:1
  • 17. V i s h a l S i n g h ( 0 0 3 2 0 9 0 3 6 1 3 ) | 13 6 . P A R T D E S I G N AIM To prepare the given part using CATIA v5. PROCEDURE  Select the XY plane (the plane the profile will be sketched on).  Enter the Sketcher Work Bench.  Sketch the profile of the part without considering the dimensions.  Constrain the profile to match the dimensions as given.  Exit the Sketcher Work Bench, return to the Part Design Work Bench.  Click Pad and give the thickness for the part.  Similarly select another plane or define a new plane using plane tool that is offset with XY, YZ, ZX plane.  Enter Sketcher to define the sketch and give the required padding.  Make similar sketches followed by pocket command to cut the slots.  Use stiffener tool for the bigger cylindrical part.  Add the base pad and the edge pad followed by slot at the edge.  Capture the image of the part so obtained. RESULT Thus the given part has been successfully modelled using CATIA v5.
  • 18. V i s h a l S i n g h ( 0 0 3 2 0 9 0 3 6 1 3 ) | 14 Renderingofthepartobtained
  • 19. AH BG D E C F B G A H 3 3 2 2 4 4 1 1 This drawing is our property; it can't be reproduced or communicated without our written agreement. SCALE 1:1 WEIGHT (kg) DRAWING NUMBER SHEET SIZE CHECKED BY: DATE: DESIGNED BY: Vishal DATE: A _ B _ C _ D _ E _ F _ G _ H _ I _ Part10.20 A3 1/1 GB Pant Engineering College 07-11-2016 Exercise - 3 15R 30 16 4 4 2 1212 42 Top view Scale: 1:1 15 65 15 Left viewFront view Scale: 1:1 45 15 R 12 Isometric view Scale: 1:1
  • 20. V i s h a l S i n g h ( 0 0 3 2 0 9 0 3 6 1 3 ) | 15 7 . P A R T D E S I G N AIM To prepare the given part using CATIA v5. PROCEDURE  Select the XY plane (the plane the profile will be sketched on).  Enter the Sketcher Work Bench.  Sketch the profile of the part without considering the dimensions.  Constrain the profile to match the dimensions as given.  Exit the Sketcher Work Bench, return to the Part Design Work Bench.  Click Pad and give the thickness for the part.  Similarly select another plane or define a new plane using plane tool that is offset with XY, YZ, ZX plane.  Enter Sketcher to define the sketch and give the required padding.  Make similar sketches followed by pocket command to cut the slots and add pads.  Use stiffener tool for the to connect the pads part.  Capture the image of the part so obtained. RESULT Thus the given part has been successfully modelled using CATIA v5.
  • 21. V i s h a l S i n g h ( 0 0 3 2 0 9 0 3 6 1 3 ) | 16 Renderingofthepartobtained
  • 22. AH BG D E C F B G A H 3 3 2 2 4 4 1 1 This drawing is our property; it can't be reproduced or communicated without our written agreement. SCALE 1:1 WEIGHT (kg) DRAWING NUMBER SHEET SIZE CHECKED BY: DATE: DESIGNED BY: Vishal DATE: A _ B _ C _ D _ E _ F _ G _ H _ I _ Part10.26 A3 1/1 GB Pant Engineering College 07-11-2016 Exercise - 4 Top View Scale: 1:1 25 R 40 R 60140 140 1010 10 2.5 Side view Scale: 1:1 60 10 1010 Front view Scale: 1:1 Isometric view Scale: 1:2
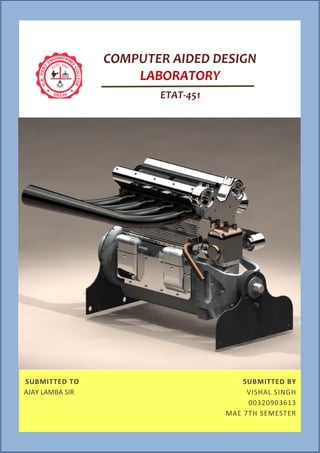
  • 23. V i s h a l S i n g h ( 0 0 3 2 0 9 0 3 6 1 3 ) | 17 8 . P A R T A S S E M B L Y AIM To prepare a knuckle joint assembly using CATIA v5. PROCEDURE  Draw the sketches and add required sketch based feature to obtain the part.  Similarly draw other parts as different part design files.  Open the CATIA assembly design and add the part design files to it.  Add suitable constraints between the parts to have the assembly.  Capture the rendering of the assembly so obtained. RESULT Thus the given assembly has been successfully modelled using CATIA v5.
  • 24. V i s h a l S i n g h ( 0 0 3 2 0 9 0 3 6 1 3 ) | 18 RenderingoftheKnuckleJointassemblyobtained