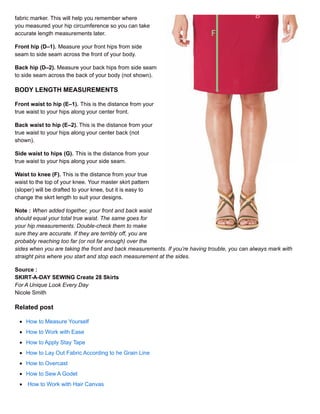
One of the greatest things about creating your own clothes is getting a personalized fit, and that starts with accurate
measurements. Make sure you have a good tape measure, straight pins, and a body-hugging outfit. It’s difficult to
take good measurements if you are wearing bulky clothing because the tape measure needs to wrap rather
snugly against your body (but not so tight that it’s uncomfortable or alters your size).
Having a friend help you is easier than taking your own measurements, but as long as you have a mirror you can
take them yourself. Make sure you stand naturally with your weight evenly distributed on both feet. And, when you
are taking width-wise measurements, make sure the measuring tape is parallel to the floor. A slight slant of the tape
can throw off the measurement and cause fitting problems later.
Prepare to take and record all the measurements described. Keep them in a safe place so you can refer to them
while drafting your designs. I have a notebook in my work area where my measurements live, so I can refer to them
for each new project.
Call Girls in Ashok Nagar Delhi ✡️9711147426✡️ Escorts Service
Body measurements
1. whafi.com http://whafi.com/sewing-techniques/body-measurements
Body Measurements
Great patterns start with accurate measurements
One of the greatest things about creating your own clothes is getting a personalized fit, and that starts with accurate
measurements. Make sure you have a good tape measure, straight pins, and a body-hugging outfit. It’s difficult to
take good measurements if you are wearing bulky clothing because the tape measure needs to wrap rather
snugly against your body (but not so tight that it’s uncomfortable or alters your size).
Having a friend help you is easier than taking your own measurements, but as long as you have a mirror you can
take them yourself. Make sure you stand naturally with your weight evenly distributed on both feet. And, when you
are taking width-wise measurements, make sure the measuring tape is parallel to the floor. A slight slant of the tape
can throw off the measurement and cause fitting problems later.
Prepare to take and record all the measurements described. Keep them in a safe place so you can refer to them
while drafting your designs. I have a notebook in my work area where my measurements live, so I can refer to them
for each new project.
Tip : You can tie ribbons around your true waist and hips to mark them for future measurements.
BODY WIDTH MEASUREMENTS
Total true-waist circumference (A). Your true waist is
probably higher than you think. It is usually the
narrowest part of your body, slightly above your belly
button. Your master pattern (or sloper) will be drafted up
to this point. Don’t worry; you’ll learn how to lower (and
raise) the waistline if you want to. While you have the
measuring tape around your body, use straight pins or
a temporary fabric marker to mark your true waistline at
the centerfront, center-back, and side seams of your
body-hugging garment. This will help you
remember where you measured your true waist when it’s
time to take length measurements.
Front waist (C–1). Measure your front waist from side
seam to side seam across the front of your body.
Back waist (C–2). Measure your back waist from side
seam to side seam across the back of your body (not
shown).
Total hip circumference (B). Your hip circumference
measurement is taken around the fullest part of your
hips, between 7″ and 9″ below your true waist. Make
sure the tape is parallel to the floor all the way around
your body and mark your hipline at the center-front,
center-back, and side seams with a pin or a temporary
2. fabric marker. This will help you remember where
you measured your hip circumference so you can take
accurate length measurements later.
Front hip (D–1). Measure your front hips from side
seam to side seam across the front of your body.
Back hip (D–2). Measure your back hips from side seam
to side seam across the back of your body (not shown).
BODY LENGTH MEASUREMENTS
Front waist to hip (E–1). This is the distance from your
true waist to your hips along your center front.
Back waist to hip (E–2). This is the distance from your
true waist to your hips along your center back (not
shown).
Side waist to hips (G). This is the distance from your
true waist to your hips along your side seam.
Waist to knee (F). This is the distance from your true
waist to the top of your knee. Your master skirt pattern
(sloper) will be drafted to your knee, but it is easy to
change the skirt length to suit your designs.
Note : When added together, your front and back waist
should equal your total true waist. The same goes for
your hip measurements. Double-check them to make
sure they are accurate. If they are terribly off, you are
probably reaching too far (or not far enough) over the
sides when you are taking the front and back measurements. If you’re having trouble, you can always mark with
straight pins where you start and stop each measurement at the sides.
Source :
SKIRT-A-DAY SEWING Create 28 Skirts
For A Unique Look Every Day
Nicole Smith
Related post
How to Measure Yourself
How to Work with Ease
How to Apply Stay Tape
How to Lay Out Fabric According to he Grain Line
How to Overcast
How to Sew A Godet
How to Work with Hair Canvas
3. Tags: body measurements, body measurements sewing, sewing measurements chart, simplicity fit guide, simplicity
measurements
"