
Recommended
More Related Content
Similar to BI-Publisher-Tutorial-Lesson-1.pdf
Similar to BI-Publisher-Tutorial-Lesson-1.pdf (20)
Recently uploaded
Recently uploaded (20)
BI-Publisher-Tutorial-Lesson-1.pdf
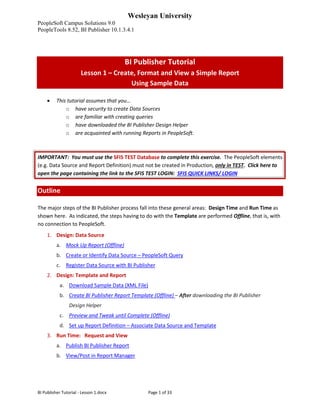
- 1. Wesleyan University PeopleSoft Campus Solutions 9.0 PeopleTools 8.52, BI Publisher 10.1.3.4.1 BI Publisher Tutorial - Lesson 1.docx Page 1 of 33 BI Publisher Tutorial Lesson 1 – Create, Format and View a Simple Report Using Sample Data • This tutorial assumes that you… o have security to create Data Sources o are familiar with creating queries o have downloaded the BI Publisher Design Helper o are acquainted with running Reports in PeopleSoft. IMPORTANT: You must use the SFIS TEST Database to complete this exercise. The PeopleSoft elements (e.g. Data Source and Report Definition) must not be created in Production, only in TEST. Click here to open the page containing the link to the SFIS TEST LOGIN: SFIS QUICK LINKS/ LOGIN Outline The major steps of the BI Publisher process fall into these general areas: Design Time and Run Time as shown here. As indicated, the steps having to do with the Template are performed Offline, that is, with no connection to PeopleSoft. 1. Design: Data Source a. Mock Up Report (Offline) b. Create or Identify Data Source – PeopleSoft Query c. Register Data Source with BI Publisher 2. Design: Template and Report a. Download Sample Data (XML File) b. Create BI Publisher Report Template (Offline) – After downloading the BI Publisher Design Helper c. Preview and Tweak until Complete (Offline) d. Set up Report Definition – Associate Data Source and Template 3. Run Time: Request and View a. Publish BI Publisher Report b. View/Post in Report Manager
- 2. Wesleyan University PeopleSoft Campus Solutions 9.0 PeopleTools 8.52, BI Publisher 10.1.3.4.1 BI Publisher Tutorial - Lesson 1.docx Page 2 of 33 1a Design: Data Source – Mock Up Report (Offline) • This step in the process can occur before the bulk of the work is done, or it can follow the creation of the query, or it can even be done as the template is being formulated. • The mockup can be derived from an existing document such as a report or piece of correspondence. • Once a template has been finalized it can be copied, altered and adapted for use with the same query or a similar query. • The report being created through this tutorial is a document listing Countries using the data you will see on the SFIS Blog Page BI Publisher/ XMLP named BI Publisher Template Example 1b Design: Data Source – Create or Identify Data Source – PeopleSoft Query • PEOPLESOFT TEST: Create a new query in the SFIS PeopleSoft TEST Database • The Record Name is COUNTRY_TBL • Select these fields: COUNTRY, DESCR, COUNTRY_2CHAR, and EU_MEMBER_STATE • Add Criteria: COUNTRY_2CHAR greater than 0 • Add this expression. (This SUBSTR (substring) expression extracts a portion of a string or field. In this case, it is the first letter of the name of each country in the DESCR field.) • Click OK and click to utilize the expression as a field (Use as Field). • Change the Heading Text to Letter • Order by the DESCR field
- 3. Wesleyan University PeopleSoft Campus Solutions 9.0 PeopleTools 8.52, BI Publisher 10.1.3.4.1 BI Publisher Tutorial - Lesson 1.docx Page 3 of 33 • Change the column sequence as shown in the final report • The Fields page should look like this: • The first few rows should look like this: • Save the query as a private query. Next you will define the query as your Data Source, i.e., the means by which the data is extracted from PeopleSoft. 1c Register Data Source with BI Publisher • Navigate to the Data Source page: Reporting Tools > BI Publisher > Data Source • Since there is no existing Data Source, click on Add a New Value • It should default to a Data Source Type of PS Query. If so, you do not have to make a change. Otherwise, select PS Query from the dropdown. • Next to Data Source ID you can type the name of the query, or the first few letters to narrow the selection. Once you’ve done so, the page will resemble the following. In this exercise, the query is: WES_SFIS_TRAIN_COUNTRY_FORMAT1
- 4. Wesleyan University PeopleSoft Campus Solutions 9.0 PeopleTools 8.52, BI Publisher 10.1.3.4.1 BI Publisher Tutorial - Lesson 1.docx Page 4 of 33 • To the right is a checkbox labeled Private Data Source. This will be checked if you saved the Data Source as a Private Query. • Once you have typed the query name, click the Add button. The Data Source page will appear as follows: • Description: (Optional) Enter descriptive text that provides more detail about the data source. Otherwise, the description automatically defaults to the Data Source ID when you click Save. • Owner ID: (Optional) Indicate which product, feature, or application owns this data source. • Registered Date/Time: This is a read-only field maintained by the system that indicates the date that the initial data source registration was made.
- 5. Wesleyan University PeopleSoft Campus Solutions 9.0 PeopleTools 8.52, BI Publisher 10.1.3.4.1 BI Publisher Tutorial - Lesson 1.docx Page 5 of 33 • Last Update Date/Time: This is a read-only field that indicates the date that the last update to the data source was made. • Active: If not already checked, select to indicate that this is an active data source. o Only active data sources can be chosen when creating a new Report Definition. o Only reports with active data sources can be processed. • Registered By: This is a read-only field that indicates the user ID of the operator who initially registered the data source. • Updated By: This is a read-only field that indicates the user ID of the operator who last updated the data source. • Generate the Sample Data File and Schema File: o Click Generate under the Generate File column for Sample Data File (XML file). o Click Generate under the Generate File column for Schema File. • After the Data Source is generated, an XML file is created. • Click the Save button. • The Data Source page now appears as follows: • Note: You will see that in the Generate File column the link names have changed from Generate to Regenerate. If you make changes to the underlying query at a later point, you will need to return here to regenerate the Data Source (and save the XML file again as shown in the next section).
- 6. Wesleyan University PeopleSoft Campus Solutions 9.0 PeopleTools 8.52, BI Publisher 10.1.3.4.1 BI Publisher Tutorial - Lesson 1.docx Page 6 of 33 2a Download Sample Data (XML File) • Once you have registered the query as your Data Source, you need to save the Sample Data File so you can utilize it to create the BI Publisher Template. The Sample Data File, as you can see, has an extension of XML. This XML file will provide you with placeholders to work out the formatting and other details of the template. Oracle Definition of Sample Data File: The sample data file is an XML file with sample data that is used for data mapping, template preview, and determining burst fields. Preview action is available within a desktop template designer or from within the report definition page. For PS Query and Connected Query data source types the sample data file can be system-generated or uploaded. For XML file data source type, the sample data file must be uploaded. • To view the XML File, click on the link containing the name of the file. o The browser appears and displays the XML file data. You do not need to do anything with this file except to save it. o Save the XML file in an appropriate directory. You will be accessing the XML file when you create the Word template. o Below is the appearance of the beginning of the XML file. Once you have saved the file, you can close it.
- 7. Wesleyan University PeopleSoft Campus Solutions 9.0 PeopleTools 8.52, BI Publisher 10.1.3.4.1 BI Publisher Tutorial - Lesson 1.docx Page 7 of 33 2b Create BI Publisher Report Template (Offline) • Once the Sample Data (XML file) has been saved, open MS Word. o If you wish, you can save the document at this point as an RTF file, or you can wait until later. Note that you must save the file before you can run Preview. • Select Add-Ins from the menu. • To gain access to the data in the XML File, click on the Data menu and select Load XML Data • Windows Explorer opens. • Navigate to the directory where you saved the XML file • Click to open the file. In this example, it is WES_SFIS_TRAIN_COUNTRY_tutorial 1.xml. • When this message appears, click OK • Tip: Before you insert the fields, you can start to format the overall dimensions of the page. For example, set your margins and line spacing and put in a few blank lines at the top of the page. In this example, the margins are 0.5” on either side and the document is single spaced. • To begin inserting the fields and formatting the template, click on Insert.
- 8. Wesleyan University PeopleSoft Campus Solutions 9.0 PeopleTools 8.52, BI Publisher 10.1.3.4.1 BI Publisher Tutorial - Lesson 1.docx Page 8 of 33 • The Insert menu appears as follows: • There are a number of methods for inserting the fields into the Word template. The easiest way to initially display all rows of data is to use the Table Wizard, which is the method that will be demonstrated here. • Place your cursor on the page where you would like to locate the beginning of the table. Click on Table Wizard… The following page opens – “Please select your report format.” • You will be creating a Table, so accept that default by clicking Next.
- 9. Wesleyan University PeopleSoft Campus Solutions 9.0 PeopleTools 8.52, BI Publisher 10.1.3.4.1 BI Publisher Tutorial - Lesson 1.docx Page 9 of 33 • “Which grouping field do you want to report on?” This page opens with a dropdown box for the Data Set. An XML document can contain many data sets. This file only contains one, so you can click Next again. (You can read more about Data Sets by clicking on the Help button.) • Drag over the five query fields so the page look like this: • Note that the Expression field has a name of Expr5 5. If there were a number of expression fields in your query, it would be a good idea to give them more easily identifiable names while still in Query. This would make them simpler to work with in the template. However, since there is just one expression field here, that is not necessary.
- 10. Wesleyan University PeopleSoft Campus Solutions 9.0 PeopleTools 8.52, BI Publisher 10.1.3.4.1 BI Publisher Tutorial - Lesson 1.docx Page 10 of 33 • Click Next. • The following page opens –“How would you like to group your report?” o First, since you want to have the letter of the alphabet placed above each corresponding group of names, select the field name Expr5 5 from the dropdown box and leave the default, Group above. o Second, you can indicate that the data is already sorted. o The Break field allows you three options: No Break, Page, or Section. For this example, the default of No Break is left as is. • After you make the entries , the page appears as shown here:
- 11. Wesleyan University PeopleSoft Campus Solutions 9.0 PeopleTools 8.52, BI Publisher 10.1.3.4.1 BI Publisher Tutorial - Lesson 1.docx Page 11 of 33 • Click Next. On the following page – “Which fields would you like to use to sort the data?” - you can further define the sorting of the other fields in the table. Select Descr – Ascending. • Click Next. • You have the opportunity to change the field labels on the last page, “How do you want to label the fields?” Note that if you do not do it now you can make those changes at any time. Make the changes as follows:
- 12. Wesleyan University PeopleSoft Campus Solutions 9.0 PeopleTools 8.52, BI Publisher 10.1.3.4.1 BI Publisher Tutorial - Lesson 1.docx Page 12 of 33 • You’ll see there’s no change for the Descr field label. This is because that label is going to be removed from the template. Click Finish. • The table template opens: • This is a brief explanation of the codes you see that have been added through the Table Wizard: o group row by EXPR5_5 – indicates the beginning of the grouping as well as the order o F - “for-each” code to designate the start of each row (before the first field in the row, DESCR) as well as the order o E – (after the last field in the row, EU_MEMBER_STATE) at the end of each row, to indicate the row is closed o end row by EXPR5_5 – designates the end of each grouping o The technical information that underlies the code can be seen by double-clicking on the phrase or letter. 2c Preview and Tweak Until Complete (Offline) • At this point, it’s a good idea to run a preview to get an idea of how this report will look. (This is something you should do on a regular basis as you refine your template.) • Click on Add-Ins and then the Preview menu. You will be viewing the preview as a PDF file, so select PDF.
- 13. Wesleyan University PeopleSoft Campus Solutions 9.0 PeopleTools 8.52, BI Publisher 10.1.3.4.1 BI Publisher Tutorial - Lesson 1.docx Page 13 of 33 • If you have not already saved the file as an RTF, the first time you choose to run a Preview, you will receive this message: • Click OK. And you will be taken to Windows Explorer where you can save the document as an RTF file. In this example the file is named BI Tutorial Country 1.rtf. This is the file that will ultimately be your final report. • You can now run the PDF Preview which will appear similar to the following: • Since the XML file is sample data, until you associate the Template with the Report Definition, it will appear as shown here. In Lesson 2, when you have a clearer understanding of how the BI Publisher process works from beginning to end, you will be introduced to an advanced method that places real data on the template you are editing. • You can begin formatting the table by changing the width of each column. Starting with the last column, make all except the first column narrower. • Delete the “DESCR” label (not the DESCR field) from the blue label box. • Move the EXPR5_5 field into the blue label cell. o Note: Since the cell you are placing the EXPR5_5 field into is a label cell, the EXPR5_5 field is still above and outside of the row. • Using MS Word tools, change the font type and size of the EXPR5_5 field and make it bold. In this example, it is set at Times New Roman, Bold, 14. The template should look like this:
- 14. Wesleyan University PeopleSoft Campus Solutions 9.0 PeopleTools 8.52, BI Publisher 10.1.3.4.1 BI Publisher Tutorial - Lesson 1.docx Page 14 of 33 • Run Preview, and the preview should look like this: • If you’re satisfied with its appearance so far, you can save the RTF file at this point. • Change the background color of the labels to light gray by using MS Word processes. • Using MS Word processes: o Change the text color of the EXPR5_5 field to White. o Highlight the EXPR5_5 field with Teal. o Change the font of the three labels to Times New Roman and center the labels over each column. o Add in a footer with the file name on the left and Page x of x on the right. o Center a heading above the table, formatting in Times New Roman, Bold, 14, Teal: BI Publisher Template Example List of Countries with Codes EU Members Highlighted • The upper part of the page should appear as follows:
- 15. Wesleyan University PeopleSoft Campus Solutions 9.0 PeopleTools 8.52, BI Publisher 10.1.3.4.1 BI Publisher Tutorial - Lesson 1.docx Page 15 of 33 • The footer should be similar to this: • Run Preview. The Preview should look similar to the following:
- 16. Wesleyan University PeopleSoft Campus Solutions 9.0 PeopleTools 8.52, BI Publisher 10.1.3.4.1 BI Publisher Tutorial - Lesson 1.docx Page 16 of 33 • The next formatting task is Conditional Formatting, which is a BI Publisher process. o Since the data shown is sample data, you will not see the effects of the Conditional Formatting until you associate the Template with the Report Definition and run it in the Query Report Viewer. o The formatting will affect the rows that begin with DESCR and end with EU_MEMBER_STATE. • Highlight the row of data starting with F DESCR and ending with EU_MEMBER_STATE E. Be sure you include everything shown here: • Right click so that the following menus open. Click on BI Publisher at the top of the menu, and then click on Create Conditional Format… • The following menu opens:
- 17. Wesleyan University PeopleSoft Campus Solutions 9.0 PeopleTools 8.52, BI Publisher 10.1.3.4.1 BI Publisher Tutorial - Lesson 1.docx Page 17 of 33 • Under the General Section, In the Data field dropdown, select the field EU_MEMBER_STATE. You will recall that this is a Yes/No field and that the information contained is either a “Y” or an “N.” We will first format the rows for countries that have a “Y” in that field. This portion of the menu should appear as follows: • For the right-hand field, change Number to Date/Text. • Check the box to indicate you wish the format to Apply to Entire Table Row. • In the next section, Condition 1, select from the Data field dropdown Equal to. The field to the right is also a dropdown box with a list of fields. You can also make an entry that is not in the list. In this case, type in “Y” (no quotes). You’ll note that when you do, the Preview box opens with Text in red on a white background, and the Format button is no longer grayed out. • Click on the Format button to open the next menu:
- 18. Wesleyan University PeopleSoft Campus Solutions 9.0 PeopleTools 8.52, BI Publisher 10.1.3.4.1 BI Publisher Tutorial - Lesson 1.docx Page 18 of 33 o Check the Background Color box and Select Teal. o The Font Color box is already checked. Select Yellow. o Note that you can change the Font Style if you wish as well. The Format section for Condition 1 should now appear as follows: • Click OK. • Under Condition 2, set the Data field equal to “N” (no quotes). And select the opposite colors: o For the Format menu, check the Background Color and select Yellow o For the Font Color select Teal o Click OK. o Condition 2 should look like this: • Click OK.
- 19. Wesleyan University PeopleSoft Campus Solutions 9.0 PeopleTools 8.52, BI Publisher 10.1.3.4.1 BI Publisher Tutorial - Lesson 1.docx Page 19 of 33 • The entire menu should appear as follows: • Click OK to save these changes. • The Template now has an addition at the front of the row, the letter C before the F DESCR indicating there is Conditional Formatting starting at that point for the row: • If need to edit the conditional format, you can double-click the “C” and the menu will open. • You can run a Preview, but you will not see these changes. o Since this is sample data, and since this formatting is conditional, you won’t see it in effect until the Template is associated with the Report Definition, i.e., the actual live data. • You should Save the Template at this time . 2d Set up Report Definition – Associate Data Source and Template • In this step we relate the recently saved Template with the Data Source in PeopleSoft. Until this point, there is no direct connection between them. • Begin by navigating to Report Definition: (Reporting Tools > BI Publisher > Report Definition)
- 20. Wesleyan University PeopleSoft Campus Solutions 9.0 PeopleTools 8.52, BI Publisher 10.1.3.4.1 BI Publisher Tutorial - Lesson 1.docx Page 20 of 33 • Click on Add a New Value. When the next page opens, enter a Report Name. There is a 12- character limit. • Data Source Type: The default should be set to PS Query. If it is not, select PS Query. • Data Source ID: In this dropdown box you can search for the query by typing in all or the first few letters of the query name. If you do not type in the entire name, a list of queries will be displayed that you can choose from. • Click the Add button. The following group of pages will appear:
- 21. Wesleyan University PeopleSoft Campus Solutions 9.0 PeopleTools 8.52, BI Publisher 10.1.3.4.1 BI Publisher Tutorial - Lesson 1.docx Page 21 of 33 • Start with the Definition page which displays the Report Name. • Enter a descriptive name for the report in Report Description. There is a 30-character limit. • Under Report Status, change In Progress to Active. Required in order to proceed. • Under Report Category ID, select an appropriate Report Category (i.e. a Report Category security group to which you belong). • Owner ID: Select PeopleTools • Set the Template Type as RTF if it is not already • Retention Days: Leave blank • The Definition page should now appear as follows:
- 22. Wesleyan University PeopleSoft Campus Solutions 9.0 PeopleTools 8.52, BI Publisher 10.1.3.4.1 BI Publisher Tutorial - Lesson 1.docx Page 22 of 33 • In order to save the Report Definition, you must first associate a Template with it. • Click on the Template tab. Notice that the Report Name is displayed at the top. There is now a Template ID that consists of the Report Name plus “_1.” There can be multiple Templates associated with each Report Definition, and each one will end with a succeeding number.
- 23. Wesleyan University PeopleSoft Campus Solutions 9.0 PeopleTools 8.52, BI Publisher 10.1.3.4.1 BI Publisher Tutorial - Lesson 1.docx Page 23 of 33 • Default Template: Should be checked. • Description: Enter a description for the Template (there is a 30-character limit). • Language Code: Leave as English. • Channel: Leave blank. • Effective Date: Defaults to today’s date. This can be changed. Leave as is. • Status: Change In Progress to Active. Required in order to proceed. • Leave the Use Data Transform box unchecked. • Leave the Use Alt. XML box unchecked. • Upload the RTF Template by clicking on the yellow Upload button (Note: In Internet Explorer, you may need to hold down the CTRL key at the same time). o A popup menu will appear prompting you to browse for the RTF Template file you recently created. Click on the Browse button and navigate to the location of the file. o After you browse and locate the RTF Template file, click on the yellow Upload button to upload the file.
- 24. Wesleyan University PeopleSoft Campus Solutions 9.0 PeopleTools 8.52, BI Publisher 10.1.3.4.1 BI Publisher Tutorial - Lesson 1.docx Page 24 of 33 o Once you have uploaded the template, you will see the following at the bottom of the page, in the Template Files section. o Notice that in the original name there were spaces: BI Tutorial Country 1.rtf. When its name is displayed here, the spaces are replaced by underscores: BI_Tutorial_Country_1.rtf. o You can run a Preview at this point, which will be similar to the PDF previews you saw before, i.e. it will contain sample data and it will not display the conditional formatting that you created. o This Preview, however, is an RTF file. o The beginning of the file looks like this: o Close the Preview. • Click on the Output tab. Change the Default to RTF.
- 25. Wesleyan University PeopleSoft Campus Solutions 9.0 PeopleTools 8.52, BI Publisher 10.1.3.4.1 BI Publisher Tutorial - Lesson 1.docx Page 25 of 33 • Do not make any other changes on the Output page. • Save the Report Definition by clicking on the Save button in the lower left. • Now that this step has been completed, you can publish the report. 3a Run Time: Publish BI Publisher Report • Query Report Viewer: • Below is one of the methods for publishing a BI Publisher Report: Query Report Viewer. • The second method, using Query Report Scheduler and Query Manager is discussed under Section 3b. • Navigate to the page - Reporting Tools > BI Publisher > Query Report Viewer • On the Query Report Viewer page, enter the Report Name and click the Search button. • The RTF file opens, and the page appears as follows:
- 26. Wesleyan University PeopleSoft Campus Solutions 9.0 PeopleTools 8.52, BI Publisher 10.1.3.4.1 BI Publisher Tutorial - Lesson 1.docx Page 26 of 33 • You’ll see that the Format is shown as RTF which you should leave as is. • Click on the View Report link. Open the file. You could also Save it at this time if you wish. If you do, be sure to give it a new name. • The entire first page (1 of 9) resembles the following. You will recall that when you set up the Conditional Formatting you checked the box for the Conditional Formatting to Apply to Entire Table Row, and you can observe that in the report. • Save a copy of the report by doing a Save As an RTF file.
- 27. Wesleyan University PeopleSoft Campus Solutions 9.0 PeopleTools 8.52, BI Publisher 10.1.3.4.1 BI Publisher Tutorial - Lesson 1.docx Page 27 of 33 o Be sure to give it a new name. o You can use it as an RTF file or save the RTF file as a Word Document. Once you have saved it you can use it as you would any other Word document. • At any time you can go back into the Template and make formatting or other changes. o If you do, you will need to upload the Template again into the existing Report Definition to have the latest version associated. 3b Run Time: View/Post in Report Manager • Query Report Scheduler: The other method to produce the report is through Query Report Scheduler. • Below you will see two approaches for generating the report: o Email attachment o Report Manager • Navigate to the page: Reporting Tools > BI Publisher > Query Report Scheduler • Sending the report as an email: o Since this Report has not yet been run through the Query Report Scheduler, you will need to set up a Run Control ID. Click on the Add a New Value Tab
- 28. Wesleyan University PeopleSoft Campus Solutions 9.0 PeopleTools 8.52, BI Publisher 10.1.3.4.1 BI Publisher Tutorial - Lesson 1.docx Page 28 of 33 Type in a new Run Control ID and click the Add button. o The following page opens: o Populate the fields as follows: Data Source Type: The default should be Query. If it is not, change it to Query. Report Name: You can search for or enter the entire name. Template ID: If there is just one Template, this field will fill in automatically based on the Report Name. If there is more than one Template, you will choose from the dropdown. Template As Of Date: To be filled in if the date is a factor. o Click on Save to save this Run Control o Click on Run
- 29. Wesleyan University PeopleSoft Campus Solutions 9.0 PeopleTools 8.52, BI Publisher 10.1.3.4.1 BI Publisher Tutorial - Lesson 1.docx Page 29 of 33 o The Process Scheduler Request page opens: o Change the Type from Web to Email. In order to have an email sent to your email address, click on the Distribution link. The Distribution Detail page open. It defaults to your name as the User. You can add other recipients where indicated.
- 30. Wesleyan University PeopleSoft Campus Solutions 9.0 PeopleTools 8.52, BI Publisher 10.1.3.4.1 BI Publisher Tutorial - Lesson 1.docx Page 30 of 33 o Click OK to return to the Process Scheduler Request page. Then click OK on that page. o When you are returned to the Query Report Scheduler page, click Save again to save the changes for the Run Control. o Then Run as you would any Process Scheduler process until the Run Status is at Success and Distribution Status is at Posted. o You should shortly receive an email message with the RTF report attached.
- 31. Wesleyan University PeopleSoft Campus Solutions 9.0 PeopleTools 8.52, BI Publisher 10.1.3.4.1 BI Publisher Tutorial - Lesson 1.docx Page 31 of 33 • Report Manager: o On the Query Report Scheduler page, set up a Run Control ID. Click on the Add a New Value Tab Populate the fields as previously shown. Click on Save to save this Run Control. Click on Run o Click on OK and then on Process Monitor. Run as you would any Process Scheduler process.
- 32. Wesleyan University PeopleSoft Campus Solutions 9.0 PeopleTools 8.52, BI Publisher 10.1.3.4.1 BI Publisher Tutorial - Lesson 1.docx Page 32 of 33 o Once the Run Status is at Success and Distribution Status is at Posted, click on the link Go back to Query Report Scheduler. o Click on the Report Manager link. o When the following page opens, click on the Report link. o When the Report page opens, click on the Name link.
- 33. Wesleyan University PeopleSoft Campus Solutions 9.0 PeopleTools 8.52, BI Publisher 10.1.3.4.1 BI Publisher Tutorial - Lesson 1.docx Page 33 of 33 o You will be prompted to save the RTF file in the location you have been using. o Be sure to save the file with a new name. This concludes Lesson 1.