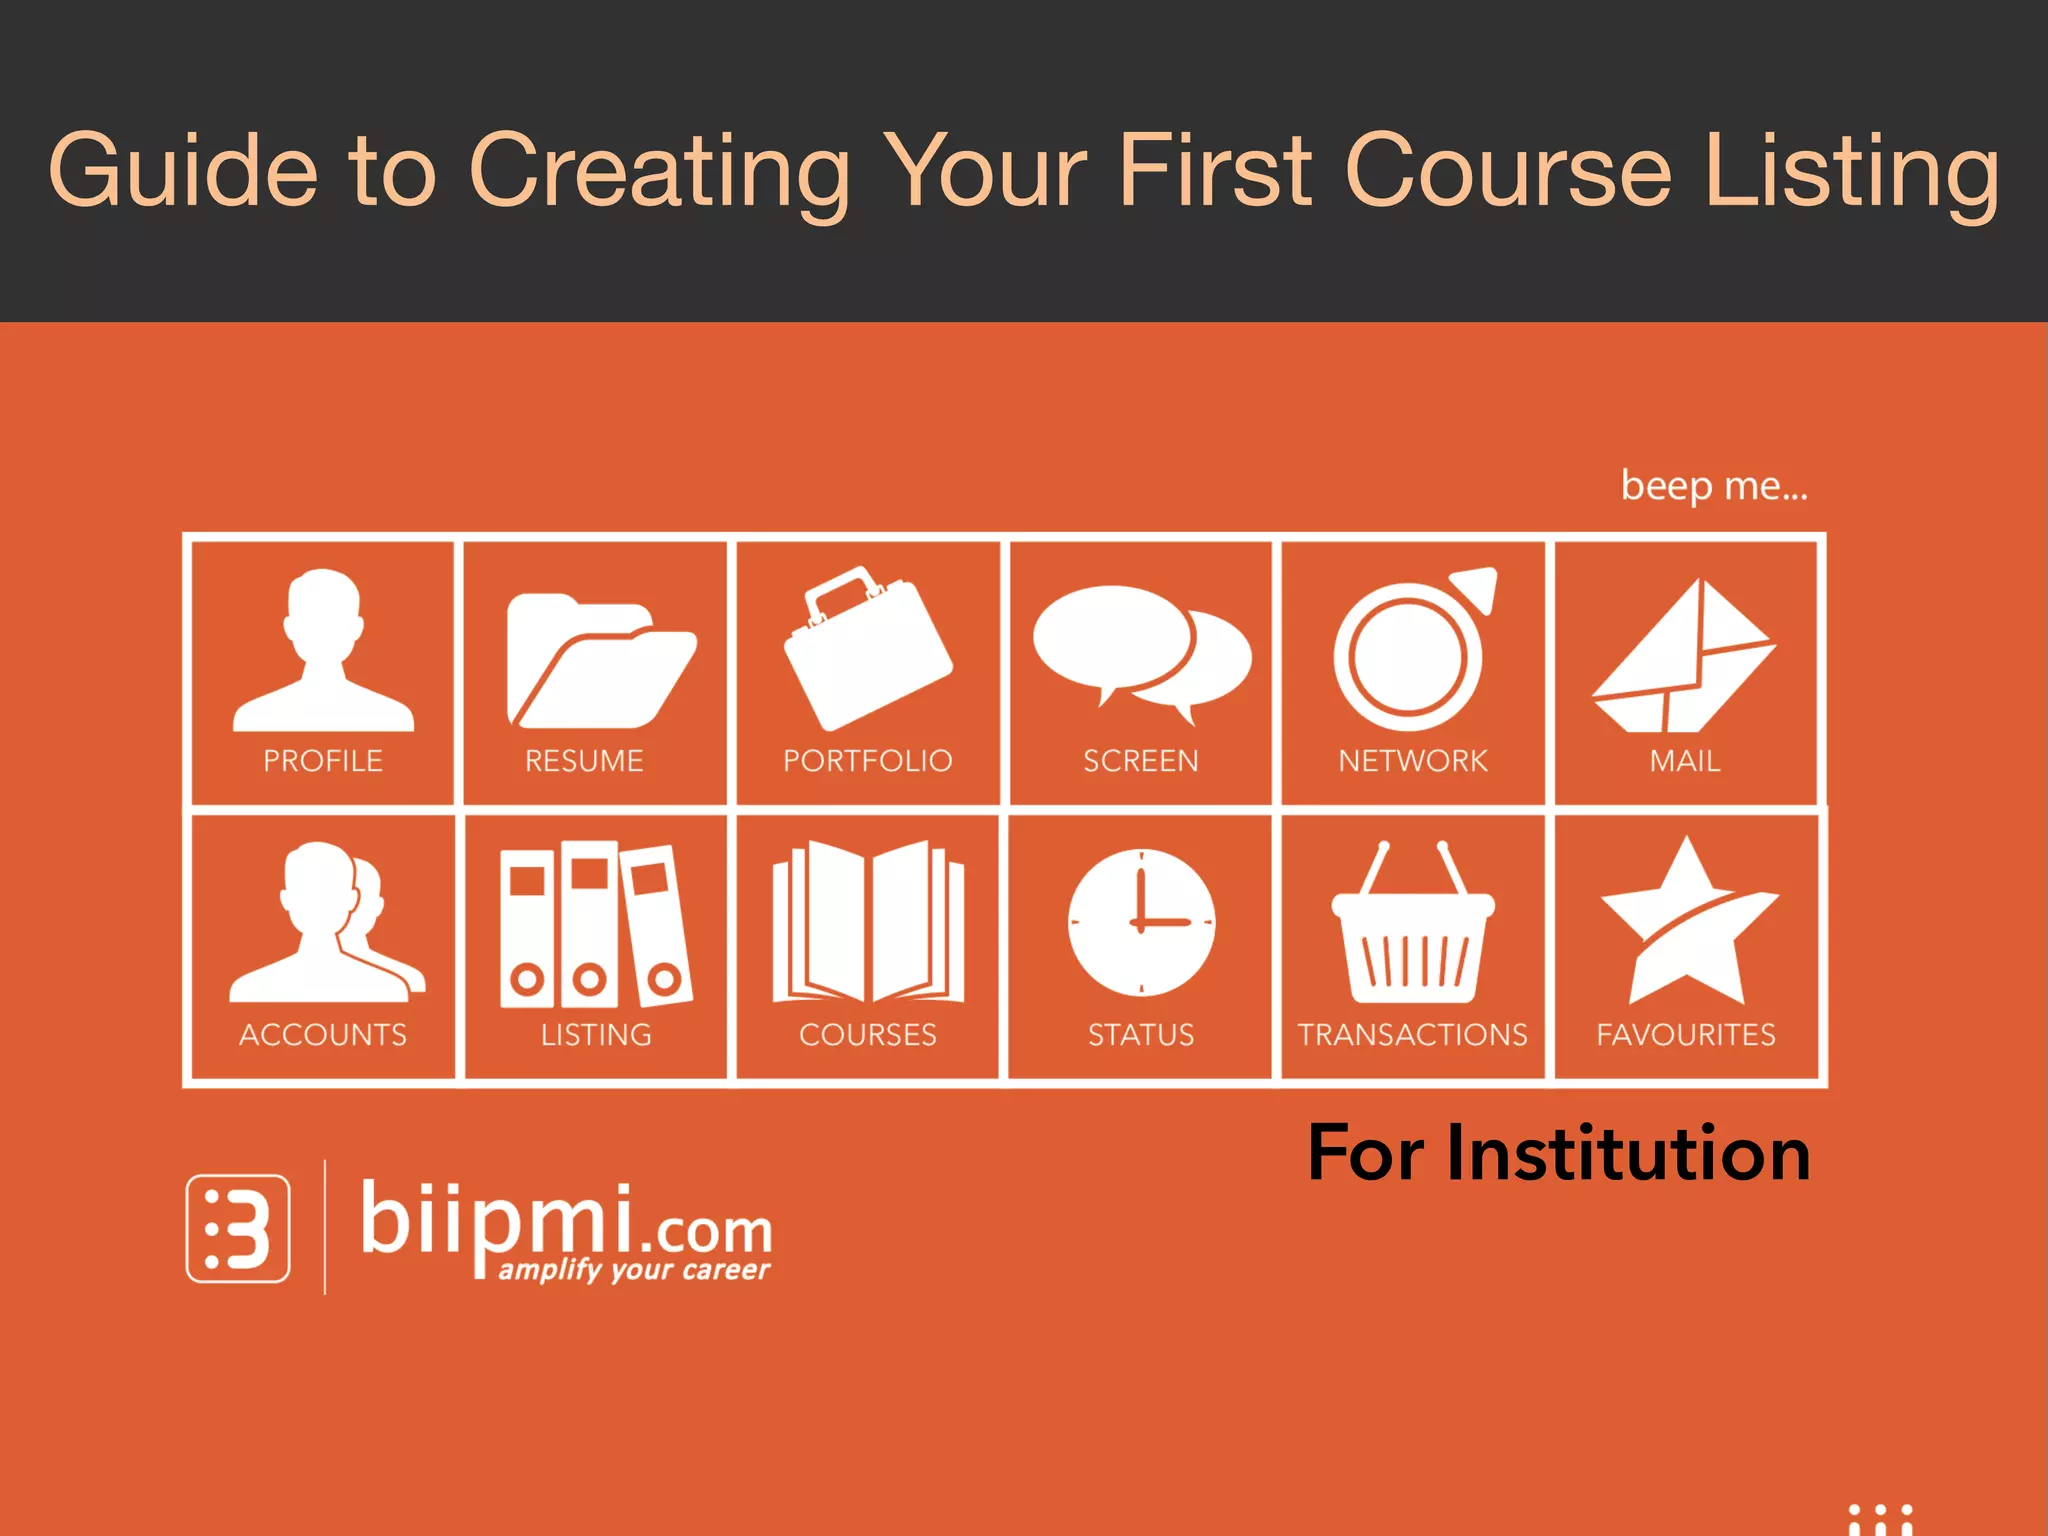
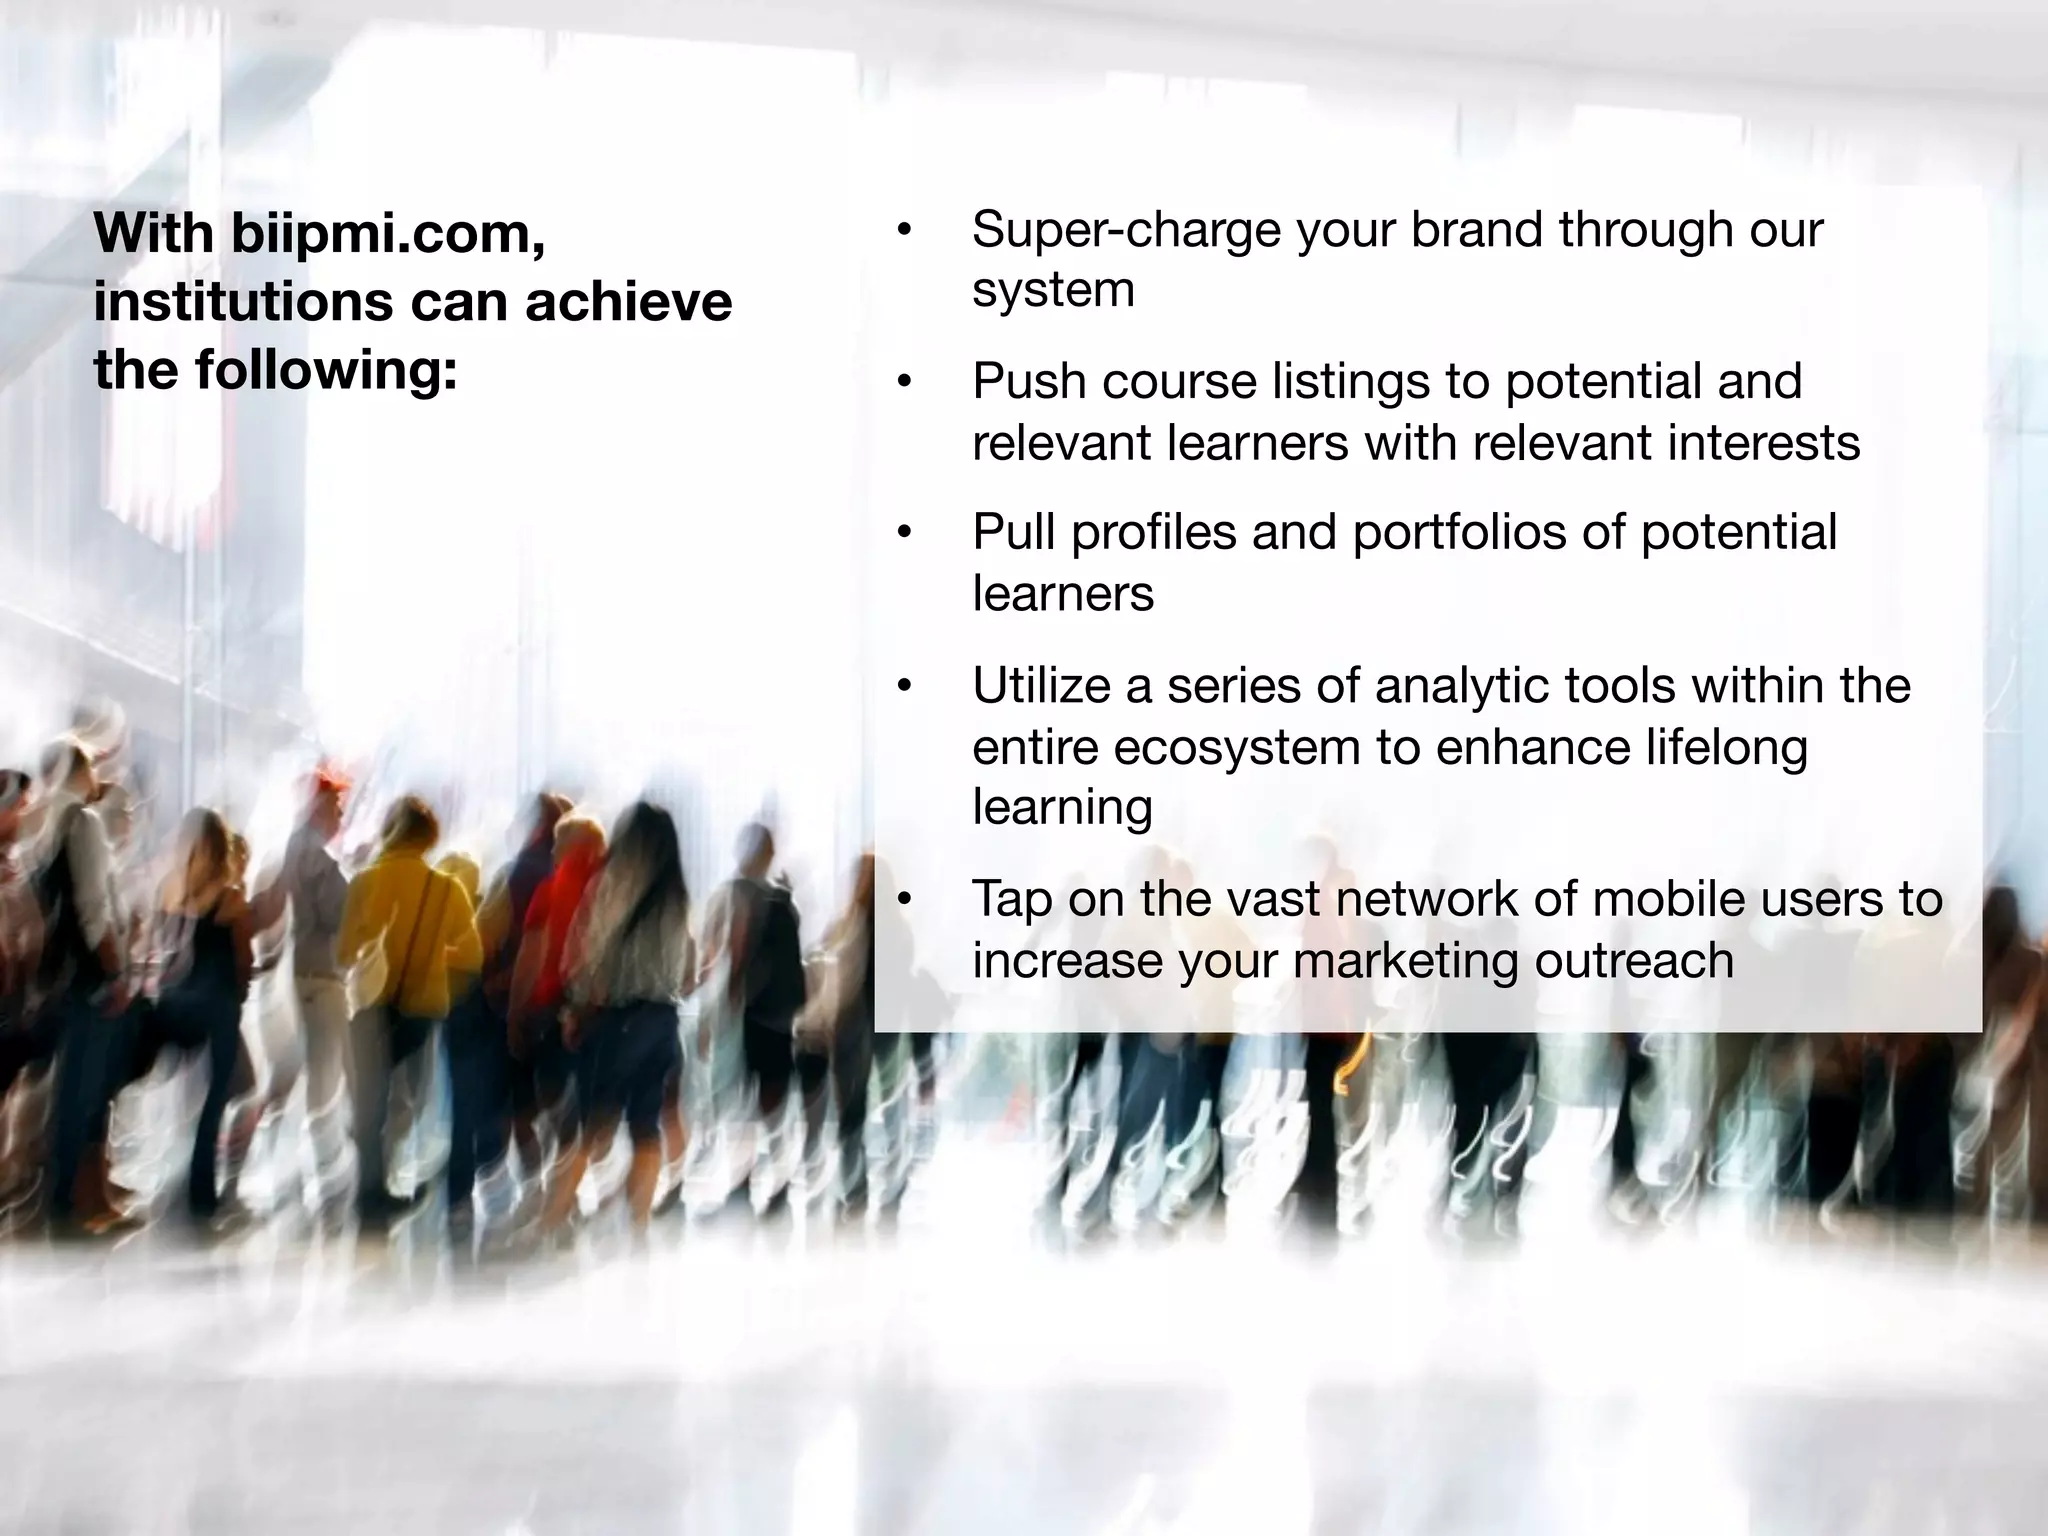
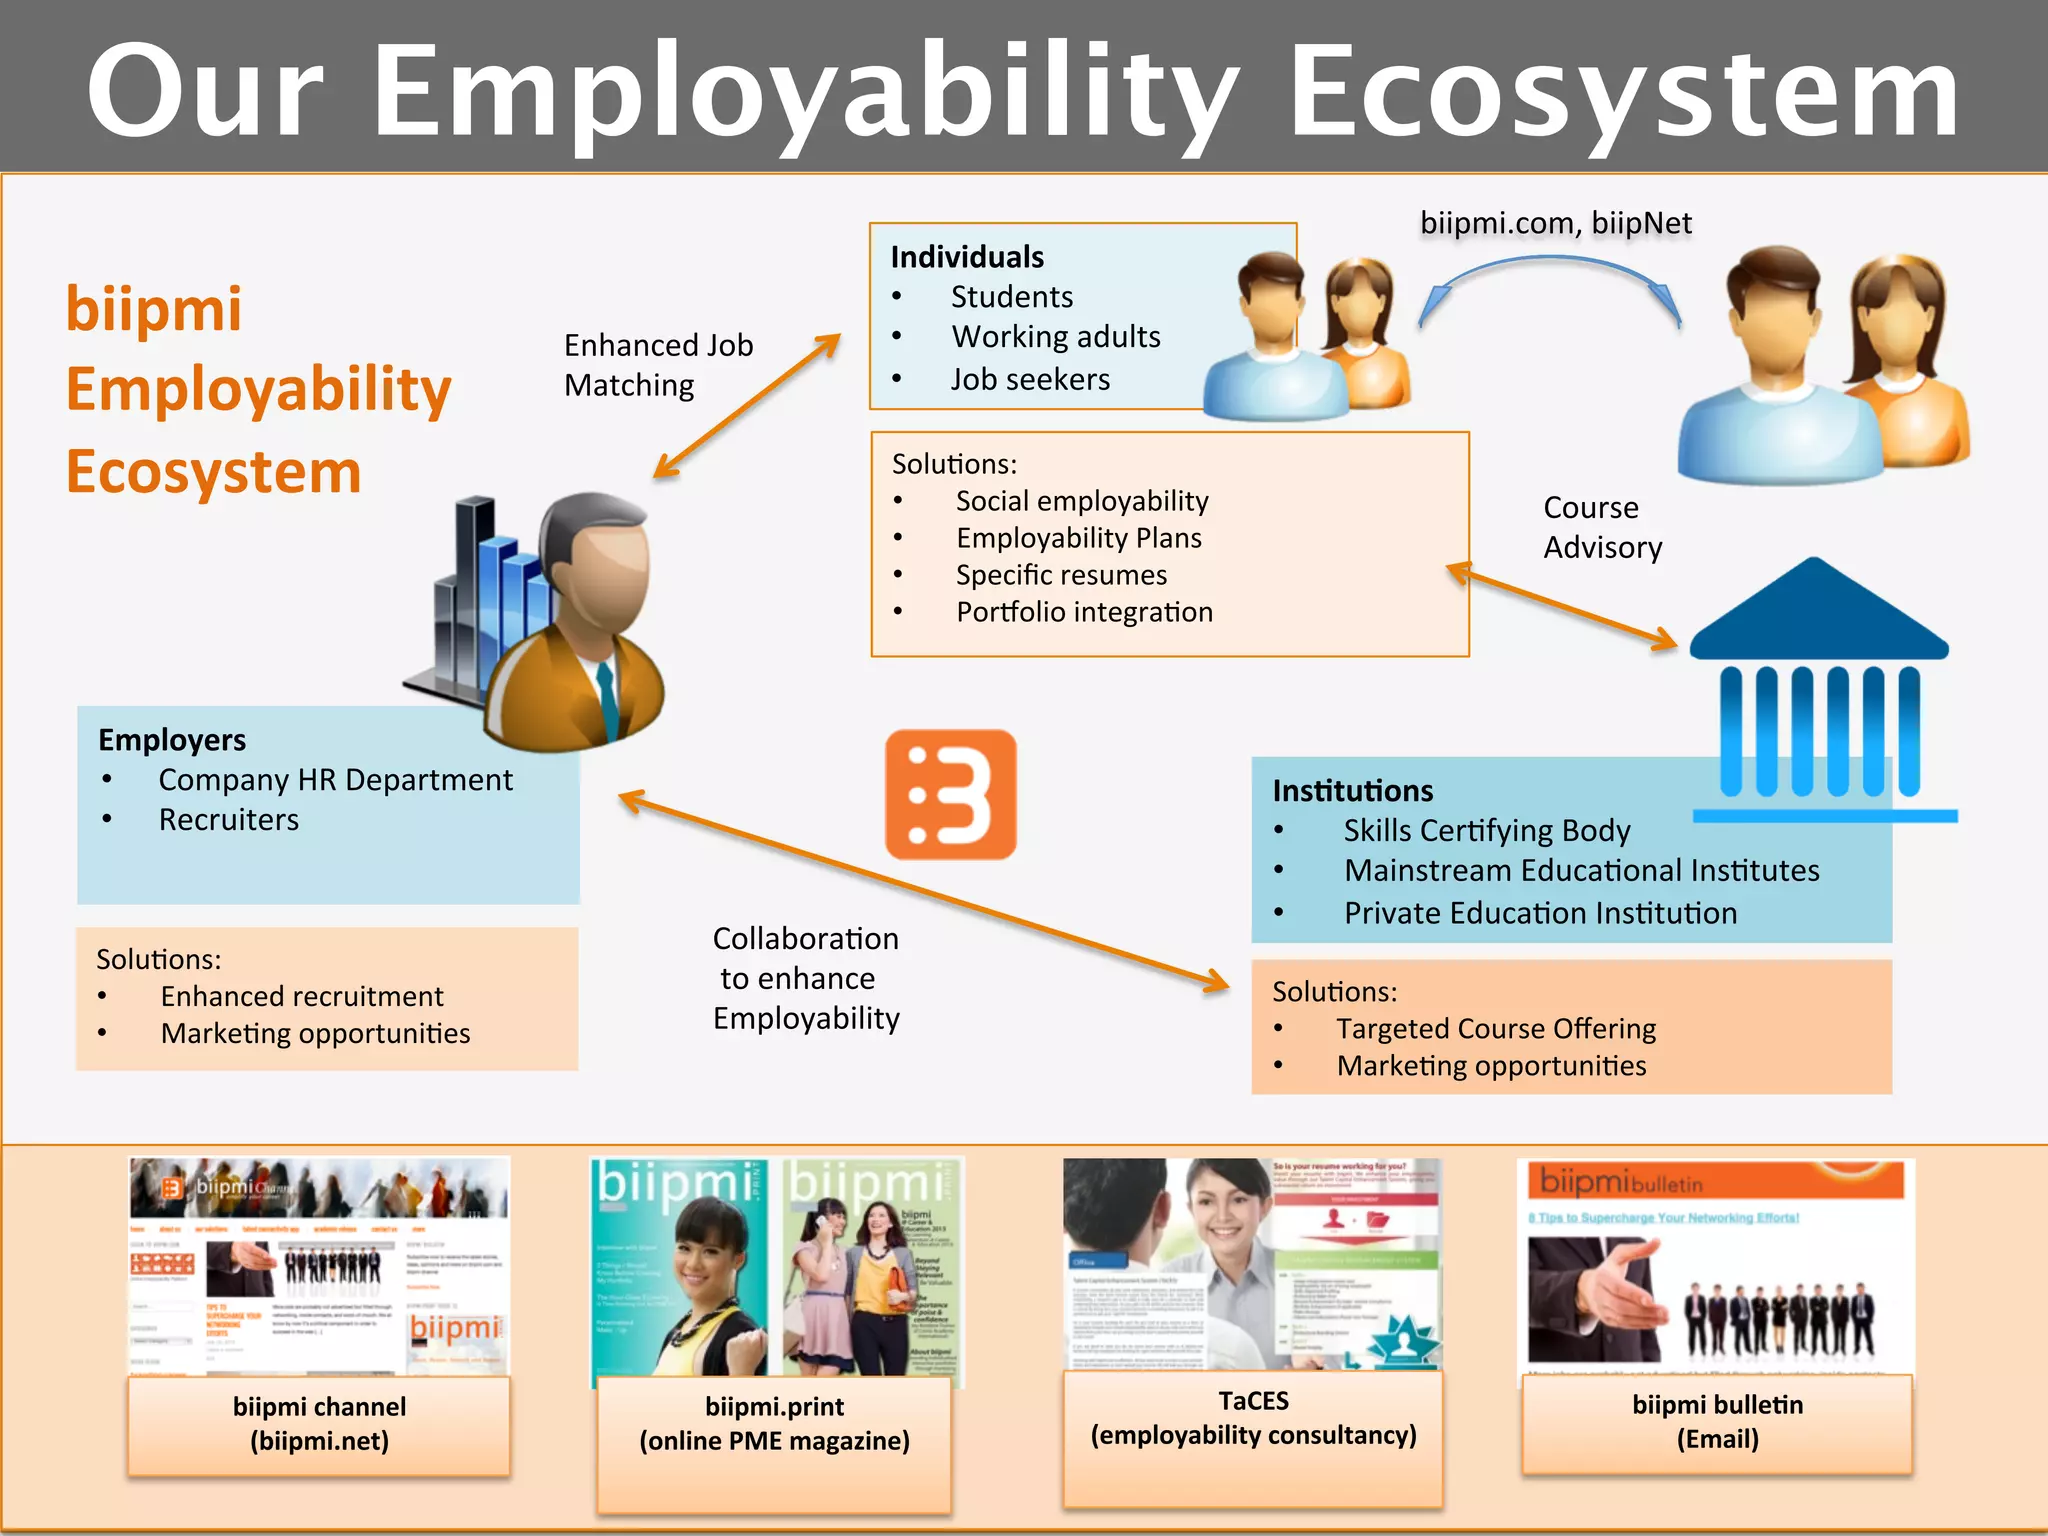
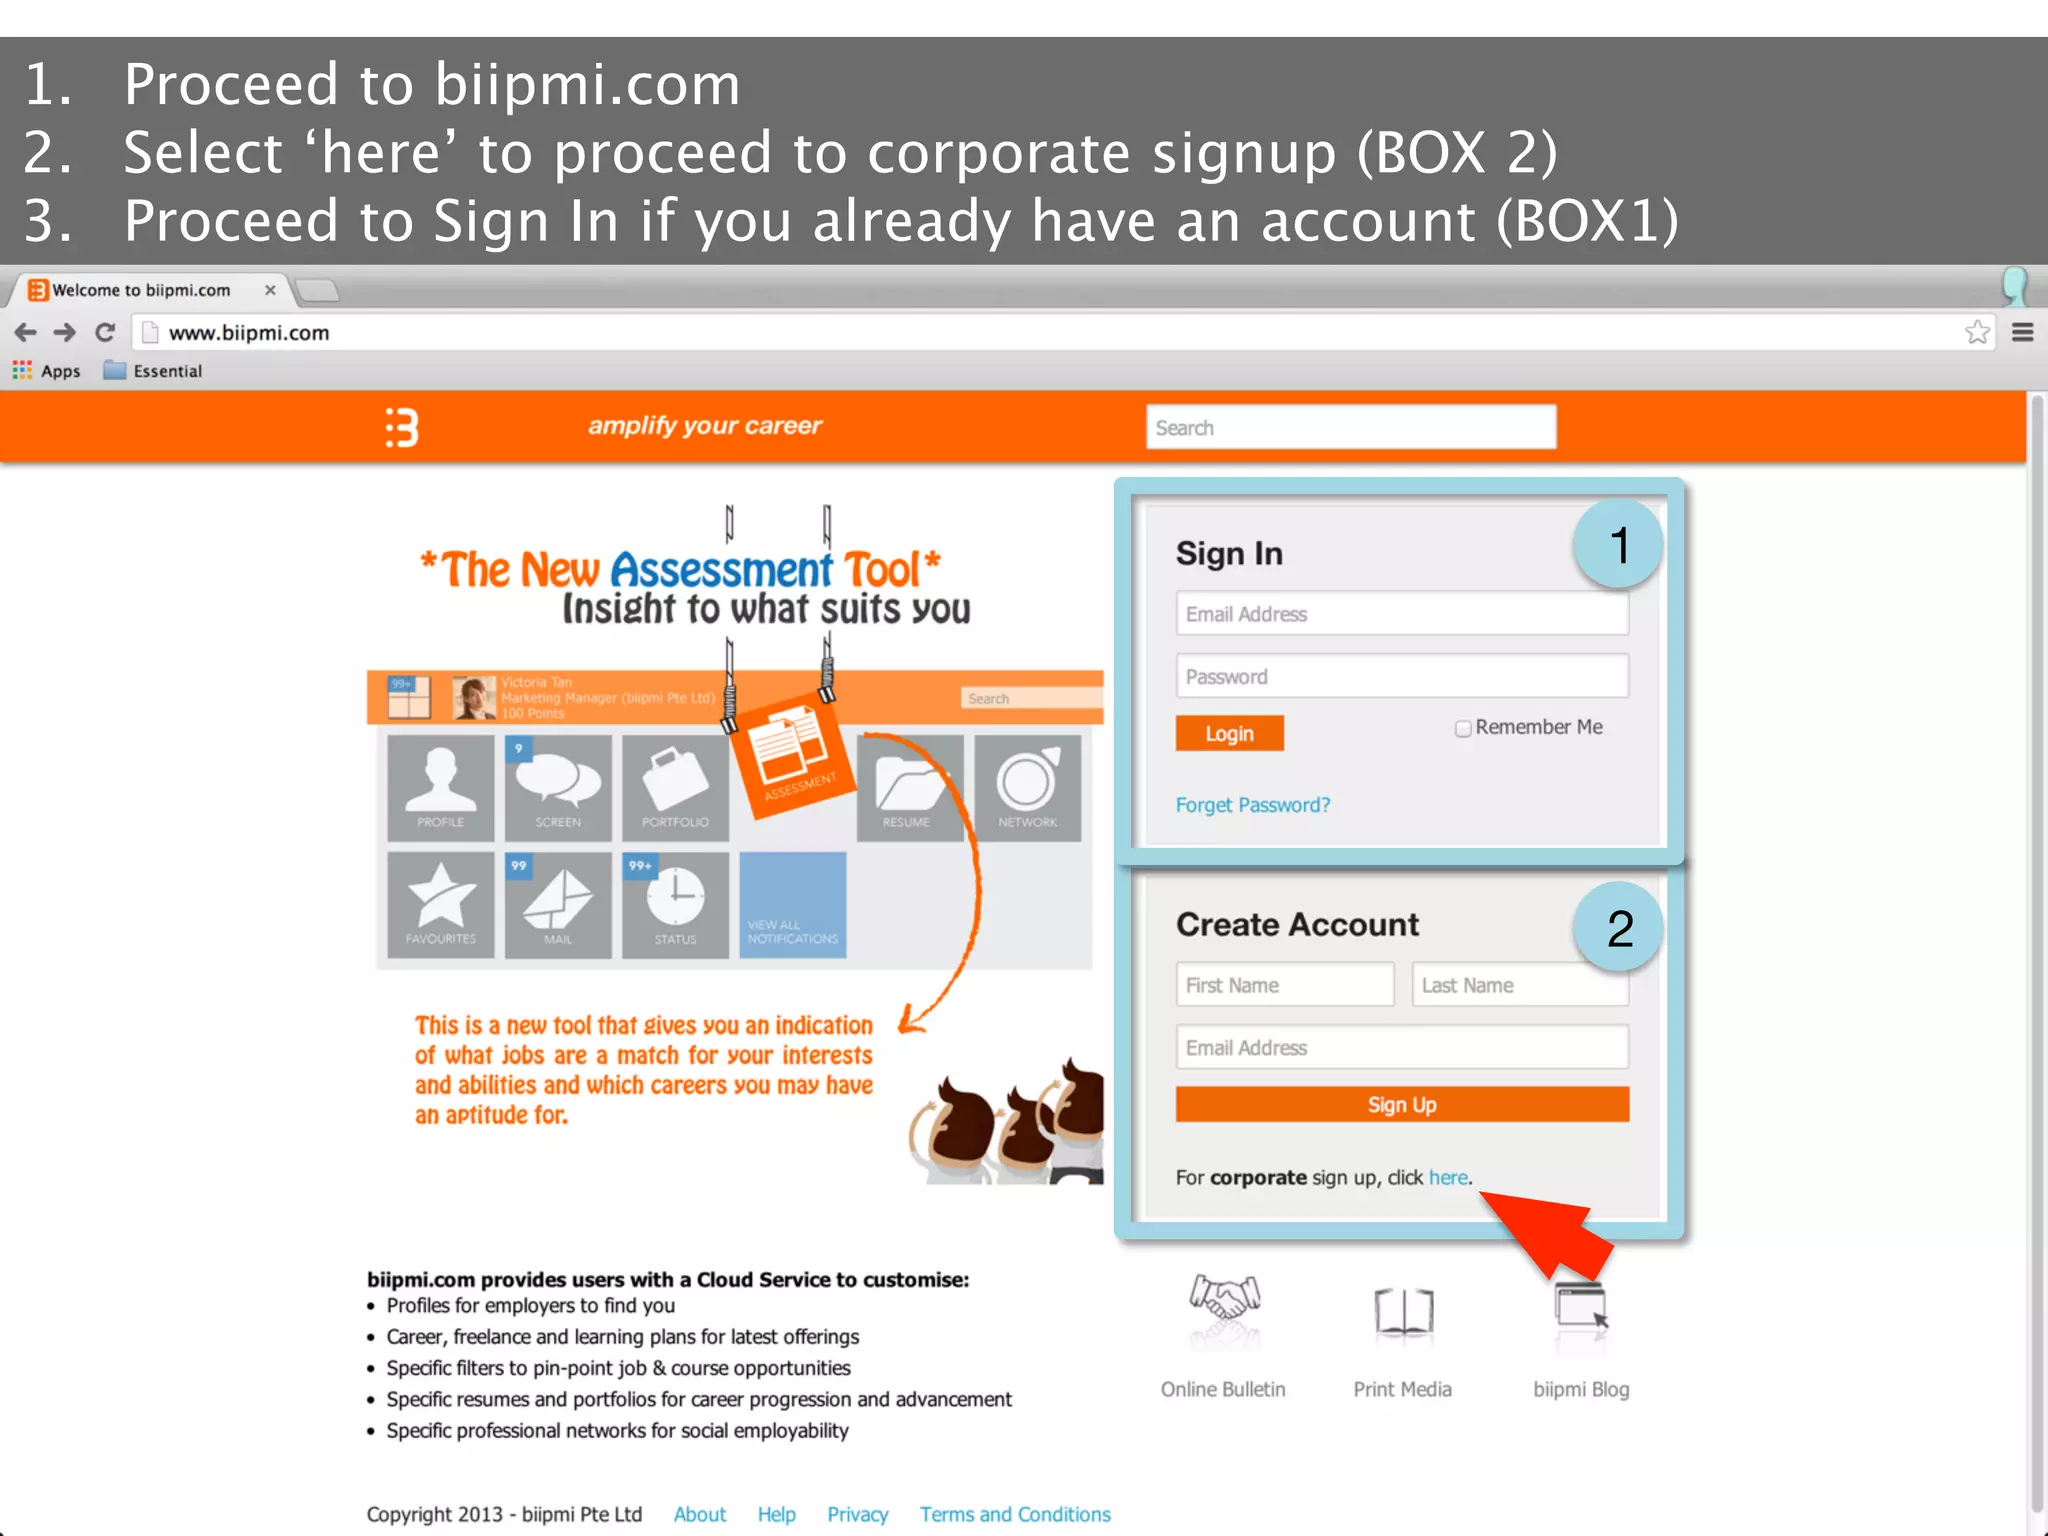
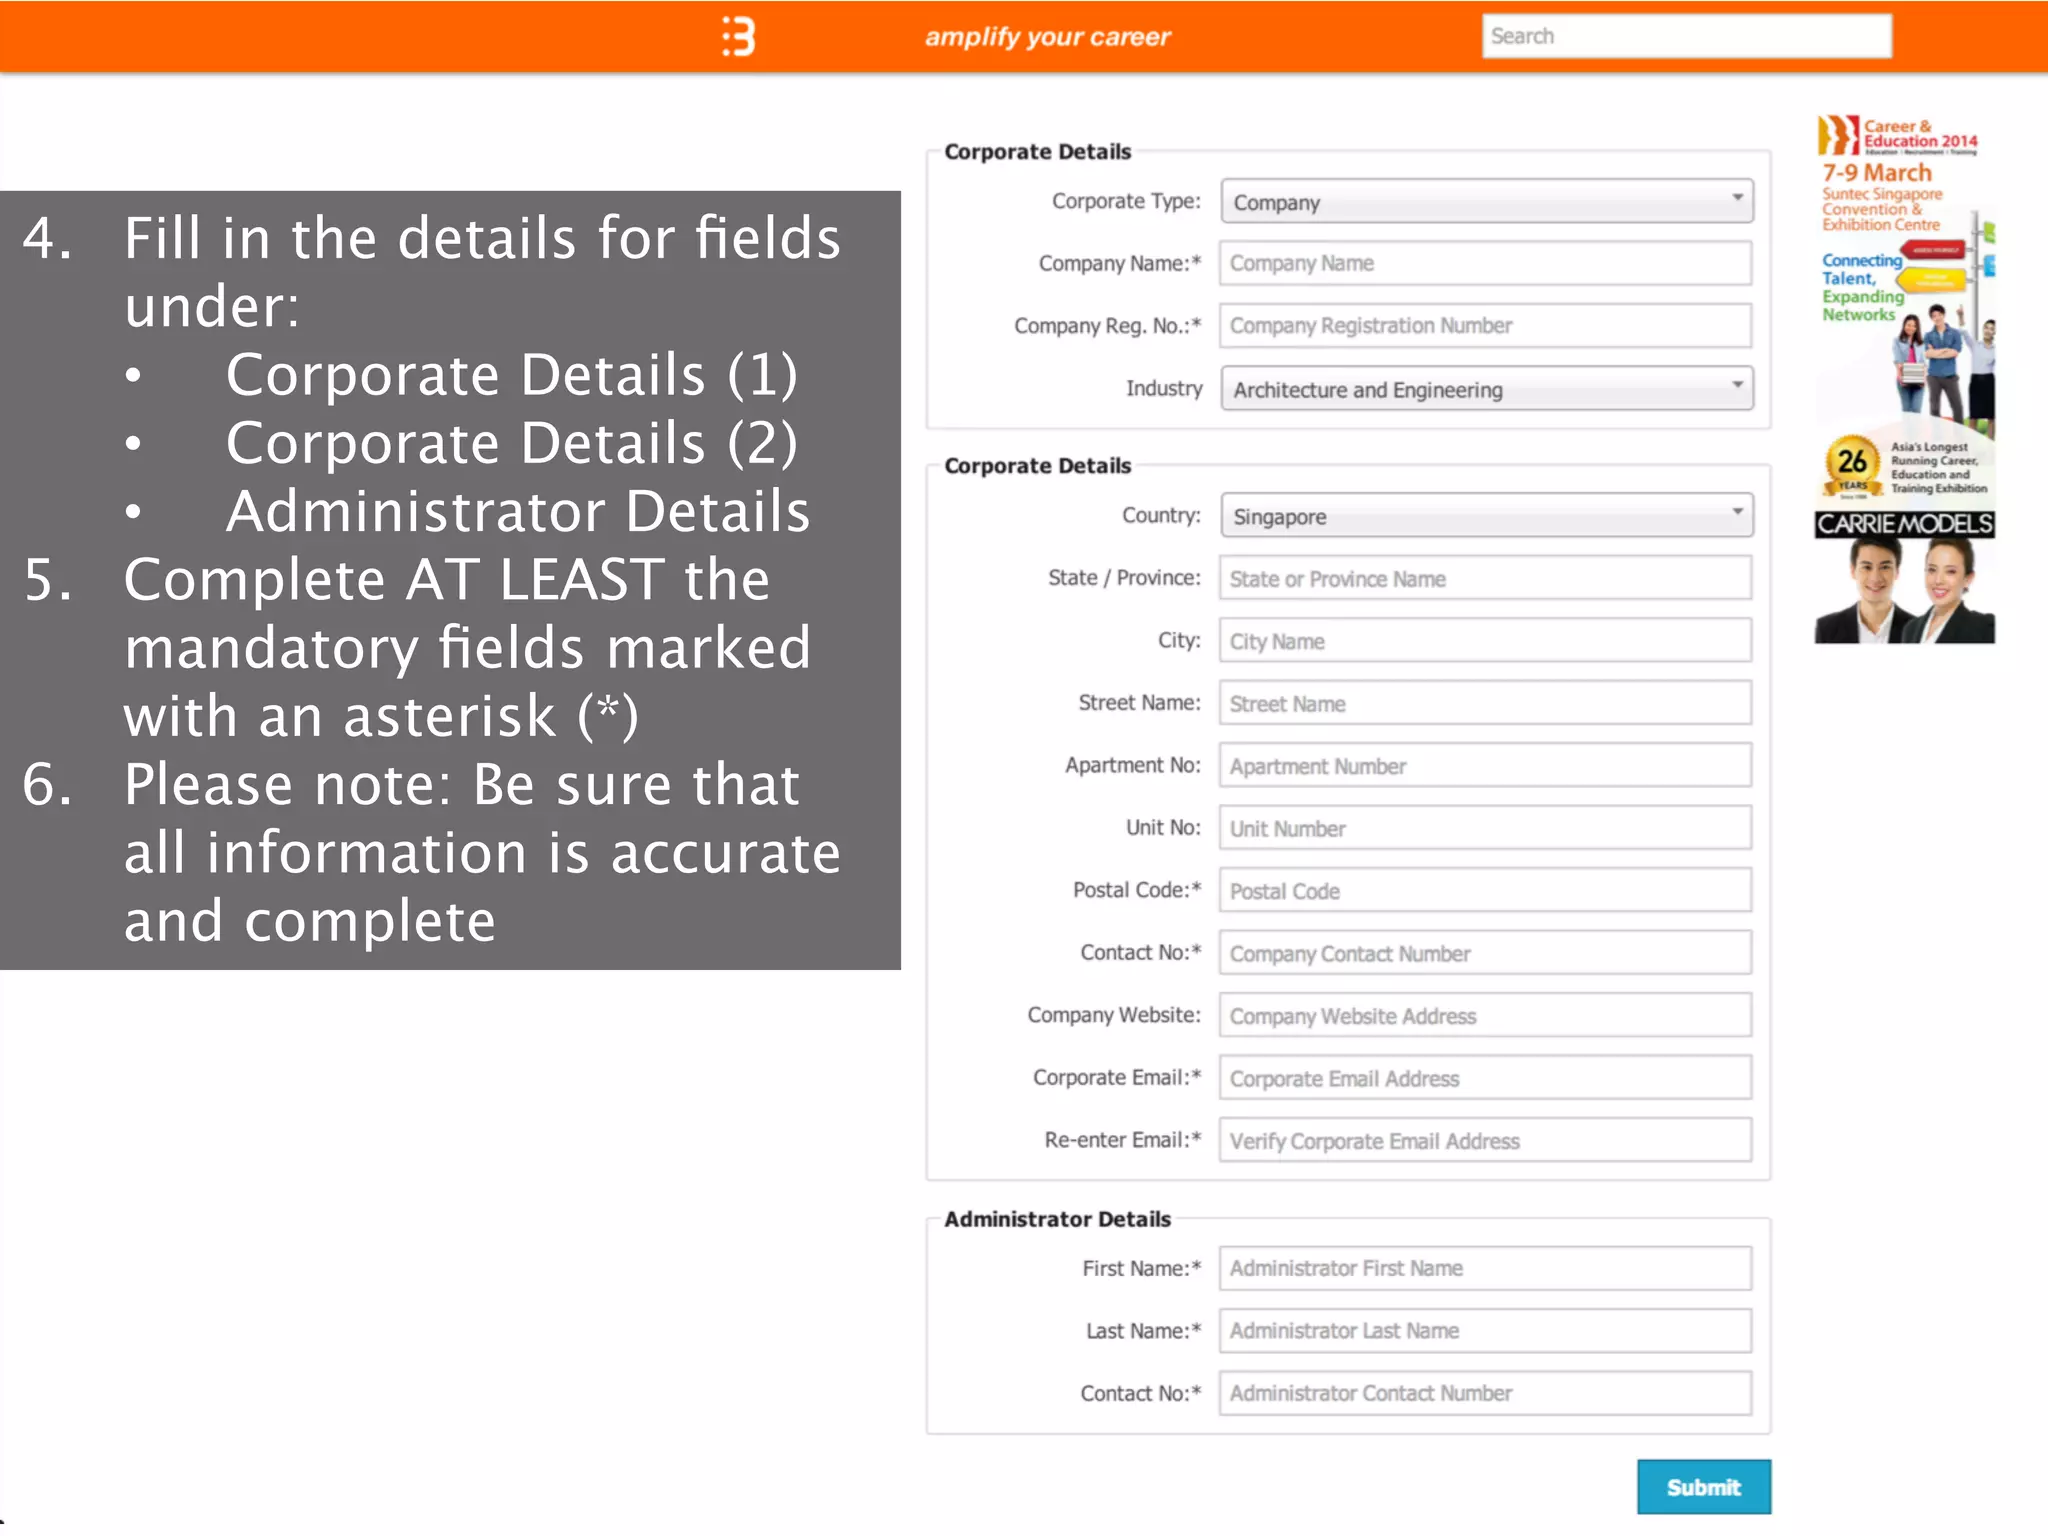
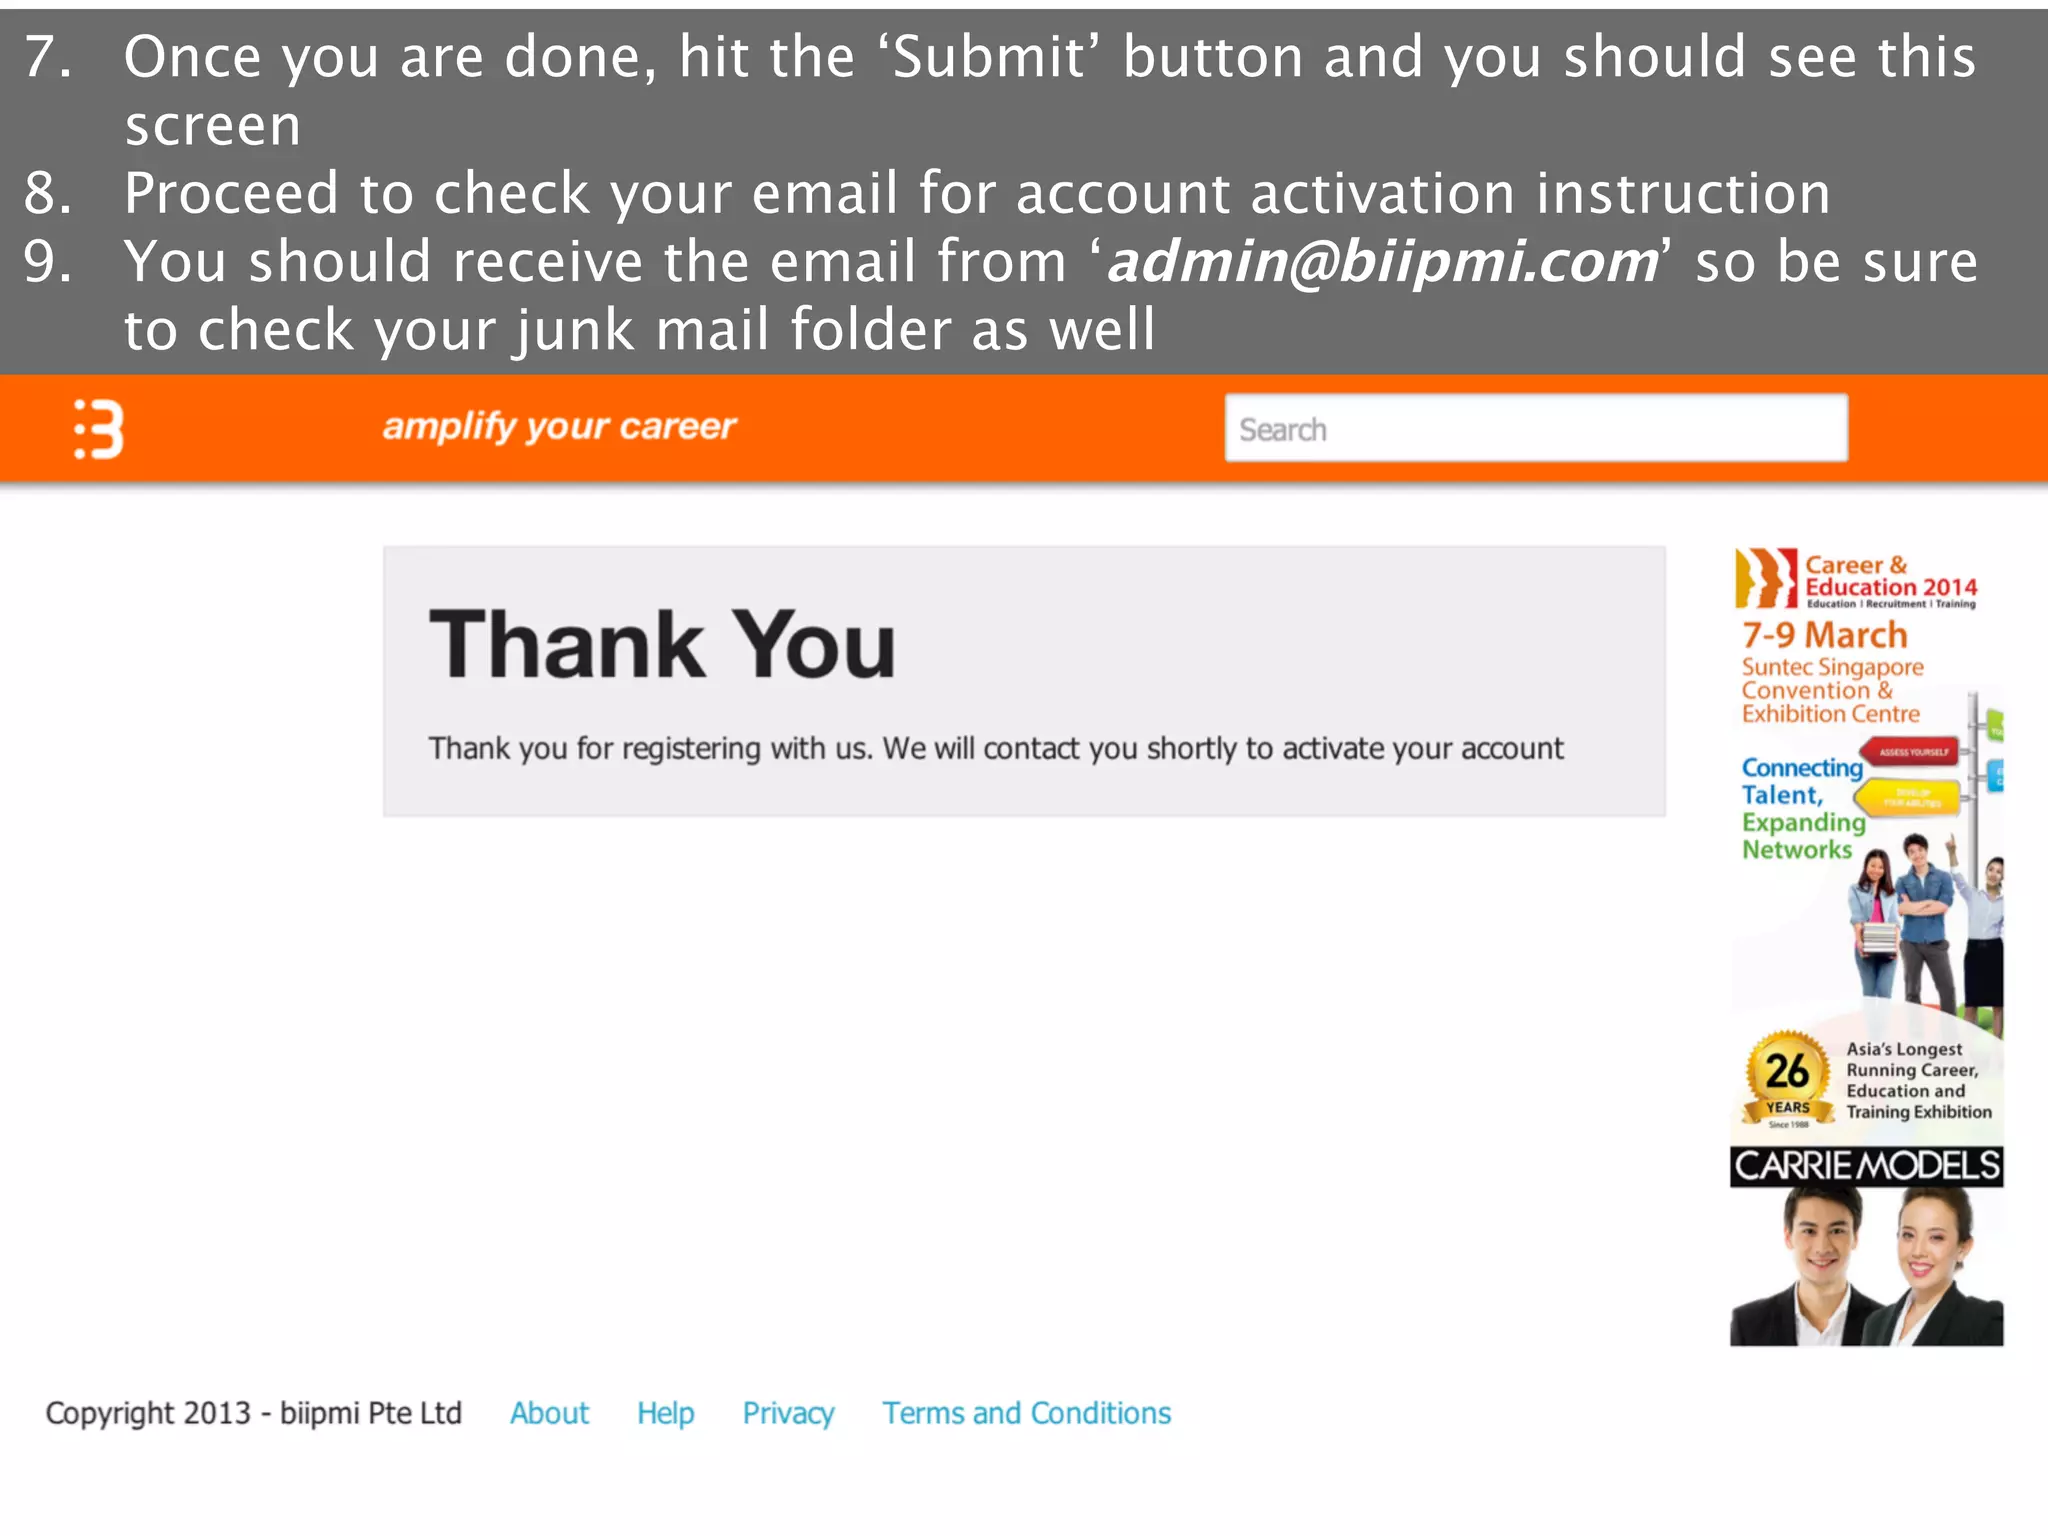
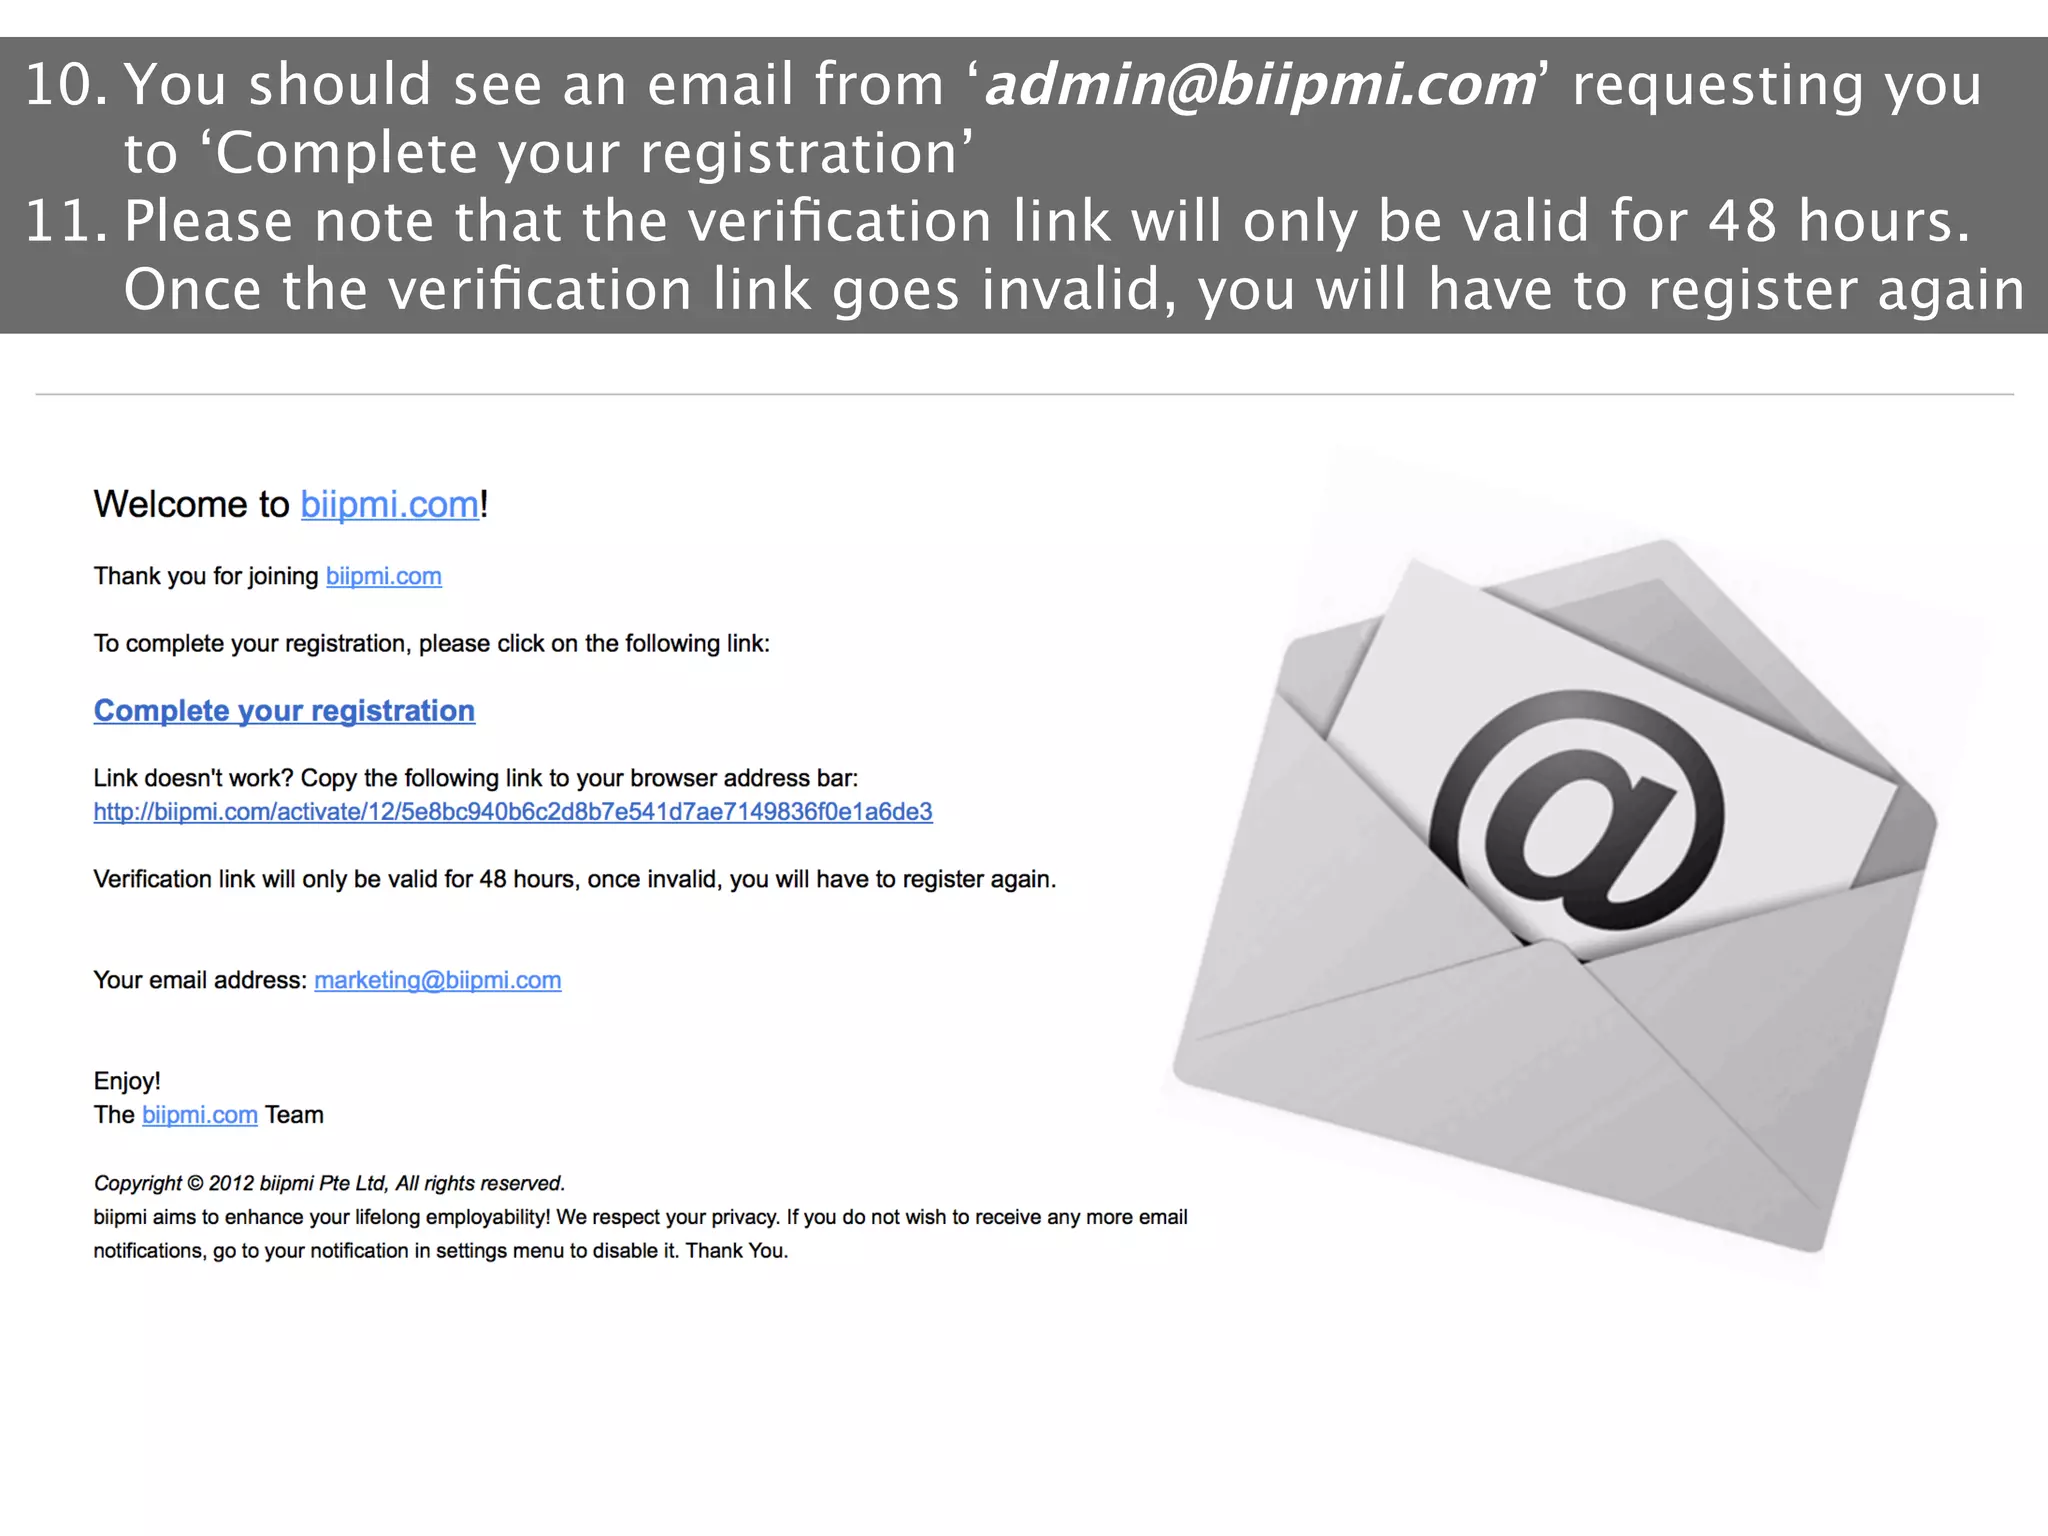
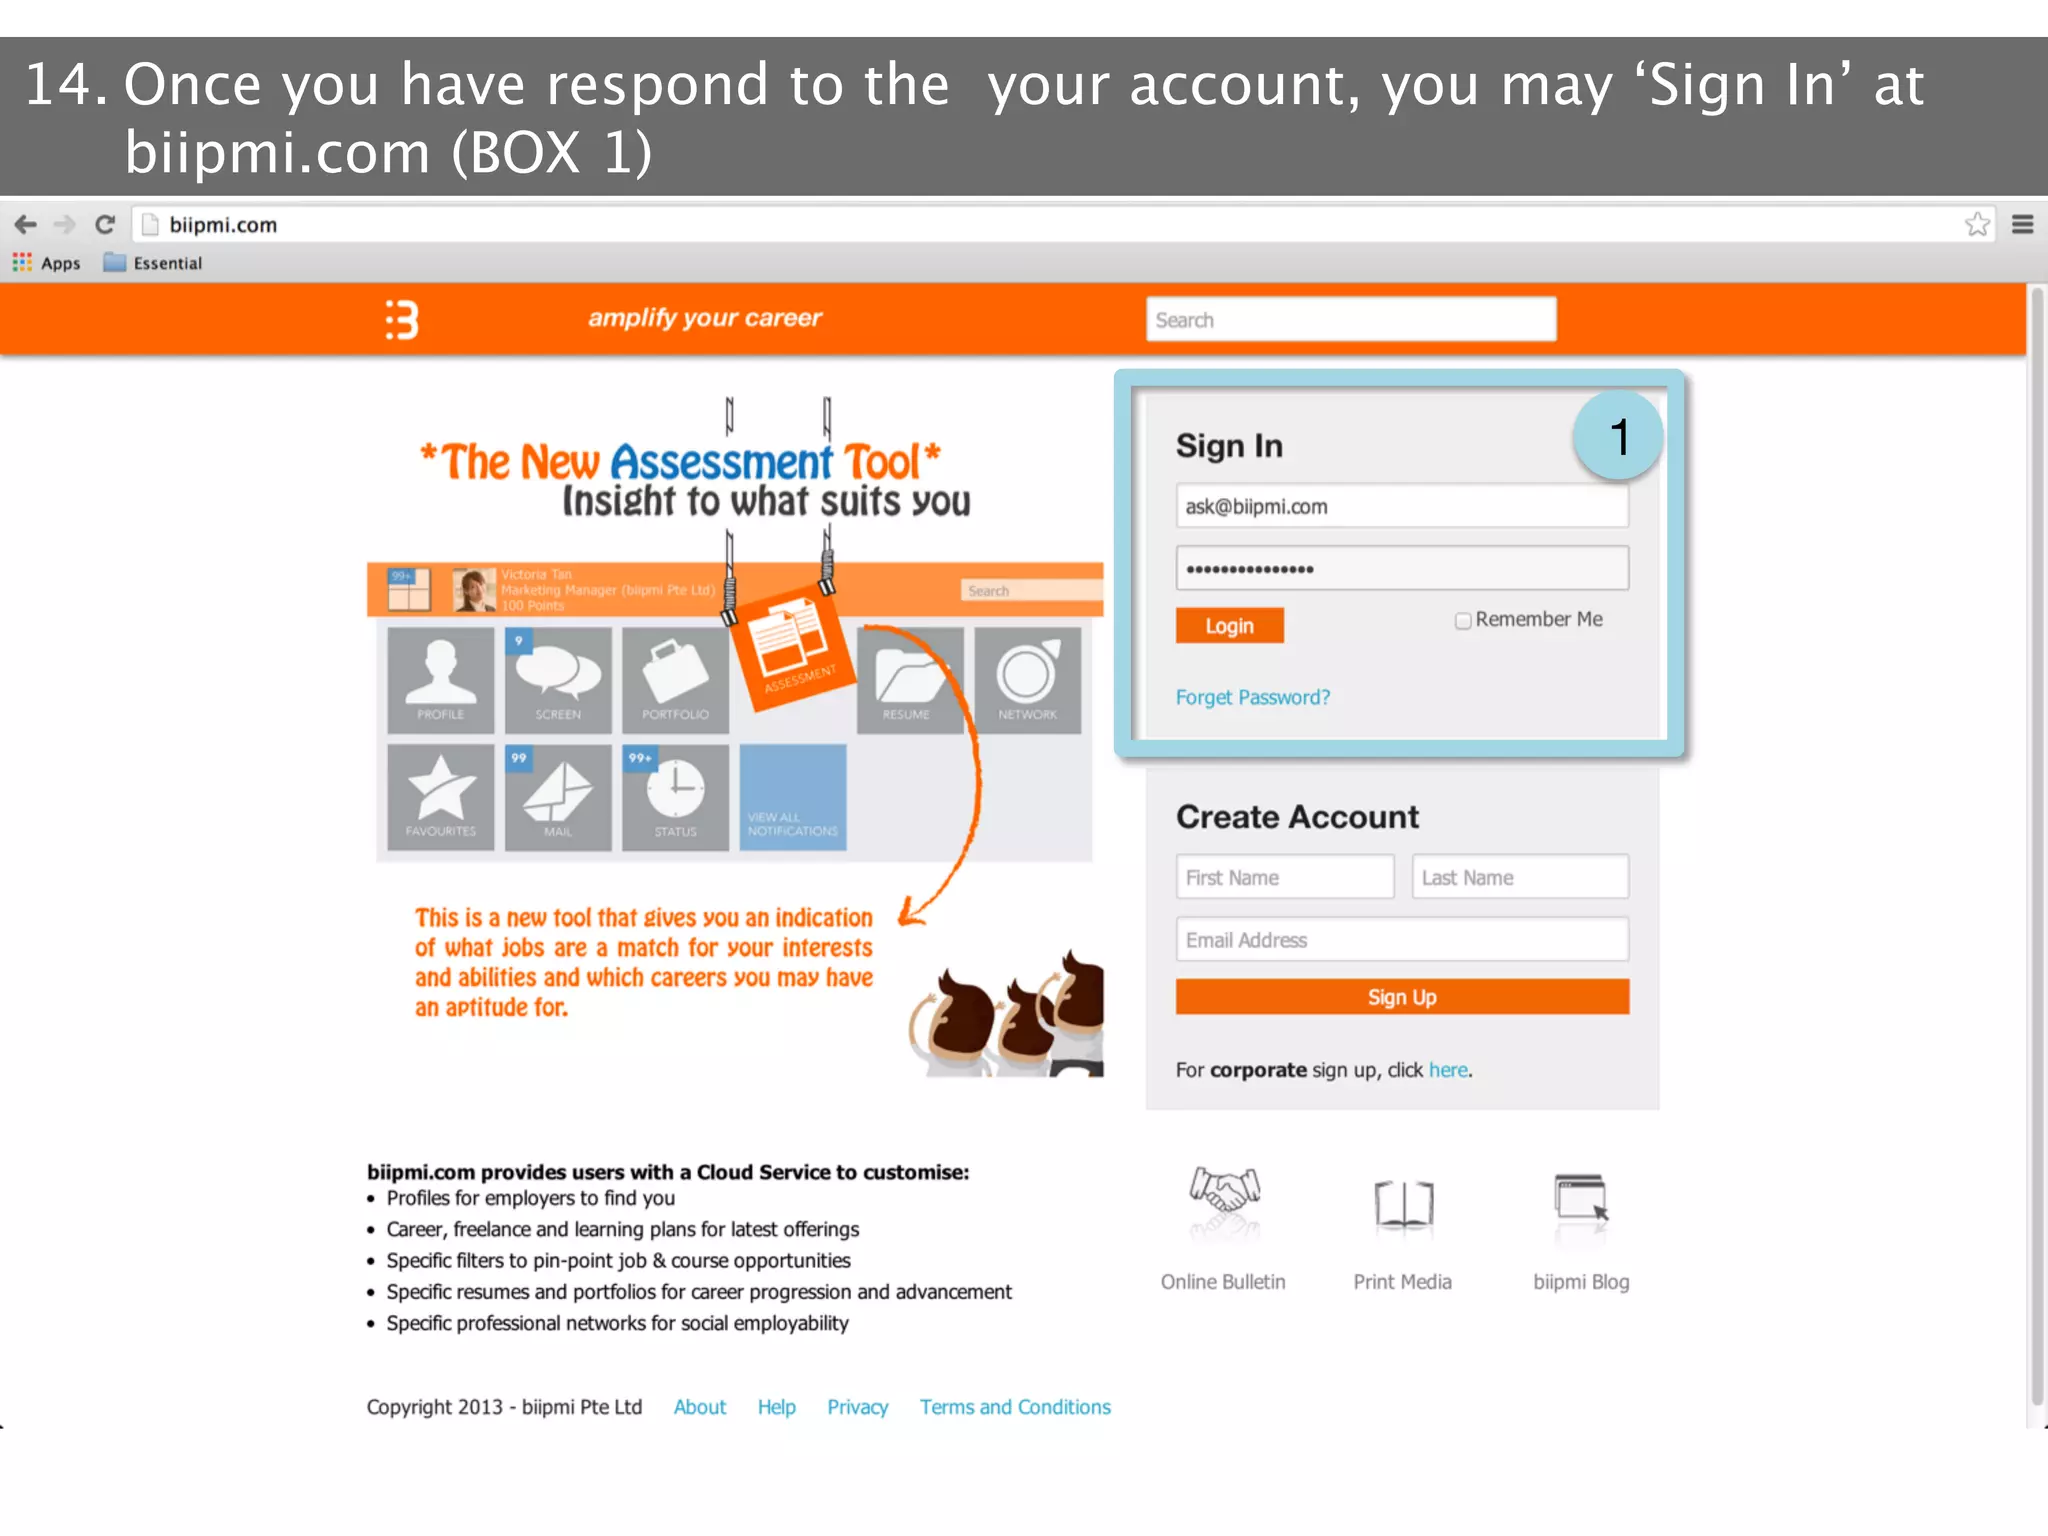
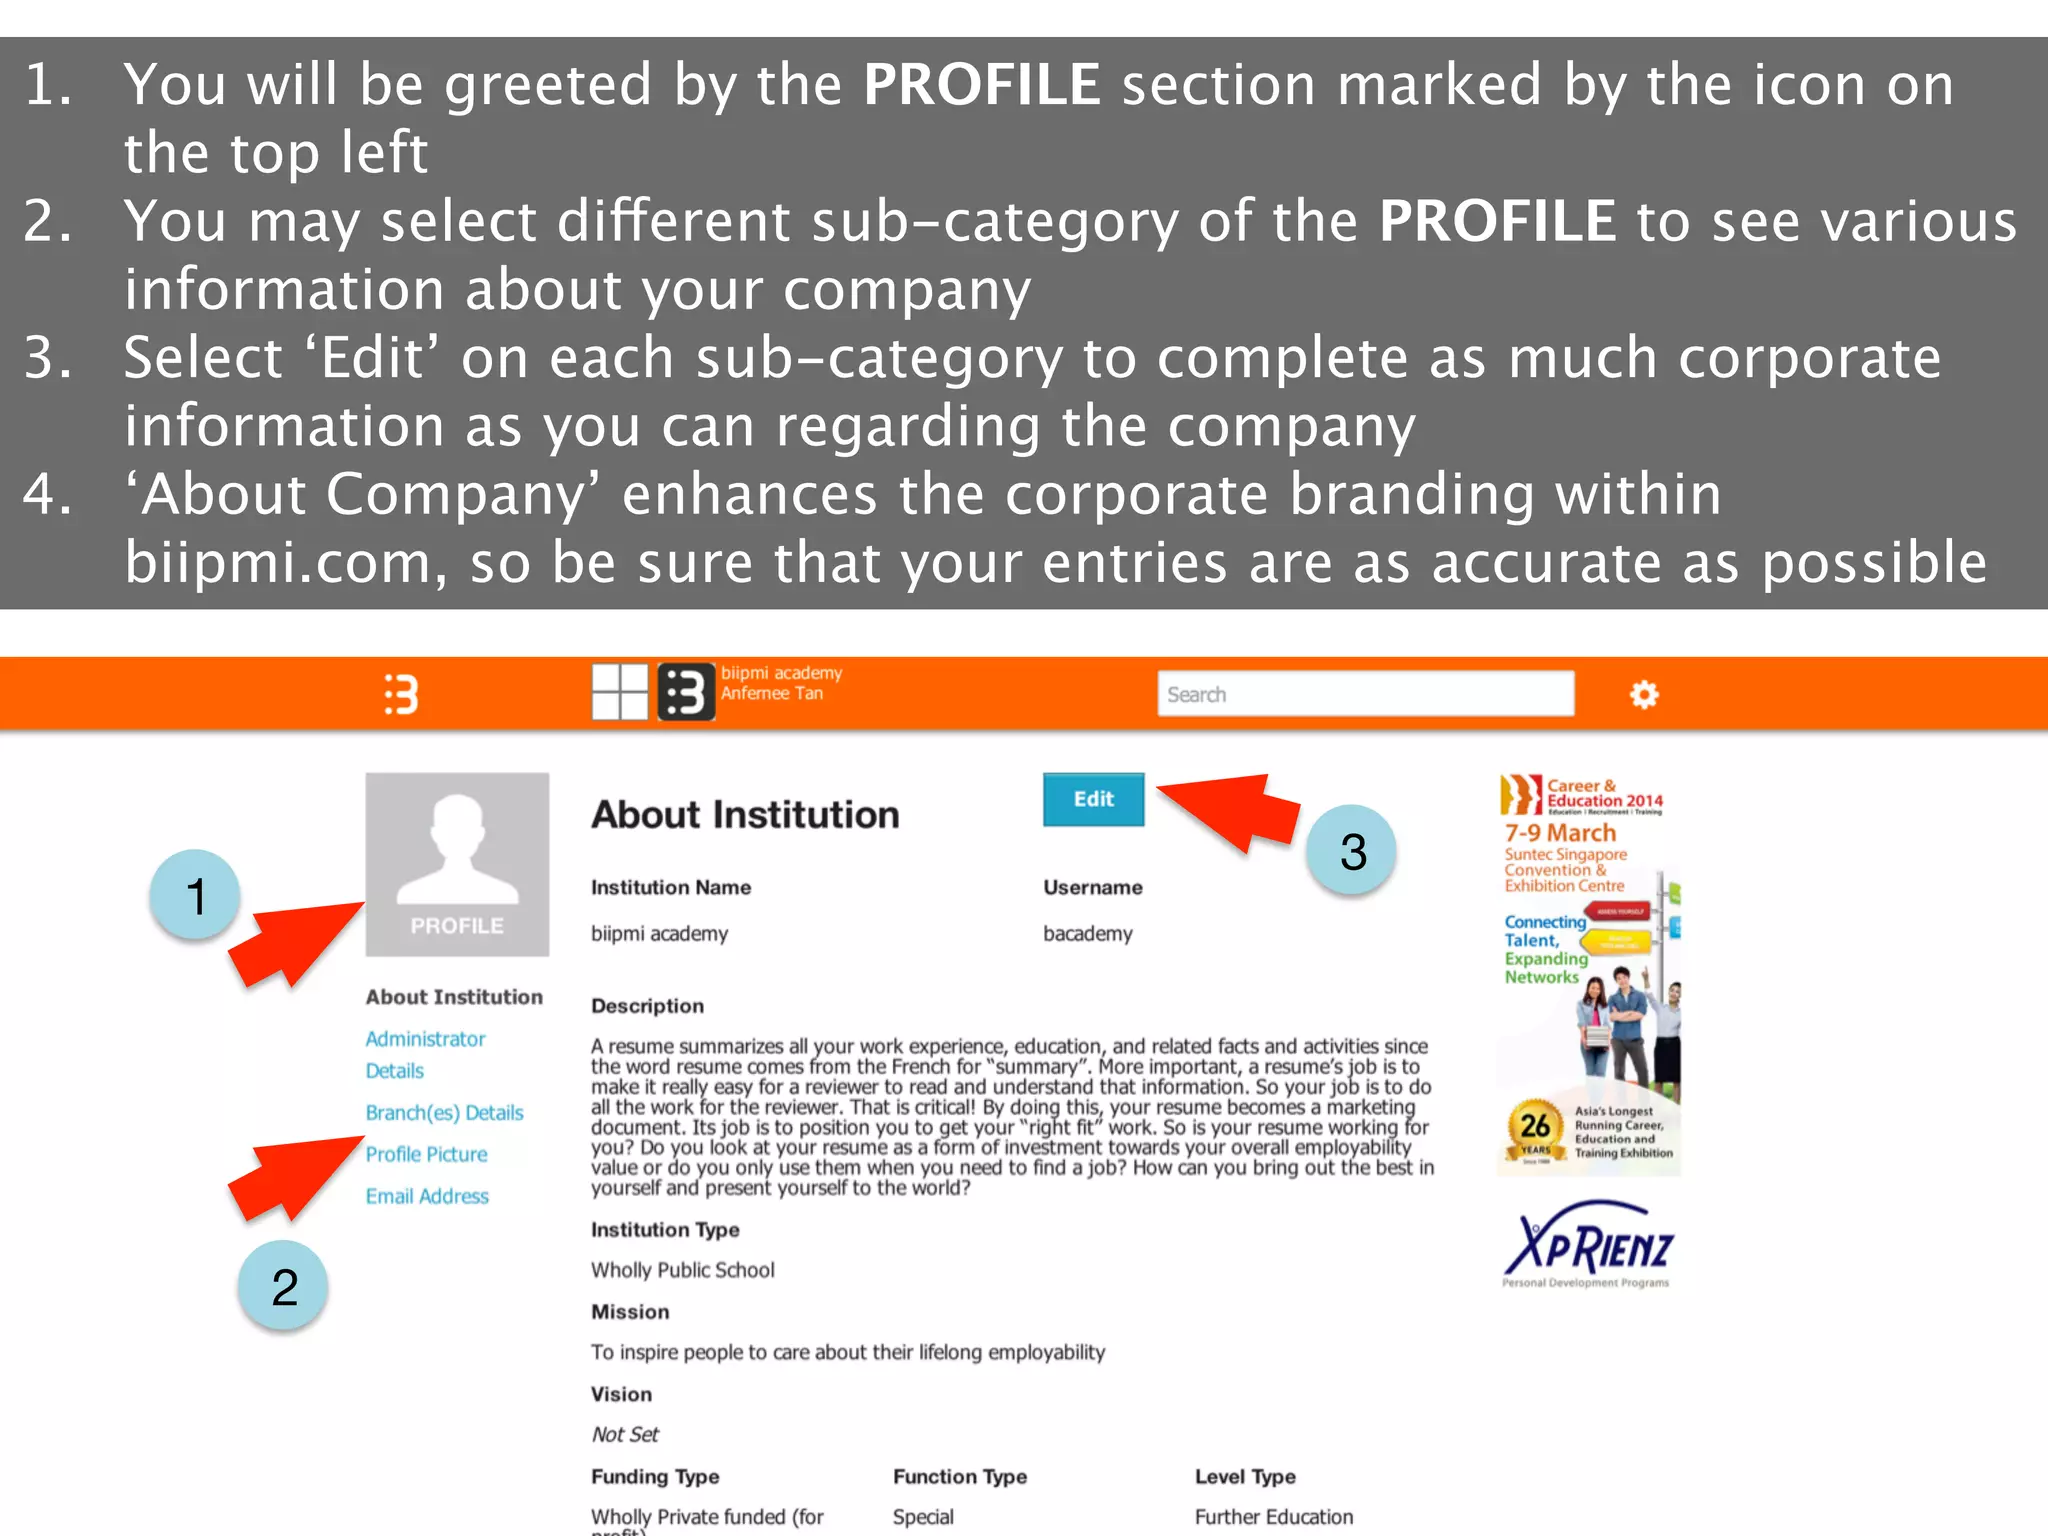
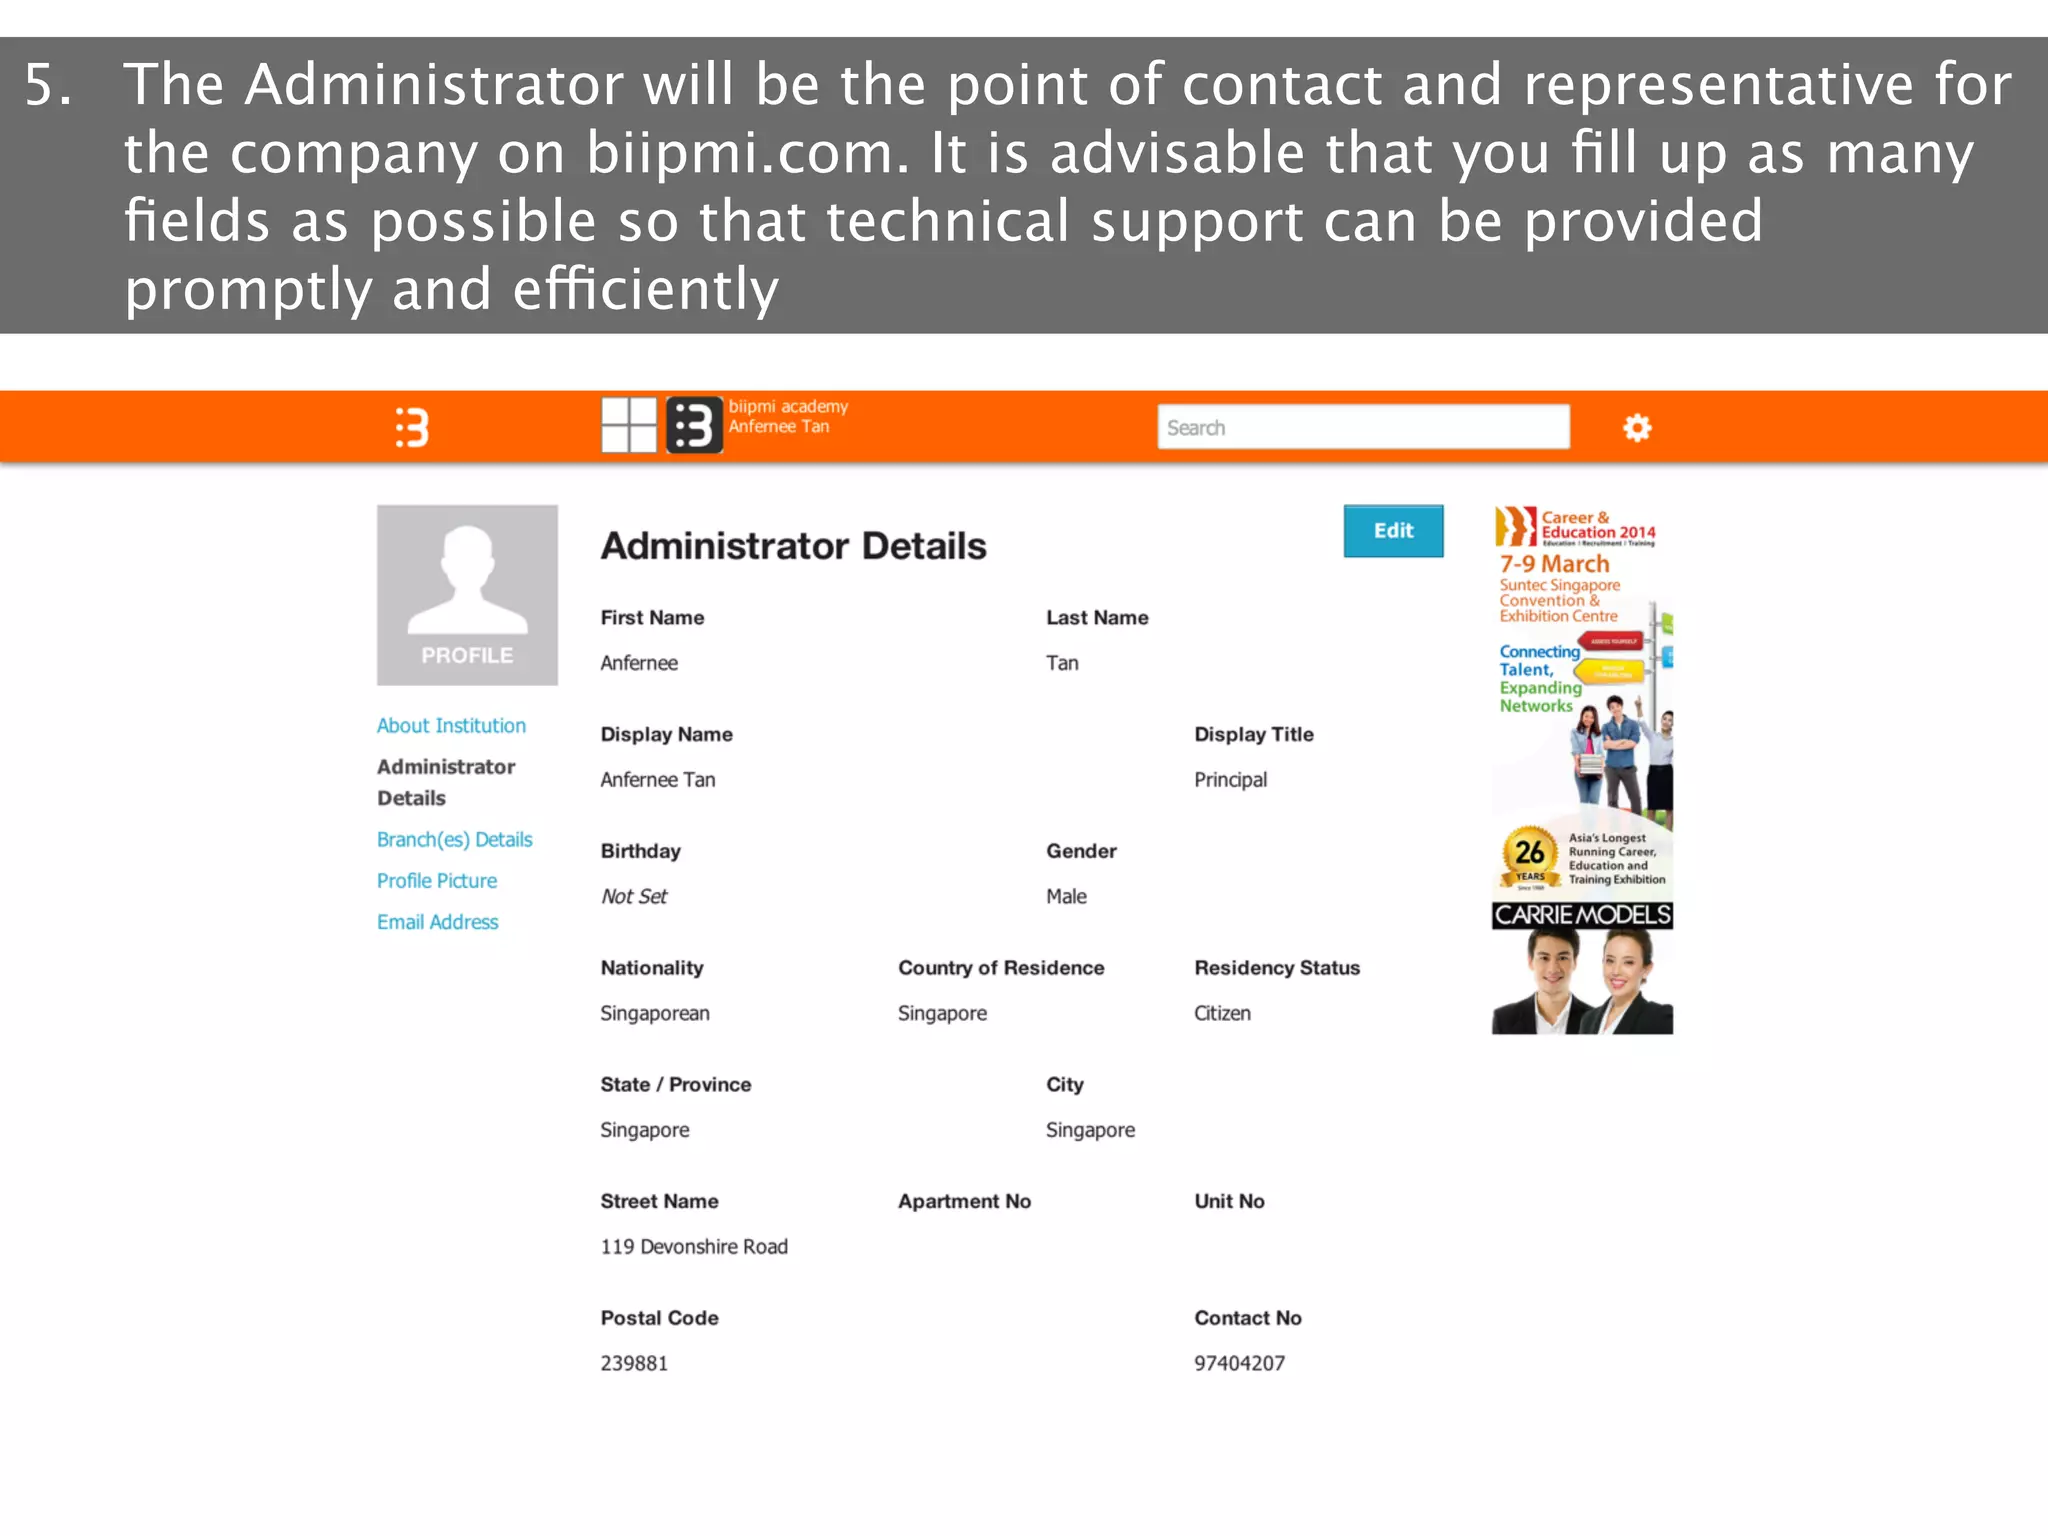
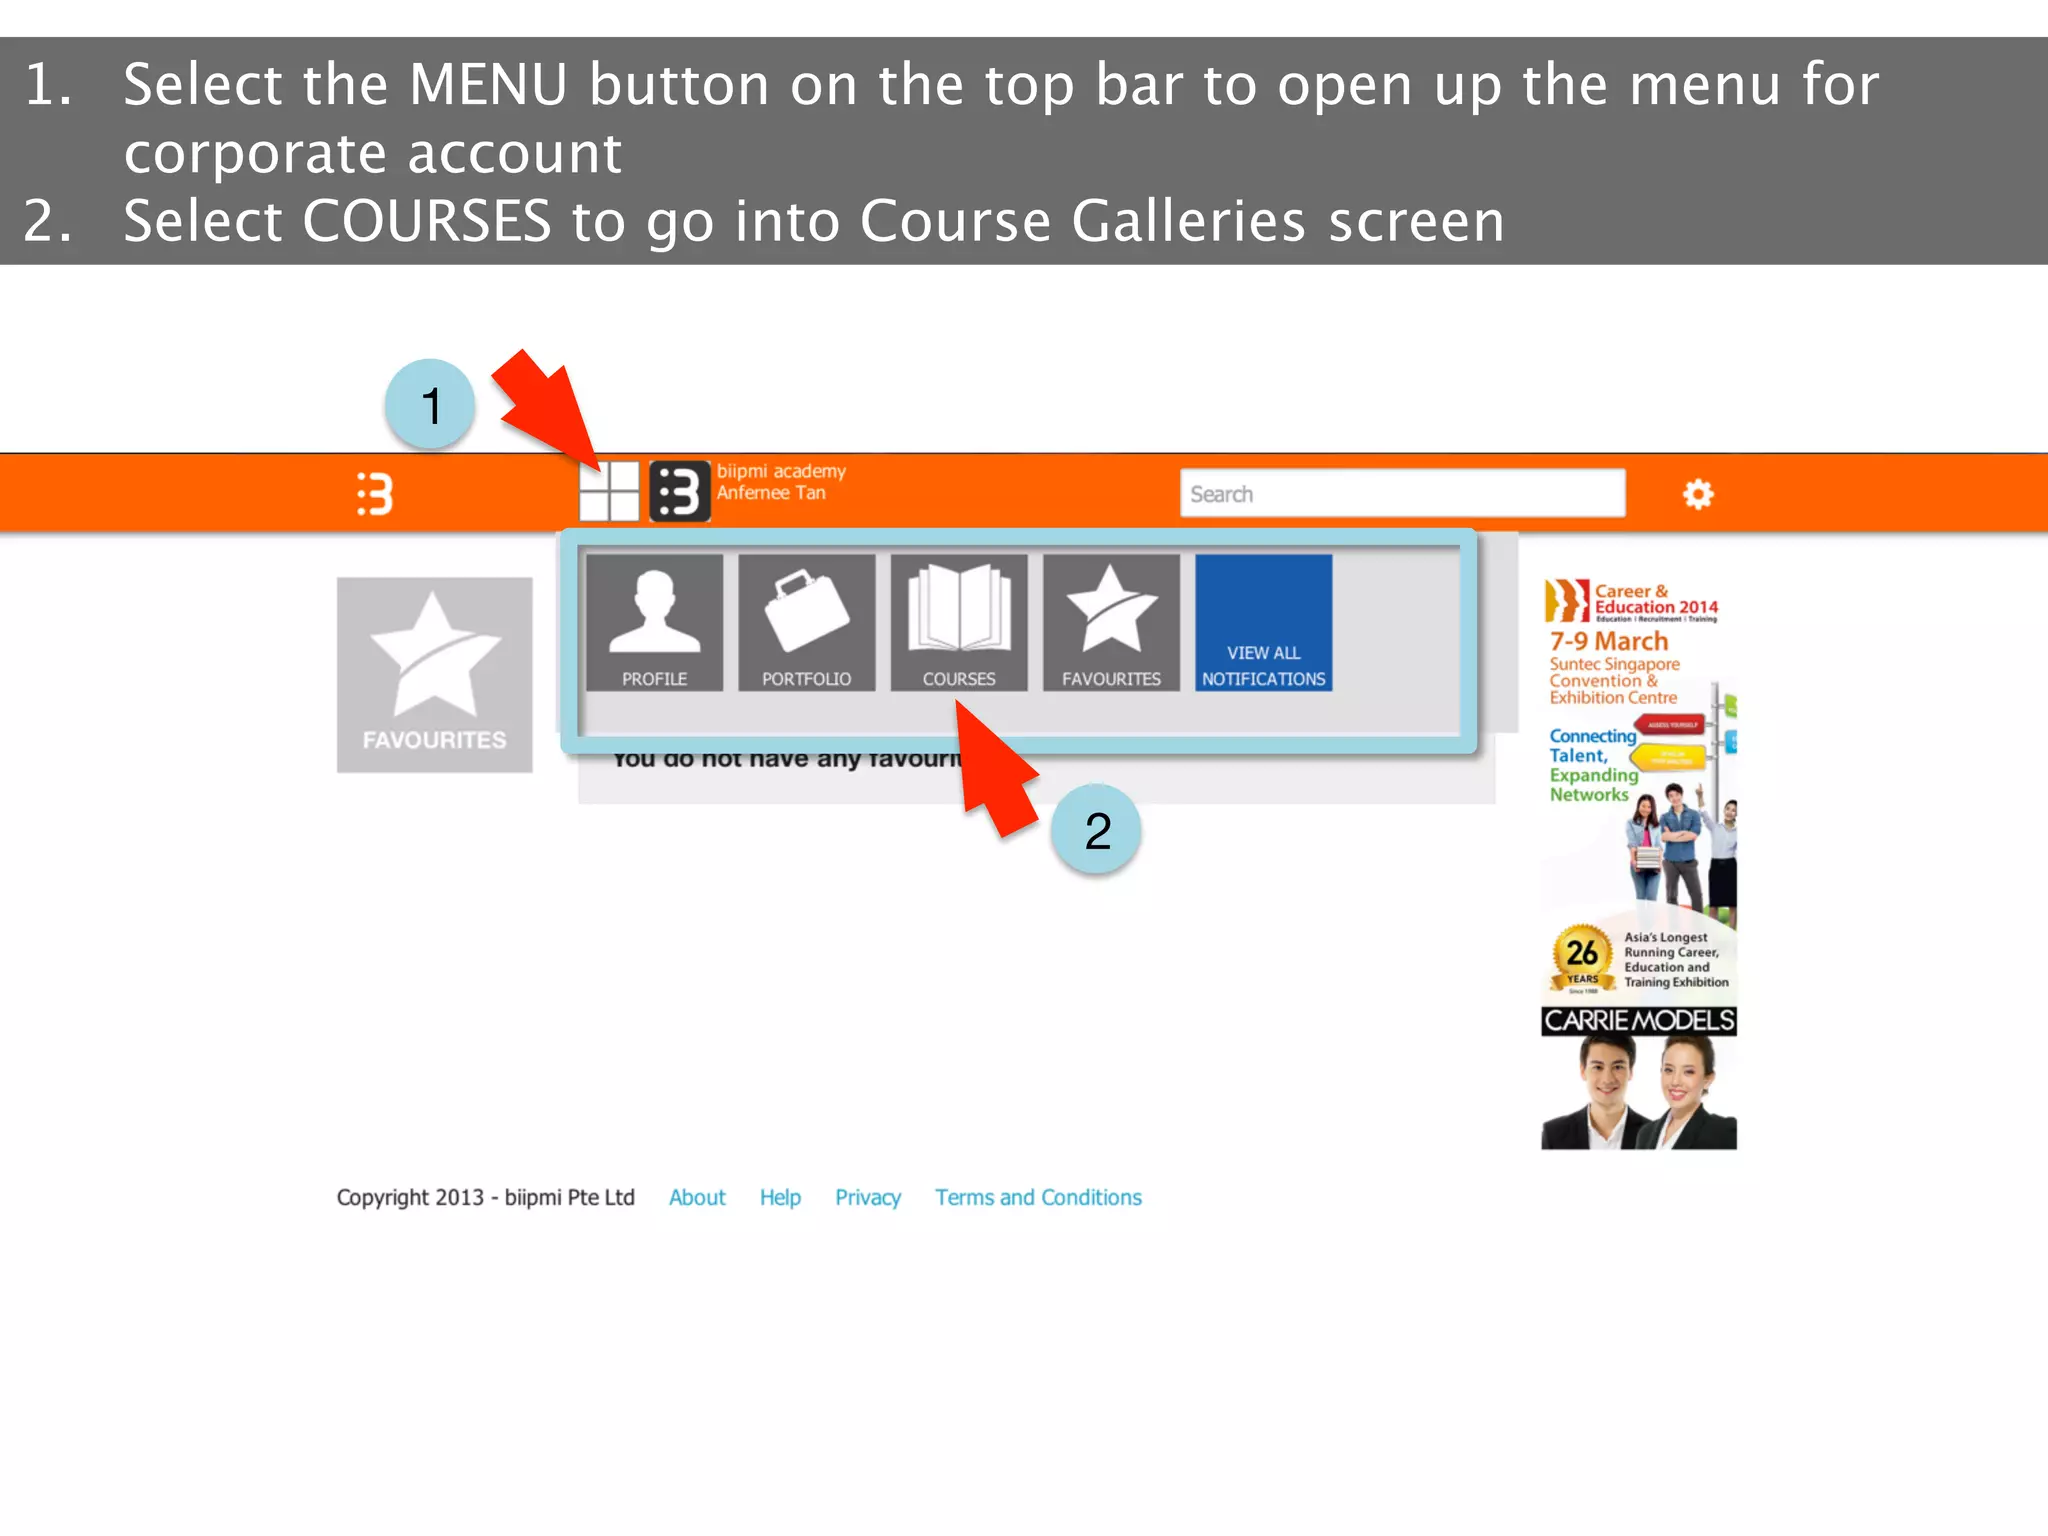
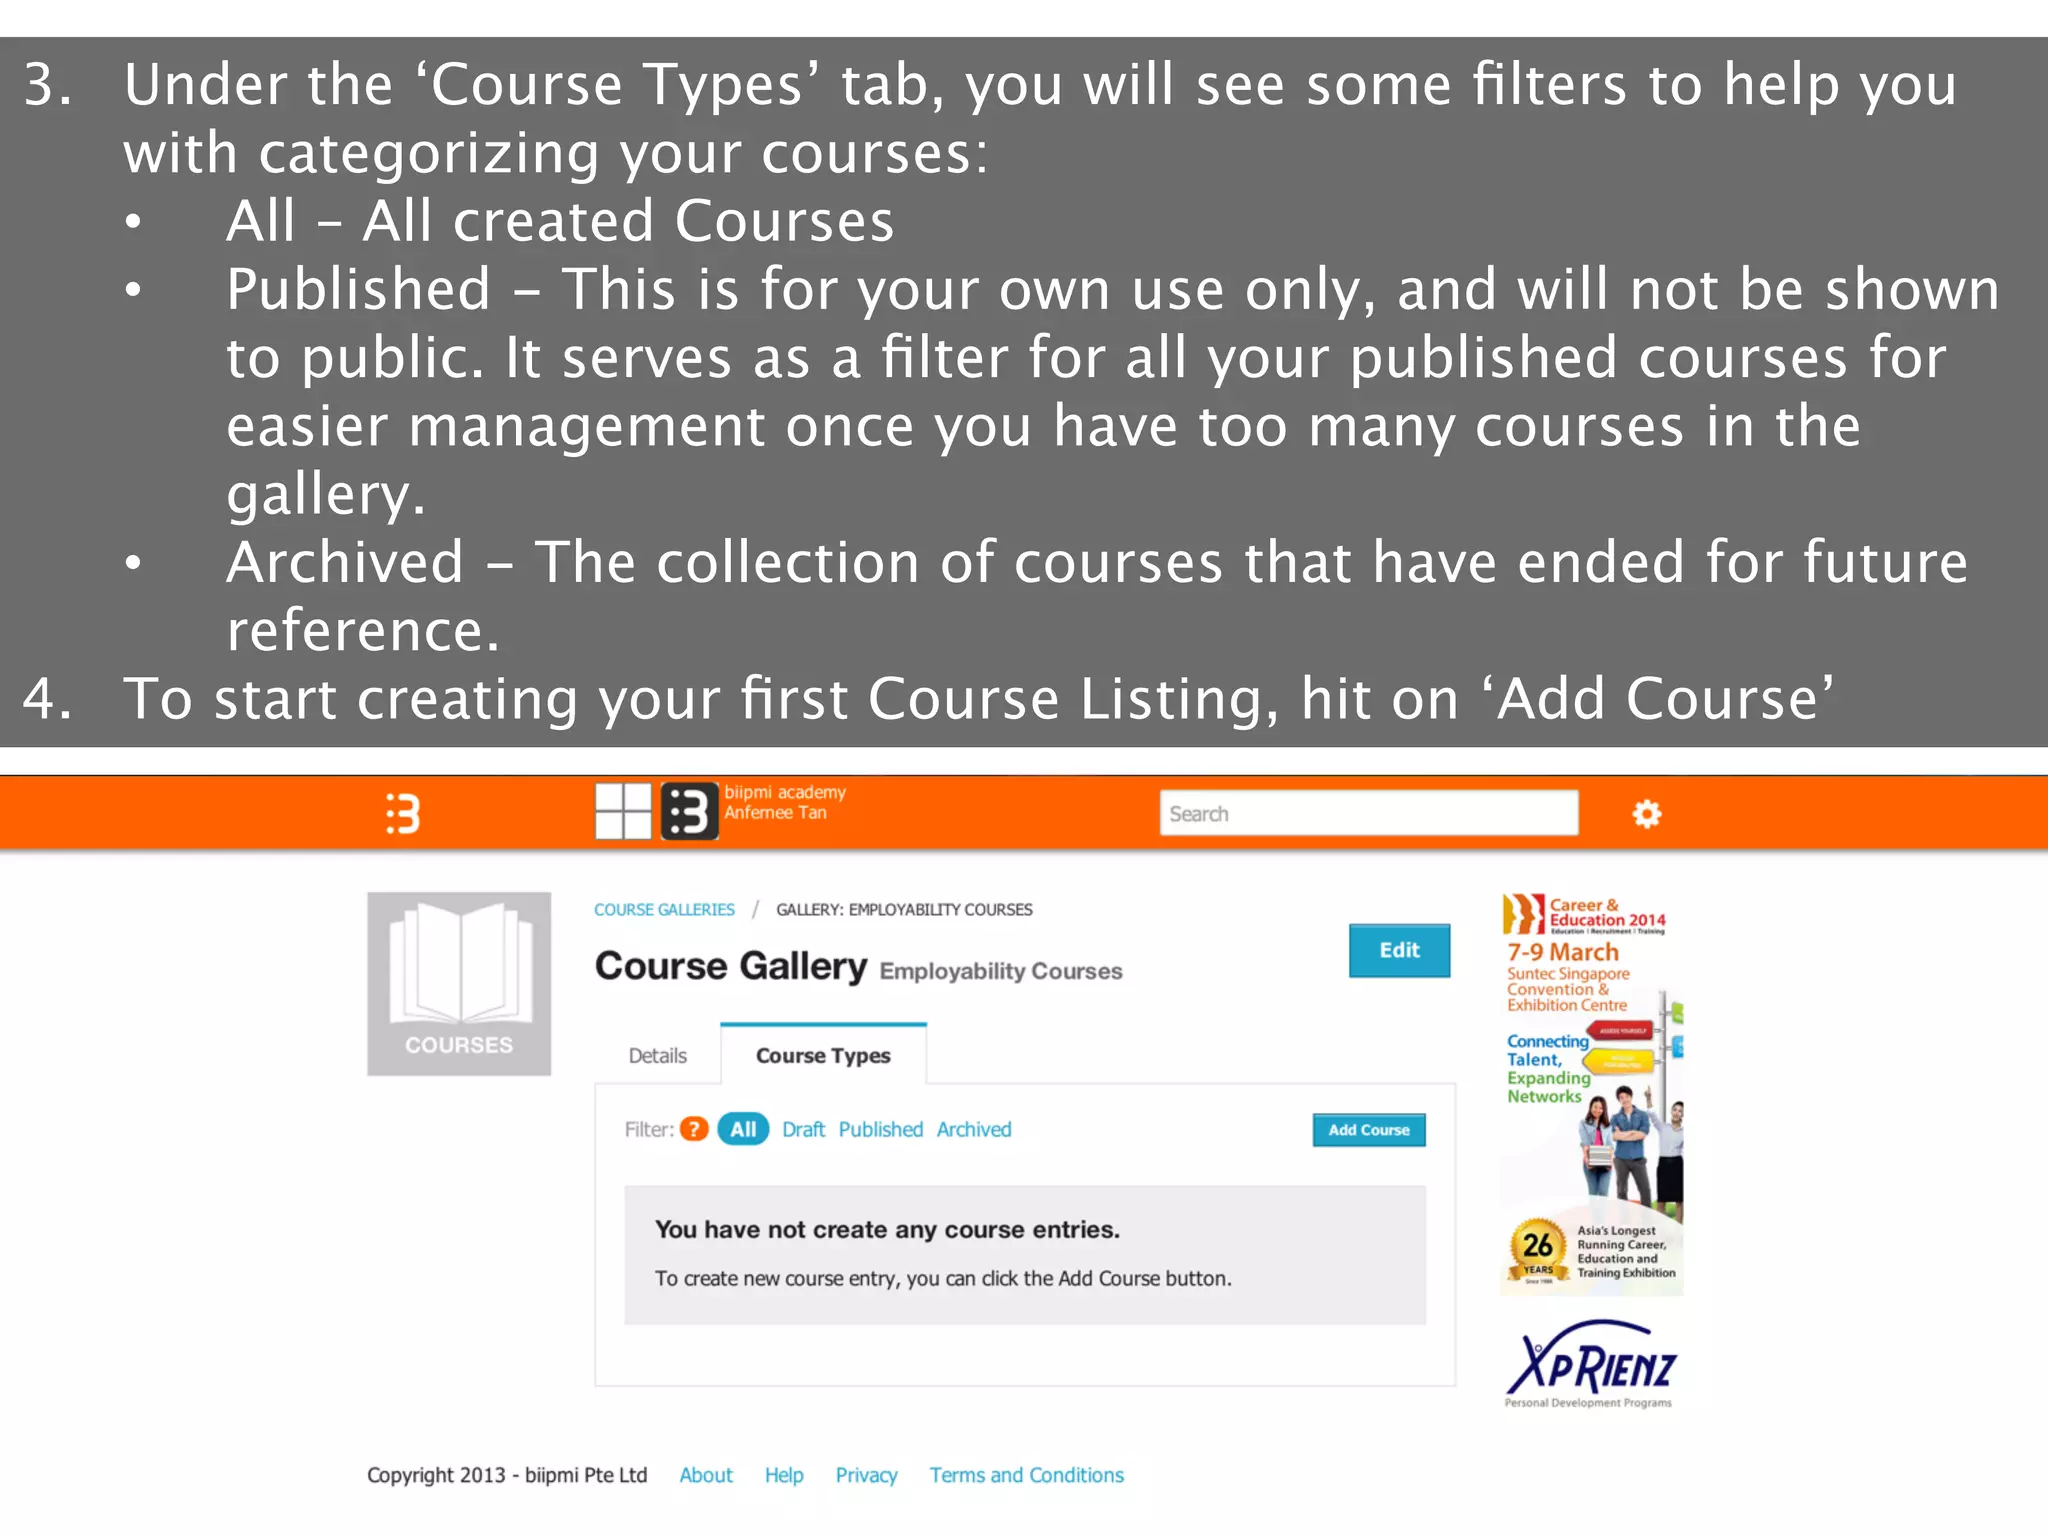
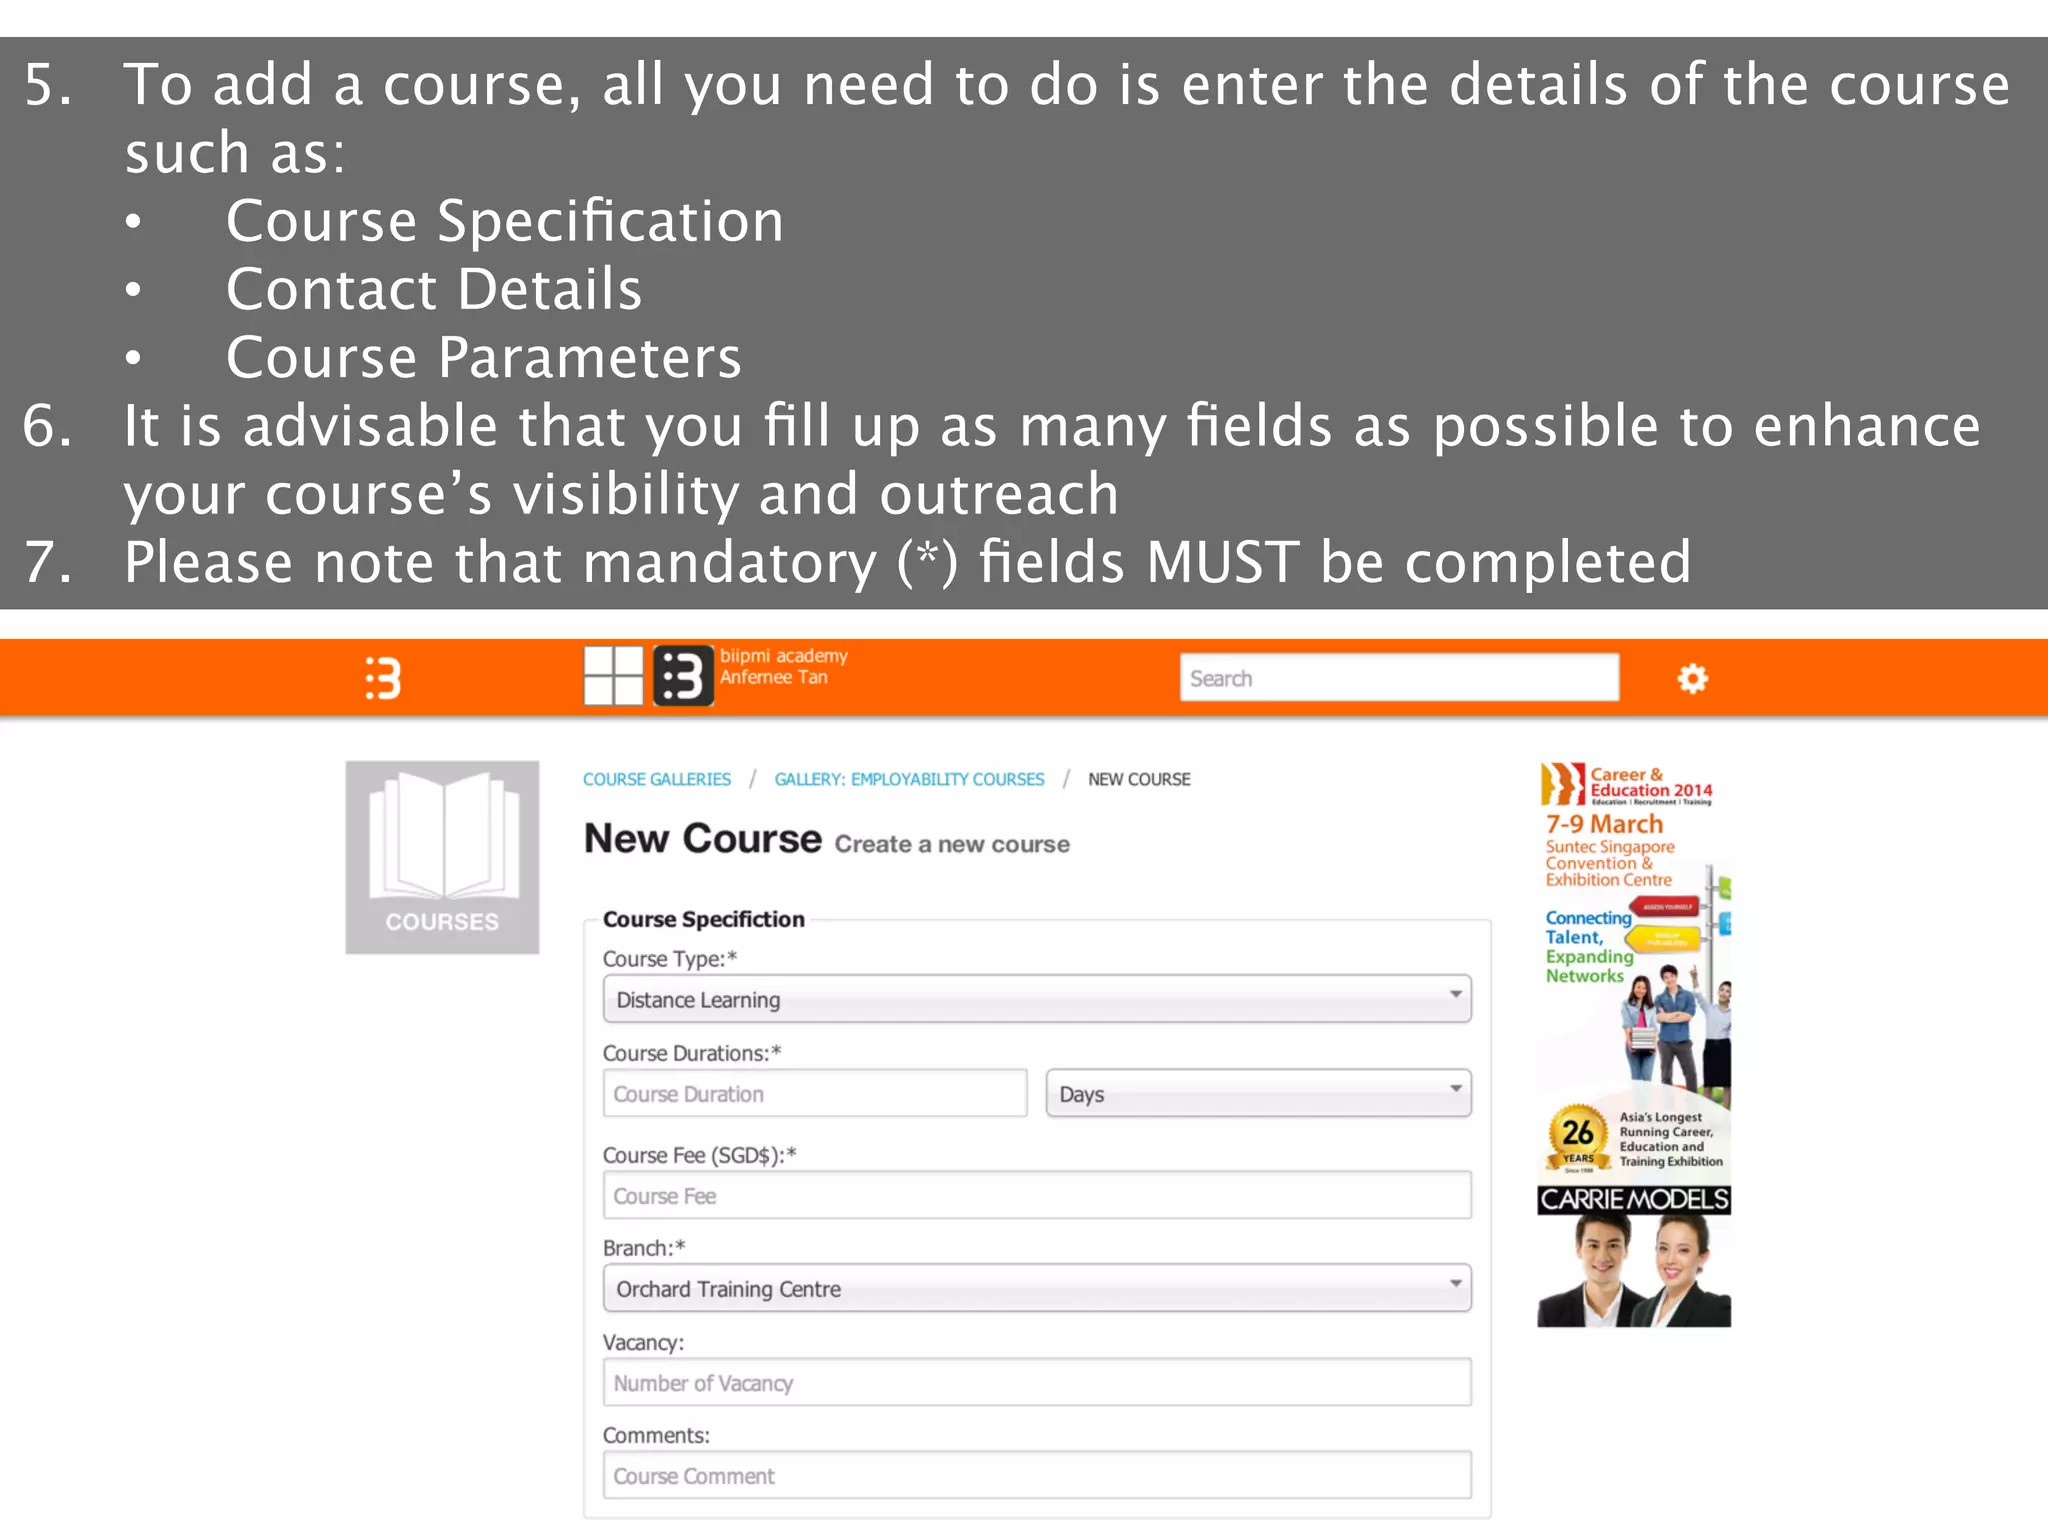
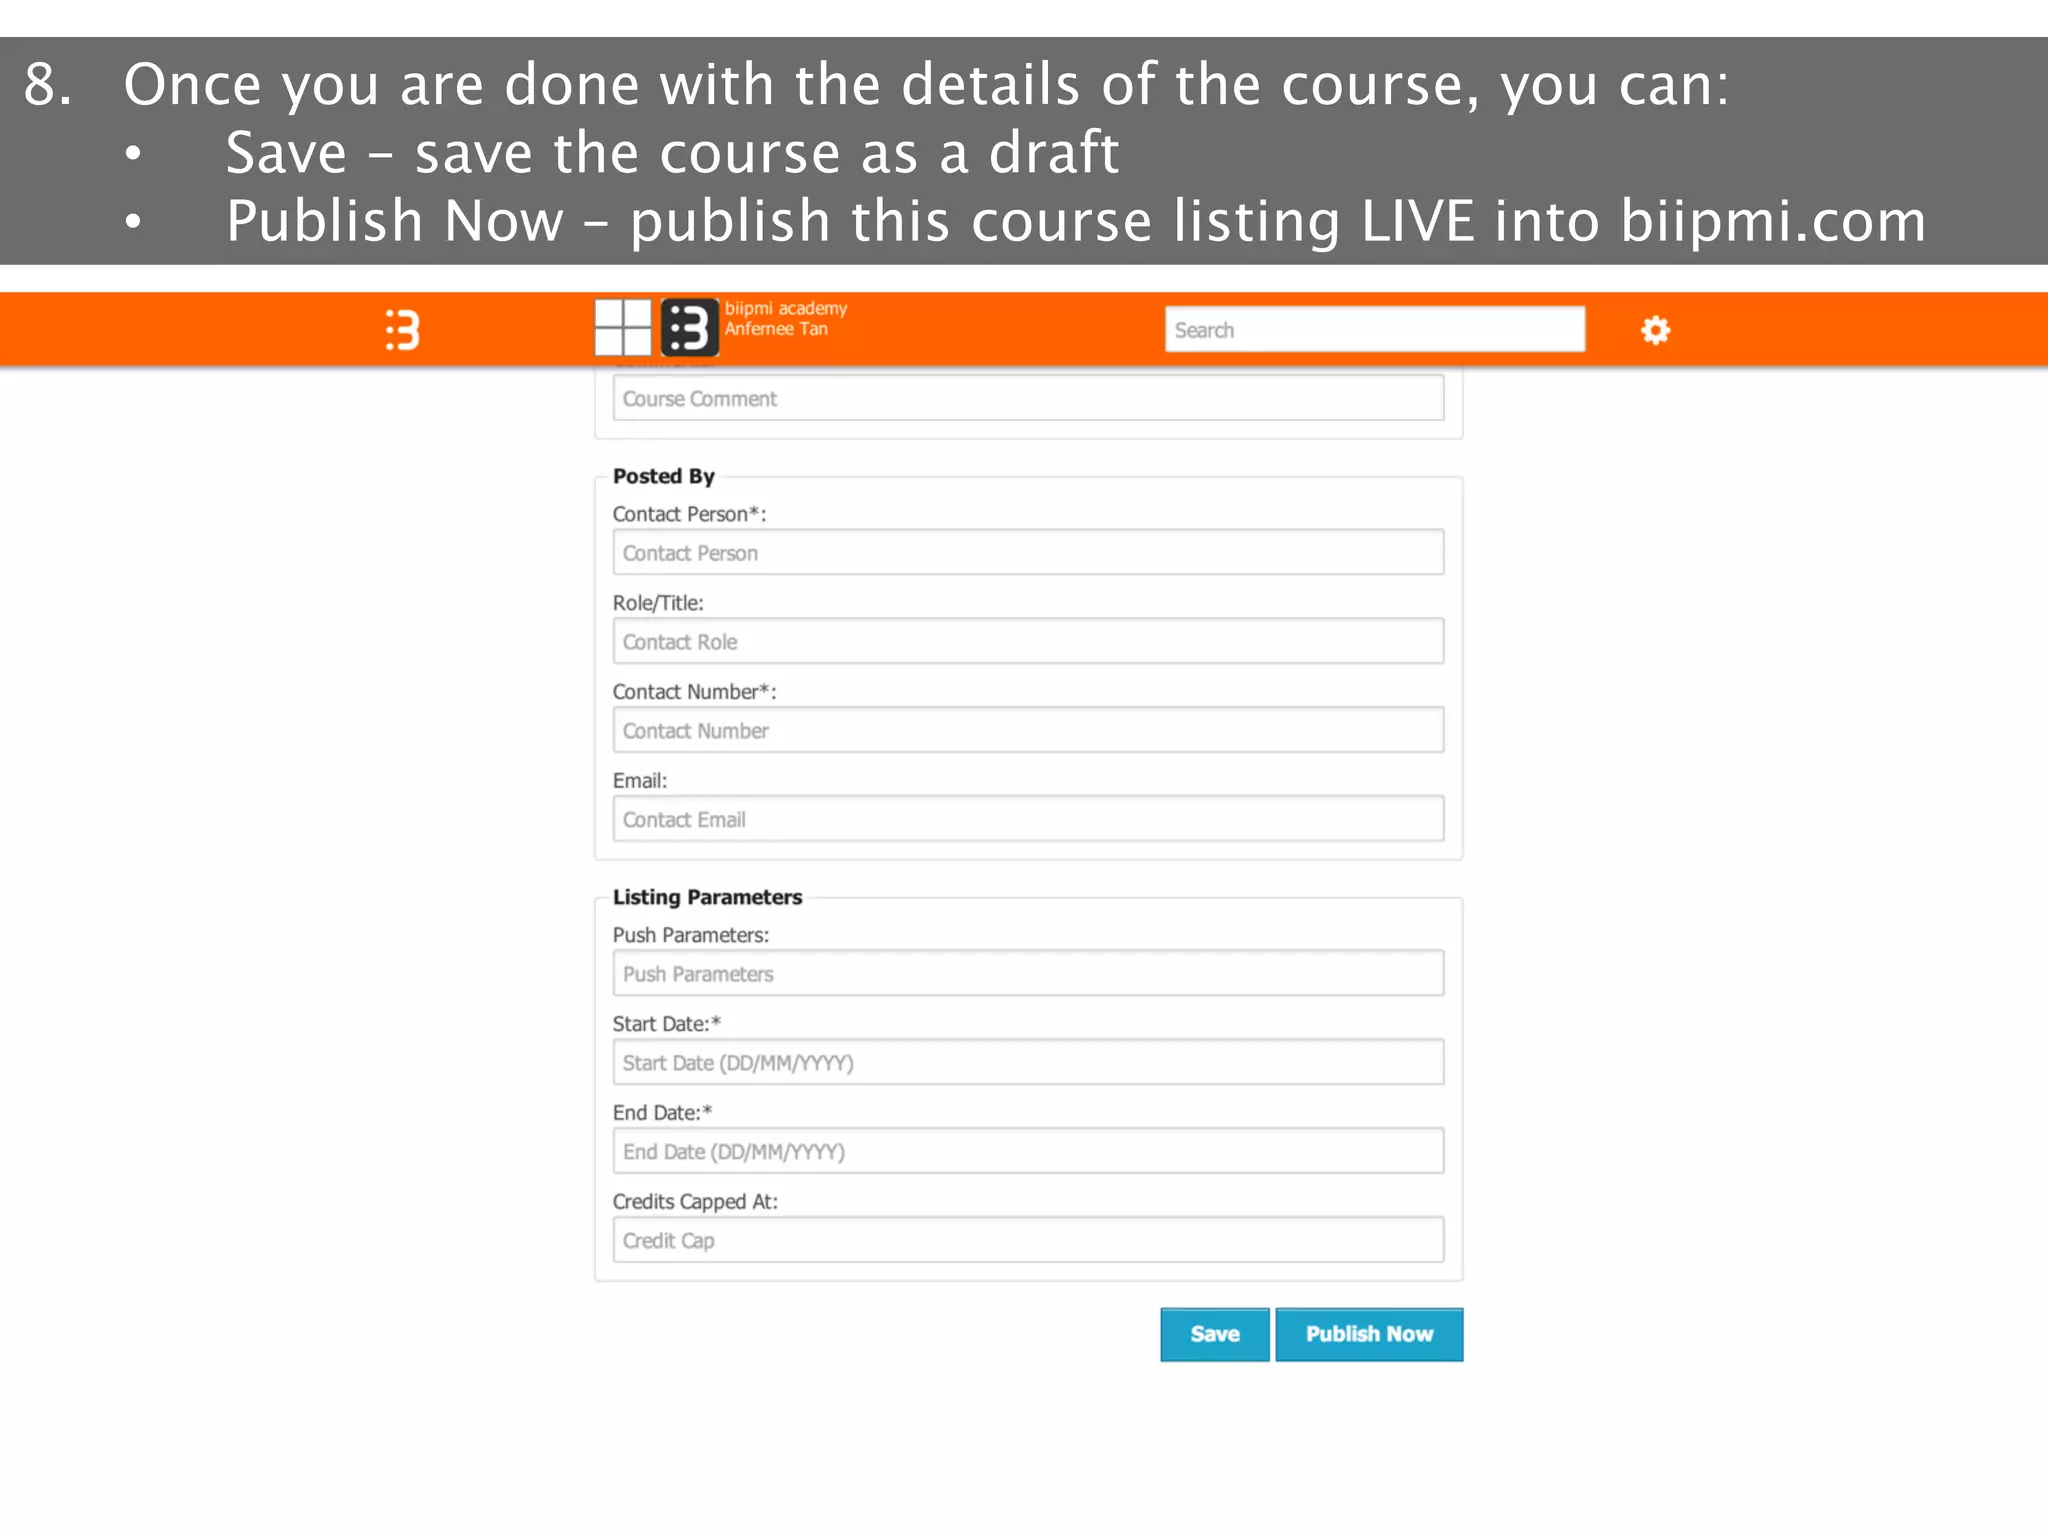
Guide to Creating Your First Course Listing

For Institution
We Match Your Course Offers
biipmi.com is the platform that
connects learners to the most
relevant courses.

It uses the latest in social media
concepts, lifelong learning
principles, and mobile marketing
innovations to provide individuals
with the best-matched course.
With biipmi.com,
institutions can achieve
the following: 

• 

Super-charge your brand through our
system 

• 

Push course listings to potential and
relevant learners with relevant interests

• 

Pull profiles and portfolios of potential
learners

• 

Utilize a series of analytic tools within the
entire ecosystem to enhance lifelong
learning 

• 

Tap on the vast network of mobile users to
increase your marketing outreach
Our Employability Ecosystem
biipmi	
  
Employability	
  	
  
Ecosystem	
  

Enhanced	
  Job	
  
Matching	
  

Individuals	
  
•  Students	
  
•  Working	
  adults	
  
•  Job	
  seekers	
  
Solu5ons:	
  
• 
Social	
  employability	
  
• 
Employability	
  Plans	
  
• 
Specific	
  resumes	
  
• 
PorBolio	
  integra5on	
  

Employers	
  
•  Company	
  HR	
  Department	
  
•  Recruiters	
  

Solu5ons:	
  
• 
Enhanced	
  recruitment	
  	
  
• 
Marke5ng	
  opportuni5es	
  

biipmi	
  channel	
  
(biipmi.net)	
  

biipmi.com,	
  biipNet	
  

Collabora5on	
  
	
  to	
  enhance	
  
Employability	
  

biipmi.print	
  	
  
(online	
  PME	
  magazine)	
  

Course	
  
Advisory	
  

Ins2tu2ons	
  
• 
Skills	
  Cer5fying	
  Body	
  
• 
Mainstream	
  Educa5onal	
  Ins5tutes	
  
• 
Private	
  Educa5on	
  Ins5tu5on	
  
Solu5ons:	
  
• 
Targeted	
  Course	
  Offering	
  
• 
Marke5ng	
  opportuni5es	
  

TaCES	
  	
  
(employability	
  consultancy)	
  

biipmi	
  bulle2n	
  	
  
(Email)	
  
First Step: 
Create Institution Account
1.  Proceed to biipmi.com
2.  Select ‘here’ to proceed to corporate signup (BOX 2) 
3.  Proceed to Sign In if you already have an account (BOX1)

1

2
4.  Fill in the details for fields
under:
•  Corporate Details (1)
•  Corporate Details (2)
•  Administrator Details
5.  Complete AT LEAST the
mandatory fields marked
with an asterisk (*)
6.  Please note: Be sure that
all information is accurate
and complete
7.  Once you are done, hit the ‘Submit’ button and you should see this
screen
8.  Proceed to check your email for account activation instruction
9.  You should receive the email from ‘admin@biipmi.com’ so be sure
to check your junk mail folder as well
10. You should see an email from ‘admin@biipmi.com’ requesting you
to ‘Complete your registration’
11. Please note that the verification link will only be valid for 48 hours.
Once the verification link goes invalid, you will have to register again
12. You will be brought to this webpage after hitting the Verification
link.
13. Complete ALL the fields here:
•  Password
•  Account Unsername (Please note that you can ONLY change the
Username once)
•  Account ‘Secret Question’ and ‘Secret Answers’
14. Once you have respond to the your account, you may ‘Sign In’ at
biipmi.com (BOX 1)

1
Second Step: 
Updating Institution Information
1.  You will be greeted by the PROFILE section marked by the icon on
the top left
2.  You may select different sub-category of the PROFILE to see various
information about your company
3.  Select ‘Edit’ on each sub-category to complete as much corporate
information as you can regarding the company
4.  ‘About Company’ enhances the corporate branding within
biipmi.com, so be sure that your entries are as accurate as possible

3

1

2
5.  The Administrator will be the point of contact and representative for
the company on biipmi.com. It is advisable that you fill up as many
fields as possible so that technical support can be provided
promptly and efficiently
6.  ‘Branch Details’ helps in the geo-location job matching later on
when you create your job postings, so be sure to create a ‘Branch’
for all your outlets
7.  You can set the appropriate corporate logo for your company

8.  Or add a secondary email to enhance the security feature
Third Step: 
Add Course Gallery
This	
  is	
  the	
  display	
  of	
  all	
  your	
  available	
  courses	
  where	
  users	
  will	
  select	
  and	
  sign	
  up	
  from	
  
this	
  gallery.	


Both	
  unpublished	
  and	
  published	
  courses	
  will	
  be	
  shown.	
  You	
  can	
  proceed	
  to	
  publish	
  
unpublished	
  courses	
  once	
  the	
  details	
  are	
  complete.	
  Even	
  if	
  the	
  admission	
  date	
  has	
  yet	
  
to	
  begin,	
  it	
  is	
  s5ll	
  fine	
  to	
  publish	
  as	
  you	
  will	
  be	
  asked	
  to	
  fill	
  in	
  a	
  start	
  and	
  end	
  date	
  for	
  
your	
  course	
  availability.	


Once	
  published,	
  you	
  will	
  be	
  able	
  to	
  view	
  a	
  summary	
  list	
  of	
  people	
  who	
  have	
  viewed	
  and	
  
signed	
  up	
  for	
  your	
  courses.	
  
• 
• 

In the following pages, you will see terminologies such as Course
Gallery, Course Types and Courses
Here is a simple illustration to explain these terminologies

biipmi.com Account

Institution might own
more than one Course
Gallery, eg: Business
Administration is one
Course Gallery

Course
Gallery A
Institution
Course
Gallery B

Course Listing are the
actual individual courses
under each Course
Gallery. Courses here
can be Drafts, Published
or Archived

Course Listing
A-1
Course Listing
A-2
Course Listing
B-1
1.  Select the MENU button on the top bar to open up the menu for
corporate account
2.  Select COURSES to go into Course Galleries screen
1

2
3.  Select ‘Add’ to start creating a new Course Gallery

3
4.  Complete as much details as possible about this Course Gallery
5.  Please note that mandatory (*) fields MUST be completed
6.  It is also important to know that Gallery is NOT the individual
courses but a collection of similar/ related courses
7.  Save the Course Gallery once you are done
Fourth Step: 
Add Course Listing
This	
  is	
  the	
  display	
  of	
  all	
  your	
  available	
  courses	
  where	
  users	
  will	
  select	
  and	
  sign	
  up	
  from	
  
this	
  gallery.	


Both	
  unpublished	
  and	
  published	
  courses	
  will	
  be	
  shown.	
  You	
  can	
  proceed	
  to	
  publish	
  
unpublished	
  courses	
  once	
  the	
  details	
  are	
  complete.	
  Even	
  if	
  the	
  admission	
  date	
  has	
  yet	
  
to	
  begin,	
  it	
  is	
  s5ll	
  fine	
  to	
  publish	
  as	
  you	
  will	
  be	
  asked	
  to	
  fill	
  in	
  a	
  start	
  and	
  end	
  date	
  for	
  
your	
  course	
  availability.	


Once	
  published,	
  you	
  will	
  be	
  able	
  to	
  view	
  a	
  summary	
  list	
  of	
  people	
  who	
  have	
  viewed	
  and	
  
signed	
  up	
  for	
  your	
  courses.	
  
1.  Under each Course Gallery created you have ‘Details’ and ‘Course
Types’ tab
2.  Check out the details of your Course Gallery under ‘Details’ tab
3.  Under the ‘Course Types’ tab, you will see some filters to help you
with categorizing your courses:
•  All – All created Courses
•  Published - This is for your own use only, and will not be shown
to public. It serves as a filter for all your published courses for
easier management once you have too many courses in the
gallery.
•  Archived - The collection of courses that have ended for future
reference.
4.  To start creating your first Course Listing, hit on ‘Add Course’
5.  To add a course, all you need to do is enter the details of the course
such as:
•  Course Specification
•  Contact Details 
•  Course Parameters
6.  It is advisable that you fill up as many fields as possible to enhance
your course’s visibility and outreach 
7.  Please note that mandatory (*) fields MUST be completed
8.  Once you are done with the details of the course, you can:
•  Save – save the course as a draft
•  Publish Now – publish this course listing LIVE into biipmi.com
Want to know more?
Here are some links…

•  Employability Platform: 
–  http://biipmi.com/

•  Blog: 
–  http://biipmi.net/

•  About Us: 
–  http://biipmi.net/about/

•  Total Solution: 
–  http://biipmi.net/our-solutions/

•  Academic Releases: 
–  http://biipmi.net/academic-release/
©	
  biipmi	
  Pte	
  Ltd	
  2013	
  

We Match Your Course Offers

biipmi.com - Guide to Creating Your First Course Listing

  • 1.
    Guide to CreatingYour First Course Listing For Institution
  • 2.
    We Match YourCourse Offers biipmi.com is the platform that connects learners to the most relevant courses. It uses the latest in social media concepts, lifelong learning principles, and mobile marketing innovations to provide individuals with the best-matched course.
  • 3.
    With biipmi.com, institutions canachieve the following: •  Super-charge your brand through our system •  Push course listings to potential and relevant learners with relevant interests •  Pull profiles and portfolios of potential learners •  Utilize a series of analytic tools within the entire ecosystem to enhance lifelong learning •  Tap on the vast network of mobile users to increase your marketing outreach
  • 4.
    Our Employability Ecosystem biipmi   Employability     Ecosystem   Enhanced  Job   Matching   Individuals   •  Students   •  Working  adults   •  Job  seekers   Solu5ons:   •  Social  employability   •  Employability  Plans   •  Specific  resumes   •  PorBolio  integra5on   Employers   •  Company  HR  Department   •  Recruiters   Solu5ons:   •  Enhanced  recruitment     •  Marke5ng  opportuni5es   biipmi  channel   (biipmi.net)   biipmi.com,  biipNet   Collabora5on    to  enhance   Employability   biipmi.print     (online  PME  magazine)   Course   Advisory   Ins2tu2ons   •  Skills  Cer5fying  Body   •  Mainstream  Educa5onal  Ins5tutes   •  Private  Educa5on  Ins5tu5on   Solu5ons:   •  Targeted  Course  Offering   •  Marke5ng  opportuni5es   TaCES     (employability  consultancy)   biipmi  bulle2n     (Email)  
  • 5.
    First Step: CreateInstitution Account
  • 6.
    1.  Proceed tobiipmi.com 2.  Select ‘here’ to proceed to corporate signup (BOX 2) 3.  Proceed to Sign In if you already have an account (BOX1) 1 2
  • 7.
    4.  Fill inthe details for fields under: •  Corporate Details (1) •  Corporate Details (2) •  Administrator Details 5.  Complete AT LEAST the mandatory fields marked with an asterisk (*) 6.  Please note: Be sure that all information is accurate and complete
  • 8.
    7.  Once youare done, hit the ‘Submit’ button and you should see this screen 8.  Proceed to check your email for account activation instruction 9.  You should receive the email from ‘admin@biipmi.com’ so be sure to check your junk mail folder as well
  • 9.
    10. You should seean email from ‘admin@biipmi.com’ requesting you to ‘Complete your registration’ 11. Please note that the verification link will only be valid for 48 hours. Once the verification link goes invalid, you will have to register again
  • 10.
    12. You will bebrought to this webpage after hitting the Verification link. 13. Complete ALL the fields here: •  Password •  Account Unsername (Please note that you can ONLY change the Username once) •  Account ‘Secret Question’ and ‘Secret Answers’
  • 11.
    14. Once you haverespond to the your account, you may ‘Sign In’ at biipmi.com (BOX 1) 1
  • 12.
    Second Step: UpdatingInstitution Information
  • 13.
    1.  You willbe greeted by the PROFILE section marked by the icon on the top left 2.  You may select different sub-category of the PROFILE to see various information about your company 3.  Select ‘Edit’ on each sub-category to complete as much corporate information as you can regarding the company 4.  ‘About Company’ enhances the corporate branding within biipmi.com, so be sure that your entries are as accurate as possible 3 1 2
  • 14.
    5.  The Administratorwill be the point of contact and representative for the company on biipmi.com. It is advisable that you fill up as many fields as possible so that technical support can be provided promptly and efficiently
  • 15.
    6.  ‘Branch Details’helps in the geo-location job matching later on when you create your job postings, so be sure to create a ‘Branch’ for all your outlets
  • 16.
    7.  You canset the appropriate corporate logo for your company 8.  Or add a secondary email to enhance the security feature
  • 17.
    Third Step: AddCourse Gallery This  is  the  display  of  all  your  available  courses  where  users  will  select  and  sign  up  from   this  gallery.     Both  unpublished  and  published  courses  will  be  shown.  You  can  proceed  to  publish   unpublished  courses  once  the  details  are  complete.  Even  if  the  admission  date  has  yet   to  begin,  it  is  s5ll  fine  to  publish  as  you  will  be  asked  to  fill  in  a  start  and  end  date  for   your  course  availability.     Once  published,  you  will  be  able  to  view  a  summary  list  of  people  who  have  viewed  and   signed  up  for  your  courses.  
  • 18.
    •  •  In the followingpages, you will see terminologies such as Course Gallery, Course Types and Courses Here is a simple illustration to explain these terminologies biipmi.com Account Institution might own more than one Course Gallery, eg: Business Administration is one Course Gallery Course Gallery A Institution Course Gallery B Course Listing are the actual individual courses under each Course Gallery. Courses here can be Drafts, Published or Archived Course Listing A-1 Course Listing A-2 Course Listing B-1
  • 19.
    1.  Select theMENU button on the top bar to open up the menu for corporate account 2.  Select COURSES to go into Course Galleries screen 1 2
  • 20.
    3.  Select ‘Add’to start creating a new Course Gallery 3
  • 21.
    4.  Complete asmuch details as possible about this Course Gallery 5.  Please note that mandatory (*) fields MUST be completed 6.  It is also important to know that Gallery is NOT the individual courses but a collection of similar/ related courses 7.  Save the Course Gallery once you are done
  • 22.
    Fourth Step: AddCourse Listing This  is  the  display  of  all  your  available  courses  where  users  will  select  and  sign  up  from   this  gallery.     Both  unpublished  and  published  courses  will  be  shown.  You  can  proceed  to  publish   unpublished  courses  once  the  details  are  complete.  Even  if  the  admission  date  has  yet   to  begin,  it  is  s5ll  fine  to  publish  as  you  will  be  asked  to  fill  in  a  start  and  end  date  for   your  course  availability.     Once  published,  you  will  be  able  to  view  a  summary  list  of  people  who  have  viewed  and   signed  up  for  your  courses.  
  • 23.
    1.  Under eachCourse Gallery created you have ‘Details’ and ‘Course Types’ tab 2.  Check out the details of your Course Gallery under ‘Details’ tab
  • 24.
    3.  Under the‘Course Types’ tab, you will see some filters to help you with categorizing your courses: •  All – All created Courses •  Published - This is for your own use only, and will not be shown to public. It serves as a filter for all your published courses for easier management once you have too many courses in the gallery. •  Archived - The collection of courses that have ended for future reference. 4.  To start creating your first Course Listing, hit on ‘Add Course’
  • 25.
    5.  To adda course, all you need to do is enter the details of the course such as: •  Course Specification •  Contact Details •  Course Parameters 6.  It is advisable that you fill up as many fields as possible to enhance your course’s visibility and outreach 7.  Please note that mandatory (*) fields MUST be completed
  • 26.
    8.  Once youare done with the details of the course, you can: •  Save – save the course as a draft •  Publish Now – publish this course listing LIVE into biipmi.com
  • 27.
    Want to knowmore? Here are some links… •  Employability Platform: –  http://biipmi.com/ •  Blog: –  http://biipmi.net/ •  About Us: –  http://biipmi.net/about/ •  Total Solution: –  http://biipmi.net/our-solutions/ •  Academic Releases: –  http://biipmi.net/academic-release/
  • 28.
    ©  biipmi  Pte  Ltd  2013   We Match Your Course Offers