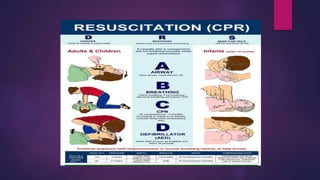
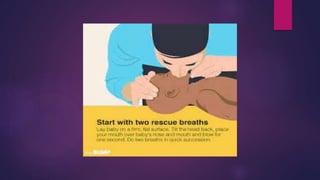
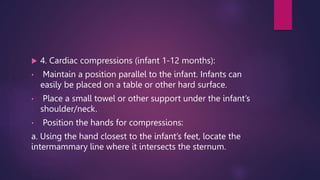
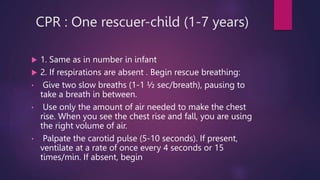
BCLS(Basic cardiac life
support) INFANT and CHILD
PREPARED/DISCUSSED BY: JENNIFER I.TAM, RM,PH.D
Cardiopulmonary Resuscitation
 Cardiopulmonary resuscitation (CPR) – Is the basic life-
saving skill that is utilized in the event of cardiac,
respiratory or cardiopulmonary arrest to maintain tissue
oxygenation by providing external cardiac compression
and/or artificial respiration.
 This life saving skill is initiated in the event that an
individual is found with or develops the absence of a
pulse or respiration or both.
 The basic goals of CPR, which are often referred to as the
ABC’s of emergency resuscitation, follow:
 A: Establish Airway
 B: Initiate Breathing
 C: Maintain Circulation
Assessment
• Assess responsiveness and level of consciousness by
gently shaking or tapping the client while shouting,
“Are you OK?”
• Assess the amount and abilities of any available
assistance. CPR cannot be performed indefinitely by a
single individual.
• Assess the client’s position (flat) on a hard surface, is
essential to assess respiratory and cardiac status and
to adequately perform cardiopulmonary
resuscitation.
Care must be taken when positioning the client with
suspected head or neck injury.
• Assess respiratory status by looking for chest rise and
fall, listening for air exchange, and feeling for the
presence of air movement.
A patent airway is essential for successful artificial
respirations. The head tilt/chin lift assists in preventing
the tongue from obstructing the airway. The jaw
thrust- is used when a head or neck injury is suspected
because it prevents extension of the neck and
decreases the potential of further injury.
 Assess circulatory status by using the carotid or
brachial pulse points. Presence of pulse
contraindicates the initiation of external cardiac
compressions.
Check for safety
 Make sure it’s safe to provide assistance.
 Look around for hazards that could harm you or the victim
Check for response
1. Assess responsiveness, activate emergency medical
system, position the child, position self, open airway, and
assess for respirations. Remember respiratory arrest is more
common in the pediatric population.
2. If respirations are absent , begin rescue breathing:
• Avoid overextension of the infant’s neck.
• Place a small towel or diaper under the infant’s shoulder
or use a hand to support the neck.
• Make a tight seal over both the infant’s nose and
mouth and gently administer artificial respirations.
• Give two slow breaths (1-1 ½ sec/breath), pausing to
take a breath in between.
• Use only the amount of air needed to make the chest
rise.
 3. Assess circulatory status using the brachial pulse:
• Locate the brachial pulse on the inside of the upper arm
between the elbow and the shoulder by placing your
thumb on the outside of the arm palpating the proximal
side of the arm with the index finger and middle finger.
• If a pulse is palpated, continue rescue breathing 20
times/min.or once every 3 seconds.
• If a pulse is absent, begin cardiac compressions.
 4. Cardiac compressions (infant 1-12 months):
• Maintain a position parallel to the infant. Infants can
easily be placed on a table or other hard surface.
• Place a small towel or other support under the infant’s
shoulder/neck.
• Position the hands for compressions:
a. Using the hand closest to the infant’s feet, locate the
intermammary line where it intersects the sternum.
 b. Place the index finger 1cm below this location on the
sternum and place the middle finger next to the index
finger.
 c. Using these two fingers, compress in a downward
motion 1.3-2.5cm (1/2-1 inch) at the rate of 100
times/min.
 d. Keep the other hand on the infant’s forehead
 e. At the end of every fifth compression, administer a
ventilation (1-1 ½ seconds)
 F. Re-evaluate infant after 10 cycles.
CPR : One rescuer-child (1-7 years)
 1. Same as in number in infant
 2. If respirations are absent . Begin rescue breathing:
• Give two slow breaths (1-1 ½ sec/breath), pausing to
take a breath in between.
• Use only the amount of air needed to make the chest
rise. When you see the chest rise and fall, you are using
the right volume of air.
• Palpate the carotid pulse (5-10 seconds). If present,
ventilate at a rate of once every 4 seconds or 15
times/min. If absent, begin
 cardiac compressions,
 3. Cardiac compressions (child 1-7 years)
• Maintain a position on knees parallel to child’s sternum.
• Place a small towel or other support under the child’s
shoulder.
• Position the hands for compressions
a. Locate the lower margin of the rib cage using the hand
closest to the feet and find the notch where ribs and
sternum meet.
 b. Place the middle finger of this hand on notch and then
place the index finger next to the middle finger.
 c. Place the heel of the other hand next to the index
finger of the first hand on the sternum with the heel
parallel to the sternum (1cm above the xiphoid process).
 d. Keeping the elbows locked and the shoulders over the
child, compress the sternum 2.5-3.8cm (1-1 ½ inches) at
the rate of 80-100 times/min
 e. Keep the other hand on the child’s forehead
 f. At the end of every fifth compression administer a
ventilation (1-1 ½ seconds).
 g. Re-evaluate the child after 10 cycles.
BCLSBasic-cardiac-life-support .    pptx

BCLSBasic-cardiac-life-support . pptx

  • 1.
    BCLS(Basic cardiac life support)INFANT and CHILD PREPARED/DISCUSSED BY: JENNIFER I.TAM, RM,PH.D
  • 3.
    Cardiopulmonary Resuscitation  Cardiopulmonaryresuscitation (CPR) – Is the basic life- saving skill that is utilized in the event of cardiac, respiratory or cardiopulmonary arrest to maintain tissue oxygenation by providing external cardiac compression and/or artificial respiration.  This life saving skill is initiated in the event that an individual is found with or develops the absence of a pulse or respiration or both.  The basic goals of CPR, which are often referred to as the ABC’s of emergency resuscitation, follow:
  • 4.
     A: EstablishAirway  B: Initiate Breathing  C: Maintain Circulation
  • 5.
    Assessment • Assess responsivenessand level of consciousness by gently shaking or tapping the client while shouting, “Are you OK?” • Assess the amount and abilities of any available assistance. CPR cannot be performed indefinitely by a single individual. • Assess the client’s position (flat) on a hard surface, is essential to assess respiratory and cardiac status and to adequately perform cardiopulmonary resuscitation.
  • 6.
    Care must betaken when positioning the client with suspected head or neck injury. • Assess respiratory status by looking for chest rise and fall, listening for air exchange, and feeling for the presence of air movement.
  • 7.
    A patent airwayis essential for successful artificial respirations. The head tilt/chin lift assists in preventing the tongue from obstructing the airway. The jaw thrust- is used when a head or neck injury is suspected because it prevents extension of the neck and decreases the potential of further injury.
  • 10.
     Assess circulatorystatus by using the carotid or brachial pulse points. Presence of pulse contraindicates the initiation of external cardiac compressions.
  • 11.
    Check for safety Make sure it’s safe to provide assistance.  Look around for hazards that could harm you or the victim
  • 12.
    Check for response 1.Assess responsiveness, activate emergency medical system, position the child, position self, open airway, and assess for respirations. Remember respiratory arrest is more common in the pediatric population. 2. If respirations are absent , begin rescue breathing: • Avoid overextension of the infant’s neck. • Place a small towel or diaper under the infant’s shoulder or use a hand to support the neck.
  • 14.
    • Make atight seal over both the infant’s nose and mouth and gently administer artificial respirations. • Give two slow breaths (1-1 ½ sec/breath), pausing to take a breath in between. • Use only the amount of air needed to make the chest rise.
  • 16.
     3. Assesscirculatory status using the brachial pulse: • Locate the brachial pulse on the inside of the upper arm between the elbow and the shoulder by placing your thumb on the outside of the arm palpating the proximal side of the arm with the index finger and middle finger. • If a pulse is palpated, continue rescue breathing 20 times/min.or once every 3 seconds. • If a pulse is absent, begin cardiac compressions.
  • 17.
     4. Cardiaccompressions (infant 1-12 months): • Maintain a position parallel to the infant. Infants can easily be placed on a table or other hard surface. • Place a small towel or other support under the infant’s shoulder/neck. • Position the hands for compressions: a. Using the hand closest to the infant’s feet, locate the intermammary line where it intersects the sternum.
  • 22.
     b. Placethe index finger 1cm below this location on the sternum and place the middle finger next to the index finger.  c. Using these two fingers, compress in a downward motion 1.3-2.5cm (1/2-1 inch) at the rate of 100 times/min.  d. Keep the other hand on the infant’s forehead  e. At the end of every fifth compression, administer a ventilation (1-1 ½ seconds)  F. Re-evaluate infant after 10 cycles.
  • 24.
    CPR : Onerescuer-child (1-7 years)  1. Same as in number in infant  2. If respirations are absent . Begin rescue breathing: • Give two slow breaths (1-1 ½ sec/breath), pausing to take a breath in between. • Use only the amount of air needed to make the chest rise. When you see the chest rise and fall, you are using the right volume of air. • Palpate the carotid pulse (5-10 seconds). If present, ventilate at a rate of once every 4 seconds or 15 times/min. If absent, begin
  • 27.
     cardiac compressions, 3. Cardiac compressions (child 1-7 years) • Maintain a position on knees parallel to child’s sternum. • Place a small towel or other support under the child’s shoulder. • Position the hands for compressions a. Locate the lower margin of the rib cage using the hand closest to the feet and find the notch where ribs and sternum meet.
  • 29.
     b. Placethe middle finger of this hand on notch and then place the index finger next to the middle finger.  c. Place the heel of the other hand next to the index finger of the first hand on the sternum with the heel parallel to the sternum (1cm above the xiphoid process).  d. Keeping the elbows locked and the shoulders over the child, compress the sternum 2.5-3.8cm (1-1 ½ inches) at the rate of 80-100 times/min  e. Keep the other hand on the child’s forehead
  • 30.
     f. Atthe end of every fifth compression administer a ventilation (1-1 ½ seconds).  g. Re-evaluate the child after 10 cycles.