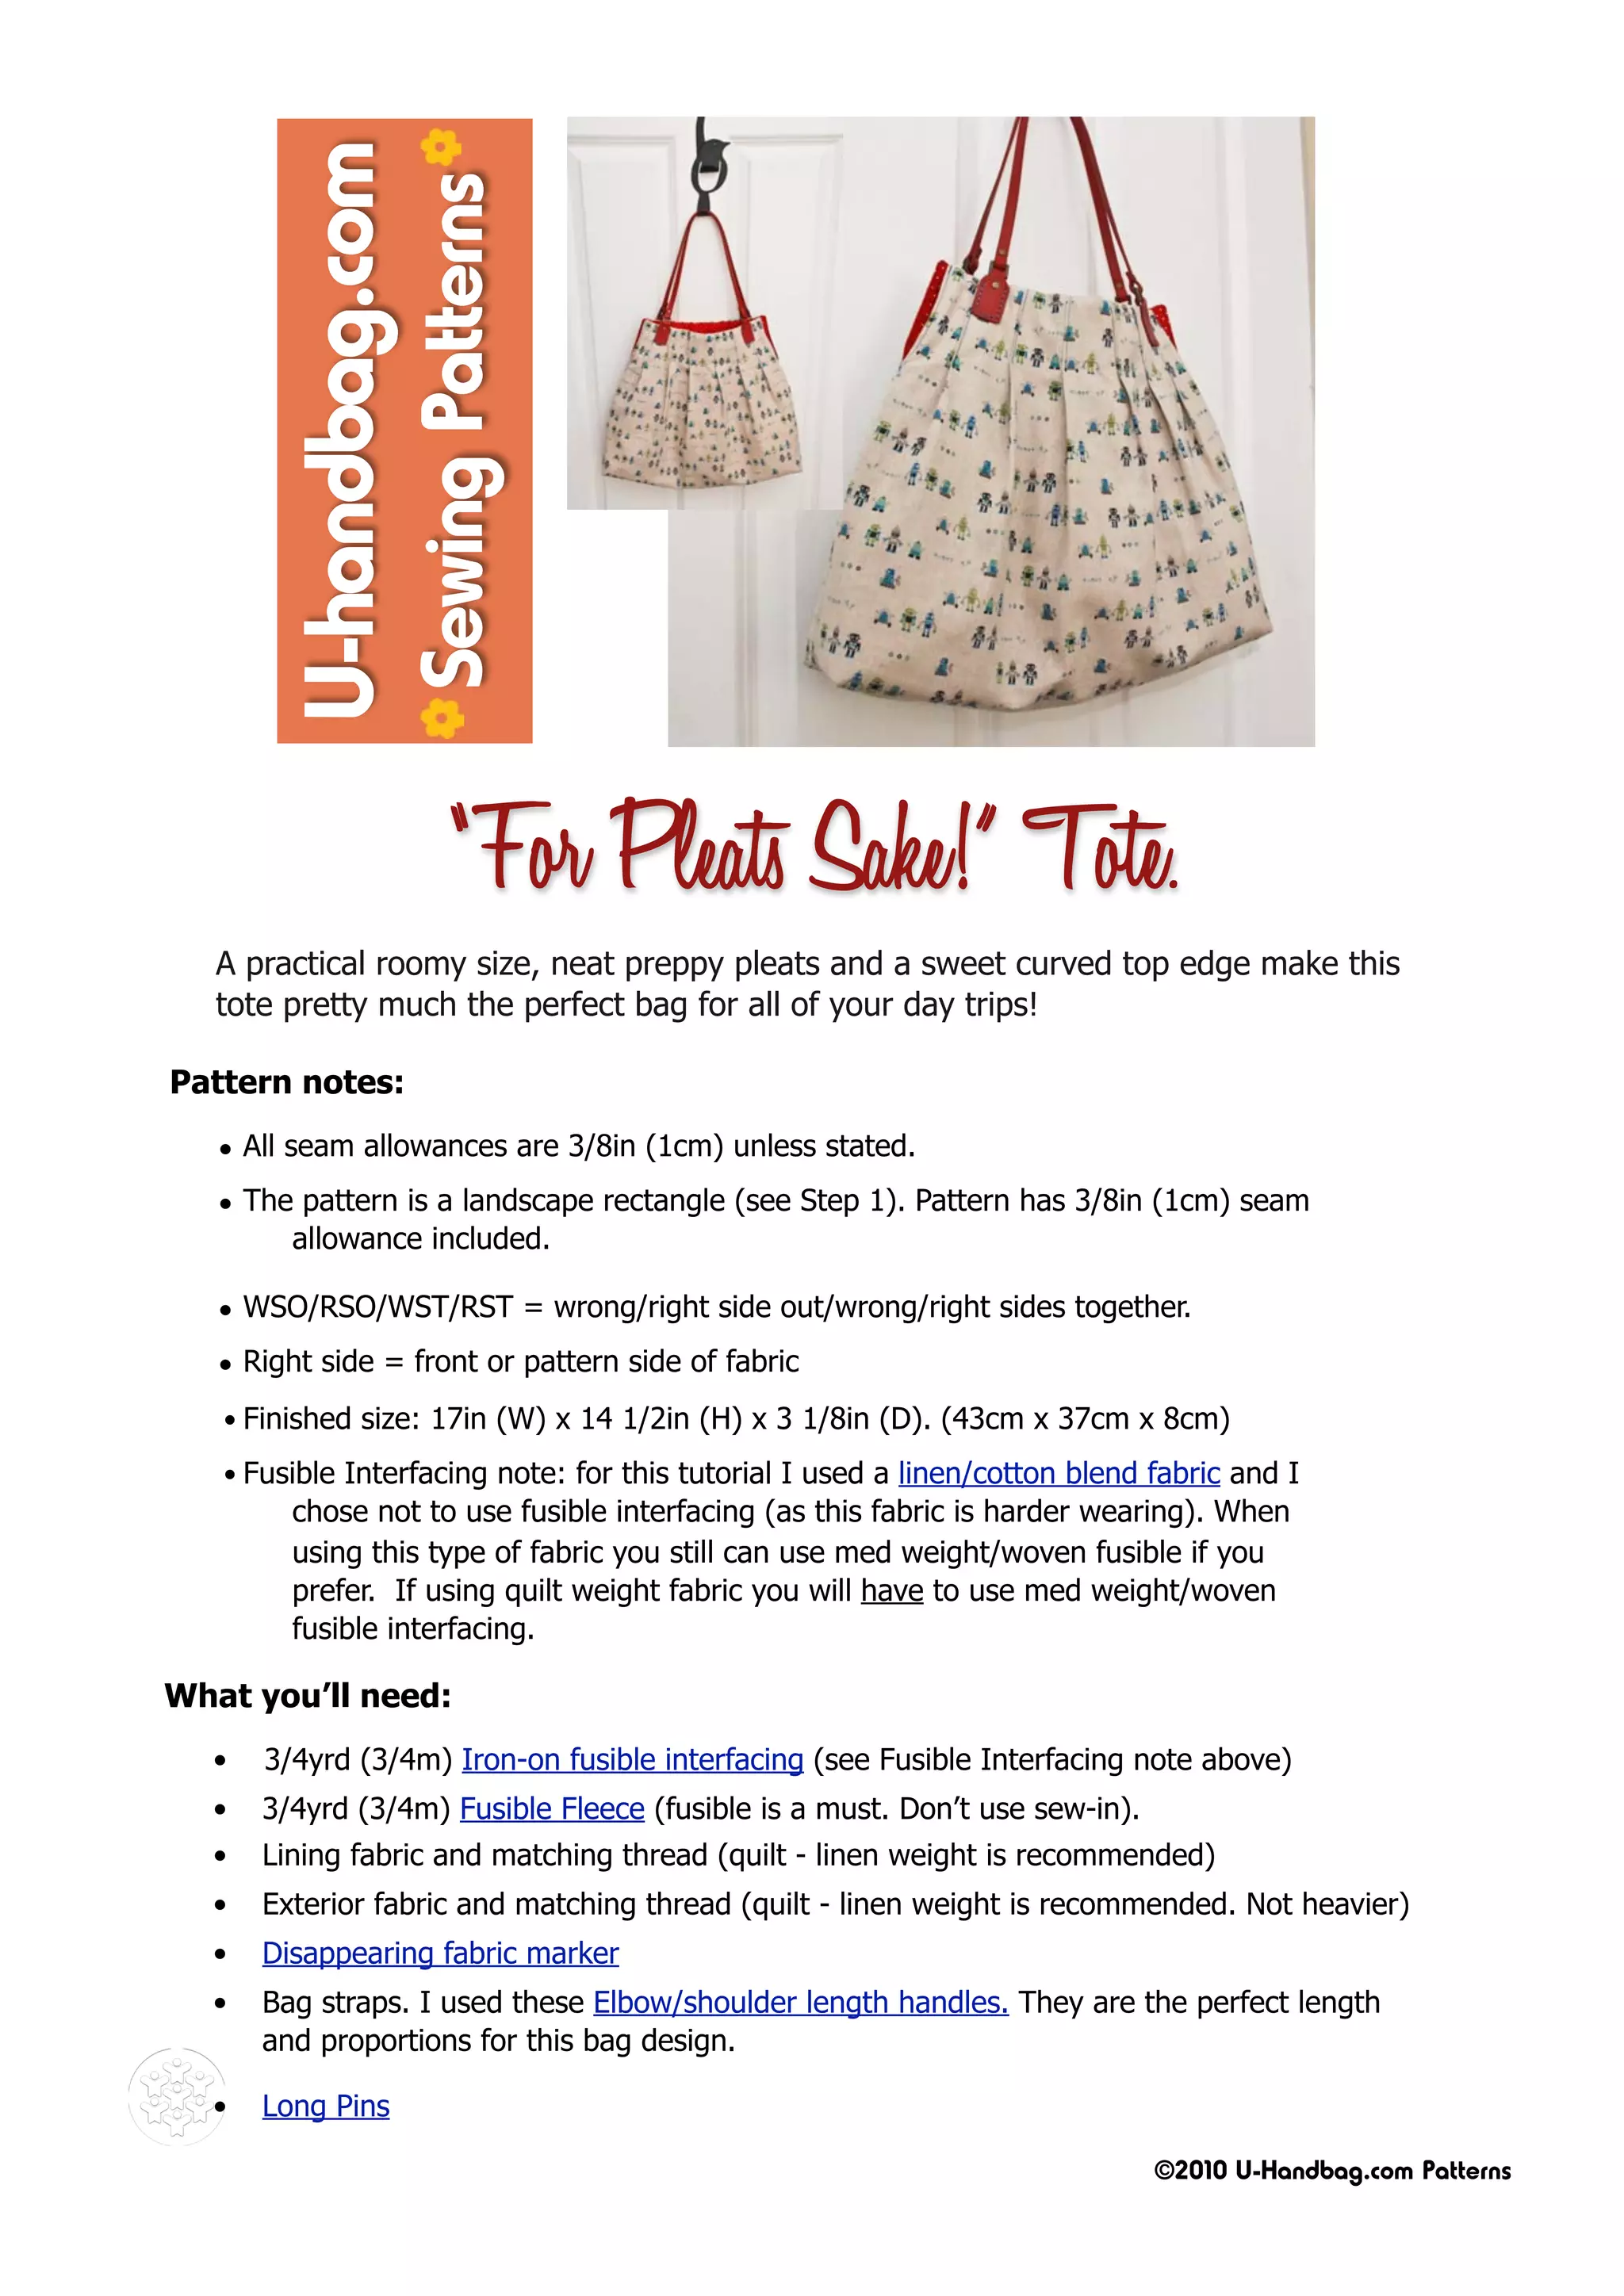
SlideShare a Scribd company logo
U-handbag.com
                      Sewing Patterns


                            “For Pleats Sake!” Tote.
      A practical roomy size, neat preppy pleats and a sweet curved top edge make this
      tote pretty much the perfect bag for all of your day trips!

  Pattern notes:

      • All seam allowances are 3/8in (1cm) unless stated.
      • The pattern is a landscape rectangle (see Step 1). Pattern has 3/8in (1cm) seam
           allowance included.

      • WSO/RSO/WST/RST = wrong/right side out/wrong/right sides together.
      • Right side = front or pattern side of fabric
      • Finished size: 17in (W) x 14 1/2in (H) x 3 1/8in (D). (43cm x 37cm x 8cm)
      • Fusible Interfacing note: for this tutorial I used a linen/cotton blend fabric and I
           chose not to use fusible interfacing (as this fabric is harder wearing). When
           using this type of fabric you still can use med weight/woven fusible if you
           prefer. If using quilt weight fabric you will have to use med weight/woven
           fusible interfacing.

  What you’ll need:
     •   3/4yrd (3/4m) Iron-on fusible interfacing (see Fusible Interfacing note above)
     •   3/4yrd (3/4m) Fusible Fleece (fusible is a must. Don’t use sew-in).
     •   Lining fabric and matching thread (quilt - linen weight is recommended)
     •   Exterior fabric and matching thread (quilt - linen weight is recommended. Not heavier)
lorem• ipsum dolor met set
         Disappearing fabric marker
quam• nunc parumI used these Elbow/shoulder length handles. They are the perfect length
         Bag straps.
         and proportions for this bag design.
         2007
     •   Long Pins

                                                                                ©2010 U-Handbag.com Patterns
How to make the bag

Steps to prepare:
   1. Before you begin have a read through the
      instructions and follow them in order. Cut 2
      of each all fabric, fleece (and the fusible
      interfacing if using) pieces as below:

      • 21in(W) x 15 5/8in(H). (53cm x
           40cm)

   2. If using, iron the fusible interfacing onto the
      wrong side of the exterior fabric pieces.

   3. Trim off 3/8in (1cm) all around the fusible
      fleece pieces. Iron the fleece (centrally) to
      the WS of the lining pieces. See Fig 1.           Fig 1. Iron the fleece to WS of the lining fabric so that there is an
                                                              even 3/8in (1cm) fabric margin all around the fleece.
   4. On all fabric pieces make a marking on both
      side edges 4 1/2in (11 1/2cm) down from
      the top edge. These markings are your ‘V-
      markings’ and will be important for later.

Steps to the exterior bag:

   5. Make 2 marks for the first pleat - On the RS
      top edge of one of the exterior fabric pieces
      work from right to left to make the 2
      markings as shown in Fig 2.
                                                              2 6/8in (7cm)                             2in (5cm)
   6. Fold the fabric into a concertina to make the
      first pleat. Using the markings you just
      made, fold the fabric as shown in Fig 3.
      Place a pin into the pleat. See Fig 4.

   7. Make another 2 marks for the 2nd pleat
      (work from right to left as before) see fig
      4. Fold the 2nd pleat in the same way as for
      Step 6. Mark and fold another 4 pleats in
                                                             Fig 2. Measure in from the right side and make 2 marks
      the same way so you have a total of 6
                                                                   on the top edge as shown in the pic above.
      evenly spaced pleats running along the top
      edge. Set aside.

   8. Pleat the other exterior fabric piece in the
      same way by repeating Steps 5-7. Now
      both exterior pieces have been pleated you
      can match up them up against each other to
      check they are both the same width. If not,
      adjust as necessary. Take your time with
      this step - a little bit of fitting & jiggling
      around is to be expected :)

                                                                                       ©2010 U-Handbag.com Patterns
9. Take one of the exterior pieces and fan the
   pleats out so that they look pretty and
   reasonably even. If you can, arrange the
   pleats to aim for a softly curved top edge.
   When you’re happy with the way the pleats
   sit, iron the folds approx 5 1/2in (13cm)
   down from the top edge. See fig 5.

10. Now to mark the pleat stitch lines. Measure
    and mark 4in (10cm) down from the top
    edge on both the OUTER pleats See fig 6.
    Repeat this step for the remaining 4 pleats
    EXCEPT you need to measure 3 1/8in (8cm)
    down from the top edge.                             Fig 3. Fold the fabric into a concertina along the marks you
                                                                               made in step 5.
11. Now to stitch the pleats in place using the
    pleat stitch lines we just made as a guide. If
    you like you can use more pins down the
    length of each pleat before stitching them.
    Topstitch the pleats in place though all
                                                          2 3/8in (6cm)                       1 5/8in (4cm)
    layers. Be sure to sew a few reverse stitches
    at the end of each line to secure the
    stitches. See fig 7.

12. Repeat Steps 9-11 for the other exterior
    fabric piece. Be sure to compare and match
    the two exterior fabric pieces (for equal
    curviness at the top edge) at Step 9 before
    you commit and stitch!

13. Bring the 2 pleated exterior pieces RST
                                                       Fig 4. Pop a pin into the 1st pleat to keep it in place. Measuring
    match all edges and pin. Starting and            from the folded edge of the first pleat (where the pink dot is) make
    stopping at the V-markings (that you made         2 more pleat marks for the 2nd pleat as shown in the pic above.
    in Step 4) stitch the exterior pieces              Repeat for another 4 pleats. Working this way should result in
    together. (The V-markings are so called              pleats that are all spaced 1 1/2in (4cm) from each other.
    because this is the point where the top part
    of the bag opens out into a ‘V’ (or 2 flaps).
    Stitch all along the sides and bottom edges.
    Be sure to sew securing stitches at start &
    end of your stitches. Iron the seams open.

14. Create a flat bottom for the bag. Grab one
    of the bottom corners of the exterior and
    match the side seam with the bottom seam.
    Flatten to form a triangle. Square off the
    triangle tip as shown in Fig 8.

15. Stitch along the line you made in the
   previous step and then trim off the excess
                                                        Fig 5. Arrange the pleats to your liking and then iron them in
   fabric See Fig 9. Repeat Steps 13-14 for               place. I used my trusty finger presser instead of an iron.
   the other bottom corner. Turn the exterior
   bag RSO.
                                                                                  ©2010 U-Handbag.com Patterns
Steps to the bag lining:
   16. Make the bag lining in the same way as the
       exterior bag by repeating Steps 5-15
       EXCEPT at Step 13 you need to leave a gap
       of 6in (15cm) in the bottom edge for turning
       out at a later stage and you need to leave
       the lining bag WSO.

Steps to constructing the bag:

   17. Insert the bag exterior (still turned RSO) into
       the bag lining. The right sides of the bag
       exterior and the lining should now be                Fig 6. On the outer pleats, measure and mark 4in (6cm) down
       touching each other. See Fig 10.                       from the top edge on the pleat fold. On the 4 inner pleats
                                                                   measure 3 1/8in (8cm) down from the top edge.
   18. You’ll see that the top of the bag forms a
       ‘V’ (or 2 flaps). Before pinning together take
       extra care to match all V-markings at the
       side edges of the lining and exterior bags.
       See Fig 11. Carefully line up the lining and
       exterior raw edges of both flaps, pinning one
       flap at a time.

   19. Stitch one flap at a time. Begin stitching at
       the V-marking. To start, actually place your
       needle into the V-marking (where the start/
       end stitches from Step 13 are situated).
       Stitch all around the sides and top edge
       stopping at the other V-marking. Repeat
                                                               Fig 7. Neatly topstitch the pleats in place stopping at the
       with other purse flap. Clip off the flap top
                                                                            markings you made in Step 9.
       edge corners. See Fig 12.

   20. Turn the whole bag RSO by carefully teasing
       the exterior bag completely out through the
       opening in the lining. See fig 13. Push the
       top edge corners out with a blunt tool.

   21. Stitch the gap in the lining shut by pushing
       the seam allowance inside the hole and
       topstitching close to the edge for a neat
                                                                 3 1/8in (8cm)
       finish. Pop the lining into the exterior. Place a
       clean tea towel over the exterior and iron
       out any creases in the bag (use a travel
       sized iron if possible - it's handier for getting
       into them nooks and crannies!) The tea
       cloth will prevent any goo or scorch marks
       getting onto your yummy new bag.
                                                            Fig 8. Flatten one of the bottom corners - look inside the bag to
                                                           check that the side seam meets the bottom seam. Use a ruler, to
                                                                       measure a line that is 3 1/8in (8cm) long &
                                                                     at right angle (90 degrees) to the side seam.


                                                                                       ©2010 U-Handbag.com Patterns
22. Reinforce the ‘V’ at both side edges of the bag
    by topstitching all along the ‘V’. Ensure your
    top & bottom threads match your fabrics! See
    Fig 14.

23. Mark the position for the bag handles. I chose
    to place the outer side edge of my handles 1
    1/8in (3cm) in from the side edge, but it’s up
    to you where you put ‘em. See Fig 15.

24. Use tapestry thread to backstitch the handle
    tabs to your bag. Stitch through all layers.
    This is a nice job to do whilst watching the
    telly. See Fig 16.                                     Fig 9. Stitch along the marked line ensuring your beginning
                                                                     and ending stitches are nice and secure.
25. Ta Dah! All finished and looking lovely. I’ll see        Trim off the excess fabric as 3/8in (1cm) from the seam
    you at the local deli for a tall mocha. Hehe!


                                                           Fig 10. Insert the exterior bag completely into the lining bag
                                                                               as shown in the pic.


                                                        Fig 11. Carefully match up the V-markings at the side edges of the
                                                          lining & exterior bags. Pin all around the top, one flap at a time.


                                                                                       ©2010 U-Handbag.com Patterns
Fig 12. Clip off the top edge corners (but not to close too the
      seam) to make a neater corner when turning out.


      Fig 13. Gently pull the exterior bag out through the
               gap in the bottom of the lining.


Fig 14. Topstitch all around the ‘V’ at both side edges of the bag.


                              ©2010 U-Handbag.com Patterns
Fig 15. Mark the bag handle position. Measure from the bag side
                                                               edge to the outer side of the handle tab. I think 1 1/8in (3cm) in
                                                                         from the side looks good, but it’s up to you.


                                                                 Fig 16. Use a pretty contrasting or matching colour tapestry
                                                                      thread (silk is looks fab if you have it) to backstitch
                                                                                     the handles to your bag.
©2010 U-Handbag Patterns. Copyright Notes:
You are welcome to hand make items from our patterns for
commercial and non-commercial use. We are happy for
you to sell items made from our designs on Etsy or market
stalls etc. However, permissions for commercial use do not
include factory manufacture for mass production and mass
selling. We respectfully ask you to not pass off our pattern
designs as your own creation and to not reproduce any
part this pattern anywhere. Thanks for your
understanding :)


                                                                                             ©2010 U-Handbag.com Patterns

More Related Content

What's hot

Making felt slippers from an old sweater
Making felt slippers from an old sweaterMaking felt slippers from an old sweater
Making felt slippers from an old sweaterWoolcraft
 
Basic Hand stitches used for Embroideries
Basic Hand stitches used for EmbroideriesBasic Hand stitches used for Embroideries
Basic Hand stitches used for Embroideries
Nikita Bhateja
 
How To Sew: Heart Appliqué Quilt
How To Sew: Heart Appliqué QuiltHow To Sew: Heart Appliqué Quilt
How To Sew: Heart Appliqué Quilt
CandCSewing
 
Fashion Design student work (Dezyne E' cole College)
Fashion Design student work (Dezyne E' cole College)Fashion Design student work (Dezyne E' cole College)
Fashion Design student work (Dezyne E' cole College)dezyneecole
 
fullness in garment ( tuck dart pleats etc)
fullness in garment ( tuck dart pleats etc)fullness in garment ( tuck dart pleats etc)
fullness in garment ( tuck dart pleats etc)
Ragu Nathan
 
How To Sew: Embellished Curtain Panel
How To Sew: Embellished Curtain PanelHow To Sew: Embellished Curtain Panel
How To Sew: Embellished Curtain Panel
CandCSewing
 
K to 12 Tailoring/Dressmaking - Basic Hand Stitches
K to 12 Tailoring/Dressmaking - Basic Hand Stitches K to 12 Tailoring/Dressmaking - Basic Hand Stitches
K to 12 Tailoring/Dressmaking - Basic Hand Stitches Rona De la Rama
 
Pleats - Types and purpose.
Pleats - Types and purpose.Pleats - Types and purpose.
Pleats - Types and purpose.
Veonica Nandini
 
Monika Mehra, Fashion Design ,Dezyne E'cole College
Monika Mehra, Fashion Design ,Dezyne E'cole CollegeMonika Mehra, Fashion Design ,Dezyne E'cole College
Monika Mehra, Fashion Design ,Dezyne E'cole College
dezyneecole
 
Copper cushion tutorial
Copper cushion tutorial Copper cushion tutorial
Copper cushion tutorial
Hands On Workshop - HOW
 

What's hot (12)

Cestinha patch
Cestinha patchCestinha patch
Cestinha patch
 
Making felt slippers from an old sweater
Making felt slippers from an old sweaterMaking felt slippers from an old sweater
Making felt slippers from an old sweater
 
Basic Hand stitches used for Embroideries
Basic Hand stitches used for EmbroideriesBasic Hand stitches used for Embroideries
Basic Hand stitches used for Embroideries
 
How To Sew: Heart Appliqué Quilt
How To Sew: Heart Appliqué QuiltHow To Sew: Heart Appliqué Quilt
How To Sew: Heart Appliqué Quilt
 
Satinand sateenweave
Satinand sateenweaveSatinand sateenweave
Satinand sateenweave
 
Fashion Design student work (Dezyne E' cole College)
Fashion Design student work (Dezyne E' cole College)Fashion Design student work (Dezyne E' cole College)
Fashion Design student work (Dezyne E' cole College)
 
fullness in garment ( tuck dart pleats etc)
fullness in garment ( tuck dart pleats etc)fullness in garment ( tuck dart pleats etc)
fullness in garment ( tuck dart pleats etc)
 
How To Sew: Embellished Curtain Panel
How To Sew: Embellished Curtain PanelHow To Sew: Embellished Curtain Panel
How To Sew: Embellished Curtain Panel
 
K to 12 Tailoring/Dressmaking - Basic Hand Stitches
K to 12 Tailoring/Dressmaking - Basic Hand Stitches K to 12 Tailoring/Dressmaking - Basic Hand Stitches
K to 12 Tailoring/Dressmaking - Basic Hand Stitches
 
Pleats - Types and purpose.
Pleats - Types and purpose.Pleats - Types and purpose.
Pleats - Types and purpose.
 
Monika Mehra, Fashion Design ,Dezyne E'cole College
Monika Mehra, Fashion Design ,Dezyne E'cole CollegeMonika Mehra, Fashion Design ,Dezyne E'cole College
Monika Mehra, Fashion Design ,Dezyne E'cole College
 
Copper cushion tutorial
Copper cushion tutorial Copper cushion tutorial
Copper cushion tutorial
 

Viewers also liked

Adapting Levels of Assurance for NSTIC
Adapting Levels of Assurance for NSTICAdapting Levels of Assurance for NSTIC
Adapting Levels of Assurance for NSTIC
Jim Fenton
 
Kritn Cassidy Photography
Kritn Cassidy PhotographyKritn Cassidy Photography
Kritn Cassidy Photography
Stephen Thompson
 
OneID Garage Door
OneID Garage DoorOneID Garage Door
OneID Garage Door
Jim Fenton
 
Identity systems
Identity systemsIdentity systems
Identity systemsJim Fenton
 
Notifs update
Notifs updateNotifs update
Notifs update
Jim Fenton
 
iBeacons: Security and Privacy?
iBeacons: Security and Privacy?iBeacons: Security and Privacy?
iBeacons: Security and Privacy?
Jim Fenton
 
Sleep Better at Night - Release Confidence Metrics
Sleep Better at Night - Release Confidence MetricsSleep Better at Night - Release Confidence Metrics
Sleep Better at Night - Release Confidence Metrics
thatqaguy
 
IgnitePII2014 Nōtifs
IgnitePII2014 NōtifsIgnitePII2014 Nōtifs
IgnitePII2014 Nōtifs
Jim Fenton
 
Techno etiquette final copy
Techno etiquette final copyTechno etiquette final copy
Techno etiquette final copy
Marcelline Chitolie
 
Security Questions Considered Harmful
Security Questions Considered HarmfulSecurity Questions Considered Harmful
Security Questions Considered Harmful
Jim Fenton
 
LOA Alternatives - A Modest Proposal
LOA Alternatives - A Modest ProposalLOA Alternatives - A Modest Proposal
LOA Alternatives - A Modest Proposal
Jim Fenton
 
Toward Better Password Requirements
Toward Better Password RequirementsToward Better Password Requirements
Toward Better Password Requirements
Jim Fenton
 

Viewers also liked (13)

Adapting Levels of Assurance for NSTIC
Adapting Levels of Assurance for NSTICAdapting Levels of Assurance for NSTIC
Adapting Levels of Assurance for NSTIC
 
Kritn Cassidy Photography
Kritn Cassidy PhotographyKritn Cassidy Photography
Kritn Cassidy Photography
 
OneID Garage Door
OneID Garage DoorOneID Garage Door
OneID Garage Door
 
Cassinelli
CassinelliCassinelli
Cassinelli
 
Identity systems
Identity systemsIdentity systems
Identity systems
 
Notifs update
Notifs updateNotifs update
Notifs update
 
iBeacons: Security and Privacy?
iBeacons: Security and Privacy?iBeacons: Security and Privacy?
iBeacons: Security and Privacy?
 
Sleep Better at Night - Release Confidence Metrics
Sleep Better at Night - Release Confidence MetricsSleep Better at Night - Release Confidence Metrics
Sleep Better at Night - Release Confidence Metrics
 
IgnitePII2014 Nōtifs
IgnitePII2014 NōtifsIgnitePII2014 Nōtifs
IgnitePII2014 Nōtifs
 
Techno etiquette final copy
Techno etiquette final copyTechno etiquette final copy
Techno etiquette final copy
 
Security Questions Considered Harmful
Security Questions Considered HarmfulSecurity Questions Considered Harmful
Security Questions Considered Harmful
 
LOA Alternatives - A Modest Proposal
LOA Alternatives - A Modest ProposalLOA Alternatives - A Modest Proposal
LOA Alternatives - A Modest Proposal
 
Toward Better Password Requirements
Toward Better Password RequirementsToward Better Password Requirements
Toward Better Password Requirements
 

Similar to bag pattern_pleated

Glass Slipper Project: Handbag Pattern
Glass Slipper Project: Handbag PatternGlass Slipper Project: Handbag Pattern
Glass Slipper Project: Handbag Pattern
American Sewing Guild - Chicago Chapter
 
Manipulating fabric - The Art of Manipulating Fabric
Manipulating fabric - The Art of Manipulating FabricManipulating fabric - The Art of Manipulating Fabric
Manipulating fabric - The Art of Manipulating Fabric
https://www.facebook.com/garmentspace
 
珠包稿Eveningbag
珠包稿Eveningbag珠包稿Eveningbag
珠包稿EveningbagAngel
 
我真的很(((愛、愛、愛)))你們。這是一個溫暖的手作~上樓珠珠包圖稿
我真的很(((愛、愛、愛)))你們。這是一個溫暖的手作~上樓珠珠包圖稿 我真的很(((愛、愛、愛)))你們。這是一個溫暖的手作~上樓珠珠包圖稿
我真的很(((愛、愛、愛)))你們。這是一個溫暖的手作~上樓珠珠包圖稿
Angel
 
How To Sew: Jewelry Organizer
How To Sew: Jewelry OrganizerHow To Sew: Jewelry Organizer
How To Sew: Jewelry Organizer
CandCSewing
 
How to turn a sweater into a sweater dress
How to turn a sweater into a sweater dressHow to turn a sweater into a sweater dress
How to turn a sweater into a sweater dressguestba1678
 
Sweater Dress Slide Show
Sweater Dress Slide ShowSweater Dress Slide Show
Sweater Dress Slide Show
Jennifer Moore
 
Babies sewing intructions
Babies sewing intructionsBabies sewing intructions
Babies sewing intructions
VictorOrtega103
 
Bdft ii, d&pm, unit-i, draping
Bdft ii, d&pm, unit-i, drapingBdft ii, d&pm, unit-i, draping
Bdft ii, d&pm, unit-i, draping
Rai University
 
Creating a baby quilt 2016
Creating a baby quilt 2016Creating a baby quilt 2016
Creating a baby quilt 2016
Amy Siems MAL
 
Ruffle Hem Skirt
Ruffle Hem SkirtRuffle Hem Skirt
Ruffle Hem Skirt
Angela Bowman
 
Scrub Cap For Long Hair Printable Pattern and DIY Tutorial
Scrub Cap For Long Hair Printable Pattern and DIY TutorialScrub Cap For Long Hair Printable Pattern and DIY Tutorial
Scrub Cap For Long Hair Printable Pattern and DIY Tutorial
Larissa Fontenot
 
Shirt plackets
Shirt plackets Shirt plackets
Shirt plackets
jolsen1
 
How To Make A Shoulder Bag From A Pillowcase
How To Make A Shoulder Bag From A PillowcaseHow To Make A Shoulder Bag From A Pillowcase
How To Make A Shoulder Bag From A Pillowcasekootoyoo
 
Vianneth
ViannethVianneth
Vianneth
viannethb
 

Similar to bag pattern_pleated (20)

Glass Slipper Project: Handbag Pattern
Glass Slipper Project: Handbag PatternGlass Slipper Project: Handbag Pattern
Glass Slipper Project: Handbag Pattern
 
Manipulating fabric - The Art of Manipulating Fabric
Manipulating fabric - The Art of Manipulating FabricManipulating fabric - The Art of Manipulating Fabric
Manipulating fabric - The Art of Manipulating Fabric
 
Sapatinho
SapatinhoSapatinho
Sapatinho
 
珠包稿Eveningbag
珠包稿Eveningbag珠包稿Eveningbag
珠包稿Eveningbag
 
我真的很(((愛、愛、愛)))你們。這是一個溫暖的手作~上樓珠珠包圖稿
我真的很(((愛、愛、愛)))你們。這是一個溫暖的手作~上樓珠珠包圖稿 我真的很(((愛、愛、愛)))你們。這是一個溫暖的手作~上樓珠珠包圖稿
我真的很(((愛、愛、愛)))你們。這是一個溫暖的手作~上樓珠珠包圖稿
 
How To Sew: Jewelry Organizer
How To Sew: Jewelry OrganizerHow To Sew: Jewelry Organizer
How To Sew: Jewelry Organizer
 
Blusa Burda
Blusa BurdaBlusa Burda
Blusa Burda
 
Shirt stitching
Shirt stitchingShirt stitching
Shirt stitching
 
How to turn a sweater into a sweater dress
How to turn a sweater into a sweater dressHow to turn a sweater into a sweater dress
How to turn a sweater into a sweater dress
 
Sweater Dress Slide Show
Sweater Dress Slide ShowSweater Dress Slide Show
Sweater Dress Slide Show
 
Babies sewing intructions
Babies sewing intructionsBabies sewing intructions
Babies sewing intructions
 
Bdft ii, d&pm, unit-i, draping
Bdft ii, d&pm, unit-i, drapingBdft ii, d&pm, unit-i, draping
Bdft ii, d&pm, unit-i, draping
 
Bolsa qua drada
Bolsa qua dradaBolsa qua drada
Bolsa qua drada
 
Creating a baby quilt 2016
Creating a baby quilt 2016Creating a baby quilt 2016
Creating a baby quilt 2016
 
Ruffle Hem Skirt
Ruffle Hem SkirtRuffle Hem Skirt
Ruffle Hem Skirt
 
Scrub Cap For Long Hair Printable Pattern and DIY Tutorial
Scrub Cap For Long Hair Printable Pattern and DIY TutorialScrub Cap For Long Hair Printable Pattern and DIY Tutorial
Scrub Cap For Long Hair Printable Pattern and DIY Tutorial
 
Shirt plackets
Shirt plackets Shirt plackets
Shirt plackets
 
How To Make A Shoulder Bag From A Pillowcase
How To Make A Shoulder Bag From A PillowcaseHow To Make A Shoulder Bag From A Pillowcase
How To Make A Shoulder Bag From A Pillowcase
 
Molly monkey pattern multipg
Molly monkey pattern multipgMolly monkey pattern multipg
Molly monkey pattern multipg
 
Vianneth
ViannethVianneth
Vianneth
 

Recently uploaded

Connect Conference 2022: Passive House - Economic and Environmental Solution...
Connect Conference 2022: Passive House -  Economic and Environmental Solution...Connect Conference 2022: Passive House -  Economic and Environmental Solution...
Connect Conference 2022: Passive House - Economic and Environmental Solution...
TE Studio
 
Technoblade The Legacy of a Minecraft Legend.
Technoblade The Legacy of a Minecraft Legend.Technoblade The Legacy of a Minecraft Legend.
Technoblade The Legacy of a Minecraft Legend.
Techno Merch
 
Between Filth and Fortune- Urban Cattle Foraging Realities by Devi S Nair, An...
Between Filth and Fortune- Urban Cattle Foraging Realities by Devi S Nair, An...Between Filth and Fortune- Urban Cattle Foraging Realities by Devi S Nair, An...
Between Filth and Fortune- Urban Cattle Foraging Realities by Devi S Nair, An...
Mansi Shah
 
一比一原版(UCB毕业证书)伯明翰大学学院毕业证成绩单如何办理
一比一原版(UCB毕业证书)伯明翰大学学院毕业证成绩单如何办理一比一原版(UCB毕业证书)伯明翰大学学院毕业证成绩单如何办理
一比一原版(UCB毕业证书)伯明翰大学学院毕业证成绩单如何办理
h7j5io0
 
一比一原版(UAL毕业证书)伦敦艺术大学毕业证成绩单如何办理
一比一原版(UAL毕业证书)伦敦艺术大学毕业证成绩单如何办理一比一原版(UAL毕业证书)伦敦艺术大学毕业证成绩单如何办理
一比一原版(UAL毕业证书)伦敦艺术大学毕业证成绩单如何办理
708pb191
 
PORTFOLIO FABIANA VILLANI ARCHITECTURE.pdf
PORTFOLIO FABIANA VILLANI ARCHITECTURE.pdfPORTFOLIO FABIANA VILLANI ARCHITECTURE.pdf
PORTFOLIO FABIANA VILLANI ARCHITECTURE.pdf
fabianavillanib
 
Storytelling For The Web: Integrate Storytelling in your Design Process
Storytelling For The Web: Integrate Storytelling in your Design ProcessStorytelling For The Web: Integrate Storytelling in your Design Process
Storytelling For The Web: Integrate Storytelling in your Design Process
Chiara Aliotta
 
一比一原版(Brunel毕业证书)布鲁内尔大学毕业证成绩单如何办理
一比一原版(Brunel毕业证书)布鲁内尔大学毕业证成绩单如何办理一比一原版(Brunel毕业证书)布鲁内尔大学毕业证成绩单如何办理
一比一原版(Brunel毕业证书)布鲁内尔大学毕业证成绩单如何办理
smpc3nvg
 
Maximize Your Content with Beautiful Assets : Content & Asset for Landing Page
Maximize Your Content with Beautiful Assets : Content & Asset for Landing Page Maximize Your Content with Beautiful Assets : Content & Asset for Landing Page
Maximize Your Content with Beautiful Assets : Content & Asset for Landing Page
pmgdscunsri
 
White wonder, Work developed by Eva Tschopp
White wonder, Work developed by Eva TschoppWhite wonder, Work developed by Eva Tschopp
White wonder, Work developed by Eva Tschopp
Mansi Shah
 
Design Thinking Design thinking Design thinking
Design Thinking Design thinking Design thinkingDesign Thinking Design thinking Design thinking
Design Thinking Design thinking Design thinking
cy0krjxt
 
一比一原版(RHUL毕业证书)伦敦大学皇家霍洛威学院毕业证如何办理
一比一原版(RHUL毕业证书)伦敦大学皇家霍洛威学院毕业证如何办理一比一原版(RHUL毕业证书)伦敦大学皇家霍洛威学院毕业证如何办理
一比一原版(RHUL毕业证书)伦敦大学皇家霍洛威学院毕业证如何办理
9a93xvy
 
一比一原版(毕业证)长崎大学毕业证成绩单如何办理
一比一原版(毕业证)长崎大学毕业证成绩单如何办理一比一原版(毕业证)长崎大学毕业证成绩单如何办理
一比一原版(毕业证)长崎大学毕业证成绩单如何办理
taqyed
 
Timeless Principles of Good Design
Timeless Principles of Good DesignTimeless Principles of Good Design
Timeless Principles of Good Design
Carolina de Bartolo
 
RTUYUIJKLDSADAGHBDJNKSMAL,D
RTUYUIJKLDSADAGHBDJNKSMAL,DRTUYUIJKLDSADAGHBDJNKSMAL,D
RTUYUIJKLDSADAGHBDJNKSMAL,D
cy0krjxt
 
一比一原版(BU毕业证)波士顿大学毕业证如何办理
一比一原版(BU毕业证)波士顿大学毕业证如何办理一比一原版(BU毕业证)波士顿大学毕业证如何办理
一比一原版(BU毕业证)波士顿大学毕业证如何办理
peuce
 
Mohannad Abdullah portfolio _ V2 _22-24
Mohannad Abdullah  portfolio _ V2 _22-24Mohannad Abdullah  portfolio _ V2 _22-24
Mohannad Abdullah portfolio _ V2 _22-24
M. A. Architect
 
一比一原版(BU毕业证书)伯恩茅斯大学毕业证成绩单如何办理
一比一原版(BU毕业证书)伯恩茅斯大学毕业证成绩单如何办理一比一原版(BU毕业证书)伯恩茅斯大学毕业证成绩单如何办理
一比一原版(BU毕业证书)伯恩茅斯大学毕业证成绩单如何办理
h7j5io0
 
UNIT IV-VISUAL STYLE AND MOBILE INTERFACES.pptx
UNIT IV-VISUAL STYLE AND MOBILE INTERFACES.pptxUNIT IV-VISUAL STYLE AND MOBILE INTERFACES.pptx
UNIT IV-VISUAL STYLE AND MOBILE INTERFACES.pptx
GOWSIKRAJA PALANISAMY
 
Book Formatting: Quality Control Checks for Designers
Book Formatting: Quality Control Checks for DesignersBook Formatting: Quality Control Checks for Designers
Book Formatting: Quality Control Checks for Designers
Confidence Ago
 

Recently uploaded (20)

Connect Conference 2022: Passive House - Economic and Environmental Solution...
Connect Conference 2022: Passive House -  Economic and Environmental Solution...Connect Conference 2022: Passive House -  Economic and Environmental Solution...
Connect Conference 2022: Passive House - Economic and Environmental Solution...
 
Technoblade The Legacy of a Minecraft Legend.
Technoblade The Legacy of a Minecraft Legend.Technoblade The Legacy of a Minecraft Legend.
Technoblade The Legacy of a Minecraft Legend.
 
Between Filth and Fortune- Urban Cattle Foraging Realities by Devi S Nair, An...
Between Filth and Fortune- Urban Cattle Foraging Realities by Devi S Nair, An...Between Filth and Fortune- Urban Cattle Foraging Realities by Devi S Nair, An...
Between Filth and Fortune- Urban Cattle Foraging Realities by Devi S Nair, An...
 
一比一原版(UCB毕业证书)伯明翰大学学院毕业证成绩单如何办理
一比一原版(UCB毕业证书)伯明翰大学学院毕业证成绩单如何办理一比一原版(UCB毕业证书)伯明翰大学学院毕业证成绩单如何办理
一比一原版(UCB毕业证书)伯明翰大学学院毕业证成绩单如何办理
 
一比一原版(UAL毕业证书)伦敦艺术大学毕业证成绩单如何办理
一比一原版(UAL毕业证书)伦敦艺术大学毕业证成绩单如何办理一比一原版(UAL毕业证书)伦敦艺术大学毕业证成绩单如何办理
一比一原版(UAL毕业证书)伦敦艺术大学毕业证成绩单如何办理
 
PORTFOLIO FABIANA VILLANI ARCHITECTURE.pdf
PORTFOLIO FABIANA VILLANI ARCHITECTURE.pdfPORTFOLIO FABIANA VILLANI ARCHITECTURE.pdf
PORTFOLIO FABIANA VILLANI ARCHITECTURE.pdf
 
Storytelling For The Web: Integrate Storytelling in your Design Process
Storytelling For The Web: Integrate Storytelling in your Design ProcessStorytelling For The Web: Integrate Storytelling in your Design Process
Storytelling For The Web: Integrate Storytelling in your Design Process
 
一比一原版(Brunel毕业证书)布鲁内尔大学毕业证成绩单如何办理
一比一原版(Brunel毕业证书)布鲁内尔大学毕业证成绩单如何办理一比一原版(Brunel毕业证书)布鲁内尔大学毕业证成绩单如何办理
一比一原版(Brunel毕业证书)布鲁内尔大学毕业证成绩单如何办理
 
Maximize Your Content with Beautiful Assets : Content & Asset for Landing Page
Maximize Your Content with Beautiful Assets : Content & Asset for Landing Page Maximize Your Content with Beautiful Assets : Content & Asset for Landing Page
Maximize Your Content with Beautiful Assets : Content & Asset for Landing Page
 
White wonder, Work developed by Eva Tschopp
White wonder, Work developed by Eva TschoppWhite wonder, Work developed by Eva Tschopp
White wonder, Work developed by Eva Tschopp
 
Design Thinking Design thinking Design thinking
Design Thinking Design thinking Design thinkingDesign Thinking Design thinking Design thinking
Design Thinking Design thinking Design thinking
 
一比一原版(RHUL毕业证书)伦敦大学皇家霍洛威学院毕业证如何办理
一比一原版(RHUL毕业证书)伦敦大学皇家霍洛威学院毕业证如何办理一比一原版(RHUL毕业证书)伦敦大学皇家霍洛威学院毕业证如何办理
一比一原版(RHUL毕业证书)伦敦大学皇家霍洛威学院毕业证如何办理
 
一比一原版(毕业证)长崎大学毕业证成绩单如何办理
一比一原版(毕业证)长崎大学毕业证成绩单如何办理一比一原版(毕业证)长崎大学毕业证成绩单如何办理
一比一原版(毕业证)长崎大学毕业证成绩单如何办理
 
Timeless Principles of Good Design
Timeless Principles of Good DesignTimeless Principles of Good Design
Timeless Principles of Good Design
 
RTUYUIJKLDSADAGHBDJNKSMAL,D
RTUYUIJKLDSADAGHBDJNKSMAL,DRTUYUIJKLDSADAGHBDJNKSMAL,D
RTUYUIJKLDSADAGHBDJNKSMAL,D
 
一比一原版(BU毕业证)波士顿大学毕业证如何办理
一比一原版(BU毕业证)波士顿大学毕业证如何办理一比一原版(BU毕业证)波士顿大学毕业证如何办理
一比一原版(BU毕业证)波士顿大学毕业证如何办理
 
Mohannad Abdullah portfolio _ V2 _22-24
Mohannad Abdullah  portfolio _ V2 _22-24Mohannad Abdullah  portfolio _ V2 _22-24
Mohannad Abdullah portfolio _ V2 _22-24
 
一比一原版(BU毕业证书)伯恩茅斯大学毕业证成绩单如何办理
一比一原版(BU毕业证书)伯恩茅斯大学毕业证成绩单如何办理一比一原版(BU毕业证书)伯恩茅斯大学毕业证成绩单如何办理
一比一原版(BU毕业证书)伯恩茅斯大学毕业证成绩单如何办理
 
UNIT IV-VISUAL STYLE AND MOBILE INTERFACES.pptx
UNIT IV-VISUAL STYLE AND MOBILE INTERFACES.pptxUNIT IV-VISUAL STYLE AND MOBILE INTERFACES.pptx
UNIT IV-VISUAL STYLE AND MOBILE INTERFACES.pptx
 
Book Formatting: Quality Control Checks for Designers
Book Formatting: Quality Control Checks for DesignersBook Formatting: Quality Control Checks for Designers
Book Formatting: Quality Control Checks for Designers
 

bag pattern_pleated

  • 1. U-handbag.com Sewing Patterns “For Pleats Sake!” Tote. A practical roomy size, neat preppy pleats and a sweet curved top edge make this tote pretty much the perfect bag for all of your day trips! Pattern notes: • All seam allowances are 3/8in (1cm) unless stated. • The pattern is a landscape rectangle (see Step 1). Pattern has 3/8in (1cm) seam allowance included. • WSO/RSO/WST/RST = wrong/right side out/wrong/right sides together. • Right side = front or pattern side of fabric • Finished size: 17in (W) x 14 1/2in (H) x 3 1/8in (D). (43cm x 37cm x 8cm) • Fusible Interfacing note: for this tutorial I used a linen/cotton blend fabric and I chose not to use fusible interfacing (as this fabric is harder wearing). When using this type of fabric you still can use med weight/woven fusible if you prefer. If using quilt weight fabric you will have to use med weight/woven fusible interfacing. What you’ll need: • 3/4yrd (3/4m) Iron-on fusible interfacing (see Fusible Interfacing note above) • 3/4yrd (3/4m) Fusible Fleece (fusible is a must. Don’t use sew-in). • Lining fabric and matching thread (quilt - linen weight is recommended) • Exterior fabric and matching thread (quilt - linen weight is recommended. Not heavier) lorem• ipsum dolor met set Disappearing fabric marker quam• nunc parumI used these Elbow/shoulder length handles. They are the perfect length Bag straps. and proportions for this bag design. 2007 • Long Pins ©2010 U-Handbag.com Patterns
  • 2. How to make the bag Steps to prepare: 1. Before you begin have a read through the instructions and follow them in order. Cut 2 of each all fabric, fleece (and the fusible interfacing if using) pieces as below: • 21in(W) x 15 5/8in(H). (53cm x 40cm) 2. If using, iron the fusible interfacing onto the wrong side of the exterior fabric pieces. 3. Trim off 3/8in (1cm) all around the fusible fleece pieces. Iron the fleece (centrally) to the WS of the lining pieces. See Fig 1. Fig 1. Iron the fleece to WS of the lining fabric so that there is an even 3/8in (1cm) fabric margin all around the fleece. 4. On all fabric pieces make a marking on both side edges 4 1/2in (11 1/2cm) down from the top edge. These markings are your ‘V- markings’ and will be important for later. Steps to the exterior bag: 5. Make 2 marks for the first pleat - On the RS top edge of one of the exterior fabric pieces work from right to left to make the 2 markings as shown in Fig 2. 2 6/8in (7cm) 2in (5cm) 6. Fold the fabric into a concertina to make the first pleat. Using the markings you just made, fold the fabric as shown in Fig 3. Place a pin into the pleat. See Fig 4. 7. Make another 2 marks for the 2nd pleat (work from right to left as before) see fig 4. Fold the 2nd pleat in the same way as for Step 6. Mark and fold another 4 pleats in Fig 2. Measure in from the right side and make 2 marks the same way so you have a total of 6 on the top edge as shown in the pic above. evenly spaced pleats running along the top edge. Set aside. 8. Pleat the other exterior fabric piece in the same way by repeating Steps 5-7. Now both exterior pieces have been pleated you can match up them up against each other to check they are both the same width. If not, adjust as necessary. Take your time with this step - a little bit of fitting & jiggling around is to be expected :) ©2010 U-Handbag.com Patterns
  • 3. 9. Take one of the exterior pieces and fan the pleats out so that they look pretty and reasonably even. If you can, arrange the pleats to aim for a softly curved top edge. When you’re happy with the way the pleats sit, iron the folds approx 5 1/2in (13cm) down from the top edge. See fig 5. 10. Now to mark the pleat stitch lines. Measure and mark 4in (10cm) down from the top edge on both the OUTER pleats See fig 6. Repeat this step for the remaining 4 pleats EXCEPT you need to measure 3 1/8in (8cm) down from the top edge. Fig 3. Fold the fabric into a concertina along the marks you made in step 5. 11. Now to stitch the pleats in place using the pleat stitch lines we just made as a guide. If you like you can use more pins down the length of each pleat before stitching them. Topstitch the pleats in place though all 2 3/8in (6cm) 1 5/8in (4cm) layers. Be sure to sew a few reverse stitches at the end of each line to secure the stitches. See fig 7. 12. Repeat Steps 9-11 for the other exterior fabric piece. Be sure to compare and match the two exterior fabric pieces (for equal curviness at the top edge) at Step 9 before you commit and stitch! 13. Bring the 2 pleated exterior pieces RST Fig 4. Pop a pin into the 1st pleat to keep it in place. Measuring match all edges and pin. Starting and from the folded edge of the first pleat (where the pink dot is) make stopping at the V-markings (that you made 2 more pleat marks for the 2nd pleat as shown in the pic above. in Step 4) stitch the exterior pieces Repeat for another 4 pleats. Working this way should result in together. (The V-markings are so called pleats that are all spaced 1 1/2in (4cm) from each other. because this is the point where the top part of the bag opens out into a ‘V’ (or 2 flaps). Stitch all along the sides and bottom edges. Be sure to sew securing stitches at start & end of your stitches. Iron the seams open. 14. Create a flat bottom for the bag. Grab one of the bottom corners of the exterior and match the side seam with the bottom seam. Flatten to form a triangle. Square off the triangle tip as shown in Fig 8. 15. Stitch along the line you made in the previous step and then trim off the excess Fig 5. Arrange the pleats to your liking and then iron them in fabric See Fig 9. Repeat Steps 13-14 for place. I used my trusty finger presser instead of an iron. the other bottom corner. Turn the exterior bag RSO. ©2010 U-Handbag.com Patterns
  • 4. Steps to the bag lining: 16. Make the bag lining in the same way as the exterior bag by repeating Steps 5-15 EXCEPT at Step 13 you need to leave a gap of 6in (15cm) in the bottom edge for turning out at a later stage and you need to leave the lining bag WSO. Steps to constructing the bag: 17. Insert the bag exterior (still turned RSO) into the bag lining. The right sides of the bag exterior and the lining should now be Fig 6. On the outer pleats, measure and mark 4in (6cm) down touching each other. See Fig 10. from the top edge on the pleat fold. On the 4 inner pleats measure 3 1/8in (8cm) down from the top edge. 18. You’ll see that the top of the bag forms a ‘V’ (or 2 flaps). Before pinning together take extra care to match all V-markings at the side edges of the lining and exterior bags. See Fig 11. Carefully line up the lining and exterior raw edges of both flaps, pinning one flap at a time. 19. Stitch one flap at a time. Begin stitching at the V-marking. To start, actually place your needle into the V-marking (where the start/ end stitches from Step 13 are situated). Stitch all around the sides and top edge stopping at the other V-marking. Repeat Fig 7. Neatly topstitch the pleats in place stopping at the with other purse flap. Clip off the flap top markings you made in Step 9. edge corners. See Fig 12. 20. Turn the whole bag RSO by carefully teasing the exterior bag completely out through the opening in the lining. See fig 13. Push the top edge corners out with a blunt tool. 21. Stitch the gap in the lining shut by pushing the seam allowance inside the hole and topstitching close to the edge for a neat 3 1/8in (8cm) finish. Pop the lining into the exterior. Place a clean tea towel over the exterior and iron out any creases in the bag (use a travel sized iron if possible - it's handier for getting into them nooks and crannies!) The tea cloth will prevent any goo or scorch marks getting onto your yummy new bag. Fig 8. Flatten one of the bottom corners - look inside the bag to check that the side seam meets the bottom seam. Use a ruler, to measure a line that is 3 1/8in (8cm) long & at right angle (90 degrees) to the side seam. ©2010 U-Handbag.com Patterns
  • 5. 22. Reinforce the ‘V’ at both side edges of the bag by topstitching all along the ‘V’. Ensure your top & bottom threads match your fabrics! See Fig 14. 23. Mark the position for the bag handles. I chose to place the outer side edge of my handles 1 1/8in (3cm) in from the side edge, but it’s up to you where you put ‘em. See Fig 15. 24. Use tapestry thread to backstitch the handle tabs to your bag. Stitch through all layers. This is a nice job to do whilst watching the telly. See Fig 16. Fig 9. Stitch along the marked line ensuring your beginning and ending stitches are nice and secure. 25. Ta Dah! All finished and looking lovely. I’ll see Trim off the excess fabric as 3/8in (1cm) from the seam you at the local deli for a tall mocha. Hehe! Fig 10. Insert the exterior bag completely into the lining bag as shown in the pic. Fig 11. Carefully match up the V-markings at the side edges of the lining & exterior bags. Pin all around the top, one flap at a time. ©2010 U-Handbag.com Patterns
  • 6. Fig 12. Clip off the top edge corners (but not to close too the seam) to make a neater corner when turning out. Fig 13. Gently pull the exterior bag out through the gap in the bottom of the lining. Fig 14. Topstitch all around the ‘V’ at both side edges of the bag. ©2010 U-Handbag.com Patterns
  • 7. Fig 15. Mark the bag handle position. Measure from the bag side edge to the outer side of the handle tab. I think 1 1/8in (3cm) in from the side looks good, but it’s up to you. Fig 16. Use a pretty contrasting or matching colour tapestry thread (silk is looks fab if you have it) to backstitch the handles to your bag. ©2010 U-Handbag Patterns. Copyright Notes: You are welcome to hand make items from our patterns for commercial and non-commercial use. We are happy for you to sell items made from our designs on Etsy or market stalls etc. However, permissions for commercial use do not include factory manufacture for mass production and mass selling. We respectfully ask you to not pass off our pattern designs as your own creation and to not reproduce any part this pattern anywhere. Thanks for your understanding :) ©2010 U-Handbag.com Patterns